
You also want an ePaper? Increase the reach of your titles
YUMPU automatically turns print PDFs into web optimized ePapers that Google loves.
Contents<br />
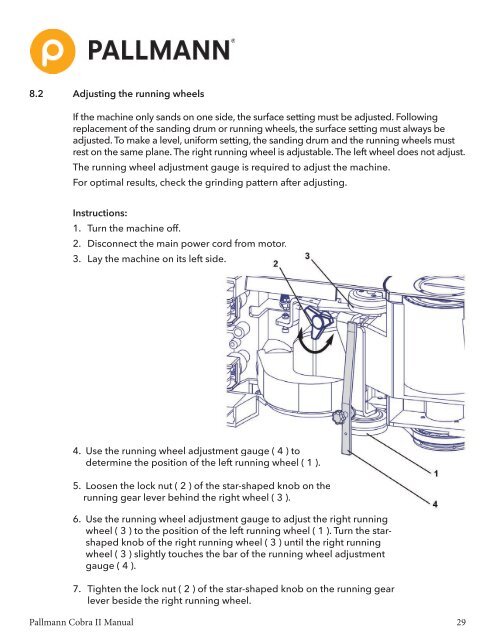
8.2 Adjusting the running wheels<br />
If the machine only sands on one side, the surface setting must be adjusted. Following<br />
1 Introduction..................................................................................................................................................................... replacement of the sanding drum or running wheels, the surface setting must always 4 be<br />
adjusted. To make a level, uniform setting, the sanding drum and the running wheels must<br />
2 Scope rest of delivery on the ............................................................................................................................................................ same plane. The right running wheel is adjustable. The left wheel does 5not adjust.<br />
3 Machine The specifications running <strong>COBRA</strong> wheel CLASSIC adjustment ................................................................................................................... gauge is required to adjust the machine. 6<br />
3.1 Important For components optimal ...................................................................................................................................................... results, check the grinding pattern after adjusting.<br />
6<br />
3.2 Technical data .................................................................................................................................................................. 7<br />
3.3 Safety and machine protection facilities............................................................................................................................ 7<br />
4<br />
Instructions:<br />
Proper use ....................................................................................................................................................................... 7<br />
1. Turn the machine off.<br />
5 Assembly 2. of Disconnect the machine............................................................................................................................................... the main power cord from motor.<br />
8<br />
5.1 Installing the guide tube ................................................................................................................................................... 8<br />
3. Lay the machine on its left side.<br />
5.2 Installing the motor ........................................................................................................................................................... 8<br />
6 Disassembling for transport ......................................................................................................................................... 9<br />
6.1 Removing the guide tube ................................................................................................................................................ 9<br />
6.2 Removing the motor.......................................................................................................................................................... 10<br />
7 Operating the <strong>COBRA</strong> CLASSIC .................................................................................................................................. 11<br />
7.1 Protective clothing and equipment .................................................................................................................................. 11<br />
7.2 Fitting the dust bag ........................................................................................................................................................ 11<br />
7.3 Safety instructions regarding dust .................................................................................................................................... 12<br />
7.4 Disposing of sanding dust ............................................................................................................................................... 12<br />
7.5 Replacing the sanding belt .............................................................................................................................................. 13<br />
7.6 Adjusting the sanding pressure ....................................................................................................................................... 14<br />
7.7 Safety instructions for electric cable and connectors ...................................................................................................... 14<br />
7.8 Connecting the <strong>COBRA</strong> CLASSIC to the mains power .................................................................................................. 15<br />
7.9 Remarks about sanding parquet and plank floors .......................................................................................................... 16<br />
7.10 <strong>Sanding</strong> with the <strong>COBRA</strong> CLASSIC ............................................................................................................................... 19<br />
8 Maintenance ................................................................................................................................................................... 24<br />
4. Use the running wheel adjustment gauge ( 4 ) to<br />
8.1 Changing the sanding drum ............................................................................................................................................ 24<br />
8.2 Adjusting the determine running wheels the .......................................................................................................................................... position of the left running wheel ( 1 ).<br />
26<br />
8.3 Adjusting the castor wheels ............................................................................................................................................ 27<br />
8.4 Adjusting 5. the Loosen tension roller the ............................................................................................................................................... lock nut ( 2 ) of the star-shaped knob on the<br />
28<br />
8.5 Changing the running belt.............................................................................................................................................................. gear lever behind the right wheel ( 3 ).<br />
29<br />
8.6 Checking dust extraction ................................................................................................................................................. 30<br />
8.7 Switching<br />
6.<br />
off<br />
Use<br />
and storing<br />
the running<br />
the machine<br />
wheel<br />
............................................................................................................................<br />
adjustment gauge to adjust the right running<br />
30<br />
9<br />
wheel ( 3 ) to the position of the left running wheel ( 1 ). Turn the starshaped<br />
knob of the right running wheel ( 3 ) until the right running<br />
Declaration of conformity .............................................................................................................................................. 31<br />
10<br />
wheel ( 3 ) slightly touches the bar of the running wheel adjustment<br />
Warranty...........................................................................................................................................................................<br />
gauge ( 4 ).<br />
32<br />
7. Tighten the lock nut ( 2 ) of the star-shaped knob on the running gear<br />
lever beside the right running wheel.<br />
Pallmann Cobra <strong>II</strong> <strong>Manual</strong> 29