

BIS 311 DeVry Week 2 I Lab

Create successful ePaper yourself
Turn your PDF publications into a flip-book with our unique Google optimized e-Paper software.
Monthly payment<br />
Get inputs:<br />
Loan amount<br />
Annual rate<br />
Years of loan<br />
Calculate Monthly payment =-PMT(Annual rate /12,Years of loan *12,Loan amount)<br />
Display Monthly payment formatted as currency with $ and cents<br />
Stop<br />
Deliverables<br />
Submit a Word document named <strong>Lab</strong>2YourFirstLastName.docx(where YourFirstLastName = your first and last name;<br />
e.g., <strong>Lab</strong>2JohnSmith.docx) containing the following.<br />
Screenshot of the form showing the application running, with correct input and output values displayed in the form<br />
Copy of button-click event code<br />
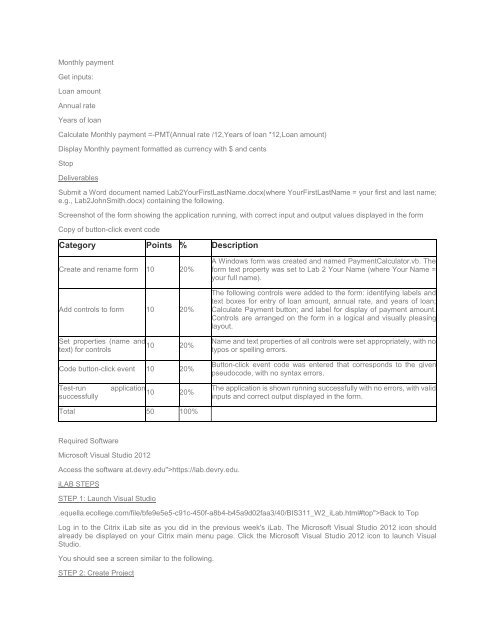
Category Points % Description<br />
Create and rename form 10 20%<br />
Add controls to form 10 20%<br />
Set properties (name and<br />
10 20%<br />
text) for controls<br />
Code button-click event 10 20%<br />
A Windows form was created and named PaymentCalculator.vb. The<br />
form text property was set to <strong>Lab</strong> 2 Your Name (where Your Name =<br />
your full name).<br />
The following controls were added to the form: identifying labels and<br />
text boxes for entry of loan amount, annual rate, and years of loan;<br />
Calculate Payment button; and label for display of payment amount.<br />
Controls are arranged on the form in a logical and visually pleasing<br />
layout.<br />
Name and text properties of all controls were set appropriately, with no<br />
typos or spelling errors.<br />
Button-click event code was entered that corresponds to the given<br />
pseudocode, with no syntax errors.<br />
Test-run<br />
successfully<br />
application<br />
10 20%<br />
The application is shown running successfully with no errors, with valid<br />
inputs and correct output displayed in the form.<br />
Total 50 100%<br />
Required Software<br />
Microsoft Visual Studio 2012<br />
Access the software at.devry.edu">https://lab.devry.edu.<br />
iLAB STEPS<br />
STEP 1: Launch Visual Studio<br />
.equella.ecollege.com/file/bfe9e5e5-c91c-450f-a8b4-b45a9d02faa3/40/<strong>BIS</strong><strong>311</strong>_W2_i<strong>Lab</strong>.html#top">Back to Top<br />
Log in to the Citrix i<strong>Lab</strong> site as you did in the previous week's i<strong>Lab</strong>. The Microsoft Visual Studio 2012 icon should<br />
already be displayed on your Citrix main menu page. Click the Microsoft Visual Studio 2012 icon to launch Visual<br />
Studio.<br />
You should see a screen similar to the following.<br />
STEP 2: Create Project


