

BIS 311 DeVry Week 1 I Lab

Create successful ePaper yourself
Turn your PDF publications into a flip-book with our unique Google optimized e-Paper software.
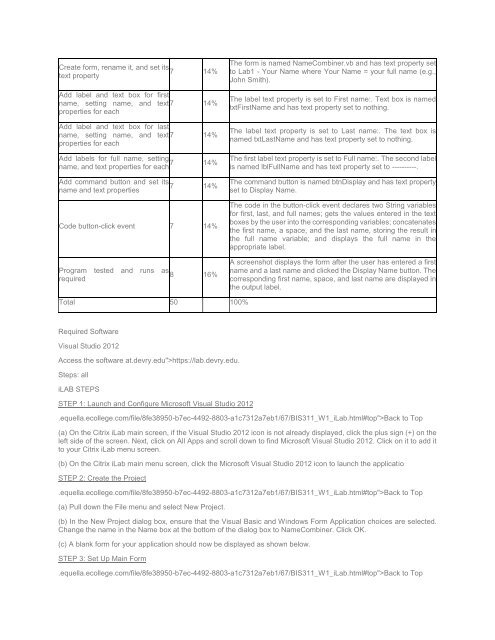
Create form, rename it, and set its<br />
7 14%<br />
text property<br />
Add label and text box for first<br />
name, setting name, and text 7 14%<br />
properties for each<br />
Add label and text box for last<br />
name, setting name, and text 7 14%<br />
properties for each<br />
The form is named NameCombiner.vb and has text property set<br />
to <strong>Lab</strong>1 - Your Name where Your Name = your full name (e.g.,<br />
John Smith).<br />
The label text property is set to First name:. Text box is named<br />
txtFirstName and has text property set to nothing.<br />
The label text property is set to Last name:. The text box is<br />
named txtLastName and has text property set to nothing.<br />
Add labels for full name, setting<br />
name, and text properties for each 7 14% The first label text property is set to Full name:. The second label<br />
is named lblFullName and has text property set to ----------.<br />
Add command button and set its<br />
7 14%<br />
name and text properties<br />
Code button-click event 7 14%<br />
Program tested and runs as<br />
8 16%<br />
required<br />
The command button is named btnDisplay and has text property<br />
set to Display Name.<br />
The code in the button-click event declares two String variables<br />
for first, last, and full names; gets the values entered in the text<br />
boxes by the user into the corresponding variables; concatenates<br />
the first name, a space, and the last name, storing the result in<br />
the full name variable; and displays the full name in the<br />
appropriate label.<br />
A screenshot displays the form after the user has entered a first<br />
name and a last name and clicked the Display Name button. The<br />
corresponding first name, space, and last name are displayed in<br />
the output label.<br />
Total 50 100%<br />
Required Software<br />
Visual Studio 2012<br />
Access the software at.devry.edu">https://lab.devry.edu.<br />
Steps: all<br />
iLAB STEPS<br />
STEP 1: Launch and Configure Microsoft Visual Studio 2012<br />
.equella.ecollege.com/file/8fe38950-b7ec-4492-8803-a1c7312a7eb1/67/<strong>BIS</strong><strong>311</strong>_W1_i<strong>Lab</strong>.html#top">Back to Top<br />
(a) On the Citrix i<strong>Lab</strong> main screen, if the Visual Studio 2012 icon is not already displayed, click the plus sign (+) on the<br />
left side of the screen. Next, click on All Apps and scroll down to find Microsoft Visual Studio 2012. Click on it to add it<br />
to your Citrix i<strong>Lab</strong> menu screen.<br />
(b) On the Citrix i<strong>Lab</strong> main menu screen, click the Microsoft Visual Studio 2012 icon to launch the applicatio<br />
STEP 2: Create the Project<br />
.equella.ecollege.com/file/8fe38950-b7ec-4492-8803-a1c7312a7eb1/67/<strong>BIS</strong><strong>311</strong>_W1_i<strong>Lab</strong>.html#top">Back to Top<br />
(a) Pull down the File menu and select New Project.<br />
(b) In the New Project dialog box, ensure that the Visual Basic and Windows Form Application choices are selected.<br />
Change the name in the Name box at the bottom of the dialog box to NameCombiner. Click OK.<br />
(c) A blank form for your application should now be displayed as shown below.<br />
STEP 3: Set Up Main Form<br />
.equella.ecollege.com/file/8fe38950-b7ec-4492-8803-a1c7312a7eb1/67/<strong>BIS</strong><strong>311</strong>_W1_i<strong>Lab</strong>.html#top">Back to Top


