

Canon PIXMA i470D - i470D Easy Setup Instructions
Canon PIXMA i470D - i470D Easy Setup Instructions
Canon PIXMA i470D - i470D Easy Setup Instructions

Create successful ePaper yourself
Turn your PDF publications into a flip-book with our unique Google optimized e-Paper software.
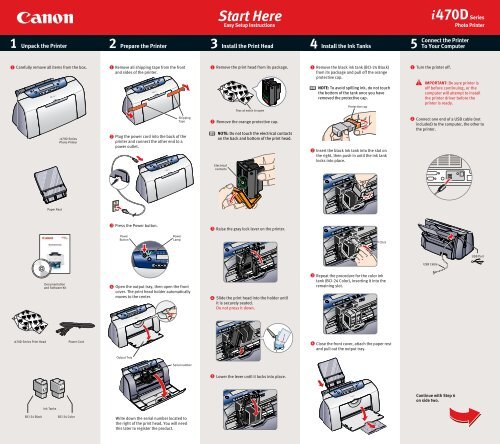
Start Here<br />
<strong>Easy</strong> <strong>Setup</strong> <strong>Instructions</strong><br />
1 2 3 4 5 Unpack the Printer Prepare the Printer<br />
Install the Print Head Install the Ink Tanks<br />
<strong>i470D</strong> Series<br />
Photo Printer<br />
Connect the Printer<br />
To Your Computer<br />
1<br />
Carefully remove all items from the box.<br />
1<br />
Remove all shipping tape from the front<br />
and sides of the printer.<br />
1<br />
Remove the print head from its package.<br />
Tear at notch to open<br />
1<br />
Remove the black ink tank (BCI-24 Black)<br />
from its package and pull off the orange<br />
protective cap.<br />
NOTE: To avoid spilling ink, do not touch<br />
the bottom of the tank once you have<br />
removed the protective cap.<br />
Protective cap<br />
1<br />
Turn the printer off.<br />
IMPORTANT: Be sure printer is<br />
off before continuing, or the<br />
computer will attempt to install<br />
the printer driver before the<br />
printer is ready.<br />
<strong>i470D</strong> Series<br />
Photo Printer<br />
2<br />
Shipping<br />
Tape<br />
Plug the power cord into the back of the<br />
printer and connect the other end to a<br />
power outlet.<br />
2<br />
Remove the orange protective cap.<br />
NOTE: Do not touch the electrical contacts<br />
on the back and bottom of the print head.<br />
Electrical<br />
contacts<br />
2<br />
Insert the black ink tank into the slot on<br />
the right, then push in until the ink tank<br />
locks into place.<br />
2<br />
Connect one end of a USB cable (not<br />
included) to the computer, the other to<br />
the printer.<br />
Paper Rest<br />
3<br />
Press the Power button.<br />
3<br />
Raise the gray lock lever on the printer.<br />
Power<br />
Button<br />
Power<br />
Lamp<br />
Click<br />
USB Port<br />
USB Cable<br />
Documentation<br />
and Software Kit<br />
4<br />
Open the output tray, then open the front<br />
cover. The print head holder automatically<br />
moves to the center.<br />
4<br />
Slide the print head into the holder until<br />
it is securely seated.<br />
Do not press it down.<br />
3<br />
Repeat the procedure for the color ink<br />
tank (BCI-24 Color), inserting it into the<br />
remaining slot.<br />
<strong>i470D</strong> Series Print Head<br />
Power Cord<br />
4<br />
Close the front cover, attach the paper rest<br />
and pull out the output tray.<br />
Output Tray<br />
Serial number<br />
5<br />
Lower the lever until it locks into place.<br />
Continue with Step 6<br />
on side two.<br />
Ink Tanks<br />
BCI-24 Black<br />
BCI-24 Color<br />
Write down the serial number located to<br />
the right of the print head. You will need<br />
this later to register the product.
6 Install the Printer Driver (Windows ® ) 6 Install the Printer Driver (Macintosh ® ) 7 Align the Print Head<br />
Windows<br />
Macintosh<br />
1<br />
Be sure to TURN THE PRINTER OFF.<br />
Power<br />
Button<br />
Power<br />
Lamp off<br />
5<br />
When the Printer Port window appears,<br />
TURN THE PRINTER ON so the printer port<br />
(connection) can be automatically detected.<br />
1<br />
Turn on your Mac and your printer and insert<br />
the “<strong>i470D</strong> <strong>Setup</strong> Software & User's Guide”<br />
CD-ROM.<br />
8<br />
Click Install. When a message asking for<br />
your confirmation to proceed with the<br />
installation, click Continue Installation.<br />
1<br />
2<br />
Place a sheet of blank paper in the<br />
paper rest.<br />
Start the alignment procedure.<br />
2<br />
Double-click the CD-ROM icon, then the<br />
Mac OS X folder, then the Printer Driver<br />
folder.<br />
Windows:<br />
a. For Windows XP/2000, click Start,<br />
select Control Panel, Printers and<br />
Other Hardware, then Printers and<br />
Faxes.<br />
b. Right-click the <strong>Canon</strong> <strong>i470D</strong> icon,<br />
then click Printing Preferences.<br />
NOTE: For Windows ® XP or Windows<br />
2000, log on to Windows as an<br />
Administrator before continuing.<br />
6<br />
When the Terminate Installation window<br />
appears, click OK.<br />
9<br />
When the message “The software was<br />
successfully installed” appears, click<br />
Restart.<br />
NOTE: For Windows 98/Me, click<br />
Start, Settings, then Printers. Rightclick<br />
the <strong>Canon</strong> <strong>i470D</strong> icon, then<br />
click Properties.<br />
IMPORTANT: If you see the Found<br />
New Hardware Wizard, click Cancel.<br />
NOTE: Remember to register your<br />
product. The serial number is<br />
located on the inside of the printer,<br />
to the right of the print head.<br />
3<br />
Double-click the <strong>i470D</strong>.mpkg icon.<br />
10<br />
Access your CD-ROM again. Double-click<br />
the Mac OS X folder, then the Memory Card<br />
Utility folder.<br />
c. Click the Maintenance tab, then click<br />
the Print Head Alignment icon.<br />
11<br />
Double-click the BJUtility.mpkg icon.<br />
7<br />
When the Other Driver screen appears,<br />
click Install. Then follow the on-screen<br />
instructions.<br />
2<br />
Close any open software applications,<br />
then insert the “<strong>i470D</strong> <strong>Setup</strong> Software &<br />
User's Guide” CD-ROM. The setup program<br />
should run automatically.<br />
NOTE: If the setup program does<br />
not run, click Start, then Run, then<br />
type D:\msetup.exe, where D is your<br />
CD-ROM drive.<br />
Click OK when the Terminate Installation<br />
window appears.<br />
4<br />
5<br />
6<br />
When the “Authenticate” screen appears,<br />
enter your administrator name and<br />
password, then click OK.<br />
When the “Welcome to the BJ printer driver<br />
Installer” screen appears, click Continue.<br />
Read the Software License Agreement<br />
and click Continue, then click Agree.<br />
12<br />
13<br />
Follow the on-screen instructions. If you're<br />
prompted to restart your computer after the<br />
installation, restart your computer.<br />
Access your CD-ROM again. From the<br />
Application folder, double-click on the<br />
software to be installed.<br />
d. When asked to start print head<br />
alignment, click OK.<br />
Macintosh OS X:<br />
a. Double-click the Macintosh HD icon, then<br />
Applications folder. Double-click the<br />
Utilities folder, then the Print Center icon.<br />
When the Printer List screen appears,<br />
select <strong>i470D</strong>.<br />
3<br />
Read the License Agreement, then click<br />
Yes to continue.<br />
8<br />
When the software screen appears,<br />
click Install.<br />
7<br />
Select a destination for the printer driver<br />
to be installed. Then click Continue.<br />
Under Printers menu, select Configure<br />
Printer. Select <strong>i470D</strong>, and click Select.<br />
4<br />
When the main menu appears, click<br />
Install.<br />
14<br />
Follow the on-screen instructions. When the<br />
“Installation has finished” screen appears,<br />
click OK.<br />
b. Click the down-arrow to select Test Print.<br />
c. Click the Print Head Alignment icon.<br />
9<br />
10<br />
When the Terminate Installation window<br />
appears, click OK, then Exit.<br />
Click Yes if you are prompted to restart your<br />
computer<br />
NOTE: Be sure to register your product.<br />
The serial number is located on the<br />
inside of the printer, to the right of the<br />
print head.<br />
3<br />
Follow the on-screen instructions.<br />
IMPORTANT: To ensure highest<br />
quality output, continue with Step 7<br />
Align the Print Head.<br />
IMPORTANT: To ensure highest<br />
quality output, continue with Step 7<br />
Align the Print Head.<br />
4<br />
Click OK (Windows) or Send (Macintosh)<br />
when finished.<br />
Part no. QA7-2628-V01<br />
40-42409-1102<br />
© 2003 <strong>Canon</strong> U.S.A. Inc.<br />
<strong>Canon</strong> is a registered trademark of <strong>Canon</strong> Inc.<br />
All other products and brand names are registered<br />
trademarks or trademarks of their respective owners.<br />
Specifications subject to change without notice.<br />
PRINTED IN VIETNAM


