

Commercial Carpet and Carpet Tiles by Heckmondwike
Heckmondwike's range of commercial carpets and commercial carpet tiles is included in this stunning A4 product catalogue. Technical and specification information is also included, as well as stunning visuals and pages dedicated to design inspiration. Physical copies are available on request.
Heckmondwike's range of commercial carpets and commercial carpet tiles is included in this stunning A4 product catalogue. Technical and specification information is also included, as well as stunning visuals and pages dedicated to design inspiration. Physical copies are available on request.

You also want an ePaper? Increase the reach of your titles
YUMPU automatically turns print PDFs into web optimized ePapers that Google loves.
<strong>Heckmondwike</strong> Planning & Securing<br />
Fibre Bonded <strong>Carpet</strong>s<br />
Technical Support<br />
In all cases the carpet should be rolled out flat in a<br />
minimum room temperature of 18ºC for 24 hours to allow<br />
acclimatisation. The method follows the stages for bonding<br />
the carpet before making the seams <strong>and</strong> trimming the edges.<br />
The subfloor should be clean, dry <strong>and</strong> flat <strong>and</strong> prepared in<br />
accordance with BS5325. Timber floor should be covered<br />
with plywood or other appropriate sheet materials.<br />
Replace the carpet carefully <strong>and</strong> accurately<br />
back into position <strong>and</strong> roll with a 68kg<br />
flooring roller to ensure overall contact<br />
with the adhesive. Repeat for the other<br />
end of the sheet. Successive lengths may<br />
be installed in this way.<br />
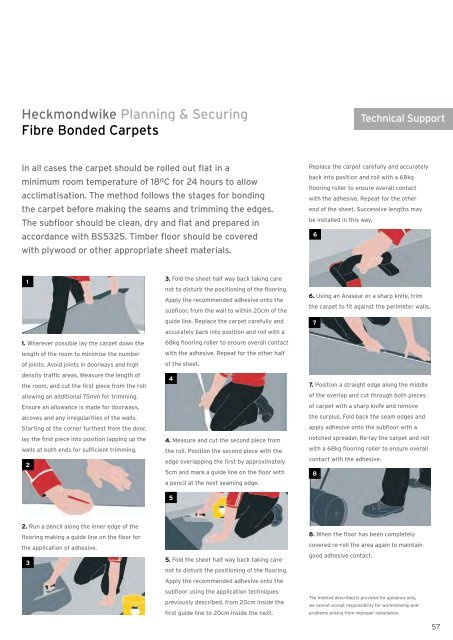
6<br />
1<br />
1. Wherever possible lay the carpet down the<br />
length of the room to minimise the number<br />
of joints. Avoid joints in doorways <strong>and</strong> high<br />
density traffic areas. Measure the length of<br />
the room, <strong>and</strong> cut the first piece from the roll<br />
allowing an additional 75mm for trimming.<br />
Ensure an allowance is made for doorways,<br />
alcoves <strong>and</strong> any irregularities of the walls.<br />
Starting at the corner furthest from the door,<br />
lay the first piece into position lapping up the<br />
walls at both ends for sufficient trimming.<br />
2<br />
3. Fold the sheet half way back taking care<br />
not to disturb the positioning of the flooring.<br />
Apply the recommended adhesive onto the<br />
subfloor, from the wall to within 20cm of the<br />
guide line. Replace the carpet carefully <strong>and</strong><br />
accurately back into position <strong>and</strong> roll with a<br />
68kg flooring roller to ensure overall contact<br />
with the adhesive. Repeat for the other half<br />
of the sheet.<br />
4<br />
4. Measure <strong>and</strong> cut the second piece from<br />
the roll. Position the second piece with the<br />
edge overlapping the first <strong>by</strong> approximately<br />
5cm <strong>and</strong> mark a guide line on the floor with<br />
a pencil at the next seaming edge.<br />
5<br />
6. Using an Araseur or a sharp knife, trim<br />
the carpet to fit against the perimeter walls.<br />
7<br />
7. Position a straight edge along the middle<br />
of the overlap <strong>and</strong> cut through both pieces<br />
of carpet with a sharp knife <strong>and</strong> remove<br />
the surplus. Fold back the seam edges <strong>and</strong><br />
apply adhesive onto the subfloor with a<br />
notched spreader. Re-lay the carpet <strong>and</strong> roll<br />
with a 68kg flooring roller to ensure overall<br />
contact with the adhesive.<br />
8<br />
2. Run a pencil along the inner edge of the<br />
flooring making a guide line on the floor for<br />
the application of adhesive.<br />
3<br />
5. Fold the sheet half way back taking care<br />
not to disturb the positioning of the flooring.<br />
Apply the recommended adhesive onto the<br />
subfloor using the application techniques<br />
previously described, from 20cm inside the<br />
first guide line to 20cm inside the next.<br />
8. When the floor has been completely<br />
covered re-roll the area again to maintain<br />
good adhesive contact.<br />
The method described is provided for guidance only,<br />
we cannot accept responsibility for workmanship <strong>and</strong><br />
problems arising from improper installation.<br />
57