

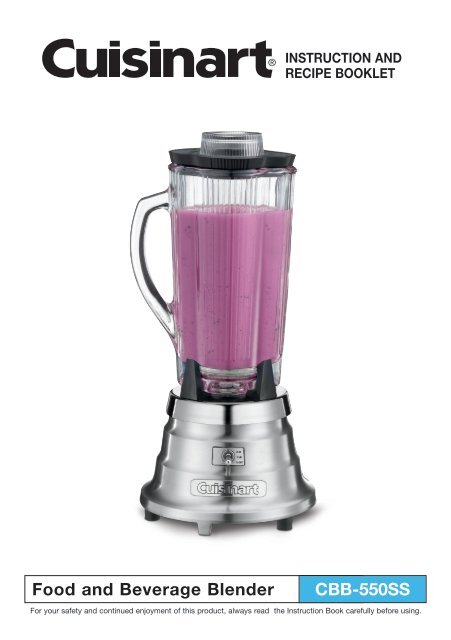
Cuisinart Food & Beverage Blender -CBB-550SS - MANUAL
Cuisinart Food & Beverage Blender -CBB-550SS - MANUAL
Cuisinart Food & Beverage Blender -CBB-550SS - MANUAL

You also want an ePaper? Increase the reach of your titles
YUMPU automatically turns print PDFs into web optimized ePapers that Google loves.
INSTRUCTION AND<br />
RECIPE BOOKLET<br />
<strong>Food</strong> and <strong>Beverage</strong> <strong>Blender</strong><br />
<strong>CBB</strong>-<strong>550SS</strong><br />
For your safety and continued enjoyment of this product, always read the Instruction Book carefully before using.
IMPORTANT UNPACKING<br />
INSTRUCTIONS<br />
1. Place the gift box containing your <strong>Cuisinart</strong> ®<br />
<strong>Blender</strong> on a flat, sturdy surface before<br />
unpacking.<br />
2. Open corrugated flap. Remove blender<br />
container assembly, instruction booklet and<br />
other printed materials from top of corrugated<br />
box. Please use caution not to tip the<br />
container when removing. CAUTION: Sharp<br />
blade inside blender jar.<br />
3. Next, remove the top corrugated insert.<br />
Carefully lift blender base from box and<br />
set aside.<br />
4. Replace all corrugated inserts in the box and<br />
save the box for repacking.<br />
REPACKING INSTRUCTIONS<br />
1. Place the unit on a large, sturdy, flat surface.<br />
2. Carefully place blender base in bottom<br />
of box.<br />
3. Place corrugated insert over base.<br />
4. Place blender container assembly<br />
over corrugated insert and cover with<br />
corrugated flap.<br />
5. Close box for shipping.<br />
CONTENTS<br />
Important Safeguards......................................... 2<br />
Grounding Instructions....................................... 3<br />
Important: Hot Blending Instructions................. 3<br />
Parts and Features............................................. 4<br />
Operating Instructions........................................ 5<br />
How to Clean Containers................................... 5<br />
Resetting Thermal Protection............................. 5<br />
How to Clean Unit Base..................................... 5<br />
Recipes............................................................... 6<br />
Warranty............................................................ 10<br />
IMPORTANT<br />
Always unplug the <strong>Cuisinart</strong> ® <strong>Blender</strong> from<br />
outlet when disassembling and assembling.<br />
IMPORTANT<br />
SAFEGUARDS<br />
When using electrical appliances, basic safety<br />
precautions should always be taken, including<br />
the following:<br />
1. READ ALL INSTRUCTIONS.<br />
2. Unplug from outlet when not in use, before<br />
putting on or taking off parts, and before<br />
cleaning.<br />
3. To protect against risk of electrical shock,<br />
do not put appliance in water or other liquid.<br />
4. Do not use carbonated liquids in the<br />
blender jar, or any blending container. Using<br />
carbonated liquids in the blender jar or any<br />
blending container may result in injury.<br />
5. This appliance should not be used by or<br />
near children or individuals with certain<br />
disabilities.<br />
6. Avoid contact with moving parts.<br />
7. Do not operate the <strong>Cuisinart</strong> ® <strong>Blender</strong> or any<br />
other electrical appliances with a damaged<br />
cord or plug, or after the unit malfunctions,<br />
or is dropped or damaged in any manner.<br />
Return it to the nearest authorized service<br />
facility for examination, repair, or adjustment.<br />
8. The use of attachments, including canning<br />
jars, not recommended or sold by <strong>Cuisinart</strong><br />
may cause fire, electric shock, or injury.<br />
9. Do not use outdoors.<br />
10. Do not let cord hang over edge of table or<br />
counter, or touch hot surfaces.<br />
11. Keep hands and utensils out of jar while<br />
blending to prevent the possibility of severe<br />
personal injury and/or damage to the blender.<br />
A rubber spatula may be used, but must be<br />
used only when the blender is not running.<br />
12. Blades are sharp. Handle carefully.<br />
13. Always operate blender with cover in place.<br />
14. When blending hot liquids, remove center<br />
piece of two-piece cover. Begin processing<br />
with only one cup (8 oz.). Always begin<br />
processing at the lowest speed setting. Keep<br />
hands and other exposed skin away from the<br />
lid opening to prevent possible burns. See<br />
Hot Blending Instructions.<br />
2
15. Do not leave blender unattended while<br />
it is running.<br />
16. Do not operate your appliance in an<br />
appliance garage or under a wall cabinet.<br />
When storing in an appliance garage,<br />
always unplug the unit from the electrical<br />
outlet. Not doing so could create a risk of<br />
fire, especially if the appliance touches the<br />
walls of the garage or the door touches the<br />
unit as it closes.<br />
SAVE THESE<br />
INSTRUCTIONS<br />
FOR HOUSEHOLD<br />
USE ONLY<br />
GROUNDING<br />
INSTRUCTIONS<br />
For your protection, <strong>Cuisinart</strong> ® <strong>Blender</strong>s are<br />
equipped with a 3-conductor cord set that has<br />
a molded 3-prong grounding-type plug, and<br />
should be used in combination with a properly<br />
connected grounding-type outlet as shown<br />
in Figure 1. If a grounding-type outlet is not<br />
available, an adapter, shown in Figure 2, may<br />
be obtained so that a 2-slot wall outlet can be<br />
used with a 3-prong plug. Referring to Figure 3,<br />
the adapter must be grounded by attaching its<br />
grounding lug under the screw of the outlet cover<br />
plate. CAUTION: Before using an adapter, it must<br />
be determined that the outlet cover plate screw is<br />
properly grounded. If in doubt, consult a licensed<br />
electrician. Never use an adapter unless you are<br />
sure it is properly grounded.<br />
Note: Use of an adapter is not permitted<br />
in Canada.<br />
This appliance is for 120 volts only and should<br />
not be used with a converter.<br />
IMPORTANT: HOT<br />
BLENDING INSTRUCTIONS<br />
To minimize the possibility of scalding when<br />
blending hot ingredients, the following<br />
precautions and procedures must be observed:<br />
1. Limit amount of material processed to<br />
one cup (8 oz.).<br />
2. Completely remove the lid insert of the twopiece<br />
container lid before starting motor.<br />
(This will allow venting of the rapidly heated<br />
and expanding air present inside container<br />
when blender is running.)<br />
3. Start blending on low speed.<br />
4. While blender is running, up to 1½ cups (12<br />
oz.) of additional liquid can be added. Pour<br />
liquid slowly through the opening in the lid.<br />
3
PARTS AND FEATURES<br />
A. Measuring Cap (2 oz.) – Center part<br />
of the two-piece lid is removable for adding<br />
ingredients while blending, and for releasing<br />
steam while puréeing soup. Made from<br />
Polystyrene and is BPA free.<br />
B. Lid– Two-piece PVC lid is BPA free and<br />
dishwasher safe.<br />
C. Glass Carafe<br />
D. Handle<br />
B<br />
A<br />
E. Blade– Stainless steel cutting blades.<br />
F. Hi, Lo, Off Toggle Switch<br />
Control Panel<br />
D<br />
G. Classic Waterfall Zinc<br />
Die-Cast Base<br />
C<br />
E<br />
F<br />
G<br />
4
OPERATING<br />
INSTRUCTIONS<br />
1. When placing the container on the unit<br />
base, make sure that the unit is turned off<br />
and is at a complete stop. Do not put the<br />
container on or take it off while the unit is<br />
running. Doing so may damage the drive<br />
shaft or blade assembly. For best results,<br />
do not fill container above the 3-cup level.<br />
2. Be sure the switch is in the off position<br />
and plug the blender into a convenient<br />
outlet.<br />
3. The <strong>Cuisinart</strong> ® <strong>Blender</strong> is ideal for<br />
blending ice drinks. A hint when mixing<br />
ice drinks: Keep the blades in the<br />
container covered with liquid, turn the unit<br />
on, remove the lid insert on top of the jar<br />
lid, and feed the ice cubes slowly into the<br />
jar. NOTE: Never use containers other<br />
than <strong>Cuisinart</strong> ® <strong>Blender</strong> containers with<br />
your <strong>Cuisinart</strong> unit.<br />
4. CAUTION: DO NOT use carbonated<br />
liquids in the blender jar or any blending<br />
container. Using carbonated liquids in the<br />
blender jar or any blending container may<br />
result in injury.<br />
5. Put ingredients into container, then put<br />
on cover. Always add liquid ingredients<br />
first, unless otherwise specified in recipe.<br />
Always hold container with one hand<br />
while blending.<br />
6. CAUTION: To avoid damage to your<br />
blender, do not run the blender if the<br />
blades become blocked or jammed during<br />
use. Turn the blender off immediately,<br />
remove the container from the blender<br />
base and dislodge the material that is<br />
blocking or jamming the blade.<br />
HOW TO CLEAN<br />
CONTAINERS<br />
1. Remove the container from the unit base.<br />
Remove the lid. Add a cup of cleaning<br />
solution, made by adding a few drops of<br />
dishwashing detergent to 1 cup of cool<br />
water, to the container. Scrub and flush<br />
out the interior of the container and the lid<br />
to dislodge and remove as much residue<br />
as possible. Empty the container.<br />
2. Add more cleaning solution. Put lid on<br />
container, place container on unit base,<br />
and run on high speed for two minutes.<br />
3. Empty the container and repeat as<br />
above, using clean rinse water in place of<br />
cleaning solution. Empty, rinse and dry,<br />
prior to storing unit.<br />
4. Wash and rinse container prior to initial<br />
use, and immediately after each use.<br />
HOW TO CLEAN<br />
UNIT BASE<br />
To clean the unit base, unplug the power cord.<br />
Wipe the exterior surfaces with a soft cloth<br />
or sponge d<strong>amp</strong>ened with cleaning solution.<br />
Rinse with clean water. Do not immerse the<br />
base in cleaning solution or water. Wipe the<br />
base with dry towel. Any other servicing<br />
should be performed by an authorized service<br />
representative.<br />
RESETTING THERMAL<br />
PROTECTION<br />
• Your blender is equipped with a<br />
manual reset switch to protect the<br />
motor from overheating.<br />
• If your blender stops running under<br />
heavy use, turn toggle switch to OFF and<br />
unplug the power cord. Empty the blender<br />
container of all its contents and allow<br />
approximately 5 to 10 minutes for the<br />
motor to cool down.<br />
• Plug the power cord back into the outlet<br />
and continue blending.<br />
• If your blender does not function properly<br />
following this procedure, discontinue use<br />
and contact a certified <strong>Cuisinart</strong> Customer<br />
Service Center.<br />
5
CONTENTS<br />
SHAKES<br />
Chocolate Malted Shake ............. 6<br />
Power Shake ...................... 6<br />
SMOOTHIES<br />
Strawberry Banana Smoothie ......... 6<br />
Mango Lime Smoothie. .............. 6<br />
Citrus Julius ....................... 7<br />
BREAKFAST<br />
Oatmeal Banana Waffles ............. 7<br />
APPETIZERS<br />
Guacamole ....................... 7<br />
Sun-Dried Tomato Tapenade ......... 7<br />
VINAIGRETTE<br />
Balsamic Vinaigrette ................ 8<br />
Tangy Blue Cheese Dressing ......... 8<br />
SOUPS<br />
Gazpacho. ........................ 8<br />
Cream of Carrot Soup ............... 8<br />
DESSERTS<br />
Berry Cobbler ..................... 9<br />
Amazing Chocolate Silk Pie .......... 9<br />
RECIPES<br />
Chocolate Malted Shake<br />
2 servings<br />
½ cup whole milk<br />
1 tablespoon chocolate syrup<br />
1 cup chocolate ice cream<br />
3 tablespoons malt powder<br />
1 teaspoon vanilla<br />
Place ingredients in blender jar in order listed.<br />
Blend for 2 minutes on HI.<br />
Nutritional information per serving:<br />
Calories 335 (31% from fat) • carb. 51g • pro. 8g<br />
fat 12g • sat. fat 7g • chol. 37mg • sod. 242mg<br />
calc. 239mg • fiber 0g<br />
2 servings<br />
Power Shake<br />
½ cup orange juice<br />
1 ripe banana<br />
1½ cups fresh or frozen strawberries<br />
1 tablespoon sugar (optional)<br />
6–8 ice cubes<br />
Place ingredients in blender jar in order listed.<br />
Blend for 1–2 minutes on HI.<br />
Nutritional information per serving (with sugar):<br />
Calories 138 (5% from fat) • carb. 34g • pro. 2g • fat 1g<br />
chol. 0mg • sod. 5mg • calc. 28mg • fiber 4g<br />
2 servings<br />
Strawberry<br />
Banana Smoothie<br />
¾ cup nonfat milk<br />
1 cup strawberries, hulled, cut in half<br />
½ cup banana slices (½-inch slices)<br />
1 tablespoon plain, fat-free yogurt<br />
10 ice cubes<br />
Place ingredients in blender jar in order listed.<br />
Cover and blend on LO for about 20 seconds,<br />
then on HI for another 40 seconds. Serve<br />
immediately.<br />
Nutritional information per serving:<br />
Calories 84 (6% from fat) • carb. 17g • pro. 4g • fat 1g<br />
chol. 2mg • sod. 56mg • calc. 139mg • fiber 2g<br />
Mango Lime Smoothie<br />
4 servings<br />
2 mangoes, peeled, pitted, and cut into<br />
1-inch pieces<br />
½ cup lime juice<br />
¼ cup apple juice<br />
¼ cup mango juice<br />
6 tablespoons sugar<br />
9 ice cubes<br />
¼ cup rum (optional)<br />
Place all ingredients in blender jar in order listed,<br />
cover, and blend for 1–2 minutes on HI.<br />
Nutritional information per serving:<br />
Calories 196 (2% from fat) • carb. 43g • pro. 1g • fat 0g<br />
chol. 0mg • sod. 6mg • calc. 16mg • fiber 2g<br />
6
2 servings<br />
Citrus Julius<br />
1 cup milk<br />
¼ cup tangerine juice<br />
¼ cup orange juice<br />
2 tablespoons sugar<br />
10 ice cubes<br />
½ egg white<br />
½ teaspoon vanilla<br />
Place all ingredients in blender jar in order listed,<br />
cover, and blend for 1–2 minutes on HI.<br />
Nutritional information per serving:<br />
Calories 175 (21% from fat) • carb. 24g • pro. 10g • fat 4g<br />
chol. 17mg • sod. 151mg • calc. 162mg • fiber 0g<br />
Oatmeal Banana Waffles<br />
Makes 8–10 waffles<br />
1 cup old-fashioned oats (not instant)<br />
1 cup flour<br />
1 tablespoon baking powder<br />
½ teaspoon baking soda<br />
½ teaspoon ground cinnamon<br />
1 ⁄8 teaspoon ground nutmeg<br />
3 tablespoons brown sugar<br />
1½ cups buttermilk<br />
2 large eggs<br />
2 medium-size ripe bananas, sliced<br />
4 tablespoons butter (melted)<br />
1 tablespoon vanilla extract<br />
Pinch salt<br />
Blend ½ cup oats on HI until they reach a<br />
powdery consistency. Put blended oats into a<br />
bowl with remaining oats and set aside. Blend<br />
the remainder of dry ingredients until thoroughly<br />
mixed. Add to oats.<br />
Blend buttermilk, eggs, banana, butter and<br />
vanilla extract on LO until smooth.<br />
Pour wet ingredients over dry ingredients, and<br />
stir until just mixed. Do not overmix.<br />
Pour ½ cup of batter per waffle onto hot waffle<br />
iron. Cook. Serve immediately, or reserve baked<br />
waffles in 200°F degree oven until all waffles have<br />
been baked.<br />
Nutritional information per waffle (10-waffle yield):<br />
Calories 183 (32% from fat) • carb. 26g • pro. 5g • fat 7g<br />
chol. 56mg • sod. 777mg • calc. 142mg • fiber 2g<br />
8 servings<br />
Guacamole<br />
1 ripe avocado, peeled, halved,<br />
and pitted<br />
1 lime, juiced<br />
1 garlic clove, chopped<br />
1 plum tomato, quartered<br />
1 ⁄8 cup fresh cilantro leaves<br />
1 ⁄8 teaspoon salt<br />
1 green onion, sliced<br />
2–3 drops Tabasco ® sauce or other<br />
hot sauce<br />
Place all ingredients in a bowl and mash slightly<br />
with fork. Transfer to blender and blend on LO<br />
just until combined. Do not overblend.<br />
For a chunkier texture: Blend all ingredients<br />
except avocado. Mash avocado by hand and stir<br />
into blended mixture.<br />
Nutritional information per serving (2 tablespoons):<br />
Calories 43 (66% from fat) • carb. 4g • pro. 1g • fat 4g<br />
• chol. 0mg • sod. 44mg • calc. 6mg • fiber 2g<br />
16 servings<br />
Sun-Dried Tomato<br />
Tapenade<br />
8 ounces sun-dried tomatoes in oil,<br />
drained<br />
2 garlic cloves<br />
2 tablespoons grated Parmesan cheese<br />
½ teaspoon oregano<br />
½ teaspoon basil<br />
¼ teaspoon salt<br />
3 tablespoons extra virgin olive oil<br />
Place all ingredients in blender. Mix on HI,<br />
stopping frequently to scrape down the sides of<br />
blender jar. Tapenade is best when paired with<br />
cheese and bread.<br />
Nutritional information per serving (2 tablespoons):<br />
Calories 56 (70% from fat) • carb. 4g • pro. 1g • fat 5g<br />
chol. 1mg • sod. 83mg • calc. 17mg • fiber 0g<br />
7
Balsamic Vinaigrette<br />
Makes about 2 cups<br />
1 tablespoon Dijon mustard<br />
3 tablespoons balsamic vinegar<br />
2 garlic cloves, peeled<br />
½ teaspoon salt<br />
1 cup olive oil<br />
Pepper to taste<br />
Blend first 4 ingredients on HI for a few seconds.<br />
Then, with blender running, remove small lid<br />
insert and pour in oil VERY SLOWLY. It will take<br />
a while, but the results are worth it! Season with<br />
pepper.<br />
Nutritional information per serving (2 tablespoons):<br />
Calories 97 (98% from fat) • carb. 0g • pro. 0g • fat 11g<br />
• chol. 0mg • sod. 77mg • calc. 1mg • fiber 0g<br />
Makes 1¾ cups<br />
Tangy Blue<br />
Cheese Dressing<br />
1 garlic clove, peeled<br />
1 shallot, peeled and cut into<br />
½-inch pieces<br />
2 tablespoons fresh Italian<br />
parsley leaves<br />
1 cup lowfat mayonnaise<br />
½ cup buttermilk or fat-free plain yogurt<br />
¼ cup crumbled blue cheese<br />
½<br />
¼<br />
teaspoon kosher salt<br />
teaspoon ground white pepper<br />
Dash Tabasco ® or other hot sauce<br />
to taste<br />
Place garlic, shallot and parsley in blender<br />
container. Blend on HI for 10 seconds. Scrape<br />
blender jar and add remaining ingredients.<br />
Blend on HI for 30–40 seconds until smooth and<br />
creamy. Let stand for 30 minutes before serving,<br />
to allow flavors to develop.<br />
Nutritional information per tablespoon:<br />
Calories 31 (84% from fat) • carb. 1g • pro. 0g • fat 3g<br />
chol. 4mg • sod. 112mg • calc. 13mg • fiber 0g<br />
8 servings<br />
Gazpacho<br />
1 can (12 ounces) spicy vegetable juice<br />
4–5 fresh plum tomatoes, quartered<br />
1 can (14 ounces) crushed tomatoes<br />
with<br />
roasted garlic (if available)<br />
2 garlic cloves, peeled<br />
1 medium onion, chopped<br />
1 celery stalk with leaves, cut into<br />
1-inch chunks<br />
1 teaspoon Worcestershire sauce<br />
1 teaspoon balsamic vinegar<br />
½ teaspoon lemon juice<br />
Red pepper flakes to taste<br />
Salt to taste<br />
Pepper to taste<br />
5–6 drops hot sauce<br />
Place all ingredients in blender and run for 2–3<br />
minutes on HI. If the blender is too full, you may<br />
want to make this recipe in 2 batches.<br />
Nutritional information per serving (1 cup):<br />
Calories 22 (7% from fat) • carb. 5g • pro. 1g • fat 0g<br />
chol. 0mg • sod. 166mg • calc. 13mg • fiber 1g<br />
Cream of Carrot Soup<br />
8 servings<br />
4 carrots, peeled and sliced<br />
1 medium onion, sliced<br />
1 celery stalk, cut into 1-inch chunks<br />
1½ cups chicken stock<br />
½ cup cooked white rice<br />
1 teaspoon salt<br />
Cayenne pepper to taste<br />
¾ cup light cream<br />
Sour cream and diced roasted red<br />
peppers (garnish)<br />
In a small stockpot, bring vegetables and one<br />
cup of chicken stock to a simmer, and cook for<br />
20–25 minutes. Let cool for 15–20 minutes. Pour<br />
soup into blender with remaining stock, rice,<br />
salt and cayenne. Blend on LO for 1–2 minutes,<br />
until smooth. Add cream and chill in refrigerator<br />
to serve cold, or reheat to just below a simmer<br />
to serve hot. Garnish with diced peppers and a<br />
dollop of sour cream.<br />
Nutritional information per serving (1 cup):<br />
Calories 88 (45% from fat) • carb. 10g • pro. 2g • fat 4g<br />
chol. 15mg • sod. 143mg • calc. 37mg • fiber 1g<br />
8
8 servings<br />
Berry Cobbler<br />
3 eggs<br />
1 cup milk<br />
¾ tablespoon baking powder<br />
1 cup flour<br />
½ cup sugar<br />
1 teaspoon vanilla<br />
Nutmeg to taste<br />
Cinnamon to taste<br />
Lemon zest to taste<br />
3 cups berries, tossed with sugar<br />
Mix all ingredients, except fruit, in blender on LO.<br />
Grease individual ramekins with butter. Place<br />
fruit on the bottom and pour in batter to cover<br />
the fruit. Sprinkle with sugar and bake in 350°F<br />
degree oven for 30 minutes. Serve warm.<br />
Note: Cobbler can be made with peaches, pears,<br />
apples, and other fruits.<br />
Nutritional information per serving (cobbler batter only):<br />
Calories 152 (18% from fat) • carb. 26g • pro. 5g<br />
fat 3g • chol. 84mg • sod. 39mg • calc. 89mg • fiber 0g<br />
12 slices<br />
Amazing Chocolate<br />
Silk Pie<br />
12 ounces bittersweet or semisweet<br />
chocolate, broken into small pieces<br />
1 tablespoon vanilla extract<br />
1 package (19 ounces) silken tofu<br />
1 nine-inch graham cracker or<br />
chocolate cookie crust (purchased<br />
or homemade)<br />
Melt chocolate in double boiler over barely<br />
simmering water (may also be done in<br />
microwave); stir in vanilla extract. Place tofu<br />
in blender jar; blend on HI until smooth, 10–15<br />
seconds. Remove small lid, and, with blender<br />
running on HI, add melted chocolate mixture in a<br />
steady stream; blend 15 seconds. Stop blender<br />
and scrape sides of blender jar with a spatula.<br />
Blend on HI 10–15 seconds longer. Pour into<br />
crust. Cover and chill at least 4 hours before<br />
serving. May be served with slightly sweetened<br />
whipped cream.<br />
Nutritional information per serving:<br />
Calories 281 (53% from fat) • carb. 28g • pro. 8g • fat 18g<br />
chol. 0mg • sod. 145mg • calc. 90mg • fiber 1g<br />
9
Limited Three-Year Warranty<br />
(U.S. and Canada ONLY)<br />
This warranty is available to consumers only. You<br />
are a consumer if you own a <strong>Cuisinart</strong> ® <strong>Food</strong> and<br />
<strong>Beverage</strong> <strong>Blender</strong> that was purchased at retail<br />
for personal, family or household use. Except<br />
as otherwise required under applicable law, this<br />
warranty is not available to retailers or other<br />
commercial purchasers or owners.<br />
We warrant that your <strong>Cuisinart</strong> ® <strong>Food</strong> and<br />
<strong>Beverage</strong> <strong>Blender</strong> will be free of defects in<br />
materials and workmanship under normal home<br />
use for 3 years from the date of original purchase.<br />
We recommend that you visit our website,<br />
www.cuisinart.com for a fast, efficient way to<br />
complete your product registration. However,<br />
product registration does not eliminate the need<br />
for the consumer to maintain the original proof<br />
of purchase in order to obtain the warranty<br />
benefits. In the event that you do not have proof<br />
of purchase date, the purchase date for purposes<br />
of this warranty will be the date of manufacture.<br />
If your <strong>Cuisinart</strong> ® <strong>Food</strong> and <strong>Beverage</strong> <strong>Blender</strong><br />
should prove to be defective within the warranty<br />
period, we will repair it, or if we think necessary,<br />
replace it. To obtain warranty service, simply<br />
call our toll-free number 1-800-726-0190 for<br />
additional information from our Consumer<br />
Service Representatives, or send the defective<br />
product to Consumer Service at <strong>Cuisinart</strong>, 7475<br />
North Glen Harbor Blvd., Glendale, AZ 85307.<br />
To facilitate the speed and accuracy of your<br />
return, please enclose $10.00 for shipping and<br />
handling of the product.<br />
Please pay by check or money order made<br />
payable to <strong>Cuisinart</strong> (California residents need<br />
only supply proof of purchase and should call<br />
1-800-726-0190 for shipping instructions).<br />
NOTE: For added protection and secure handling<br />
of any <strong>Cuisinart</strong> product that is being returned,<br />
we recommend you use a traceable, insured<br />
delivery service. <strong>Cuisinart</strong> cannot be held<br />
responsible for in-transit damage or for packages<br />
that are not delivered to us. Lost and/or damaged<br />
products are not covered under warranty. Please<br />
be sure to include your return address, daytime<br />
phone number, description of the product defect,<br />
product model number (located on bottom of<br />
product), original date of purchase, and any other<br />
information pertinent to the product’s return.<br />
CALIFORNIA RESIDENTS ONLY:<br />
California law provides that for In-Warranty<br />
Service, California residents have the option of<br />
returning a nonconforming product (A) to the<br />
store where it was purchased or (B) to another<br />
retail store that sells <strong>Cuisinart</strong> products of the<br />
same type.<br />
The retail store shall then, at its discretion,<br />
either repair the product, refer the consumer<br />
to an independent repair facility, replace the<br />
product, or refund the purchase price less the<br />
amount directly attributable to the consumer’s<br />
prior usage of the product. If the above two<br />
options do not result in the appropriate relief<br />
to the consumer, the consumer may then<br />
take the product to an independent repair<br />
facility if service or repair can be economically<br />
accomplished. <strong>Cuisinart</strong> and not the consumer<br />
will be responsible for the reasonable cost of<br />
such service, repair, replacement, or refund for<br />
nonconforming products under warranty.<br />
California residents may also, according to their<br />
preference, return nonconforming products<br />
directly to <strong>Cuisinart</strong> for repair, or if necessary,<br />
replacement, by calling our Consumer Service<br />
Center toll-free at 1-800-726-0190. <strong>Cuisinart</strong><br />
will be responsible for the cost of the repair,<br />
replacement, and shipping and handling for such<br />
products under warranty.<br />
BEFORE RETURNING YOUR<br />
CUISINART PRODUCT<br />
If you are experiencing problems with your<br />
<strong>Cuisinart</strong> product, we suggest that you call<br />
our <strong>Cuisinart</strong> Service Center at 1-800-726-<br />
0190 before returning the product for service.<br />
If servicing is needed, a Representative can<br />
confirm whether the product is under warranty<br />
and direct you to the nearest service location.<br />
Your <strong>Cuisinart</strong> ® <strong>Food</strong> and <strong>Beverage</strong> <strong>Blender</strong> has<br />
been manufactured to the strictest specifications<br />
and has been designed for use only in 120-volt<br />
outlets and only with authorized accessories<br />
and replacement parts. This warranty expressly<br />
excludes any defects or damages caused by<br />
attempted use of this unit with a converter, as<br />
well as by use with accessories, replacement<br />
10
parts or repair service other than those<br />
authorized by <strong>Cuisinart</strong>. This warranty does not<br />
cover any damage caused by accident, misuse,<br />
shipment or other than ordinary household<br />
use. This warranty excludes all incidental<br />
or consequential damages. Some states do<br />
not allow the exclusion or limitation of these<br />
damages, so these exclusions may not apply to<br />
you. You may also have other rights, which vary<br />
from state to state.<br />
Important: If the nonconforming product is to<br />
be serviced by someone other than <strong>Cuisinart</strong>’s<br />
Authorized Service Center, please remind the<br />
servicer to call our Consumer Service Center at<br />
1-800-726-0190 to ensure that the problem is<br />
properly diagnosed, the product is serviced with<br />
the correct parts, and the product is still under<br />
warranty.<br />
11
NOTES:<br />
12
<strong>MANUAL</strong> DE<br />
INSTRUCCIONES Y<br />
LIBRO DE RECETAS<br />
Licuadora para alimentos y líquidos<br />
<strong>CBB</strong>-<strong>550SS</strong><br />
Para su seguridad y para disfrutar plenamente de este producto,<br />
siempre lea cuidadosamente las instrucciones antes de usarlo.
IMPORTANTES<br />
INSTRUCCIONES<br />
DE DESEMBALAJE<br />
1. Ponga la caja sobre una superficie<br />
espaciosa, plana y segura.<br />
2. Abra la caja. Retire el manual de<br />
instrucciones y otros folletos de la caja.<br />
Tenga cuidado de no volcar la jarra.<br />
PRECAUCIÓN: la cuchilla adentro de la jarra<br />
es muy afilada.<br />
3. Retire el inserto de cartón ubicado encima<br />
del aparato. Alce cuidadosamente el bloquemotor<br />
y sáquelo de la caja.<br />
4. Le aconsejamos que conserve el material de<br />
embalaje.<br />
INSTRUCCIONES DE<br />
EMPAQUE<br />
1. Ponga la caja sobre una superficie<br />
espaciosa, plana y segura.<br />
2. Coloque la base de la licuadora en el fondo<br />
de la caja.<br />
3. Ponga el inserto de cartón encima de la base.<br />
4. Coloque la jarra encima del inserto de cartón<br />
y cúbrala con la hoja de cartón.<br />
5. Cierre la caja.<br />
ÍNDICE<br />
Medidas de seguridad importantes................... 2<br />
Instrucciones de puesta a tierra......................... 3<br />
Líquidos calientes............................................... 3<br />
Piezas y características...................................... 4<br />
Instrucciones de operación................................ 5<br />
Limpieza de la jarra............................................. 5<br />
Limpieza de la base............................................ 5<br />
Dispositivo de protección del motor.................. 5<br />
Recetas............................................................... 6<br />
Garantía............................................................. 10<br />
IMPORTANTE<br />
Siempre desconecte el aparato antes de<br />
ensamblar o desensamblarlo.<br />
2
MEDIDAS DE<br />
SEGURIDAD<br />
IMPORTANTES<br />
Al usar aparatos eléctricos, siempre debe tomar<br />
precauciones básicas de seguridad, incluso las<br />
siguientes:<br />
1. LEA TODAS LAS INSTRUCCIONES.<br />
2. Desconecte el aparato cuando no está en<br />
uso, antes de instalar/sacar piezas y antes de<br />
limpiarlo.<br />
3. Para reducir el riesgo de electrocución, no<br />
coloque el aparato en agua ni en ningún otro<br />
líquido.<br />
4. no utilice este aparato para mezclar líquidos<br />
carbonatados; esto puede causar heridas.<br />
5. Este aparato no debe ser usado por o<br />
cerca de niños o personas con ciertas<br />
discapacidades.<br />
6. Evite el contacto con las piezas móviles.<br />
7. No utilice este aparato si el cable o la clavija<br />
estuviesen dañados, después de que hubiese<br />
funcionado mal o que se hubiese caído o<br />
si estuviese dañado; regréselo a un centro<br />
de servicio autorizado para su revisión,<br />
reparación o ajuste.<br />
8. El uso de accesorios, incluso frascos para<br />
conservas, no recomendados o proveídos<br />
por <strong>Cuisinart</strong>, presenta un riesgo de incendio,<br />
electrocución o heridas.<br />
9. No lo utilice en exteriores.<br />
10. No permita que el cable cuelgue del borde<br />
de la encimera o de la mesa, ni que haga<br />
contacto con superficies calientes.<br />
11. Para reducir el riesgo de herida seria o de<br />
daño al aparato, mantenga las manos y<br />
los utensilios fuera de la jarra durante el<br />
funcionamiento. Se podrá usar una espátula<br />
de goma, siempre que el aparato esté<br />
apagado.<br />
12. Las cuchillas son muy filosas; manipúlelas<br />
con mucho cuidado.<br />
13. No encienda el aparato a menos que la tapa<br />
esté debidamente puesta.<br />
14. Cuando licue líquidos calientes, quite el<br />
tapón medidor (la parte central de la tapa).<br />
No ponga más de una taza (8 onzas/235ml)<br />
3<br />
de alimentos en la jarra para empezar a<br />
licuar. Siempre empiece a licuar a velocidad<br />
baja. Para reducir el riesgo de quemaduras,<br />
mantenga las manos y la piel alejadas de<br />
la abertura en la tapa. Consulte la sección<br />
“Líquidos calientes”.<br />
15. Nunca descuide ni abandone el aparato<br />
mientras está funcionando.<br />
16. No haga funcionar el aparato debajo o<br />
dentro de un armario/gabinete. Siempre<br />
desconecte el aparato antes de guardarlo<br />
en un armario/gabinete. Dejar el aparato<br />
conectado presenta un riesgo de incendio,<br />
especialmente si este toca las paredes o la<br />
puerta del armario/gabinete cuando cierra.<br />
GUARDE ESTAS<br />
INSTRUCCIONES<br />
PARA USO<br />
DOMÉSTICO<br />
SOLAMENTE
PIEZAS Y<br />
CARACTERÍSTICAS<br />
A. Tapón medidor de 2 onzas (60 ml)<br />
Pieza central de la tapa; retírela para agregar<br />
ingredientes durante el licuado o licuar sopa<br />
caliente. Hecho de copoliéster sin BPA.<br />
B. Tapa – Tapa de dos piezas de PVC sin BPA,<br />
apta para lavavajillas.<br />
C. Jarra de vidrio<br />
D. Asa<br />
B<br />
A<br />
E. Cuchilla – Cuchilla de acero inoxidable.<br />
F. Interruptor de palanca HI/LO/OFF<br />
(alto/bajo/apagado)<br />
D<br />
G. Base de zinc fundido con diseño<br />
en cascada clásico<br />
C<br />
E<br />
F<br />
G<br />
4
INSTRUCCIONES DE<br />
PUESTA A TIERRA<br />
Para su protección, su aparato está equipado<br />
con un cable de puesta a tierra, con clavija<br />
de tierra, la cual debe ser conectada a una<br />
toma de corriente debidamente puesta a<br />
tierra (Fig. 1). Si una toma de corriente con<br />
toma de tierra no está disponible, se podrá<br />
usar un adaptador para conectar el aparato<br />
a una toma de corriente sin toma de tierra<br />
(Fig. 2). El adaptador debe ser puesto a tierra<br />
mediante un tornillo de metal que conecte la<br />
lengüeta del adaptador a la placa de la toma<br />
de corriente (Fig. 3). PRECAUCIÓN: antes<br />
de conectar el adaptador, asegúrese de que<br />
la toma de corriente esté puesta a tierra.<br />
Si no está seguro/a, comuníquese con un<br />
electricista. Nunca use un adaptador sin estar<br />
seguro/a de que la toma de corriente esté<br />
puesta a tierra.<br />
Nota: está prohibido usar un adaptador en<br />
el Canadá.<br />
Conecte el cable solamente a una toma de<br />
corriente de 120 V; no utilice el aparato con<br />
un convertidor de voltaje.<br />
IMPORTANTE: LÍQUIDOS<br />
CALIENTES<br />
Para reducir el riesgo de quemaduras al licuar<br />
líquidos calientes, siga las precauciones<br />
siguientes:<br />
1. No licue más de una taza (235 ml) de<br />
alimentos a la vez.<br />
2. Retire el tapón medidor (la pieza central<br />
de la tapa) antes de encender el aparato;<br />
esto permitirá que el aire caliente se<br />
escape, evitando los derrames.<br />
3. Siempre empiece a licuar a velocidad<br />
baja.<br />
4. Una vez licuada la cantidad inicial de<br />
alimentos, se puede añadir hasta 1½ taza<br />
(355 ml) de líquido. Agregue el líquido<br />
lentamente por la abertura en la tapa.<br />
INSTRUCCIONES DE<br />
OPERACIÓN<br />
1. Asegúrese de que el aparato esté<br />
apagado y de que el árbol motor esté<br />
inmóvil antes de instalar la jarra sobre<br />
la base. Nunca instale/saque la jarra<br />
mientras el motor está encendido;<br />
esto puede dañar el árbol motor o las<br />
cuchillas. Para lograr resultados óptimos,<br />
no llene la jarra más allá de la marca de 3<br />
tazas (700 ml).<br />
2. Asegúrese de que el aparato esté<br />
apagado (“OFF”) y enchufe el cable en<br />
una toma de corriente.<br />
3. Su licuadora <strong>Cuisinart</strong> ® es ideal para<br />
preparar bebidas heladas. Consejo:<br />
añada suficientemente líquido como para<br />
cubrir las cuchillas, encienda la licuadora,<br />
y luego agregue lentamente cubitos de<br />
hielo por la abertura en la tapa. NOTA:<br />
nunca utilice jarras de otra marca con su<br />
licuadora <strong>Cuisinart</strong> ® .<br />
4. PRECAUCIÓN: NO procese líquidos<br />
carbonatados con este aparato ni con<br />
ningún otra licuadora; esto puede causar<br />
heridas.<br />
5. Coloque los ingredientes en la jarra<br />
y cierre la tapa. Siempre agregue los<br />
ingredientes líquidos primero, salvo<br />
indicación contraria en la receta. Siempre<br />
sostenga la jarra con una mano durante el<br />
funcionamiento.<br />
6. PRECAUCIÓN: para evitar daños a<br />
la licuadora, apaguen el aparato si las<br />
cuchillas se bloquean o se atascan<br />
durante el uso. Si esto ocurriera, apague<br />
inmediatamente la licuadora, retire la<br />
jarra de la base y desaloje los alimentos<br />
trabados con una espátula.<br />
5
LIMPIEZA DE LA JARRA<br />
1. Retire la jarra de la base. Saque la tapa.<br />
Agregue una taza (235 ml) de agua fresca<br />
y unas gotas de detergente lavavajillas.<br />
Restriegue la tapa y el interior de la jarra<br />
con un cepillo para quitar los residuos de<br />
alimentos. Vacíe la jarra.<br />
2. Agregue más solución limpiadora. Cierre la<br />
tapa, coloque la jarra sobre la base y haga<br />
funcionar el aparato a velocidad alta por 2<br />
minutos.<br />
3. Vacíe la jarra y repita con agua fresca. Vacíe,<br />
enjuague y seque la jarra antes de guardarla.<br />
4. Lave y enjuague la jarra antes del primer uso<br />
e inmediatamente después de cada uso.<br />
LIMPIEZA DE LA BASE<br />
Desconecte el aparato. Limpie la base con<br />
un paño suave o una esponja humedecida<br />
con solución limpiadora. Enjuague con agua.<br />
No sumerja la base en solución limpiadora ni<br />
en agua. Seque la base con una toalla seca.<br />
Cualquier otro servicio debe ser realizado por un<br />
técnico autorizado.<br />
DISPOSITIVO DE<br />
PROTECCIÓN DEL MOTOR<br />
• Su aparato cuenta con un dispositivo<br />
de protección térmica que apaga<br />
automáticamente el motor en caso de<br />
recalentamiento.<br />
• Si el aparato se apaga repentinamente,<br />
apáguelo, poniendo el interruptor en “OFF”,<br />
y luego desconecte el cable de la toma de<br />
corriente. Vacíe la jarra y permita que el motor<br />
se enfríe por 5–10 minutos.<br />
• Cuando el motor esté frío, vuelva a conectar<br />
el aparato y siga licuando.<br />
• Si el aparato no funcionara debidamente<br />
después de seguir estos pasos, deje de<br />
usarlo y comuníquese con un centro de<br />
servicio autorizado.<br />
ÍNDICE<br />
BATIDOS<br />
Malteada de chocolate. .............. 6<br />
Batido energético. .................. 6<br />
“SMOOTHIES”<br />
“Smoothie” de banana y fresa. ........ 6<br />
“Smoothie” de mango y limón verde. ... 6<br />
“Julius” de cítricos .................. 7<br />
DESAYUNOS<br />
Wafles/Gofres de avena y banana. ..... 7<br />
APERITIVOS/ENTRADAS<br />
Guacamole ....................... 7<br />
“Tapenade” de tomates secados al sol . 7<br />
VINAGRETAS<br />
Vinagreta balsámica. ................ 8<br />
Aderezo agridulce de queso azul. ...... 8<br />
SOPAS<br />
Gazpacho ......................... 9<br />
Crema de zanahorias ................ 9<br />
POSTRES<br />
Postre crujiente de frutas del bosque ... 9<br />
Torta de chocolate con tofu. ......... 10<br />
RECETAS<br />
Malteada de chocolate<br />
Rinde 2 porciones<br />
½ taza (120 ml) de leche entera<br />
1 cucharada de jarabe de chocolate<br />
1 cucharada de helado de chocolate<br />
3 cucharadas de malta en polvo<br />
1 cucharadita de extracto natural de<br />
vainilla<br />
Poner los ingredientes en la jarra de la licuadora,<br />
en el orden indicado. Licuar a velocidad alta (HI)<br />
por 2 minutos.<br />
Información nutricional por porción:<br />
Calorías 335 (31 % de grasa) • Carbohidratos 51 g<br />
Proteínas 8 g • Grasa 12 g • Grasa saturada 7 g •<br />
Colesterol 37 mg • Sodio 242 mg • Calcio 239 mg • Fibra<br />
0 g<br />
6
Batido energético<br />
Rinde 2 porciones<br />
½ taza (120 ml) de jugo de naranja<br />
1 banana madura<br />
1½ taza (300 g) de fresas frescas o<br />
congeladas<br />
1 cucharada de azúcar granulada<br />
(opcional)<br />
6–8 cubitos de hielo<br />
Poner los ingredientes en la jarra de la licuadora,<br />
en el orden indicado. Licuar a velocidad alta (HI)<br />
por 1–2 minutos.<br />
Información nutricional por porción (con azúcar):<br />
Calorías 138 (5 % de grasa) • Carbohidratos 34 g<br />
Proteínas 2 g • Grasa 1 g • Colesterol 0 mg • Sodio 5 mg<br />
Calcio 28 mg • Fibra 4 g<br />
“Smoothie” de banana y<br />
fresa<br />
Rinde 2 porciones<br />
¾ taza (175 ml) de leche sin grasa/<br />
descremada<br />
1 taza (200 g) de fresas, partidas en dos<br />
½ taza (115 g) de rodajas de banana<br />
1 cucharada de yogur natural sin grasa<br />
10 cubitos de hielo<br />
Poner los ingredientes en la jarra de la licuadora,<br />
en el orden indicado. Licuar a velocidad baja (LO)<br />
por 20 segundos, y luego a velocidad alta (HI) por<br />
40 segundos. Servir inmediatamente.<br />
Información nutricional por porción:<br />
Calorías 84 (6 % de grasa) • Carbohidratos 17 g<br />
Proteínas 4 g • Grasa 1 g • Colesterol 2 mg • Sodio 56 mg<br />
Calcio 139 mg • Fibra 2 g<br />
“Smoothie” de mango y<br />
limón verde<br />
Rinde 4 porciones<br />
2 mangos, en pedazos<br />
½ taza (120 ml) de jugo de lima/limón<br />
verde fresco<br />
¼ taza (60 ml) de jugo de manzana<br />
¼ taza (60 ml) de jugo de mango<br />
6 cucharadas de azúcar granulada<br />
9 cubitos de hielo<br />
¼<br />
taza (60 ml) de ron (opcional)<br />
Poner los ingredientes en la jarra de la licuadora,<br />
en el orden indicado. Licuar a velocidad alta (HI)<br />
por 1–2 minutos.<br />
Información nutricional por porción:<br />
Calorías 196 (2 % de grasa) • Carbohidratos 43 g<br />
Proteínas 1 g • Grasa 0 g • Colesterol 0 mg • Sodio 6<br />
mg • Calcio 16 mg • Fibra 2 g<br />
“Julius” de cítricos<br />
Rinde 2 porciones<br />
1 taza (235 ml) de leche<br />
¼ taza (60 ml) de jugo de tangerina<br />
¼ taza (60 ml) de jugo de naranja<br />
2 cucharadas de azúcar granulada<br />
10 cubitos de hielo<br />
½ clara de huevo<br />
½ cucharadita de extracto natural de<br />
vainilla<br />
Poner los ingredientes en la jarra de la licuadora,<br />
en el orden indicado. Licuar a velocidad alta (HI)<br />
por 1–2 minutos.<br />
Información nutricional por porción:<br />
Calorías 175 (21 % de grasa) • Carbohidratos 24 g<br />
Proteínas 10 g • Grasa 4 g • Colesterol 17 mg<br />
Sodio 151 mg • Calcio 162 mg • Fibra 0 g<br />
Wafles/Gofres de avena y<br />
banana<br />
Rinde 8–10 wafles/gofres<br />
1 taza (80 g) de copos de avena (no utilice<br />
avena instantánea)<br />
1 taza (125 g) de harina común<br />
1 cucharada de polvo de hornear<br />
½ cucharadita de bicarbonato de sodio<br />
½ cucharadita de canela en polvo<br />
1 ⁄8 cucharadita de nuez moscada<br />
3 cucharadas de azúcar moreno<br />
1½ taza (365 g) de suero de leche<br />
(“buttermilk”)<br />
2 huevos grandes<br />
2 bananas medianas maduras, en rodajas<br />
4 cucharadas (55 g) de mantequilla sin<br />
sal, derretida<br />
1 cucharada de extracto natural de<br />
vainilla<br />
1 pizca de sal<br />
Poner ½ taza (40 g) de avena en la jarra de la<br />
7
licuadora. Licuar a velocidad alta (HI) hasta que<br />
esté en polvo. Colocar en un tazón, con el resto<br />
de la avena; reservar. Licuar los ingredientes<br />
secos restantes. Agregar a la avena.<br />
Licuar el suero de leche, los huevos, la banana,<br />
la mantequilla y la vainilla a velocidad baja (LO)<br />
hasta obtener una mezcla homogénea.<br />
Agregar a la mezcla de ingredientes secos;<br />
revolver brevemente para mezclar. No mezclar<br />
demasiado.<br />
Utilizar ½ taza (120 ml) de la mezcla por wafle/<br />
gofre. Cocer. Servir inmediatamente o mantener<br />
caliente en el horno precalentado en 200 °F<br />
(100 °C) hasta el momento de comer.<br />
Información nutricional por wafle/gofre (basada en 10<br />
porciones):<br />
Calorías 183 (32 % de grasa) • Carbohidratos 26 g<br />
Proteínas 5 g • Grasa 7 g • Colesterol 56 mg • Sodio 777<br />
mg Calcio 142 mg • Fibra 2 g<br />
Rinde 8 porciones<br />
Guacamole<br />
1 aguacate maduro<br />
1 lima/limón verde, exprimida<br />
1 diente de ajo, picado<br />
1 tomate italiano, cortado en cuartos<br />
1 ⁄8 taza de cilantro fresco<br />
1 ⁄8 cucharadita de sal<br />
1 cebolleta (“green onion”), picada<br />
2–3 gotas de Tabasco ® u otra salsa picante<br />
Poner todos los ingredientes en un tazón y<br />
aplastar ligeramente con un tenedor. Poner la<br />
mezcla en la jarra y licuar brevemente a velocidad<br />
baja (LO) para mezclar. No licuar demasiado.<br />
Para obtener una textura menos cremosa: licuar<br />
todos los ingredientes, excepto el aguacate.<br />
Majar el aguacate ligeramente con un tenedor y<br />
agregarlo a la mezcla.<br />
Información nutricional por porción de 2 cucharadas:<br />
Calorías 43 (66 % de grasa) • Carbohidratos 4 g<br />
Proteínas 1 g • Grasa 4 g • Colesterol 0 mg • Sodio 44 mg<br />
Calcio 6 mg • Fibra 2 g<br />
“Tapenade” de tomates<br />
secados al sol<br />
Rinde 16 porciones<br />
8 onzas (225 g) de tomates secados al sol<br />
en aceite, escurridos<br />
2 dientes de ajo<br />
2 cucharaditas de queso Parmesano<br />
rallado<br />
½ cucharadita de orégano seco<br />
½ cucharadita de albahaca seca<br />
¼ cucharadita de sal<br />
3 cucharadas de aceite de oliva virgen<br />
extra<br />
Poner todos los ingredientes en la jarra de la<br />
licuadora. Licuar a velocidad alta (HI), parando<br />
frecuentemente para raspar la jarra. Servir con<br />
pan y queso.<br />
Información nutricional por porción de 2 cucharadas:<br />
Calorías 56 (70 % de grasa) • Carbohidratos 4 g<br />
Proteínas 1 g • Grasa 5 g • Colesterol 1 mg • Sodio 83 mg<br />
• Calcio 17 mg • Fibra 0 g<br />
Vinagreta balsámica<br />
Rinde aproximadamente 2 tazas (475 ml)<br />
1 cucharada de mostaza de Dijon<br />
3 cucharadas de vinagre balsámico<br />
2 dientes de ajo<br />
½ cucharadita de sal<br />
1 taza (235 ml) de aceite de oliva<br />
Pimienta, al gusto<br />
Licuar los primeros 4 ingredientes a velocidad<br />
alta (HI) por unos segundos. Agregar MUY<br />
LENTAMENTE el aceite por la abertura en la<br />
tapa, sin apagar la licuadora. ¡El proceso es<br />
lento, pero el resultado vale la pena! Sazonar con<br />
pimienta.<br />
Información nutricional por porción de 2 cucharadas:<br />
Calorías 97 (98 % de grasa) • Carbohidratos 0 g<br />
Proteínas 0 g • Grasa 11 g • Colesterol 0 mg • Sodio 77 mg<br />
Calcio 1 mg • Fibra 0 g<br />
Aderezo agridulce<br />
de queso azul<br />
Rinde 1¾ taza (415 ml)<br />
1 diente de ajo<br />
8
1 chalote, pelado y cortado en pedazos<br />
2 cucharadas de perejil italiano fresco<br />
1 taza (235 ml) de mayonesa baja en<br />
grasa<br />
½ taza (125 g) de suero de leche<br />
(“buttermilk”) o yogur natural sin grasa<br />
¼ taza (30 g) de queso azul desmenuzado<br />
½ cucharadita de sal kosher<br />
¼ cucharadita de pimienta blanca recién<br />
molida<br />
1 pizca de Tabasco ® u otra salsa picante<br />
Poner el ajo, el chalote y el perejil en la jarra<br />
de la licuadora. Licuar a velocidad alta (HI)<br />
por 10 segundos. Raspar la jarra y agregar los<br />
ingredientes restantes. Licuar a velocidad alta<br />
(HI) por 30–40 segundos, hasta obtener una<br />
mezcla suave y cremosa. Deje descansar por<br />
30 minutos antes de servir para combinar los<br />
sabores.<br />
Información nutricional por cucharada:<br />
Calorías 31 (84 % de grasa) • Carbohidratos 1 g<br />
Proteínas 0 g • Grasa 3 g • Colesterol 4 mg • Sodio 112 mg<br />
Calcio 13 mg • Fibra 0 g<br />
Rinde 8 porciones<br />
Gazpacho<br />
1 lata de 12 onzas (360 ml) de jugo<br />
vegetal picante<br />
4–5 tomates italianos frescos, en cuartos<br />
1 lata de 14 onzas (395 g) de tomates<br />
triturados con ajo asado<br />
2 dientes de ajo<br />
1 cebolla mediana, picada<br />
1 rama de apio, con hojas, en trozos<br />
1 cucharadita de salsa Worcestershire<br />
1 cucharadita de vinagre balsámico<br />
½ cucharadita de jugo de limón fresco<br />
Hojuelas de pimiento rojo, al gusto<br />
Sal, al gusto<br />
Pimienta, al gusto<br />
5–6 gotas de salsa picante<br />
Poner los ingredientes en la jarra de la licuadora.<br />
Licuar a velocidad alta (HI) por 2–3 minutos.<br />
Nota: procesar en 2 veces si es necesario.<br />
Información nutricional por porción de 1 taza (235 ml):<br />
Calorías 22 (7 % de grasa) • Carbohidratos 5 g<br />
Proteínas 1 g • Grasa 0 g • Colesterol 0 mg • Sodio 166 mg<br />
Calcio 13 mg • Fibra 1 g<br />
9<br />
Crema de zanahorias<br />
Rinde 8 porciones<br />
4 zanahorias, peladas y cortadas en<br />
rodajas<br />
1 cebolla mediana, en rodajas<br />
1 rama de apio, en trozos<br />
1½ taza (355 ml) de caldo de pollo<br />
½ taza (100 g) de arroz blanco cocido<br />
1 cucharadita de sal<br />
Pimienta de cayena, al gusto<br />
¾ taza (375 ml) de crema baja en grasa<br />
Crema agria y cubitos de pimiento<br />
dulce rojo asado para decorar<br />
Colocar los vegetales y una taza (235 ml) del<br />
caldo de pollo en una cacerola. Cocinar a fuego<br />
lento por 20–25 minutos. Dejar enfriar por<br />
15–20 minutos. Poner la sopa, el caldo de pollo<br />
restante, el arroz, la sal y la pimienta de cayena<br />
en la jarra de la licuadora. Licuar a velocidad baja<br />
(LO) por 1–2 minutos, hasta obtener una mezcla<br />
suave. Agregar la crema y refrigerar. Servir frío o<br />
recalentar. Decorar con cubitos de pimiento rojo<br />
asado y una cucharada de crema agria.<br />
Información nutricional por porción de 1 taza (235 ml):<br />
Calorías 88 (45 % de grasa) • Carbohidratos 10 g •<br />
Proteínas 2 g • Grasa 4 g • Colesterol 15 mg • Sodio 143<br />
mg • Calcio 37 mg • Fibra 1 g<br />
Postre crujiente de frutas<br />
del bosque<br />
Rinde 8 porciones<br />
3 huevos<br />
1 taza (235 ml) de leche<br />
¾ cucharada de polvo de hornear<br />
1 taza (125 g) de harina común<br />
½ taza (100 g) de azúcar granulada<br />
1 cucharadita de extracto natural de<br />
vainilla<br />
Nuez moscada rallada, al gusto<br />
Canela en polvo, al gusto<br />
Ralladura de limón, al gusto<br />
3 tazas (450 g) de frutas del bosque,<br />
mezcladas con azúcar<br />
Poner todos los ingredientes excepto las frutas<br />
en la jarra de la licuadora. Licuar a velocidad<br />
baja (LO) hasta obtener una mezcla homogénea.<br />
Enmantequillar ramequines. Disponer las frutas<br />
en el fondo y cubrir con la mezcla. Esparcir<br />
azúcar encima y hornear en 350 °F (180 °C) por<br />
30 minutos. Servir tibio.
Nota: esta receta también puede prepararse con<br />
duraznos, peras, manzanas u otras frutas.<br />
Información nutricional por porción (mezcla solamente):<br />
Calorías 152 (18 % de grasa) • Carbohidratos 26 g<br />
Proteínas 5 g • Grasa 3 g • Colesterol 84 mg • Sodio 39 mg<br />
Calcio 89 mg • Fibra 0 g<br />
Torta de chocolate<br />
con tofu<br />
Rinde 12 porciones<br />
12 onzas (340 g) de chocolate semiamargo<br />
o semidulce, en pedacitos<br />
1 cucharada de extracto natural de<br />
vainilla<br />
19 onzas (570 g) de tofu (queso de soya)<br />
suave<br />
1 fondo de torta de 9 pulgadas (22 cm)<br />
de galletas Graham o galletas de<br />
chocolate (comprado o casero)<br />
Derretir el chocolate al baño María o en el<br />
microondas; agregar la vainilla. Poner el tofu<br />
en la jarra de la licuadora. Licuar velocidad alta<br />
(HI) por 10–15 segundos, hasta obtener una<br />
mezcla suave. Sin apagar la licuadora, agregar<br />
el chocolate derretido por la abertura en la tapa<br />
y seguir licuando a velocidad alta (HI) por 15<br />
segundos. Raspar la jarra con una espátula.<br />
Licuar a velocidad alta (HI) por 10–15 segundos<br />
adicionales. Echar la mezcla encima del fondo de<br />
torta. Cubrir y refrigerar por 4 horas o más antes<br />
de servir. Servir con crema batida ligeramente<br />
endulzada.<br />
Información nutricional por porción:<br />
Calorías 281 (53 % de grasa) • Carbohidratos 28 g<br />
Proteínas 8 g • Grasa 18 g • Colesterol 0 mg • Sodio 145<br />
mg • Calcio 90 mg • Fibra 1 g<br />
GARANTÍA LIMITADA DE<br />
TRES AÑOS<br />
(válida en los EE.UU. y en<br />
Canadá solamente)<br />
Esta garantía es para los consumidores<br />
solamente. Usted es un consumidor si ha<br />
comprado su aparato <strong>Cuisinart</strong> ® en una tienda,<br />
para uso personal o casero. A excepción de los<br />
estados donde la ley lo permita, esta garantía no<br />
es para los detallistas, los otros comerciantes ni<br />
los dueños.<br />
<strong>Cuisinart</strong> garantiza este aparato contra todo<br />
defecto de materiales o fabricación durante 3<br />
años después de la fecha de compra original,<br />
siempre que el aparato haya sido utilizado para<br />
uso doméstico y según las instrucciones. Le<br />
aconsejamos que llene el formulario de registro<br />
disponible en www.cuisinart.com a fin de<br />
facilitar la verificación de la fecha de compra<br />
original. Sin embargo, no es necesario registrar el<br />
producto para recibir servicio bajo esta garantía.<br />
En ausencia del recibo de compra, el período de<br />
garantía será calculado a partir de la fecha de<br />
fabricación.<br />
Si este aparato presentara algún defecto de<br />
materiales o fabricación durante el período de<br />
garantía, la reparemos o reemplazaremos (a<br />
nuestra opción). Para obtener servicio bajo esta<br />
garantía, llame a nuestra línea directa gratuita al<br />
1-800-726-0190 o regrese el aparato defectuoso<br />
a: <strong>Cuisinart</strong>, Service Department, 7475 North<br />
Glen Harbor Blvd., Glendale, AZ 85307.<br />
Regrese el aparato defectuoso, junto con su<br />
recibo de compra y un cheque o giro postal de<br />
US$10.00 para cubrir los gastos de manejo y<br />
envío.<br />
Los residentes de California solo necesitan dar<br />
una prueba de compra y deben llamar al 1-800-<br />
726-0190 para recibir instrucciones de envío.<br />
NOTA: para mayor seguridad, le aconsejamos<br />
que mande su paquete por un método de entrega<br />
con seguro y seguimiento. <strong>Cuisinart</strong> no será<br />
responsable por los daños ocurridos durante el<br />
transporte o por los paquetes mandados a una<br />
dirección equivocada. Los productos perdidos<br />
y/o dañados durante el envío no serán cubiertos<br />
10
ajo esta garantía. Recuerde incluir su nombre,<br />
dirección y teléfono, la descripción del problema,<br />
así como cualquier información pertinente.<br />
RESIDENTES DE CALIFORNIA<br />
SOLAMENTE<br />
La ley del estado de California ofrece dos<br />
opciones bajo el período de garantía. Los<br />
residentes del estado de California pueden (A)<br />
regresar el producto defectuoso a la tienda<br />
donde lo compraron o (B) a otra tienda que venda<br />
productos <strong>Cuisinart</strong> ® de este tipo.<br />
La tienda, a su opción, reparará el producto,<br />
referirá al consumidor a un centro de servicio<br />
independiente, cambiará el producto o<br />
reembolsará al consumidor por el precio original<br />
del producto, menos la cantidad imputable al uso<br />
del producto por el consumidor hasta que este<br />
se dañe. Si estas dos opciones no satisfacen<br />
al consumidor, podrá llevar el producto a un<br />
centro de servicio independiente, siempre que se<br />
pueda ajustar o reparar el producto de manera<br />
económica. <strong>Cuisinart</strong> será responsable por los<br />
gastos de servicio, reparación, reemplazo o<br />
reembolso de los productos defectuosos durante<br />
el período de garantía.<br />
garantía no cubre el uso institucional o comercial<br />
del producto, y no es válida en caso de daños<br />
causados por mal uso, negligencia o accidente.<br />
Esta garantía excluye expresamente todos los<br />
daños incidentales o consecuentes. Algunos<br />
Estados no permiten la exclusión o limitación<br />
de daños incidentales o consecuentes, de<br />
modo que las limitaciones mencionadas pueden<br />
no regir para usted. Usted puede tener otros<br />
derechos que varían de un Estado a otro.<br />
Importante: si debe llevar el aparato defectuoso<br />
a un centro de servicio no autorizado, por<br />
favor informe al personal del centro de servicio<br />
que deberían llamar al servicio posventa de<br />
<strong>Cuisinart</strong> al 1-800-726-0190 a fin de diagnosticar<br />
el problema correctamente, usar las piezas<br />
correctas para repararlo y asegurarse de que el<br />
producto esté bajo garantía.<br />
Los residentes de California también pueden,<br />
si lo desean, mandar el aparato defectuoso<br />
directamente a <strong>Cuisinart</strong> para que lo reparen o<br />
lo cambien. Para esto, se debe llamar a nuestro<br />
servicio posventa al 1-800-800-726-0190.<br />
<strong>Cuisinart</strong> será responsable por los gastos de<br />
reparación, reemplazo, manejo y envío de los<br />
productos defectuosos durante el período de<br />
garantía.<br />
ANTES DE HACER REPARAR SU<br />
APARATO<br />
Si su aparato tiene algún problema, le<br />
recomendamos que llame a nuestro servicio<br />
posventa al 1-800-726-0190 antes de regresar<br />
el aparato a <strong>Cuisinart</strong>. Un representante le<br />
confirmará si su aparato sigue bajo garantía y le<br />
indicará la dirección del centro de servicio más<br />
cercano.<br />
Este aparato satisface las más altas exigencias<br />
de fabricación y ha sido diseñado para uso sobre<br />
corriente de 120 V, usando accesorios y piezas<br />
de repuesto autorizados solamente. Esta garantía<br />
excluye expresamente los daños causados por<br />
accesorios, piezas o reparaciones no autorizados<br />
por <strong>Cuisinart</strong>, así como los daños causados<br />
por el uso de un convertidor de voltaje. Esta<br />
11
Trademarks or service marks of third parties used herein<br />
are the trademarks or service marks of their respective owners.<br />
Todas las marcas registradas, comerciales o de servicio mencionadas en este<br />
documento pertenecen a sus titulares respectivos.<br />
©2016 <strong>Cuisinart</strong><br />
150 Milford Road<br />
East Windsor, NJ 08520<br />
Printed in USA<br />
Impreso en los EE.UU.<br />
16CE018334<br />
IB-14115-ESP


