

flipbook

Create successful ePaper yourself
Turn your PDF publications into a flip-book with our unique Google optimized e-Paper software.
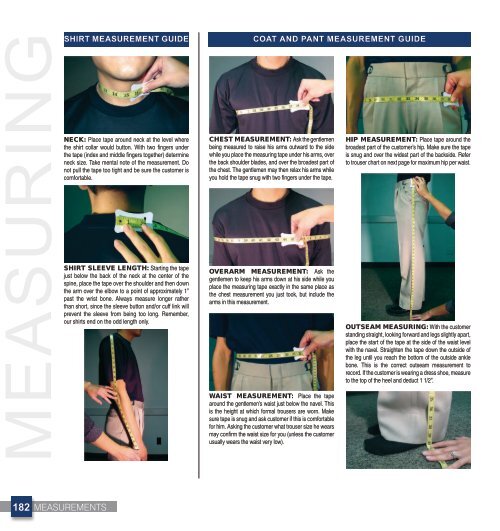
MEASURINGSHIRT MEASUREMENT<br />
GUIDE COAT AND PANT MEASUREMENT GUIDE<br />
NECK: Place tape around neck at the level where<br />
the shirt collar would button. With two fingers under<br />
the tape (index and middle fingers together) determine<br />
neck size. Take mental note of the measurement. Do<br />
not pull the tape too tight and be sure the customer is<br />
comfortable.<br />
SHIRT SLEEVE LENGTH: Starting the tape<br />
just below the back of the neck at the center of the<br />
spine, place the tape over the shoulder and then down<br />
the arm over the elbow to a point of approximately 1”<br />
past the wrist bone. Always measure longer rather<br />
than short, since the sleeve button and/or cuff link will<br />
prevent the sleeve from being too long. Remember,<br />
our shirts end on the odd length only.<br />
CHEST MEASUREMENT: Ask the gentlemen<br />
being measured to raise his arms outward to the side<br />
while you place the measuring tape under his arms, over<br />
the back shoulder blades, and over the broadest part of<br />
the chest. The gentlemen may then relax his arms while<br />
you hold the tape snug with two fingers under the tape.<br />
OVERARM MEASUREMENT: Ask the<br />
gentlemen to keep his arms down at his side while you<br />
place the measuring tape exactly in the same place as<br />
the chest measurement you just took, but include the<br />
arms in this measurement.<br />
WAIST MEASUREMENT: Place the tape<br />
around the gentlemen’s waist just below the navel. This<br />
is the height at which formal trousers are worn. Make<br />
sure tape is snug and ask customer if this is comfortable<br />
for him. Asking the customer what trouser size he wears<br />
may confirm the waist size for you (unless the customer<br />
usually wears the waist very low).<br />
HIP MEASUREMENT: Place tape around the<br />
broadest part of the customer’s hip. Make sure the tape<br />
is snug and over the widest part of the backside. Refer<br />
to trouser chart on next page for maximum hip per waist.<br />
OUTSEAM MEASURING: With the customer<br />
standing straight, looking forward and legs slightly apart,<br />
place the start of the tape at the side of the waist level<br />
with the navel. Straighten the tape down the outside of<br />
the leg until you reach the bottom of the outside ankle<br />
bone. This is the correct outseam measurement to<br />
record. If the customer is wearing a dress shoe, measure<br />
to the top of the heel and deduct 1 1/2”.<br />
182<br />
MEASUREMENTS