

Gourmia GMC700 8-in-1 AnyCooker -
Gourmia GMC700 8-in-1 AnyCooker -
Gourmia GMC700 8-in-1 AnyCooker -

You also want an ePaper? Increase the reach of your titles
YUMPU automatically turns print PDFs into web optimized ePapers that Google loves.
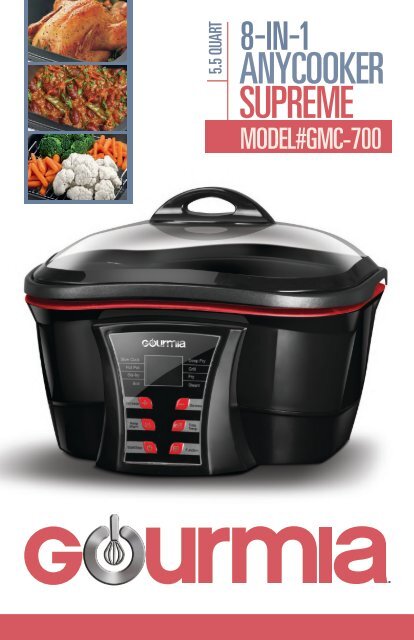
5.5 QUART<br />
8-IN-1<br />
ANYCOOKER<br />
SUPREME<br />
MODEL#GMC-700
Table of Contents<br />
Read All Instructions Prior to Operat<strong>in</strong>g 2<br />
Important Safeguards and Warn<strong>in</strong>gs 3-5<br />
Introduction 6<br />
Compliance and Wattage 6<br />
Gett<strong>in</strong>g to Know Your Multi-Purpose Cooker 7-9<br />
Plac<strong>in</strong>g Handle on Fry<strong>in</strong>g Basket 10<br />
How to Use 11<br />
Quick Cook<strong>in</strong>g Instructions 12<br />
Slow Cook Function 13-17<br />
Hot Pot Function - Great for Fondue! 17-21<br />
Stir-Fry Function 22-26<br />
Boil Function 26-30<br />
Deep Fry Function 30-34<br />
Grill Function 35-39<br />
Fry Function 39-43<br />
Steam Function 43-47<br />
Roast<strong>in</strong>g Function 48-52<br />
Keep Warm 52-53<br />
Recipes and Cook<strong>in</strong>g Videos 54-60<br />
Troubleshoot<strong>in</strong>g 61<br />
Ma<strong>in</strong>tenance and Care 62<br />
Warranty 63<br />
Read All Instructions Prior to Operat<strong>in</strong>g<br />
• This manual is a comprehensive step-by-step user <strong>in</strong>struction guide on<br />
how to use the 8-<strong>in</strong>-1 Multi-Purpose Cooker.<br />
• Make sure to read, understand and follow all these <strong>in</strong>structions.<br />
• To address any questions relat<strong>in</strong>g to order<strong>in</strong>g parts, operat<strong>in</strong>g the 8-<strong>in</strong>-1<br />
Multi-Purpose Cooker, troubleshoot<strong>in</strong>g, ma<strong>in</strong>tenance, service or any<br />
th<strong>in</strong>g else, contact <strong>Gourmia</strong> ® Customer Service at 888-552-0033.<br />
2
Important Safeguards and Warn<strong>in</strong>gs<br />
When us<strong>in</strong>g electrical appliances, the follow<strong>in</strong>g safety precautions<br />
MUST be followed to reduce the risk of fire, electric shock and/or <strong>in</strong>jury.<br />
• This product is only for <strong>in</strong>door household use. Do NOT use outdoors.<br />
• Do NOT use appliance for other than <strong>in</strong>tended use.<br />
• Do NOT use this appliance as a space heat<strong>in</strong>g device.<br />
• Do NOT operate this appliance while Cook<strong>in</strong>g Pot content is empty.<br />
• Improper use of this appliance may result <strong>in</strong> temporary, permanent or fatal<br />
<strong>in</strong>juries that could have been avoided.<br />
• This appliance is NOT <strong>in</strong>tended to be used by persons (<strong>in</strong>clud<strong>in</strong>g children) with<br />
reduced physical, sensory or mental capabilities, or lack of experience and knowledge;<br />
unless they are supervised while us<strong>in</strong>g the appliance and given <strong>in</strong>struction on how to<br />
use the appliance by the person responsible for their safety. This person who is giv<strong>in</strong>g<br />
<strong>in</strong>struction MUST have read and understand how to use this appliance and assumes<br />
total responsibility for the safety of the person they are supervis<strong>in</strong>g.<br />
• This appliance should NOT be used by children.<br />
• Children should be supervised to ensure that they do NOT play with the appliance.<br />
• Close supervision is necessary when any appliance is used near children.<br />
• To protect aga<strong>in</strong>st electrical shock do NOT immerse cord, plug or appliance <strong>in</strong> water<br />
or other liquids.<br />
• Do NOT touch hot surfaces <strong>in</strong>stead use handles or knobs.<br />
• Unplug appliance from outlet when NOT <strong>in</strong> use and before clean<strong>in</strong>g.<br />
• Allow appliance to cool off before <strong>in</strong>sert<strong>in</strong>g or remov<strong>in</strong>g parts and before wash<strong>in</strong>g<br />
parts.<br />
• It is recommended to regularly <strong>in</strong>spect the appliance. Do NOT operate any appliance<br />
with a damaged cord or plug, or after the appliance malfunctions or has been<br />
damaged <strong>in</strong> any manner.<br />
• Do NOT use any accessory attachments NOT recommended by the appliance<br />
manufacturer s<strong>in</strong>ce it may cause <strong>in</strong>juries.<br />
• Do NOT let cord hang over the edge of table or counter, or touch hot surfaces.<br />
• Do NOT place on or near a hot gas or electric burner, or <strong>in</strong> a heated oven.<br />
• To turn off the appliance press the “Stop” Button and then unplug power cord from<br />
wall outlet.<br />
3
• When us<strong>in</strong>g the appliance, provide adequate air space above and on all sides for<br />
circulation. Do NOT place appliance underneath cab<strong>in</strong>ets.<br />
• Do NOT cut foods directly <strong>in</strong> the Cook<strong>in</strong>g Pot and do NOT use metal utensils <strong>in</strong> this<br />
appliance; both actions could scratch the nonstick ceramic coat<strong>in</strong>g.<br />
• For cook<strong>in</strong>g, we recommend us<strong>in</strong>g wooden spoons or silicone spatulas or utensils<br />
for stirr<strong>in</strong>g the food.<br />
• For wash<strong>in</strong>g, we recommend us<strong>in</strong>g a soft dishrag or non-metallic sponge or brush.<br />
• Do NOT put the Cooker or Nonstick Cook<strong>in</strong>g Pot <strong>in</strong> the dishwasher.<br />
• Do NOT use nonstick cook<strong>in</strong>g spray on the Nonstick Cook<strong>in</strong>g Pot.<br />
• Preseason the Nonstick Cook<strong>in</strong>g Pot by first wash<strong>in</strong>g and completely dry<strong>in</strong>g it, then<br />
use a paper towel to rub about a teaspoon of oil (any type will do) around the <strong>in</strong>side of<br />
the Nonstick Cook<strong>in</strong>g Pot.<br />
• The Cook<strong>in</strong>g Pot gets hot. When <strong>in</strong> use, always use oven mitts or potholders when<br />
touch<strong>in</strong>g any outer or <strong>in</strong>ner surface of the appliance.<br />
• If there is a power outage, the Multi-Function Cooker will turn off. If this is discovered<br />
quickly, cont<strong>in</strong>ue cook<strong>in</strong>g when the power is restored. If you are not sure how long the<br />
Multi-Function Cooker has been off, discard the food.<br />
• Do NOT operate if the appliance is covered by or touch<strong>in</strong>g flammable materials,<br />
<strong>in</strong>clud<strong>in</strong>g towels, curta<strong>in</strong>s, draperies, walls or anyth<strong>in</strong>g similar.<br />
• Do NOT store any item on top of the appliance while <strong>in</strong> operation.<br />
• Do NOT store any materials, items or appliances, other than the manufacturer’s<br />
recommended accessories, <strong>in</strong> this appliance when NOT <strong>in</strong> use.<br />
• Do NOT place any materials <strong>in</strong> the appliance such as paper, cardboard, plastic, foam<br />
and other flammable materials or their likes.<br />
• Extreme caution MUST be used when mov<strong>in</strong>g an appliance conta<strong>in</strong><strong>in</strong>g hot oil or<br />
other hot liquids. It is recommended that the appliance NOT be moved while the appliance<br />
and contents are still hot.<br />
• Do NOT use the appliance to store any types of oils or liquids.<br />
• Proceed with CAUTION when add<strong>in</strong>g refrigerated foods <strong>in</strong>to the heated Nonstick<br />
Cook<strong>in</strong>g Pot.<br />
• The appliance is NOT <strong>in</strong>tended to be operated by means of an external timer or<br />
separate remote control system.<br />
• Do NOT use this appliance on an unstable surface. Place this appliance on a stable,<br />
leveled and durable surface.<br />
• Do NOT attempt to use, heat or cook nonfood items <strong>in</strong> this appliance.<br />
• This appliance generates heat and ris<strong>in</strong>g steam dur<strong>in</strong>g its use. Proper precautions<br />
4
MUST be taken to prevent the risk of burns, fires, or other <strong>in</strong>jury to persons or damage<br />
to property.<br />
• Avoid sudden temperature changes, such as add<strong>in</strong>g frozen foods <strong>in</strong>to the heated<br />
Cook<strong>in</strong>g Pot or plac<strong>in</strong>g the hot Cook<strong>in</strong>g Pot directly on the countertop.<br />
• To prevent damage or shock hazard, cook ONLY <strong>in</strong> the Nonstick Cook<strong>in</strong>g Pot<br />
provided.<br />
• When cook<strong>in</strong>g, carefully lift Glass Lid from Cooker by the handle to allow water to<br />
drip <strong>in</strong>to Cook<strong>in</strong>g Pot but do NOT allow water to drip <strong>in</strong>to Cook<strong>in</strong>g Pot if it is filled<br />
with cook<strong>in</strong>g oil or lard.<br />
• Never use the Cook<strong>in</strong>g Pot on a gas or electric cooktop, or over an open flame.<br />
• Never wear loose articles of cloth<strong>in</strong>g that can fall <strong>in</strong>side the Cook<strong>in</strong>g Pot while it’s<br />
be<strong>in</strong>g used or while it’s still hot.<br />
• <strong>Gourmia</strong> ® , it’s owners, partners, officers, employees, affiliates, manufacturers,<br />
importers, promoters, parent companies and anyone else who does bus<strong>in</strong>ess with<br />
them are NOT responsible or liable for anyone misus<strong>in</strong>g this appliance, modify<strong>in</strong>g<br />
the orig<strong>in</strong>al appliance <strong>in</strong> anyway, servic<strong>in</strong>g appliance with unauthorized personnel, not<br />
follow<strong>in</strong>g or ignor<strong>in</strong>g <strong>in</strong>structions, or us<strong>in</strong>g the appliance for anyth<strong>in</strong>g else other than<br />
its <strong>in</strong>tended use.<br />
POLARIZED PLUG: This appliance has a polarized plug (one blade is wider than the<br />
other). To reduce the risk of electric shock, this plug is <strong>in</strong>tended to fit <strong>in</strong>to a polarized<br />
outlet only one way. If the plug does not fully fit <strong>in</strong>to the outlet, reverse the plug. If it<br />
still does not fit, contact a qualified electrician. Do not attempt to modify the plug <strong>in</strong><br />
any way. Do NOT use an extension cord with this appliance.<br />
TAMPER-RESISTANT SCREW: This appliance is equipped with a tamper-resistant<br />
screw to prevent removal of the outer cover. To reduce the risk of fire or electric shock,<br />
DO NOT attempt to remove the outer cover. There are no user-serviceable parts<br />
<strong>in</strong>side. Repair should ONLY be done by authorized service personnel.<br />
ELECTRICAL CORD: If the power cord is damaged, please contact Customer Service<br />
at 888-552-0033.<br />
SAVE THESE INSTRUCTIONS<br />
This product is only for <strong>in</strong>door household use.<br />
5
Introduction --------------------<br />
Thank you for purchas<strong>in</strong>g our 8-<strong>in</strong>-1 Multi-Purpose Cooker and for the opportunity<br />
to serve you and your family delicious meals for years to come. When design<strong>in</strong>g our<br />
products, we listen to your needs and wants <strong>in</strong> order to develop the highest quality<br />
appliances that fit your lifestyle.<br />
Because we know how important your kitchen space is, our 8-<strong>in</strong>-1<br />
Multi-Purpose Cooker is 8 appliances <strong>in</strong> 1 stylish compact design that gives you the<br />
convenience to slow cook; stir fry, boil, deep fry, grill, fry, steam and even use as a<br />
hot pot. While clean<strong>in</strong>g has never been easier with the nonstick cook<strong>in</strong>g pot, sta<strong>in</strong>less<br />
steel racks and basket; glass lid and cooker with soft-touch controls and removable<br />
magnetic power cord.<br />
We th<strong>in</strong>k of you often, s<strong>in</strong>ce our customer’s satisfaction is our #1 priority and<br />
the reason why we value your op<strong>in</strong>ion and feedback. Your <strong>in</strong>put allows us to come up<br />
with ground-break<strong>in</strong>g solutions for your everyday life. We are committed to be<strong>in</strong>g a<br />
reliable company that you can count on and one that excels <strong>in</strong> mak<strong>in</strong>g the most stylish,<br />
durable and <strong>in</strong>novative appliances <strong>in</strong> the market place.<br />
Compliance and Wattage ----<br />
• Intertek 3079590<br />
• Conforms to UL STD 1026 and 1083. Certified to CSA STD C22 2 NO 64<br />
• 120V 60HZ 1500W<br />
6
Gett<strong>in</strong>g to Know Your Multi-Purpose Cooker----<br />
Appliance may vary slightly from<br />
what is illustrated.<br />
1. Tempered Glass Lid<br />
2. Fry<strong>in</strong>g Basket with Handle<br />
3. Steam<strong>in</strong>g Rack<br />
4. Roast<strong>in</strong>g Rack<br />
5. Nonstick Cook<strong>in</strong>g Pot<br />
6. Cooker<br />
7. Removable Magnetic Power Cord<br />
8. Control Panel<br />
9. Digital Display<br />
For Replacable Parts,<br />
Call Customer Service at 888-552-0033.<br />
7
1. Back of Cooker<br />
2. Magnets that Attach to Power Cord<br />
3. Power Cord Lip (faces down) for<br />
Connection<br />
4. Removable Magnetic Power Cord<br />
For Replacable Parts Call Customer Service at 888-552-0033.<br />
8
1. Functions for: Slow Cook, Hot Pot, Stir-Fry and Boil<br />
2. Function Lights Digital Display<br />
3. Cook<strong>in</strong>g Temperature Digital Display <strong>in</strong> Fahrenheit<br />
• Lowest temperature is 122°F and highest temperature is 464°F<br />
• Default temperature displays when Cook<strong>in</strong>g Function is selected<br />
4. Function Lights Digital Display<br />
5. Functions for: Deep Fry, Grill, Fry and Steam<br />
6. Timer Digital Display<br />
• Lowest time is 1 m<strong>in</strong>ute and highest time is 9 hours and 59 m<strong>in</strong>utes<br />
• Default cook<strong>in</strong>g time displays when Cook<strong>in</strong>g Function is selected (hour and m<strong>in</strong>utes)<br />
7. Decrease Button<br />
• Press and release button to decrease time or temperature by 1 digit<br />
• Press and hold down button to decrease time or temperature faster<br />
8. Time/Temperature Button<br />
• Press Time/Temp Button 1 time to select time<br />
• Press Time/Temp Button 2 times to select temperature<br />
9. Function Button to Select Cook<strong>in</strong>g Function<br />
10. Control Panel<br />
11. Start/Stop Button<br />
12. Keep Warm Button<br />
• Default time is 2 hours and set temperature is 176°F<br />
13. Increase Button<br />
• Press and release button to <strong>in</strong>crease time or temperature by 1 digit<br />
• Press and hold down button to <strong>in</strong>crease time or temperature faster<br />
14. Digital Display<br />
9
Plac<strong>in</strong>g Handle on Fry<strong>in</strong>g Basket ----<br />
Squeeze Inward<br />
Insert Through Here<br />
While Squeez<strong>in</strong>g<br />
Insert In Here<br />
Release<br />
10
- How to Use--- -- ----------<br />
This product is only for <strong>in</strong>door household use. Make sure to read and<br />
understand the Important Safeguards and Warn<strong>in</strong>gs before operat<strong>in</strong>g the<br />
8-<strong>in</strong>-1 Multi-Function Cook.<br />
Gett<strong>in</strong>g Started<br />
Unpack and Remove All Pack<strong>in</strong>g Materials<br />
1. Unpack the 8-<strong>in</strong>-1 Multi-Purpose Cooker and remove<br />
all pack<strong>in</strong>g materials <strong>in</strong>clud<strong>in</strong>g the Foam L<strong>in</strong>er between<br />
the Non-Stick Cook<strong>in</strong>g Pot and the Cooker.<br />
Remove Foam L<strong>in</strong>er<br />
Place Handle on Basket<br />
2. Place the Handle on the Fry<strong>in</strong>g Basket by grasp<strong>in</strong>g<br />
the Metal Prongs and squeez<strong>in</strong>g <strong>in</strong>ward. Insert the Metal<br />
Prongs <strong>in</strong>to loops <strong>in</strong>side the basket and release the Metal<br />
Prongs.<br />
Hand Wash and Dry<br />
3. Hand wash and dry the follow<strong>in</strong>g: Tempered Glass<br />
Lid, Fry<strong>in</strong>g Basket, Steam<strong>in</strong>g Rack, Roast<strong>in</strong>g Rack and<br />
Nonstick Cook<strong>in</strong>g Pot.<br />
11
Quick Cook<strong>in</strong>g Instructions------------<br />
Cook<strong>in</strong>g Instructions<br />
1. Connect the Power Cord to the Cooker and power outlet.<br />
Function<br />
Default<br />
1. 2. Select<br />
Press<br />
Connect the Power Image Cord to the Cooker and power outlet.<br />
Function<br />
Function Light Temp./Time<br />
Button Press<br />
2. Select<br />
Image Function Flashes Function Default<br />
Function<br />
Button<br />
Light Flashes Temp./Time<br />
2.Select<br />
Function<br />
Slow Cook<br />
(After it shuts<br />
off, it goes<br />
<strong>in</strong>to Keep Warm<br />
mode for 2 hrs.)<br />
1 time<br />
Slow Cook<br />
212°F/6 hrs.<br />
Press<br />
Once<br />
Time/Temp.<br />
Press Button Once<br />
Time/Temp.<br />
Button<br />
Press<br />
+ or –<br />
Button<br />
(Time)<br />
Press<br />
Twice<br />
Time/Temp.<br />
Press Button Twice<br />
Time/Temp.<br />
Button<br />
Press<br />
+ or –<br />
Button<br />
(Temp.)<br />
Hot Pot<br />
2 times<br />
Hot Pot<br />
212°F/1 hr.<br />
Press<br />
+ or –<br />
Button<br />
(Time)<br />
Press<br />
+ or –<br />
Button<br />
(Temp.)<br />
Stir Fry<br />
3 times<br />
Stir Fry<br />
464°F/15 m<strong>in</strong>.<br />
Press<br />
+ or –<br />
Button<br />
(Time)<br />
Press<br />
+ or –<br />
Button<br />
(Temp.)<br />
Boil<br />
(After it shuts<br />
off, it goes<br />
<strong>in</strong>to Keep Warm<br />
mode for 2 hrs.)<br />
4 times<br />
Boil<br />
302°F/25 m<strong>in</strong>.<br />
Press<br />
+ or –<br />
Button<br />
(Time)<br />
Press<br />
+ or –<br />
Button<br />
(Temp.)<br />
Deep Fry<br />
5 times<br />
Deep Fry<br />
392°F/30 m<strong>in</strong>.<br />
Press<br />
+ or –<br />
Button<br />
(Time)<br />
Press<br />
+ or –<br />
Button<br />
(Temp.)<br />
Grill<br />
6 times<br />
Grill<br />
464°F/30 m<strong>in</strong>.<br />
Press<br />
+ or –<br />
Button<br />
(Time)<br />
Press<br />
+ or –<br />
Button<br />
(Temp.)<br />
Fry<br />
7 times<br />
Fry<br />
356°F/25 m<strong>in</strong>.<br />
Press<br />
+ or –<br />
Button<br />
(Time)<br />
Press<br />
+ or –<br />
Button<br />
(Temp.)<br />
Steam<br />
8 times<br />
Steam<br />
428°F/15 m<strong>in</strong>.<br />
Press<br />
+ or –<br />
Button<br />
(Time)<br />
Press<br />
+ or –<br />
Button<br />
(Temp.)<br />
Roast<strong>in</strong>g<br />
N/A<br />
N/A<br />
374°F/1 hr.<br />
Press Time/Temp<br />
Button to Set<br />
Press<br />
+<br />
Button<br />
(Time)<br />
Press<br />
+<br />
Button<br />
(Temp.)<br />
3. Press Start button on Control Panel to beg<strong>in</strong> heat<strong>in</strong>g up the Cooker<br />
(Function Light turns solid).<br />
4. When timer runs out, the Cooker beeps 9 times and shuts off automatically<br />
or manually press the Stop button on Control Panel.<br />
5. Press the Keep Warm Button to keep the food warm, then press the Stop<br />
button to shut off the Cooker.<br />
3. Press Start button on Control Panel to beg<strong>in</strong> heat<strong>in</strong>g up the Cooker (Function Light turns solid).<br />
4. When timer runs out, the Cooker shuts off automatically or manually press the Stop button on Control Panel.<br />
5. Press the Keep Warm Button to keep the food warm, then press the Stop button to shut off the Cooker.<br />
12<br />
c 2016 <strong>Gourmia</strong>d .All Rights Reserved.
Slow Cook Function----------------<br />
1. For the Slow Cook Function use the<br />
Cooker, Nonstick Cook<strong>in</strong>g Pot, Lid and<br />
Power Cord (A).<br />
Place the Cooker on a stable, leveled<br />
and durable surface.<br />
2. Add <strong>in</strong>gredients to the Nonstick Cook<strong>in</strong>g<br />
Pot and cover with Glass Lid (B).<br />
NOTE: Or follow recipe <strong>in</strong>structions.<br />
3. Place the Power Cord on the Cooker and<br />
plug <strong>in</strong>to outlet (C).<br />
NOTE: Power Cord Lip MUST face down<br />
<strong>in</strong> order to plug it <strong>in</strong>to the Cooker. Cooker<br />
beeps when Power Cord is plugged <strong>in</strong>.<br />
13
4. The Temperature and<br />
Time on Digital Display will<br />
illum<strong>in</strong>ate and stay on until<br />
the Cooker is unplugged (D).<br />
5. Press the Function Button<br />
1 time (or as many times<br />
as needed) to choose Slow<br />
Cook and Function Light<br />
illum<strong>in</strong>ates on Digital Display<br />
and beg<strong>in</strong>s flash<strong>in</strong>g (E).<br />
NOTE: Default temperature is<br />
212°F and default time is 6<br />
hours.<br />
6. To adjust the temperature,<br />
press the Time/Temp Button 2<br />
times and temperature symbol<br />
starts flash<strong>in</strong>g on Digital Display;<br />
then press the Decrease (-)<br />
Button or the Increase (+) Button<br />
to change the temperature (F).<br />
NOTE: Change the temperature<br />
accord<strong>in</strong>g to what the recipe<br />
calls for.<br />
14
7. To adjust the time, press<br />
the Time/Temp Button 1 time<br />
and time symbol starts flash<strong>in</strong>g<br />
on Digital Display; then press<br />
the Decrease (-) Button or<br />
the Increase (+) Button to<br />
change the time (G).<br />
NOTE: Change the time<br />
accord<strong>in</strong>g to what the recipe<br />
calls for.<br />
8. Press Start Button to beg<strong>in</strong><br />
heat<strong>in</strong>g the Cook<strong>in</strong>g Pot to<br />
the chosen temperature and<br />
beg<strong>in</strong> the cook<strong>in</strong>g process<br />
(H).<br />
NOTE: The Cooker makes<br />
a noise while it’s heat<strong>in</strong>g up<br />
but that is normal and then it<br />
stops. The Slow Cook Light on<br />
Digital Display stops flash<strong>in</strong>g<br />
and becomes solid and timer<br />
beg<strong>in</strong>s its countdown.<br />
The Cook<strong>in</strong>g Pot and Lid get hot.<br />
When <strong>in</strong> use, always use oven mitts or<br />
potholders when touch<strong>in</strong>g any outer or<br />
<strong>in</strong>ner surface of the Cooker. Use handle<br />
on Glass Lid to lift it up and proceed with<br />
CAUTION when remov<strong>in</strong>g it because of the<br />
condensed steam on the Lid. Do NOT cook<br />
the food <strong>in</strong> the Keep Warm cycle (HH).<br />
15
9. When cook<strong>in</strong>g time ends,<br />
the Cooker beeps 9 times, it<br />
switches to Keep Warm Cycle<br />
for a default time of 2 hours<br />
and the Keep Warm Light<br />
comes on (J). To turn off<br />
Cooker press the Stop Button.<br />
Do NOT keep the food<br />
<strong>in</strong> the Keep Warm Cycle for<br />
more than 4 hours.<br />
10. To adjust the Keep Warm<br />
Time, press the Time/Temp<br />
Button 1 time and time<br />
symbol starts flash<strong>in</strong>g on<br />
Digital Display; then press<br />
the Decrease (-) Button or<br />
the Increase (+) Button to<br />
change the time (K).<br />
11. When Keep Warm time<br />
ends, the Keep Warm light<br />
turns off and the Cooker<br />
turns off and beeps 9 times<br />
(L).<br />
16
12. To turn off Cooker (before<br />
times ends) press the Stop<br />
Button (M).<br />
Unplug the Power Cord<br />
from the Cooker and power<br />
outlet. Allow Cooker and<br />
parts to cool off completely<br />
before wash<strong>in</strong>g them.<br />
Hot Pot Function------------------<br />
1. For the Hot Pot Function use the<br />
Cooker, Nonstick Cook<strong>in</strong>g Pot, Lid and<br />
Power Cord (A).<br />
NOTE: Us<strong>in</strong>g the Lid for this Function is<br />
optional (or follow recipe <strong>in</strong>structions).<br />
Place the Cooker on a stable,<br />
leveled and durable surface.<br />
17
2. Add <strong>in</strong>gredients to the Nonstick Cook<strong>in</strong>g<br />
Pot and cover with Glass Lid (B).<br />
NOTE: Or follow recipe <strong>in</strong>structions.<br />
3. Place the Power Cord on the Cooker and<br />
plug <strong>in</strong>to outlet (C).<br />
NOTE: Power Cord Lip MUST face down<br />
<strong>in</strong> order to plug it <strong>in</strong>to the Cooker. Cooker<br />
beeps when Power Cord is plugged <strong>in</strong>.<br />
4. The Temperature and<br />
Time on Digital Display will<br />
illum<strong>in</strong>ate and stay on until<br />
the Cooker is unplugged (D).<br />
18
5. Press the Function Button<br />
2 times (or as many times as<br />
needed) to choose Hot Pot<br />
and Function Light illum<strong>in</strong>ates<br />
on Digital Display and beg<strong>in</strong>s<br />
flash<strong>in</strong>g (E).<br />
NOTE: Default temperature<br />
is 212°F and default time is<br />
1 hour.<br />
6. To adjust the temperature,<br />
press the Time/Temp Button<br />
2 times and temperature<br />
symbol starts flash<strong>in</strong>g on<br />
Digital Display; then press<br />
the Decrease (-) Button or<br />
the Increase (+) Button to<br />
change the temperature (F).<br />
NOTE: Change the temperature<br />
accord<strong>in</strong>g to what the recipe<br />
calls for.<br />
7. To adjust the time, press<br />
the Time/Temp Button 1 time<br />
and time symbol starts flash<strong>in</strong>g<br />
on Digital Display; then press<br />
the Decrease (-) Button or<br />
the Increase (+) Button to<br />
change the time (G).<br />
NOTE: Change the time<br />
accord<strong>in</strong>g to what the recipe<br />
calls for.<br />
19
8. Press Start Button to beg<strong>in</strong><br />
heat<strong>in</strong>g the Cook<strong>in</strong>g Pot to the<br />
chosen temperature and beg<strong>in</strong><br />
the cook<strong>in</strong>g process (H).<br />
NOTE: The Cooker makes<br />
a noise while it’s heat<strong>in</strong>g up<br />
but that is normal and then<br />
it stops. The Hot Pot Light on<br />
Digital Display stops flash<strong>in</strong>g<br />
and becomes solid and timer<br />
beg<strong>in</strong>s its countdown.<br />
The Cook<strong>in</strong>g Pot and Lid get hot. When<br />
<strong>in</strong> use, always use oven mitts or potholders<br />
when touch<strong>in</strong>g any outer or <strong>in</strong>ner surface<br />
of the Cooker. Use handle on Glass Lid to<br />
lift it up and proceed with CAUTION when<br />
remov<strong>in</strong>g it because of the condensed<br />
steam on the Lid. Do NOT cook the food <strong>in</strong><br />
the Keep Warm cycle (HH).<br />
20<br />
9. When cook<strong>in</strong>g time ends,<br />
the Cooker beeps 9 times,<br />
it does NOT switch to Keep<br />
Warm Cycle. To keep Fondue<br />
warm, press the Keep Warm<br />
Button (default time 2 hours)<br />
and the Keep Warm Light<br />
comes on (J). To turn off<br />
Cooker press the Stop Button.<br />
Do NOT keep the<br />
Fondue <strong>in</strong> the Keep Warm<br />
Cycle for more than 2 hours.
10. To adjust the Keep Warm<br />
Time, press the Time/Temp<br />
Button 1 time and time<br />
symbol starts flash<strong>in</strong>g on<br />
Digital Display; then press<br />
the Decrease (-) Button or<br />
the Increase (+) Button to<br />
change the time (K).<br />
11. When Keep Warm time<br />
ends, the Keep Warm light<br />
turns off and the Cooker<br />
turns off and beeps 9 times<br />
(L).<br />
12. To turn off Cooker (before<br />
times ends) press the Stop<br />
Button (M).<br />
Unplug the Power Cord<br />
from the Cooker and power<br />
outlet. Allow Cooker and<br />
parts to cool off completely<br />
before wash<strong>in</strong>g them.<br />
21
Stir-Fry Function------------------<br />
1. For the Stir-Fry Function use the Cooker,<br />
Nonstick Cook<strong>in</strong>g Pot, Lid and Power Cord<br />
(A).<br />
NOTE: Us<strong>in</strong>g the Lid for this Function is<br />
optional (or follow recipe <strong>in</strong>structions).<br />
Place the Cooker on a stable, leveled<br />
and durable surface.<br />
2. Add oil, butter or other similar <strong>in</strong>gredient<br />
for Stir-Fry to the Nonstick Cook<strong>in</strong>g Pot and<br />
cover with Glass Lid (B).<br />
NOTE: Or follow recipe <strong>in</strong>structions.<br />
3. Place the Power Cord on the Cooker and<br />
plug <strong>in</strong>to outlet (C).<br />
NOTE: Power Cord Lip MUST face down<br />
<strong>in</strong> order to plug it <strong>in</strong>to the Cooker. Cooker<br />
beeps when Power Cord is plugged <strong>in</strong>.<br />
22
4. The Temperature and<br />
Time on Digital Display will<br />
illum<strong>in</strong>ate and stay on until<br />
the Cooker is unplugged (D).<br />
5. Press the Function Button<br />
3 times (or as many times as<br />
needed) to choose Stir-Fry<br />
and Function Light illum<strong>in</strong>ates<br />
on Digital Display and beg<strong>in</strong>s<br />
flash<strong>in</strong>g (E).<br />
NOTE: Default temperature<br />
is 464°F and default time is<br />
15 m<strong>in</strong>utes.<br />
6. To adjust the temperature,<br />
press the Time/Temp Button<br />
2 times and temperature<br />
symbol starts flash<strong>in</strong>g on<br />
Digital Display; then press<br />
the Decrease (-) Button or the<br />
Increase (+) Button to change<br />
the temperature (F).<br />
NOTE: Change the temperature<br />
accord<strong>in</strong>g to what the recipe<br />
calls for.<br />
23
7. To adjust the time, press<br />
the Time/Temp Button 1 time<br />
and time symbol starts flash<strong>in</strong>g<br />
on Digital Display; then press<br />
the Decrease (-) Button or the<br />
Increase (+) Button to change<br />
the time (G).<br />
NOTE: Change the time<br />
accord<strong>in</strong>g to what the recipe<br />
calls for.<br />
8. Press Start Button to beg<strong>in</strong><br />
heat<strong>in</strong>g the Cook<strong>in</strong>g Pot to the<br />
chosen temperature and beg<strong>in</strong><br />
the cook<strong>in</strong>g process (H).<br />
NOTE: The Cooker makes<br />
a noise while it’s heat<strong>in</strong>g up<br />
but that is normal and then<br />
it stops. The Stir-Fry Light on<br />
Digital Display stops flash<strong>in</strong>g<br />
and becomes solid and timer<br />
beg<strong>in</strong>s its countdown.<br />
Preheat Cooker for 30<br />
seconds. The Cook<strong>in</strong>g Pot<br />
and Lid get hot. When <strong>in</strong> use,<br />
always use oven mitts or potholders<br />
when touch<strong>in</strong>g any<br />
outer or <strong>in</strong>ner surface of the<br />
Cooker. Use handle on Glass<br />
Lid to lift it up and proceed with<br />
CAUTION when remov<strong>in</strong>g it<br />
because of the condensed<br />
steam on the Lid. Do NOT cook<br />
the food <strong>in</strong> the Keep Warm cycle<br />
(HH).<br />
24
9. When cook<strong>in</strong>g time ends,<br />
the Cooker beeps 9 times,<br />
it does NOT switch to Keep<br />
Warm Cycle. To keep food<br />
warm, press the Keep Warm<br />
Button (default time 2 hours)<br />
and the Keep Warm Light<br />
comes on (J). To turn off<br />
Cooker press the Stop Button.<br />
Do NOT keep the food<br />
<strong>in</strong> the Keep Warm Cycle for<br />
more than 30 m<strong>in</strong>utes for<br />
food will dry out.<br />
10. To adjust the Keep Warm<br />
Time, press the Time/Temp<br />
Button 1 time and time<br />
symbol starts flash<strong>in</strong>g on<br />
Digital Display; then press<br />
the Decrease (-) Button or<br />
the Increase (+) Button to<br />
change the time (K).<br />
11. When Keep Warm time<br />
ends, the Keep Warm light<br />
turns off and the Cooker turns<br />
off and beeps 9 times (L).<br />
25
12. To turn off Cooker (before<br />
times ends) press the Stop<br />
Button (M).<br />
Unplug the Power Cord<br />
from the Cooker and power<br />
outlet. Allow Cooker and<br />
parts to cool off completely<br />
before wash<strong>in</strong>g them.<br />
Boil Function---------------------<br />
1. For the Boil Function use the Cooker,<br />
Nonstick Cook<strong>in</strong>g Pot, Lid and Power Cord<br />
(A).<br />
NOTE: Us<strong>in</strong>g the Lid for this Function is<br />
optional.<br />
Place the Cooker on a stable, leveled<br />
and durable surface.<br />
2. Add water up to the max l<strong>in</strong>e on the<br />
<strong>in</strong>side of Nonstick Cook<strong>in</strong>g Pot for Boil<strong>in</strong>g<br />
and cover with Glass Lid (B).<br />
NOTE: Or follow recipe <strong>in</strong>structions.<br />
26
3. Place the Power Cord on the Cooker and<br />
plug <strong>in</strong>to outlet (C).<br />
NOTE: Power Cord Lip MUST face down<br />
<strong>in</strong> order to plug it <strong>in</strong>to the Cooker. Cooker<br />
beeps when Power Cord is plugged <strong>in</strong>.<br />
4. The Temperature and<br />
Time on Digital Display will<br />
illum<strong>in</strong>ate and stay on until<br />
the Cooker is turned off (D).<br />
27<br />
5. Press the Function Button<br />
4 times (or as many times as<br />
needed) to choose Boil and<br />
Function Light illum<strong>in</strong>ates<br />
on Digital Display and beg<strong>in</strong>s<br />
flash<strong>in</strong>g (E).<br />
NOTE: Default temperature<br />
is 302°F and default time is<br />
25 m<strong>in</strong>utes.
6. To adjust the temperature,<br />
press the Time/Temp Button<br />
2 times and temperature<br />
symbol starts flash<strong>in</strong>g on<br />
Digital Display; then press<br />
the Decrease (-) Button or<br />
the Increase (+) Button to<br />
change the temperature (F).<br />
NOTE: Change the temperature<br />
accord<strong>in</strong>g to what the recipe<br />
calls for.<br />
7. To adjust the time, press<br />
the Time/Temp Button 1<br />
time and time symbol starts<br />
flash<strong>in</strong>g on Digital Display;<br />
then press the Decrease (-)<br />
Button or the Increase (+)<br />
Button to change the time<br />
(G).<br />
NOTE: Change the time<br />
accord<strong>in</strong>g to what the recipe<br />
calls for.<br />
28<br />
8. Press Start Button to beg<strong>in</strong><br />
heat<strong>in</strong>g the Cook<strong>in</strong>g Pot to the<br />
chosen temperature and beg<strong>in</strong><br />
the cook<strong>in</strong>g process (H).<br />
NOTE: The Cooker makes a<br />
noise while it’s heat<strong>in</strong>g up<br />
but that is normal and then<br />
it stops. The Boil Light on<br />
Digital Display stops flash<strong>in</strong>g<br />
and becomes solid and timer<br />
beg<strong>in</strong>s its countdown.
Wait until water starts to boil and<br />
then use CAUTION when putt<strong>in</strong>g food <strong>in</strong> the<br />
water. Do NOT cook the food <strong>in</strong> the Keep<br />
Warm cycle. The Cook<strong>in</strong>g Pot and Lid get<br />
hot. When <strong>in</strong> use, always use oven mitts or<br />
potholders when touch<strong>in</strong>g any outer or <strong>in</strong>ner<br />
surface of the Cooker. Use handle on Glass Lid<br />
to lift it up and proceed with CAUTION when<br />
remov<strong>in</strong>g it because of the condensed<br />
steam on the Lid (HH).<br />
9. When cook<strong>in</strong>g time ends,<br />
the Cooker beeps 9 times,<br />
it switches to Keep Warm<br />
Cycle for a default time of<br />
2 hours and the Keep Warm<br />
Light comes on (J). To turn<br />
off Cooker press the Stop<br />
Button.<br />
Do NOT keep the food<br />
<strong>in</strong> the Keep Warm Cycle for<br />
more than 1 hour.<br />
10. To adjust the Keep Warm<br />
Time, press the Time/Temp<br />
Button 1 time and time<br />
symbol starts flash<strong>in</strong>g on<br />
Digital Display; then press the<br />
Decrease (-) Button or the<br />
Increase (+) Button to change<br />
the time (K).<br />
29
11. When Keep Warm time<br />
ends, the Keep Warm light<br />
turns off and the Cooker<br />
turns off and beeps 9 times<br />
(L).<br />
12. To turn off Cooker<br />
(before times ends) press<br />
the Stop Button (M).<br />
Unplug the Power Cord<br />
from the Cooker and power<br />
outlet. Allow Cooker and<br />
parts to cool off completely<br />
before wash<strong>in</strong>g them.<br />
Deep Fry Function----------------<br />
1. For the Deep Fry Function use the Cooker,<br />
Nonstick Cook<strong>in</strong>g Pot, Fry<strong>in</strong>g Basket, Lid and<br />
Power Cord (A).<br />
NOTE: Us<strong>in</strong>g the Lid for this Function is<br />
optional, but if Lid is used do NOT let the<br />
condensed steam on the Glass Lid fall <strong>in</strong>to<br />
the hot oil.<br />
Place the Cooker on a stable, leveled<br />
and durable surface.<br />
30
2. Add the oil for Deep Fry<strong>in</strong>g to the Nonstick<br />
Cook<strong>in</strong>g Pot and cover with Glass Lid (B).<br />
NOTE: Or follow recipe <strong>in</strong>structions.<br />
Fill the Nonstick Cook<strong>in</strong>g Pot with oil<br />
up to the MAX Oil L<strong>in</strong>e on the <strong>in</strong>side of the<br />
Cook<strong>in</strong>g Pot.<br />
3. Place the Power Cord on the Cooker and<br />
plug <strong>in</strong>to outlet (C).<br />
NOTE: Power Cord Lip MUST face down<br />
<strong>in</strong> order to plug it <strong>in</strong>to the Cooker. Cooker<br />
beeps when Power Cord is plugged <strong>in</strong>.<br />
4. The Temperature and<br />
Time on Digital Display will<br />
illum<strong>in</strong>ate and stay on until<br />
the Cooker is unplugged (D).<br />
31
5. Press the Function Button<br />
5 times (or as many times as<br />
needed) to choose Deep Fry<br />
and Function Light illum<strong>in</strong>ates<br />
on Digital Display and beg<strong>in</strong>s<br />
flash<strong>in</strong>g (E).<br />
NOTE: Default temperature is<br />
392°F and default time is 30<br />
m<strong>in</strong>utes.<br />
6. To adjust the temperature,<br />
press the Time/Temp Button<br />
2 times and temperature<br />
symbol starts flash<strong>in</strong>g on<br />
Digital Display; then press<br />
the Decrease (-) Button or<br />
the Increase (+) Button to<br />
change the temperature (F).<br />
NOTE: Change the temperature<br />
accord<strong>in</strong>g to what the<br />
recipe calls for.<br />
7. To adjust the time, press<br />
the Time/Temp Button 1<br />
time and time symbol starts<br />
flash<strong>in</strong>g on Digital Display;<br />
then press the Decrease (-)<br />
Button or the Increase (+)<br />
Button to change the time (G).<br />
NOTE: Change the time<br />
accord<strong>in</strong>g to what the recipe<br />
calls for.<br />
32
8. Press Start Button to beg<strong>in</strong><br />
heat<strong>in</strong>g the Cook<strong>in</strong>g Pot to<br />
the chosen temperature and<br />
beg<strong>in</strong> the cook<strong>in</strong>g process (H).<br />
NOTE: The Cooker makes a<br />
noise while it’s heat<strong>in</strong>g up<br />
but that is normal and then it<br />
stops. The Deep Fry Light on<br />
Digital Display stops flash<strong>in</strong>g<br />
and becomes solid and timer<br />
beg<strong>in</strong>s its countdown.<br />
The Cook<strong>in</strong>g Pot, Fry<strong>in</strong>g Basket and<br />
Lid get hot. When <strong>in</strong> use, always use oven<br />
mitts or potholders when touch<strong>in</strong>g any<br />
outer or <strong>in</strong>ner surface of the Cooker. Use<br />
handle on Glass Lid to lift it up and do NOT<br />
let the condensed steam on the Lid fall<br />
<strong>in</strong>to the hot oil (HH).<br />
Preheat Cooker for 4 to 5 m<strong>in</strong>utes,<br />
place food <strong>in</strong> the Fry<strong>in</strong>g Basket and use<br />
CAUTION when putt<strong>in</strong>g Fry<strong>in</strong>g Basket <strong>in</strong><br />
the oil. Do NOT cook the food <strong>in</strong> the Keep<br />
Warm cycle (HHH).<br />
33
9. When cook<strong>in</strong>g time ends, the<br />
Cooker turns off and beeps 9<br />
times, it does NOT switch to Keep<br />
Warm Cycle. Take out Fry<strong>in</strong>g Basket<br />
and place it on the outer rim of<br />
the Nonstick Cook<strong>in</strong>g Pot to dra<strong>in</strong><br />
excess oil (J). To keep fry<strong>in</strong>g follow<br />
steps 5 through 9.<br />
Do NOT keep the Cooker “ON” once fry<strong>in</strong>g is completed.<br />
10. To turn off Cooker (before<br />
times ends) press the Stop<br />
Button (M).<br />
Unplug the Power Cord<br />
from the Cooker and power<br />
outlet. Allow Cooker and<br />
parts to cool off completely<br />
before wash<strong>in</strong>g them.<br />
34
Grill Function -- -<br />
1. For the Grill Function use the Cooker,<br />
Nonstick Cook<strong>in</strong>g Pot, Lid and Power<br />
Cord (A).<br />
NOTE: Us<strong>in</strong>g the Lid for this Function is<br />
optional (or follow recipe <strong>in</strong>structions).<br />
Place the Cooker on a stable,<br />
leveled and durable surface.<br />
2. Cover Nonstick Cook<strong>in</strong>g Pot with<br />
Glass Lid (B).<br />
NOTE: Follow recipe <strong>in</strong>structions.<br />
35
3. Place the Power Cord on the Cooker and<br />
plug <strong>in</strong>to outlet (C).<br />
NOTE: Power Cord Lip MUST face down<br />
<strong>in</strong> order to plug it <strong>in</strong>to the Cooker. Cooker<br />
beeps when Power Cord is plugged <strong>in</strong>.<br />
4. The Temperature and<br />
Time on Digital Display will<br />
illum<strong>in</strong>ate and stay on until<br />
the Cooker is unplugged (D).<br />
5. Press the Function Button<br />
6 times (or as many times as<br />
needed) to choose Grill and<br />
Function Light illum<strong>in</strong>ates on<br />
Digital Display and beg<strong>in</strong>s<br />
flash<strong>in</strong>g (E).<br />
NOTE: Default temperature<br />
is 464°F and default time is<br />
30 m<strong>in</strong>utes.<br />
36
6. To adjust the temperature,<br />
press the Time/Temp Button<br />
2 times and temperature<br />
symbol starts flash<strong>in</strong>g on<br />
Digital Display; then press<br />
the Decrease (-) Button or<br />
the Increase (+) Button to<br />
change the temperature (F).<br />
NOTE: Change the temperature<br />
accord<strong>in</strong>g to what the<br />
recipe calls for.<br />
7. To adjust the time, press<br />
the Time/Temp Button 1<br />
time and time symbol starts<br />
flash<strong>in</strong>g on Digital Display;<br />
then press the Decrease (-)<br />
Button or the Increase (+)<br />
Button to change the time (G).<br />
NOTE: Change the time<br />
accord<strong>in</strong>g to what the recipe<br />
calls for.<br />
8. Press Start Button to<br />
beg<strong>in</strong> heat<strong>in</strong>g the Cook<strong>in</strong>g<br />
Pot to the chosen temperature<br />
and beg<strong>in</strong> the cook<strong>in</strong>g<br />
process (H).<br />
NOTE: The Cooker makes a<br />
noise while it’s heat<strong>in</strong>g up<br />
but that is normal and then<br />
it stops. The Grill Light on<br />
Digital Display stops flash<strong>in</strong>g<br />
and becomes solid and timer<br />
beg<strong>in</strong>s its countdown.<br />
37
Preheat Cooker for 30 seconds then<br />
follow recipe <strong>in</strong>structions. The Cook<strong>in</strong>g<br />
Pot and Lid get hot (HH). When <strong>in</strong> use,<br />
always use oven mitts or potholders when<br />
touch<strong>in</strong>g any outer or <strong>in</strong>ner surface of the<br />
Cooker. Use handle on Glass Lid to lift<br />
it up and proceed with CAUTION when<br />
remov<strong>in</strong>g it because of the condensed<br />
steam on the Lid. Do NOT cook the food <strong>in</strong><br />
the Keep Warm cycle.<br />
9. When cook<strong>in</strong>g time ends,<br />
the Cooker beeps 9 times,<br />
it does NOT switch to Keep<br />
Warm Cycle. To keep food<br />
warm, press the Keep Warm<br />
Button (default time 2 hours)<br />
and the Keep Warm Light<br />
comes on (J). To turn off<br />
Cooker press the Stop Button.<br />
Do NOT keep the food<br />
<strong>in</strong> the Keep Warm Cycle for<br />
more than 30 m<strong>in</strong>utes.<br />
38<br />
10. To adjust the Keep Warm<br />
Time, press the Time/Temp<br />
Button 1 time and time<br />
symbol starts flash<strong>in</strong>g on<br />
Digital Display; then press the<br />
Decrease (-) Button or the<br />
Increase (+) Button to<br />
change the time (K).
11. When Keep Warm time<br />
ends, the Keep Warm light<br />
turns off and the Cooker<br />
turns off and beeps 9 times<br />
(L).<br />
12. To turn off Cooker (before<br />
times ends) press the Stop<br />
Button (M).<br />
Unplug the Power Cord<br />
from the Cooker and power<br />
outlet. Allow Cooker and<br />
parts to cool off completely<br />
before wash<strong>in</strong>g them.<br />
Fry Function----------------------<br />
1. For the Fry Function use the Cooker, Nonstick<br />
Cook<strong>in</strong>g Pot, Lid and Power Cord (A).<br />
NOTE: Us<strong>in</strong>g the Lid for this Function is<br />
optional, but if Lid is used do NOT let the<br />
condensed steam on the Glass Lid fall <strong>in</strong>to the<br />
hot oil.<br />
Place the Cooker on a stable, leveled<br />
and durable surface.<br />
39
2. Add the oil for Fry<strong>in</strong>g to the Nonstick<br />
Cook<strong>in</strong>g Pot and cover with Glass Lid (B).<br />
NOTE: Or follow recipe <strong>in</strong>structions.<br />
Do not pass the MAX Oil L<strong>in</strong>e on the<br />
<strong>in</strong>side of the Cook<strong>in</strong>g Pot.<br />
3. Place the Power Cord on the Cooker and<br />
plug <strong>in</strong>to outlet (C).<br />
NOTE: Power Cord Lip MUST face down<br />
<strong>in</strong> order to plug it <strong>in</strong>to the Cooker. Cooker<br />
beeps when Power Cord is plugged <strong>in</strong>.<br />
4. The Temperature and<br />
Time on Digital Display will<br />
illum<strong>in</strong>ate and stay on until<br />
the Cooker is unplugged (D).<br />
40
5. Press the Function Button<br />
7 times (or as many times as<br />
needed) to choose Fry and<br />
Function Light illum<strong>in</strong>ates<br />
on Digital Display and beg<strong>in</strong>s<br />
flash<strong>in</strong>g (E).<br />
NOTE: Default temperature<br />
is 356°F and default time is<br />
25 m<strong>in</strong>utes.<br />
6. To adjust the temperature,<br />
press the Time/Temp Button<br />
2 times and temperature<br />
symbol starts flash<strong>in</strong>g on<br />
Digital Display; then press<br />
the Decrease (-) Button or<br />
the Increase (+) Button to<br />
change the temperature (F).<br />
NOTE: Change the temperature<br />
accord<strong>in</strong>g to what the recipe<br />
calls for.<br />
7. To adjust the time, press<br />
the Time/Temp Button 1 time<br />
and time symbol starts flash<strong>in</strong>g<br />
on Digital Display; then press<br />
the Decrease (-) Button or the<br />
Increase (+) Button to change<br />
the time (G).<br />
NOTE: Change the time<br />
accord<strong>in</strong>g to what the recipe<br />
calls for.<br />
41
8. Press Start Button to<br />
beg<strong>in</strong> heat<strong>in</strong>g the Cook<strong>in</strong>g<br />
Pot to the chosen temperature<br />
and beg<strong>in</strong> the cook<strong>in</strong>g<br />
process (H).<br />
NOTE: The Cooker makes a<br />
noise while it’s heat<strong>in</strong>g up<br />
but that is normal and then<br />
it stops. The Fry Light on<br />
Digital Display stops flash<strong>in</strong>g<br />
and becomes solid and timer<br />
beg<strong>in</strong>s its countdown.<br />
The Cook<strong>in</strong>g Pot and Lid get hot.<br />
When <strong>in</strong> use, always use oven mitts or<br />
potholders when touch<strong>in</strong>g any outer or<br />
<strong>in</strong>ner surface of the Cooker. Use handle on<br />
Glass Lid to lift it up and do NOT let the<br />
condensed steam on the Lid fall <strong>in</strong>to the<br />
hot oil (HH).<br />
Preheat Cooker for 30 seconds,<br />
and use CAUTION when putt<strong>in</strong>g food<br />
<strong>in</strong>side the Nonstick Cook<strong>in</strong>g Pot. Follow<br />
recipe <strong>in</strong>structions. Do NOT cook the food<br />
<strong>in</strong> the Keep Warm cycle (HHH).<br />
42
9. When cook<strong>in</strong>g time ends,<br />
the Cooker turns off and<br />
beeps 9 times, it does NOT<br />
switch to Keep Warm Cycle.<br />
(J). To keep fry<strong>in</strong>g follow<br />
steps 5 through 9.<br />
Do NOT keep the<br />
Cooker “ON” once fry<strong>in</strong>g is<br />
completed.<br />
10. To turn off Cooker (before<br />
times ends) press the Stop<br />
Button (M).<br />
Unplug the Power Cord<br />
from the Cooker and power<br />
outlet. Allow Cooker and<br />
parts to cool off completely<br />
before wash<strong>in</strong>g them.<br />
Steam Function-------------------<br />
1. For the Steam Function use the Cooker,<br />
Nonstick Cook<strong>in</strong>g Pot, Steam<strong>in</strong>g Rack, Lid<br />
and Power Cord (A).<br />
NOTE: Lid must be used for this function<br />
(or follow recipe <strong>in</strong>structions).<br />
Place the Cooker on a stable, leveled<br />
and durable surface.<br />
43
2. Add water up to the MAX L<strong>in</strong>e on the<br />
<strong>in</strong>side of Nonstick Cook<strong>in</strong>g Pot for Steam<strong>in</strong>g,<br />
then add Steam<strong>in</strong>g Rack, food and cover with<br />
Glass Lid (B).<br />
NOTE: Or follow recipe <strong>in</strong>structions.<br />
3. Place the Power Cord on the Cooker and<br />
plug <strong>in</strong>to outlet (C).<br />
NOTE: Power Cord Lip MUST face down<br />
<strong>in</strong> order to plug it <strong>in</strong>to the Cooker. Cooker<br />
beeps when Power Cord is plugged <strong>in</strong>.<br />
4. The Temperature and<br />
Time on Digital Display will<br />
illum<strong>in</strong>ate and stay on until<br />
the Cooker is turned off (D).<br />
44
5. Press the Function Button<br />
8 times (or as many times<br />
as needed) to choose Steam<br />
and Function Light illum<strong>in</strong>ates<br />
on Digital Display and beg<strong>in</strong>s<br />
flash<strong>in</strong>g (E).<br />
NOTE: Default temperature<br />
is 428°F and default time is<br />
15 m<strong>in</strong>utes.<br />
6. To adjust the temperature,<br />
press the Time/Temp Button<br />
2 times and temperature<br />
symbol starts flash<strong>in</strong>g on<br />
Digital Display; then press<br />
the Decrease (-) Button or the<br />
Increase (+) Button to<br />
change the temperature (F).<br />
NOTE: Change the temperature<br />
accord<strong>in</strong>g to what the<br />
recipe calls for.<br />
7. To adjust the time, press<br />
the Time/Temp Button 1 time<br />
and time symbol starts flash<strong>in</strong>g<br />
on Digital Display; then press<br />
the Decrease (-) Button or the<br />
Increase (+) Button to change<br />
the time (G).<br />
NOTE: Change the time<br />
accord<strong>in</strong>g to what the recipe<br />
calls for.<br />
45
8. Press Start Button to beg<strong>in</strong><br />
heat<strong>in</strong>g the Cook<strong>in</strong>g Pot to the<br />
chosen temperature and beg<strong>in</strong><br />
the cook<strong>in</strong>g process (H).<br />
NOTE: The Cooker makes a<br />
noise while it’s heat<strong>in</strong>g up but<br />
that is normal and then it stops.<br />
The Steam Light on Digital<br />
Display stops flash<strong>in</strong>g and<br />
becomes solid and timer<br />
beg<strong>in</strong>s its countdown.<br />
When water starts to boil, use<br />
CAUTION when lift<strong>in</strong>g the Lid by the<br />
handle, lift it away from your body<br />
as you may get burned with the hot<br />
steam. Do NOT cook the food <strong>in</strong> the<br />
Keep Warm cycle. The Cook<strong>in</strong>g Pot,<br />
Steam<strong>in</strong>g Rack and Lid get hot. When<br />
<strong>in</strong> use, always use oven mitts or<br />
potholders when touch<strong>in</strong>g any outer<br />
or <strong>in</strong>ner surface of the Cooker (HH).<br />
9. When cook<strong>in</strong>g time ends,<br />
the Cooker beeps 9 times,<br />
it does NOT switch to Keep<br />
Warm Cycle (J). To turn off<br />
Cooker press the Stop Button.<br />
Do NOT keep the food <strong>in</strong><br />
the Keep Warm Cycle for<br />
more than 5 m<strong>in</strong>utes for it<br />
might overcook depend<strong>in</strong>g<br />
on the food and recipe.<br />
46
10. To adjust the Keep Warm<br />
Time, press the Time/Temp<br />
Button 1 time and time<br />
symbol starts flash<strong>in</strong>g on<br />
Digital Display; then press the<br />
Decrease (-) Button or the<br />
Increase (+) Button to<br />
change the time (K).<br />
11. When Keep Warm time<br />
ends, the Keep Warm light<br />
turns off and the Cooker<br />
turns off and beeps 9 times<br />
(L).<br />
12. To turn off Cooker<br />
(before times ends) press<br />
the Stop Button (M).<br />
Unplug the Power Cord from<br />
the Cooker and power outlet.<br />
Allow Cooker and parts to<br />
cool off completely before<br />
wash<strong>in</strong>g them.<br />
47
----------- Roast<strong>in</strong>g Function ------------------<br />
1. For the Roast<strong>in</strong>g Function use the Cooker,<br />
Nonstick Cook<strong>in</strong>g Pot, Roast<strong>in</strong>g Rack, Lid and<br />
Power Cord (A).<br />
NOTE: Lid must be used for this function (or<br />
follow recipe <strong>in</strong>structions).<br />
Place the Cooker on a stable, leveled<br />
and durable surface.<br />
2. Cover Nonstick Cook<strong>in</strong>g Pot with Glass<br />
Lid (B).<br />
NOTE: Follow recipe <strong>in</strong>structions.<br />
3. Place the Power Cord on the Cooker and<br />
plug <strong>in</strong>to outlet (C).<br />
NOTE: Power Cord Lip MUST face down<br />
<strong>in</strong> order to plug it <strong>in</strong>to the Cooker. Cooker<br />
beeps when Power Cord is plugged <strong>in</strong>.<br />
48
4. The Temperature and<br />
Time on Digital Display will<br />
illum<strong>in</strong>ate and stay on until<br />
the Cooker is unplugged (D).<br />
5. To set the recommended<br />
temperature and time for<br />
Roast<strong>in</strong>g, press the Time/<br />
Temp Button 2 times and<br />
temperature symbol starts<br />
flash<strong>in</strong>g on Digital Display and<br />
press the Increase (+) Button<br />
to change the temperature to<br />
374°F. Then press the Time/<br />
Temp Button 1 time and time<br />
symbol starts flash<strong>in</strong>g on<br />
Digital Display and press the<br />
Increase (+) Button to change<br />
the time to 1 hour (E).<br />
NOTE: There is no default<br />
temperature or time for the<br />
Roast<strong>in</strong>g Function.<br />
6. To adjust the temperature,<br />
press the Time/Temp Button<br />
2 times and temperature<br />
symbol starts flash<strong>in</strong>g on<br />
Digital Display; then press<br />
the Decrease (-) Button or<br />
the Increase (+) Button to<br />
change the temperature (F).<br />
NOTE: Change the temperature<br />
accord<strong>in</strong>g to what the recipe<br />
calls for.<br />
49
7. To adjust the time, press<br />
the Time/Temp Button 1 time<br />
and time symbol starts flash<strong>in</strong>g<br />
on Digital Display; then press<br />
the Decrease (-) Button or<br />
the Increase (+) Button to<br />
change the time (G).<br />
NOTE: Change the time<br />
accord<strong>in</strong>g to what the recipe<br />
calls for.<br />
8. Press Start Button to beg<strong>in</strong><br />
heat<strong>in</strong>g the Cook<strong>in</strong>g Pot to<br />
the chosen temperature and<br />
beg<strong>in</strong> the cook<strong>in</strong>g process (H).<br />
NOTE: The Cooker makes a<br />
noise while it’s heat<strong>in</strong>g up<br />
but that is normal and then<br />
it stops. The timer beg<strong>in</strong>s its<br />
countdown.<br />
Preheat Cooker for 30 seconds then<br />
follow recipe <strong>in</strong>structions. The Cook<strong>in</strong>g<br />
Pot, Roast<strong>in</strong>g Rack and Lid get hot (HH).<br />
When <strong>in</strong> use, always use oven mitts or<br />
potholders when touch<strong>in</strong>g any outer or<br />
<strong>in</strong>ner surface of the Cooker. Use handle<br />
on Glass Lid to lift it up and proceed with<br />
CAUTION when remov<strong>in</strong>g it because of<br />
the condensed steam on the Lid. Do NOT<br />
cook the food <strong>in</strong> the Keep Warm cycle.<br />
50
9. When cook<strong>in</strong>g time ends,<br />
the Cooker beeps 9 times,<br />
it does NOT switch to Keep<br />
Warm Cycle. To keep food<br />
warm, press the Keep<br />
Warm Button (default time 2<br />
hours) and the Keep Warm<br />
Light comes on (J). To turn<br />
off Cooker press the Stop<br />
Button.<br />
Do NOT keep the food<br />
<strong>in</strong> the Keep Warm Cycle for<br />
more than 30 m<strong>in</strong>utes.<br />
10. To adjust the Keep Warm<br />
Time, press the Time/Temp<br />
Button 1 time and time symbol<br />
starts flash<strong>in</strong>g on Digital Display;<br />
then press the Decrease (-)<br />
Button or the Increase (+)<br />
Button to change the time (K).<br />
11. When Keep Warm time<br />
ends, the Keep Warm light<br />
turns off and the Cooker turns<br />
off and beeps 9 times (L).<br />
51
12. To turn off Cooker (before<br />
times ends) press the Stop<br />
Button (M).<br />
Unplug the Power Cord from<br />
the Cooker and power outlet.<br />
Allow Cooker and parts to<br />
cool off completely before<br />
wash<strong>in</strong>g them.<br />
----------------------Keep Warm----------------------<br />
1. When cook<strong>in</strong>g time ends,<br />
the Cooker beeps 9 times. To<br />
keep food warm, press the<br />
Keep Warm Button (default<br />
time 2 hours) and the Keep<br />
Warm Light comes on (A).<br />
To turn off Cooker press the<br />
Stop Button.<br />
Do NOT keep the food<br />
<strong>in</strong> the Keep Warm Cycle for<br />
more time than the recipe<br />
calls for.<br />
52
2. To adjust the Keep Warm<br />
Time, press the Time/Temp<br />
Button 1 time and time<br />
symbol starts flash<strong>in</strong>g on<br />
Digital Display; then press the<br />
Decrease (-) Button or the<br />
Increase (+) Button to change<br />
the time (B).<br />
3. When Keep Warm time<br />
ends, the Keep Warm light<br />
turns off and the Cooker<br />
turns off and beeps 9 times<br />
(C).<br />
4. To turn off Cooker (before<br />
times ends) press the Stop<br />
Button (D).<br />
Unplug the Power Cord<br />
from the Cooker and power<br />
outlet. Allow Cooker and parts<br />
to cool off completely before<br />
wash<strong>in</strong>g them.<br />
53
-----------Recipes and Cook<strong>in</strong>g Videos------------<br />
Scan QR Code to<br />
Watch Cook<strong>in</strong>g Video<br />
https://youtu.be/XL7ol91Kk-s<br />
Cornish<br />
Hen Roast<br />
Serves: 4 people Prep time: 25 m<strong>in</strong>utes<br />
Serv<strong>in</strong>g size: 1 Hen for 2 people Cook time: 1 hour<br />
Ingredients<br />
2 (20 oz.) Cornish Hens<br />
4 Sprigs of Rosemary<br />
8 Sprigs of Thyme<br />
1 1/2 Stick (12 oz.) Herbed Garlic Butter<br />
6 Fresh Cloves of Garlic<br />
5-6 Whole Carrots<br />
5-6 Stalks of Celery<br />
12 oz. F<strong>in</strong>gerl<strong>in</strong>g Potatoes<br />
1 1/4 Cup of Chicken Stalk<br />
1/3 Cup Orange Juice (no pulp)<br />
2 Tsp Onion Powder<br />
2 Tsp Garlic Powder<br />
Salt<br />
Pepper<br />
54
Food Prep<br />
Vegetable Potatoes Medley<br />
1. Cut bottom of carrots off then cut <strong>in</strong>to even quadrants and place <strong>in</strong> bowl.<br />
2. Cut bottom of celeries then cut <strong>in</strong>to even quadrants and place <strong>in</strong> bowl.<br />
3. Some F<strong>in</strong>gerl<strong>in</strong>g potatoes will be larger than others, so cut the larger<br />
potatoes <strong>in</strong> half and place <strong>in</strong> bowl.<br />
4. Pour 1 cup of Chicken Stalk <strong>in</strong>to bowl.<br />
5. Pour 1/4 cup of Orange Juice <strong>in</strong>to bowl.<br />
6. Add 2 Tsp of Herbed Garlic Butter <strong>in</strong>to bowl.<br />
Cornish Hens<br />
1. R<strong>in</strong>se hens and pat dry ensur<strong>in</strong>g sk<strong>in</strong> is dry so butter will stick to it.<br />
2. Puncture 3-5 holes <strong>in</strong> the cavity of hen, upwards towards the breast with<br />
out punctur<strong>in</strong>g the sk<strong>in</strong>.<br />
3. Us<strong>in</strong>g po<strong>in</strong>ter f<strong>in</strong>ger separate sk<strong>in</strong> from breast mak<strong>in</strong>g a sweep<strong>in</strong>g motion<br />
with f<strong>in</strong>ger.<br />
4. Take 1 Tsp of Herbed Garlic Butter and spread under sk<strong>in</strong> along the left<br />
breast be<strong>in</strong>g sure to spread evenly.<br />
5. Take another tablespoon of butter and spread evenly under sk<strong>in</strong> on right<br />
side of breast.<br />
6. Pat dry Hen once more just <strong>in</strong> case Hen was previously chilled,<br />
condensation may be present keep<strong>in</strong>g the sk<strong>in</strong> moist.<br />
7. Spread 2-3 Tablespoons of Herbed Butter all along the outside of the hen<br />
mak<strong>in</strong>g sure to spread an even coat throughout the hen.<br />
8. R<strong>in</strong>se hands with warm water.<br />
9. Beg<strong>in</strong> season<strong>in</strong>g Hen by plac<strong>in</strong>g 1 sprig of rosemary <strong>in</strong>side cavity of hen.<br />
10. Place 2-3 sprigs of Thyme <strong>in</strong>side cavity of hen.<br />
11. Place 1 whole clove of Garlic <strong>in</strong>side cavity as well.<br />
12. Start season<strong>in</strong>g the outside of the bird by spr<strong>in</strong>kl<strong>in</strong>g 1-2 p<strong>in</strong>ches of Salt.<br />
13. Spread 1Tsp of Onion powder on outside sk<strong>in</strong>.<br />
14. Spread 1Tsp of Garlic powder on outside sk<strong>in</strong>.<br />
15. Spr<strong>in</strong>kle pepper all around on outside sk<strong>in</strong>.<br />
16. Pour 1/4 cup of Chicken Stalk mixed with the rema<strong>in</strong><strong>in</strong>g orange juice<br />
and pour half <strong>in</strong>to each hen.<br />
17. Repeat the above for each hen.<br />
55
Prepp<strong>in</strong>g the 8-<strong>in</strong>-1 Multi-Purpose Cooker<br />
1. Press Function 6 times (or as many times as needed) follow<strong>in</strong>g the light<br />
til it illum<strong>in</strong>ates the Grill Function which can also be used to roast.<br />
2. Once Grill Function is illum<strong>in</strong>ated the light will cont<strong>in</strong>ue to flash lett<strong>in</strong>g you<br />
at you may still adjust the time and temperature. To do so follow the<br />
<strong>in</strong>structions bellow:<br />
a. Press Time/Temp Button once to change time, the default time is 30 m<strong>in</strong>utes,<br />
press Increase (+) on the Control Panel to move the time up to 1 hour.<br />
b. After chang<strong>in</strong>g time you may now press the Time/Temp button once more to<br />
adjust the temperature to 302°F by press<strong>in</strong>g Decreas<strong>in</strong>g (-) on the Control Panel.<br />
3. Once you have set the time and temperature, pour the vegetables and<br />
potatoes <strong>in</strong>to the bottom of the cooker and place the Steam<strong>in</strong>g Rack<br />
top side fac<strong>in</strong>g down.<br />
4. Take the slices of lemon and lay them on the Steam<strong>in</strong>g Rack mak<strong>in</strong>g a<br />
bed for the hens.<br />
5. Place hens on bed of lemons and spread the rema<strong>in</strong><strong>in</strong>g 4-6 cloves of<br />
garlic around the Steam<strong>in</strong>g Rack.<br />
6. Press Start button to allow the cooker to heat up and now you’re ready to<br />
start cook<strong>in</strong>g!<br />
7. When the time is up the cooker will automatically turn off. At this time<br />
us<strong>in</strong>g a meat a thermometer <strong>in</strong>sert along the breast be<strong>in</strong>g careful<br />
not to puncture the cavity, and the meat should read 180°F<br />
lett<strong>in</strong>g you know it is fully cooked through.<br />
NOTE: There will be a lot of juices left over with your vegetables that can<br />
be saved and used to make a soup.<br />
Brown<strong>in</strong>g Hens (Optional)<br />
1. After empty<strong>in</strong>g the Cooker of all content, leave Cooker set to Grill Function.<br />
2. Press Time/Temp Button on Cooker to change time, the default time is 30<br />
m<strong>in</strong>utes, press Decrease (-) on the Control Panel to move the time to 5-6<br />
m<strong>in</strong>utes.<br />
3. Press Start Button to allow the cooker to heat up.<br />
4. Once the cooker has heated place hens breast-side down and allow them<br />
to brown for about a m<strong>in</strong>utes, cont<strong>in</strong>ue to turn the hens till desired brown<strong>in</strong>g<br />
is reached.<br />
Bon Appetite<br />
56
57<br />
Scan QR Code to<br />
Watch Cook<strong>in</strong>g Video<br />
https://youtu.be/E_C8MWJpjg8<br />
Steak<br />
Fajitas<br />
Serves: 6 people Prep Time: 15 m<strong>in</strong>utes<br />
Serv<strong>in</strong>g size: 2 fajitas per person Cook time: 20 m<strong>in</strong>utes<br />
Ingredients<br />
1 1/2 Pound of Top Round Beef cut <strong>in</strong>to Strips<br />
3 Whole Peppers (green, red, yellow)<br />
1 Whole White Onion<br />
6 oz. Baby Bella Mushrooms Sliced and R<strong>in</strong>sed<br />
1/4 Cup of Cook<strong>in</strong>g W<strong>in</strong>e<br />
2 Tsp Butter<br />
2 tsp Fajita Season<strong>in</strong>g<br />
2 tsp Onion Powder<br />
1 Tbl Fresh M<strong>in</strong>ced Garlic<br />
A P<strong>in</strong>ch of Cum<strong>in</strong> (½ tsp)<br />
Salt<br />
Pepper<br />
Guacamole<br />
Shredded Cheese<br />
Salsa<br />
Tortillas<br />
Prepp<strong>in</strong>g your meal<br />
1. Cut top round beef <strong>in</strong>to even strips.<br />
2. Slice onions and peppers <strong>in</strong>to even strips.<br />
3. R<strong>in</strong>se and cut Baby Bella mushrooms <strong>in</strong>to even slices.
4. M<strong>in</strong>ce about 2-3 cloves of fresh garlic.<br />
5. Season meat (be sure to evenly spread out the season<strong>in</strong>g mak<strong>in</strong>g sure<br />
that all the steak is equally coated)<br />
Cook<strong>in</strong>g the Fajitas<br />
Sett<strong>in</strong>g up 8-<strong>in</strong>-1 Multi-Purpose Cooker<br />
1. Press Function 3 times (or as many times as needed) follow<strong>in</strong>g the light<br />
till it illum<strong>in</strong>ates the Stir-Fry Function.<br />
2. Once the Stir-Fry Function is illum<strong>in</strong>ated the light will cont<strong>in</strong>ue to flash<br />
lett<strong>in</strong>g you know that you may still adjust the time and temperature. To<br />
do so follow the <strong>in</strong>structions bellow:<br />
a. Press Time/Temp Button once to change time the default time is 15 m<strong>in</strong>utes, press<br />
Increase (+) on the Control Panel to <strong>in</strong>crease the time to 20 m<strong>in</strong>utes.<br />
b. After chang<strong>in</strong>g time you may now press the Time/Temp button once more to adjust<br />
the temperature, but <strong>in</strong> this recipe the default temperature of 464°F is perfect.<br />
3. Press Start Button to allow the cooker to heat up and now you are ready<br />
to start cook<strong>in</strong>g!<br />
Cook<strong>in</strong>g<br />
4. Place two tablespoons of butter <strong>in</strong>side the Nonstick Cook<strong>in</strong>g Pot and<br />
spread it around with a wooden spoon to avoid scratch<strong>in</strong>g the nonstick surface.<br />
5. Place a tablespoon of garlic and the white onion <strong>in</strong> the Nonstick Cook<strong>in</strong>g<br />
Pot with the butter and let it sit for a m<strong>in</strong>ute, stirr<strong>in</strong>g occasionally.<br />
6. Now place steaks <strong>in</strong> Nonstick Cook<strong>in</strong>g Pot to sear them, spread the<br />
steaks around cover<strong>in</strong>g the entire Cook<strong>in</strong>g Pot and let them sit for 1-2 m<strong>in</strong>.<br />
7. Once the steaks have seared on one side flip and allow the other side to<br />
sear as well.<br />
8. After steaks have been seared, add <strong>in</strong> the Baby Bella mushrooms.<br />
9. Add <strong>in</strong> the cook<strong>in</strong>g w<strong>in</strong>e, enough to coat everyth<strong>in</strong>g <strong>in</strong> the Nonstick Cook<strong>in</strong>g Pot.<br />
10. Add <strong>in</strong> the peppers.<br />
11. Place Glass Lid on the Cook<strong>in</strong>g Pot and cook for 5-6 m<strong>in</strong>utes.<br />
12. Remove Glass Lid by the handle and place Steam<strong>in</strong>g Rack with top side<br />
up on the Cook<strong>in</strong>g Pot’s four marked grooves, then place tortillas on<br />
the Steam<strong>in</strong>g Rack. As fajitas are cook<strong>in</strong>g, the ris<strong>in</strong>g steam will warm<br />
the tortillas. Steam each tortilla for 20-30 seconds.<br />
13. Now your fajitas and tortillas are done, if time has not run out yet press<br />
the Stop Button to turn off Cooker.<br />
Bon Appetite<br />
58
59<br />
Scan QR Code to<br />
Watch Cook<strong>in</strong>g Video<br />
https://youtu.be/hYgaoz9H5d8<br />
Simple<br />
Pot Roast<br />
Serves: 4 people Prep Time: 20 m<strong>in</strong>utes<br />
Cook<strong>in</strong>g Time: 2-4 hours<br />
Ingredients<br />
2 ½ Pounds of Chuck Roast Boneless Meat<br />
1 Whole White Onion<br />
8 oz. Whole Baby Bella Mushrooms<br />
24 oz. F<strong>in</strong>gerl<strong>in</strong>g Medley Potatoes<br />
1 Cup Beef Stalk<br />
1/4 Cup Cook<strong>in</strong>g W<strong>in</strong>e<br />
2 Tsp Worcestershire Sauce<br />
2 Sprigs of Rosemary<br />
4 Sprigs of Thyme<br />
1 Tsp Herbed Garlic Butter<br />
2 tsp Onion Powder<br />
2 tsp Garlic Powder<br />
Salt<br />
Pepper<br />
Meal Prep<br />
1. Dice 1 Whole White Onion<br />
2. 8 oz. Whole Baby Bella Mushrooms<br />
3. F<strong>in</strong>gerl<strong>in</strong>g Potatoes Halved<br />
4. 2 Sprigs of Rosemary Cut <strong>in</strong> Half<br />
5. 4 Sprigs of Thyme Cut <strong>in</strong> Half
Meat Season<strong>in</strong>g<br />
1. Spread 1 tsp of onion powder evenly on each side of the meat.<br />
2. Spread 1 tsp of garlic powder evenly on each side of the meat.<br />
3. Salt and Pepper on each side of the meat.<br />
Cook Meal<br />
Sear the Meat<br />
1. Plug <strong>in</strong> 8-<strong>in</strong>-1 Multi-Purpose Cooker<br />
2. Press Function 6 times (or as many times as needed) follow<strong>in</strong>g the light<br />
till it illum<strong>in</strong>ates the Grill Function.<br />
a. The Function Light flashes lett<strong>in</strong>g you know that you can adjust time and temperature.<br />
b. To adjust time press Time/Temp Button once, the default time is 30 m<strong>in</strong>utes change<br />
it to 6 m<strong>in</strong>utes by press<strong>in</strong>g the Decreased (-) Button.<br />
c. To adjust temperature press Time/Temp Button once more, the default temperature<br />
is 464°F which work for this recipe.<br />
3. Press Start Button to heat up the Cooker.<br />
4. Add 1 Tsp of Herbed Butter to the Nonstick Cook<strong>in</strong>g Pot and spread it<br />
around with a wooden spoon.<br />
5. Once Cooker is heated, place meat <strong>in</strong> the Nonstick Cook<strong>in</strong>g Pot and let it<br />
sit without mov<strong>in</strong>g for 3 m<strong>in</strong>utes.<br />
6. After 3 m<strong>in</strong>utes, flip the meat to sear on the other side for the last 2-2 1/2 m<strong>in</strong>.<br />
Slow-Cook<br />
1. Once cooker turns off, Press Function Button until Slow Cook Function<br />
light illum<strong>in</strong>ates.<br />
a. Adjust time by press<strong>in</strong>g Time/Temp Button once, default time is 6 hours, press the<br />
Decrease (-) Button until 2 hours is displayed.<br />
b. Adjust temperature by press<strong>in</strong>g Time/Temp Button once more, default temperature<br />
is 212ºF, press Increase (+) Button until 302°F is displayed.<br />
2. Pour <strong>in</strong> diced white onion.<br />
3. Add whole Baby Bella Mushrooms.<br />
4. Pour 1 cup of Beef Stalk, 1/4 cup of cook<strong>in</strong>g w<strong>in</strong>e and 2 Tsp of Worcestershire<br />
sauce.<br />
5. Place Glass Lid on Cooker and press the Start Button.<br />
6. Once Timer runs out, remove meat and potatoes lett<strong>in</strong>g meat rest before cutt<strong>in</strong>g.<br />
Mak<strong>in</strong>g Gravy<br />
1. Add 1-2 Tsp of Flour, mix<strong>in</strong>g constantly till sauce thickens <strong>in</strong>to a gravy.<br />
2. Once sauce thickens you may now carve the meat and pour the gravy on top.<br />
Bon Appetite<br />
60
-------------------Troubleshoot<strong>in</strong>g-------------------<br />
Problem Possible Cause Solution<br />
Cooker is not turn<strong>in</strong>g on • The power outlet might • Use another power outlet.<br />
not have any power.<br />
• Plug the Power Cord to the<br />
• The Power Cord is plugged <strong>in</strong> wrong. Cooker with the Lip fac<strong>in</strong>g down.<br />
Food is undercooked • The wrong Function or temperature may • Make sure you use the correct<br />
have been used.<br />
Function, temperature and<br />
• The power may have been <strong>in</strong>terrupted. Cook<strong>in</strong>g time for your recipe.<br />
• The Lid may have been improperly placed • If the power was <strong>in</strong>terrupted<br />
on the Cook<strong>in</strong>g Pot.<br />
and you don’t know for how long,<br />
• The power wattage <strong>in</strong> your home might be discard the food.<br />
different.<br />
• Make sure the Lid is placed evenly<br />
• Lid might have been removed too many on top of the Cook<strong>in</strong>g Pot.<br />
times dur<strong>in</strong>g cook<strong>in</strong>g.<br />
• Keep the Lid closed while roast<strong>in</strong>g<br />
or slow cook<strong>in</strong>g. Every time the Lid<br />
is removed it adds another 15-20<br />
m<strong>in</strong>utes to slow cook<strong>in</strong>g.<br />
Food is over cooked • There may be a difference between your • As you use the Multi-Purpose Cooker<br />
Recipe and the operation of the Multi-Purpose make note of the temperature and time<br />
Cooker sett<strong>in</strong>gs.<br />
it took to cook your favorite recipes.<br />
• Not all appliances cook exactly the same,<br />
these sett<strong>in</strong>g might be different from other<br />
appliances you have used.<br />
The meat was done but • The foods might have been placed improperly • Place the vegetables on the bottom<br />
the vegetables were <strong>in</strong> the Cook<strong>in</strong>g Pot. and sides of the Cook<strong>in</strong>g Pot.<br />
undercooked while slow<br />
• Place the meat on top of the vegetables<br />
cook<strong>in</strong>g<br />
and <strong>in</strong> the center of the Cook<strong>in</strong>g Pot.<br />
If additional assistance is needed, please call our Customer Service at 888-552-0033.<br />
61
---------------Ma<strong>in</strong>tenance and Care---------------<br />
Before clean<strong>in</strong>g any part, make sure the 8-<strong>in</strong>-1 Multi-Purpose Cooker is off,<br />
unplugged and cool. Before mov<strong>in</strong>g or clean<strong>in</strong>g the Cook<strong>in</strong>g Pot, wait until<br />
the hot oil has cooled completely, empty content and wipe down with paper<br />
towel before wash<strong>in</strong>g for easy clean<strong>in</strong>g. Do NOT use steel wool scour<strong>in</strong>g<br />
pads or abrasive cleaners to clean any parts. Do NOT immerge Cooker or<br />
Power Cord <strong>in</strong> water.<br />
Wipe Down Outside Wash by Hand with Dishwasher Safe,<br />
Surfaces with Soft Soft Pad and Dry Top Rack ONLY<br />
Damp Cloth and Dry<br />
Do Not leave Particles on Elements<br />
62
We are here to help you!<br />
Warranty ------------------------<br />
1 Year Limited Warranty<br />
For service, repair or any questions regard<strong>in</strong>g your appliance please<br />
contact our Customer Service at 888-552-0033.<br />
• This appliance has a 1 Year Limited Warranty from the orig<strong>in</strong>al date of<br />
purchase with proof of purchase.<br />
• Save your receipt as proof of date purchased.<br />
• This applies to the orig<strong>in</strong>al person who purchased the appliance and it is<br />
not transferable to a third party user.<br />
• Repairs and replacements of defective parts are at the seller’s discretion.<br />
• In the event that repairs aren’t possible, the seller will replace the product or part.<br />
• If product replacement or repair is not acceptable, the seller has the<br />
option of refund<strong>in</strong>g the cash value for the appliance or part returned.<br />
Th<strong>in</strong>gs NOT covered under this warranty<br />
• Normal wear and tear from us<strong>in</strong>g the appliance<br />
• Accidental negligence<br />
• Damage from misuse, abuse or neglect of appliance<br />
• Us<strong>in</strong>g appliance for other th<strong>in</strong>gs than its <strong>in</strong>tended use<br />
• Repair of appliance by unauthorized parties<br />
• Any modification done to the orig<strong>in</strong>al appliance<br />
• Damage from commercial use of the appliance<br />
• Appliances used or serviced outside the country of purchase<br />
• Shipp<strong>in</strong>g and handl<strong>in</strong>g costs associated with the replacement of the appliance<br />
<strong>Gourmia</strong>’s liability will not exceed the purchase price of the appliance.<br />
63
<strong>Gourmia</strong>.com<br />
This manual conta<strong>in</strong>s the most current <strong>in</strong>formation at the time of pr<strong>in</strong>t<strong>in</strong>g.<br />
<strong>Gourmia</strong> ® reserves the right to modify systems, components and content without notice.<br />
This manual is 100% recyclable.<br />
© 2016 <strong>Gourmia</strong> ® . All Rights Reserved.<br />
<strong>Gourmia</strong> ® is a Registered Trademark of The SteelStone Group.<br />
Products mentioned here<strong>in</strong> are for identification purposes only and<br />
may be registered trademarks or trademarks of their respective<br />
companies. All other brand names, trademarks or registered<br />
trademarks are the property of their respective owners.<br />
We value your bus<strong>in</strong>ess and we are here to help you with any questions or comments you might have.<br />
Please call our Customer Service Department at 888-552-0033.<br />
64


