
You also want an ePaper? Increase the reach of your titles
YUMPU automatically turns print PDFs into web optimized ePapers that Google loves.
curbs or foundations will not<br />
need an edge restraint. Various<br />
types of edging materials can<br />
be used. <strong>Nicolock</strong> recommends<br />
a Snap Edge edge restraint<br />
system since it is easy to install<br />
and will not rot or decay.<br />
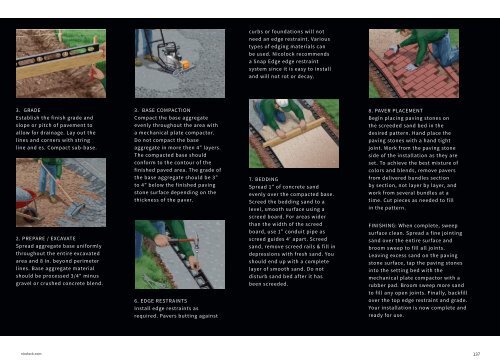
3. GRADE<br />
Establish the finish grade and<br />
slope or pitch of pavement to<br />
allow for drainage. Lay out the<br />
lines and corners with string<br />
line and es. Compact sub-base.<br />
2. PREPARE / EXCAVATE<br />
Spread aggregate base uniformly<br />
throughout the entire excavated<br />
area and 8 in. beyond perimeter<br />
lines. Base aggregate material<br />
should be processed 3/4” minus<br />
gravel or crushed concrete blend.<br />
3. BASE COMPACTION<br />
Compact the base aggregate<br />
evenly throughout the area with<br />
a mechanical plate compactor.<br />
Do not compact the base<br />
aggregate in more then 4” layers.<br />
The compacted base should<br />
conform to the contour of the<br />
finished paved area. The grade of<br />
the base aggregate should be 3”<br />
to 4” below the finished paving<br />
stone surface depending on the<br />
thickness of the paver.<br />
6. EDGE RESTRAINTS<br />
Install edge restraints as<br />
required. Pavers butting against<br />
7. BEDDING<br />
Spread 1” of concrete sand<br />
evenly over the compacted base.<br />
Screed the bedding sand to a<br />
level, smooth surface using a<br />
screed board. For areas wider<br />
than the width of the screed<br />
board, use 1” conduit pipe as<br />
screed guides 4’ apart. Screed<br />
sand, remove screed rails & fill in<br />
depressions with fresh sand. You<br />
should end up with a complete<br />
layer of smooth sand. Do not<br />
disturb sand bed after it has<br />
been screeded.<br />
8. PAVER PLACEMENT<br />
Begin placing paving stones on<br />
the screeded sand bed in the<br />
desired pattern. Hand place the<br />
paving stones with a hand tight<br />
joint. Work from the paving stone<br />
side of the installation as they are<br />
set. To achieve the best mixture of<br />
colors and blends, remove pavers<br />
from delivered bundles section<br />
by section, not layer by layer, and<br />
work from several bundles at a<br />
time. Cut pieces as needed to fill<br />
in the pattern.<br />
FINISHING: When complete, sweep<br />
surface clean. Spread a fine jointing<br />
sand over the entire surface and<br />
broom sweep to fill all joints.<br />
Leaving excess sand on the paving<br />
stone surface, tap the paving stones<br />
into the setting bed with the<br />
mechanical plate compactor with a<br />
rubber pad. Broom sweep more sand<br />
to fill any open joints. Finally, backfill<br />
over the top edge restraint and grade.<br />
Your installation is now complete and<br />
ready for use.<br />
nicolock.com 137