Commercial 2018

Create successful ePaper yourself
Turn your PDF publications into a flip-book with our unique Google optimized e-Paper software.
Recommended adhesive: pressure sensitive, water based acrylate glue, like<br />
Thomsit K 188E, Uzin KE 2000S, or other brand equivalent with these. Apply<br />
the adhesive to the sub-floor and spread evenly using an A2 or A4 trowel<br />
and maintaining the spread rate of approximately 200–250 g/m2. Leave the<br />
adhesive to evaporate completely till it changes color from opaque to transparent<br />
yellow. After approximately 60–90 minutes test it with your finger, and<br />
if the adhesive is not tacky anymore, you can start the laying.<br />
IN CASE OF VINYL SHEET FLOOR COVERINGS<br />
Start to position the folded back flooring sheet onto the adhesive bed. To<br />
ensure good bonding, thoroughly smooth the flooring sheet, working from<br />
the center outwards, with the help of a manual cork rubber, confirming no air<br />
bubbles are trapped underneath. Finally roll the installed flooring using a 50–60<br />
kg roller. Repeat the sequence to install the other half of the flooring sheet. In<br />
order to make site formed coved skirting, draw a line on the wall to mark the<br />
height the coving will reach and fit the capping strip to the wall using contact<br />
adhesive. Attach the cove former in a similar way: using a brush, apply contact<br />
adhesive to the back of the cove former and to the wall up to the capping strip<br />
and leave both to dry. When completely dry, firmly push the vinyl with the cove<br />
former into place and tuck the top edge into the capping strip.<br />
IN CASE OF LVT<br />
LVT planks are to be installed generally parallel to the main light source,<br />
usually this is the longer side. Carefully determine where to begin tile or plank<br />
installation. It is customary to centre rooms and hallways so borders are not<br />
less than half a tile or plank. In hallways and small places it is simpler to work<br />
lengthwise from one end using a centre reference line. Make sure cut edges<br />
are always against the wall.<br />
In case of simple surface pattern, measure the size of the room and mark<br />
the straight starting line of the installation. The distance of the starting line<br />
from the deepest part of the wall should be minimum the width of the plank<br />
minus 2-3 cm, or multiple of the width of the plank minus 2-3 cm. Coat the<br />
adhesive on the subfloor with the spatula, coated surface should be max.<br />
3-4 rows at the same time and wait until the adhesive will be dry. Make finger<br />
test! Follow always the instructions of the glue manufacturer. LVT should be<br />
installed by offsetting method. Starting on the starting line, place the LVT<br />
pieces side by side, glue them on the subfloor, and closely fit the edges of<br />
the planks to each other. If the last piece of LVT is longer then needed, mark<br />
and cut the plank installing the cut end next to the wall. The remainder of the<br />
LVT which has been cut off can be used to start the next row as long as it is<br />
minimum 20 cm. If the last piece in the row is a full plank, start the next row<br />
with a cut piece which has minimum 20 cm length, ideal case is to make half<br />
cut piece. Against the wall install cut edge piece. Place each LVT piece tight,<br />
against the adjoining element, and well embed in the adhesive. The next<br />
rows can be started with the pieces cut from the previous rows, minimum<br />
size of these pieces are 20 cm. After gluing roll down well the planks with a<br />
steel roller as well (weight 50-70 kg) in all directions, forward and back and<br />
diagonally. Prepare the skirting at the walls. Skirting can be made from the<br />
same LVT plank or from other plastic or metallic skirting, which is in harmony<br />
with the design of LVT. Use silicone seals between the joints of LVT and<br />
skirting.<br />
WELDING<br />
Welding (in case of sheet vinyl floor coverings) can be performed after no less<br />
than 24–48 hours upon installation, depending on the kind of the applied<br />
adhesive and the adhesive manufacturer’s instructions.<br />
HEAT WELDING<br />
Application of heat welding is mandatory for wet areas and premises with<br />
underfloor heating. When the flooring is ready, the joints should be grooved to<br />
appropriate depth and width either manually, or with a power tool. For foam<br />
backed vinyl floorings the joints should be grooved to the depth of the upper<br />
(outer) layer; for firm dense surfaces the joints should be grooved to the 2/3 of<br />
the profile; the recommended groove width is 2–3 mm. The joints should be<br />
thoroughly cleaned from any debris. Use ø 4 mm GraboWeld welding rod for<br />
heat welding of the commercial vinyl floorings. Set the working temperature<br />
of the heat welding gun to approximately 300–400 C°. The welding can be<br />
carried out with the help of an automatic appliance or with a hand-operated<br />
welding set. Before starting the procedure, trial welding is recommended in order<br />
to set the optimal welding temperature and speed. After the welding seam<br />
has cooled down, remove the excessive welding rod in two steps. First cut off<br />
the top half of the welding rod using a quarter moon knife. After the remaining<br />
weld has cooled to the room temperature, perform the final trim.<br />
HEAT WELDING IN THE CORNERS<br />
From the perspective of the flooring external and internal corners are distinguished.<br />
Fitting of welds in internal corners can be performed in two ways: either<br />
by precision cutting and subsequent silicon filling of the seam, or by „halfrod”<br />
welding. In the latter case, the welding rod cut-offs from the first trim can<br />
be used to fill in the vertical seams by pressing them into the vertical grooves<br />
with the rounded side down and then applying heat coagulation to the joints.<br />
The excess welding rod should be trimmed off. It is recommended to pre-heat<br />
the coves before welding the joints. Precision cutting is important for external<br />
corners as well. Corner welding should be performed with a welding rod.<br />
COLD WELDING<br />
Cold welding is another common technique used for the installation of commercial<br />
PVC floorings. This method ensures quick seam closing and is especially<br />
suitable for chip floors and all-over surfaces, as it produces an integral<br />
seamless covering for large areas.<br />
The cold welding technique consists of four steps:<br />
1. Place the PVC flooring strips so as they overlap for approximately 3–5<br />
cm. Cut the sheets lengthwise along a metal rule and remove the cut-off<br />
waste from both the top and the bottom layer.<br />
2. Center the masking paper tape over the closely cut joints of the PVC<br />
strips and press it on tightly with a roller to stop the cold welding paste<br />
from sneaking while being filled into the joint.<br />
3. Cut through the masking tape simply and firmly along the seam with a<br />
circular cutter (or a trapezoid blade).<br />
4. Thoroughly shake up the tube with the cold welding paste. Press the nozzle<br />
of the cold welding paste tube deeply into the joint with one hand and<br />
pull the tube along the joint. Use your other hand to dose the cold welding<br />
paste so that an approximately 5 mm wide line appears on the surface<br />
of the masking tape. Allow bonding for ten minutes and then remove the<br />
masking tape. The result is an almost invisible waterproof seam.<br />
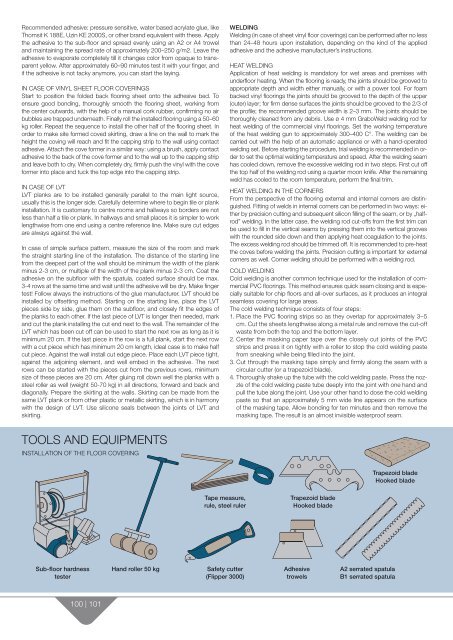
TOOLS AND EQUIPMENTS<br />
INSTALLATION OF THE FLOOR COVERING<br />
Trapezoid blade<br />
Hooked blade<br />
Tape measure,<br />
rule, steel ruler<br />
Trapezoid blade<br />
Hooked blade<br />
Sub-floor hardness<br />
tester<br />
Hand roller 50 kg<br />
Safety cutter<br />
(Flipper 3000)<br />
Adhesive<br />
trowels<br />
A2 serrated spatula<br />
B1 serrated spatula<br />
100 | 101