Create successful ePaper yourself
Turn your PDF publications into a flip-book with our unique Google optimized e-Paper software.
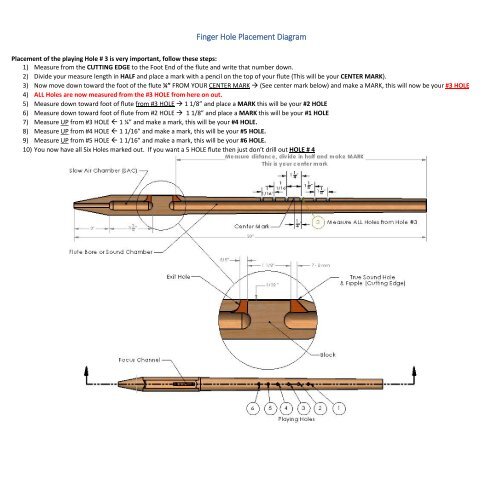
Finger Hole Placement Diagram<br />
Placement <strong>of</strong> <strong>the</strong> playing Hole # 3 is very important, follow <strong>the</strong>se steps:<br />
1) Measure from <strong>the</strong> CUTTING EDGE to <strong>the</strong> Foot End <strong>of</strong> <strong>the</strong> flute and write that number down.<br />
2) Divide your measure length in HALF and place a mark with a pencil on <strong>the</strong> top <strong>of</strong> your flute (This will be your CENTER MARK).<br />
3) Now move down toward <strong>the</strong> foot <strong>of</strong> <strong>the</strong> flute ¼” FROM YOUR CENTER MARK (See center mark below) and make a MARK, this will now be your #3 HOLE<br />
4) ALL Holes are now measured from <strong>the</strong> #3 HOLE from here on out.<br />
5) Measure down toward foot <strong>of</strong> flute from #3 HOLE 1 1/8” and place a MARK this will be your #2 HOLE<br />
6) Measure down toward foot <strong>of</strong> flute from #2 HOLE 1 1/8” and place a MARK this will be your #1 HOLE<br />
7) Measure UP from #3 HOLE 1 ¼” and make a mark, this will be your #4 HOLE.<br />
8) Measure UP from #4 HOLE 1 1/16” and make a mark, this will be your #5 HOLE.<br />
9) Measure UP from #5 HOLE 1 1/16” and make a mark, this will be your #6 HOLE.<br />
10) You now have all Six Holes marked out. If you want a 5 HOLE flute <strong>the</strong>n just don’t drill out HOLE # 4


