
Create successful ePaper yourself
Turn your PDF publications into a flip-book with our unique Google optimized e-Paper software.
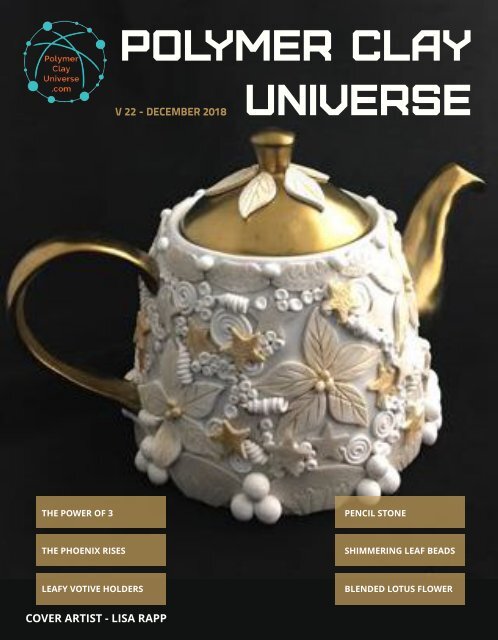
POLYMER c l a y<br />
V 22 - DECEMBER 2018<br />
u n iv e r s e<br />
THE POWER OF 3<br />
PENCIL STONE<br />
THE PHOENIX RISES<br />
SHIMMERING LEAF BEADS<br />
LEAFY VOTIVE HOLDERS<br />
BLENDED LOTUS FLOWER<br />
COVER ARTIST - LISA RAPP
TABLE OF CONTENTS<br />
Meet Lisa Rapp<br />
3<br />
Pencil Stone - Suzanne Ivester<br />
5<br />
The Power of 3 - Kira McCoy<br />
7<br />
The Phoenix Rises - Cindi McGee<br />
10<br />
39<br />
The Best Time for Leaf Beads - Klio Tsaliki<br />
13<br />
Blended Lotus Flower - Panarili<br />
19<br />
Leafy Place Card Candle Holders - Sandy Huntress<br />
21<br />
Gallery<br />
23<br />
SALESSTART<br />
DECEMBER 2nd!<br />
w w w.PassionforPolym er.com<br />
cel ebr at ing pol ymer cl ay, mixed-media, and mor e!
FEATURED ARTIST<br />
Meet Cover Artist<br />
Lisa Rapp<br />
What influences your designs?<br />
I'm inspired by so many things! I love to peruse art<br />
museums, travel and experience nature. I enjoy sewing<br />
and am often inspired by a fabulous textile design.<br />
Sometimes its just the shape of a fun teapot I've picked<br />
up at a thrift store, or the giant catalpa leaves dropping in<br />
my backyard. Color is always a very important<br />
consideration for me as well.<br />
Tell us about your favorite style/design technique.<br />
I like to think I'm constantly evolving. A favorite<br />
technique today might be my least favorite by next<br />
year. I do enjoy working with alcohol inks, mica<br />
powders, color combinations and challenging myself to<br />
use every last scrap of an interesting veneer. I try to<br />
keep learning new things to do with clay and like to<br />
make things that are utilitarian as well as beautiful.<br />
Which artist(s) inspire your creativity?<br />
I come from a family of artists, so I guess I have to<br />
start there. My dad was an accomplished painter,<br />
photographer and illustrator.<br />
As far as clay artists I'd have to say I've been very<br />
inspired by all the wonderful artists I've met through all<br />
of the online groups I've been part of, as well as the<br />
fabulous experience of attending<br />
IPCA Synergy last year and<br />
meeting so many inspirational<br />
artists in person.<br />
FB:<br />
https://www.facebook.com/higirlsdesigns/<br />
Etsy shop:<br />
https://www.etsy.com/shop/HiGirls<br />
3
4<br />
The 2019 Polymer Clay Adventure offers more than ever<br />
before! Join our guided tour through amazing workshops<br />
from artists around the world, bonus content, a private<br />
interactive group, swaps, giveaways and more!<br />
Payment plan now available!<br />
w w w.polym erclayadvent ure.com
"PENCIL STONE"<br />
Creat e St one-Like Effect s w it h<br />
Wat ercolor-Pencil Shavings<br />
THEPOLYMER<br />
CHEF<br />
Watercolor pencils are a unique and versatile art medium.<br />
Many of us have used them as an exciting means of creating<br />
complex works of art by bridging the gap between drawing<br />
and painting. In the past, I?ve used them to apply color to<br />
polymer clay surfaces, but this is the first time I?ve tried to<br />
incorporate the pencils?wood shavings into the clay along with<br />
the pigments. The colors, when spritzed with alcohol, behave<br />
much like alcohol inks, and the bits of wood add texture to<br />
faux-stone recipes. So dig out those old pencils--you know you<br />
still have them somewhere--and start experimenting!<br />
A Monthly "Recipe" for Amazing<br />
Polymer Projects<br />
By SUZANNE IVESTER<br />
5
About brands and amounts of pencil shavings -<br />
The two brands of watercolor pencils I tried are Prismacolor and Derwent Inktense. Both brands work well, but they yield<br />
quite different results and require different amounts of shavings. The Inktense pencils, as the name implies, have much<br />
more-saturated pigments than the Prismacolor pencils. When I tried the Inktense, I used 1/4 tsp. of shavings (from Violet,<br />
Fuchsia, and Shiraz pencils) and the beads turned out much darker than the beads shown here. I didn?t care much for the<br />
color, so I tried the same amount of the Prismacolor shavings (Violet, Lilac, and Mulberry) and the color was much lighter.<br />
In fact, I decided it was too light, so I added another 1/4 tsp. of shavings, for a total of 1/2 tsp. About 5 twists of each of<br />
three pencils (a total of 15) in my sharpener added up to about 1/4 tsp.<br />
To summarize: If you?re using Derwent Inktense pencils, start with about 3 twists of each pencil (about 1/8 tsp.). If you?re<br />
using Prismacolor, start with about 10 twists (3/8 - 1/2 tsp.). If the color is too light, you can always add more, but it?s<br />
harder to add more clay to lighten a too-dark color.<br />
Ingredients and Special Tools<br />
1/4 pkg. Premo! Sculpey® Effects Gray Granite polymer clay<br />
1/4 pkg. Premo! Sculpey® Effects Translucent polymer clay<br />
1/4 tsp. ultrafine black or slate-colored holographic glitter<br />
Watercolor pencils, 3 compatible colors<br />
Spray bottle containing isopropyl alcohol<br />
Clean pencil sharpener that collects shavings<br />
Very small zipper locking bag<br />
Deli sheets<br />
Stiff brush, like a clay-dedicated toothbrush<br />
Instructions<br />
1. Blend the Gray Granite and Translucent clays. Roll to a thin<br />
sheet.<br />
2. Sprinkle the glitter over the surface, fold the sheet with the<br />
glitter inside, and roll through the pasta machine again until the<br />
glitter is well-blended.<br />
3. Shave the pencils with the pencil sharpener, collecting the<br />
shavings. Transfer the shavings to the zipper lock bag. Crush<br />
the shavings inside the bag with your fingers until the wood<br />
pieces are broken up into small bits. Measure the amount of<br />
shavings you want to use and sprinkle them across the thin<br />
sheet of clay.<br />
4. Spritz the surface of the sheet with alcohol and watch the colors bloom! Brush the colors in streaks across the clay. You<br />
may want to add more glitter at this time (optional). Let the alcohol dry.<br />
5. Fold the clay with the shavings and the extra glitter inside. Place the clay between two deli sheets to run through your<br />
pasta machine. This will keep your rollers from turning purple if the tinted alcohol isn?t completely dry!<br />
6. Roll the clay to a thin sheet, which will be the veneer you?ll use to cover your beads and other objects. I suggest using<br />
white clay as a base under the veneer to highlight the variations of sheer color.<br />
Yield<br />
I made all the focal pieces and beads in this necklace and had enough veneer left to make several<br />
more beads.<br />
Variations<br />
If you?re not into purple, you can use the same technique with other color families. Think about red,<br />
orange, yellow; blue, green, turquoise; black, brown, rust. You can also use a different color of glitter.<br />
6<br />
http://thepolymerchef.blogspot.com
T h e pow er o f 3<br />
A "Recipe" for Design Harm ony<br />
By KIRA MCCOY<br />
When you sit down to create something you may want to have a goal in mind. You may ask<br />
yourself first - what colors should I use? This is a great question and a good place to start.<br />
The next question you may have is about shape - what shapes should I use? How many?<br />
There are ?principles? of design that can help you with this. Harmony is a big one - it means that<br />
all of your parts and pieces are working together as a whole and they make your artwork<br />
instinctively look ?good? to most people. So what exactly does ?harmony? mean, and how do you<br />
achieve it?<br />
Harmony can be described as sameness, the belonging of one thing with another. The repetition of design elements like<br />
color, texture, shape and form is one of the easiest ways to achieve harmony to create a composition.<br />
But don?t fall into a common misconception- ?sameness? in this instance does not mean SAME. It means SIMILAR.<br />
So in order to explain this better, let?s break it down to a very basic rule you can use. Try using three of something ?similar?<br />
in your designs. Three colors, three shapes, three types (for example if you are making jewelry, three types of beads.) If<br />
you are making something with a pattern or cane work on it, 3 types of canes.<br />
Three is an excellent number in design. It has enough variation to make something look interesting, without looking too<br />
crazy or too boring. It can be very balanced because it is only one more than two.<br />
How would this work, for example, in a piece of jewelry? Let?s say you would like to create a simple bracelet. These are<br />
made around a soda can, and each of them has been a free video tutorial on PolymerClayTV?s YouTube channel. While I<br />
design something, I don?t really think hard about this harmony principle because I have had a lot of practice. So now I?ll<br />
explain each one so you can start to understand.<br />
In the yellow bracelet, I have chosen yellow as a base color.<br />
Pink and orange are harmonious additions because they are<br />
analogous on the color wheel. This means they are next to<br />
each other with no colors in between. You can almost never<br />
go wrong when you design with analogous colors.<br />
For the shapes and other design elements, there are also<br />
three! There is one<br />
texture in the<br />
yellow part,<br />
another in the<br />
orange part, and<br />
the rolled snakes<br />
of pink are<br />
smooth. This<br />
provides a visual<br />
play back and<br />
forth between<br />
textured and<br />
smooth, and is<br />
varied enough to<br />
create some<br />
interest, while<br />
similar enough to<br />
remain harmonious.<br />
7
This cuff is ?faux leather.? So the base color is a dark<br />
brown matte clay with texture. The addition of a<br />
silkscreened design in a metallic dark brown gives a<br />
little visual contrast and harmony- it is similar without<br />
being exactly the SAME.<br />
A second color, purple, is used to create a little visual<br />
?pop? on top and inside the band, and the third color is<br />
metallic gold. This is harmonious with the metallic<br />
pattern, and is also a complimentary color to the purple.<br />
Complimentary colors are across from each other on<br />
the color wheel, and are always harmonious.<br />
For shape and texture, we can see the large band is slightly textured, the<br />
purple band has a pattern of dots, and the flowers are metallic gold. Just enough again with three patterns and shapes to<br />
remain simple, yet look interesting.<br />
This is a Crabby?s Ginger Beer bottle covered in clay.<br />
We can see the same harmony ideas being used here.<br />
The main color is wasabi green, with a pretty version of<br />
lilac (see the purple/yellow compliments being used<br />
again?) and a third color, turquoise, is introduced.<br />
Turquoise, lilac, and yellow-green are very close to a<br />
split-compliment color scheme, where instead of using<br />
the color directly across on the wheel, you use ones on<br />
either side of it. You can play around with this idea to<br />
find colors that look nice together.<br />
The design has three textures created by silkscreening<br />
with a metallic paint, matte molded shapes, and glossy<br />
fabric paint. The<br />
shapes of the<br />
molds echo the<br />
pattern of the<br />
silkscreen,<br />
without being<br />
exactly the<br />
same.<br />
Try using this principle of three in your next designs, and see how it helps you to create harmonious projects using three<br />
colors, three patterns, and three shapes.<br />
8
a Special Pr oduct<br />
col l ect ion f or al l your<br />
Magical cr af t ing needs!<br />
Cr eat e Jewel s + Baubl es,<br />
f air y door s + Houses +<br />
f air y gar den accessor ies!<br />
Text ur es, Sil kscr eens,<br />
hol ogr aphic f il ms + Fiber s,<br />
cabochons, met al f oil s,<br />
shape cut t er s,<br />
r ubber st amps +<br />
Mor e!<br />
www.Diyf air y.com<br />
Necklace & Succulent Jar by Sandra Pflug. Mushroom Door by Aoife Smyth Murphey<br />
9
A monthly project tutorial featuring a<br />
wide variety of techniques. My<br />
motto is "Dare to be Different," and I<br />
never know which direction my muse<br />
will take me in!<br />
Behind TheseEyes<br />
By CINDI MCGEE<br />
THE PHOENIX RISES<br />
In Greek mythology, a phoenix is a long-lived bird that cyclically regenerates or is otherwise born again. Associated<br />
with the Sun, a phoenix obtains new life by arising from the ashes of its predecessor. The phoenix seemed like the<br />
perfect option for my project this month, since our theme is Lotus/Rebirth!<br />
10
MATERIALS:<br />
Premo! Sculpey® Accents® - Twinkle Twinkle (black sparkle), Sunset Pearl<br />
Premo! Sculpey® - Orange, Cadmium Red Hue<br />
Pardo Viva Decor Jewellery Clay - Topaz<br />
Round clay cutter set<br />
CreateAlong.com bird clay cutter<br />
Makin?s Professional® Ultimate Clay Extruder® and multi-hole disc<br />
Wing rubber stamp (or wing mold, or template to trace)<br />
Sculpey® Bake & Bond Adhesive<br />
Sphere tool<br />
Clay blade<br />
Craft knife<br />
Clay roller<br />
DecoArt® Metallic Lustre? - Gold<br />
Condition and roll Topaz clay to about 1/8?<br />
thick. Use bird cutter to cut bird from rolled<br />
clay.<br />
Use uninked wing stamp to gently add a<br />
feather pattern to the bird?s body. Use craft<br />
knife to cut wings from bird. Set aside.<br />
Create a blend for the wings and tail feathers. I<br />
only needed a small amount, so I rolled cylinders about 1/4? in diameter of the Sunset Pearl,<br />
Orange, Cadmium Red Hue and Topaz clay about 1 1/2? long.<br />
Place them adjacent to each other in the order you desire. Use clay roller to begin to flatten<br />
the cylinders. Flatten to about 1/8? then fold in half as shown, trying to align the ends as<br />
straight as possible, and roll again. Continue rolling and folding until the colors are blended as<br />
desired.<br />
If using a stamp, gently impress the wing (uninked) into the<br />
blended clay. Use a craft knife to cut around the stamp image. If<br />
using a mold, carefully mold a wing with the blended clay sheet. If<br />
you do not have a stamp or a mold, you can free form cut a wing,<br />
or even print a template to use with a craft knife.<br />
11
Insert the remaining blended clay into extruder. Use multi-hole disc to extrude<br />
blended clay strands.<br />
Add a touch of bake & bond and mount the wing to the<br />
bird, trimming as necessary to the size you like.<br />
Roll Twinkle Twinkle (black sparkle) clay to about 1/4?,<br />
determine size of circle cutter needed to create a base for<br />
your phoenix and cut from black clay.<br />
Add a touch of bake & bond and mount bird body to base<br />
disc. Begin adding extruded strands of blended clay to<br />
embellish the tail and create a cascading effect. I let the<br />
ends of my strands curl for added interest. I also added<br />
strands to the tip of the wing.<br />
Add a tiny ball of red clay for the eye.<br />
Use sphere tool to soften the edges of the black<br />
disc, and the edges of the bird and wing.<br />
Bake according to manufacturer instructions.<br />
Let cool.<br />
Use fingertip to apply a light touch of Metallic<br />
Lustre to highlight the edges and textures.<br />
Roll additional black clay sheet about 1/8?<br />
thick. To create a bail, use small circle cutter to cut a disc, fold in half, and<br />
mount to top of pendant with a space between the disc and the pendant.<br />
Bake according to<br />
manufacturer instructions.<br />
Let cool.<br />
Add a touch of Metallic<br />
Lustre around the edges of<br />
the bail. Add gold satin<br />
cording and closure.<br />
www.CindiMcGeeBehindTheseEyes.blogspot.com<br />
https:/ / www.etsy.com/ shop/ CindiMcGeeDesigns<br />
12
The Best Time for Leaf Beads<br />
By<br />
KLIO TSALIKI<br />
Christmas is just around the corner. It is time to decorate our space, garlands, lights and baubles are all over! People give<br />
and receive presents, everybody is in a holiday mood! And there are festive jewelry around, with Christmas trees and so<br />
on.<br />
This tutorial will show you how to create leaf shaped beads which you can use either for decorative or jewelry purposes.<br />
You will need:<br />
Tools:<br />
· Pasta machine<br />
· Texture mats<br />
· Rigid blade<br />
· A glass bottle or jar<br />
· Tweezers (optional)<br />
· Leaf shaped cookie cutters<br />
Materials:<br />
· Polymer clay in metallic or pearl hues (like Premo! Sculpey® Accents® colors, Cernit® metallics, etc.)<br />
· Deli paper<br />
· Scrap clay<br />
· Baby talc 13
Condition your scrap clay and make it a thick snake. Depending on the size of the leaves you want to make, you will cut<br />
equal size pieces from this snake to make the core of the beads. Let the scrap clay snake aside until you are ready to<br />
use it.<br />
Select some of your favorite metallic colors and make a skinner blend out of them. You<br />
need to use metallic or pearl since these leaves will be made using the Mica shift<br />
technique. Remember the ?golden rule? of making a Skinner blend, and it is called<br />
Rainbow! Put the colors in a ?natural order?, which<br />
means yellow>orange>red>purple>blue>green<br />
etc. This way colors are blending with their closest<br />
relative ones, giving more hues to the final sheet<br />
and avoiding ugly and dark or undesired colors as<br />
well.<br />
You will need a medium thickness sheet, so run<br />
your final Skinner blend through your pasta<br />
machine at setting #2 or 3# or even thinner.<br />
Select among your texture sheets some which could give the ?leaf? look to your<br />
beads. These texture sheets carry patterns which can represent the natural look of the leaves, or give this impression as<br />
well: If you have leaf patterned texture mat, use it!<br />
Apply some baby talc on your clay sheet, which will prevent the texture mat to stick on<br />
the clay and helps to remove it from the clay easily.<br />
Place on your clay sheet the texture mat and roll it over with your rolling pin to impress<br />
well and deeply the texture.<br />
Here is the imprinted clay sheet I made for my leaves. I used all kinds of metallic<br />
colored clay and pearly as well. I used Premo Accents for the green, peacock and<br />
purple hues, Cernit Shiny for the red part and Cernit Metallic hues for the cloudy<br />
colored right part. Premo gold was used for the left side golden part.<br />
You can also use any color you like mixed with the correspondent pearl hues to get a<br />
more metallic effect as well. Pearl colors also give very nice mica shift technique<br />
results.<br />
Place your textured clay sheet on a<br />
bottle and press it slightly to stick on<br />
the glass. This will help you shave the<br />
lifted parts of the texture. You can<br />
either place the bottle on a towel or<br />
something which will prevent the bottle<br />
to roll or hold the bottle against your<br />
body and start shaving.<br />
Shave little by little, move your blade<br />
carefully so that you cut more or less<br />
slices of equal thickness.<br />
Continue shaving the entire sheet.<br />
Remove carefully the shaved sheet off the bottle and place it between two pieces of<br />
paper.<br />
With your rolling pin roll over the paper to smooth the remaining texture of the shaved<br />
sheet.<br />
Papers are protecting your sheet, your rolling pin will not stick on the clay and you avoid<br />
transfer of small pieces of the shaved clay as well.<br />
14
Here is the shaved and smoothed clay sheet! It is soft and smooth like silk! And<br />
the imprinted pattern is there, although you have already shaved the lifted parts of<br />
it.<br />
Select a leaf shaped cookie cutter and cut leaf<br />
shapes taking care to include in each shape<br />
more than one of the skinner blend hues.<br />
You will need 2 cut outs for each leaf, so cut in<br />
pairs. Make also equal number of core round<br />
beads, one bead for a pair of leaves.<br />
Get a drilling tool, needle, toothpick or<br />
whatever you use to drill raw clay and insert it<br />
in the center of the bead, like you were making a round<br />
bead.With your fingers built a leaf shape from this round bead, by<br />
pressing the top and bottom part of the bead. Then place a leaf shaped<br />
cut out at the back side of this scrap clay leaf shaped bead and with<br />
your fingers smooth the surface and ensure that no air bubbles are<br />
present at the back side of the bead.<br />
Fold the excess part of the leaf shaped cut out and stick it on the core<br />
clay, like it is shown in the image.<br />
This photo shows how the first side of the<br />
bead looks like. Keep in mind that the leaf<br />
shaped core bead must have the appropriate<br />
size matching to the cut out. This means that you need to have a cut out<br />
a bit larger than the core bead, because you have to fold the ends around<br />
the scrap clay core. But if you have a significantly smaller core bead than<br />
the size needed, then you will end up with the back side ends in the front<br />
part of the bead. So, maybe is a good idea to try first with some scrap<br />
clay for both, core and cut out shape, to find out the right measures of<br />
each of them.Back to our real bead, cover the other side of the bead the<br />
same way and again fold the excess of the leaf shape at the edges of the<br />
leaf bead. I like playing with the colors and have a double sided bead with<br />
different colors.<br />
Look at the hole; it is big enough to pass through it either a stringing<br />
material or some wire. Wire will give you more options; you can<br />
assemble some of the leaves to make a brooch.<br />
Do the same for all your cut out shapes.<br />
Get the remaining of the skinner blend sheet and try to make a roll out of<br />
it like it is shown in the photo. The idea is to reuse it as an additional<br />
skinner<br />
blend, so fold<br />
it in a way<br />
that colors<br />
are more or<br />
less at the<br />
same place,<br />
what we need is to make a new skinner blend, like the one<br />
used to make the leaves.<br />
Run the roll through the pasta machine and when it becomes smooth and without<br />
gaps and cuts, with your blade cut strips one long strip of the skinner blend for each<br />
bead you made. This strip will be used to cover the point where the two leaf shaped<br />
cut outs meet each other. This skinner blend needs to be thick enough to let you<br />
texture it. If you don?t want texture at the ends or you don?t have enough clay to do it,<br />
run this additional skinner blend at a thinner setting.<br />
15
This photo shows you how to place the strip around the bead. Insert again the needle in the<br />
hole and keep the peak just out of the other side of the hole. Wrap the first part of the strip and<br />
when you reach the point where you can feel the peak of the needle, push the needle gently out<br />
to the other end and drill the strip. This trick is much easier<br />
than to wrap the strip around the edges and then search to<br />
find where the hole is.<br />
Now your bead is wrapped, and has a nice leaf shape.<br />
Cut the excess of the strip at the point where the needle comes into the bead and with<br />
your fingers arrange the strip, push it gently to stick on the shape and cover the meeting<br />
points and so on.<br />
Here is an almost finished shiny metallic leaf shaped bead.<br />
With your tweezers<br />
pinch the strip carefully<br />
and create a beautiful<br />
leafy texture at the<br />
ends. Depending on the tweezers edges the result will be different.<br />
Experiment a bit with some scrap clay as well, before using it to your<br />
precious shiny leaves.<br />
From this point you can add some<br />
details. You can press the back side of<br />
a knife or the edge of a credit card to mark a line from the top to the<br />
bottom of the leaf, just over the needle. If you want to do this, do it with<br />
the needle placed inside the hole, otherwise you will close or reduce the<br />
hole.<br />
You can leave the beads like this, just with the strip around them. But you<br />
can also add a bit of<br />
texture if you prefer.<br />
Here is where the<br />
tweezers get in the<br />
game.<br />
When finished, bake them as usually, tented and protected, in the<br />
middle of the oven, for 45 mins. Always stay close to the oven when<br />
baking,<br />
bad surprises happen from time to time and being close can<br />
prevent them.<br />
Here are the finished beads baked, sanded and buffed to<br />
get all the shine they can and show up the beautiful details.<br />
If you have enough skinner blend to try something else, here<br />
is another idea.<br />
Here is the second<br />
part of the same<br />
skinner blend, this<br />
time is coated with a<br />
very thin golden clay<br />
layer and run again<br />
through the pasta<br />
machine. So I got a<br />
skinner blend backed<br />
with some golden<br />
clay.<br />
16
Using one of your texture mats, texture<br />
the golden side as you did earlier with<br />
the first project. Put the textured sheet<br />
on the bottle the same way you did<br />
with the previous one. Start<br />
shaving. This time the colorful<br />
skinner blend will appear under<br />
the golden coat when shaving.<br />
The process is the same, shave<br />
the entire clay sheet and then<br />
put it between two papers and<br />
roll over with your rolling pin.<br />
When ready, cut out some<br />
different leaf shapes.<br />
Follow the same steps as earlier.<br />
· Core scrap clay beads (long this time and not round), having<br />
in mind that you need to totally cover them with the cut outs<br />
but you don?t want excess parts on your beads.<br />
· Pairs of cut outs for each bead<br />
· Build the bead on the needle instead of trying to drill it<br />
afterwards.<br />
· Smooth the ends with a toothpick or a thin tool closing them<br />
and trapping inside the core bead. Beware of the air pockets.<br />
· With your fingers correct the peaks of the leaves if necessary.<br />
You can make any kind of leaf shaped beads this way. Just<br />
keep the basic shape for the inner core bead and then cover<br />
both sides with the cut outs and smooth the ends.<br />
You can also add the final strip around the bead if you like; it is<br />
a matter of taste.<br />
Another idea is to use a pearl backing instead of the golden one.<br />
Depending on the colors and the shape you will use and the pattern<br />
imprinted, your leaves can be not only Christmas and holiday themed<br />
but anything you like.<br />
Heart shaped leaves (press the one end of the bead to make it look like a<br />
heart). And you can see the different effect another tweezers gave to<br />
these beads.<br />
17
And more color combinations along with several texture<br />
mats give beautiful beads.<br />
When you have a good enough hole to pass through it<br />
some wire, there are more options!<br />
You can assemble some leaves to create a brooch!<br />
And if you have a nice big leaf shape, make a single leaf brooch<br />
or pendant!<br />
And who says you can?t use them to make a garland, earrings,<br />
key chains, even coasters and so many things! Possibilities are<br />
unlimited! Leaves are addictive and you will love them!<br />
Enjoy and Merry Christmas!<br />
18<br />
Follow me on FB https://www.facebook.com/klio.tsaliki<br />
and Etsy https://www.etsy.com/shop/1000and1
BLENDED<br />
LOTUS FLOWER<br />
By PANARILI<br />
Lotus. I had never thought of making one, although I love flowers, and that is what I started creating when I began working<br />
with with polymer clay. So, this is truly somewhat of a mixture of combining something very familiar to me, and something out<br />
of my comfort zone - Rebirth.<br />
MATERIALS:<br />
Sculpey® Souffle - So 80s Bright Pink and Igloo White<br />
Drop cutters<br />
Ceramic tile or glass from a photo frame<br />
Plastic bag<br />
Pasta-machine<br />
Oven<br />
19
Condition the clay. We will start with a Skinner blend. We will need<br />
one square of pure white and another square with pink and white<br />
triangles.<br />
Place white square over the pink and white<br />
This will make the even lightness to the whole<br />
blended sheet of clay.<br />
Run through the pasta-machine. Fold it and run through the<br />
pasta-machine again and again till you get the smooth graded color.<br />
Assembling the Lotus<br />
A. The blended sheet is to be about 3mm thick, so you may want to fold it several times ? lighter to the lighter darker to<br />
the darker. Put it on a ceramic tile or photo frame glass the lighter side down. Put plastic wrap or a plastic bag over the<br />
clay and cut a drop shape with the help of the cutter.<br />
B-C. Do not take the plastic wrap off. Cut two more<br />
drops as shown below.<br />
D<br />
D. Carefully take off the exceeding<br />
clay, being careful not to rip it or not<br />
to mass it up. Place it on the tile<br />
again and cover with the plastic<br />
wrap. Cut two more details as<br />
shown on the photo. Take off the<br />
plastic and take out these two<br />
details and put them aside.<br />
E. Cover the rest of the blended sheet with a plastic<br />
wrap again and cut two more details.<br />
G<br />
F. Take the details you made in point ?d? and<br />
attach them to the main part ? just place as<br />
close as possible, trying to not damage their<br />
shape.<br />
G. Take the details you made in point ?e? and<br />
also attach them to the main part. See the<br />
picture, I have marked the details ?d? and ?e?.<br />
H. Take out details marked 1, 2, 3, 4 and put<br />
them aside. Make one more full drop from<br />
the blended sheet (same as before, put foil<br />
over the clay and cut off with a cutter).<br />
Finish assembling the lotus flower.<br />
I. Place the full drop in the middle, elements 1 and 2 are the bottom side petals, detail 3 is the<br />
middle bottom petal.<br />
Make sure you place all the elements closest possible to each other but do not squeeze.<br />
Baking time. Bake according to manufacturer instructions.<br />
A B C<br />
The lotus is ready, now it is up to you weather to make a brooch, a pendant or a decoration<br />
for a diary.<br />
E<br />
H<br />
I<br />
F<br />
www.etsy.com/shop/PANARILI<br />
https://www.flickr.com/photos/in-handmade<br />
20
Leafy Place Card Candle Holders<br />
Create pretty personalized candles to grace the table at any gathering. This leaf vein silkscreen would look<br />
lovely in the colors of any season.<br />
21
MATERIALS:<br />
2 inch diameter, 2 ½ inch tall votive candle holders<br />
Colored clay for blackboard labels<br />
Pasta machine<br />
CreateAlong.com Label shaped clay cutter<br />
CreateAlong.com Leaf Veins silkscreen<br />
1-2 oz.package Premo! Sculpey® Translucent clay (will cover<br />
2-3 candle holders)<br />
Scrap of colored clay to tint translucent<br />
Clay blade<br />
Chalkboard paint<br />
Roll out a medium thick (about 1.5 mm, #3 on an Atlas) sheet of clay color that<br />
will match your votive background. Although it will be painted the edges will<br />
show and the back may be seen through the candle.<br />
Use the label shaped clay cutter to cut as many labels as you need for your place<br />
holders. Use your fingers to smooth the edges.<br />
Position these on your votive candle holders<br />
and bake for 30 minutes.<br />
Once baked follow the manufacturer?s<br />
directions to paint with chalkboard paint and<br />
condition with chalk.<br />
Mix a block of Premo! translucent play with a dab of<br />
whatever color you want to tint it. You don?t have to mix it in<br />
a completely, some streaks add interest. Keep in mind that<br />
the more colored clay you add the less translucent the final<br />
results will be.<br />
Roll this clay out on a thin sitting on the pasta machine,<br />
about 0.5 mm thick #8 on an Atlas.<br />
22<br />
Paint the leaf veins silkscreen onto this clay sheet<br />
as many times as you can. I used gold paint, but<br />
use whatever works for your color scheme.<br />
Once the paint is completely dry cut 2 1/ 4 inch strips. You will need two strips to go<br />
around each candle holder.<br />
If you are using a standard 2 inch diameter by 2<br />
1/ 2 inch tall votive candle holder you should be<br />
able to make a straight strip fit around the holder<br />
lining up one long cut edge with the top edge<br />
and smoothing out the excess towards the<br />
bottom.<br />
Cut your edges straight then abut another strip to finish wrapping all the way around the<br />
candle holder.<br />
Cut a straight line where the two ends overlap, then remove the excess from the top, lift<br />
up the bottom and remove the excess from underneath.<br />
Lay a deli sheet over the seams and use your fingers to lightly burnish to smooth out the appearance of seams.<br />
Bake your candle holders for 30 minutes at the manufacturer's recommended temperature.<br />
Once cooled glue the chalkboard label in place and use a chalk marker to write names, sentiments or whatever you like.<br />
http:/ / keepsakecrafts.net<br />
https:/ / www.facebook.com/ KeepsakeCrafts.net
LOTUS/ REBIRTH<br />
A GALLERY OF CREATIVE PROJECTS FROM OUR CREATE ALONG<br />
POLYMER CLAY TRIBE FACEBOOK PAGE OCTOBER CHALLENGE<br />
Sandra Pflug<br />
V?ra ?ulcová<br />
Susan Morton<br />
Janna Baranovska<br />
Elena Angarskaya<br />
Melissa Barrett<br />
Falcone<br />
Janice Cartier<br />
Shelley Barrass<br />
Cece Cormier<br />
23
GIVE THE GIFT OF<br />
CREATIVITY!<br />
Pre-orders now available!<br />
ht t p:/ / w w w.polym erclayt radingcoins.com<br />
24
cel ebr at ing pol ymer cl ay, mixed-media, and mor e!<br />
We asked, you answered, we listened! STARTING IN JANUARY 2019, Polymer Clay<br />
Universe Magazine will become Passion for Polymer and will be available in both<br />
PRINT and digital editions! Passion<br />
for Polymer will bring you a wide<br />
SALESBEGIN<br />
DECEMBER 2nd!!<br />
w w w.PassionforPolym er.com<br />
variety of creative polymer clay and<br />
mixed-media project tutorials for<br />
unique jewelry, miniatures, sculpture,<br />
caning, art dolls, Steampunk, art<br />
canvases..... we've got a lot in store<br />
for you!. Not to mention interviews<br />
with amazing artists, informative<br />
articles on how to build your business and build a successful brand, a gallery of<br />
inspiration photos, and more!<br />
We would love for YOU to share YOUR Passion for Polymer! Find our<br />
upcoming themes, information on how to submit articles and tutorials<br />
for consideration, and deadlines for submissions at<br />
ht t ps:/ / w w w.passionforpolym er.com / cont ribut e.<br />
Artists are paid for published articles!<br />
Contact<br />
hi@createalong.com<br />
www.polymerclayuniverse.com<br />
@polymerclaytv