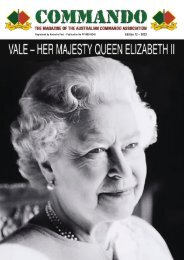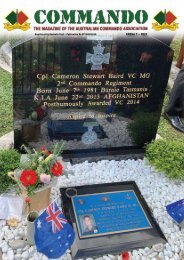
COMMANDO News Magazine - Edition 16, 2019
The Official Commando News Magazine
The Official Commando News Magazine
- No tags were found...

You also want an ePaper? Increase the reach of your titles
YUMPU automatically turns print PDFs into web optimized ePapers that Google loves.
22 October 1944, the regiment relieved<br />
the American outpost at Babiang and<br />
began to assist the ANGAU patrols in the<br />
area. Once they had concentrated fully<br />
by November the 6th Division began its<br />
advance eastwards towards the Japanese<br />
base at Wewak, in order to destroy the<br />
remnants of the Japanese 18th Army. Prior<br />
to this, however, the 2nd/7th Cdo Sqn<br />
conducted preliminary patrols in order to<br />
gather information on topography and<br />
enemy dispositions in the region.<br />
Initially tasked with the defence of the port, airfield<br />
and base facilities at Aitape, 2nd/6th Cdo Regt was<br />
ordered to advance towards Wewak to destroy the<br />
remnants of the Japanese 18th Army. Patrols by the<br />
2nd/6th Cdo Regt preceded the main Australian<br />
advance of the 6th Division. The attack, which began in<br />
November 1944, proceeded along two axes—the 19th<br />
Brigade (2nd/9th Cdo Sqn was attached) moved along<br />
the coast towards the Japanese base at Wewak, while the<br />
2nd/7th Cdo Sqn, working with ANGAU detachments,<br />
advanced into the Torricelli Mountains, driving towards<br />
Maprik, which provided the Japanese with most of their<br />
supplies. While the advance was under way, the 17th<br />
Brigade was assigned the task of building a defensive<br />
position around the airfield and base facilities at Aitape,<br />
while the <strong>16</strong>th Brigade was held back in reserve.<br />
On 19 December, the 19th Brigade crossed the<br />
Danmap River and began moving towards the east to<br />
cut the main Japanese line of communication. A series of<br />
minor actions followed, but no significant engagements<br />
took place, and at the end of four weeks they had<br />
reached Wallum, about 45 miles (72 km) east of Aitape.<br />
A week later, on 24 January 1945, the <strong>16</strong>th Brigade<br />
relieved the 19th, while the 17th Brigade continued the<br />
advance towards the west through the Torricellis.<br />
The operations were characterised by prolonged<br />
small-scale patrolling with small-scale company attacks.<br />
Progress was slowed by the difficulties of transporting<br />
supplies overland or by barge and the flash flooding of a<br />
number of the rivers the Australians had to cross. In one<br />
incident, seven men from the 2/3 Battalion drowned in<br />
the swollen waters of the Danmap River, which had risen<br />
suddenly after a torrential downpour. After Dogreto Bay<br />
was occupied, the supply problems eased somewhat.<br />
On <strong>16</strong> March 1945, the airfields at But and Dagua on<br />
the coast were occupied, although fighting continued<br />
further inland from there over the course of the following<br />
fortnight as the Australians fought to gain control of the<br />
Tokuku Pass. On 25 March, Lieutenant Albert Chowne,<br />
a platoon commander from the Australian 2/2 Battalion<br />
(not 2nd/2nd Cdo Sqn) led an attack on a Japanese<br />
position that was holding up the advance on Wewak. For<br />
his actions he was posthumously awarded the Victoria<br />
Cross. Heavy fighting continued for four days after this,<br />
and the Australians resorted to the use of flame throwers<br />
for the first time in the war, using them effectively against<br />
heavily entrenched Japanese positions; the weapon had<br />
a profound psychological effect, boosting the morale<br />
of the Australians and sapping that of the Japanese<br />
defenders, many of whom simply fled in the face of<br />
flame thrower teams.<br />
In the Torricelli Mountains, as well as<br />
keeping the enemy from the flanks of the<br />
two infantry battalions of the 17th Brigade,<br />
the 2nd/10th Cdo Sqn was tasked to clear<br />
the populous areas to the northeast of the<br />
Ami villages. Initially the Australians were<br />
very successful, managing to use surprise<br />
to their advantage in dealing with the<br />
pockets of Japanese resistance that they<br />
encountered, however, as the fighting<br />
continued they began to suffer for lack<br />
of fire support. In an effort to overcome<br />
this problem air support from Aitape was called in, and<br />
each of the squadron’s three troops were given a 2-inch<br />
mortar, while a 3-inch mortar section was attached to the<br />
squadron. Throughout February a number of ambushes<br />
and attacks were undertaken by the squadron, before<br />
on 20 February 1945, ‘C’ Troop carried out an attack on<br />
Kualigem which failed to remove the Japanese from the<br />
village and resulted in the loss of two officers killed and<br />
five troopers wounded.<br />
The 17th Brigade continued its advance against<br />
stubborn Japanese defence. Nevertheless, by 23 April<br />
1945, they had secured Maprik. The fall of Maprik<br />
allowed the Australians to begin constructing an<br />
airfield 8 miles (13 km) away at Hayfield, and this was<br />
completed on 14 May allowing reinforcements and<br />
supplies to be flown in. Elsewhere, the 19th Brigade<br />
had begun its assault on Wewak in early May. HMA<br />
Ships Hobart, Arunta, Waraamunga, Swan and HMS<br />
Newfoundland (of the British Pacific Fleet) as well as the<br />
RAAF bombarded the Wewak defences. On 11 May, a<br />
landing at Dove Bay secured by the 2nd/9th & 2nd/10th<br />
Cdo Sqns as part of the Farida Force was undertaken to<br />
encircle Wewak and prevent the escape of its garrison.<br />
Along with the 2nd/9th Cdo Sqn, the 2nd/10th Cdo Sqn<br />
formed the initial assault force. Coming ashore ahead<br />
of the main landing force, the assault squadrons came<br />
up against only very sporadic Japanese resistance and<br />
as the rest of the force moved inland, the 2nd/10th Cdo<br />
Sqn secured the beachhead. Later they were moved to<br />
the west to Mandi, where the squadron headquarters<br />
set up in the Mandi garden and they began patrolling<br />
operations along the Wewak-Forok road.<br />
Wewak fell on the same day, as the 19th Brigade<br />
occupied its airfield. The fighting around Wewak<br />
Airfield continued until 15 May, however, when men<br />
from the 2/4 Battalion, with armoured support, attacked<br />
Japanese positions overlooking the airstrip. It was<br />
during this attack that Private Edward Kenna carried out<br />
the deeds that led to him being awarded the Victoria<br />
Cross, attacking several Japanese bunkers.<br />
Following this, the remaining Japanese in the area<br />
withdrew into the Prince Alexander Mountains to the<br />
south of Wewak. To counter this, the <strong>16</strong>th Brigade with<br />
the 2nd/7th Cdo Sqn was dispatched to follow them<br />
up, and push them towards the 17th Brigade (2nd/10th<br />
Cdo Sqn attached), which advanced towards the east<br />
towards Maprik. Meanwhile, the 19th Brigade came<br />
up against strongly defended positions around several<br />
high features known as Mount Kawakubo, Mount Tazaki<br />
and Mount Shiburangu.<br />
In the first half of June, the 2nd/10th Cdo Sqn<br />
28 <strong>COMMANDO</strong> NEWS ~ <strong>Edition</strong> <strong>16</strong> | <strong>2019</strong>