
You also want an ePaper? Increase the reach of your titles
YUMPU automatically turns print PDFs into web optimized ePapers that Google loves.
2 • COUNTERFACT
INSIDE<br />
ISSUE <strong>10</strong><br />
PUBLISHER<br />
One Small Step Games<br />
EDITOR<br />
Jon Compton<br />
CONTENT EDITOR<br />
Ty Bomba<br />
CONTRIBUTING EDITORS<br />
Paulo Vicente dos Santos Alves, Raymond<br />
E. Bell Jr., Jim Bloom, Arnold Blumberg, Jon<br />
Cecil, Andrew Hind, Maciej Jonasz, J.E. &<br />
H.W. Kaufmann, Timothy J. Kutta, Jonathan<br />
Lupton, Roger Mason, Christopher Miskimon,<br />
Ravi Rikhye, Javier Romero, Carl O. Schuster,<br />
Philip Sharp, William Stroock, Brian Train,<br />
Allyn Vannoy & Gil Villahermosa<br />
DESIGNER<br />
Lisé Patterson<br />
MAPS<br />
Larry Hoffman<br />
ADVERTISING<br />
Please contact orders@ossgames.com to<br />
receive advertising rates. We have published<br />
ad rates, but we also accept simulation games<br />
in exchange for ad space. Send queries to the<br />
email address listed above.<br />
SUBSCRIPTIONS<br />
COUNTERFACT is not a periodical, but rather<br />
is published on an “as ready” basis. Subscriptions<br />
are sold on a per-issue basis; with a<br />
minimum commitment of 4 issues in order to<br />
receive a subscriber discounted $16.96 per issue.<br />
You are charged this amount plus shipping<br />
at the time that the next issue goes to press. To<br />
subscribe, please visit our website: ossgamescart.com.<br />
NOTE<br />
COUNTERFACT reserves all rights on the contents<br />
herein. Nothing may be reproduced from<br />
it in whole or in part without prior permission<br />
from the publisher. All rights reserved. All correspondence<br />
should be sent to COUNTERFACT,<br />
11655 Winesap Pl., La Plata, MD 20646.<br />
WRITING FOR COUNTERFACT<br />
If you would like to write for this publication,<br />
please contact: COUNTERFACT Editor, 11655<br />
Winesap Pl., La Plata, MD 20646, or send<br />
email queries to submissions@ossgames.<br />
com.<br />
4<br />
<strong>10</strong><br />
21<br />
26<br />
34<br />
38<br />
Operation Pincher: Stalin’s Drive in the Middle East,<br />
1948-49 – What If?<br />
by Ty Bomba<br />
Turkey vs. Bulgaria: A Potential Near-Future Conflict<br />
by Maciej Jonasz<br />
Hussite Wagon Warfare: Tanks Prefigured?<br />
by Jim Bloom<br />
India’s Maritime Strategy<br />
by Carl O. Schuster<br />
Compare & Contrast: Germany’s Panzer 38(t) vs. the<br />
USSR’s BT-7<br />
by Gilberto Villahermosa<br />
Infographic: Z-Day<br />
by Allyn Vannoy and Jay Karamales<br />
Visit the <strong>CounterFact</strong> Magazine Facebook page,<br />
where each week we post at least one original<br />
article—totally free to Facebook users.<br />
<br />
<br />
<br />
<br />
<br />
<br />
<br />
<br />
ABOUT THE COVER<br />
An artist’s concept of one of<br />
Stalin’s heavy tanks on the attack<br />
in 1949.<br />
COUNTERFACT • 3
Operation<br />
Pincher:<br />
Photo Credit: Pixabay & background Created by BiZkettE1/Freepik<br />
4 • COUNTERFACT
By Ty Bomba<br />
Stalin’s Drive in the Middle East,<br />
What If?<br />
Communist Perspectives<br />
Immediately after the end of World War II, Stalin’s<br />
strategic outlook was centered on the idea of holding<br />
secure what had just been won in the struggle<br />
against Nazi Germany. He codified that thinking<br />
in a lengthy memo he wrote early in 1947 titled: “The<br />
Plan for the Active Defense of the Territory of the Soviet<br />
Union.”<br />
In it, he forecast that, were a new war to begin, it<br />
would do so via an Anglo-Allied attack into the Central<br />
European lands recently occupied by the Soviets. In turn,<br />
the Red Army’s initial mission would then be to defeat<br />
that aggression before it could advance far enough east to<br />
reach the Russian Motherland proper. The overall goal<br />
was to be “securing the invulnerability of the boundaries<br />
established by international agreement after World War<br />
II.”<br />
Since he still didn’t have an atomic bomb, his further<br />
thinking centered around defeating the US nuclear<br />
monopoly by deploying Soviet conventional strength<br />
on the ground. He therefore ordered the smaller<br />
postwar Red Army to be made more combat efficient<br />
via full motorization. (During World<br />
War II, the Red Army had still had to<br />
employ 3.5 million horses to meet its<br />
transport needs.) The mechanization<br />
program was mostly completed<br />
by 1949.<br />
COUNTERFACT • 5
YUGOSLAVIA<br />
Yugoslavs<br />
GREECE<br />
ROMANIA<br />
BULGARIA<br />
Bulgarians 15 Div<br />
<strong>10</strong> Div<br />
8 Div<br />
2 Div<br />
Istanbul<br />
6 Div<br />
15 Div<br />
20 Div<br />
3 Div<br />
2 Div<br />
Black Sea<br />
TURKEY<br />
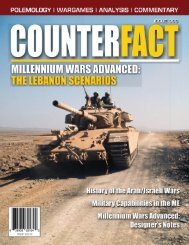
US/UK Estimate of Soviet Mid-East Attack Plan<br />
1948-49<br />
1 Div<br />
9 Div<br />
Soviet Limits of Advance<br />
D + 45<br />
D + 90<br />
D + 120<br />
USSR<br />
<strong>10</strong> Div<br />
5 Div<br />
Tabriz 3 Div<br />
Mioneh<br />
Baku<br />
Caspian<br />
Sea<br />
Mosul<br />
Zenjan<br />
Tehran<br />
CRETE<br />
Mediterranean Sea<br />
2 Div Quantity of Soviet Divisions<br />
Trunk Railroads<br />
Main Oilfields<br />
Potential US Heavy Bomber Bases<br />
LIBYA Possible Soviet Airborne Mersa Matruh Attacks<br />
Soviet Invasion Routes<br />
CYPRUS<br />
EGYPT<br />
Tripoli<br />
LEBANON<br />
Haifa<br />
ISRAEL<br />
Suez<br />
Photo Credit: Freepik & Event and exhibition at the Foreign Ministry<br />
marking the 70th anniversary of the Axis powers’ declaration of war on Greece.<br />
www.mfa.gr/www.mfa.gr/Articles/en-US/ts25<strong>10</strong>20<strong>10</strong>_KL1951.htm<br />
JORDAN<br />
SYRIA<br />
SAUDI<br />
ARABIA<br />
Baghdad<br />
Kirkuk<br />
IRAQ<br />
Ahwaz<br />
Bander<br />
Basra Shar<br />
<br />
<br />
<br />
<br />
<br />
<br />
<br />
<br />
<br />
<br />
<br />
in that tnati<br />
nation’s scivil lw<br />
war<br />
in<br />
1948.<br />
IRAN<br />
300 Miles<br />
500 Km<br />
MAP DESIGNED BY L. HOFFMAN<br />
Despite the greater<br />
access to Kremlin<br />
records granted historians<br />
since the implosion<br />
of the USSR, no<br />
document has as yet<br />
emerged telling exactly<br />
when Stalin moved<br />
from that doctrine of<br />
strategic defense to one<br />
of strategic offense. Even<br />
so, though it remains impossible<br />
to distinguish exactly<br />
when he crossed that line, we<br />
know that sometime in 1948 he<br />
had made the switch in his thinking.<br />
The evidence for that comes from<br />
his split with – and damning ideological<br />
condemnation of – Yugoslav communist<br />
dictator Josef Broz Tito in March<br />
of that year. The long-offered explanation for<br />
their mutual alienation was that it had come<br />
about due to Stalin’s jealously of the alternative<br />
approach to socialization presented by the smaller<br />
6 • COUNTERFACT
country’s dictator. As such, the blame later offered by<br />
historians was kept centered on the Soviet dictator’s<br />
well known ego and belief in his own unique mission<br />
in history in regard to the final unfolding of communist<br />
dominance of the planet. More recently, though,<br />
as documents from the former Yugoslav government<br />
have become available, we know that interpretation<br />
is, if not completely false, only a part of the story.<br />
The main reason the break came about was due to<br />
Tito’s desire to set up Yugoslavia as the regional hegemon<br />
of the Balkans. More particularly, he saw the<br />
then burgeoning Greek Civil War as the means to do<br />
that. He pleaded, if Stalin would only give logistical<br />
support for Yugoslav and Albanian forces to intervene<br />
there, a quick and complete communist victory could<br />
be won.<br />
Stalin disagreed, though not on principle, but due<br />
to the fact he was then in the process of fully consolidating<br />
his own control over what he judged to be<br />
more strategically valuable territory to the north of<br />
the Balkans in Europe – namely Czechoslovakia and<br />
Poland – and in the Far East, via the communist victory<br />
then looming in China’s civil war. He felt certain<br />
any open communist invasion into Greece would<br />
bring swift retaliation by the British and Americans,<br />
who had strong aero-naval forces on hand close by in<br />
the Mediterranean.<br />
It therefore was best, he maintained, to let the<br />
communist momentum building on those more<br />
important fronts carry forward the socialist bloc to<br />
the proper moment for launching a larger war directly<br />
against the two main opponents: the US and UK. Of<br />
course, for Tito, the Balkan peninsula was the crucial<br />
front.<br />
Since Tito was unwilling to back off from that idea,<br />
Stalin clothed the resultant split in ideological wrappings.<br />
In turn, Tito had to give up launching his proposed<br />
invasion of Greece, since he had no confidence<br />
in its success minus at least Soviet logistical support.<br />
Had Stalin been somewhat less egotistical, or had<br />
he merely had a different opinion of Euro-Asian strategic<br />
geography, we could’ve had a Third World War<br />
that began in the Balkans, and that was then likely<br />
to have quickly expanded from there into southwest<br />
Asia. That expansion would’ve taken place for two<br />
reasons.<br />
First, given the range of the US bomber force at<br />
the time, the only places from which the Americans<br />
COUNTERFACT • 7
could’ve dependably delivered their “air atomic”<br />
offensive against the industrial vitals of the USSR –<br />
then still mostly in and just east of the Urals, after<br />
having been moved there to keep them out of German<br />
hands during the previous war – would’ve been<br />
from British bases on Cyprus, Crete and at Suez.<br />
Second, America – which had been the powerhouse<br />
oil exporter for the whole Anglo-Allied war<br />
effort during World War II – was passing peak production.<br />
That meant the oilfields of the Mid-East<br />
would’ve been crucial to any major new war effort by<br />
those nations. Those oilfields, in turn (see map), were<br />
almost totally undefended, and they lay much closer<br />
to the Red Army’s start lines than they did to any concomitant<br />
centers of Anglo-Allied power. Their early<br />
seizure in any new World War could’ve been crippling<br />
to the Allies’ capabilities.<br />
<br />
“Sandown” was the codename for the initial 1948<br />
British plan to defend the Mid-East against a feared<br />
communist invasion that might stretch across a front<br />
from the Albanian coast to Iran. The British planners<br />
concluded that, on its own, the UK couldn’t hope<br />
to hold off such an attack for long. Since the only<br />
armies within that entire region that could be expected<br />
to be at least somewhat combat effective against<br />
the Soviets were those of Turkey and the nascent<br />
Jewish state of Israel, the essential ally again had to be<br />
the US.<br />
The lure in that regard – in those pre-NATO times<br />
– was to be the US need for bomber bases in range<br />
of the strategic centers of gravity of the USSR. That<br />
meant the aforementioned Mediterranean islands or<br />
the base complex at the Suez Canal.<br />
Though US Air Force generals viewed the Mediterranean<br />
and Middle East as the crucial staging area<br />
from which to begin their strategic counteroffensive<br />
against the USSR, that assessment wasn’t shared<br />
by those running the US Army. The army generals<br />
viewed that theater in the same way they had during<br />
World War II: a diversion from the main one in<br />
northwest Europe. Since it was the army that would<br />
be called on to provide the ground force necessary to<br />
secure the Mediterranean and Middle East bases the<br />
air force wanted, it was the older service’s viewpoint<br />
that counted most.<br />
Sandown was therefore initially drawn up by the<br />
British with four possible defense lines, each nearer<br />
Photo Credit: Freepik & Bundesarchiv, Bild <strong>10</strong>1I-178-1536-18A / Schütte / CC-BY-SA 3.0<br />
<br />
8 • COUNTERFACT
than the one before it to the crucial Suez and island<br />
nexus. The line ultimately to have been taken up<br />
would’ve depended on how much involvement could<br />
be gotten from the Americans, and how quickly it<br />
would be deployed, if the Soviets attacked.<br />
From the US military’s perspective, though there<br />
was general agreement the strategic bombing campaign<br />
of World War II hadn’t been decisive in bringing<br />
about the defeat of Germany, the advent of the<br />
atomic bomb seemed to finally provide the weapon<br />
needed to win wars solely from the air. Beyond<br />
theory, in light of all the above, there was no other<br />
practical strategy available for the US other than what<br />
the air force termed an “air atomic” offensive.<br />
In sum, at various times some 20 to 30 Soviet cities<br />
– picked for their industrial or administrative importance<br />
– were listed for bomber-delivered annihilation<br />
during any new world war’s first weeks. By 1948 those<br />
plans had gone through 18 major iterations, along<br />
with variants within each of them. They began with<br />
“Totality” in August 1945, which was Gen. Eisenhower’s<br />
quickly produced, almost memo-like, response to<br />
President Truman’s call for such a plan of operations<br />
in case one were needed.<br />
Pincher, begun in March 1946, went on to be<br />
adapted into a series of global “strategic studies,”<br />
which expanded and kept bifurcating, eventually<br />
subsuming even the British Sandown plan when the<br />
two powers resumed joint war planning in 1948.<br />
“Pincher” referred to the overall strategy of “pinching<br />
off” Soviet advances and capabilities.<br />
Conclusion<br />
At the end of World War II the Soviet Union had<br />
some 12.7 million personnel under arms, with the<br />
Red Army fielding approximately 477 division-equivalents<br />
supported by about 35,500 combat aircraft. By<br />
the end of 1947, the agricultural and industrial labor<br />
requirements for postwar reconstruction had allowed<br />
for only 4.4 million of those personnel to be kept in<br />
service along with about 24,000 aircraft. Meanwhile,<br />
however, the Anglo-Allied militaries declined from<br />
their wartime highs into an even smaller force.<br />
If World War III had begun during 1948-49, then,<br />
it’s difficult to evaluate which side would’ve won.<br />
At the conventional level, it’s possible the Soviets<br />
could’ve achieved the overrunning of Western Europe<br />
and Southwest Asia that Allied planners feared. At<br />
the same time, though, if those Soviet advances didn’t<br />
break overall Allied morale, thereby allowing time<br />
for the US “air atomic” strategic counteroffensive<br />
to be carried out, it’s difficult to imagine how the<br />
Soviets could’ve held up against that kind of destruction.<br />
It would most likely have been a close-run thing<br />
for both sides, with its final outcome dependent on<br />
which side kept up its morale – and therefore its determination<br />
to go on fighting – the longest. CF<br />
SELECTED SOURCES<br />
Ely, Col. Louis R. The Red Army Today. Harrisburg, PA:<br />
Military Service Publishing Co., 1949.<br />
Evangelista, Matthew A. “Stalin’s Postwar Army<br />
Reappraised,” International Security, Vol. 7, No. 3<br />
(Winter, 1982-83), pp. 1<strong>10</strong>-138.<br />
Gentile, Gian P. “Planning for Preventive War, 1945-<br />
1950,” Joint Force Quarterly, Spring 2000, pp. 68-74.<br />
Jeronim, Perovic. The Tito-Stalin Split: A Reassessment<br />
in Light of New Evidence. University of Zurich: Zurich<br />
Open Repository and Archive, 2007. Available as a free<br />
online download.<br />
Herken, Gregg. The Winning Weapon: The Atomic Bomb<br />
in the Cold War, 1945-1950. New York: Alfred A. Knopf,<br />
1980.<br />
Mastny, Vojtech, Sven G. Holtsmark & Andreas Wenger.<br />
War Plans and Alliances in the Cold War: Threat<br />
Perceptions in the East and West. New York: Routledge,<br />
2006.<br />
Ross, Steven T. American War Plans, 1945-1950:<br />
Strategies for Defeating the Soviet Union. Portland, OR:<br />
Frank Cass, 1996.<br />
Zabecki, Maj. Gen. David T., ed. Blueprints for Battle:<br />
Planning for War in Central Europe, 1948-1968.<br />
Lexington, KY: University Press of Kentucky, 2012.<br />
COUNTERFACT • 9
TURKEY<br />
VS.<br />
BULGARIA<br />
Photo Credit: Background texture Designed by Kjpargeter / Freepik<br />
<strong>10</strong> • COUNTERFACT
A POTENTIAL NEAR-FUTURE CONFLICT<br />
by Maciej Jonasz<br />
<br />
The history of Turkish-Bulgarian bilateral relations isn’t a pleasant<br />
one. The Turks completed their conquest of Bulgaria late in the 14 th<br />
century, beginning a half-millennium of brutal occupation. While<br />
little is mentioned about that chapter of European history when colonialism<br />
or imperialism is discussed, what the Bulgarians experienced was as<br />
bad as anything inflicted on other colonized peoples anywhere on the planet.<br />
In fact, in many ways, Turkish colonialism was far worse than the average.<br />
The Turkish occupation began with the extermination of the upper strata<br />
of Bulgaria’s society, which left only what the Turks referred to as the “cattle.”<br />
The land and its residents were then distributed among Turkish lords and, in<br />
addition to working for them and paying the non-Muslim head tax, the Bulgarians<br />
had to hand over a quota of children each year for indoctrination to<br />
become fanatical Muslim warriors – the infamous Janissaries.<br />
In addition to the suffering purposefully inflicted by the Turks, the Bulgarians<br />
were also saddled with the same socioeconomic system that set in place<br />
stagnation all across the Ottoman Empire while the rest of Europe saw steady<br />
progress. While that same Ottoman stagnation set the conditions for their<br />
eventual fall, it also meant, when Bulgarian independence was finally achieved,<br />
they were far behind the rest of Europe. Some of its modern-day economic ills<br />
can still be traced back to that bleak heritage.<br />
The occupation ended in 1878 when, after a bloody two-year campaign, the<br />
Russians liberated Bulgaria. At first, due to Western unease and uncertainty<br />
over exactly how the Ottoman retreat from Europe was to be handled, Bulgaria<br />
was officially granted only autonomy within that empire, but in 1908 it status<br />
was finally turned into full independence.<br />
As one legacy of the Turkish imperial presence, eight percent of Bulgaria’s<br />
population still consists of citizens of that ethnicity. That demographic fact<br />
could become a flashpoint for conflict anytime a fully Islamist regime in Ankara<br />
wanted to make it so.<br />
<br />
With a population just over 80 million and a large and well armed military,<br />
Turkey is the Balkan region’s powerhouse. Bulgaria, with fewer than 8 million<br />
citizens and a military that’s not only small but also armed with outdated weapons,<br />
is at the other end of that regional power scale.<br />
The Bulgarians field a fully professional army of 16,000 personnel who are<br />
grouped into one special forces and two mechanized brigades. Thanks to the<br />
COUNTERFACT • 11
Photo Credit: US Army Reserve / Sgt. 1st Class Brian Hamilton<br />
Cadets from the Turkish Military Academy react to direct contact during<br />
the 2016 Sandhurst competition.<br />
professionalization of the armed forces, numerous<br />
deployments on peacekeeping operations abroad, as<br />
well as participating in NATO exercises, the quality<br />
of those soldiers is rated high. In addition, as the<br />
military consists almost exclusively of ethnic Bulgarians,<br />
it’s a cohesive force whose personnel would be<br />
fully motivated to fight for their country in the face of<br />
Turkish aggression.<br />
While the personnel are of good quality, their<br />
equipment isn’t. Armored vehicles are largely of Cold<br />
War vintage and, even at that, they’re not numerous.<br />
For example, there are fewer than 300 infantry fighting<br />
vehicles, mainly old BMP-1 and BMP-23 models.<br />
Another big weakness is the lack of a serious tank<br />
force. Once Bulgaria had almost 2,000 T-54/55 and<br />
T-72 main battle tanks, but nearly all those have been<br />
decommissioned and put into storage. Currently only<br />
about 20 T-72s remain fully operable and in active<br />
service. While the ones in storage could theoretically<br />
be brought back into service, the soldiers needed to<br />
operate them would also have to be trained. That<br />
means, in any suddenly erupting war, the tanks in<br />
storage could only see service as replacements for<br />
those lost in combat. There likely<br />
wouldn’t be sufficient time to use them<br />
to expand the armored force.<br />
Facing the Bulgarians would be a<br />
Turkish Army of 350,000 personnel,<br />
who are grouped into one motorized<br />
infantry and two mechanized divisions,<br />
along with 16 separate mechanized brigades,<br />
eight separate motorized infantry<br />
brigades, a dozen separate armored<br />
brigades and four separate commando<br />
brigades.<br />
The Turks field a force of well over<br />
2,000 main battle tanks. That includes<br />
349 fully modern German-made Leopard<br />
2 models. The rest have been kept<br />
sufficiently up to date to ensure they<br />
remain at least minimally combat ready.<br />
Turkish mechanized infantry would<br />
ride into combat in a mix of US-made M113s, Turkish-made<br />
ACV-15s and Russian-made BTR-60PBs and<br />
BTR-80s, for a total of almost 5,000 infantry fighting<br />
vehicles. Whereas only the ACV-15s boast armament<br />
larger than a machinegun (a 25mm cannon) the overall<br />
size of the Turkish tank force means their infantry<br />
are unlikely to be left without support when dealing<br />
with enemy armor.<br />
In the air, the disparity between the two countries<br />
is even greater than on the ground. With only<br />
about 50 combat aircraft of all types, the Bulgarian<br />
Air Force wouldn’t be capable of providing effective<br />
air support in any large-scale conventional war. Not<br />
only tiny, the air force is saddled with obsolete Cold<br />
War-era aircraft that are becoming more and more<br />
difficult just to keep in the air.In comparison, the<br />
Turks can put over 400 combat jets into the air. Most<br />
of them are F-16C/D models, along with three dozen<br />
upgraded F-4E Phantoms, which is an older but still<br />
capable machine. In addition to those fixed-wing<br />
aircraft, the Turks have over 50 attack helicopters – a<br />
mix of US-made AH-1 Cobras and domestically produced<br />
T-129s.<br />
At sea the balance of forces isn’t any more favorable<br />
for the Bulgarians, even though their navy is in<br />
a better condition than their air force. The core of<br />
their surface combatant force consists of three former-<br />
Belgian Wielingen-class frigates. Though those are<br />
1970s vintage warships, they underwent an upgrade<br />
12 • COUNTERFACT
Shumen<br />
Hwy A2<br />
Varna<br />
Sofia<br />
Hwy A4<br />
Veliko Tarnovo<br />
Sliven<br />
Hwy A1<br />
Burgas<br />
Black<br />
Sea<br />
Plovdiv<br />
Haskovo<br />
Istanbul<br />
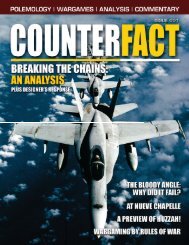
BULGARIA<br />
Option 1: Northern Amphibious Attack<br />
Option 2: Southern Amphibious Attack<br />
Option 3: Overland Attack Left<br />
Option 4: Overland Attack Right<br />
Xanthi<br />
Main Attacks<br />
Supporting Attacks<br />
0 25 50 75 <strong>10</strong>0<br />
0 50<br />
Miles<br />
Km<br />
<strong>10</strong>0 150<br />
Edirne<br />
Rte 7<br />
Kirklareli<br />
TURKEY<br />
Corlu<br />
Sea of<br />
Marmara<br />
Turkish Strategic Options<br />
in 2004. Other than those three frigates, Bulgarian<br />
warships are all un-modernized Cold War-era<br />
designs and not up to today’s standards. In fact, the<br />
navy’s one Soviet-built frigate, and all three of its<br />
corvettes, are likely not combat capable. Bulgaria’s<br />
last submarine was retired from service in 2011.<br />
Like with the rest of the Bulgarian armed forces,<br />
the navy has transitioned to an all-professional force<br />
and its personnel have participated in numerous<br />
NATO exercises. It one truly notable asset is its<br />
special forces element.<br />
Another asset that warrants mention, and that<br />
would likely be the only one that could be operationally<br />
effective against the Turks, are the <strong>10</strong> minewarfare<br />
vessels. In the face of what would be almost<br />
certain Turkish supremacy on the water and in the<br />
air, they wouldn’t last long, but they could potentially<br />
lay minefields that would impede enemy operations<br />
in Bulgaria’s coastal waters.<br />
Facing the Bulgarian Navy at sea would be a Turkish<br />
force that dwarfs it in both numbers and capabilities.<br />
Whereas its inventory includes a number of<br />
outdated warships, the Turkish Navy also has plenty<br />
of modern designs – both surface and sub-surface –<br />
thanks to what’s been a steady pace of procurement.<br />
An important element of the Turkish Navy would be<br />
Turkish Army vehicles<br />
<br />
the collapse of the<br />
solution process in July<br />
2015.<br />
its force of 55 amphibious landing craft, giving it a<br />
sealift capacity sufficient to land all of their marine<br />
brigade at one time.<br />
Overall, the Turkish military advantage is overwhelming<br />
in every important numeric category. Even<br />
Photo Credit: US Wikimedia Commons / Mahmut Bozarslan<br />
COUNTERFACT • 13
subtracting forces Turkey requires to deal with Kurdish<br />
insurgents, maintain security on their border<br />
with Syria, and those deployed in occupied northern<br />
Cyprus facing the Greeks, the odds against the Bulgarians<br />
are still massive.<br />
Terrain<br />
A look at the topographic map of Bulgaria shows<br />
the country is broken into four distinct regions which<br />
run east-west, essentially looking on a map like nothing<br />
so much as layers of a cake. In the north there’s a<br />
strip of flat land along the Danube. At about 40 to 90<br />
miles wide, that river valley stretches all the way from<br />
the Black Sea coast in the east to the Serb border on<br />
the west.<br />
Parallel to that valley on the south are the Balkan<br />
Mountains, which are about 30 miles across northsouth<br />
and that also run east-west from the sea to<br />
Serbia. While not exactly alpine in ruggedness, they<br />
remain a significant obstacle to military operations as<br />
they have only a limited road network and are heavily<br />
wooded. All movement through them would be kept<br />
channeled into a few narrow passes.<br />
South of the mountains, there’s another strip of<br />
flat ground. It extends from the sea two-thirds of the<br />
way across the country.<br />
The strip of land along the Turkish border also<br />
consists of rough terrain and makes up the final<br />
strategic layer. Though not really mountainous, that<br />
Strandzha region is hilly and forested enough to impede<br />
mechanized operations. The main access route<br />
through that rough terrain is Highway A4 in the west<br />
Route 7 in the center. The A4 in the west would<br />
make a good main supply route, while the Route 7<br />
corridor is narrow and passes through a more heavily<br />
forested region, which would make it easier to block<br />
by the defenders.<br />
Bulgaria’s capital, Sofia, is in the west of the country<br />
close to the Serb border. It’s in a valley within the<br />
Balkan Mountains, and it can only be accessed via<br />
14 • COUNTERFACT
BULGARIA VS. TURKEY<br />
QUANTITATIVE COMPARISONS<br />
BULGARIA<br />
TURKEY<br />
7.1 Million<br />
Population<br />
80.8 Million<br />
<br />
33,150<br />
350,000<br />
19,500<br />
Reserves<br />
360,565<br />
Photo Credit: US Army / Staff Sgt. Matthew Keeler<br />
Main Battle Tanks<br />
531* 2,446<br />
Other Armored Vehicles<br />
1,<strong>10</strong>3 9,031<br />
<br />
600 2,398<br />
Bulgarian mechanized infantry on winter maneuvers.<br />
narrow passes. The country’s second-largest city, Plovdiv,<br />
lies exposed on the southern plain. Two other<br />
important locales would be Burgas and Varna on the<br />
coast, as the control of their port facilities – especially<br />
at Varna – would make it easier for the Turks to push<br />
forward supplies.<br />
<br />
An important fact about Bulgaria’s population is<br />
the large number of ethnic Turks within it. At eight<br />
<br />
20 207<br />
Ground Attack Aircraft<br />
32 207<br />
* Fully operable = 20<br />
COUNTERFACT • 15
Marine Corps Gen.<br />
Joseph Dunford Jr., left,<br />
chairman of the Joint Chiefs<br />
of Staff, speaks with Gen. Hulusi Akar of<br />
the Turkish army, center, and Gen. Valery Gerasimov<br />
of the Russian army in Antalya, Turkey, March 6, 2017. The three<br />
chiefs of defense are discussing their nations’ operations in<br />
northern Syria.<br />
percent they still form a sizable minority, even though<br />
a large number of them have recently begun moving<br />
back to Turkey to take advantage of their parent<br />
country’s better economy and labor market.<br />
In the war being hypothesized here, some portion<br />
of Bulgaria’s Turks could be expected to support the<br />
invading forces as a “Fifth Column.” Even without<br />
resorting to arms, their employment as guides and<br />
informers would render the Turkish military valuable<br />
service. If armed, they could intercept Bulgarian supply<br />
columns behind the front line.<br />
A more recent factor, which could also be used by<br />
the Turks to advantage, is the mass of other Islamic<br />
migrants heading to Europe. Currently held back at<br />
the Bulgarian border, they could be allowed to move<br />
freely once that border was breached. A wave of such<br />
migrants, bussed into occupied parts of Bulgaria<br />
by the Turks, could then continue to walk north,<br />
thereby adding further strain on Bulgarian defensive<br />
operations. That would be especially true if the Turks<br />
armed them, or if they helped themselves to weapons<br />
abandoned on the battlefield. After all, those migrants<br />
are overwhelmingly fighting-age men who, as<br />
the crime statistics now coming out of Europe indicate,<br />
aren’t generally averse to violence.<br />
Not only would the movement of thousands of<br />
migrants force the Bulgarians to divert resources<br />
to stopping them, their very presence could set in<br />
motion a flow of ethnic-Bulgarian refugees. Those<br />
two groups would likely clash with each other, in<br />
a savage war within a war, thereby adding further<br />
strain on the overall Bulgarian defense.<br />
International Reaction<br />
Bulgaria’s most likely allies in a conflict with<br />
the Turks would be Serbia and Romania, who<br />
also have a bitter history of dealing with Ottoman<br />
imperialism. Sadly for the Bulgarians, neither of<br />
those nations, alone or together, has the combat<br />
power – especially in the air – to match the Turks.<br />
Bulgaria’s other neighbor, Greece, is stronger and,<br />
in some ways, might be considered evenly matched<br />
against the Turks, and they would also be positioned<br />
on the invaders’ strategic flank during any such war.<br />
At the same time, though, the decision to support the<br />
Bulgarians could be difficult for the Greeks. Their<br />
many islands near the Turkish coast would be vulnerable<br />
to quick seizure, and their common mainland<br />
border is narrow enough the Turks could protect it<br />
without ending their thrust into Bulgaria.<br />
Further afield are other eastern European countries<br />
that also share a history of Turkish invasion, and that<br />
therefore might summon the political will to move<br />
to help stop a new one. All of them, however, with<br />
the exception of Poland, have only limited military<br />
strength, and they would likely only have the combat<br />
power needed to stop the Turks without an ability to<br />
actually throw them back. Even if all those countries<br />
entered the war on the Bulgarian side, they would be<br />
hard pressed to muster the strength necessary to liberate<br />
any occupied territory.<br />
Western European nations don’t have much of a<br />
military edge over the Turks, either. As things stand,<br />
after a quarter-century of reductions in their defense<br />
budgets, their armed forces are no longer anywhere<br />
near what they used to be. The strongest of them -<br />
Britain, France and Germany – have air forces smaller<br />
than Turkey’s (albeit better equipped), and they can<br />
muster only a total of 244 combat ready main battle<br />
tanks.<br />
16 • COUNTERFACT
There is also the political question of any of those<br />
countries showing willingness to risk the heavy casualties<br />
a clash with Turkey would entail, or even to<br />
go against a Muslim country in defense of a Christian<br />
one. Given their own growing and increasingly<br />
separatist Muslim populations, such an intervention<br />
would carry the risk of an outright break in their<br />
already deteriorating security situations at home.<br />
Of the world’s two largest powers, the US is the<br />
one that could stop and roll back a Turkish invasion<br />
with relative ease. At the same time, though,<br />
America’s hands would be tied by the existence of<br />
the USAF base at Incirlik in Turkey. That facility’s<br />
personnel and their dependents would potentially<br />
become hostages as soon as US intervention was<br />
threatened.<br />
Lastly there is Russia. Though it has a long way to<br />
go to match the US in military strength, the Russian<br />
armed forces have made considerable progress in<br />
recent years. That progress is likely sufficient to stop<br />
and throw back the Turks, though not nearly as fast<br />
or as thoroughly as could the US.<br />
More importantly, though, Russia has demonstrated<br />
the political will to deploy its armed forces<br />
into combat in order to serve their own strategic<br />
interests. If Bulgaria’s turning away from NATO to<br />
enter into Russia’s sphere of influence was on the<br />
table, as it almost certainly would be, that might be<br />
enough of a gain for Putin to order his forces into<br />
action.<br />
<br />
With two overland avenues of approach and an<br />
amphibious one available to the Turks, their options<br />
are three – left, center and right.<br />
The left option would see their main advance<br />
along Highway A4 to Plovdiv and then on to Sofia<br />
from there. The advantage of that approach would<br />
be its potential speed. It’s not only the shortest<br />
route to Sofia; Highway A4 also provides the easiest<br />
route on which to push forces and supplies into the<br />
fight. At the same time, though, and for those same<br />
reasons, that route would certainly be defended by<br />
Bulgaria’s best units. Operations there would likely<br />
be immediately costly in terms of casualties and<br />
equipment wastage.<br />
BULGARIA TURKEY<br />
<br />
25 445<br />
Transport Helicopters<br />
24 475<br />
Attack Helicopters<br />
— 54<br />
Submarines<br />
— 12<br />
<br />
4 16<br />
Corvettes<br />
3 <strong>10</strong><br />
Patrol Boats<br />
— 34<br />
Mine Warfare Craft<br />
<strong>10</strong> 11<br />
Merchant Marine Vessels<br />
80 1,285<br />
COUNTERFACT • 17
Photo Credit: US Air Force photo by Staff Sgt. Nesha Humes<br />
Bulgarian paratroopers wait to load two Super Hercules C-130Js and an<br />
Alenia C-27J Spartan during Exercise Thracian Spring 17 over Plovdiv<br />
Regional Airport, Bulgaria, March 15, 2017.<br />
The center option would see an advance along<br />
Route 7 and then, once the Turks reached east-west<br />
Highway A1, they would turn left toward Plovdiv<br />
and Sofia. The terrain there is more difficult, as the<br />
forested hills would channel their advance into a<br />
series of potential kill zones. Further, Highway A1<br />
doesn’t have the same capacity to handle traffic as<br />
Highway A4. Again, though, for those same reasons,<br />
the Bulgarians wouldn’t defend that approach with<br />
their best.<br />
The Turks’ third option would be to conduct an<br />
envelopment of Bulgaria’s landward defenses by<br />
executing an amphibious operation on the Black Sea<br />
coast. Neither the Bulgarian Navy nor Air Force have<br />
the assets to stop such an operation, or even to inflict<br />
much in the way of losses on the Turks. Nor could<br />
the ground force defeat it once the Turkish marines<br />
set up a secure beachhead.<br />
The Bulgarians have only enough combat power<br />
to defend the two dry land routes into their country<br />
from the south and not much more. As Turkish<br />
diverisonary attacks in the south would still likely be<br />
sufficient to keep some significant portion<br />
of the Bulgarian Army busy there, the road<br />
to Sofia from the beachhead would be<br />
largely open.<br />
As the Turks have sufficient assets for<br />
only one amphibious landing, they would<br />
need to choose between one at Burgas in<br />
the south or one at Varna farther north.<br />
Both locations have beaches perfect for<br />
landing troops, and both have airports<br />
that can be used to ferry in reinforcements<br />
and supplies and to evacuate casualties.<br />
An advantage for landing at Burgas is<br />
the fact the A1 highway that begins there,<br />
runs all the way to Sofia, allowing for<br />
rapid movement of troops and supplies. In<br />
contrast, the A2 highway, which starts in<br />
Varna, goes west for less than a 70 miles,<br />
which would mean the rest of that advance<br />
would have to be made along regular two-lane<br />
roads.<br />
The Burgas option has the disadvantage<br />
that, if the Bulgarians were to pull back their<br />
forces holding the border area south of there, they<br />
would be able to block the A1. If a landing took place<br />
at Varna, on the other hand, no withdrawal in the<br />
south would likely be able to bring troops into position<br />
to block it in a timely way.<br />
<br />
The Bulgarians have two options: defend forward<br />
or in depth. A forward defense would see both their<br />
army brigades blocking the land routes into the country<br />
from the south, using the rough terrain near the<br />
border to form a series of successive defensive positions.<br />
The intent would be to prevent the Turks from<br />
capturing significant Bulgarian territory before some<br />
kind of outside intervention halted the invasion.<br />
Politically, that’s the best option, as it would force<br />
the Turks to fight hard from the moment they crossed<br />
the border. If outside intervention came fast enough,<br />
the invaders would capture only a small piece of the<br />
country, and that would also bring the least harm<br />
to Bulgaria’s civilian population. At the same time,<br />
speedily mounting Turkish casualties might lead to<br />
opposition to the war at home.<br />
18 • COUNTERFACT
Even so, this option is risky from a military standpoint<br />
and could lead to disaster. That is, given the<br />
Turks’ crushing superiority, the Bulgarians wouldn’t<br />
be able to hold any positions near the border for<br />
long. The attackers would punch through, and the<br />
Bulgarians would be forced to withdraw under a hail<br />
of bombs, rockets and missiles from above. That<br />
could deal them such a blow they would be unable<br />
to mount effective resistance anywhere else in the<br />
country, and the Turks might then complete their<br />
conquest with ease. Only if foreign intervention came<br />
before the border defense collapsed, or at least before<br />
the inevitable retreat from it could be turned into a<br />
rout, would this option stand a chance of success.<br />
The second option, defending in depth, is militarily<br />
the better one. Here the Bulgarians would pull<br />
back into the Balkan mountains to make their stand.<br />
Taking advantage of that good defensive terrain, they<br />
could hold ground much longer and inflict heavy<br />
losses on the attackers. Even in this case, however,<br />
the Turks could advance by using vertical envelopment<br />
via helicopter assaults and paradrops. Still, this<br />
option wouldn’t only cost the Turks more time and<br />
blood, the longer the campaign lasted, the greater the<br />
chance of foreign intervention.<br />
On the other hand, this option could be a political<br />
disaster in that at least a third of the country would<br />
speedily come under occupation. Then, if the Turks<br />
repeated what they did on Cyprus – ethnic cleansing<br />
and the bringing in of settlers – the Bulgarians could<br />
see some large portion of their country partitioned<br />
out from under them. That might be the “lesser<br />
evil,” though, as the same could happen to the whole<br />
country if the forward defense was chosen but then<br />
collapsed before foreign intervention stopped the<br />
invaders.<br />
In the end, the Bulgarians’ choice would depend<br />
on their estimate of long foreign intervention would<br />
take to make itself felt. If quickly, then forward<br />
defense would have to be the choice; if slowly, then<br />
defense in depth.<br />
<br />
Overall, the disparity of forces between Turkey and<br />
Bulgaria – not only in quantity, but also in quality –<br />
is so large any conflict between the two would be decisively<br />
one sided. It would be a conflict the Bulgarians<br />
couldn’t win on their own and, at best under present<br />
conditions, they could only hope for a Cyprus-style<br />
cease-fire and partition of their territory. That would<br />
likely be the first step in the subsequent destruction<br />
of independent Bulgaria.<br />
The Bulgarians’ salvation in case of war can only<br />
come in the form of foreign intervention – either<br />
military or political. The strength of the Turkish<br />
armed forces means a military one would require not<br />
only a lot of combat power, but also the acceptance<br />
of potentially heavy losses by the intervening nations.<br />
They would also face the risk of socio-political turmoil<br />
at home from their own Islamic populations.<br />
That would likely require more political will than any<br />
potential interventionist countries possess. CF<br />
COUNTERFACT • 19
20 • COUNTERFACT
By Ty Bomba<br />
Operation<br />
Pincher:<br />
Photo Credit: Pixabay & background Created by BiZkettE1/Freepik<br />
Stalin’s Drive in the Middle East,<br />
1948-49<br />
What If?<br />
COUNTERFACT RULES • 1
CONTENTS<br />
1.0 Introduction<br />
2.0 Components<br />
3.0 Set Up & Hex Control<br />
4.0 How to Win<br />
5.0 Turn Sequence<br />
6.0 Airpower<br />
7.0 Stacking<br />
8.0 Supply<br />
9.0 Reinforcements<br />
<strong>10</strong>.0 Movement<br />
11.0 Combat<br />
12.0 Atomic Attacks & US Prestige<br />
CREDITS<br />
Design & Development: Ty Bomba<br />
Playtesting: Grant Cardwell, Milton Duncan, Sanders and<br />
Isaiah Elliott, Christopher Perello & Sherman Tutweiler<br />
Map Graphics: Ania B. Ziolkowska<br />
Counters & Production: Jon Compton<br />
Layout: Lisé Patterson<br />
1.2 Scales.<br />
Each hexagon on the map represents 60 miles (97 kilometers)<br />
from side to opposite side. Communist units of maneuver<br />
are Soviet and satellite-nation armies (plus super-elite Guards<br />
Airborne divisions) along with Allied armies, corps, divisions,<br />
brigades and regiments. There are no US units on-scene at the<br />
start of play, but army “regimental combat teams” and Marine<br />
Corps regiments and a brigade rush in as reinforcements. Air<br />
power is abstracted, with counters and rules showing the effects<br />
of one side or the other gaining temporary air superiority over<br />
portions of the map.<br />
1.3 Definitions.<br />
If a rule is said to apply to “Communist units,” that means it<br />
applies to all the units of that side (see 2.5). If a rule is said to<br />
apply only to “Soviet” units, it applies to all the subset of Communist<br />
units bearing the “SU,” “8G” or “15G” abbreviations<br />
(for “Soviet Union,” 8 th Guards Airborne Corps” and “15 th<br />
Guards Airborne Corps,” respectively). If a rule is said to apply<br />
to “Allied units,” that means it applies to all the units of that<br />
side, regardless of their nationalities (see 2.6). If a rule applies<br />
only to some further national or unit-type subset of Communist<br />
or Allied units, that will be specifically stated.<br />
Old Hands Note. No reps, no ZOC. (If you don’t know what<br />
that means, you’re not an old hand, but don’t worry about it.)<br />
1.0 INTRODUCTION<br />
1.1 Operation Pincher: Stalin’s Drive In the Middle<br />
East, 1949 – What If?<br />
(OP) is an alternative history wargame that allows two players<br />
investigate the strategic parameters that would’ve been in place<br />
in southeastern Europe and the Middle East had Stalin attacked<br />
there at that time, most likely in conjunction with a drive into<br />
Western Europe. His goal in starting such a southern drive<br />
would’ve been to blitz to the oilfields and Allied base areas in<br />
North Africa and the upper Persian Gulf. That would’ve effectively<br />
broken the geostrategic back of the British Commonwealth<br />
of Nations, disrupted Europe’s oil supply, and delayed the US<br />
from being able to mount an atomic bombardment campaign<br />
into the USSR. The scenario is based on the actual “Pincher”<br />
series of defensive plans drawn up in the Pentagon from 1946<br />
through 1949.<br />
2.0 COMPONENTS<br />
2.1 Components.<br />
The components to a complete game of OP include these rules,<br />
the mapsheet and the sheet of 176 die-cut counters (which are<br />
also referred to as “units” and “unit-counters”). Players must<br />
provide a standard six-sided die to resolve combat and other<br />
probabilistic events in the game.<br />
2.2 Map.<br />
The Game Map illustrates the militarily significant terrain<br />
found around the eastern Mediterranean littoral in 1949 when<br />
portrayed at this scale. A hexagonal (“hex”) grid is printed over<br />
the map to regulate the placement and movement of units across<br />
it, much like in Chess and Checkers. A unit is considered to<br />
be in only one hex at any one time. Every hex on the map has<br />
a unique four-digit identification number printed within it.<br />
They’re provided to help find exact locations more quickly and<br />
to allow for the recording of unit positions if a game has to be<br />
taken down before it can be completed. For example, the city of<br />
Cairo is in hex 18<strong>10</strong>.<br />
2 • COUNTERFACT CT<br />
RULES
Design Note. On the game map, it looks as if the Israelis had<br />
managed to gain and maintain control of both the West Bank<br />
and the Gaza Strip during their first war with the Arabs. Rather<br />
than have to write special rules to handle those two initially<br />
split-controlled hexes, I decided to assume that, the moment<br />
this hypothesized war first began, the Israelis would’ve indeed<br />
reacted by taking those two areas.<br />
2.3 Unit-Counters.<br />
Most of the counters represent combat formations; others are<br />
provided as informational markers and memory aids. After<br />
reading through these rules at least once, carefully punch out the<br />
counters. Using a nail clipper (or an emery board or purposedesigned<br />
counter-clipping device) to remove the nub-like “dog<br />
ears” from their corners will facilitate the units’ easy handling<br />
and stacking during play and will also demonstrate to your opponents<br />
your samurai-like determination and discipline.<br />
2.4 Sample Combat Unit.<br />
Each combat unit-counter displays several pieces of information:<br />
nationality, specific historic identification, unit type and size and<br />
combat strengths.<br />
Historical<br />
Identity<br />
Attack<br />
Factor<br />
Unit Size<br />
Defense<br />
Factor<br />
Unit Type<br />
Nationality<br />
(color scheme)<br />
BACK<br />
(reduced)<br />
Allied Side<br />
British (UK) units – black on tan<br />
Hellenic (Greek) unit – white on black<br />
Iranian & Arab units – white on leaf-green<br />
Israeli units – black on sky blue<br />
US Army units – black on olive drab<br />
US Marine Corps units – white on olive drab<br />
Turkish Units – black on gray<br />
2.6 Historical Identification & Abbreviations.<br />
All units are given their specific identities by the numbers or<br />
names used to designate those formations during this period.<br />
Those abbreviations are defined as follows.<br />
APA – Albanian People’s Army<br />
BPA – Bulgarian People’s Army<br />
DAG – Democratic Army of Greece (Greek Commies)<br />
EA – Egyptian Army<br />
G – Guards<br />
HA – Hellenic Army<br />
IIA – Iranian Imperial Army<br />
Is – Israeli<br />
JA – Jordanian Army<br />
LA – Lebanese Army<br />
MC – Mechanized Corps (Yugoslavian)<br />
SA – Syrian Army<br />
Sh – Shock<br />
SU – Soviet Union<br />
T – Turkey<br />
UK – United Kingdom<br />
US – United States<br />
USMC – United States Marine Corps<br />
Yu – Yugoslavia<br />
2.5 Nationality.<br />
A unit’s nationality, and therefore the side it’s on, is shown by<br />
its color scheme and a two-letter abbreviation.<br />
Communist Side<br />
Soviet Airborne units – white on red<br />
All Other Soviet units – black on red<br />
Yugoslavian units – black on orange<br />
Bulgarian units – black on yellow<br />
Albanian & Greek communist (DAG) units – black on white<br />
2.7 Unit Sizes.<br />
Units’ organizational sizes, from largest down to smallest, are<br />
shown using the following symbols. If a unit’s size symbol is<br />
bracketed, that means its an ad hoc formation, put together solely<br />
for this campaign, rather than being one regularly carried on the<br />
table of organization of its army.<br />
XXXX – army<br />
XXX – corps<br />
XX – division<br />
X – brigade<br />
III – regiment or “regimental combat team” if bracketed<br />
COUNTERFACT CT RULES •<br />
3
2.8 Unit Types.<br />
The following symbols in each counter’s unit-type box distinguish<br />
the various combat arms employed here.<br />
2.12 Marker Counters.<br />
The uses of the following counters are explained at the appropriate<br />
points throughout the rest of the rules.<br />
Armor/Tank<br />
Shock<br />
• Hex Control Markers<br />
(see 3.8 & section 4.0)<br />
Infantry or Combined Arms<br />
Mechanized<br />
Paratroop<br />
• Soviet Guards Airborne Corps Designators<br />
(see 3.5)<br />
2.9 Combat Factors.<br />
Attack and defense factors are the measures of each unit’s ability<br />
to conduct those types of combat operations. Their specific uses<br />
are explained in section 11.0.<br />
• Soviet Victory Point Markers<br />
(see sections 4.0)<br />
• Game Turn Marker (see section 5.0)<br />
2.<strong>10</strong> Movement Factor.<br />
This number – which isn’t actually printed on the counters – is<br />
a measure of a unit’s ability to move across the hex grid printed<br />
over the map. Units pay varied movement costs to enter different<br />
hexes, depending on the terrain in each and, in some cases,<br />
the moving unit’s type. Every unit’s movement factor is four<br />
during first movement phases and two during second movement<br />
phases. See sections 5.0 and <strong>10</strong>.0 for details.<br />
• Allied & Communist Airpower Markers<br />
(see section 6.0)<br />
2.11 Step Strength.<br />
All ground units in the game have one or two “strength steps,”<br />
which are also simply called “steps.” That’s an arbitrary term<br />
used to express the ability of a unit to absorb a certain amount<br />
of combat losses before ceasing to be an effective formation (a<br />
measure of its “robustness” in current US Army jargon). Those<br />
units with combat factors printed on only one side of their<br />
counters are “one-step” units; those with printing on both sides<br />
of their counters are “two-step” units. If a two-step unit suffers a<br />
one-step loss, it’s flipped over so its one-step side (with the lower<br />
combat factors) shows. If a one-step unit, or a two-stepper that’s<br />
already been “reduced,” suffers a step loss, it’s removed from the<br />
map (“eliminated”) and placed into a “dead pile” off to the side.<br />
No fully eliminated unit is ever returned to play, at any level of<br />
step strength, for the remainder of the game.<br />
• Allied & Communist Aerial Supply Markers<br />
(see 8.16)<br />
• Atomic Blast Markers<br />
(see section 12.0)<br />
4 • COUNTERFACT CT<br />
RULES
3.0 SET UP & HEX CONTROL<br />
3.1 In General.<br />
The players should first decide which of the two sides each will<br />
control. One player commands the Communist forces while the<br />
other commands the Allied forces. After determining sides, the<br />
players should each take the units under his own command (see<br />
2.5) and sort them onto and around the maps according to the<br />
instructions below. Note that stacking rules apply during set up<br />
(see section 7.0). Set up using the step-by-step sequence given<br />
below.<br />
3.2 US Reinforcements & Aerial Supply Marker.<br />
The Allied player should set aside, within easy reach off to the<br />
side of the maps, his side’s aerial supply marker along with the<br />
four USMC units. He should then take all the US Army regimental<br />
combat teams and place them into a large-mouth opaque<br />
container (such as a cereal bowl or coffee mug), Those US Army<br />
and Marine Corps units form the Allied reinforcement pool,<br />
meaning they will only enter play on the map after the game has<br />
already begun. Note there are no other reinforcements for the<br />
Allied side.<br />
3.3 Allied On-Map Set Up.<br />
The Allied player next sets up the HA unit anywhere in mainland<br />
Greece, all the Turkish units anywhere in that country, the<br />
IIA unit anywhere in Iran, the EA unit in Cairo, the Is, JA, LA<br />
and SA units anywhere in their respective countries and, finally,<br />
the UK units in Suez (19<strong>10</strong>) and/or Port Said hexes (1811).<br />
3.4 Communist Set Up.<br />
The Communist player should begin his side’s set up by setting<br />
off to the side, within easy reach, all seven of the Soviet<br />
guards airborne divisions and his side’s aerial supply marker.<br />
He should then place the Albanian, Yugoslavian and Bulgarian<br />
units anywhere in their respective countries. He also sets up<br />
the DAG unit anywhere in Yugoslavia. He should next place all<br />
Soviet armies, along with the 8G and 15G Corps markers, into a<br />
second large-mouth opaque container, and then blindly (meaning<br />
without looking) pulls 14 of those counters. The ones not<br />
pulled are out of play and should be put back into their storage<br />
container. Further in regard to Soviet unit set up, see rule <strong>10</strong>.22.<br />
If one of the counters the Communist player pulled during<br />
the step above was the 8 th Guards Airborne Corps marker, he<br />
should add the 7 th , 76 th and 98 th Guards Airborne Divisions to<br />
the armies he pulled from the container. He should then put<br />
away that corps marker as it has no further function during<br />
play. If one of the counters the Communist player pulled during<br />
the step above was the 15 th Guards Airborne Corps marker, he<br />
should add the <strong>10</strong>3 rd , <strong>10</strong>4 th , <strong>10</strong>5 th and <strong>10</strong>6 th Guards Airborne<br />
Divisions to the armies he pulled from the container. He should<br />
then put away that corps marker as it has no further function<br />
during play. It’s possible the Communist player will get one,<br />
both or neither of the airborne corps. For further details on<br />
those divisions’ entry into play on the map, see 5.8, 6.5, 8.16,<br />
8.17, 9.2, 9.4 and 11.23<br />
3.6 Soviet Armies Set Up.<br />
All the Soviet armies drawn by that player as given above in 3.4<br />
are now set up by that player in any hexes in the USSR and/or<br />
Bulgaria.<br />
3.7 Marker Deployment.<br />
Put the Turn marker in the “1” box of the Turn Track printed<br />
on the mapsheet. Put the “x<strong>10</strong>” and “x1” markers into the “0”<br />
box of the Communist Victory Points Track. Put an Atomic<br />
Blast marker into the “0” (zero) box of the US Atomic Attacks<br />
This Turn Track. Put the Hex Control and Atomic Blast markers<br />
into any easily reached pile off to the side of the map. That<br />
completes set up.<br />
3.8 Hex Control.<br />
The idea of “hex control” — which side “owns” which hexes<br />
at any given instant — is important for purposes of judging<br />
victory (see section 4.0). At the start of play the Communist<br />
side controls all hexes in the USSR, Bulgaria, Yugoslavia and<br />
Albania; the Allied side controls all others. The control status<br />
of a hex switches from one side to the other whenever a ground<br />
unit from the other side enters it. Control switching is immediate,<br />
and may occur and reoccur in the same hexes any number<br />
of times during play. Hex control markers are provided for use<br />
on the board to help keep track of which hexes are controlled by<br />
which side in areas where the deployment of actual units doesn’t<br />
make that clear.<br />
3.5 Soviet Airborne Reinforcements.<br />
The only reinforcement units mandated as such on the Communist<br />
side are (possibly) the seven Soviet Airborne Divisions.<br />
COUNTERFACT CT RULES •<br />
5
4.0 HOW TO WIN<br />
4.1 In General, the Communist player is generally on the<br />
offensive, trying to win by driving into Allied territory as fast as<br />
possible and in such a way as to bring about the conquest of as<br />
much of the map as possible. The Allied player wins by preventing<br />
the Communist player from having fulfilled that side’s victory<br />
conditions as judged at the conclusion of Turn 8.<br />
4.2 When to Check for Victory.<br />
The various kinds of victory are generally only checked during<br />
Phase IV of Game Turn 8. Of course, the game may also end at<br />
any time if either player assesses the situation to be hopeless and<br />
therefore capitulates unconditionally to the other player.<br />
4.4 Winning on Points.<br />
If the Soviet player didn’t have either guards airborne corps in<br />
his order of battle, at the end of Turn 8 he’s considered to have<br />
won the game if he has 30 or more VP at that time. If the Soviet<br />
player had either one of the guards airborne corps in his order<br />
of battle, at the end of Turn 8 he’s considered to have won the<br />
game if he has 40 or more VP at that time. If the Soviet player<br />
had both guards airborne corps in his order of battle, at the end<br />
of Turn 8 he’s considered to have won the game if he has 50 or<br />
more VP at that time.<br />
4.5 Allied Victory.<br />
The Allied player wins the game if, at the end of Turn 8, the<br />
Communist player hasn’t fulfilled that side’s victory conditions<br />
as given above.<br />
4.3 Communist Victory Points.<br />
The Communist player earns victory points (VP) for controlling<br />
various kinds of hexes according to the list below. At the start<br />
of play he has zero VP; keep a running total of them, recording<br />
each change immediately as it happens. Note the Communist<br />
player will have fewer than zero VP and the Allied player never<br />
earns VP. Also note the status of a hex in regard to supply and<br />
having been nuked has no bearing on its yield of VP.<br />
• Istanbul = <strong>10</strong> VP<br />
• Jerusalem = <strong>10</strong> VP<br />
• Every other city in mainland Europe and Asia = 1<br />
VP<br />
• Every other major city in mainland Europe and Asia<br />
= 2 VP<br />
• Every oilfield = 3 VP<br />
• Every Libyan, Egyptian or island city or major city =<br />
5 VP<br />
• Variable VP due to US atomic attacks (see section<br />
12.0)<br />
Design Note. If hex contains both a city and an oilfield, it has<br />
the VP value of both combined.<br />
Historical Note. The cities in the final category above are worth<br />
so much more than the others on the map because it was from<br />
bases in North Africa and on the Mediterranean islands the<br />
USAF was to later launch the (atomic) strategic air campaign<br />
that would ultimately win the war for the Allies.<br />
Design Note. All the cities and major cities have been deliberately<br />
omitted from the Communist home areas on the map.<br />
That way, though Allied units are allowed to potentially move<br />
into and through those countries, there’s no VP advantage for<br />
doing so. That’s because, all the Pincher series plans were totally<br />
defensive in nature; the US and its allies were not logistically or<br />
strategically prepared to go on the offensive at the grand strategic<br />
level in this theater at this time. Their objective would’ve been to<br />
defeat the Communist attack, not start one of their own.<br />
5.0 TURN SEQUENCE<br />
5.1 In General.<br />
Every game turn of OP is divided into two “player turns,” one<br />
Communist and one “Allied.” That full sequence makes up one<br />
“game turn,” of which there are a maximum of eight in an entire<br />
match. The Communist Player Turn is the first player turn in<br />
every game turn. Every action taken by a player must be carried<br />
out during the appropriate part of the sequence outlined below.<br />
Once a player has finished a particular phase, or a specific activity<br />
within a phase, he may not go back to perform some forgotten<br />
action or redo a poorly executed one unless his opponent<br />
graciously permits it.<br />
5.2 Turn Sequence.<br />
The game turn sequence is given below in outline. The rest of<br />
the rules are organized, as much as possible, to explain things in<br />
the order they’re encountered as you go through this sequence<br />
in each game turn.<br />
6 • COUNTERFACT CT<br />
RULES
Turn Sequence Outline<br />
I. Airpower Phase<br />
II. Soviet Player Turn<br />
A. Soviet First Movement Phase<br />
B. Soviet First Combat Phase<br />
C. Soviet Second Combat or Second Movement Phase<br />
III. Allied Player Turn<br />
A. Allied First Movement Phase<br />
B. Allied First Combat Phase<br />
C. Allied Second Combat or Second Movement Phase<br />
D. US Reinforcement Phase<br />
IV. Administrative Phase<br />
5.3 Second Movement or Combat Phase.<br />
At the start of Phase II.C. in every Communist Player Turn, and<br />
at the start of Phase III.C. in every Allied Player Turn, the player<br />
taking his turn must declare whether he will finish it with a second<br />
movement phase or a second combat phase. That decision<br />
is always up to each commander. No matter what phase choice a<br />
player makes, all his units are bound by that decision.<br />
5.4 Second Movement Phase MF Reduction.<br />
All the normal movement rules given in section <strong>10</strong>.0 pertain in<br />
second movement phases with the following special restriction:<br />
all units only have movement factors of two rather than the four<br />
of first movement phases.<br />
5.5 Second Combat Phase Odds Shift Penalty.<br />
All the normal combat rules given in section 11.0 pertain in<br />
second combat phases, but with added restriction that all attacks<br />
suffer a one-column-left odds reduction (in addition to all other<br />
applicable odds shifts).<br />
5.6 Ending a Game Turn.<br />
Game Turns 1 through 8 are completed when each one’s Phase<br />
IV is concluded. At those times move forward by one box the<br />
Game Turn marker on the Game Turn Track printed on the<br />
mapsheet.<br />
5.8 Communist Reinforcements.<br />
The only Communist reinforcements available are the Soviet<br />
guards airborne divisions that may have been included in that<br />
side’s order of battle as given in 3.5, and which are entered into<br />
play during any of that side’s movement phases (first or second).<br />
See 5.8, 6.5, 8.16, 8.17, 9.2, 9.4 and 11.23 for more details on<br />
both Soviet and US airborne entries and special combat rules in<br />
that regard.<br />
5.9 Administrative Phases.<br />
During these phases, the players should cooperate to clean up<br />
around the map, moving and adjusting markers as necessary to<br />
prepare for the start of the new turn.<br />
6.0 AIRPOWER<br />
6.1 In General.<br />
At the start of the Airpower Phases of Turns 2 through 8, both<br />
players openly a die. The side getting the higher total has “air<br />
superiority” for that turn all across map (reroll ties). If you had<br />
air superiority the turn prior, add one to your roll this turn; however,<br />
that addition may never be greater than one no matter how<br />
on many previous turns you may have had air superiority. Subtract<br />
the lower rolled total from higher roll total: the winning<br />
player gets that many airpower markers (one through five). He<br />
immediately places all those markers as described below. Note<br />
there will never be a turn in which both players have airpower<br />
markers deployed on the map at the same time. Also note the<br />
Soviet player will automatically always get a +1 modifier to his air<br />
superiority die roll on Turn 2.<br />
6.2 Turn 1 Communist Air Superiority.<br />
On Turn 1, due to the factor of strategic surprise, the Communist<br />
player is guaranteed to have air superiority that turn. Only<br />
he rolls an airpower die that turn. That result is the number of<br />
Airpower Markers he deploys that turn. (If he rolls a six, he still<br />
only gets five markers.)<br />
5.7 US Overseas Reinforcement Phases.<br />
See <strong>10</strong>.4 for details on this phase. It is the method by which US<br />
Army reinforcements enter play on the map after having come<br />
from overseas. Note that this phase is skipped during Game<br />
Turn 1.<br />
6.3 Placement.<br />
Available airpower markers may be placed in any hexes on the<br />
map. Friendly and enemy ground unit presence has no bearing<br />
on this. Note, though, no more than one marker may be placed<br />
in any one hex. All available markers must be deployed.<br />
COUNTERFACT CT RULES •<br />
7
6.4 Range.<br />
Every airpower marker on the map effects the hex in which it’s<br />
placed and all six of the immediately surrounding hexes. That’s<br />
termed its “range.” If the ranges of two or more friendly airpower<br />
markers overlap, there are no additive effects because of it.<br />
6.5 Airpower’s Effect on Enemy Movement.<br />
For an enemy unit or stack to make a regular move into a hex<br />
that’s in range of one or more of your airpower markers, it must<br />
pay an extra movement point (MP) to do so for each such hex<br />
entered, for both in-hex and hexside costs. Your own airpower<br />
markers have no effect on the movement of your own forces.<br />
Note that enemy airpower presence in a hex doesn’t absolutely<br />
prohibit your units making regular moves into and/or through<br />
such hexes; it merely makes it more expensive in terms of movement<br />
point expenditures. Also note neither player may make<br />
paratroop airdrops in range of an enemy airpower marker.<br />
6.6 Airpower & Combat.<br />
If you make an attack into a hex that’s in range of one or more<br />
of your airpower markers, your attack gains a one-column<br />
rightward shift (cumulative with all other applicable bonus<br />
and penalty shifts). Conversely, if an enemy attack is launched<br />
against one of your forces, and that defending force is in range<br />
of one or more of your airpower markers, that defense benefits<br />
from a one-column leftward shift (cumulative with all other applicable<br />
bonus and shifts). Those shifts never amount to more<br />
than one column per battle, no matter how many markers are<br />
in range. Also note these shifts are applicable in both first and<br />
second combat phases.<br />
6.7 Soviet Airpower & US Atomic Attacks.<br />
No US atomic attack may take place within range of one or<br />
more Soviet airpower markers. Note that doesn’t mean Soviet air<br />
superiority on any given turns work to prevent any US atomic attacks;<br />
it only does so within the range of the individual markers<br />
deployed on the map.<br />
6.8 Airpower Marker Retrieval.<br />
Deployed airpower markers remain on the map until the Administrative<br />
Phase of each turn, at which time they’re retrieved for<br />
use again in the next turn. Airpower markers are never subject<br />
to elimination; all the markers are always available for use as<br />
described above.<br />
7.0 STACKING<br />
7.1 In General.<br />
Stacking is the term used to describe the piling of more than<br />
one friendly unit in the same hex at the same time. Opposing<br />
grounds units will generally never stack together; generally only<br />
friendly units stack together. See 11.23 and 11.24 for the exceptions.<br />
7.2<br />
The stacking rules are in effect for both sides during set up and<br />
all through every phase of every turn. You therefore need to be<br />
careful in regard to the order in which you move your units;<br />
otherwise, moves made carelessly early in your movement phases<br />
may work to jam you up later in those phases. If, at the end of<br />
any phase, any hexes are found to be over-stacked, the player<br />
owning the units in those hexes must eliminate enough excess<br />
units there, of his choice, so as to bring the hexes into compliance<br />
with the stacking rules.<br />
7.3 Stacking Limit.<br />
The stacking limit for both sides is a maximum of seven units.<br />
Note that for stacking purposes step and combat strength and<br />
have no bearing; however, each (XXXX) army and corps (XXX)<br />
sized formation counts as “two units” for stacking purposes.<br />
7.4<br />
None of the markers pictured in rule 2.12 have any stacking<br />
value, and they may be placed in any hexes according to the rules<br />
for their respective uses.<br />
7.5<br />
Both players are always free to examine all stacks on the map<br />
and the map sheets, both friendly and enemy.<br />
7.6 Stacking Order.<br />
The top-down/bottom-up order in which units in a hex are piled<br />
together has no significance.<br />
7.7 International & Inter-Service Stacking is allowed for<br />
both sides, but only within the strictures of rule <strong>10</strong>.19. US Army<br />
and USMC units may stack together without any special considerations<br />
coming into effect.<br />
8 • COUNTERFACT CT<br />
RULES
8.1 In General.<br />
8.0 SUPPLY<br />
In order for a unit to be able to move and fight at its full potential,<br />
it must be in supply. Supply for movement is determined at<br />
the moment a given unit begins to move and, once determined,<br />
that status lasts all during a unit’s move. Supply for combat is<br />
determined at the start of each individual battle for all the units<br />
of both sides involved in that battle.<br />
8.2 Tracing Supply Lines.<br />
No counters are provided to represent the materiel consumed<br />
by the combat units. Instead, that’s abstracted into the process<br />
of supply line tracing (“tracing supply”). A unit has supply (“is<br />
in supply”) if it can trace a path of contiguous hexes of any<br />
length from a friendly “supply source hex” to its own location. A<br />
unit without a valid supply line is said to be “out of supply” or<br />
“OOS.”<br />
8.3 Enemy Units & Supply Lines.<br />
Supply paths may generally not be traced into enemy occupied<br />
hexes. See 11.23 and 11.24 for the exceptions.<br />
8.4 Terrain & Supply.<br />
Within the strictures given in this section, the supply lines of<br />
both sides may be traced into and through all kinds of terrain<br />
except for all-sea hexes and hexsides, which is prohibited.<br />
8.5 OOS Movement.<br />
If a unit or stack is found to be OOS at the start of its move,<br />
the movement factor of that force is halved for that phase. That<br />
halving remains in effect throughout that movement phase even<br />
if the moving force moves into a location where it would’ve been<br />
judged to have had supply had it started its move there.<br />
8.6 OOS Combat.<br />
If an attack contains one or more units found to be OOS at<br />
the start of that battle’s resolution, those OOS units have their<br />
attack factor halved when that battle’s odds are calculated. If a<br />
defending force is OOS at the start of that battle’s resolution,<br />
those units have their defense factor halved when that battle’s<br />
odds are calculated. In both those cases, when halving round<br />
up all remainders. If more than one unit in a given battle is to<br />
be halved, add together the combat factors of all such units and<br />
them perform just one halving and rounding.<br />
8.7 Indefinite OOS.<br />
No unit is ever reduced in step strength or fully eliminated<br />
simply for being OOS. Units of both sides may remain OOS<br />
indefinitely.<br />
8.8 Willful OOS.<br />
It’s permitted for both players to move units into hexes in which<br />
they may or will become OOS.<br />
8.9 Appropriate Supply Sources.<br />
Units may only use supply sources appropriate to their own side<br />
as described in the rules below.<br />
8.<strong>10</strong> International Supply Line Tracing is allowed. That<br />
is, the supply lines of units of the various nationalities, both<br />
friendly and enemy, may freely cross each another and my even<br />
run through same hex paths.<br />
8.11 Nuked Hexes.<br />
On both maps, hexes containing an atomic attack marker may<br />
still have supply lines traced into and out of them (but see 8.13<br />
below).<br />
8.12 Home Country Supply.<br />
All units are always in supply for all purposes when in hexes of<br />
their own country.<br />
8.13 UK & US Supply Sources are all the friendly controlled<br />
port (coastal city and coastal major city) hexes on the map. Note,<br />
however, that once a port is nuked, it loses its supply providing<br />
capacity for the rest of the game. Because of the mobility restrictions<br />
on non-UK/US Allied units (see <strong>10</strong>.19), all those other<br />
nationalities will only make use of the home country supply rule<br />
given above in 8.13<br />
8.14 US/UK & SU Coastal Supply.<br />
US/UK units in coastal hexes anywhere on the map are always<br />
in supply while in those hexes. Similarly, Soviet (SU) units in<br />
Black Sea coast hexes (3307 to 3316, inclusive) are always in supply<br />
while in those hexes. That remains true regardless of whether<br />
a coastal hex has been nuked, and it is equally true in the coastal<br />
hexes of all the various oceans, seas and gulfs on the map.<br />
8.15 Communist Supply Sources, which are potentially<br />
available for use as needed by all the nationalities on that side<br />
in the game, are all the friendly controlled all-land hexes on the<br />
north map edge: 3300 to 3307 & 3316 to 3321, inclusive. Those<br />
COUNTERFACT CT RULES •<br />
9
hexes lose their supply-providing capacity while occupied by enemy<br />
units, but they regain that capacity as soon as that condition<br />
is overturned.<br />
8.16 Aerial Supply.<br />
A one hex aerial supply capacity is available to both sides. Either<br />
player may place his side’s aerial supply marker(s) atop any one<br />
of his side’s stacks anywhere on the map anytime during the<br />
turn, provided only that the chosen hex isn’t in range of one or<br />
more enemy airpower markers at that time. All friendly units in<br />
that hex are considered fully supplied while the marker remains<br />
in place. The marker remains in the chosen hex throughout the<br />
remainder of that turn or until it becomes enemy controlled,<br />
whichever comes first. An aerially supplied unit or stack moving<br />
away from the chosen hex might therefore still run into supply<br />
difficulties later in the turn, depending on the phase sequence.<br />
The markers have no step or combat values of their own, but<br />
neither can they ever be eliminated from play. Both are always<br />
available for potential use every turn (but also see below).<br />
8.17 Paratroop Air Assault Supply.<br />
If a paratrooper unit or stack is making an airdrop, no matter if<br />
it’s opposed or unopposed (see 5.8, 6.5, 8.16, 8.17, 9.2, 9.4 and<br />
11.23) that uses its side’s aerial supply capacity for that turn.<br />
8.18 USMC Amphibious Attack Supply.<br />
If a USMC unit or stack is making an opposed amphibious landing<br />
(see 11.24) that unit or force is in supply as an extension of<br />
rule 8.14.<br />
9.0 REINFORCEMENTS<br />
9.1 In General.<br />
Reinforcements are units of both sides that don’t start the game<br />
already in play on the map; rather, they enter play after the war<br />
has already begun. On the Allied side, the only reinforcements<br />
are US units. On the Communist side, the only reinforcements<br />
are the Soviet guards airborne divisions (provided they were<br />
found to be in that side’s order of battle during set up, see 3.4<br />
and 3.5).<br />
9.2 Communist Airborne Reinforcements.<br />
The seven guards airborne divisions constitute the only reinforcements<br />
potentially available to the Communist side during<br />
the game. During any turn the Communist player may decide<br />
to enter one, some or all of those those divisions during any<br />
portion of his first or second movement phase, provided only<br />
that his aerial supply marker isn’t already on the map at that<br />
time. He may pick as their entry location any land hex on the<br />
map other than mountains or marshes or ones in range of any<br />
Allied airpower marker (enemy ground unit occupation is OK).<br />
On any given turn, there may not be more than one drop made.<br />
That selection made, he places the divisions he’s selected into<br />
the chosen hex. They remain there throughout the rest of the<br />
game turn unless eliminated by Allied attack. During that turn<br />
of entry they may neither move nor attack (however, see 11.23 -<br />
Paratroop Air Assaults) but are automatically in aerial supply as<br />
given in 8.17. After their turn of entry, they trace supply (or draw<br />
aerial supply) and move like normal units.<br />
9.3 US Army Reinforcement Arrivals.<br />
Starting on Turn 2, during that turn’s and every subsequent<br />
game turn’s Phase III.D, the Allied player should openly a die<br />
and subtract one from that result. That result (zero through five)<br />
is the number of units he then pulls blindly (without first looking)<br />
from the US reinforcement pool created during set up according<br />
to rule 3.2. The arriving units are generally immediately<br />
placed in any functioning US/UK supply source hex (meaning<br />
an un-nuked and friendly controlled ports) on the map. Also<br />
note, since US reinforcement don’t enter during a movement<br />
phase, it costs them nothing to be placed onto the map.<br />
9.4 US Paratroop (Airborne) Arrivals may, at the Allied<br />
player’s option, enter via airdrop. That is, when they become<br />
available via 9.3 above, that player may enter them in generally<br />
the same way the Soviet airborne are entered. That is, as soon<br />
they become available, he may select any land hex on the map<br />
other than mountains or marshes or ones in range of any Soviet<br />
airpower marker (enemy ground unit occupation is OK). On any<br />
given turn, there may not be more than one drop made. Note<br />
these units would still be entering during the Phase III.D, not<br />
during an Allied Movement Phase. Such units will afterward<br />
need to trace supply normally or be provided aerial supply and<br />
they would use up the Allied aerial supply capacity on the turn<br />
of their airdrop. If this kind of entry isn’t made on their turn<br />
of their initial availability, the Allied player must enter them as<br />
regular ground reinforcements. If a chosen airdrop entry hex<br />
contains any Communist unit(s) immediately resolve the resultant<br />
air assault combat in that hex using the same procedure as<br />
given in 11.23.<br />
<strong>10</strong> • COUNTERFACT CT<br />
RULES
Historical Note. The restrictions on US paratroop entry given<br />
above are meant to model the historic fact that, despite the Anglo-Allies<br />
having been the first powers to ever organize a whole<br />
“Airborne Army” in WW2, that combat arm had been allowed<br />
to wither away in the years after 1945. On the Soviet side, their<br />
high command had intensely studied the airborne operations<br />
of WW2 that had been conducted on all sides, and they would<br />
therefore have been better prepared in regard to deployment<br />
timing and flexibility.<br />
9.5 No US Army Delays.<br />
No US Army reinforcement of any type may have its arrival<br />
delayed to a later turn. Any US Army units not entered during<br />
their turn of arrival are simply put back into the reinforcement<br />
pool.<br />
9.6 USMC Reinforcements.<br />
The four USMC units in the counter-mix aren’t placed into the<br />
pool of US Army reinforcements. Instead, starting during Phase<br />
III.D. of Game Turn 3, they become available one per turn (chosen<br />
deliberately by the US player). That means all four will have<br />
become available by that phase in Game Turn 6. The Marines’<br />
arrivals aren’t debited against the Allied player’s reinforcement<br />
rolls for US Army units.<br />
Unlike US Army reinforcements, the USMC units may be held<br />
off-map indefinitely by the Allied player. He may choose to enter<br />
them – singly, a few at a time, or as a unified group – as if they<br />
were (non-paratroop) army reinforcements during Phase III.D.,<br />
or he may bring them ashore via amphibious assault, either opposed<br />
or unopposed, during any of his movement phases. For<br />
details on that, see <strong>10</strong>.20 and 11.24.<br />
<strong>10</strong>.0 MOVEMENT<br />
<strong>10</strong>.1<br />
Every ground unit in the game has a movement factor of four<br />
during their side’s first movement phases and two during their<br />
side’s second movement phases. That’s the number of “movement<br />
points” (also called “MP,” “movement factors” and “MF”)<br />
available to the unit to use to move across the hex grid during<br />
its side’s movement phases in each game turn. Units move from<br />
hex to adjacent hex – no “skipping” of hexes is allowed – paying<br />
varied costs to do so depending on the terrain in, and barriers<br />
along the sides of, the hexes being entered. The movement of<br />
each player’s ground units takes place only during his own player<br />
turn’s movement phases and reinforcement entries.<br />
<strong>10</strong>.2 Limits.<br />
MP may not be accumulated from turn to turn or phase to<br />
phase, nor may they be loaned or given from one unit or stack<br />
to another. A player may potentially move all, some, or none of<br />
his units in each of his movement phases throughout the game.<br />
Moving units aren’t required to expend all their MP before stopping.<br />
The movement of each unit or stack must be completed<br />
before that of another is begun. A player may only change the<br />
position of an already moved unit or stack if his opponent agrees<br />
to allow it.<br />
<strong>10</strong>.3 Minimum Movement Ability.<br />
Every unit is generally guaranteed the ability to move at least one<br />
hex during a friendly movement phase by expending all its MF<br />
in order to do so at the very start of its move (no matter what<br />
would otherwise be the exact numeric costs involved). Note,<br />
however, that guarantee doesn’t allow units to enter hexes or<br />
cross hexsides that are otherwise impassable.<br />
<strong>10</strong>.4 Stack Movement.<br />
To move together as a stack, units must begin a friendly movement<br />
phase already stacked together in the same hex. Units<br />
aren’t, however, required to move together simply because they<br />
started a friendly movement phase in the same hex; such units<br />
might be moved together, individually or in sub-stacks.<br />
<strong>10</strong>.5 Splitting Stacks.<br />
When moving a stack, you may halt it temporarily to allow a<br />
unit or sub-stack to split off and move away on a separate course.<br />
The units left behind in the original (or “parent”) stack may<br />
then resume their own movement, even splitting off other units<br />
if desired. Once you begin moving an entirely different parent<br />
stack, or an individual unit that began in a different hex than<br />
the currently moving parent stack, you may no longer resume<br />
the movement of the earlier stack without your opponent’s<br />
permission.<br />
<strong>10</strong>.6 Terrain & Movement.<br />
All terrain features on the map are classified into two broad categories:<br />
natural and manmade. Both those categories are further<br />
divided into different types (see below). There’s never more than<br />
one type of natural terrain in any one hex, but more than one<br />
type of manmade terrain may exist in the same hex.<br />
<strong>10</strong>.7 Natural Terrain & Water Barriers.<br />
There are the following types of natural terrain and hydrographic<br />
features on the map: clear, mountain, marsh, river hexsides<br />
and all-sea/lake/strait hexes and hexsides and Qattara Depres-<br />
COUNTERFACT CT<br />
RULES •<br />
11
sion hexsides. The effects those various features have on the<br />
movement of units are described below and are also summarized<br />
on the Terrain Effects Chart (TEC) printed on the mapsheet for<br />
quick reference during play.<br />
<strong>10</strong>.16 Oilfields generate no movement costs on<br />
their own; entry into oilfield hexes is determined<br />
by the other terrain in their hex and any water barriers<br />
around their hexsides.<br />
<strong>10</strong>.8 Clear terrain is the “base” terrain of the<br />
game; it’s devoid of any natural features that would<br />
enhance defense or slow movement at this level of<br />
operations. Each clear hex costs all ground units<br />
one MP to enter. All city and major city hexes are considered to<br />
otherwise be clear terrain.<br />
<strong>10</strong>.9 Mountains.<br />
Each mountain hex costs most units two MP to<br />
enter.<br />
<strong>10</strong>.17 Transport Line Movement.<br />
The “transport line” hexes on the map represent<br />
amalgamated representations of this region’s main<br />
railroads and highways in 1949 (based on US Army<br />
maps from that period). Therefore, as long as a moving unit<br />
moves from one transport line hex to another transport line hex<br />
by crossing a transport line hexside, that move only costs that<br />
unit only one-half of a movement point. That is, all normal inhex<br />
and hexside movement costs are suspended for units using<br />
that kind of movement (but also see 12.6).<br />
<strong>10</strong>.<strong>10</strong> Marsh hexes cost two MP to enter.<br />
<strong>10</strong>.11 River, Strait & Lake Hexsides.<br />
These water barriers exist between hexes, along<br />
the hexsides, rather than lying in-hex. Every such<br />
hexside may generally be crossed by units by paying<br />
one extra MP for that crossing. “Extra” means in<br />
addition to whatever normal movement cost is<br />
involved for the hex being entered. For all rules<br />
purposes, the Dead Sea, Bahr al-Milh, Buhayrat<br />
ath-Tharthar and Hawar al-Hammar (as well as<br />
Lakes Van and Orumiyeh) are considered lakes<br />
<strong>10</strong>.12 All-Sea hexes & Hexsides.<br />
No movement or combat is generally allowed across<br />
or into them, but see <strong>10</strong>.20 below for the exception.<br />
<strong>10</strong>.13 Qattara Depression hexsides may not be<br />
crossed by any unit.<br />
<strong>10</strong>.14 Manmade Terrain & Movement.<br />
Manmade terrain exists in the following types:<br />
cities, major cities, oilfields, transport lines and<br />
border hexsides.<br />
<strong>10</strong>.18 Cumulative Costs.<br />
The total movement cost for entering any hex is always the sum<br />
of all the applicable in-hex and hexside costs.<br />
<strong>10</strong>.19 Multi-National Stack Movement & Geographic<br />
Restrictions.<br />
Within the nationally determined geographic restrictions given<br />
below – and also printed on the mapsheet for quick reference<br />
during play – international stacking and movement is allowed<br />
without penalty for both sides. Note that SU, UK and US units<br />
may potentially move anywhere on the map. Also note “Arab<br />
units” are all Egyptian, Jordanian, Lebanese and Syrian units in<br />
the counter-mix.<br />
GEOGRAPHIC RESTRICTIONS<br />
Nationalities<br />
Albanian,<br />
Bulgarian, Greek<br />
Communist &<br />
Yugoslavian<br />
Arab, Greek,<br />
Iranian, Israeli<br />
& Turkish<br />
Only Move & Fight In<br />
Europe & Asiatic Turkey. May not<br />
attack across the border hexsides<br />
of Asiatic Turkey.<br />
Anywhere in their own countries.<br />
May attack, but not advance after<br />
combat, across their respective<br />
nation’s border hexsides.<br />
<strong>10</strong>.15 Cities & Major Cities.<br />
The cost for entering un-nuked city or major city<br />
hexes is one MP for all units. Except for purposes<br />
of adjudicating victory points (see section 4.0),<br />
there are no functional differences between city<br />
and major city hexes.<br />
12 • COUNTERFACT CT<br />
RULES
<strong>10</strong>.20 US/UK Sea Moves.<br />
During each of that side’s first and second movement phases,<br />
the Allied player may move-by-sea up to one full stack of US<br />
and/or UK units. Each such move must begin and end in a<br />
friendly controlled and un-nuked port. Units that make sea<br />
moves may not move in any other way or attack that turn. That<br />
latter condition remains in place no matter the phase sequence<br />
being used that turn. Sea moves may not be made during Allied<br />
Movement Phases in which a USMC amphibious landing is<br />
made (see 9.6).<br />
<strong>10</strong>.21 Paratroop Airdrops.<br />
See 5.8, 6.5, 8.16, 8.17, 9.2, 9.4 and 11.23.<br />
11.3 Multi-Hex Attacks.<br />
An enemy occupied hex may be attacked in one battle by as<br />
many of your units as you can bring to bear from one, some or<br />
all the surrounding hexes; however, no more than one hex may<br />
ever be the object of any one attack.<br />
11.4 Indivisibility of Individual Units.<br />
No single attacking unit may have its attack factor divided and<br />
applied to more than one battle. Likewise, no defending unit<br />
may have part of its defense factor attacked by one or a few<br />
attackers while another part is attacked by others. No attacking<br />
unit may attack more than once per combat phase, and no defending<br />
unit may be attacked more than once per combat phase.<br />
<strong>10</strong>.22 Soviet Black Sea Amphibious Move.<br />
During the Communist set up (see 3.4) that player may place any<br />
one Soviet (SU) combined arms army (with factors of 4-6/2-3)<br />
in any unoccupied Turkish Black Sea coast hex from 3<strong>10</strong>7 to<br />
3217, inclusive. If that set up option isn’t taken, or it’s blocked<br />
by there being one or more Turkish units in every one of those<br />
hexes (unlikely), it may not be conducted later in the game.<br />
11.0 COMBAT<br />
11.1<br />
Attacks take place between adjacent opposing units during the<br />
combat phases in every player turn. Attacking is generally voluntary;<br />
the mere fact of enemy unit adjacency doesn’t necessitate<br />
your units launch attacks against those adjacent enemy units.<br />
Both players are generally free to attack or not, as each chooses<br />
on a case by case basis, during both of his own combat phases<br />
in each turn throughout the game. (For the two exceptions, see<br />
11.23 and 11.24 below.) The player whose combat phase it is, is<br />
considered the “attacker,” and the other player is considered the<br />
“defender,” no matter the general situation across the map.<br />
11.2 Multiple Defenders in One Hex.<br />
If there are two or more enemy units in a hex being attacked<br />
by your units, you may only attack that stack as if it were one<br />
combined defending unit.<br />
11.5 Attack Sequencing.<br />
There’s no arbitrary limit on the number of attacks each player<br />
may resolve during his combat phases. The attacker need not declare<br />
all his attacks beforehand, and he may resolve them in any<br />
order he wishes, as long as the resolution of one is completed<br />
before that of the next is begun.<br />
11.6 Stacks Attacking & Defending.<br />
It’s not necessary for all the units you have stacked in a given hex<br />
to participate in the same attack. Some of the units in a stack<br />
might attack into one hex while others attacked into some other<br />
hex or simply didn’t attack at all. No defending unit may ever<br />
refuse combat; all units in an attacked hex must participate in its<br />
defense.<br />
11.7 Combat Procedure.<br />
Normally the attacking player should strive to have several times<br />
more attack factors involved in a battle than the defender has<br />
defense factors. Such battles are called “high odds” attacks. To<br />
resolve such fights, the attacking player begins by calculating his<br />
“odds.” Do that by adding together the attack factors of all the<br />
attacking units involved in the battle; then add up the defense<br />
factors of the enemy units defending in the battle. Divide the<br />
defender-total into the attacker-total and round down any<br />
remainder. For example, if 26 attack factors attack 7 defense<br />
factors, the situation yields an odds ratio of 3:1 (“three to one”).<br />
That is, 27÷7=3.71, which rounds down to 3. To turn that “3”<br />
into a ratio, you must set a “1” next to it on the right. Thus “3”<br />
becomes “3:1,” which corresponds to a column-heading on the<br />
Combat Results Table (CRT) printed on the mapsheet.<br />
COUNTERFACT CT<br />
RULES •<br />
13
11.8 Poor Odds Attacks.<br />
Battles in which the attacking force has fewer combat factors<br />
than the defender are called “poor odds attacks.” Procedures in<br />
such situations are modified from what’s described above in that<br />
here you divide the defender’s total by the attacker’s, round up<br />
all remainders, and set the “1” on the left side of that result. For<br />
example, if a force with 5 attack factors is attacking a force with<br />
11 defense factors, it’s a poor odds attack. In that case, divide 11<br />
by 5 (11÷5=2.2), and round up (2.2 becomes 3); then set a “1”<br />
on the left of that “3,” yielding odds of 1:3 (“one to three”).<br />
11.9 CRT Odds Limits.<br />
Note the column headings on the CRT range from 1:2 to 6:1.<br />
Final odds greater than 6:1 are resolved at 6:1. Odds less than<br />
1:2 always receive automatic “2/0” results.<br />
11.<strong>10</strong> Odds Shifters.<br />
Combat odds may be modified by the terrain in the defender’s<br />
hex and around its perimeter, as well as by other factors described<br />
below. All applicable odds shifters are cumulative in<br />
their effects. That is, in every battle, all applicable shifts are applied<br />
to get one final left or right shift. Leftward shifts favor the<br />
defender; rightward shifts favor the attacker.<br />
11.16 Combat Air Support.<br />
If you conduct one or more attacks and/or defenses within one<br />
or more of your airpower marker’s ranges, those combats get a<br />
one-column odds shift in your side’s favor. That bonus is never<br />
increased beyond one odds shift per battle, however, even if a<br />
particular combat is in range of more than one marker.<br />
11.17 Concentric Attack.<br />
If a defending hex is attacked by units in opposite hexes, or by<br />
units from three surrounding hexes with one hex between each<br />
and the next attacker-occupied hex, or by units from more than<br />
three hexes, that attack may be eligible to receive the “concentric<br />
attack” one-column right odds shift bonus. The concentric shift<br />
is never awarded for attacks into city or major city hexes (nuked<br />
or not), but is otherwise always available when the attacking<br />
units are positioned as described above.<br />
11.18 Final Combat Resolution.<br />
After all applicable odds shifts have been applied, the attacker<br />
rolls a die and cross-indexes that result beneath that proper odds<br />
ratio column to get a “combat result.” For example, a result of<br />
“6” rolled for an attack made at 3:1 odds yields a combat result<br />
of “2/1.”<br />
11.11 Clear Terrain.<br />
Units defending in clear terrain hexes devoid of all other terrain<br />
features derive no benefit to their defense.<br />
11.12 Mountains.<br />
Units defending in mountain hexes receive a one-column-left<br />
(1L) benefit on that account.<br />
11.13 Marsh.<br />
Units defending in marsh hexes derive no benefit to their<br />
defense.<br />
11.14 River, Straits & Lake Hexsides.<br />
If all the attacking units in a battle are attacking across any<br />
combination of these types of water barrier hexsides, that attack<br />
suffers a one-column-left (1L) odds shift on that account.<br />
11.15 Cities & Major Cities.<br />
Shift the odds one column leftward (1L), and no concentric attack<br />
bonus (see 11.17 below) is ever possible when attacking any<br />
defenders in a city or major city.<br />
11.19 Combat Results given in terms of steps lost by the<br />
involved forces of one or both sides. The number printed to<br />
the left of each result’s slash applies to the involved attacking<br />
units; the number printed to the right of the slash applies to the<br />
involved defending units. For example, a combat result of “1/2”<br />
would mean the involved attacking force must lose a total of one<br />
step, while the involved defending units must lose a total of two<br />
steps. In each battle the defender must always completely absorb<br />
his combat result before the attacker absorbs his. There is never<br />
any carry over of a combat result from one battle into any other<br />
battle or phase or turn. Any combat losses in excess of those<br />
involved are ignored.<br />
11.20 Apportioning Losses.<br />
Within the strictures given above, both players are always free to<br />
apportion his own side’s step losses among his involved attacking<br />
or defending units as he sees fit.<br />
11.21 Advance-After-Combat.<br />
At the end of every attack, whenever the defender’s hex is left<br />
empty of all units, the victorious surviving attacking units may<br />
14 • COUNTERFACT CT<br />
RULES
advance-after-combat into that hex. Stacking limitations must be<br />
observed. Such advances aren’t part of normal movement; they<br />
don’t cost any MP, but advancing units must still observe normal<br />
terrain prohibitions. Advancing-after-combat is an option; it’s<br />
never mandatory; however, the decision to advance must be<br />
made immediately after the battle is resolved and before that of<br />
another is begun. It’s not necessary for advancing attackers to<br />
stack-full the newly won hex; the victorious player may send just<br />
one or a few units. There’s never any defender advance-aftercombat;<br />
victorious defenders and simply hold in place.<br />
11.22 Multi-National Attacks & Defenses.<br />
Within the strictures given in <strong>10</strong>.19, multi-national attacks and<br />
defense are permitted for both sides without any special considerations<br />
or penalties or bonuses.<br />
11.25 US 1st Marine Division is said to be deployed whenever<br />
any three or four of the USMC units in the counter-mix<br />
are in the same hex. Whenever that situation pertains, all Allied<br />
defenses in that hex, and all Allied attacks including that hex<br />
within the attacking force, gain a one-column-shift in favor of<br />
the Allied side.<br />
11.26 US/UK Coastal Combat Bonus.<br />
Whenever US and/or UK units are defending in, or attacking<br />
into, a coastal hex (which includes gulf hexes and hexsides), that<br />
combat receives a one-column odds shift in favor of the US/UK<br />
force. Also note the presence of other Allied nationalities in no<br />
way serves to negate this bonus, as long as one or more involved<br />
units is US or UK.<br />
11.23 Paratroop Air Assaults.<br />
If a US or SU paratroop drop is made into a hex containing one<br />
or more enemy units, a special kind of in-hex battle must immediately<br />
be fought there. Normal combat procedures are followed<br />
except only in-hex terrain is taken into account and no units<br />
from outside the airdrop hex may participate in the battle in<br />
any way. If the drop is being made within the range of a friendly<br />
airpower marker, those planes do contribute their combat bonus<br />
to the paratroop attack. Further, at the end of the battle’s resolution,<br />
if there are one or more surviving units on either side,<br />
recalculate the odds and run another round of combat on that<br />
basis. Keep that up until either all the landing paratroopers or<br />
all the defenders have been annihilated. Further in this regard,<br />
also see rules 5.8, 6.5, 8.16, 8.17, 9.2 and 9.4.<br />
11.24 USMC Amphibious Landings.<br />
If a USMC unit or stack is making an amphibious landing (see<br />
9.6 & <strong>10</strong>.20) into a hex containing one or more enemy units,<br />
a special kind of in-hex battle must immediately be fought<br />
there. Normal combat procedures are generally followed. If the<br />
invasion is being made within the range of a friendly airpower<br />
marker, those planes do contribute their combat bonus to the<br />
Marines’ attack, and rules 11.25 and 11.26 below also pertain.<br />
Further, at the end of the battle’s resolution, if there are one or<br />
more surviving units on either side, recalculate the odds and<br />
run another round of combat on that basis. Keep that up until<br />
either all the landing Marines or all the defenders have been<br />
annihilated.<br />
12.0 ATOMIC ATTACKS &<br />
US PRESTIGE<br />
12.1 First Use.<br />
On Turn 1, the Allied player may not make any atomic attacks.<br />
On subsequent turns that stricture is no longer in effect, and he<br />
may potentially make any number of such attacks.<br />
12.2 Targeting Eligibility.<br />
Any hex on the map may be attacked<br />
atomically (“nuked”)<br />
by the Allied player,<br />
provided it’s not in<br />
range of one or more<br />
Communist airpower<br />
markers at<br />
the time.<br />
Enemy<br />
unit presence<br />
isn’t needed in order to allow<br />
for an attack to be made into<br />
a hex. No off-map Communist<br />
units may be nuked until they are in<br />
play on the map.<br />
12.3 Atomic Attack Timing.<br />
Within the strictures given above, at any time during<br />
any his own side’s movement<br />
or combat phases,<br />
COUNTERFACT CT<br />
RULES •<br />
15
the Allied player may pause his non-atomic activities and say: “I<br />
will now conduct an atomic attack!”<br />
12.4 Attack Resolution.<br />
The Allied player should openly roll a die and then consult the<br />
Atomic Attack Terrain DRM (Dice Roll Modifiers) Table to<br />
get a final numeric result. The dice roll result is reduced by the<br />
modifier given for the terrain type in the hex where the attack is<br />
taking place. Note that the presence of one or more atomic blast<br />
detonation markers in a hex that’s being nuked again in no way<br />
affects which terrain line on the DRM Table is to be used for the<br />
new attack.<br />
12.5 Atomic Attack Results.<br />
The final numeric result obtained using the process above is the<br />
number of steps the Communist player must immediately eliminate<br />
within the attacked hex. He’s free to eliminate and reduce<br />
his involved units in any way he sees fit in order to satisfy the<br />
overall step-loss requirement. It’s possible no step losses will be<br />
required. Even so, all atomic attacks result in the disruption of<br />
all the surviving units in the target hex. Show that by placing the<br />
mushroom cloud marker atop such units, keeping it there until<br />
that turn’s Administrative Phase, when it would be moved to a<br />
position below the units and their disruption is ended. Disrupted<br />
Communist units grant their attackers a 1R column shift.<br />
12.7 US Prestige Loss.<br />
Every turn, if/when the Allied player makes that side’s first<br />
atomic attack, he must, immediately after resolving the attack<br />
itself, openly roll another die. He halves that result, rounding<br />
down any remainder to get a final result of zero through three<br />
(which procedure is abbreviated as “1d6/2rd”). The Communist<br />
player then adds that amount of VP to his total.<br />
A second attack during the same turn requires another such<br />
roll, but that time the halved result is rounded up if there’s any<br />
remainder (“1d6/2ru”).<br />
A third attack in a turn gets that same second-attack procedure,<br />
but then a one is also added to it (“1d6/2ru+1).<br />
Fourth and subsequent attacks in a turn get that same thirdattack<br />
treatment, but then a two is added to it (“1d6/2ru+2”) .<br />
Also note, in all attacks, if the target hex was until then an unnuked<br />
city the Soviet player increases his rolled VP by another<br />
one point, or by two in the case of major cities.<br />
A table is printed on the map to keep track of the number of<br />
atomic attacks made each turn.<br />
12.6 Atomic Detonation Markers.<br />
Within the strictures given above, there’s no limit on the<br />
number of times any given hex may be nuked per turn or over<br />
the course of an entire game. Each time a strike is made into a<br />
hex, no matter the operational result, place a mushroom cloud<br />
detonation (a.k.a. “blast”) marker there (see 2.11). If there are<br />
one or more blast markers in a hex, the normal entry costs for<br />
the in-hex terrain there are increased by one (total, no matter<br />
how many markers are present). If one or more hexes become<br />
multiply nuked, feel free to remove all the markers but one,<br />
since the effects of each blast aren’t cumulative.<br />
Copyright © 2019 One Small Step,<br />
Bowie, MD
Hussite<br />
Tanks Prefigured?<br />
by Jim Bloom<br />
Photo Credit: US wikimedia commons<br />
Battle Of Lipany.<br />
COUNTERFACT • 21
Some surveys of the background to the<br />
development of modern armor doctrine<br />
find precedents for the tank as far back as<br />
Hyksos, Philistine and Egyptian chariots.<br />
All that’s really just pop history, however, a patching<br />
together synthetic parallels for dramatic effect.<br />
The chariot was initially only a weapons carrier<br />
for infantry – the British World War II Bren carrier<br />
and the Humvee of Desert Storm fame come to mind<br />
rather than Guderian’s panz er columns. Somewhat<br />
later there was an effort to employ chariots to break<br />
enemy infantry formations, but the elephant proved<br />
more effective in that role until ways were devised to<br />
defeat those temperamental beasts. More properly,<br />
then, the battlefield innovations pioneered by legend-<br />
The Hussite Wars<br />
1419 – 36<br />
Magdeburg<br />
Kulmbach<br />
MECKLENBURG<br />
Havel<br />
BRANDENBURG<br />
Elbe<br />
22 • COUNTERFACT<br />
Saale<br />
Leipzig<br />
SAXONY<br />
1430<br />
Nuremberg<br />
Regensburg<br />
Eger<br />
BAVARIA<br />
Torgau<br />
Dresden<br />
Altenburg<br />
Eger<br />
Spree<br />
Oder<br />
Stettin<br />
Bernau<br />
Berlin<br />
1427<br />
Brandenburg<br />
Frankfurt<br />
Plauen<br />
Tachau<br />
Upper<br />
Palatinate<br />
Possessions of:<br />
Luxemburgs<br />
Habsburgs<br />
Wettins<br />
Hohenzollerns<br />
Hussite core territory<br />
Cottbus<br />
Guben<br />
Bautzen<br />
Prague<br />
BOHEMIA<br />
Pilsen<br />
Mies<br />
Taus<br />
Passau<br />
LUSATIA<br />
Saaz<br />
Areas of most intense fighting<br />
Main Battles<br />
Main Axes of Advance<br />
Aussig<br />
Neumark<br />
Lipan<br />
Tabor<br />
Danube<br />
POMERANIA<br />
Lauban<br />
Gorlitz<br />
Friedeburg<br />
Deutschbrod<br />
Zwettl Krems<br />
Warta<br />
Liegnitz<br />
Breslau<br />
Brieg<br />
SILESIA<br />
1427<br />
Nachod<br />
Koniggratz<br />
Konitz<br />
Brunn<br />
Iglau<br />
1427<br />
MORAVIA<br />
1425<br />
AUSTRIA<br />
1433<br />
Vienna<br />
March<br />
Danzig<br />
Dirschau<br />
TEUTONIC KNIGHTS<br />
Posen (Poznan)<br />
POLAND<br />
Neisse<br />
1428<br />
Pressburg<br />
Schwetz<br />
Thorn<br />
ary Hussite warrior Jan Ziska in the early 15 th century<br />
were at least somewhat relevant to the creation of<br />
armored warfare than the foregoing examples, though<br />
even that analogy is, as are most historical comparisons,<br />
still not perfect.<br />
That last caveat is true because there were several<br />
notable pre-Ziska theoretical speculations as to the<br />
employment of vehicle-mobile firepower. Even so,<br />
they were fanciful musings on a concept of a force<br />
multiplier rather than thought out practical blueprints<br />
for their production and deployment. For<br />
example, the often noted tank sketches of Leonardo<br />
da Vinci are really no more precursors of the modern<br />
tank than are the ancient near eastern chariots. They<br />
were really only reveries about battlefield wish lists.<br />
More recently, during the ascendancy of<br />
the eminent Prussian military theorist Moltke<br />
the Elder, there was another, generally overlooked,<br />
effort to rely on the Hussite precedent<br />
to solve modern battlefield problems. That is,<br />
Vistula<br />
Waag<br />
HUNGARY<br />
Komorn<br />
Gleiwitz<br />
0 50 Miles <strong>10</strong>0<br />
150<br />
0 50 <strong>10</strong>0 150 200<br />
Km<br />
250<br />
soon after the successful Prussian campaign<br />
against the Danes in 1864, and just before the<br />
Austro -Prussian Seven Weeks War, one Lt.<br />
Col. Kammby took a stab at reviving the Hussite<br />
system in his treatise, The Battlewagon: A<br />
Historical Study with Observations on the Unique<br />
Features and the Employment of the Battle wagon.<br />
That essay was discussed in a long footnote by<br />
the famous historian of warfare Hans Delbruck<br />
in his classic work, History of the Art of<br />
War, and it bears reexamination here.<br />
Kammby believed a battlewagon of the<br />
future could act as a combat arm, functioning<br />
as a blend between cavalry and infantry. He<br />
further imagined such vehicles could be used,<br />
like cav alry, to bring shock action against the<br />
enemy and break his formations.<br />
That portion of Kammby’s idea was strikingly<br />
similar to the tank concepts prevalent by<br />
the late 1930s, but he also incorpo rated the<br />
countervailing notion of the tank as a shield<br />
and lead element for advancing infantry. He<br />
wrote just before internal-combustion engine<br />
propulsion became feasible, and he therefore<br />
envisioned what was merely a more efficient<br />
and agile application of the Hussites’ animaldrawn<br />
vehicles.<br />
Apart from Delbruck, however, no one<br />
seems to have noticed the proposed new
possibility for the Hussite derivative. By the time<br />
agricultural caterpillar tractors were being appraised<br />
for possible military applications, around<br />
1905, the Ziska episode was of obscure historical<br />
interest only.<br />
Hussite Baptism of Fire<br />
The opening clash between their enemies and<br />
the Hussites came at a time still early in the developmental<br />
stage of the wagon-fort. The siege of<br />
Prague occurred at a time when the devices were<br />
still just an improvised expedient rather than a<br />
deliberately planned system.<br />
At the onset of the Papal call to arms against<br />
them, the heretic Hussites instinctively went on<br />
the defensive, seizing whatever fortified towns<br />
and castles they could and throwing up earthwork<br />
defenses wherever feasible. Such quantities of the<br />
new handheld firearms as could be seized from<br />
the armories of Czech nobles were dispersed<br />
among the ranks of their peasant throng, who<br />
were otherwise mostly armed with converted<br />
agricultural imple ments and crossbows.<br />
Ziska had appreciated the potential of the<br />
wagon-fort tactic before the start of the Holy Roman<br />
imperial drive to sup press the Czech rebellion.<br />
Czech Units in had implemented the method<br />
to a small extent during the reign of Venceslas IV, in<br />
fighting which Ziska had taken part.<br />
The only access route to Prague was through a relatively<br />
open flank of the siege guarded by a spiny ridge<br />
called Ziskov Hill. That was the Imperialists’ obvious<br />
focal point for opera tions. Ziska, aware of the hill’s<br />
crucial location, has tened to reinforce the existing<br />
watchtower on its summit by throwing up two wooden<br />
bulwarks and digging ramparts strengthened with<br />
stones, all fronted by a ditch. Several field guns were<br />
placed in back of the rampart, but the configuration<br />
of the terrain didn’t allow the use of true wagon-forts.<br />
The Imperialist operations around Prague were<br />
marked by their inability to coordinate the efforts of<br />
the various factions among their knights. Their offensives<br />
tended to unravel whenever some units failed to<br />
act in a timely way, either due to a lack of enthusiasm<br />
or poor communications. Ziska’s men were even able<br />
to take one of the surrounding enemy held castles<br />
from its gar rison, though there again there was no<br />
scope for employ ing wagon-forts.<br />
Eberhard Windeck with Hans von Polenz and his forces overwhelming those of the Hussites<br />
and their armoured carriages in a bloody battle (11 November 1429).<br />
From this experience, however, what Ziska learned<br />
was that a tightly knit and coordinated defense could<br />
lure the inflexible chivalry to throw themselves recklessly<br />
against devastating firepower. He also perceived<br />
how cracks in the Imperialist coalition prevented<br />
them from making anything beyond lackadaisical and<br />
disjointed thrusts, rather than launching a coordinated<br />
and all out onslaught that might’ve overturned the<br />
Hussites ability to check a deter mined heavy cavalry<br />
charge. Those lessons had impli cations for occasions<br />
when wagon-forts could be used.<br />
<br />
It’s reliably estimated Jan Trocnov was born into<br />
a gentry family in 1359. His nom de guerre, “Ziska,”<br />
meaning in Czech “One Eyed,” was given him after<br />
he’d lost an eye in combat. His service as a squire<br />
was notable enough to gain him an appointment as a<br />
hunter for the court of Bohemia’s King Wenceslas. As<br />
a leader of royal hunting parties, Ziska gained further<br />
experi ence in fieldcraft and marksmanship that<br />
served him well in later years.<br />
Photo Credit: US wikimedia commons / Illustrator aus der Werkstatt von Diebold Lauber<br />
COUNTERFACT • 23
Ziska left the king’s service to join one of the antiimperial<br />
guerrilla bands forming across Bohemia. It<br />
was during that period of shifting alliances, raid and<br />
counter-raid among the factions, that Ziska’s tactical<br />
prowess attracted the attention of the Moravian<br />
nobleman John Sokol of Lamberg.<br />
Sokol had observed the ease with which Ziska<br />
related to both peasants and the gentry — in short,<br />
he got on well with all those who had little to lose in<br />
opposing the empire. He also noted how Ziska was<br />
uncommonly skilled at quickly adapting his plans of<br />
attack and defense to take advantage of topography.<br />
Sokol sought and got Ziska’s participation in an<br />
expedition he was organizing to assist the King of Poland<br />
against the incursions of the Teutonic Knights.<br />
Those knights had at first pushed east with a Christianizing<br />
mission against the hea then Lithuanians.<br />
During that phase, Wenceslas support ed the German<br />
crusade. In turn, the German knights came to esteem<br />
Czech soldiers as among the finest in Europe and<br />
actively recruited among them.<br />
After the Lithuanians accepted Christianity, Czech<br />
support for the continued colonialism of the knights<br />
there evaporated. In fact, most in Bohemia and Moravia<br />
then came to be sympathetic to the struggle of<br />
fellow Slavs against German invaders. Czech soldiers<br />
rallied to the Polish-Lithuanian standards. Of the<br />
fifty such banners flying on the battlefield of Grunwald/Tannenberg<br />
on 15 July 14<strong>10</strong>, five denoted units<br />
comprised of Bohemian and Moravian volunteers.<br />
Ziska was present at that bat tle, but it’s not known for<br />
certain if he stayed at the Polish king’s headquarters<br />
or took a position in the line.<br />
Ziska was in fact Sokol’s eager student throughout<br />
that campaign. As such, he experienced the movement<br />
of large bodies of troops in full-scale combat,<br />
and he ob served for the first time the effects of<br />
massed gunpowder wea pons. He immediately grasped<br />
the limitations that new technology placed on armored<br />
cavalry when they had to fight en trenched<br />
forces. Ziska was also able to study the way both sides<br />
used the cover of their supply trains when driven back<br />
on their camps.<br />
While Ziska’s military art was being forged on<br />
foreign fields, his homeland raged with its own wave<br />
of religious and nationalistic upheaval. By the time<br />
of his return there in 1412, the preaching of Jan Hus<br />
had in flamed many of his countrymen.<br />
On his return from Poland, Ziska took up residence<br />
near Prague, once again entering the ser vice of<br />
the court of Wenceslas, but this time as a bodyguard.<br />
Since the queen worshiped at the chapel where Hus<br />
preached, Ziska soon struck up a relationship with<br />
the heretical pastor. In fact, along with most of the<br />
royal retinue, he soon became an ardent devotee.<br />
After the papal summons for a crusade, the Hussites<br />
coalesced into war parties around four captains.<br />
Ziska led the most militant faction, initially with<br />
Battle on Vitkov Hill.<br />
Photo Credit: US wikimedia commons / Painter Adolf Liebscher<br />
24 • COUNTERFACT
some 400 followers – and, equally important as it<br />
turned out, they also had a dozen farm carts.<br />
Hussite Offensives<br />
The portrayal of Ziska’s methods as being totally<br />
defen sive, both tactically and strategically, is a simplification.<br />
A few contemporary chroniclers recorded<br />
the wagon-fort system employed in deep raiding<br />
forays. One of the more fanciful of them, Aeneas<br />
Sylvius, an official in the Papal court, was particularly<br />
interested in recording the astounding performance<br />
of the Hussite armies.<br />
In one of his descriptions, he wrote of their wagon<br />
columns moving across an open field to engage formations<br />
of knights as the latter were advancing to<br />
attack. The Hussite column, according to Sylvius,<br />
would cut the charg ing knights into isolated groups<br />
by forming various letters of the alphabet, all directed<br />
by the use of flag signals.<br />
Elsewhere he mentions extended flying columns of<br />
rush ing war carts firing their cannon broadside into<br />
the flanks of surrounded Imperial forces. Though<br />
that was surely an exag geration, Ziska’s warriors did<br />
become imbued with a spirit of invincibility as their<br />
victories mounted.<br />
The loose ag glomerations of Imperial knights<br />
tended to become unnerved merely upon hearing<br />
the thunderous war anthems chanted from in side<br />
the lumbering wagon trains. As early as 1423, Ziska<br />
con ducted a bold experiment, leading an expedition<br />
into Hun gary only to quickly bring it back when the<br />
limitations of the wagon-fort system for the strategic<br />
offensive manifested themselves.<br />
The exaggerated drill-like precision in combat<br />
attributed to the Hussites by Sylvius and his like<br />
was surmised rather than observed. The Hungarian<br />
expedition (along with others launched later into<br />
other enemy heartlands; see the map) was only possible<br />
because of the fearful reputation the Hussites<br />
had already earned for themselves. The Germans,<br />
Mor avians, Hungarians and others whose lands were<br />
raided in that way didn’t challenge the plundering<br />
processions of Bohemian wagon-forts for that same<br />
reason. Had the Imperialists been bold and flexible<br />
enough to attack the extended files of wagons while<br />
they were moving through constricting terrain, the<br />
vaunted wagon-fort system would’ve been literally<br />
stopped in its tracks.<br />
Conclusion<br />
The complexity and precise calibration demand ed<br />
by what amounted to the semi-mobile barricade-andcounterattack<br />
system of the Hussite wagon-forts presupposed<br />
a degree of dedication and steadfastness not<br />
customarily associated with medieval armyies. Only<br />
an inspired and talented leader the likes of Ziska,<br />
along with the fanatic sense of duty and zeal of the<br />
hymn-singing Hussite throngs, could’ve made it work.<br />
It’s also significant the system was only effective<br />
against an enemy armed and led like the plodding<br />
and inflexible knight ly orders pitted against them.<br />
Once opposed by a similarly constituted force, such<br />
as at the fratricidal showdown at Lipany, results were<br />
indecisive.<br />
The wagon-fort system was later taken up briefly<br />
by various German duchies in the latter half of the<br />
15 th century. As field artillery became more mobile<br />
and flexible, however, the wagon bulwarks turned<br />
into-more of an impediment than a shelter. They had<br />
completely fallen out of use by the time of the start of<br />
the Thirty Years War in 1618.<br />
We can therefore put aside the vision of the wagon-forts<br />
as some kind of land battle fleet, armored<br />
train or panzer prototype. If a modern analogy is<br />
needed, then perhaps the Germans’ towed-into-place<br />
anti- tank gun “Pakfront” of World War II is most<br />
suitable. Similar to that German defensive method<br />
used against the Soviet juggernaut in 1943-45, Ziska<br />
employed what amounted to an anvil-and-hammer<br />
tactical scheme. CF<br />
The Hussite Wagenburg - an old sketch from the 15th century.<br />
Photo Credit: US wikimedia commons / Illustrator Unkown<br />
COUNTERFACT • 25
y Carl O. Schuster<br />
Photo Credit: Indian Navy photo / http://indiannavy.nic.in<br />
26 • COUNTERFACT
India’s economy and diplomatic clout have been growing steadily over<br />
the last 15 years. With that growth has come a geographic expansion<br />
of the country’s interests and concerns, reinforced by changes in the<br />
strategic and security environment.<br />
Russia has moved closer to China, and China’s expanding power and<br />
more assertive geostrategic activities, particularly at sea, have combined with<br />
maritime piracy and terrorist threats to change India’s national security<br />
requirements.<br />
Indian Navy flotilla of Western Fleet escort INS Vikramaditya (R33) and INS Viraat (R22) in the Arabian Sea.<br />
COUNTERFACT • 27
India has responded by laying the foundation to<br />
become a major diplomatic, economic and maritime<br />
regional power. The country’s leadership envisions<br />
maritime power as making a critical contribution to<br />
India’s rise as a power. The navy’s role in that evolving<br />
national security strategy has three major components:<br />
protecting the nation’s strategic interests,<br />
commerce and its relationships with its allies. In that<br />
role, the navy is not just a protector of the seas but<br />
also a visible arm of India’s diplomacy and expanding<br />
overseas presence.<br />
Officially released on <strong>10</strong> October 2015, the Indian<br />
Navy’s strategy is titled: “Ensuring Secure Seas: Indian<br />
Maritime Security Strategy.” It reflects that service’s<br />
response to the country’s economic growth, expanding<br />
maritime trade, increased technological base and<br />
the emerging diversity and strength of the threats<br />
facing it.<br />
With over 90 percent of India’s external trade volume<br />
moving by sea, and its geographically expanding<br />
economic interests, investments and markets dependent<br />
on the maritime domain, maintaining oceanic<br />
security and stability at ever greater distances from its<br />
own coasts has become a vital strategic requirement.<br />
Moreover, Asia’s growing economic strength has<br />
shifted the world’s geo-strategic focus from a Euro-<br />
Atlantic to an Indo-Pacific one. The Indian Navy<br />
is therefore changing its operations and maritime<br />
footprint to reflect that shift. India’s 21 st century<br />
resurgence, if it is to continue, is seen as being inconvertibly<br />
linked to secure global seas in general and<br />
those of the Indian Ocean more particularly. India’s<br />
ISRAEL<br />
EGYPT<br />
SUDAN<br />
JORDAN<br />
ERITREA<br />
ETHIOPA<br />
IRAQ<br />
SAUDI<br />
ARABIA<br />
YEMEN<br />
DJIBOUTI<br />
U.A.E.<br />
IRAN<br />
OMAN<br />
AFGH.<br />
PAKISTAN<br />
Gwadar Naval Base &<br />
Surveillance Facilities<br />
Mumbai<br />
Karwar<br />
Kochi<br />
INDIA<br />
NEPAL<br />
SRI LANKA<br />
BHU.<br />
BANG.<br />
Upgraded<br />
MYANMAR<br />
Port Facility<br />
Chittagong<br />
Port Facility<br />
Visakhapatnam<br />
Commercial Naval Base<br />
Surveillance<br />
Port Blair<br />
Facility<br />
Andaman Is.<br />
Kra Canal<br />
LAOS<br />
THAILAND<br />
VIETNAM<br />
CAMBODIA<br />
CHINA<br />
Tropic of Cancer<br />
Hainan Is.<br />
Sanya<br />
Submarine Base<br />
Woody Is.<br />
South China<br />
Sea<br />
SOMALIA<br />
Maldives<br />
Hambantota<br />
MALAYSIA<br />
KENYA<br />
Seychelles<br />
Equator<br />
INDIAN OCEAN<br />
Sumatra<br />
Borneo<br />
INDONESIA<br />
TANZANIA<br />
Diego Garcia<br />
Java<br />
MOZAMBIQUE<br />
MADAGASCAR<br />
Indian listening<br />
stations<br />
Mauritius<br />
Tropic of Capricorn<br />
Indian Facilities<br />
Chinese Facilities (String of Pearls)<br />
US Naval Base<br />
2000 Km<br />
<strong>10</strong>00 Miles<br />
Sino-Indian Strategic Competition<br />
in the Indian Ocean, 2019<br />
28 • COUNTERFACT
leaders also see secure sea lines of communications<br />
and freedom of navigation on the world ocean as essential<br />
to the security of its citizens living and working<br />
overseas. With all that in mind, the revised strategy<br />
has increased focus on the following.<br />
INS Vikramaditya in Baltic Sea during her trails in 2013.<br />
• Increasing the safety and security of seaborne<br />
trade and energy routes, especially in the Indian<br />
Ocean Region (IOR).<br />
• The crucial importance of maintaining freedom<br />
of navigation and strengthening the international<br />
legal regime at sea, particularly the United<br />
Nations Convention on the Law of the Sea<br />
(UNCLOS).<br />
• The considerable value in undertaking cooperation<br />
and coordination among various allied<br />
navies to counter common threats at sea.<br />
The new strategy contrasts with its 2007 predecessor,<br />
which was titled “Freedom to Use the Sea’s:<br />
India’s Maritime Strategy,” in three ways. First, it puts<br />
a greater emphasis on multi-agency and international<br />
security collaboration. Second, it defines an expanding<br />
area of Indian interest as stretching all across the<br />
IOR. Third, it calls for innovation and technological<br />
cooperation between Indian industry and its military<br />
in order to further the attainment of those first two<br />
new goals.<br />
In contrast, the earlier strategy focused almost<br />
entirely on military operations on and over the sea<br />
to ensure India’s freedom to use local sea lanes. It included<br />
a call for some cooperation among the service<br />
branches, but it emphasized sea control as the navy’s<br />
primary mission across all levels of conflict.<br />
There was little discussion of the actual means of<br />
power projection in the 2007 strategy, nor were cyber<br />
or netcentric operations even mentioned. The new<br />
strategy emphasizes both.<br />
Also, the earlier strategy contained little mention<br />
of coastal and terrorist threats, since they hadn’t yet<br />
manifested a maritime component. That changed<br />
with the 2008 Mumbai attack, in which terrorists<br />
infiltrated that city from the sea via a fishing vessel<br />
they’d seized. As a result of that attack and the onset<br />
of piracy in the Indian Ocean, the new strategy places<br />
a greater emphasis on countering piracy and terrorism.<br />
INS Vikramaditya in Baltic Sea during her trails in 2013.<br />
Maritime security is more complex today than ever<br />
before. It’s now perceived as being multi-dimensional,<br />
meaning it emanates across the three dimensions of<br />
the physical world into and through the electro-magnetic<br />
spectrum an on to the cyber-dimension.<br />
Even within just the traditional physical maritime<br />
battlespace, security concerns have become diverse<br />
and their strategic counters almost contradictory. For<br />
example, non-state threats such as terrorism and piracy<br />
typically employ “low tech” weapons and tactics,<br />
hiding among innocent maritime activities to strike in<br />
a fashion not unlike insurgents ashore. Patrolling can<br />
deter such attacks while naval and coast guard units<br />
are actually present, but as is often the case in fighting<br />
guerrilla armies ashore, the enemy rarely strikes<br />
when sufficient force is present to ensure their defeat.<br />
Also, high-tech weapons are often ineffective<br />
against such asymmetric opponents. Thus, countering<br />
that kind of maritime threat requires differently<br />
armed ships and a mixture of traditional and innovative<br />
operations and tactics. Those kinds of operations<br />
will differ significantly from countering a peer-state<br />
maritime opponent who most likely is equipped with<br />
high-tech sensors and weapons. Yet the nation’s mari-<br />
Photo Credit: Indian Navy photo / http://indiannavy.nic.in<br />
COUNTERFACT • 29
Photo Credit: National Archives at College Park / JO1 Todd Macdonald, USN<br />
The India Navy, Delhi Class Destroyer, INS MYSORE (D 60) leads the way during the opening day of Exercise MALABAR 04,<br />
conducted off the coast of India, in the Indian Ocean.<br />
Hindustan Shipyard at Visakhapatnam, India. Where the INS<br />
Arihant was built and where it will be launched.<br />
Photo Credit: US Wikimedia Commons / Adityamadhav83<br />
time security forces must be prepared to face both<br />
kinds of opponents.<br />
India is therefore both expanding and modernizing<br />
all its naval components. It has bought and is<br />
building newer and more capable aircraft carriers to<br />
replace the aging ones that served the fleet for over<br />
30 years. The naval air arm is also acquiring modern<br />
aircraft to replace the Cold War-era platforms that<br />
dominate its current inventory.<br />
The submarine force is also benefitting from the<br />
new national interest in naval forces. In addition to<br />
receiving new units, it is also acquiring new weapons,<br />
many developed in partnership with other countries.<br />
For example, the BrahMos supersonic anti-ship cruise<br />
missile (ASCM) was developed in partnership with<br />
Russia and will be carried by aircraft, surface warships<br />
and submarines. A land-based version is being supplied<br />
to the army, and both versions are likely to be<br />
sold to Vietnam to help that nation face the growing<br />
Chinese threat in the South China Sea. Finally, India<br />
is testing its first submarine launched ballistic missile,<br />
adding a naval component to their strategic nuclear<br />
forces.<br />
30 • COUNTERFACT
Ship/Aircraft Type<br />
TODAY 2025<br />
estimated<br />
Ship/Aircraft Type<br />
TODAY 2025<br />
estimated<br />
CTOL Aircraft Carrier 0 1<br />
Ski Jump Aircraft Carrier 2 2<br />
CG 0 1<br />
DDG <strong>10</strong> 15<br />
FF/FFG 14 20<br />
Corvette 23 24<br />
PC 27 30<br />
MSO 6 6<br />
SSBN 0 1**<br />
SSN 1* 2<br />
SSB 0 1-2**<br />
SS 14 14<br />
LPD 1 3<br />
LST 5 6<br />
LSM 4 4<br />
Mini-Submarines<br />
AO/AOE 4 6<br />
Naval Aircraft<br />
Carrier Fighters:<br />
MiG-29<br />
AV-8 Harrier<br />
Teja<br />
Maritime Patrol/ASW:<br />
Il-38<br />
Tu-142<br />
P-8i<br />
Medium Range MPA<br />
Do228<br />
Follow-On<br />
33<br />
8<br />
0<br />
5<br />
8<br />
8<br />
8<br />
0<br />
34<br />
0<br />
24<br />
0<br />
0<br />
14<br />
0<br />
12<br />
Amphibian SAR: US-2 0 12<br />
UAVs/Mk-8 24 36-48<br />
Carrier AWACS 0 4<br />
Attack Helicopters 0 8***<br />
AEW Helicopters: Ka-31 2 4<br />
ASW Helicopters:<br />
Ka-31<br />
Ka-28<br />
SH-70<br />
SH-3 Sea King<br />
Transport/SAR Helicopters:<br />
Follow-On<br />
H-3 Sea King<br />
SA-319 Alouette<br />
2<br />
12<br />
0<br />
35<br />
0<br />
12***<br />
8<br />
Abbreivations<br />
CTOL = Conventional Takeoff & Landing<br />
CG = Guided Missile Cruiser<br />
DDG = Guided Missile Destroyer<br />
FF/FFG = Frigate/Guided Missile Frigate<br />
PC = Patrol Craft (Coastal Patrol)<br />
MSO = Oceangoing Minesweeper<br />
SSBN = Nuclear Powered Ballistic Missile<br />
Submarine<br />
SSB = Conventionally Powered Ballistic<br />
Missile Submarine<br />
SSN = Nuclear Powered Attack Submarine<br />
SS = Conventionally Powered Attack<br />
Submarine<br />
LPD = Landing Platform Dock Ship<br />
LST = Tank Landing Ship<br />
LSM = Medium Landing Ship<br />
Mini-Submarines = 2-4 Man Submarines<br />
Used in Unconventional Warfare<br />
AO/AOE = Fleet Logistics Support Ships<br />
ASW = Anti-Submarine Warfare<br />
SAR = Search and Rescue<br />
AWACS = Airborne Warning and Control<br />
System Aircraft<br />
Notes<br />
*Leased from Russia<br />
**Costs Will Impact Choice of Ballistic Missile<br />
Submarine Design & Propulsion.<br />
***Used to Support Indian Maritime<br />
Commando (US SEAL equivalent),<br />
Amphibious Operations by the Marine<br />
Brigade & General Fleet Logistics<br />
14<br />
4<br />
18-24<br />
0<br />
12-24***<br />
0-4<br />
0<br />
Photo Credit: Background vector created by Freepik<br />
COUNTERFACT • 31
In theory, the called-for naval construction program<br />
will provide a powerful fleet with significant<br />
strategic and operational power projection capabilities<br />
by 2025. Of course, like all such plans, India’s new<br />
strategy faces many challenges to its stated goals.<br />
India’s defense budget deliberations have always<br />
difficult, and the country faces land-based threats<br />
of immediate concern that also demand resources.<br />
There are three ongoing insurgencies, while jihadist<br />
terrorism poses a potential threat to the country and<br />
its Hindu population. India also shares land borders<br />
with two overtly hostile countries, China and Pakistan,<br />
with the latter being the more immediate and<br />
constant threat.<br />
For example, Pakistan continues its clandestine<br />
sponsorship of terrorist attacks in India, which triggered<br />
an Indian retaliatory special forces raid on<br />
29 September 2016. Near daily artillery exchanges<br />
along the Kashmir line of control in the far north are<br />
another constant reminder of the Pakistani threat.<br />
Pakistan’s possession of nuclear weapons adds a<br />
potentially catastrophic dimension to all that. Finally,<br />
Pakistan’s ally China, against whom India fought a<br />
war in 1960-62, maintains a significant military presence<br />
along and near the Sino-Indian frontier.<br />
The resources required to counter and deter those<br />
threats will compete with the naval budget. Despite<br />
those challenges, India will certainly expand its<br />
navy and naval operations over the next decade, the<br />
only question being what degree of success they will<br />
achieve. CF<br />
SOURCES<br />
Defence Staff Writer. “India Set to Participate in<br />
Multinational Exercise in the South China Sea,” India Times,<br />
01 May 16.<br />
Dhowan, Adm. R. K., Chief of Naval Staff. Ensuring Secure<br />
Seas: Indian Maritime Security Strategy. Indian Navy<br />
National Security Publication (NSP12), Ministry of Defence,<br />
<strong>10</strong> October 2015.<br />
Go, Yamada. “As China Rises, India Asserts Itself,” Nikkei<br />
Asian Review, 2 April 2015.<br />
Mehta, Adm. Sureesh, Chief of Naval Staff. Indian Military<br />
Doctrine Integrated Headquarters, Ministry of Defence<br />
(Navy), 2009 updated on 16 February 2016.<br />
Patrick Cronin and Darshana Baruah, “The Modi Doctrine<br />
for the Indo-Pacific Maritime Region,” The Diplomat, 2 Dec.<br />
2014.<br />
Rout, Hemant Kumr. “Maiden Test of Undersea K-4 Missile<br />
From Arihant Submarine,” India Express, 09 April 2016.<br />
32 • COUNTERFACT
COUNTERFACT • 33
Compare<br />
& Contrast<br />
Germany’s<br />
The vast scope of Operation Barbarossa<br />
has long obscured the fact the largest<br />
tank battles in history took place from<br />
June to August 1941 in the western<br />
border districts of the Soviet Union, where more than<br />
13,000 Red Army tanks clashed with 3,400 German<br />
panzers. In less than three weeks of fighting, the<br />
Soviets lost some 12,000 of those tanks versus the<br />
Germans’ roughly 400.<br />
At the end of six months, some 20,500 Red Army<br />
tanks had been destroyed in further tank battles.<br />
Many of those vehicles, more than 4,000 in all, were<br />
BT-7 models from the 21 tanks corps of the Leningrad,<br />
Baltic, Western, Odessa, Moscow, Kiev and<br />
Kharkov Military Districts. More than 1,700 additional<br />
BT-7s equipped five tank corps of the Central<br />
Asian, Caucasus, Baikal and Far Eastern Military<br />
Districts, which weren’t involved in the fighting.<br />
Opposing them were 660 Panzer 38(t)s distributed<br />
among five panzer divisions. (The “t” stands for “formerly<br />
Czechoslovakian,” which in German is spelled<br />
“Tschechoslowakei.”)<br />
To compare the fighting abilities of both tanks and<br />
their crews early on in the conflict, one engagement,<br />
in which Brig. Gen. Hans Freiherr von Funck’s 7 th<br />
Panzer Division clashed with the Col. Fedor Fedorov’s<br />
5 th Tank Division, in the border region of East Prussia<br />
and Lithuania on the Suwalki-Alytus-Vilnius axis,<br />
during the first few days of the conflict, provides an<br />
instructive overall example.<br />
Organized into a panzer regiment and a motorized<br />
infantry brigade with two motorized rifle regiments<br />
34 • COUNTERFACT
y Gilberto Villahermosa<br />
Panzer 38(t)<br />
vs.<br />
USSR’s BT-7<br />
(along with support elements), Funck’s division,<br />
battle hardened in France under Erwin Rommel the<br />
year before, began with 265 combat vehicles. There<br />
were: 53 Panzer IIs, 167 Panzer 38(t)s, seven Panzer<br />
38(t) command tanks, 30 Panzer IVs and eight Panzer<br />
III command tanks.<br />
Fedorov’s division, which had participated in the<br />
invasion of Poland and the Soviet occupation of Lithuania<br />
in 1939, but lacked true combat experience,<br />
was organized into two tank and one motorized rifle<br />
regiment (with support elements). It entered combat<br />
with 268 tanks and 76 armored cars, including: 170<br />
BT-7s, 18 T-26 light tanks, 30 T-28 multi-turreted medium<br />
tanks and 50 of the newly deployed T-34s.<br />
Technically, the Red Army division outclassed its<br />
German counterpart with 80 medium tanks (T-34s<br />
and T-28s) versus only 30 medium Panzer IVs. The<br />
Germans, however, seemingly possessed superiority in<br />
light tanks over the Soviets, with 220 Panzer IIs and<br />
Panzer 38(t)s arrayed against 188 BT-7s and T-26s.<br />
Even so, when the Soviet armored cars – many carrying<br />
the same 45mm gun found on the BT-7 and T-26<br />
– are added to the equation, the Soviets can be seen<br />
to have effectively outnumbered the Germans in light<br />
armored fighting vehicles.<br />
Seized from the Czechoslovakian military after the<br />
bloodless takeover of that country in 1938, and used<br />
primarily in the mechanization of the German horse<br />
cavalry units, the Panzer 38(t)s took part in the invasions<br />
of Poland in 1939 and France in 1940. After<br />
the latter campaign it underwent modifications to<br />
improve its combat performance and better integrate<br />
COUNTERFACT • 35
Panzer 38T<br />
it into German<br />
service. Those upgrades primarily focused on increasing<br />
armor protection, with emphasis on shielding the<br />
four-man crew.<br />
By the beginning of Operation Barbarossa, the<br />
Panzer 38(t) had become a mainstay vehicle within<br />
the German mechanized force, replacing the Panzer<br />
III in many units and equipping five of the 17 panzer<br />
divisions. In fact, they represented about 20 percent<br />
of all the tanks (almost 700) taking part in opening of<br />
the campaign against the Soviet Union.<br />
Weighing 9.8 tons and equipped with a 37mm gun<br />
and two 7.92mm machineguns, the Panzer 38(t) was<br />
the only German tank of foreign origin to remain in<br />
production for the duration of the war. It easily outclassed<br />
both the German-designed Panzer I (equipped<br />
only with machineguns) and Panzer II (armed with a<br />
20mm cannon), which made up the bulk of the early<br />
panzer force. It was also heavier and better armored<br />
than those German contemporaries but, as was soon<br />
discovered in Poland and France, the Panzer 38(t) was<br />
still susceptible to Allied anti-tank artillery and antitank<br />
rifles.<br />
The BT-7 (“BT” stands for the Russian language<br />
term for “Fast Tank”) had entered the Soviet inventory<br />
in 1931 as a “cavalry” (reconnaissance) tank,<br />
and it was a curious amalgamation of US and Soviet<br />
technology. Initially based on an imported US model<br />
design by Walter Christie, the follow-on Soviet variants<br />
departed from that origin, particularly in terms<br />
of armament.<br />
The BT-7 saw its combat debut in 1937 in the<br />
Spanish Civil War, and was also used against the Japanese<br />
Army along the Mongolian frontier<br />
in 1938-39. It participated in the Soviet invasion<br />
of Poland in 1939 and the Winter War with<br />
Finland that same year. By June 1941 more than<br />
5,500 BT-7s had been built. (Sadly for the<br />
Soviets, an estimated 70 percent<br />
of their entire light tank park of<br />
BT-7s and T-26s were down for<br />
maintenance when the Germans<br />
invaded.)<br />
Weighing 13.8 tons and armed<br />
with a 45mm gun and two 7.62mm<br />
machineguns, the BT-7 wasn’t as well<br />
armored as the Panzer 38(t). Though<br />
faster than their enemy counterpart, its three-man<br />
crew had their hands full in combat as compared to<br />
the German vehicle’s four-man crew.<br />
Technically, the two vehicles were fairly evenly<br />
matched. The BT-7’s 45mm gun had better armor<br />
penetration at <strong>10</strong>0 meters, while the Panzer 38(t)’s<br />
37mm gun had better penetration at 500 meters.<br />
Thus the Red Army tankers sought to close to within<br />
<strong>10</strong>0 meters before engaging, while their opponents<br />
sought to engage from standoff distances beyond <strong>10</strong>0<br />
meters. As the border battles would show, however,<br />
tank warfare is actually much more than just a clash<br />
between armor, firepower and mobility.<br />
The two divisions started engaging on the first day<br />
of Barbarossa, when a small detachment of BA-<strong>10</strong><br />
armored cars from 5 th Tank encountered elements of<br />
7 th Panzer outside Alytus as the Germans lunged for<br />
the two bridges across the Neman River in the northern<br />
and southern parts of that town. The Germans<br />
secured both bridges quickly, but the battle grew intensity<br />
when they tried to cross and expand a bridgehead.<br />
A T-34 knocked out a Panzer IV and a T-28<br />
rammed and destroyed a Panzer 38(t) in the north,<br />
while BT-7s firing from hull-down positions knocked<br />
out six German tanks in the south.<br />
Both sides fed more and more forces into the<br />
battle, with the Soviet division launching BT-7s and<br />
T-34s in unsupported and piecemeal counterattacks<br />
all during the afternoon. Time after time, the German<br />
tanks shot up the Soviet counter-attacks. In comparison<br />
to the Germans, the Soviet tank crews didn’t<br />
have good situational awareness, and they maneuvered<br />
with no central direction. (Every German tank<br />
carried a two-way radio, while only Soviet command<br />
tanks – easily identifiable to German gunners due to<br />
36 • COUNTERFACT
their outside antenna arrays – had them.)<br />
The Red Army tanks were relentlessly picked off<br />
by the German tanks and field guns. By the end of<br />
the day, the Germans had put out of action 85 Soviet<br />
tanks; though Soviet accounts suggest about half of<br />
those losses were due to mechanical breakdown and<br />
other mishaps. German sources listed their own losses<br />
for the day at 11 tanks, including four Panzer IVs and<br />
seven light tanks, mainly Panzer 38(t)s. Additional<br />
vehicles were knocked out or damaged, but were then<br />
recovered and repaired. Most damaged Soviet tanks<br />
had to be abandoned as 5 th Tank Division withdrew<br />
across the Neman River, leaving the battlefield under<br />
German control.<br />
Fighting between the 7 th Panzer and 5 th Tank Divisions<br />
continued over the next several days as the<br />
Germans advanced on Vilnius. By 24 June, when they<br />
entered that city, all that remained of Fedorov’s division<br />
was a battle group of 15 tanks, 20 armored cars<br />
and nine artillery pieces. Nonetheless, even as the<br />
Red Army continued to fall back, Fedorov continued<br />
to counterattack whenever an opportunity presented<br />
itself.<br />
On 26 June, 7 th Panzer Division entered Minsk. On<br />
that same day, all that remained of 5 th Tank Division<br />
were three tanks and some 40 trucks. The division<br />
had effectively ceased to exist, and its remnants were<br />
ordered to break off and move east to Kaluga, a locale<br />
then still far in the Soviet rear area. There they were<br />
to be incorporated into a new tank division to be<br />
incorporated into XIV Mechanized Corps.<br />
The 7 th had also suffered heavily, forcing it to temporarily<br />
disband one of its three panzer battalions in<br />
order to use those vehicles to bring the other two up<br />
to strength. Only about half of the original complement<br />
Panzer 38(t) tanks were still functional, though<br />
most of those losses were attributable to mechanical<br />
breakdown rather than combat.<br />
The victories of the German Panzer<br />
38(t)s over their counterpart Soviet<br />
BT-7s were largely due to broader issues<br />
of tactical experience and preparedness,<br />
and not to technical advantages or<br />
disadvantages inherent in either vehicle.<br />
At the strategic level, Stalin’s misguided<br />
policy of not permitting the reinforcement of<br />
the East Prussian-Lithuanian border area during the<br />
first days of the war – in the hope some negotiated<br />
settlement was still possible – further exacerbated a<br />
host of other Red Army systemic problems.<br />
Production of the Panzer 38(t) as a tank ended<br />
in June 1942, because they had been rendered fully<br />
obsolete by the appearance of the Soviet T-34 medium<br />
and KV heavy tanks. Instead, production of<br />
their chasses were switched to the turretless Marder<br />
(Marten) tank destroyer, which mounted a 75mm<br />
anti-tank gun. While not as versatile as a turreted<br />
tank, the Marder had enough firepower to deal with<br />
the emerging Soviet tank threat.<br />
The BT-7 also became increasingly scarce after<br />
1941, with only a few hundred remaining in the Red<br />
Army’s inventory by the time of the spring and summer<br />
battles of the next year. By the time of the Stalingrad<br />
campaign in the autumn and winter of 1942-43,<br />
there were hardly any BT-7s still in front line service.<br />
By the end of the war there were only 299 of them in<br />
all of European Russia, of which only 43 were operating,<br />
mainly for training, with the remainder sitting in<br />
repair facilities. CF<br />
SELECTED SOURCES<br />
Steven Zaloga. BT Fast Tank. The Red Army’s Cavalry Tank 1931-<br />
1945. Oxford: Osprey Publishing, 2016.<br />
Steven J. Zaloga. Panzer 38(t) vs. BT-7. Barbarossa 194. Oxford:<br />
Osprey Publishing, 2017.<br />
BT-7<br />
COUNTERFACT • 37
38 • COUNTERFACT
COUNTERFACT • 39
40 • COUNTERFACT