

CameraintheWild - Carolinas Nature Photographers Association
CameraintheWild - Carolinas Nature Photographers Association
CameraintheWild - Carolinas Nature Photographers Association

Create successful ePaper yourself
Turn your PDF publications into a flip-book with our unique Google optimized e-Paper software.
FIT RIGHT IN<br />
Sue Jarrett • sjarrett@islc.net<br />
Finally you have the opportunity for that photo trip you’ve always<br />
wanted to make—price, dates, locations —fit right in. I am talking<br />
about the Average Joe or Jane who has saved for years for that tripof-a-lifetime.<br />
Not First Class and Five-Star, but Coach and Three-<br />
Star, how the majority travel.<br />
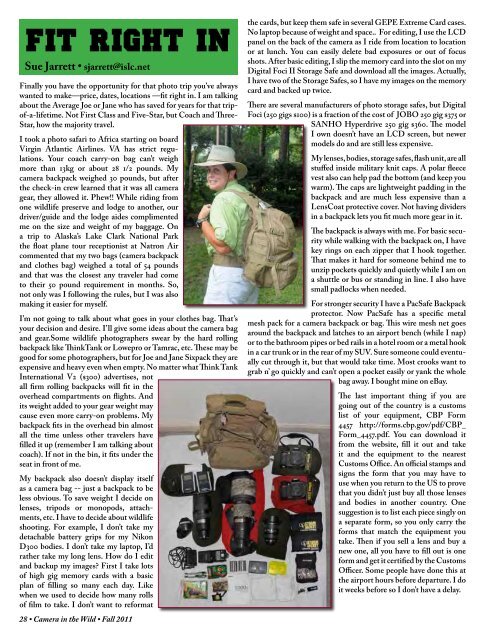
I took a photo safari to Africa starting on board<br />
Virgin Atlantic Airlines. VA has strict regulations.<br />
Your coach carry-on bag can’t weigh<br />
more than 13kg or about 28 1/2 pounds. My<br />
camera backpack weighed 30 pounds, but after<br />
the check-in crew learned that it was all camera<br />
gear, they allowed it. Phew!! While riding from<br />
one wildlife preserve and lodge to another, our<br />
driver/guide and the lodge aides complimented<br />
me on the size and weight of my baggage. On<br />
a trip to Alaska’s Lake Clark National Park<br />
the float plane tour receptionist at Natron Air<br />
commented that my two bags (camera backpack<br />
and clothes bag) weighed a total of 54 pounds<br />
and that was the closest any traveler had come<br />
to their 50 pound requirement in months. So,<br />
not only was I following the rules, but I was also<br />
making it easier for myself.<br />
I’m not going to talk about what goes in your clothes bag. That’s<br />
your decision and desire. I’ll give some ideas about the camera bag<br />
and gear.Some wildlife photographers swear by the hard rolling<br />
backpack like ThinkTank or Lowepro or Tamrac, etc. These may be<br />
good for some photographers, but for Joe and Jane Sixpack they are<br />
expensive and heavy even when empty. No matter what Think Tank<br />
International V2 ($300) advertises, not<br />
all firm rolling backpacks will fit in the<br />
overhead compartments on flights. And<br />
its weight added to your gear weight may<br />
cause even more carry-on problems. My<br />
backpack fits in the overhead bin almost<br />
all the time unless other travelers have<br />
filled it up (remember I am talking about<br />
coach). If not in the bin, it fits under the<br />
seat in front of me.<br />
My backpack also doesn’t display itself<br />
as a camera bag -- just a backpack to be<br />
less obvious. To save weight I decide on<br />
lenses, tripods or monopods, attachments,<br />
etc. I have to decide about wildlife<br />
shooting. For example, I don’t take my<br />
detachable battery grips for my Nikon<br />
D300 bodies. I don’t take my laptop, I’d<br />
rather take my long lens. How do I edit<br />
and backup my images? First I take lots<br />
of high gig memory cards with a basic<br />
plan of filling so many each day. Like<br />
when we used to decide how many rolls<br />
of film to take. I don’t want to reformat<br />
28 • Camera in the Wild • Fall 2011<br />
the cards, but keep them safe in several GEPE Extreme Card cases.<br />
No laptop because of weight and space.. For editing, I use the LCD<br />
panel on the back of the camera as I ride from location to location<br />
or at lunch. You can easily delete bad exposures or out of focus<br />
shots. After basic editing, I slip the memory card into the slot on my<br />
Digital Foci II Storage Safe and download all the images. Actually,<br />
I have two of the Storage Safes, so I have my images on the memory<br />
card and backed up twice.<br />
There are several manufacturers of photo storage safes, but Digital<br />
Foci (250 gigs $100) is a fraction of the cost of JOBO 250 gig $375 or<br />
SANHO Hyperdrive 250 gig $360. The model<br />
I own doesn’t have an LCD screen, but newer<br />
models do and are still less expensive.<br />
My lenses, bodies, storage safes, flash unit, are all<br />
stuffed inside military knit caps. A polar fleece<br />
vest also can help pad the bottom (and keep you<br />
warm). The caps are lightweight padding in the<br />
backpack and are much less expensive than a<br />
LensCoat protective cover. Not having dividers<br />
in a backpack lets you fit much more gear in it.<br />
The backpack is always with me. For basic security<br />
while walking with the backpack on, I have<br />
key rings on each zipper that I hook together.<br />
That makes it hard for someone behind me to<br />
unzip pockets quickly and quietly while I am on<br />
a shuttle or bus or standing in line. I also have<br />
small padlocks when needed.<br />
For stronger security I have a PacSafe Backpack<br />
protector. Now PacSafe has a specific metal<br />
mesh pack for a camera backpack or bag. This wire mesh net goes<br />
around the backpack and latches to an airport bench (while I nap)<br />
or to the bathroom pipes or bed rails in a hotel room or a metal hook<br />
in a car trunk or in the rear of my SUV. Sure someone could eventually<br />
cut through it, but that would take time. Most crooks want to<br />
grab n’ go quickly and can’t open a pocket easily or yank the whole<br />
bag away. I bought mine on eBay.<br />
The last important thing if you are<br />
going out of the country is a customs<br />
list of your equipment, CBP Form<br />
4457 http://forms.cbp.gov/pdf/CBP_<br />
Form_4457.pdf. You can download it<br />
from the website, fill it out and take<br />
it and the equipment to the nearest<br />
Customs Office. An official stamps and<br />
signs the form that you may have to<br />
use when you return to the US to prove<br />
that you didn’t just buy all those lenses<br />
and bodies in another country. One<br />
suggestion is to list each piece singly on<br />
a separate form, so you only carry the<br />
forms that match the equipment you<br />
take. Then if you sell a lens and buy a<br />
new one, all you have to fill out is one<br />
form and get it certified by the Customs<br />
Officer. Some people have done this at<br />
the airport hours before departure. I do<br />
it weeks before so I don’t have a delay.<br />
Nikon GP-1 GPS unit for your camera!<br />
Peter Krenn • Krenn@comporium.net<br />
I recently added a new “toy” to my collection of photography<br />
equipment. It’s the Nikon GP-1 GPS unit. I use it with my Nikon<br />
D-300. What it does is record the GPS location and adds it to the<br />
Metadata with the rest of your Metadata information. If you are a<br />
Lightroom user all you have to do is click on the coordinates in the<br />
Metadata information and the program will automatically take you<br />
to Google Earth and give you a satellite view as to where the picture<br />
was taken. I understand it also works with other programs. Now<br />
that’s all well and good, but there is more: you can scroll in or out,<br />
even to street level if the picture was taken in an urban area. It uses<br />
the same program as Google maps. Also, it gives you the elevation<br />
and time the picture was taken.<br />
I ride a motorcycle and my style of picture taking is just following<br />
my nose and seeing where it takes me, usually down many a back<br />
road in the middle of nowhere—I’m just enjoying the ride and<br />
looking for old barns, etc. When I do find an interesting subject to<br />
photograph it may be the wrong time of day for the lighting conditions<br />
are not what I am looking for. I snap a picture anyway and now<br />
I have the information I need to return to that location. It comes in<br />
kind of handy when I’m going through pictures on the computer<br />
and see a shot I would like to take again. I just transfer the GPS<br />
position into my GPS on the motorcycle and let it lead me there.<br />
I just returned from a trip to the Northeast and into Canada and<br />
the GPS kept a great record as to where I took all the pictures of<br />
lighthouses, etc.<br />
The unit is not much bigger than your thumb and attaches to where<br />
your flash mounts, with a short cord going to your camera’s tenpin<br />
terminal. It pulls very little power and works off your camera<br />
battery. It can be adjusted so it only comes on when you depress the<br />
shutter button half way. Like most other GPS units, if you turn it<br />
on after having moved quite a distance, like on a long trip, it takes<br />
several minutes to find the location to where it is at, however once<br />
that is established it only takes about a second or so to see the red<br />
LED in the unit change to green telling you it knows your location<br />
and is ready to record it.<br />
You’ve Been Framed!<br />
David Bowers • dave.bowers@allentate.com<br />
Framing is a creative tool that draws attention to your main subject<br />
by accentuating other portions of your image with natural elements.<br />
By framing your photos, you create a sense of depth, thus, the addition<br />
of another pleasing dimension. What you’ll be creating is<br />
a pathway for the viewer’s eye to travel to the subject that’s most<br />
important within your photo. As a consequence, the viewer tends<br />
to remain fixed to your work for a longer period of time, since there’s<br />
a natural barrier between it and outer edges of the photograph.<br />
Frames for your images can come from various sources and they<br />
don’t necessarily have to be overbearing. Be careful not to make it<br />
feel cramped or to be so heavy as to dominate and take away from<br />
what you’re trying to accentuate. While setting up for the “shot”,<br />
consider moving around your subject until natural elements present<br />
themselves such as: over hanging branches, doorways, arches,<br />
windows, etc.<br />
In my photograph of the shorebirds on the beach, the main<br />
subject is in fact the “frame” situated 10 feet in front of the other<br />
birds (skimmers) which leads us to a very important point. If you<br />
desire a sharp focus of both the subject and the frame, a long depth<br />
of field is required. (ex: f11 to f22) However, some photographers<br />
like a softened frame and consequently open up to f 4.0 to f 5.6 in<br />
order to blur by means of being out of focus. This can be a very<br />
nice effect and further emphasizes the viewers “focus” on the main<br />
subject. Hey, consider this: anything that lets you go through one<br />
thing that leads to another will make a good frame! So, next time<br />
you’re out, look around, you “may have been framed”!<br />
<strong>Carolinas</strong>’ <strong>Nature</strong> <strong>Photographers</strong> <strong>Association</strong> • 29