John Newton Williams: The Untold Story - Personal Web Sites are ...
John Newton Williams: The Untold Story - Personal Web Sites are ...
John Newton Williams: The Untold Story - Personal Web Sites are ...

Create successful ePaper yourself
Turn your PDF publications into a flip-book with our unique Google optimized e-Paper software.
Back to Basics<br />
Typewriter Photography<br />
by Martin Howard<br />
Reviving a feature of the earliest<br />
ETCeteras, this column will consider<br />
the fundamentals—issues that nearly<br />
everyone who loves writing machines<br />
is bound to deal with. <strong>The</strong>se articles<br />
will be useful to beginners, but also<br />
worthwhile for experienced collectors.<br />
Most of us eventually want to photograph<br />
our typewriters—to document<br />
them, to show them to distant friends,<br />
or to post them online. But a mechanical<br />
object can be surprisingly difficult to<br />
capture. Who better to advise us<br />
than Martin Howard, whose<br />
website antiquetypewriters.<br />
com features lovely shots<br />
of his collection, some by<br />
Martin himself and some<br />
by professional photographer<br />
Jon Muldoon. (Prints of the latter<br />
<strong>are</strong> for sale on the site.) <strong>The</strong><br />
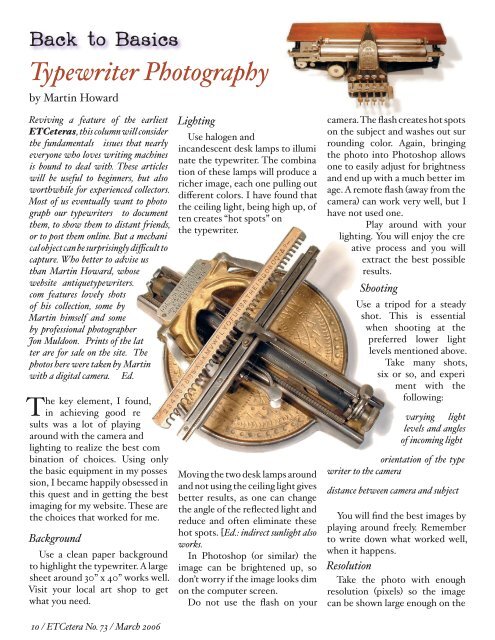
photos here were taken by Martin<br />
with a digital camera. —Ed.<br />
<strong>The</strong> key element, I found,<br />
in achieving good re�<br />
sults was a lot of playing<br />
around with the camera and<br />
lighting to realize the best com�<br />
bination of choices. Using only<br />
the basic equipment in my posses�<br />
sion, I became happily obsessed in<br />
this quest and in getting the best<br />
imaging for my website. <strong>The</strong>se <strong>are</strong><br />
the choices that worked for me.<br />
Background<br />
Use a clean paper background<br />
to highlight the typewriter. A large<br />
sheet around 30” x 40” works well.<br />
Visit your local art shop to get<br />
what you need.<br />
10 / ETCetera No. 73 / March 006<br />
Lighting<br />
Use halogen and<br />
incandescent desk lamps to illumi�<br />
nate the typewriter. <strong>The</strong> combina�<br />
tion of these lamps will produce a<br />
richer image, each one pulling out<br />
different colors. I have found that<br />
the ceiling light, being high up, of�<br />
ten creates “hot spots” on<br />
the typewriter.<br />
Moving the two desk lamps around<br />
and not using the ceiling light gives<br />
better results, as one can change<br />
the angle of the reflected light and<br />
reduce and often eliminate these<br />
hot spots. [Ed.: indirect sunlight also<br />
works.]<br />
In Photoshop (or similar) the<br />
image can be brightened up, so<br />
don’t worry if the image looks dim<br />
on the computer screen.<br />
Do not use the flash on your<br />
camera. <strong>The</strong> flash creates hot spots<br />
on the subject and washes out sur�<br />
rounding color. Again, bringing<br />
the photo into Photoshop allows<br />
one to easily adjust for brightness<br />
and end up with a much better im�<br />
age. A remote flash (away from the<br />
camera) can work very well, but I<br />
have not used one.<br />
Play around with your<br />
lighting. You will enjoy the cre�<br />
ative process and you will<br />
extract the best possible<br />
results.<br />
Shooting<br />
Use a tripod for a steady<br />
shot. This is essential<br />
when shooting at the<br />
preferred lower light<br />
levels mentioned above.<br />
Take many shots,<br />
six or so, and experi�<br />
ment with the<br />
following:<br />
varying light<br />
levels and angles<br />
of incoming light<br />
orientation of the typewriter<br />
to the camera<br />
distance between camera and subject<br />
You will find the best images by<br />
playing around freely. Remember<br />
to write down what worked well,<br />
when it happens.<br />
Resolution<br />
Take the photo with enough<br />
resolution (pixels) so the image<br />
can be shown large enough on the