


Create successful ePaper yourself
Turn your PDF publications into a flip-book with our unique Google optimized e-Paper software.
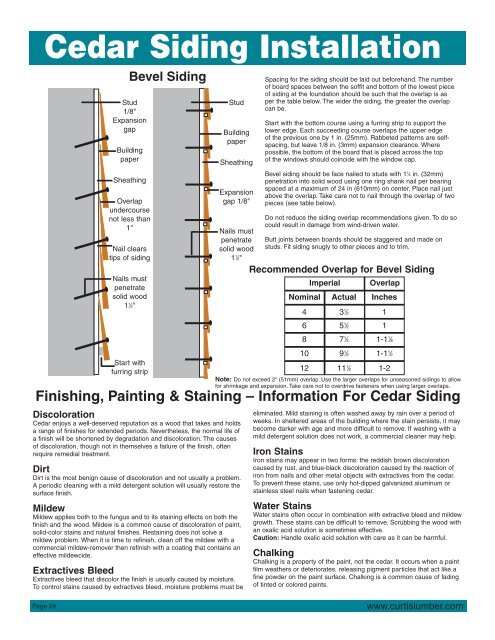
Cedar Siding Installation<br />
Stud<br />
1/8"<br />
Expansion<br />
gap<br />
Building<br />
paper<br />
Sheathing<br />
Overlap<br />
undercourse<br />
not less than<br />
1"<br />
Nail clears<br />
tips of siding<br />
Nails must<br />
penetrate<br />
solid wood<br />
1 1 ⁄2"<br />
Start with<br />
furring strip<br />
Stud<br />
Building<br />
paper<br />
Sheathing<br />
Expansion<br />
gap 1/8"<br />
Nails must<br />
penetrate<br />
solid wood<br />
1 1 ⁄2"<br />
Finishing, Painting & Staining – Information For Cedar Siding<br />
Discoloration<br />
Cedar enjoys a well-deserved reputation as a wood that takes and holds<br />
a range of finishes for extended periods. Nevertheless, the normal life of<br />
a finish will be shortened by degradation and discoloration. The causes<br />
of discoloration, though not in themselves a failure of the finish, often<br />
require remedial treatment.<br />
Dirt<br />
Dirt is the most benign cause of discoloration and not usually a problem.<br />
A periodic cleaning with a mild detergent solution will usually restore the<br />
surface finish.<br />
Mildew<br />
Mildew applies both to the fungus and to its staining effects on both the<br />
finish and the wood. Mildew is a common cause of discoloration of paint,<br />
solid-color stains and natural finishes. Restaining does not solve a<br />
mildew problem. When it is time to refinish, clean off the mildew with a<br />
commercial mildew-remover then refinish with a coating that contains an<br />
effective mildewcide.<br />
Extractives Bleed<br />
Extractives bleed that discolor the finish is usually caused by moisture.<br />
To control stains caused by extractives bleed, moisture problems must be<br />
Page 24<br />
Bevel Siding<br />
Spacing for the siding should be laid out beforehand. The number<br />
of board spaces between the soffit and bottom of the lowest piece<br />
of siding at the foundation should be such that the overlap is as<br />
per the table below. The wider the siding, the greater the overlap<br />
can be.<br />
Start with the bottom course using a furring strip to support the<br />
lower edge. Each succeeding course overlaps the upper edge<br />
of the previous one by 1 in. (25mm). Rabbeted patterns are selfspacing,<br />
but leave 1/8 in. (3mm) expansion clearance. Where<br />
possible, the bottom of the board that is placed across the top<br />
of the windows should coincide with the window cap.<br />
Bevel siding should be face nailed to studs with 1 1 ⁄4 in. (32mm)<br />
penetration into solid wood using one ring shank nail per bearing<br />
spaced at a maximum of 24 in (610mm) on center. Place nail just<br />
above the overlap. Take care not to nail through the overlap of two<br />
pieces (see table below).<br />
Do not reduce the siding overlap recommendations given. To do so<br />
could result in damage from wind-driven water.<br />
Butt joints between boards should be staggered and made on<br />
studs. Fit siding snugly to other pieces and to trim.<br />
Recommended Overlap for Bevel Siding<br />
Imperial Overlap<br />
Nominal Actual Inches<br />
4<br />
6<br />
8<br />
10<br />
12<br />
31 ⁄2<br />
51 ⁄2<br />
71 ⁄2<br />
91 ⁄2<br />
111 ⁄2 1-2<br />
Note: Do not exceed 2" (51mm) overlap. Use the larger overlaps for unseasoned sidings to allow<br />
for shrinkage and expansion. Take care not to overdrive fasteners when using larger overlaps.<br />
eliminated. Mild staining is often washed away by rain over a period of<br />
weeks. In sheltered areas of the building where the stain persists, it may<br />
become darker with age and more difficult to remove. If washing with a<br />
mild detergent solution does not work, a commercial cleaner may help.<br />
Iron Stains<br />
Iron stains may appear in two forms: the reddish brown discoloration<br />
caused by rust, and blue-black discoloration caused by the reaction of<br />
iron from nails and other metal objects with extractives from the cedar.<br />
To prevent these stains, use only hot-dipped galvanized aluminum or<br />
stainless steel nails when fastening cedar.<br />
Water Stains<br />
Water stains often occur in combination with extractive bleed and mildew<br />
growth. These stains can be difficult to remove. Scrubbing the wood with<br />
an oxalic acid solution is sometimes effective.<br />
Caution: Handle oxalic acid solution with care as it can be harmful.<br />
Chalking<br />
Chalking is a property of the paint, not the cedar. It occurs when a paint<br />
film weathers or deteriorates, releasing pigment particles that act like a<br />
fine powder on the paint surface. Chalking is a common cause of fading<br />
of tinted or colored paints.<br />
1<br />
1<br />
1-11 ⁄8<br />
1-11 ⁄2<br />
www.curtislumber.com