THE ART OF COMIC BOOK INKING By GARY MARTIN (Rewrite by ...
THE ART OF COMIC BOOK INKING By GARY MARTIN (Rewrite by ...
THE ART OF COMIC BOOK INKING By GARY MARTIN (Rewrite by ...

You also want an ePaper? Increase the reach of your titles
YUMPU automatically turns print PDFs into web optimized ePapers that Google loves.
<strong>THE</strong> <strong>ART</strong> <strong>OF</strong> <strong>COMIC</strong> <strong>BOOK</strong> <strong>INKING</strong> (rewrite) Anina Bennett<br />
CHAPTER III<br />
LINE WEIGHTS<br />
ESTABLISHING <strong>THE</strong> LIGHT SOURCE<br />
The first thing you need to do when inking a comic book panel is determine which direction the<br />
light is coming from. This is most important because it’s the cornerstone of all your subsequent lineweight<br />
decisions. The penciler’s placement of shadows will eliminate some of your guesswork. But<br />
(and this is a big “but”) sometimes there are no clues as to the direction of the light. In such cases,<br />
our hero — the inker — must step in to save the day!<br />
The easiest way to indicate the light source is simply to use a heavy line weight on the dark side<br />
of an object and a thinner line weight on its light side. This works with almost everything: a leg,<br />
arm, or body; a lamppost or telephone pole; a tree, shrubbery, or even the castle Anthrax. The<br />
exceptions are objects that are not solid, such as clouds, fire, or smoke.<br />
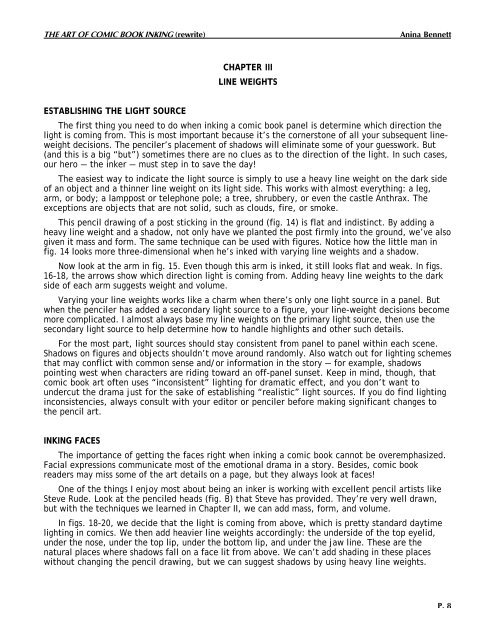
This pencil drawing of a post sticking in the ground (fig. 14) is flat and indistinct. <strong>By</strong> adding a<br />
heavy line weight and a shadow, not only have we planted the post firmly into the ground, we’ve also<br />
given it mass and form. The same technique can be used with figures. Notice how the little man in<br />
fig. 14 looks more three-dimensional when he’s inked with varying line weights and a shadow.<br />
Now look at the arm in fig. 15. Even though this arm is inked, it still looks flat and weak. In figs.<br />
16-18, the arrows show which direction light is coming from. Adding heavy line weights to the dark<br />
side of each arm suggests weight and volume.<br />
Varying your line weights works like a charm when there’s only one light source in a panel. But<br />
when the penciler has added a secondary light source to a figure, your line-weight decisions become<br />
more complicated. I almost always base my line weights on the primary light source, then use the<br />
secondary light source to help determine how to handle highlights and other such details.<br />
For the most part, light sources should stay consistent from panel to panel within each scene.<br />
Shadows on figures and objects shouldn’t move around randomly. Also watch out for lighting schemes<br />
that may conflict with common sense and/or information in the story — for example, shadows<br />
pointing west when characters are riding toward an off-panel sunset. Keep in mind, though, that<br />
comic book art often uses “inconsistent” lighting for dramatic effect, and you don’t want to<br />
undercut the drama just for the sake of establishing “realistic” light sources. If you do find lighting<br />
inconsistencies, always consult with your editor or penciler before making significant changes to<br />
the pencil art.<br />
<strong>INKING</strong> FACES<br />
The importance of getting the faces right when inking a comic book cannot be overemphasized.<br />
Facial expressions communicate most of the emotional drama in a story. Besides, comic book<br />
readers may miss some of the art details on a page, but they always look at faces!<br />
One of the things I enjoy most about being an inker is working with excellent pencil artists like<br />
Steve Rude. Look at the penciled heads (fig. B) that Steve has provided. They’re very well drawn,<br />
but with the techniques we learned in Chapter II, we can add mass, form, and volume.<br />
In figs. 18-20, we decide that the light is coming from above, which is pretty standard daytime<br />
lighting in comics. We then add heavier line weights accordingly: the underside of the top eyelid,<br />
under the nose, under the top lip, under the bottom lip, and under the jaw line. These are the<br />
natural places where shadows fall on a face lit from above. We can’t add shading in these places<br />
without changing the pencil drawing, but we can suggest shadows <strong>by</strong> using heavy line weights.<br />
P. 8