Step 1 – Prospective Supplier – Details SUPPLY CHAIN ... - Exxaro
Step 1 – Prospective Supplier – Details SUPPLY CHAIN ... - Exxaro
Step 1 – Prospective Supplier – Details SUPPLY CHAIN ... - Exxaro

You also want an ePaper? Increase the reach of your titles
YUMPU automatically turns print PDFs into web optimized ePapers that Google loves.
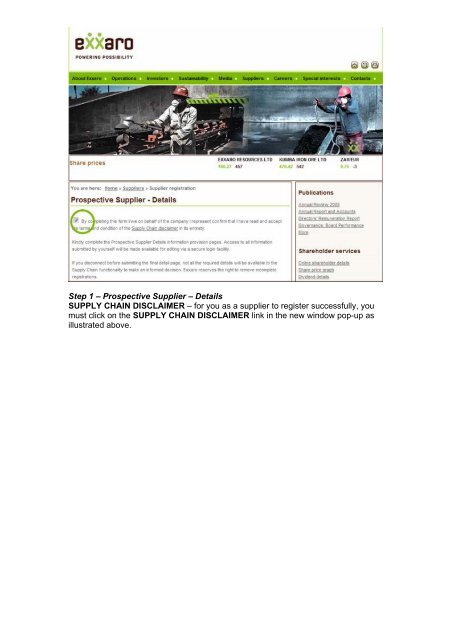
<strong>Step</strong> 1 <strong>–</strong> <strong>Prospective</strong> <strong>Supplier</strong> <strong>–</strong> <strong>Details</strong><br />
<strong>SUPPLY</strong> <strong>CHAIN</strong> DISCLAIMER <strong>–</strong> for you as a supplier to register successfully, you<br />
must click on the <strong>SUPPLY</strong> <strong>CHAIN</strong> DISCLAIMER link in the new window pop-up as<br />
illustrated above.
<strong>Step</strong> 2 <strong>–</strong> <strong>Exxaro</strong> Supply Chain Disclaimer<br />
Please read the disclaimer prior to accepting the conditions. Once the disclaimer is<br />
read and understood, you must click on the CHECKBOX to accept the disclaimer<br />
conditions. Once the check box is clicked, the disclaimer window will automatically<br />
close; you must go back to the initial page [<strong>Step</strong> 1] and click the checkbox to confirm<br />
that you have read and accepted the disclaimer conditions on behalf of yourself and<br />
the organization you represent.
<strong>Step</strong> 3 - <strong>Prospective</strong> <strong>Supplier</strong> <strong>–</strong> <strong>Details</strong><br />
You MUST fill in the details form, and click next.<br />
Above an example of a completed form.
<strong>Step</strong> 4 <strong>–</strong> <strong>Prospective</strong> <strong>Supplier</strong> <strong>–</strong> Materials<br />
You MUST select the services and or products you supply, and click next.<br />
Above an example of a completed form.
<strong>Step</strong> 5 <strong>–</strong> <strong>Prospective</strong> <strong>Supplier</strong> <strong>–</strong> References<br />
You MUST fill in a reference or references, and describe why your business will<br />
contribute positively to <strong>Exxaro</strong>. Click Submit.<br />
Above an example of a completed form.
<strong>Step</strong> 6 <strong>–</strong> Confirmation<br />
You will be redirected to this page confirming a successful registration. An email<br />
will be sent to the email address provided in [STEP 3]. This email contains login<br />
details for the REGISTERED SUPPLIER, login details may be used to edit registered<br />
supplier details.
<strong>Step</strong> <strong>–</strong> 7 <strong>–</strong> <strong>Supplier</strong> Login<br />
Login details provided via email upon a successful SUPPLIER REGISTRATION, are<br />
used to login here.
<strong>Step</strong> 8 <strong>–</strong> Successful login<br />
Once you have correctly entered the relevant email address and the password<br />
emailed to yourself, upon submission you will be presented with the above screen.<br />
Once you are on the above website page, you can either:<br />
- Change/Update Password<br />
- Update <strong>Supplier</strong> Detail<br />
- Update Materials<br />
- Update <strong>Supplier</strong> References<br />
Please select any one or multiple of the above as relevant, and make your desired<br />
changes.<br />
In the screenshot that follow, are examples of making those changes.
<strong>Step</strong> 9 <strong>–</strong> <strong>Supplier</strong> Editing login<br />
You MAY update your password, anytime by entering a new password here.<br />
On selecting submit the new password will be recorded and will be required in the<br />
next login.
<strong>Step</strong> 10 - <strong>Supplier</strong> Registration - Company Information<br />
You MAY update details on this form by simply replacing information on this form<br />
with the new information, on selecting submit, the new information will be written to<br />
the database replacing previous information.
<strong>Step</strong> 11 <strong>–</strong> <strong>Supplier</strong> registration <strong>–</strong> materials<br />
This step is divided into two sections namely, Adding additional services and or<br />
Removing current services.<br />
1. Adding additional services:<br />
When adding additional services, you must only select checkboxes for the<br />
services you are adding. Existing services are already listed at the top of the page,<br />
and they should not be selected again.<br />
2. Removing current services:<br />
When removing any or all services from those previously provided, you must select<br />
the Remove Material/Items link first and thereafter select the check box(es) for<br />
the service(s) you wish to remove.
<strong>Step</strong> 12 <strong>–</strong> <strong>Supplier</strong> Registration <strong>–</strong> References<br />
You MAY update details on this form by simply replacing information on this form<br />
with the new information, on submit, the new information will be written to the<br />
database replacing previous information.