Create successful ePaper yourself
Turn your PDF publications into a flip-book with our unique Google optimized e-Paper software.
ENGLISH ROCKSHOX, INC. • 20<strong>03</strong> U-TURN REAR SHOCK OWNER’S MANUAL<br />
I M P O R T A N T<br />
Consumer Safety Information<br />
RIDING A BIKE IS DANGEROUS. NOT PROPERLY MAINTAINING OR<br />
INSPECTING YOUR BIKE IS EVEN MORE DANGEROUS. IT’S ALSO<br />
DANGEROUS NOT TO READ THESE INSTRUCTIONS.<br />
1. Before riding the bicycle, be sure the brakes are properly installed and<br />
adjusted. If the brakes don’t work properly, the rider could suffer serious<br />
and/or fatal injuries.<br />
2. If the shock ever loses oil or if it makes sounds of excessive topping out,<br />
stop riding the bicycle immediately and have the shock inspected by a<br />
dealer or call RockShox. Continuing to ride with the shock in either of<br />
these conditions could result in loss of control of the bicycle with possible<br />
serious and/or fatal injuries.<br />
3. Always use genuine RockShox parts. Use of after-market replacement<br />
parts voids the warranty and could cause structural failure to the shock.<br />
Structural failure could result in loss of control of the bicycle with possible<br />
serious and/or fatal injuries.<br />
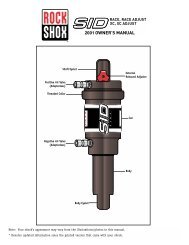
U-TURN R EAR S HOCK<br />
Based on the SID rear shock, the U-<strong>Turn</strong> rear shock allows you to choose the amount of rear<br />
wheel travel and bottom bracket height. Used in combination with the Duke U-<strong>Turn</strong>, Psylo U-<br />
<strong>Turn</strong> or adjustable travel front suspension, the U-<strong>Turn</strong> rear shock system allows the rider to<br />
choose exactly how much travel they need for the trail or terrain. The U-turn system enables<br />
the chassis to maintain consistent frame geometry regardless of travel adjustment. Like the<br />
front U-<strong>Turn</strong>, it automatically adjust the spring rate relative to the adjusted travel, firmer in the<br />
shorter travel setting and softer in the longer travel setting. Infinite adjustability allows the<br />
rider to turn the small bump ride from plush to firm. A twist of the U-<strong>Turn</strong> shock body<br />
changes the personality and feel of your bike without using a shock pump. The U-<strong>Turn</strong> shock<br />
gives your bike two personalities, from fast and efficient XC riding to free-ride and anywhere<br />
in between.<br />
I NSTALLATION<br />
It is extremely important that your RockShox rear shock is installed correctly by a qualified<br />
bicycle mechanic with proper tools. Consult your bicycle manufacturer’s instructions for proper<br />
installation of your rear shock.<br />
!<br />
WARNING<br />
IMPROPERLY INSTALLED REAR SHOCKS CAN BE EXTREMELY<br />
DANGEROUS AND MAY RESULT IN SEVERE AND/OR FATAL INJURIES.<br />
P ERFORMANCE T UNING<br />
RockShox rear shocks can be tuned for your particular weight, riding style, and terrain.<br />
IMPORTANT: BE SURE YOU TAKE YOUR BIKE FOR A TEST RIDE TO SEE IF THE REAR SHOCK IS SET UP FOR YOU<br />
STRAIGHT OFF THE SHOWROOM FLOOR.<br />
4 950-006928-00, REV. A01<br />
ROCKSHOX, INC. • 20<strong>03</strong> U-TURN REAR SHOCK OWNER’S MANUAL ENGLISH<br />
By adjusting the air pressure, travel and rebound, the U-<strong>Turn</strong> rear shock can be tuned for your<br />
particular weight, riding style, and terrain. You may benefit by making tuning adjustments to<br />
suit your specific needs. When tuning suspension, always make one change at a time and write<br />
it down. This allows you to understand how each change affects your ride.<br />
Setting Sag<br />
Sag is the amount of shock travel that is used as the rider sits stationary on the bike. Typically,<br />
sag is 15 to 30 percent of all available wheel travel. Check with your bicycle manufacturer to<br />
determine the rear wheel travel and recommended sag for your particular bike before setting<br />
sag. For the U-<strong>Turn</strong> rear shock you will be changing the air spring rate to set sag.<br />
Adjusting positive air pressure determines the spring rate, or stiffness, of the shock. The more air<br />
you put in, the firmer your shock will be.<br />
Initial Tuning Set-up<br />
Ensure your shock is set-up with the following initial settings. Then start fine tuning your<br />
shock according to your weight, riding style and terrain.<br />
• Travel adjustment - Full travel position (counterclockwise)<br />
• Positive and negative air pressure - Body weight minus 10 psi<br />
• Rebound - one complete turn counterclockwise from closed<br />
Selecting Air Pressure (Spring Rate):<br />
1. Depressurize the positive and negative air chamber by removing the air cap and depressing the valve<br />
core stems.<br />
2. Because every bike is different, a good starting point is to pressurize the positive air chamber to an air<br />
pressure equaling your body weight minus 10 psi.<br />
NOTE: AS BICYCLE DESIGNS DIFFER SIGNIFICANTLY, YOUR BICYCLE MAY REQUIRE DIFFERENT PRESSURES<br />
OR SET UP TECHNIQUES. THESE INSTRUCTIONS ARE INTENDED AS A GUIDELINE ONLY.<br />
3. After adding air to your shock based on your body weight, and without sitting on the bike, measure the<br />
distance from the floor to the seat (rear height). Write it down.<br />
4. While you sit in a normal riding position, have a friend measure the same distance. The difference<br />
between the two measurements is sag. Determine what percentage of total wheel travel this sag<br />
represents.<br />
5. If the sag is less than your bicycle manufacturer’s recommendation, a lower air pressure should be used.<br />
If the sag is greater than your bike manufacturer’s recommendation, a greater air pressure should be<br />
used.<br />
IMPORTANT: DO NOT USE AIR PRESSURE OUTSIDE THE 100 TO 250 PSI RANGE.<br />
6. Once sag has been set, pressurize the negative air chamber to match the positive air chamber pressure.<br />
TIP: ADJUSTING THE NEGATIVE AIR CHAMBER DETERMINES THE EASE OF INITIAL COMPRESSION. THE<br />
HIGHER THE AIR PRESSURE YOU PUT IN, THE EASIER IT IS TO COMPRESS THE SHOCK.<br />
7. Measure the sag once again to make sure it is the same. Write down the measurement and air pressure<br />
reading from the shock.<br />
8. Install both air caps.<br />
Example: If your bike has 4” of rear wheel travel and you want to set it up for cross-country<br />
riding, your sag should be 0.6 - 1.2 in. If you weigh 175 lb., pressurize the positive chamber to<br />
175 psi and measure your sag. Then pressurize the negative air chamber to 175 psi and<br />
remeasure sag.<br />
ROCKSHOX, INC. • JUNE 2002 5