Charger manual - Peter Lynn
Charger manual - Peter Lynn
Charger manual - Peter Lynn
- TAGS
- charger
- manual
- peter
- lynn
- peterlynn.com

Create successful ePaper yourself
Turn your PDF publications into a flip-book with our unique Google optimized e-Paper software.
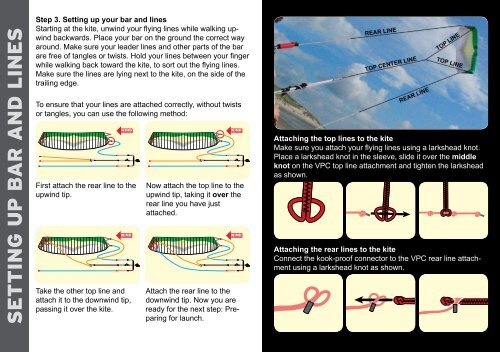
SETTING UP BAR AND LINES<br />
Step 3. Setting up your bar and lines<br />
Starting at the kite, unwind your flying lines while walking upwind<br />
backwards. Place your bar on the ground the correct way<br />
around. Make sure your leader lines and other parts of the bar<br />
are free of tangles or twists. Hold your lines between your finger<br />
while walking back toward the kite, to sort out the flying lines.<br />
Make sure the lines are lying next to the kite, on the side of the<br />
trailing edge.<br />
To ensure that your lines are attached correctly, without twists<br />
or tangles, you can use the following method:<br />
First attach the rear line to the<br />
upwind tip.<br />
Take the other top line and<br />
attach it to the downwind tip,<br />
passing it over the kite.<br />
Now attach the top line to the<br />
upwind tip, taking it over the<br />
rear line you have just<br />
attached.<br />
Attach the rear line to the<br />
downwind tip. Now you are<br />
ready for the next step: Preparing<br />
for launch.<br />
REAR LINE<br />
TOP CENTER LINE<br />
REAR LINE<br />
TOP LINE<br />
TOP LINE<br />
Attaching the top lines to the kite<br />
Make sure you attach your flying lines using a larkshead knot.<br />
Place a larkshead knot in the sleeve, slide it over the middle<br />
knot on the VPC top line attachment and tighten the larkshead<br />
as shown.<br />
Attaching the rear lines to the kite<br />
Connect the kook-proof connector to the VPC rear line attachment<br />
using a larkshead knot as shown.