For All Vehicles - Bosch Australia
For All Vehicles - Bosch Australia
For All Vehicles - Bosch Australia

You also want an ePaper? Increase the reach of your titles
YUMPU automatically turns print PDFs into web optimized ePapers that Google loves.
Technical Information Technical Information<br />
3. Battery Usage and Defects<br />
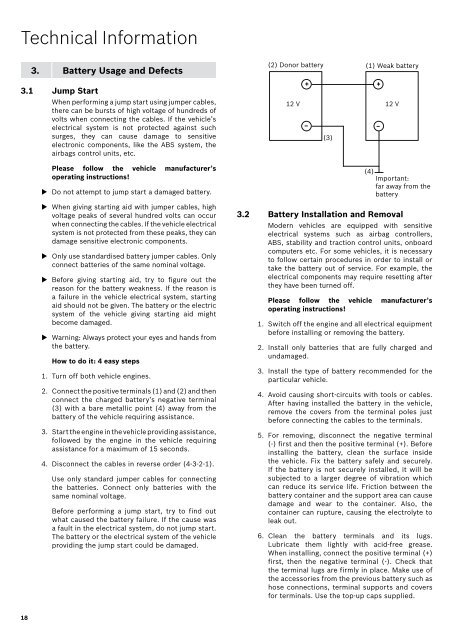
3.1 Jump Start<br />
u<br />
When performing a jump start using jumper cables,<br />
there can be bursts of high voltage of hundreds of<br />
volts when connecting the cables. If the vehicle’s<br />
electrical system is not protected against such<br />
surges, they can cause damage to sensitive<br />
electronic components, like the ABS system, the<br />
airbags control units, etc.<br />
Please follow the vehicle manufacturer’s<br />
operating instructions!<br />
Do not attempt to jump start a damaged battery.<br />
u When giving starting aid with jumper cables, high<br />
voltage peaks of several hundred volts can occur<br />
when connecting the cables. If the vehicle electrical<br />
system is not protected from these peaks, they can<br />
damage sensitive electronic components.<br />
u Only use standardised battery jumper cables. Only<br />
connect batteries of the same nominal voltage.<br />
u Before giving starting aid, try to figure out the<br />
reason for the battery weakness. If the reason is<br />
a failure in the vehicle electrical system, starting<br />
aid should not be given. The battery or the electric<br />
system of the vehicle giving starting aid might<br />
become damaged.<br />
u Warning: Always protect your eyes and hands from<br />
the battery.<br />
1.<br />
How to do it: 4 easy steps<br />
Turn off both vehicle engines.<br />
2. Connect the positive terminals (1) and (2) and then<br />
connect the charged battery’s negative terminal<br />
(3) with a bare metallic point (4) away from the<br />
battery of the vehicle requiring assistance.<br />
3. Start the engine in the vehicle providing assistance,<br />
followed by the engine in the vehicle requiring<br />
assistance for a maximum of 15 seconds.<br />
4.<br />
Disconnect the cables in reverse order (4-3-2-1).<br />
Use only standard jumper cables for connecting<br />
the batteries. Connect only batteries with the<br />
same nominal voltage.<br />
Before performing a jump start, try to find out<br />
what caused the battery failure. If the cause was<br />
a fault in the electrical system, do not jump start.<br />
The battery or the electrical system of the vehicle<br />
providing the jump start could be damaged.<br />
(2) Donor battery<br />
+ +<br />
12 V 12 V<br />
– –<br />
(3)<br />
(1) Weak battery<br />
(4)<br />
Important:<br />
far away from the<br />
battery<br />
3.2 Battery Installation and Removal<br />
Modern vehicles are equipped with sensitive<br />
electrical systems such as airbag controllers,<br />
ABS, stability and traction control units, onboard<br />
computers etc. <strong>For</strong> some vehicles, it is necessary<br />
to follow certain procedures in order to install or<br />
take the battery out of service. <strong>For</strong> example, the<br />
electrical components may require resetting after<br />
they have been turned off.<br />
Please follow the vehicle manufacturer’s<br />
operating instructions!<br />
1. Switch off the engine and all electrical equipment<br />
before installing or removing the battery.<br />
2. Install only batteries that are fully charged and<br />
undamaged.<br />
3. Install the type of battery recommended for the<br />
particular vehicle.<br />
4. Avoid causing short-circuits with tools or cables.<br />
After having installed the battery in the vehicle,<br />
remove the covers from the terminal poles just<br />
before connecting the cables to the terminals.<br />
5. <strong>For</strong> removing, disconnect the negative terminal<br />
(-) first and then the positive terminal (+). Before<br />
installing the battery, clean the surface inside<br />
the vehicle. Fix the battery safely and securely.<br />
If the battery is not securely installed, it will be<br />
subjected to a larger degree of vibration which<br />
can reduce its service life. Friction between the<br />
battery container and the support area can cause<br />
damage and wear to the container. Also, the<br />
container can rupture, causing the electrolyte to<br />
leak out.<br />
6. Clean the battery terminals and its lugs.<br />
Lubricate them lightly with acid-free grease.<br />
When installing, connect the positive terminal (+)<br />
first, then the negative terminal (-). Check that<br />
the terminal lugs are firmly in place. Make use of<br />
the accessories from the previous battery such as<br />
hose connections, terminal supports and covers<br />
for terminals. Use the top-up caps supplied.<br />
7. At least one vent must remain open to avoid the<br />
risk of an explosion.<br />
3.3 Taking the Vehicle out of Service<br />
When a vehicle is taken out of service (for example,<br />
when it is used only seasonally), charge up the<br />
battery and store it in a cool place. If it is necessary<br />
to leave the battery in the vehicle, disconnect the<br />
negative terminal. Check the OCV of the battery<br />
every two months. If the OCV is below 12.4V,<br />
recharge the battery.<br />
3.4 Technical Information on Battery<br />
Problems<br />
3.4.1 Manufacturing Defects<br />
Short Circuit / Dead Cell<br />
If a battery has a service life that is less than 12<br />
months, the problem is usually caused by a dead<br />
cell, that is, one of the cells has a density value that<br />
is much lower than the others. The affected cell<br />
bubbles visibly during the high-discharge test. To<br />
evaluate the density, a high-discharge test should<br />
be carried out. In some cases, the dead cell may<br />
be visible in the form of a sulphated cell.<br />
Internal Breakage<br />
The battery has good density values, but the voltage<br />
across the terminals cannot be measured.<br />
3.4.2 Mishandling and Warranty Exclusion<br />
The following technical problems are caused<br />
by mishandling the battery. Such cases are not<br />
subject to warranty.<br />
Low State of Charge<br />
A low state of charge is the first stage of deep<br />
discharge. With a low state of charge, the active<br />
material will not have sustained any damage.<br />
The battery can still be charged with a standard<br />
charger.<br />
The causes of a low state of charge are:<br />
A defective alternator.<br />
18<br />
Figure 1 – Picture of a battery with deep discharge and<br />
sulphation<br />
19<br />
u<br />
u<br />
A low voltage output from the regulator.<br />
u High contact resistances caused by loose cable<br />
connections or dirt on the cable terminals.<br />
u<br />
Slack drive belts.<br />
u Insufficient engine running time due to short<br />
journey times.<br />
u<br />
Subsequent addition of electrical equipment.<br />
u Defective<br />
discharge.<br />
equipment causing continuous<br />
u<br />
Deep Discharge<br />
A battery suffers a deep discharge when its<br />
capacity is totally used up. The longer the<br />
battery remains in this state, the greater will<br />
be the damage done to the active material. The<br />
plates begin to suffer sulphation and recharging<br />
becomes impossible. This damage is irreversible.<br />
Possible causes of deep discharge are:<br />
See ‘Causes of Low State of Charge’<br />
u Headlights or other electrical equipment are not<br />
switched off.<br />
A battery in a good state of charge will usually<br />
have a load-free voltage >12.6V. Therefore, the<br />
voltage without charge for each cell is about<br />
2.1V. If there is a short circuit in just a single cell,<br />
this will result in a reduction of about 2.1V of the<br />
terminal voltage, which would be a typical ‘shortcircuit’<br />
voltage of 10.5V. The likelihood of two<br />
cells within the same battery having a short circuit<br />
is very low. In the case of two cells with short<br />
circuits, the OCV drops by 4.2V to a value of 8.4V.<br />
In order to exclude the effects of long shipment<br />
and storage times on the terminal voltage, as well<br />
as the possibility of two cells with short circuits<br />
etc., only batteries with a load-free voltage lower<br />
than 8 volts are regarded as deeply discharged<br />
and a claim on warranty will be rejected.<br />
Sulphation<br />
If a battery is left in a discharged state for an<br />
excessive period of time, there will be a chemical<br />
reaction known as sulphation, which will<br />
certainly compromise its performance. During the<br />
discharge process, lead sulphate is generated on<br />
the positive and negative plates and distributed<br />
evenly among them.<br />
The longer the battery is left in a discharged state,<br />
the more the small sulphate crystals grow into<br />
larger crystals and it becomes very difficult to<br />
convert these back into lead dioxide. Sulphation<br />
can become visible in the form of a white/grey<br />
layer on the plates. In most cases, this damage<br />
is irreversible and the battery cannot be used<br />
anymore.