Technical Specification - MK Electric
Technical Specification - MK Electric
Technical Specification - MK Electric

Create successful ePaper yourself
Turn your PDF publications into a flip-book with our unique Google optimized e-Paper software.
588 Prestige 2Com <strong>Technical</strong><br />
cable management | perimeter and distribution www.mkelectric.co.uk<br />
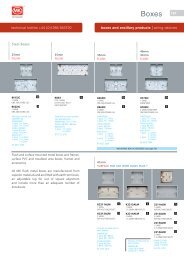
Data Trunking System<br />
installation guide<br />
General installation guidelines<br />
Tools and sundries required for installation:<br />
1. Fine toothed tenon saw or a hacksaw with a 32 – 26 TPI blade for<br />
cutting the trunking, or preferably a circular saw with a 350mm<br />
diameter fine tungsten tipped blade (100TPI approx.)<br />
2. All purpose knife or fine file for trimming of trunking<br />
3. Spirit level, Plumb Bob and chalk line<br />
4. A range of screwdrivers (flat or cross point) to suit fixing screws and<br />
Earth Carrier Connectors<br />
5. A 5.5mm Ø drill bit and No.8 Round head or Pan head screws with<br />
suitable washers to secure the trunking.<br />
6. Soft faced mallet to aid lid fitting<br />
Planning the installation<br />
It is important to spend some time planning the installation, before<br />
starting. Time spent on planning the layout at this stage can avoid<br />
mistakes later on. The installation is designed for a non-conductive<br />
substrate, if you have any queries please contact: <strong>MK</strong> <strong>Technical</strong> Sales<br />
Service Department. Telephone 01268 563720.<br />
1<br />
2<br />
1. Surface to which the trunking is to be installed should be flat and<br />
prepared for decorating.<br />
2. Establish the layout of the trunking run with particular attention to<br />
the following: -<br />
a. Changes in direction of the trunking.<br />
b. The position of any feeds to or from the system.<br />
c. The position of any connections with existing trunking/wiring<br />
systems.<br />
d. Allow for minimum distances between corners, couplers, screw<br />
fixings, angles and tees (please see individual technical sections<br />
for details).<br />
e. When installing at skirting level, ensure room is also allowed<br />
for future floor coverings to be fitted below trunking.<br />
3<br />
34mm<br />
5<br />
4<br />
13mm