OM, 7021 RB, 96143005000, 2008-12, Walk Mower - Husqvarna
OM, 7021 RB, 96143005000, 2008-12, Walk Mower - Husqvarna
OM, 7021 RB, 96143005000, 2008-12, Walk Mower - Husqvarna

You also want an ePaper? Increase the reach of your titles
YUMPU automatically turns print PDFs into web optimized ePapers that Google loves.
ASSEMBLY<br />
Read these instructions and this man u al in its entirety before you attempt to assemble or operate your new lawn mow er.<br />
IMPORTANT: THIS LAWN MOWER IS SHIPPED WITH OUT OIL OR GASOLINE IN THE ENGINE.<br />
Your new lawn mower has been as sem bled at the factory with the ex cep tion of those parts left unassembled for shipping<br />
purposes. All parts such as nuts, washers, bolts, etc., necessary to com plete the as sem bly have been placed in the parts<br />
bag. To ensure safe and proper operation of your lawn mow er, all parts and hard ware you assemble must be tightened<br />
se cure ly. Use the correct tools as nec es sary to ensure proper tightness.<br />
TO RE MOVE LAWN MOW ER FR<strong>OM</strong> CAR TON<br />
1. Remove loose parts included with mower.<br />
2. Cut down two end corners of car ton and lay end panel<br />
down flat.<br />
3. Remove all packing materials ex cept padding be tween<br />
upper and lower handle and padding holding operator<br />
presence control bar to up per handle.<br />
4. Roll lawn mower out of carton and check carton thorougly<br />
for ad di tion al loose parts.<br />
HOW TO SET UP YOUR LAWN MOWER<br />
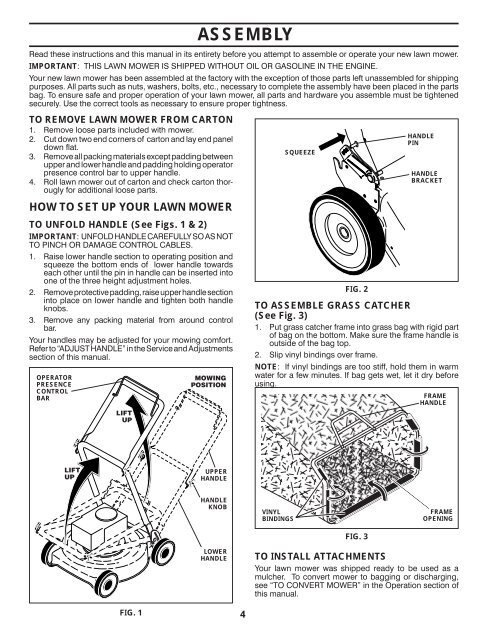
TO UNFOLD HANDLE (See Figs. 1 & 2)<br />
IMPORTANT: UNFOLD HANDLE CAREFULLY SO AS NOT<br />
TO PINCH OR DAMAGE CONTROL CABLES.<br />
1. Raise lower handle section to operating position and<br />
squeeze the bottom ends of lower handle towards<br />
each other until the pin in handle can be inserted into<br />
one of the three height adjustment holes.<br />
2. Remove protective padding, raise upper handle section<br />
into place on lower handle and tighten both handle<br />
knobs.<br />
3. Remove any packing material from around control<br />
bar.<br />
Your handles may be adjusted for your mowing comfort.<br />
Refer to “ADJUST HANDLE” in the Service and Adjustments<br />
section of this manual.<br />
OPERATOR<br />
PRESENCE<br />
CONTROL<br />
BAR<br />
LIFT<br />
UP<br />
LIFT<br />
UP<br />
FIG. 1<br />
MOWING<br />
PO SI TION<br />
UPPER<br />
HANDLE<br />
HANDLE<br />
KNOB<br />
LOWER<br />
HANDLE<br />
4<br />
FIG. 2<br />
TO ASSEMBLE GRASS CATCHER<br />
(See Fig. 3)<br />
1. Put grass catcher frame into grass bag with rigid part<br />
of bag on the bottom. Make sure the frame handle is<br />
outside of the bag top.<br />
2. Slip vinyl bindings over frame.<br />
NOTE: If vinyl bindings are too stiff, hold them in warm<br />
water for a few minutes. If bag gets wet, let it dry before<br />
using.<br />
VINYL<br />
BINDINGS<br />
SQUEEZE<br />
FIG. 3<br />
HANDLE<br />
PIN<br />
HANDLE<br />
BRACKET<br />
FRAME<br />
HANDLE<br />
FRAME<br />
OPENING<br />
TO INSTALL ATTACHMENTS<br />
Your lawn mower was shipped ready to be used as a<br />
mulcher. To convert mower to bagging or discharging,<br />
see “TO CON VERT MOWER” in the Operation section of<br />
this man u al.