

14.1m - Bocci
14.1m - Bocci
14.1m - Bocci

Create successful ePaper yourself
Turn your PDF publications into a flip-book with our unique Google optimized e-Paper software.
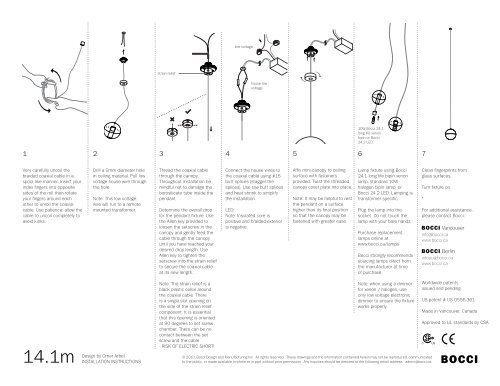
1 2 3 4 5 6 7<br />
Very carefully uncoil the<br />
braided coaxial cable in a<br />
spool like manner. Insert your<br />
index fingers into opposite<br />
sides of the roll then rotate<br />
your fingers around each<br />
other to unroll the coaxial<br />
cable. Use patience: allow the<br />
cable to uncoil completely to<br />
avoid kinks.<br />
<strong>14.1m</strong><br />
Drill a 9mm diameter hole<br />
in ceiling material. Pull low<br />
voltage house wire through<br />
the hole.<br />
Note: This low voltage<br />
wire will run to a remote<br />
mounted transformer.<br />
Design by Omer Arbel<br />
INSTALLATION INSTRUCTIONS<br />
strain relief<br />
Thread the coaxial cable<br />
through the canopy.<br />
Throughout installation be<br />
mindful not to damage the<br />
borosilicate tube inside the<br />
pendant.<br />
Determine the overall drop<br />
for the pendant fixture. Use<br />
the Allen key provided to<br />
loosen the setscrew in the<br />
canopy and gently feed the<br />
cable through the canopy<br />
until you have reached your<br />
desired drop length. Use<br />
Allen key to tighten the<br />
setscrew into the strain relief<br />
to secure the coaxial cable<br />
at its new length.<br />
Note: The strain relief is a<br />
black plastic collar around<br />
the coaxial cable. There<br />
is a single slot opening on<br />
the side of the strain relief<br />
component. It is essential<br />
that this opening is oriented<br />
at 90 degrees to set screw<br />
chamber. There can be no<br />
contact between the set<br />
screw and the cable<br />
- RISK OF ELECTRIC SHORT!<br />
line voltage<br />
house low<br />
voltage<br />
Connect the house wires to<br />
the coaxial cable using #16<br />
butt splices (stagger the<br />
splices). Use raw butt splices<br />
and heat shrink to simplify<br />
the installation.<br />
LED:<br />
Note: Insulated core is<br />
positive and braided exterior<br />
is negative.<br />
Affix mini-canopy to ceiling<br />
surface with fasteners<br />
provided. Twist the threaded<br />
canopy cover plate into place.<br />
Note: It may be helpful to rest<br />
the pendant on a surface<br />
higher than its final position<br />
so that the canopy may be<br />
fastened with greater ease.<br />
10W <strong>Bocci</strong> 24.1<br />
long life xenon<br />
bipin or <strong>Bocci</strong><br />
24.2 LED<br />
Lamp fixture using <strong>Bocci</strong><br />
24.1 long life bipin xenon<br />
lamp, standard 10W<br />
halogen bipin lamp, or<br />
<strong>Bocci</strong> 24.2 LED. Lamping is<br />
transformer specific.<br />
Plug the lamp into the<br />
socket. Do not touch the<br />
lamp with your bare hands.<br />
Purchase replacement<br />
lamps online at<br />
www.bocci.ca/lamps<br />
<strong>Bocci</strong> strongly recommends<br />
sourcing lamps direct from<br />
the manufacturer at time<br />
of purchase.<br />
Note: when using a dimmer<br />
for xenon / halogen, use<br />
only low voltage electronic<br />
dimmer to ensure the fixture<br />
works properly.<br />
© 2010, <strong>Bocci</strong> Design and Manufacturing Inc. All rights reserved. These drawings and the information contained herein may not be reproduced, communicated<br />
to the public, or made available in whole or in part without prior permission. Any inquiries should be directed to the following email address: admin@bocci.ca.<br />
Clean fingerprints from<br />
glass surfaces.<br />
Turn fixture on.<br />
*<br />
For additional assistance,<br />
please contact <strong>Bocci</strong>:<br />
info@bocci.ca<br />
www.bocci.ca<br />
infoeu@bocci.ca<br />
www.bocci.ca<br />
Worldwide patents<br />
issued and pending.<br />
US patent # US D556,361<br />
Made in Vancouver, Canada<br />
Approved to UL standards by CSA