

Product catalogue 2012-2013
Product catalogue 2012-2013
Product catalogue 2012-2013

You also want an ePaper? Increase the reach of your titles
YUMPU automatically turns print PDFs into web optimized ePapers that Google loves.
28<br />
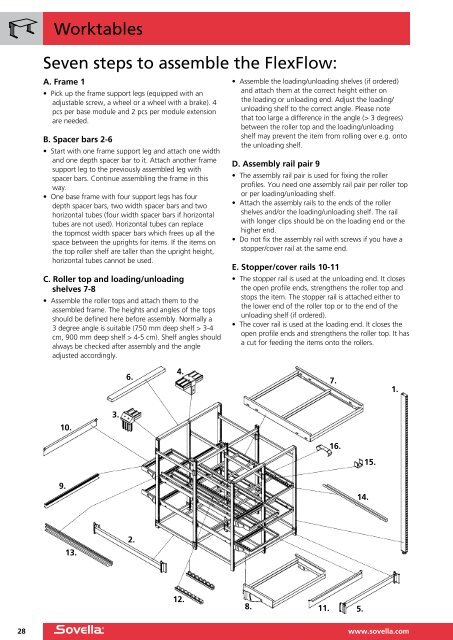
Worktables<br />
Seven steps to assemble the FlexFlow:<br />
A. Frame 1<br />
• Pick up the frame support legs (equipped with an<br />
adjustable screw, a wheel or a wheel with a brake). 4<br />
pcs per base module and 2 pcs per module extension<br />
are needed.<br />
B. Spacer bars 2-6<br />
• Start with one frame support leg and attach one width<br />
and one depth spacer bar to it. Attach another frame<br />
support leg to the previously assembled leg with<br />
spacer bars. Continue assembling the frame in this<br />
way.<br />
• One base frame with four support legs has four<br />
depth spacer bars, two width spacer bars and two<br />
horizontal tubes (four width spacer bars if horizontal<br />
tubes are not used). Horizontal tubes can replace<br />
the topmost width spacer bars which frees up all the<br />
space between the uprights for items. If the items on<br />
the top roller shelf are taller than the upright height,<br />
horizontal tubes cannot be used.<br />
C. Roller top and loading/unloading<br />
shelves 7-8<br />
• Assemble the roller tops and attach them to the<br />
assembled frame. The heights and angles of the tops<br />
should be defined here before assembly. Normally a<br />
3 degree angle is suitable (750 mm deep shelf > 3-4<br />
cm, 900 mm deep shelf > 4-5 cm). Shelf angles should<br />
always be checked after assembly and the angle<br />
adjusted accordingly.<br />
10.<br />
9.<br />
13.<br />
3.<br />
6.<br />
2.<br />
4.<br />
12.<br />
• Assemble the loading/unloading shelves (if ordered)<br />
and attach them at the correct height either on<br />
the loading or unloading end. Adjust the loading/<br />
unloading shelf to the correct angle. Please note<br />
that too large a difference in the angle (> 3 degrees)<br />
between the roller top and the loading/unloading<br />
shelf may prevent the item from rolling over e.g. onto<br />
the unloading shelf.<br />
D. Assembly rail pair 9<br />
• The assembly rail pair is used for fixing the roller<br />
profiles. You need one assembly rail pair per roller top<br />
or per loading/unloading shelf.<br />
• Attach the assembly rails to the ends of the roller<br />
shelves and/or the loading/unloading shelf. The rail<br />
with longer clips should be on the loading end or the<br />
higher end.<br />
• Do not fix the assembly rail with screws if you have a<br />
stopper/cover rail at the same end.<br />
E. Stopper/cover rails 10-11<br />
• The stopper rail is used at the unloading end. It closes<br />
the open profile ends, strengthens the roller top and<br />
stops the item. The stopper rail is attached either to<br />
the lower end of the roller top or to the end of the<br />
unloading shelf (if ordered).<br />
• The cover rail is used at the loading end. It closes the<br />
open profile ends and strengthens the roller top. It has<br />
a cut for feeding the items onto the rollers.<br />
8.<br />
11.<br />
7.<br />
16.<br />
14.<br />
5.<br />
15.<br />
1.<br />
www.sovella.com