Mode d'emploi Owner's Instructions Manual de ... - JDC Electronic SA
Mode d'emploi Owner's Instructions Manual de ... - JDC Electronic SA
Mode d'emploi Owner's Instructions Manual de ... - JDC Electronic SA

You also want an ePaper? Increase the reach of your titles
YUMPU automatically turns print PDFs into web optimized ePapers that Google loves.
<strong>Mo<strong>de</strong></strong> <strong>d'emploi</strong><br />
<strong>Owner's</strong> <strong>Instructions</strong><br />
<strong>Manual</strong> <strong>de</strong> instrucciones<br />
Instruções <strong>de</strong> utilização<br />
Libretto d'instruzioni<br />
Bedienungsanleitung<br />
Gebruikshandleiding<br />
Instrukcja Obslugi
In<strong>de</strong>x<br />
<strong>Mo<strong>de</strong></strong> <strong>d'emploi</strong> ___________________________________________________________________________3 – 14<br />
<strong>Owner's</strong> <strong>Instructions</strong> _____________________________________________________________________15 – 26<br />
<strong>Manual</strong> <strong>de</strong> instrucciones __________________________________________________________________27 – 38<br />
Instruções <strong>de</strong> utilização ___________________________________________________________________39 – 50<br />
Libretto d'instruzioni______________________________________________________________________51 – 62<br />
Bedienungsanleitung _____________________________________________________________________ 63 –74<br />
Gebruikshandleiding Bedienungsanleitung ____________________________________________________75 – 86<br />
Instrukcja Obslugi _______________________________________________________________________ 87 - 98<br />
2
I. INFORMATIONS GÉNÉRALES<br />
Vous venez d’acquérir un appareil <strong>de</strong> haute précision réalisé avec les technologies les plus mo<strong>de</strong>rnes. Il a été conçu pour résister à un usage<br />
intensif. Cependant, afin qu’il conserve son aspect et sa précision, nous vous recommandons <strong>de</strong> le traiter avec soin et <strong>de</strong> lire attentivement ce<br />
mo<strong>de</strong> d’emploi.<br />
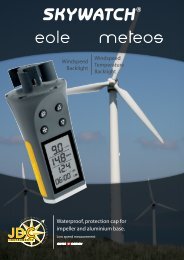
Le SKYWATCH ® Xplorer est pourvu d’une hélice et <strong>de</strong> capteurs qui permettent d’effectuer <strong>de</strong>s mesures à l’extérieur.<br />
Il vous fournit <strong>de</strong>s informations essentielles pour toutes vos activités <strong>de</strong> plein air telles que vol libre, randonnée pé<strong>de</strong>stre, alpinisme ou<br />
nautisme. Il vous donne la vitesse instantanée et maximum du vent (Xplorer 1, 2, 3 et 4), la température ambiante et ressentie (Xplorer 2, 3 et<br />
4), une boussole électronique (Xplorer 3 et 4) ainsi que l’altitu<strong>de</strong>, la pression et les tendances météorologiques (Xplorer 4).<br />
La gamme SKYWATCH ® Xplorer est conçue pour supporter une courte immersion dans l'eau à une profon<strong>de</strong>ur maximale <strong>de</strong> 1 mètre.<br />
ATTENTION !<br />
Cet appareil est conçu pour ai<strong>de</strong>r les utilisateurs qui se trouvent dans un environnement extérieur, mais IL NE PEUT PAS se substituer aux avis<br />
<strong>de</strong> la station météorologique locale. Vous <strong>de</strong>vez en conséquence vérifier et comparer périodiquement les mesures fournies par votre appareil<br />
avec les informations diffusées par la station météorologique.<br />
Les conditions climatiques extérieures peuvent parfois changer <strong>de</strong> manière dramatique et cela en très peu <strong>de</strong> temps. Une météo ensoleillée<br />
peut, par exemple, <strong>de</strong>venir orageuse en l’espace d’une <strong>de</strong>mi-heure et parfois moins. Vous <strong>de</strong>vez donc toujours suivre les règles <strong>de</strong> base <strong>de</strong><br />
sécurité quand vous entreprenez une activité extérieure.<br />
<strong>JDC</strong> ELECTRONIC <strong>SA</strong> ne pourra être tenue responsable <strong>de</strong> toutes conséquences, directes ou indirectes, et <strong>de</strong> tous les dommages qui<br />
pourraient résulter <strong>de</strong> l’utilisation <strong>de</strong> cet appareil.<br />
Caractéristiques techniques :<br />
Taille : 41 x 93 x 17 mm<br />
Poids : 51 gr (Xplorer 1), 52 gr (Xplorer 2 et 3), 53 gr (Xplorer 4)<br />
Température d'utilisation : -30°C à +60°C<br />
3
II. ENTRETIEN ET MAINTENANCE Xplorer 1 – 2 – 3 - 4<br />
La conception et la fabrication <strong>de</strong> cet appareil ont fait l’objet <strong>de</strong> beaucoup <strong>de</strong> soins. Pour se servir efficacement <strong>de</strong>s fonctions proposées, il est<br />
conseillé d’utiliser l’appareil conformément aux remarques qui suivent :<br />
• Evitez à tout prix l’intrusion d’objets tels que cheveux, fils, sable et autres poussières à l’intérieur <strong>de</strong> l’hélice car cela provoquerait une<br />
mauvaise rotation <strong>de</strong> l’hélice et donc une perte <strong>de</strong> précision. Si un cheveu ou un fil parvient tout <strong>de</strong> même à pénétrer dans l'hélice,<br />
retirez-le délicatement au moyen d'une pince à épiler, s'il s'agit <strong>de</strong> poussières ou <strong>de</strong> sable, vous pouvez passer l'hélice sous l'eau<br />
claire.<br />
• Evitez d’exposer l’appareil à <strong>de</strong>s conditions climatiques extrêmes pendant <strong>de</strong> trop longues pério<strong>de</strong>s. Bien qu’utilisant <strong>de</strong>s composants<br />
résistants à ces températures, nous vous recommandons <strong>de</strong> ne pas exposer votre instrument à <strong>de</strong> fortes sources <strong>de</strong> chaleur, comme<br />
sous le pare-brise d’une voiture par exemple.<br />
• Evitez les utilisations sans ménagement ou les chocs.<br />
• N’EXPOSEZ PAS l’appareil à <strong>de</strong>s produits chimiques puissants. Ces produits pourraient l’endommager.<br />
III. Enclenchement Xplorer 1 – 2 – 3 - 4<br />
Pour enclencher votre SKYWATCH ® Xplorer, il suffit d'effectuer une courte pression sur le bouton (symbolisée par : sur le schéma ci<strong>de</strong>ssous).<br />
L'appareil s'enclenche et affiche la version du software et le modèle <strong>de</strong> l'appareil (voir fig. D0.0 sur schéma ci-<strong>de</strong>ssous), l'appareil<br />
passe ensuite automatiquement au mo<strong>de</strong> <strong>de</strong> mesure <strong>de</strong> la vitesse instantanée du vent (Xplorer 1) ou sur le <strong>de</strong>rnier mo<strong>de</strong> affiché avant<br />
l'extinction <strong>de</strong> l'appareil (Xplorer 2, 3 et 4).<br />
Organigrammes complets <strong>de</strong>s affichages disponibles sur http://www.jdc.ch.<br />
4
IV. Arrêt <strong>de</strong> l'appareil Xplorer 1 – 2 – 3 - 4<br />
Arrêt automatique (auto-off) :<br />
Votre SKYWATCH ® Xplorer s'éteint automatiquement 1 minute après la <strong>de</strong>rnière pression du bouton ou après la <strong>de</strong>rnière mesure du vent. Ainsi<br />
il ne s'arrête pas tant que l'hélice tourne (plus <strong>de</strong> 10 secon<strong>de</strong>s).<br />
Arrêt manuel :<br />
Pour éteindre Xplorer manuellement (valable dans tous les mo<strong>de</strong>s), maintenez le bouton pressé jusqu'à l'arrêt, puis relâchez.<br />
ATTENTION ! Fonctionnement permanent possible :<br />
Soit lors <strong>de</strong> l'arrêt manuel en relâchant le bouton pendant le clignotement <strong>de</strong>s grands digits, soit lors <strong>de</strong> l'arrêt automatique en effectuant une<br />
courte pression sur le bouton pendant le clignotement.<br />
Pendant le fonctionnement permanent, toute pression sur le bouton remet l'Xplorer en mo<strong>de</strong> arrêt automatique.<br />
Remarque : si l'appareil reste allumé en permanence, la pile se décharge rapi<strong>de</strong>ment (400 à 500 heures selon le modèle).<br />
VI. Alimentation Xplorer 1 – 2 – 3 - 4<br />
Votre SKYWATCH ® Xplorer est alimenté en énergie par une pile bouton 3V type CR2032 remplaçable. Remplacement <strong>de</strong> la pile :<br />
ATTENTION ! Opération à effectuer avec soin !<br />
TOUTE MAUVAISE MANIPULATION LORS DU REMPLACEMENT DE PILE PEUT ENDOMMAGER DÉFINITIVEMENT<br />
VOTRE APPAREIL. EN CAS DE DOUTE, VEUILLEZ VOUS ADRESSER À VOTRE HORLOGER.<br />
1. Dévissez le fond en métal (6 vis).<br />
2. Dévissez la vis du capot <strong>de</strong> pile.<br />
3. Relevez délicatement le capot pour extraire la pile.<br />
4. Replacez la nouvelle pile en prenant gar<strong>de</strong> au sens <strong>de</strong> polarité (+ contre le haut), puis revissez le capot <strong>de</strong> pile. Veuillez vous assurer<br />
que la petite languette au milieu du capot soit bien relevée, ceci afin qu'elle touche le dos en métal.<br />
5. Avant <strong>de</strong> replacer le fond, veuillez vous assurer que le joint soit propre et bien positionné dans sa gorge.<br />
6. Remettez le fond et les 6 vis.<br />
Durée <strong>de</strong> vie normale <strong>de</strong> la pile :<br />
Xplorer 1, 2 et 3 : environ 30'000 mesures <strong>de</strong> 1 minute (auto-off) et plus <strong>de</strong> 20 ans en arrêt.<br />
Xplorer 4 : sans historique : i<strong>de</strong>m que Xplorer 1, 2 et 3.<br />
avec historiques : environ 25'000 mesures <strong>de</strong> 1 minute (auto-off), mais 7 ans maximum en arrêt.<br />
5
1. Eclairage <strong>de</strong> l'affichage (backlight) Xplorer 1 – 2 – 3 – 4<br />
Pour allumer le backlight, maintenez le bouton pressé pendant 1 secon<strong>de</strong> et au moment où le backlight s'allume, relâchez le bouton. Le<br />
backlight reste allumé pendant 3 secon<strong>de</strong>s, si dans les 5 secon<strong>de</strong>s qui suivent vous rallumez le backlight, il reste allumé 15 secon<strong>de</strong>s. Au-<strong>de</strong>là<br />
<strong>de</strong> ces 5 secon<strong>de</strong>s, il s'allume <strong>de</strong> nouveau pendant 3 secon<strong>de</strong>s.<br />
Remarque : le backlight s'allume dans tous les mo<strong>de</strong>s <strong>de</strong> la même manière.<br />
ATTENTION : une utilisation intensive du backlight diminue la durée <strong>de</strong> vie <strong>de</strong> la pile ! Consommation environ 100 x plus élevée que<br />
sans backlight.<br />
2. <strong>Mo<strong>de</strong></strong>s et changement <strong>de</strong> mo<strong>de</strong> Xplorer 1 - 2 – 3 – 4<br />
Une courte pression sur le bouton permet d'atteindre le mo<strong>de</strong> suivant.<br />
MODES :<br />
Xplorer 1 (1 mo<strong>de</strong>) Xplorer 2 (3 mo<strong>de</strong>s) Xplorer 3 (4 mo<strong>de</strong>s) Xplorer 4 (9 mo<strong>de</strong>s)<br />
1. vent + vent max 1. vent + vent max 1. vent + vent max 1. vent + vent max<br />
2. vent + température 2. vent +température 2. vent + température<br />
3. vent + temp. ressentie 3. vent + temp. ressentie 3. vent + temp. ressentie<br />
4. vent + boussole 4. vent + boussole<br />
5. vent + altitu<strong>de</strong> et altitu<strong>de</strong> maxi<br />
6. vent + pression relative et absolue<br />
7. historique <strong>de</strong> la tendance pression<br />
8. historique <strong>de</strong> la pression relative<br />
9. historique <strong>de</strong> l'altitu<strong>de</strong><br />
Veuillez vous référer aux chapitres suivants pour consulter les fonctions disponibles dans chaque mo<strong>de</strong>.<br />
6
3. <strong>Mo<strong>de</strong></strong> <strong>de</strong> mesure <strong>de</strong> la vitesse instantanée du vent avec maximum Xplorer 1 – 2 – 3 – 4<br />
Choix <strong>de</strong> l'unité <strong>de</strong> mesure :<br />
En maintenant le bouton pressé pendant environ 4 secon<strong>de</strong>s, les unités se mettent à défiler. Vous avez la possibilité <strong>de</strong><br />
choisir entre les unités suivantes : km/h (kilomètres par heure), mph (miles par heure), knots (nœuds), m/s (mètres par<br />
secon<strong>de</strong>) ou fps (pieds par secon<strong>de</strong>). Lorsque l'unité <strong>de</strong> votre choix apparaît, relâchez le bouton, l'unité <strong>de</strong> mesure est<br />
ainsi validée.<br />
Mesure <strong>de</strong> la vitesse :<br />
Pour que la mesure soit la plus exacte possible, il est nécessaire d'aligner l'instrument dans l'axe du vent.<br />
Précision : +/- 3 %<br />
Plage <strong>de</strong> mesure : <strong>de</strong> 0 à 150 km/h (42 m/s, 81 knots, 93 mph, 136 fps)<br />
Cycle <strong>de</strong> mesure : 2 mesures par secon<strong>de</strong><br />
Affichage :<br />
L'affichage <strong>de</strong> la vitesse instantanée se fait sur les grands digits et la vitesse maximum atteinte sur les petits digits avec l'indication .<br />
Résolution : au dixième jusqu’à 99.9, ensuite à l’unité.<br />
Effacement du maximum :<br />
Le 'max' est conservé même appareil éteint. Pour le remettre à zéro, maintenez le bouton pressé pendant au moins 2 secon<strong>de</strong>s puis relâchez.<br />
7
4. <strong>Mo<strong>de</strong></strong> <strong>de</strong> mesure <strong>de</strong> la vitesse instantanée du vent avec température ambiante Xplorer 2 – 3 – 4<br />
Choix <strong>de</strong> l'unité <strong>de</strong> mesure :<br />
En maintenant le bouton pressé pendant au moins 2 secon<strong>de</strong>s, les 2 unités se mettent à défiler. Vous avez la<br />
possibilité <strong>de</strong> choisir entre : les °C (<strong>de</strong>grés Celsius) et °F (<strong>de</strong>grés Fahrenheit). Lorsque l'unité <strong>de</strong> votre choix<br />
apparaît, relâchez le bouton, l'unité <strong>de</strong> mesure est ainsi validée.<br />
Mesure <strong>de</strong> la température ambiante :<br />
Remarque : le capteur <strong>de</strong> température est intégré au fond métallique du boîtier, c'est donc la température du fond<br />
du boîtier qui est affichée. Cette particularité permet <strong>de</strong> mesurer très précisément et très rapi<strong>de</strong>ment la température<br />
<strong>de</strong> milieux tels que :<br />
eau (sources, rivières, etc.) en immergeant <strong>de</strong> quelques centimètres l'appareil;<br />
surfaces (sol, parties métalliques, intérieurs <strong>de</strong> réfrigérateurs, etc.) en plaquant aussi bien que possible le fond <strong>de</strong> l'appareil sur la surface à<br />
mesurer;<br />
air ambiant, soit en laissant l'appareil atteindre la température <strong>de</strong> l'air, cela peut prendre plusieurs minutes, voire plusieurs dizaines <strong>de</strong><br />
minutes selon la vitesse du vent (évitez les rayons directs du soleil et le contact du fond du boîtier avec vos doigts). Sinon, pour une<br />
mesure rapi<strong>de</strong> et précise, mettez le fond du boîtier en contact avec un objet qui a la température <strong>de</strong> l'air (carrosserie <strong>de</strong> voiture, barrière<br />
métallique, murs et parois lisses etc., en évitant les surfaces <strong>de</strong> couleurs sombres et exposées au soleil).<br />
Plage <strong>de</strong> mesure du capteur : <strong>de</strong> -50°C à +100°C<br />
Cycle <strong>de</strong> mesure : une mesure toutes les 0.5 secon<strong>de</strong><br />
Affichage :<br />
L'affichage <strong>de</strong> la vitesse instantanée du vent se fait sur les grands digits, tandis que la température ambiante s'affiche sur les petits digits.<br />
Résolution (température) : au dixième <strong>de</strong> <strong>de</strong>gré<br />
8
5. <strong>Mo<strong>de</strong></strong> <strong>de</strong> mesure <strong>de</strong> la vitesse instantanée du vent avec température ressentie Xplorer 2 – 3 – 4<br />
Choix <strong>de</strong> l'unité <strong>de</strong> mesure <strong>de</strong> la température :<br />
Voir chapitre 4, choix <strong>de</strong> l'unité <strong>de</strong> mesure.<br />
Affichage :<br />
Les basses températures représentent un danger pour le corps humain et ce danger est aggravé par la vitesse du<br />
vent. Les Xplorer 2, 3 et 4 indiquent instantanément la température ressentie par le corps et prévient <strong>de</strong>s risques<br />
d’engelures et d’hypothermie.<br />
A <strong>SA</strong>VOIR : La température ressentie est calculée en tenant compte <strong>de</strong> la température ambiante et <strong>de</strong> la vitesse du<br />
vent. En cas <strong>de</strong> vent, elle donne une indication <strong>de</strong> la perte <strong>de</strong> chaleur par le corps si la température est inférieure à<br />
10°C. Formule adoptée en janvier 2003 par l'Office Fédéral <strong>de</strong> Coordination Météorologique <strong>de</strong>s Etats-Unis avec le<br />
service météo canadien (MSC), le département <strong>de</strong> la défense US (DOD) et l'Administration Océanique et<br />
Atmosphérique Nationale <strong>de</strong>s Etats-Unis (NOAA).<br />
Exemple : une température ambiante <strong>de</strong> 0°C et un vent <strong>de</strong> 30 km/h agissent sur votre corps comme une température<br />
<strong>de</strong> -7.8°C !<br />
L'affichage <strong>de</strong> la vitesse instantanée du vent se fait sur les grands digits et la température ressentie sur les petits digits avec l'indication .<br />
Résolution (température) : au dixième <strong>de</strong> <strong>de</strong>gré<br />
Cycle <strong>de</strong> mesure : 2 mesures par secon<strong>de</strong>.<br />
9
6. <strong>Mo<strong>de</strong></strong> <strong>de</strong> mesure <strong>de</strong> la vitesse instantanée du vent avec boussole électronique Xplorer 3 – 4<br />
Choix <strong>de</strong> l'unité <strong>de</strong> mesure (vent) :<br />
Voir chapitre 3, choix <strong>de</strong> l'unité <strong>de</strong> mesure.<br />
Affichage <strong>de</strong> la boussole :<br />
L'affichage <strong>de</strong> la boussole se fait en <strong>de</strong>grés sur les petits digits.<br />
A <strong>SA</strong>VOIR ! Votre SKYWATCH ® Xplorer vous indique le Nord magnétique,<br />
et non le Nord géographique !<br />
Mesure :<br />
Pour effectuer une mesure la plus précise possible, maintenez votre appareil bien à la verticale (fig. A). Lorsque les chiffres<br />
sont remplacés par , cela signifie que l'appareil est trop incliné ou qu'une source magnétique proche le perturbe.<br />
Calibration :<br />
IMPORTANT ! Calibrez votre Xplorer avant la première utilisation et à chaque changement d'environnement ou <strong>de</strong><br />
pile.<br />
Lors <strong>de</strong> la première mise sous tension <strong>de</strong> l'appareil, la boussole indique . Effectuez donc une calibration comme suit :<br />
Maintenez le bouton pressé pendant environ 3 secon<strong>de</strong>s, lorsque apparaît sur les grands digits, relâchez. Tournez<br />
ensuite sur vous-même jusqu'à ce que l'appareil indique , puis, pour vali<strong>de</strong>r la calibration, effectuez une courte pression<br />
sur le bouton.<br />
Pendant la calibration, l'appareil indique successivement , , puis et enfin <strong>de</strong>vant les petits digits.<br />
Cette opération doit s'effectuer à la vitesse <strong>de</strong> 1 tour en 30 secon<strong>de</strong>s environ.<br />
Pour une calibration précise, l'hélice NE DOIT PAS tourner ! En cas <strong>de</strong> vent, cachez l'hélice entre le pouce et l'in<strong>de</strong>x.<br />
Remarque : Les lignes <strong>de</strong> champ magnétique terrestre sont perturbées par les environnements métalliques, constructions,<br />
pylônes électriques, intérieurs <strong>de</strong> véhicules, bateaux métalliques, ainsi que par <strong>de</strong>s champs magnétiques générés par toutes<br />
les machines et appareils électriques et les aimants. Il est donc nécessaire pour <strong>de</strong>s mesures précises, soit <strong>de</strong> s'éloigner <strong>de</strong><br />
ces sources <strong>de</strong> perturbation, soit <strong>de</strong> recalibrer.<br />
10
7. <strong>Mo<strong>de</strong></strong> <strong>de</strong> mesure <strong>de</strong> la vitesse instantanée du vent avec altitu<strong>de</strong> actuelle Xplorer 4<br />
ATTENTION ! Cet appareil calcule l'altitu<strong>de</strong> au moyen <strong>de</strong> la pression <strong>de</strong> l'air. Il est donc tout à fait normal que<br />
l'altitu<strong>de</strong> change lorsque la pression <strong>de</strong> l'air change. Pour cette raison, l'appareil <strong>de</strong>man<strong>de</strong> à être calibré aussi<br />
souvent que possible.<br />
Choix <strong>de</strong> l'unité :<br />
En maintenant le bouton pressé pendant environ 4 secon<strong>de</strong>s, les unités se mettent à défiler. Vous avez la possibilité <strong>de</strong><br />
choisir entre les unités suivantes : m (mètres) et ft (pieds). Lorsque l'unité <strong>de</strong> votre choix apparaît, relâchez le bouton,<br />
l'unité <strong>de</strong> mesure est ainsi validée et l'appareil se remet en mo<strong>de</strong> <strong>de</strong> mesure <strong>de</strong> la vitesse instantanée du vent avec<br />
affichage <strong>de</strong> l'altitu<strong>de</strong>.<br />
Affichage <strong>de</strong> l'altitu<strong>de</strong> maximum :<br />
Maintenez le bouton pressez pendant environ 2 secon<strong>de</strong>s et au moment ou l'indication s'affiche, relâchez le bouton,<br />
l'appareil se met ainsi en mo<strong>de</strong> <strong>de</strong> mesure <strong>de</strong> la vitesse instantanée du vent avec affichage <strong>de</strong> l'altitu<strong>de</strong> maximum. Pour quitter ce<br />
mo<strong>de</strong>, pressez une fois sur le bouton, l'appareil revient en mo<strong>de</strong> vent/altitu<strong>de</strong>.<br />
Calibration <strong>de</strong> l'altitu<strong>de</strong> :<br />
Maintenez le bouton pressé pendant environ 3 secon<strong>de</strong>s, lorsque apparaît sur les grands digits, relâchez. Maintenez le<br />
bouton pressé pour augmenter la valeur <strong>de</strong> l'altitu<strong>de</strong> par pas <strong>de</strong> 1 unité. Pour la diminuer, relâchez puis maintenez à nouveau le<br />
bouton pressé.<br />
Une courte pression sur le bouton vali<strong>de</strong> la nouvelle altitu<strong>de</strong>.<br />
Effacement du maximum :<br />
Le 'max' est conservé même appareil éteint. Pour effacer la valeur du maximum, maintenez le bouton pressé pendant environ 2 secon<strong>de</strong>s puis<br />
relâchez. Cette opération doit s'effectuer <strong>de</strong>puis le mo<strong>de</strong> d'affichage <strong>de</strong> l'altitu<strong>de</strong> max.<br />
11
8. <strong>Mo<strong>de</strong></strong> <strong>de</strong> mesure <strong>de</strong> la vitesse du vent avec affichage <strong>de</strong> la pression relative et absolue<br />
A <strong>SA</strong>VOIR : L'appareil dispose <strong>de</strong> 2 mo<strong>de</strong>s d'affichage <strong>de</strong> la pression : la pression QFE et la pression QNH. Ces 2 abréviations (QFE et QNH)<br />
sont <strong>de</strong>s extraits du fameux co<strong>de</strong> "Q". Ce co<strong>de</strong> a été institué par la conférence <strong>de</strong> Londres en 1912. Il est constitué d'une liste d'indicatifs à 3<br />
lettres, valables pour l'ensemble <strong>de</strong>s pays du mon<strong>de</strong>. Destiné principalement aux transmissions télégraphiques et radiotélégraphiques (en<br />
Morse), il constitue une liste d'abréviations, résumant en trois lettres sans ambiguïté <strong>de</strong>s phrases, <strong>de</strong>s questions, ou <strong>de</strong>s réponses longues à<br />
formuler en clair, éliminant ainsi les risques d'erreur <strong>de</strong> transmission, <strong>de</strong> réception, <strong>de</strong> langue et d'interprétation.<br />
Le co<strong>de</strong> "Q" est encore largement utilisé <strong>de</strong> nos jours par les navires et les radioamateurs. Il reste d'usage officiel en radiotéléphonie. Le mon<strong>de</strong><br />
aéronautique n'en utilise pas la totalité, mais une partie est d'usage quotidien.<br />
CODE SIGNIFICATION<br />
QFE Pression atmosphérique au sol,<br />
on parle également <strong>de</strong> pression absolue.<br />
QNH Pression atmosphérique ramenée par calcul au niveau <strong>de</strong> la mer dans les conditions <strong>de</strong><br />
l'atmosphère standard,<br />
on parle également <strong>de</strong> pression relative.<br />
Il s'agit <strong>de</strong> la pression annoncée dans les bulletins météorologiques ou à la télévision.<br />
Choix <strong>de</strong> l'unité :<br />
En maintenant le bouton pressé pendant au moins 4 secon<strong>de</strong>s, les unités se mettent à défiler, vous avez la possibilité <strong>de</strong> choisir entre les unités<br />
suivantes : hPa (hecto Pascals) et inHg (inches <strong>de</strong> Mercure). Lorsque l'unité <strong>de</strong> votre choix apparaît, relâchez le bouton, l'unité <strong>de</strong> mesure est<br />
ainsi validée et l'appareil se remet en mo<strong>de</strong> vent/pression relative (QNH).<br />
Affichage <strong>de</strong> la pression absolue (QFE) :<br />
Maintenez le bouton pressez pendant environ 2 secon<strong>de</strong>s et au moment ou l'indication (QFE) s'affiche sur les grand<br />
digits, relâchez. L'appareil se met ainsi en mo<strong>de</strong> d'affichage <strong>de</strong> la pression absolue. Pour quitter ce mo<strong>de</strong>, pressez une fois sur<br />
le bouton, l'appareil revient en mo<strong>de</strong> vent/pression relative (QNH).<br />
12
Calibration <strong>de</strong> pression relative (QNH) :<br />
Maintenez le bouton pressez pendant environ 3 secon<strong>de</strong>s, puis relâchez au moment où s'affiche sur les grands digits.<br />
Ensuite, le réglage (augmentation/diminution) s'effectue <strong>de</strong> la même manière que la calibration <strong>de</strong> l'altitu<strong>de</strong>, voir chapitre 7<br />
(calibration altitu<strong>de</strong>).<br />
Remarques :<br />
1. Si la valeur du QNH est fixe (ne clignote pas), elle indique la pression relative (QNH) actuelle, crédible parce que déduite d'une<br />
variation lente météorologique.<br />
2. Le signe QNH clignote si cette pression a changé <strong>de</strong>puis la <strong>de</strong>rnière calibration.<br />
3. Si la valeur du QNH clignote, elle indique la pression QNH entrée lors <strong>de</strong> la <strong>de</strong>rnière calibration.<br />
4. Une montée en altitu<strong>de</strong> ou une variation météorologique sans que l'historique ne soit actif, fait clignoter la valeur du QNH.<br />
5. La calibration du QNH ou <strong>de</strong> l'altitu<strong>de</strong> (la donnée connue) permet <strong>de</strong> réajuster l'Xplorer par rapport à la pression ambiante mesurée.<br />
Celle-ci varie continuellement selon l'altitu<strong>de</strong> et les conditions météorologiques du moment.<br />
6. La seule référence <strong>de</strong> l'Xplorer est la pression <strong>de</strong> l'air qu'il mesure, dont il déduit l'altitu<strong>de</strong>. Toute variations <strong>de</strong> cette pression fait<br />
changer l'altitu<strong>de</strong> : 9 mètres par hPa à basse altitu<strong>de</strong>, 14 mètres à 5'000 mètres, c'est pourquoi il faut le calibrer aussi souvent que<br />
possible pour gar<strong>de</strong>r un affichage crédible (même les pilote d'avions <strong>de</strong> ligne ont cette contrainte !).<br />
9. <strong>Mo<strong>de</strong></strong>s d'historique Xplorer 4<br />
A <strong>SA</strong>VOIR : Les trois mo<strong>de</strong>s d'historique fonctionnent <strong>de</strong> la même manière et sont liés. Ils affichent sous<br />
différentes formes l'une <strong>de</strong>s 48 mesures <strong>de</strong> pression stockée chaque heure. Par défaut : on affiche 24 h.<br />
L'historique stocke juste la pression sur le capteur, le QNH ou l'altitu<strong>de</strong> affiché est calculé, dépendant <strong>de</strong> la<br />
calibration actuelle.<br />
Tendance : C'est la variation <strong>de</strong> pression <strong>de</strong>puis 24h (ou 48h, ou 1h, etc.) Valable si l'Xplorer est au même endroit<br />
(même altitu<strong>de</strong>). Un chiffre négatif indique une baisse <strong>de</strong> pression (arrivée d'une dépression), un chiffre<br />
positif, une augmentation (anticyclone). La pression varie naturellement dans la journée, la tendance<br />
météo est plus précise à 24h ou 48h (même heure du jour).<br />
QNH : C'est la pression relative qu'il y avait il y a 24h (ou 48h…). Valable si l'Xplorer est au même endroit et est<br />
recalibré.<br />
Altitu<strong>de</strong> : Si vous partez en bala<strong>de</strong> en montagne ou volez en parapente, vous pourrez suivre les altitu<strong>de</strong>s atteintes<br />
chaque heure. L'altitu<strong>de</strong> sera exacte si vous forcez la calibration QNH <strong>de</strong> l'Xplorer sur la pression météo<br />
qu'il y avait lors <strong>de</strong> l'enregistrement.<br />
13
Affichage d'un moment donné <strong>de</strong> l'historique :<br />
Exemple : vous désirez connaître la tendance, le QNH ou l'altitu<strong>de</strong> d'il y a 12 heures en arrière. Maintenez le bouton pressé,<br />
puis lorsque 12h apparaît sur les grands digits, relâchez.<br />
Economie <strong>de</strong> la pile (arrêt <strong>de</strong>s historiques)<br />
Cette particularité est possible en mettant hors service le capteur <strong>de</strong> pression pendant que l'appareil est éteint. Les mesures<br />
<strong>de</strong> pression et d'altitu<strong>de</strong> ne sont actives que lorsque l'appareil est allumé.<br />
Pour mettre hors service le capteur, mettez l'un <strong>de</strong>s trois historiques sur (zéro heure).<br />
Remarques :<br />
1. Si vous consultez l'historique et que vous laissez affiché 5h par exemple, la prochaine fois que vous rallumerez l'Xplorer, il affichera 24h s'il<br />
y a eu une nouvelle mesure <strong>de</strong> pression, celle-ci est gérée par l'horloge interne (une mesure par heure).<br />
2. En relâchant sur 0h, l'historique ne fera plus <strong>de</strong> mesure chaque heure (mais conservera le contenu actuel) avec économie <strong>de</strong> la pile.<br />
3. En repassant en mo<strong>de</strong> historique actif (différent <strong>de</strong> 0h), la mesure actuelle est stockée comme départ horaire et affichée sous 1h.<br />
10. Reset général Xplorer 3 et4<br />
Ce mo<strong>de</strong> remet toutes les valeurs par défaut et enlève la calibration <strong>de</strong> la boussole. Pour faire un reset général, éteignez<br />
normalement l'appareil. Puis pour le rallumer, maintenez le bouton pressé. Au moment où tous les digits du LCD apparaissent<br />
(voir ci-contre), relâchez, puis maintenez à nouveau le bouton jusqu'à l'arrêt. Vous pouvez ensuite enclencher votre appareil<br />
normalement.<br />
14
I. GENERAL INFORMATION<br />
You have just acquired a piece of high precision equipment which has been created using the most mo<strong>de</strong>rn technology. It has been <strong>de</strong>signed to<br />
stand up to intensive use. However, in or<strong>de</strong>r to maintain its appearance and its precision, we recommend that you treat it with care and pay<br />
careful attention to these operating instructions.<br />
The SKYWATCH ® Xplorer is fitted with an impeller and with sensors which allow it to carry out measurements in the open air.<br />
It will give you all the information essential for your open air activities such as hang-gliding, rambling, climbing or water sports. It will give you the<br />
instant wind speed and the maximum wind speed (Xplorer 1, 2, 3 and 4), ambient temperature and wind chill temperature (Xplorer 2, 3 and 4),<br />
an electronic compass (Xplorer 3 and 4) as well as altitu<strong>de</strong>, pressure, and trends in the weather (Xplorer 4).<br />
The SKYWATCH ® Xplorer range has been <strong>de</strong>signed to withstand short-term immersion in water at a <strong>de</strong>pth of up to one metre.<br />
IMPORTANT !<br />
This instrument is <strong>de</strong>signed as an aid to users who are in an open air environment, but IT CANNOT replace advice and warnings from the local<br />
weather station. This means that you should regularly check and compare the measurements provi<strong>de</strong>d by your instrument with the information<br />
put out by the weather station.<br />
Open-air climatic conditions can sometimes change quite dramatically and this can happen very quickly in<strong>de</strong>ed. Sunny weather can, for<br />
example, change to thun<strong>de</strong>rstorm conditions in the space of half an hour and sometimes less. You should therefore always follow basic safety<br />
rules whenever you un<strong>de</strong>rtake open air activity.<br />
<strong>JDC</strong> ELECTRONIC <strong>SA</strong> can in no way be held responsible for any consequences, direct or indirect, or for any prejudice, which might result from<br />
the use of this instrument.<br />
Technical specifications:<br />
Size: 41 x 93 x 17 mm<br />
Weight : 51 gr (Xplorer 1), 52 gr (Xplorer 2 and 3), 53 gr (Xplorer 4)<br />
Operational temperatures : -30°C to +60°C<br />
15
II. MAINTENANCE Xplorer 1 – 2 – 3 - 4<br />
The <strong>de</strong>sign and manufacture of this instrument have been the subject of a great <strong>de</strong>al of care. In or<strong>de</strong>r to make best use of the proposed<br />
functions you are advised to use the instrument in accordance with the following observations :<br />
• Avoid at all costs items such as hair, thread, sand and other dust materials getting into the impeller, as they could cause <strong>de</strong>fective<br />
rotation of the impeller and therefore a loss of precision. If a hair or a piece of thread should manage to get into the impeller, extract it<br />
gently using tweezers; in the case of dust or sand, you can run clean water over the impeller.<br />
• Avoid exposing the instrument to extreme climatic conditions for over-long periods. While it uses components resistant to such<br />
temperatures, we recommend that you do not expose your instrument to strong sources of heat, for example un<strong>de</strong>r the windscreen of<br />
a vehicle.<br />
• Avoid careless use or sharp impacts.<br />
• DO NOT EXPOSE the instrument to powerful chemicals. Such products could damage it.<br />
III. Switching on Xplorer 1 – 2 – 3 - 4<br />
To switch on your SKYWATCH® Xplorer, all that you need to is press briefly on the button (represented by : on the diagram below). The<br />
instrument switches on and displays the software version and the instrument mo<strong>de</strong>l (see fig. D0.0 on the diagram below), after which the<br />
instrument moves into the mo<strong>de</strong> for measuring the current wind speed (Xplorer 1) or to the last mo<strong>de</strong> displayed before the instrument was<br />
switched off (Xplorer 2, 3 and 4).<br />
Complete flow-charts of the displays available on http://www.jdc.ch.<br />
16
IV. Switching off Xplorer 1 – 2 – 3 - 4<br />
Switching off automatically (Auto-off):<br />
Your SKYWATCH ® Xplorer goes off automatically 1 minute after the button was last pressed or after the wind was last measured. This means<br />
that it does not stop while the impeller is still turning (more than 10 seconds).<br />
Switching off manually :<br />
In or<strong>de</strong>r to switch Xplorer off manually (valid in every mo<strong>de</strong>), hold the button pressed down until it switches off, then release.<br />
IMPORTANT ! Permanent operation possible :<br />
Either at the time of the manual switching off by releasing the button during the flashing of the large digits, or at the time of automatic switching<br />
off by pressing briefly on the button during the flashing.<br />
During permanent operation, any pressure on the button returns Xplorer into automatic off mo<strong>de</strong>.<br />
Note : if the instrument is on permanently the battery discharges rapidly (400 to 500 hours according to the mo<strong>de</strong>l).<br />
VI. Supply Xplorer 1 – 2 – 3 - 4<br />
Your SKYWATCH ® Xplorer gets its power supply from a replaceable lithium battery 3V type CR2032. To change the battery:<br />
IMPORTANT ! This operation must be carried out with care!<br />
ANY DEFECTIVE MANIPULATION DURING THE REPLACEMENT OF THE BATTERY CAN CAUSE LASTING DAMAGE<br />
TO YOUR INSTRUMENT. IN CASE OF DOUBT CONSULT YOUR WATCH DEALER OR REPAIRER.<br />
1. Unscrew the metal back (6 screws).<br />
2. Unscrew the screw of the battery cover.<br />
3. Gently remove the cover in or<strong>de</strong>r to extract the battery.<br />
4. Put in the new battery observing the polarity (+ upwards), then screw back the battery cover. Make sure that the tiny tongue in the<br />
centre of the top is raised so that it touches the metal back.<br />
5. Before refitting the back make sure that the seal is clean and securely positioned in its slot.<br />
6. Refit the back and the 6 screws.<br />
Normal battery life :<br />
Xplorer 1, 2 and 3 : approximately 30,000 measurements of 1 minute (auto-off) and more than 20 years when off.<br />
Xplorer 4 : without records : same as Xplorer 1, 2 and 3.<br />
with records : approximately 25,000 measurements of 1 minute (auto-off), but 7 years maximum when off.<br />
17
1. Backlight Xplorer 1 – 2 – 3 – 4<br />
To get the backlight to light up keep the button pressed for 1 second and as soon as the backlight lights up, release the button. The backlight<br />
remains illuminated for 3 seconds. If within the 5 seconds which follow you re-illuminate the backlight, it stays lit up for 15 seconds. Beyond<br />
these 5 seconds, it lights up again for 3 seconds.<br />
Note : the backlight lights up in the same way in all mo<strong>de</strong>s.<br />
IMPORTANT : intensive use of the backlight reduces the life of the battery / consumption approximately 100 x greater than without<br />
backlight.<br />
2. <strong>Mo<strong>de</strong></strong>s and mo<strong>de</strong> changing Xplorer 1 - 2 – 3 – 4<br />
Brief pressure on the button allows you to move to the following mo<strong>de</strong>.<br />
MODES :<br />
Xplorer 1 (1 mo<strong>de</strong>) Xplorer 2 (3 mo<strong>de</strong>s) Xplorer 3 (4 mo<strong>de</strong>s) Xplorer 4 (9 mo<strong>de</strong>s)<br />
1. wind + max. wind 1. wind + max. wind 1. wind + max. wind 1. wind + max. wind<br />
2. wind +temperature 2. wind +temperature 2. wind +temperature<br />
3. wind + wind chill temperature 3. wind + wind chill temperature 3. wind + wind chill temperature<br />
4. wind + compass 4. wind + compass<br />
5. wind + altitu<strong>de</strong> and max. altitu<strong>de</strong><br />
6. wind + relative and absolute pressure<br />
7. record of pressure trends<br />
8. record of relative pressure<br />
9. record of altitu<strong>de</strong><br />
Please refer to the following sections to consult the functions available in each mo<strong>de</strong>.<br />
18
3. <strong>Mo<strong>de</strong></strong> for measuring the instant wind speed with maximum Xplorer 1 – 2 – 3 – 4<br />
Choice of unit of measurement :<br />
By keeping the button pressed for approximately 4 seconds, the units start to go past. You can choose between the<br />
following units : km/h (kilometres per hour), mph (miles per hour), knots, m/s (metres per second), and fps (feet per<br />
second). When the unit of your choice appears, release the button and the unit of measurement is thereby selected.<br />
Measurement of speed :<br />
For the measurement to be as exact as possible it is necessary to align the instrument along the axis of the wind.<br />
Precision: +/- 3 %<br />
Measuring range: from 0 to 150 km/h (42 m/s, 81 knots, 93 mph, 136 fps)<br />
Measuring cycle: 2 measurements per second<br />
Display:<br />
The display of the current speed is done on the large digits and the maximum speed reached on the small digits with the indication .<br />
Resolution : to one <strong>de</strong>cimal place up to 99.9, then in whole units.<br />
Deletion of the maximum :<br />
The maximum is retained even when the instrument is off. In or<strong>de</strong>r to reset it to zero keep the button pressed for at least 2 seconds, then<br />
release it.<br />
19
4. <strong>Mo<strong>de</strong></strong> for measuring the instant wind speed with ambient temperature Xplorer 2 – 3 – 4<br />
Choice of unit of measurement :<br />
By keeping the button pressed down for at least 2 seconds the 2 units start to go past. You have the possibility to<br />
choose between : °C (<strong>de</strong>grees Celsius) and °F (<strong>de</strong>grees Fahrenheit) When the unit of your choice appears, release<br />
the button and the unit of measurement is thereby selected.<br />
Measuring ambient temperature :<br />
Note : the temperature sensor is integrated with the metal back of the casing, and therefore it is the temperature of<br />
the back of the casing which is displayed. This special feature makes it possible to measure very accurately the<br />
temperature of milieu such as :<br />
water (springs, streams, etc.) by immersing the instrument several centimetres;<br />
surfaces (ground, metal parts, refrigerator interiors etc) by laying as closely as possible the back of the instrument on the surface to be<br />
measured;<br />
ambient air, either by allowing the instrument to reach the air temperature, which can take several minutes, or even several dozens of<br />
minutes according to the wind speed (avoid direct sun rays and contact of the back of the casing with your fingers). Otherwise, to get a<br />
rapid and precise measurement, but the back of the casing into contact with an object which is the same temperature as the air (vehicle<br />
bodywork, metal barrier, smooth walls etc.) avoiding surfaces in dark colours and exposed to sunlight).<br />
Measuring range of the sensor : from -50°C to100°C<br />
Measuring cycle: one measurement every 0.5 seconds<br />
Display:<br />
The display of the instant wind speed is done on the large digits while the ambient temperature is displayed on the small digits.<br />
Resolution (temperature) : to the tenth of a <strong>de</strong>gree<br />
20
5. <strong>Mo<strong>de</strong></strong> for measuring the current wind speed with the wind chill temperature Xplorer 2 – 3 – 4<br />
Low temperatures present a danger to the human body and this danger is aggravated by the speed of the wind. The<br />
Xplorer mo<strong>de</strong>ls 2, 3 and 4 show immediately the temperature felt by the body and warn of risks of chilblains and<br />
hypothermia.<br />
WHICH MEANS : The wind chill factor is calculated on the basis of ambient temperature and wind speed. In the event<br />
of wind, it gives an indication of the loss of heat by the body if the temperature is less than 10°C. This is the formula<br />
which was adopted in January 2003 by the United States Fe<strong>de</strong>ral Office for Meteorological Coordination with the<br />
Meteorological Service of Canada (MSC), the US Department of Defence (DoD) and the United States National<br />
Oceanic and Atmospheric Administration (NOAA).<br />
Example: an ambient temperature of 0°C and a wind of 30 km/h act on your body as if the temperature were -7.8°C !<br />
Choice of the unit of measurement for temperature :<br />
See section 4, choice of the unit of measurement.<br />
Display:<br />
The display of the instant wind speed is ma<strong>de</strong> on the large digits and the wind chill temperature on the small digits with the indication .<br />
Resolution (temperature) : to the tenth of a <strong>de</strong>gree<br />
Measuring cycle: 2 measurements per second<br />
21
6. <strong>Mo<strong>de</strong></strong> for measuring the instant wind speed with electronic compass Xplorer 3 – 4<br />
Choice of the unit of measurement (wind) :<br />
See section 3, choice of the unit of measurement.<br />
Compass display :<br />
The compass display is given in <strong>de</strong>grees on the small digits.<br />
WHICH MEANS ! Your SKYWATCH ® Xplorer tells you magnetic north, and<br />
not geographical north !<br />
Measurement :<br />
To carry out a measurement as accurate as possible, hold your instrument perfectly vertical (fig. A). If the figures are replaced<br />
by , that means that the instrument is too tilted or that it is being disturbed by a nearby magnetic source.<br />
fig. A<br />
Calibration :<br />
IMPORTANT ! Calibrate your Xplorer before the first use and at each change of environment or battery.<br />
When the instrument is first energised, the compass shows . So you carry out a calibration as follows :<br />
Hold the button pressed down for approximately 3 seconds, and when appears in the large digits, release. Then turn<br />
yourself round until the instrument is showing , then, in or<strong>de</strong>r to validate the calibration, press briefly on the button.<br />
During the calibration, the instrument shows in succession , , then and finally in front of the small digits.<br />
This operation needs to take place at the speed of 1 turn in approximately 30 seconds.<br />
To obtain an accurate calibration, the impeller MUST NOT turn ! If there is wind, shelter the impeller between your thumb<br />
and your in<strong>de</strong>x finger.<br />
Note : The lines of a terrestrial magnetic field are disturbed by metal environments, buildings, electricity pylons, vehicle<br />
interiors, metal boats and also by magnetic fields generated by any electrical machinery or equipment and by magnets. It is<br />
therefore necessary, in or<strong>de</strong>r to obtain accurate measurements, to move away from the sources of disturbance, or to<br />
recalibrate.<br />
22
7. <strong>Mo<strong>de</strong></strong> for measuring instant wind speed with current altitu<strong>de</strong> Xplorer 4<br />
IMPORTANT ! This instrument calculates altitu<strong>de</strong> by using air pressure. It is therefore quite normal for the<br />
altitu<strong>de</strong> to change when the air pressure changes. For this reason the instrument needs to be calibrated as often<br />
as possible.<br />
Choice of the unit :<br />
By keeping the button pressed for approximately 4 seconds, the units start to go past. You can choose between the<br />
following units : m (metres) and ft (feet). When the unit of your choice appears, release the button, and the unit of<br />
measurement is thereby validated and the instrument returns to the mo<strong>de</strong> of measuring the instant wind speed with<br />
display of the altitu<strong>de</strong>.<br />
Display of the maximum altitu<strong>de</strong> :<br />
Hold the button pressed down for approximately 2 seconds and at the moment when the indication is displayed, release the<br />
button; in this way the instrument goes into the mo<strong>de</strong> for measuring the instant wind speed with display of the maximum altitu<strong>de</strong>.<br />
In or<strong>de</strong>r to quit this mo<strong>de</strong> press once on the button. The instrument then returns to the wind/altitu<strong>de</strong> mo<strong>de</strong>.<br />
Calibration of the altitu<strong>de</strong> :<br />
Hold the button pressed down for approximately 3 seconds, and when appears in the large digits, release. Hold the button<br />
pressed down to increase the figure for the altitu<strong>de</strong> in steps of 1 unit. To reduce the same, release then once again hold the<br />
button pressed down.<br />
A brief pressure on the button validates the new altitu<strong>de</strong>.<br />
Deletion of the maximum :<br />
The maximum is retained even when the instrument is off. To <strong>de</strong>lete the figure for the maximum, hold the button pressed down for<br />
approximately 2 seconds, then release it. This operation should be carried out after the mo<strong>de</strong> of display of the max. altitu<strong>de</strong>.<br />
23
8. <strong>Mo<strong>de</strong></strong> for measuring the wind speed with display of relative and absolute pressure<br />
WHICH MEANS : The instrument offers 2 mo<strong>de</strong>s for displaying pressure: QFE pressure and QNH pressure. These two abbreviations (QFE and<br />
QNH) are taken from the famous “Q” co<strong>de</strong>. This co<strong>de</strong> was instituted by the London conference of 1912. It is ma<strong>de</strong> up of a list of three letter<br />
indicators, valid for all the countries of the world. Inten<strong>de</strong>d mainly for telegraphic and radio-telegraphy transmissions (in Morse) it is ma<strong>de</strong> up of<br />
a list of abbreviations, using three letters to summarise without ambiguity phrases, questions or responses which would take too long to<br />
formulate in clear text, thus eliminating the risks of errors arising out transmission, reception, language and interpretation.<br />
The “Q” is still wi<strong>de</strong>ly used in our day by ships and amateur radio enthusiasts. It is still official usage in radio telephony. The aeronautical world<br />
does not use all of it, but regularly uses part of it.<br />
CODE MEANING<br />
QFE Atmospheric pressure at ground level, also known as absolute pressure.<br />
QNH Atmospheric pressure obtained by calculation at sea level in standard atmospheric conditions,<br />
also known as relative pressure.<br />
This is the pressure mentioned in meteorological bulletins or on the television.<br />
Choice of the unit :<br />
If the button is kept pressed down for at least 4 seconds the units start to pass by, and you have the possibility of choosing between the<br />
following units: hPa (hecto Pascals) and inHg (inches of mercury). When the unit of your choice appears, release the button. This validates the<br />
unit of measurement and the instrument goes back to the mo<strong>de</strong> wind / relative pressure (QNH).<br />
Display of absolute pressure (QFE) :<br />
Keep the button pressed down for approximately 2 seconds and at the very moment when the indication (QFE) is<br />
displayed in the large digits, release it. The instrument then goes into the mo<strong>de</strong> for displaying absolute pressure. To quit this<br />
mo<strong>de</strong>, press once on the button, and the instrument returns to the mo<strong>de</strong> wind / relative pressure (QNH).<br />
Calibration of relative pressure (QNH) :<br />
Hold the button pressed down for approximately 3 seconds, then release it at the moment when is displayed on the large<br />
digits. Then the adjustment (increase/reduction) is carried out in the same way as for the calibration of altitu<strong>de</strong>, see section 7<br />
(altitu<strong>de</strong> calibration).<br />
24
Comments:<br />
7. If QNH figure is steady (is not flashing) this indicates the current relative pressure (QNH), credible because <strong>de</strong>duced from a<br />
meteorologically slow variation.<br />
8. The QNH sign flashes if this pressure has changed since the last calibration.<br />
9. If the QNH figure is flashing, it indicates the QNH pressure entered at the last calibration.<br />
10. A rise in altitu<strong>de</strong> or a meteorological variation when the recording is not active makes the QNH figure flash.<br />
11. Calibration of the QNH or of the altitu<strong>de</strong> (known datum) makes it possible to re-adjust the 'Xplorer in relation to the measured ambient<br />
pressure. This varies continually according to the altitu<strong>de</strong> and the current meteorological conditions.<br />
12. The only reference for the 'Xplorer is the air pressure which it is measuring, from which it <strong>de</strong>duces the altitu<strong>de</strong>. Any variations in this<br />
pressure makes the altitu<strong>de</strong> change : 9 metres per hPa a low altitu<strong>de</strong>s, 14 metres at 5,000 metres, and this is why it is necessary to<br />
calibrate as often as possible to maintain a credible display (even airline pilots have this to comply with!).<br />
9. Recording mo<strong>de</strong>s Xplorer 4<br />
WHICH MEANS : The three recording mo<strong>de</strong>s operate in the same way and are connected. They display un<strong>de</strong>r<br />
different forms one of the 48 pressure measurements stored each hour. By <strong>de</strong>fault : 24 h are displayed.<br />
The record stores just the pressure on the sensor, the QNH or the altitu<strong>de</strong> displayed is calculated, <strong>de</strong>pending on the<br />
current calibration.<br />
Trend : This is the variation in pressure over the last 24 hours (or 48 hours, or 1 hour etc.). This is valid if the<br />
Xplorer is in the same place (same altitu<strong>de</strong>). A negative figure indicates a drop in pressure (arrival of a<br />
<strong>de</strong>pression), a positive figure, an increase (anticyclone). Pressure naturally varies during the day, and the<br />
weather trend is more accurate at 24 hours or 48 hours (same time of the day).<br />
QNH : This is the relative pressure at 24 hours ago (or 48 hours, etc.). Valid if the ‘Xplorer is at the same place<br />
and is recalibrated.<br />
Altitu<strong>de</strong> : If you set off for a mountain walk or go paragliding, you can check the altitu<strong>de</strong>s achieved hour by hour. The<br />
altitu<strong>de</strong> will be accurate if you force the QNH calibration of the Xplorer on the weather pressure that was<br />
present when you recor<strong>de</strong>d.<br />
Display of a particular moment in the record :<br />
Example: you want to know the trend, the QNH or the altitu<strong>de</strong> 12 hours ago. Keep the button pressed down, then when 12 h<br />
appears on the large digits, release it.<br />
25
Battery economy (stop recording)<br />
This feature is possible by disabling the pressure sensor while the instrument is off. The measurements of pressure and<br />
altitu<strong>de</strong> are only active when the instrument is on.<br />
To turn off the sensor, put one of the three records on (zero hours).<br />
Comments:<br />
4. If you consult the record and you leave displayed 5 h for example, the next time you switch on the Xplorer, it will display 24 h if there<br />
has been a new pressure measurement, this being generated by the internal clock (one measurement per hour).<br />
5. On releasing on 0h, the record will no longer do a measurement each hour (but will retain the current contents) thereby giving you<br />
battery economy.<br />
6. In going back to active record mo<strong>de</strong> (anything other an 0h) the current measurement is stored as the starting time and displayed<br />
un<strong>de</strong>r 1h.<br />
10. General reset Xplorer 3 and 4<br />
This mo<strong>de</strong> resets by <strong>de</strong>fault all figures and removes the calibration of the compass. In or<strong>de</strong>r to carry out a general reset, switch<br />
off the instrument as normal. Then, to restart, hold the button pressed down. At the moment where all the LCD digits appear (see<br />
opposite), release it, then again hold the button down until off. You can then start up your instrument in the normal way.<br />
26
I. INFORMACIÓN GENERAL<br />
Acaba usted <strong>de</strong> adquirir un aparato <strong>de</strong> alta precisión fabricado con las tecnologías más mo<strong>de</strong>rnas. Ha sido pensado para resistir un uso<br />
intensivo. Sin embargo, y con el fin <strong>de</strong> que mantenga su aspecto y precisión, le recomendamos que lo trate con cuidado y que lea atentamente<br />
estas instrucciones <strong>de</strong> uso.<br />
El SKYWATCH ® Xplorer dispone <strong>de</strong> una hélice y sensores que permiten efectuar mediciones en el exterior.<br />
Le proporciona información fundamental <strong>de</strong> todas las activida<strong>de</strong>s al aire libre como el vuelo libre, las excursiones a pie, el alpinismo o la<br />
náutica. Le ofrece la velocidad instantánea y máxima <strong>de</strong>l viento (Xplorer 1, 2, 3 y 4), la temperatura ambiente y la temperatura sentida (Xplorer<br />
2, 3 y 4), una brújula electrónica (Xplorer 3 y 4) y la altitud, la presión y las ten<strong>de</strong>ncias meteorológicas (Xplorer 4).<br />
La gama SKYWATCH ® Xplorer está pensada para soportar una breve inmersión en el agua a una profundidad máxima <strong>de</strong> 1 metro.<br />
¡ATENCIÓN!<br />
Este aparato sirve para ayudar a los usuarios que se encuentran en un entorno exterior, pero NO PUEDE sustituir a los avisos <strong>de</strong> la estación<br />
meteorológica local. Por tanto, habrá que verificar y comparar periódicamente las medidas proporcionadas por el aparato con la información<br />
difundida por la estación meteorológica.<br />
A veces, las condiciones climáticas exteriores pue<strong>de</strong>n cambiar <strong>de</strong> forma drástica y en muy poco tiempo. Por ejemplo, <strong>de</strong> un tiempo soleado se<br />
pue<strong>de</strong> pasar a un tiempo tormentoso en el espacio <strong>de</strong> una media hora o quizá menos. En consecuencia, <strong>de</strong>berán seguirse siempre las reglas<br />
básicas <strong>de</strong> seguridad cuando se emprenda una actividad en el exterior.<br />
<strong>JDC</strong> ELECTRONIC <strong>SA</strong> no asumirá ninguna responsabilidad por cualquier consecuencia, directa o indirecta, o cualquier perjuicio que pueda<br />
resultar <strong>de</strong>l uso <strong>de</strong> este aparato.<br />
Características técnicas:<br />
Dimensiones: 41 x 93 x 17 mm<br />
Peso: 51 gr (Xplorer 1), 52 gr (Xplorer 2 y 3), 53 gr (Xplorer 4)<br />
Temperatura <strong>de</strong> uso: <strong>de</strong> -30°C a +60°C<br />
27
II. CONSERVACIÓN Y MANTENIMIENTO Xplorer 1 – 2 – 3 - 4<br />
La concepción y fabricación <strong>de</strong> este aparato se han hecho con mucho cuidado. Para aprovechar con eficacia las funciones propuestas, se<br />
aconseja usar el aparato conforme a las siguientes observaciones:<br />
• Evite como sea la intrusión <strong>de</strong> objetos como cabellos, hilos, arena y otros polvos en el interior <strong>de</strong> la hélice, ya que esto provocaría<br />
una mala rotación <strong>de</strong> la hélice y, por tanto, una pérdida <strong>de</strong> precisión. Si, <strong>de</strong> todos modos, un cabello o un hilo penetran en la hélice,<br />
quítelos suavemente con unas pinzas. Si se trata <strong>de</strong> polvos o <strong>de</strong> arena, pue<strong>de</strong> limpiar la hélice con agua clara.<br />
• No exponga el aparato a condiciones climáticas extremas durante períodos <strong>de</strong> tiempo <strong>de</strong>masiado largos. Aunque se utilicen<br />
compuestos resistentes a altas temperaturas, recomendamos no exponer el instrumento a fuentes <strong>de</strong> calor muy intensas, como por<br />
ejemplo <strong>de</strong>bajo <strong>de</strong>l parabrisas <strong>de</strong> un coche.<br />
• No lo use <strong>de</strong> forma <strong>de</strong>scuidada y evite los golpes.<br />
• NO EXPONGA el aparato a productos químicos potentes. Estos productos podrían dañarlo.<br />
III. Puesta en marcha Xplorer 1 – 2 – 3 - 4<br />
Para poner en marcha EL SKYWATCH® Xplorer, sólo hay que aplicar una breve presión en el botón (simbolizado por: <strong>de</strong>l siguiente<br />
esquema). El aparato se pone en marcha y muestra la versión <strong>de</strong>l software y el mo<strong>de</strong>lo <strong>de</strong>l aparato (véase fig. D0.0 <strong>de</strong>l siguiente esquema), el<br />
aparato pasa luego automáticamente al modo <strong>de</strong> medición <strong>de</strong> la velocidad instantánea <strong>de</strong>l viento (Xplorer 1) o al último modo visualizado antes<br />
<strong>de</strong> apagar el aparato (Xplorer 2, 3 y 4).<br />
Organigramas completos <strong>de</strong> las pantallas disponibles en http://www.jdc.ch.<br />
28
IV. Parada <strong>de</strong>l aparato Xplorer 1 – 2 – 3 - 4<br />
Parada automática (auto-off):<br />
El SKYWATCH ® Xplorer se apaga automáticamente 1 minuto <strong>de</strong>spués <strong>de</strong> la última presión <strong>de</strong>l botón o <strong>de</strong>spués <strong>de</strong> la última medición <strong>de</strong>l<br />
viento. De modo que no se apaga mientras la hélice gira (más <strong>de</strong> 10 segundos).<br />
Parada manual:<br />
Para apagar el Xplorer manualmente (válido en todos los modos), mantenga pulsado el botón hasta que se pare, luego suéltelo.<br />
¡ATENCIÓN! Funcionamiento permanente posible:<br />
Con la parada manual soltando el botón durante el parpa<strong>de</strong>o <strong>de</strong> los gran<strong>de</strong>s dígitos o con la parada automática efectuando una breve presión<br />
sobre el botón durante el parpa<strong>de</strong>o.<br />
Durante el funcionamiento permanente, cualquier presión sobre el botón <strong>de</strong>vuelve al Xplorer al modo <strong>de</strong> parada automática.<br />
Nota: si el aparato permanece iluminado permanentemente, la pila se <strong>de</strong>scarga con rapi<strong>de</strong>z (400 a 500 horas según el mo<strong>de</strong>lo).<br />
VI. Alimentación Xplorer 1 – 2 – 3 - 4<br />
El SKYWATCH ® Xplorer está alimentado por una pila botón <strong>de</strong> 3V tipo CR2032 reemplazable. Sustitución <strong>de</strong> la pila :<br />
¡ATENCIÓN! ¡Operación que hay que efectuar con cuidado!<br />
CUALQUIER MALA MANIPULACIÓN AL CAMBIAR LA PILA, PUEDE PERJUDICAR DEFINITIVAMENTE EL APARATO.<br />
EN CASO DE DUDA, CONSULTE A SU RELOJERO.<br />
1. Destornille el fondo <strong>de</strong> metal (6 tornillos).<br />
2. Destornille el tornillo <strong>de</strong> la tapa <strong>de</strong> la pila.<br />
3. Levante suavemente la tapa para extraer la pila.<br />
4. Coloque la nueva pila vigilando el sentido <strong>de</strong> la polaridad (+ hacia arriba), luego vuelva a atornillar la tapa <strong>de</strong> la pila. Asegúrese <strong>de</strong><br />
que la pequeña lengüeta en medio <strong>de</strong> la tapa esté levantada, para que toque la parte posterior <strong>de</strong> metal.<br />
5. Antes <strong>de</strong> volver a colocar el fondo, asegúrese <strong>de</strong> que la junta esté correctamente colocada en su sitio.<br />
6. Vuelva a colocar el fondo y los 6 tornillos.<br />
Duración normal <strong>de</strong> la pila:<br />
Xplorer 1, 2 y 3: Unas 30.000 mediciones <strong>de</strong> 1 minuto (auto-off) y más <strong>de</strong> 20 años en parada.<br />
Xplorer 4: Sin historial: lo mismo que Xplorer 1, 2 y 3.<br />
Con historiales: unas 25.000 mediciones <strong>de</strong> 1 minuto (auto-off), pero 7 años máximo en parada.<br />
29
1. Iluminación <strong>de</strong> la pantalla (retroiluminación) Xplorer 1 – 2 – 3 – 4<br />
Para encen<strong>de</strong>r la retroiluminación, mantenga el botón apretado durante 1 segundo y en el momento en que la retroiluminación se encienda,<br />
suelte el botón. La retroiluminación permanece encendida durante 3 segundos, si en los 5 segundos siguientes se la vuelve a encen<strong>de</strong>r,<br />
permanecerá encendida 15 segundos. Después <strong>de</strong> esos 5 segundos, se encen<strong>de</strong>rá nuevamente durante 3 segundos.<br />
Nota: la retroiluminación se encien<strong>de</strong> <strong>de</strong> la misma manera en todos los modos.<br />
ATENCIÓN: ¡El uso intensivo <strong>de</strong> la retroiluminación diminuye la duración <strong>de</strong> la pila! El consumo es unas 100 veces más elevado que<br />
sin retroiluminación.<br />
2. Modos y cambio <strong>de</strong> modo Xplorer 1 - 2 – 3 – 4<br />
Una breve presión en el botón permite obtener el siguiente modo.<br />
MODOS:<br />
Xplorer 1 (1 modo) Xplorer 2 (3 modos) Xplorer 3 (4 modos) Xplorer 4 (9 modos)<br />
1. viento + viento máx 1. viento + viento máx 1. viento + viento máx 1. viento + viento máx<br />
2. viento + temperatura 2. viento + temperatura 2. viento + temperatura<br />
3. viento + temp. sentida 3. viento + temp. sentida 3. viento + temp. sentida<br />
4. viento + brújula 4. viento + brújula<br />
5. viento + altitud y altitud máxima<br />
6. viento + presión relativa y absoluta<br />
7. historial <strong>de</strong> la ten<strong>de</strong>ncia <strong>de</strong> la presión<br />
8. historial <strong>de</strong> la presión relativa<br />
9. historial <strong>de</strong> la altitud<br />
Vea los siguientes capítulos para consultar las funciones disponibles en cada modo.<br />
30
3. Modo <strong>de</strong> medición <strong>de</strong> la velocidad instantánea <strong>de</strong>l viento con máxima Xplorer 1 – 2 – 3 – 4<br />
Elección <strong>de</strong> la unidad <strong>de</strong> medida:<br />
Con el botón pulsado durante unos 4 segundos, empiezan a pasar las unida<strong>de</strong>s. Pue<strong>de</strong> elegir entre las siguientes<br />
unida<strong>de</strong>s: km/h (kilómetros por hora), mph (millas por hora), knots (millas náuticas por hora), m/s (metros por segundo) o<br />
fps (pies por segundo). Cuando aparezca la unidad elegida, suelte el botón y se validará la unidad <strong>de</strong> medida.<br />
Medición <strong>de</strong> la velocidad:<br />
Para que la medición sea lo más exacta posible, es necesario alinear el instrumento con el eje <strong>de</strong>l viento.<br />
Precisión: +/- 3 %<br />
Alcance <strong>de</strong> medición: <strong>de</strong> 0 a 150 km/h (42 m/s, 81 knots, 93 mph, 136 fps)<br />
Ciclo <strong>de</strong> medición: 2 medidas por segundo<br />
Visualización:<br />
La velocidad instantánea se muestra en los gran<strong>de</strong>s dígitos y la velocidad máxima alcanzada en los pequeños dígitos con la indicación .<br />
Resolución: en la <strong>de</strong>cena hasta 99,9, y luego en la unidad.<br />
Borrado <strong>de</strong>l máximo:<br />
El 'max' se conserva aunque el aparato esté apagado. Para volverlo a poner a cero, mantenga el botón pulsado durante como mínimo 2<br />
segundos y luego suéltelo.<br />
31
4. Modo <strong>de</strong> medición <strong>de</strong> la velocidad instantánea <strong>de</strong>l viento con temperatura ambiente Xplorer 2 – 3 – 4<br />
Elección <strong>de</strong> la unidad <strong>de</strong> medida:<br />
Con el botón pulsado durante como mínimo 2 segundos, empiezan a pasar las 2 unida<strong>de</strong>s. Pue<strong>de</strong> elegir entre: °C<br />
(grados Celsius) y °F (grados Fahrenheit). Cuando aparezca la unidad elegida, suelte el botón y se validará la<br />
unidad <strong>de</strong> medida.<br />
Medición <strong>de</strong> la temperatura ambiente:<br />
Nota: el sensor <strong>de</strong> temperatura está integrado en el fondo metálico <strong>de</strong> la caja, por tanto es la temperatura <strong>de</strong>l fondo<br />
<strong>de</strong> la caja lo que se visualiza. Esta particularidad permite medir con mucha precisión y muy rápidamente la<br />
temperatura <strong>de</strong> medios como:<br />
Agua (fuentes, ríos, etc.) sumergiendo algunos centímetros el aparato;<br />
Superficies (suelo, piezas metálicas, interiores <strong>de</strong> neveras, etc.) nivelando lo máximo posible el fondo <strong>de</strong>l aparato en la superficie a medir;<br />
Aire <strong>de</strong>l ambiente, <strong>de</strong>jando que el aparato alcance la temperatura <strong>de</strong>l aire. Esto pue<strong>de</strong> tardar algunos minutos, o incluso varias <strong>de</strong>cenas <strong>de</strong><br />
minutos según la velocidad <strong>de</strong>l viento (evite los rayos directos <strong>de</strong>l sol y el contacto <strong>de</strong>l fondo <strong>de</strong> la caja con los <strong>de</strong>dos). O, si no, para una<br />
medición rápida y precisa, ponga el fondo <strong>de</strong> la caja en contacto con un objeto que tenga la temperatura <strong>de</strong>l aire (carrocería <strong>de</strong>l coche,<br />
barrera metálica, muros y pare<strong>de</strong>s lisas, etc., evitando las superficies <strong>de</strong> colores oscuros y expuestas al sol).<br />
Rango <strong>de</strong> medición <strong>de</strong>l sensor: <strong>de</strong> -50°C a +100°C<br />
Ciclo <strong>de</strong> medición: una medición cada 0,5 segundos<br />
Visualización:<br />
La velocidad instantánea <strong>de</strong>l viento se muestra en los gran<strong>de</strong>s dígitos, mientras que la temperatura ambiente se muestra en los pequeños<br />
dígitos.<br />
Resolución (temperatura): en la décima <strong>de</strong> grado<br />
32
5. Modo <strong>de</strong> medición <strong>de</strong> la velocidad instantánea <strong>de</strong>l viento con la temperatura sentida Xplorer 2 – 3 – 4<br />
Las bajas temperaturas representan un peligro para el cuerpo humano y este peligro se agrava con la velocidad <strong>de</strong>l<br />
viento. Los Xplorer 2, 3 y 4 indican inmediatamente la temperatura sentida por el cuerpo y previenen los riesgos <strong>de</strong><br />
congelación e hipotermia.<br />
ES DECIR: El factor <strong>de</strong> enfriamiento se calcula teniendo en cuenta la temperatura ambiente y la velocidad <strong>de</strong>l viento.<br />
En caso <strong>de</strong> viento, indica la pérdida <strong>de</strong> calor <strong>de</strong>l cuerpo si la temperatura es inferior 10°C. Una fórmula adoptada en<br />
enero <strong>de</strong> 2003 por la Oficina Fe<strong>de</strong>ral <strong>de</strong> Coordinación Meteorológica <strong>de</strong> los Estados Unidos con el servicio<br />
meteorológico canadiense (MSC), el <strong>de</strong>partamento <strong>de</strong> la <strong>de</strong>fensa US (DOD) y la Administración Oceánica y<br />
Atmosférica Nacional <strong>de</strong> los Estados Unidos (NOAA).<br />
Ejemplo : ¡Una temperatura ambiente <strong>de</strong> 0°C y un viento <strong>de</strong> 30 km/h actúan sobre el cuerpo como una temperatura<br />
<strong>de</strong> -7,8°C!<br />
Elección <strong>de</strong> la unidad <strong>de</strong> medida <strong>de</strong> la temperatura:<br />
Véase el capítulo 4, elección <strong>de</strong> la unidad <strong>de</strong> medida.<br />
Visualización:<br />
La velocidad instantánea <strong>de</strong>l viento se muestra en los gran<strong>de</strong>s dígitos y la temperatura sentida en los pequeños dígitos con la indicación .<br />
Resolución (temperatura): en la décima <strong>de</strong> grado<br />
Ciclo <strong>de</strong> medición: 2 medidas por segundo.<br />
33
6. Modo <strong>de</strong> medición <strong>de</strong> la velocidad instantánea <strong>de</strong>l viento con brújula electrónica Xplorer 3 – 4<br />
Elección <strong>de</strong> la unidad <strong>de</strong> medida (viento):<br />
Véase el capítulo 3, elección <strong>de</strong> la unidad <strong>de</strong> medida.<br />
Visualización <strong>de</strong> la brújula:<br />
La visualización <strong>de</strong> la brújula se hace en grados en los pequeños dígitos.<br />
ES DECIR: ¡El SKYWATCH ® Xplorer indica el Norte magnético y no el<br />
Norte geográfico!<br />
Medida:<br />
Para realizar una medida lo más precisa posible, mantenga el aparato totalmente en vertical (fig. A). Cuando las cifras se<br />
sustituyan por , significa que el aparato está <strong>de</strong>masiado inclinado o que hay una fuente magnética cerca que lo perturba.<br />
Calibración:<br />
¡IMPORTANTE! Calibre el Xplorer antes <strong>de</strong> usarlo por primera vez y en cada cambio <strong>de</strong> entorno o <strong>de</strong> pila.<br />
Cuando se conecta el aparato a la corriente por primera vez, la brújula indica . Realice pues una calibración <strong>de</strong> la<br />
siguiente forma:<br />
Mantenga el botón pulsado durante unos 3 segundos, cuando aparezca en los gran<strong>de</strong>s dígitos, suéltelo. Gire luego<br />
sobre usted mismo hasta que el aparato indique . Después, para validar la calibración, efectúe una breve presión sobre el<br />
botón.<br />
Durante la calibración, el aparato indica sucesivamente , , <strong>de</strong>spués y finalmente <strong>de</strong>lante <strong>de</strong> los pequeños dígitos.<br />
Esta operación <strong>de</strong>be efectuarse a la velocidad <strong>de</strong> 1 giro en 30 segundos aproximadamente.<br />
¡Para una calibración precisa, la hélice NO DEBE girar! En caso <strong>de</strong> viento, sostenga la hélice entre el pulgar y el índice.<br />
Nota: Las líneas <strong>de</strong> campo magnético terrestre se ven afectadas por los entornos metálicos, las construcciones, los postes<br />
eléctricos, los interiores <strong>de</strong> los vehículos, las embarcaciones metálicas, y los campos magnéticos generados por todas las<br />
máquinas, aparatos eléctricos e imanes. Por tanto, para una medida precisa es necesario o bien alejarse <strong>de</strong> estas fuentes<br />
<strong>de</strong> perturbación o bien recalibrar.<br />
34
7. Modo <strong>de</strong> medición <strong>de</strong> la velocidad instantánea <strong>de</strong>l viento con la altitud actual Xplorer 4<br />
¡ATENCIÓN! Este aparato calcula la altitud mediante la presión <strong>de</strong>l aire. Por lo tanto, es normal que la altitud<br />
cambie cuando cambie la presión <strong>de</strong>l aire. Por este motivo, el aparato <strong>de</strong>be calibrarse lo más a menudo posible.<br />
Elección <strong>de</strong> la unidad:<br />
Con el botón pulsado durante unos 4 segundos, empiezan a pasar las unida<strong>de</strong>s. Pue<strong>de</strong> elegir entre las siguientes<br />
unida<strong>de</strong>s: m (metros) y ft (pies). Cuando aparezca la unidad elegida, suelte el botón para que la unidad <strong>de</strong> medida se<br />
vali<strong>de</strong> y el aparato vuelva al modo <strong>de</strong> medida <strong>de</strong> la velocidad instantánea <strong>de</strong>l viento con visualización <strong>de</strong> altitud.<br />
Visualización <strong>de</strong> la altitud máxima:<br />
Mantenga pulsado el botón durante unos 2 segundos y, en el momento en que se fije la indicación , suelte el botón. El<br />
aparato se pone así en modo <strong>de</strong> medida <strong>de</strong> la velocidad instantánea <strong>de</strong>l viento con visualización <strong>de</strong> la altitud máxima. Para salir<br />
<strong>de</strong> este modo, apriete una vez el botón para que el aparato vuelva al modo <strong>de</strong> viento/altitud.<br />
Calibración <strong>de</strong> la altitud:<br />
Mantenga el botón pulsado durante unos 3 segundos, cuando aparezca en los gran<strong>de</strong>s dígitos, suéltelo. Mantenga pulsado<br />
el botón para aumentar el valor <strong>de</strong> la altitud por pasos <strong>de</strong> 1 unidad. Para disminuirla, suelte y <strong>de</strong>spués vuelva a mantener<br />
pulsado el botón.<br />
Una breve presión sobre el botón valida la nueva altitud.<br />
Borrado <strong>de</strong>l máximo:<br />
El 'max' se conserva aunque el aparato esté apagado. Para borrar el valor <strong>de</strong> la máxima, mantenga pulsado el botón durante unos 2 segundos<br />
y <strong>de</strong>spués suéltelo. Esta operación <strong>de</strong>be realizarse <strong>de</strong>s<strong>de</strong> el modo <strong>de</strong> visualización <strong>de</strong> la altitud máxima.<br />
35
8. Modo <strong>de</strong> medición <strong>de</strong> la velocidad <strong>de</strong>l viento con visualización <strong>de</strong> la presión relativa y absoluta<br />
ES DECIR: El aparato dispone <strong>de</strong> 2 modos <strong>de</strong> visualización <strong>de</strong> la presión: la presión QFE y la presión QNH. Estas 2 abreviaciones (QFE y<br />
QNH) se extraen <strong>de</strong>l famoso código "Q". Este código fue instaurado por la Conferencia <strong>de</strong> Londres en 1912. Está formado por una lista <strong>de</strong><br />
indicativos <strong>de</strong> 3 letras válidos para todos los países <strong>de</strong>l mundo. Está <strong>de</strong>stinado principalmente a las transmisiones telegráficas y<br />
radiotelegráficas (en Morse) y constituye una lista <strong>de</strong> abreviaciones que resumen en tres letras y sin ambigüedad frases, preguntas o<br />
respuestas largas a formular <strong>de</strong> forma clara, eliminando así el riesgo <strong>de</strong> errores <strong>de</strong> transmisión, recepción, lengua o interpretación.<br />
El código "Q" todavía hoy lo utilizan mucho los barcos y los radioaficionados. Sigue siendo <strong>de</strong> uso oficial en radiotelefonía. El mundo<br />
aeronáutico no lo utiliza en su totalidad, pero sí se usa una parte <strong>de</strong> forma cotidiana.<br />
CÓDIGO SIGNIFICADO<br />
QFE Presión atmosférica en el suelo.<br />
Se habla también <strong>de</strong> presión absoluta.<br />
QNH Presión atmosférica obtenida por cálculo a nivel <strong>de</strong>l mar en las condiciones <strong>de</strong> la atmósfera<br />
estándar.<br />
Se habla también <strong>de</strong> presión relativa.<br />
Es la presión anunciada en los boletines meteorológicos o en televisión.<br />
Elección <strong>de</strong> la unidad:<br />
Al mantener pulsado el botón durante como mínimo 4 segundos, las unida<strong>de</strong>s empiezan a pasar y se pue<strong>de</strong> elegir entre las siguientes<br />
unida<strong>de</strong>s: hPa (hecto Pascales) y inHg (pulgadas <strong>de</strong> Mercurio). Cuando aparezca la unidad elegida, suelte el botón para que la unidad <strong>de</strong><br />
medida se vali<strong>de</strong> y el aparato vuelva al modo <strong>de</strong> viento/presión relativa (QNH).<br />
Visualización <strong>de</strong> la presión absoluta (QFE):<br />
Mantenga pulsado el botón durante unos 2 segundos y, en el momento en que aparezca la indicación (QFE) en los<br />
gran<strong>de</strong>s dígitos, suéltelo. El aparato se pone así en modo <strong>de</strong> visualización <strong>de</strong> la presión absoluta. Para salir <strong>de</strong> este modo,<br />
apriete una vez el botón para que el aparato vuelva al modo <strong>de</strong> viento/presión relativa (QNH).<br />
Calibración <strong>de</strong> la presión relativa (QNH):<br />
Mantenga pulsado el botón durante unos 3 segundos y suéltelo en el momento en que aparezca la indicación en los<br />
gran<strong>de</strong>s dígitos. Luego, se realiza el reglaje (aumento/disminución) <strong>de</strong> la misma forma que la calibración <strong>de</strong> la altitud, véase el<br />
capítulo 7 (calibración <strong>de</strong> altitud).<br />
36
Observaciones :<br />
13. Si el valor <strong>de</strong>l QNH está fijo (no parpa<strong>de</strong>a), indica la presión relativa (QNH) actual, creíble porque se <strong>de</strong>duce <strong>de</strong> una variación lenta<br />
meteorológica.<br />
14. El signo QNH parpa<strong>de</strong>a si esta presión ha cambiado <strong>de</strong>s<strong>de</strong> la última calibración.<br />
15. Si el valor <strong>de</strong>l QNH parpa<strong>de</strong>a, indica la presión QNH introducida <strong>de</strong>s<strong>de</strong> la última calibración.<br />
16. Una subida en altitud o una variación meteorológica sin que el historial esté activo, hace parpa<strong>de</strong>ar el valor <strong>de</strong>l QNH.<br />
17. La calibración <strong>de</strong>l QNH o <strong>de</strong> la altitud (el dato conocido) permite reajustar el Xplorer con relación a la presión ambiente medida. Ésta<br />
varía constantemente según la altitud y las condiciones meteorológicas <strong>de</strong>l momento.<br />
18. La única referencia <strong>de</strong>l Xplorer es la presión <strong>de</strong>l aire que mi<strong>de</strong>, <strong>de</strong> la cual <strong>de</strong>duce la altitud. Cualquier variación <strong>de</strong> esta presión hace<br />
cambiar la altitud: 9 metros por hPa a baja altitud, 14 metros a 5.000 metros. Por esto hay que calibrarla lo más a menudo posible,<br />
para mantener una visualización creíble (¡Incluso los pilotos <strong>de</strong> aviación <strong>de</strong> líneas regulares tienen esta obligación!).<br />
9. Modos <strong>de</strong> historial Xplorer 4<br />
ES DECIR: Los tres modos <strong>de</strong> historial funcionan <strong>de</strong> la misma manera y están relacionados. Muestran en diferentes<br />
formas una <strong>de</strong> las 48 medidas <strong>de</strong> presión almacenadas cada hora. Por <strong>de</strong>fecto: se muestra 24 h.<br />
El historial almacena sólo la presión en el sensor, se calcula el QNH o la altitud visualizada <strong>de</strong>pendiendo <strong>de</strong> la<br />
calibración actual.<br />
Ten<strong>de</strong>ncia: Es la variación <strong>de</strong> presión <strong>de</strong>s<strong>de</strong> 24h (o 48h, o 1h, etc.). Válida si el Xplorer está en el mismo sitio<br />
(misma altitud). Una cifra negativa indica una bajada <strong>de</strong> presión (llegada <strong>de</strong> una <strong>de</strong>presión), una cifra<br />
positiva indica un aumento (anticiclón). Naturalmente la presión varía durante el día, la ten<strong>de</strong>ncia<br />
meteorológica es más precisa a las 24h o 48h (misma hora <strong>de</strong>l día).<br />
QNH : Es la presión relativa que había hace 24h (o 48h…). Válida si el Xplorer está en el mismo lugar y se ha<br />
recalibrado.<br />
Altitud: Si sale para dar un paseo por la montaña o vuela en parapente, podrá seguir las altitu<strong>de</strong>s alcanzadas en<br />
cada hora. La altitud será exacta si fuerza la calibración QNH <strong>de</strong>l Xplorer sobre la presión meteorológica<br />
que había en el momento <strong>de</strong>l registro.<br />
Visualización <strong>de</strong> un momento dado <strong>de</strong>l historial:<br />
Ejemplo : Saber la ten<strong>de</strong>ncia, el QNH o la altitud <strong>de</strong> hace 12 horas hacia atrás. Mantenga pulsado el botón, luego cuando<br />
aparezca 12h en los gran<strong>de</strong>s dígitos, suéltelo.<br />
37
Ahorro <strong>de</strong> la pila (parada <strong>de</strong> los historiales)<br />
Esta particularidad es posible si se <strong>de</strong>sactiva el sensor <strong>de</strong> presión durante el tiempo que el aparato está apagado. Las<br />
medidas <strong>de</strong> presión y <strong>de</strong> altitud sólo están activas cuando se encien<strong>de</strong> el aparato.<br />
Para <strong>de</strong>sactivar el sensor, ponga uno <strong>de</strong> los tres historiales en (hora cero).<br />
Observaciones :<br />
7. Si consulta el historial y muestra por ejemplo 5h, la próxima vez que encienda el Xplorer se mostrará 24h si hay una nueva medida <strong>de</strong><br />
presión. Ésta funciona con el reloj interno (una medida por hora).<br />
8. Al soltar en 0h, el historial no medirá más cada hora (pero conservará el contenido actual) con ahorro <strong>de</strong> la pila.<br />
9. Al volver al modo historial activo (diferente <strong>de</strong> 0h), la medida actual se almacena como salida horaria y se muestra en 1h.<br />
10. Reset general Xplorer 3 y 4<br />
Este modo recupera todos los valores por <strong>de</strong>fecto y elimina la calibración <strong>de</strong> la brújula. Para hacer un reset general, apague el<br />
aparato <strong>de</strong> forma normal. Después, para volverlo a encen<strong>de</strong>r, mantenga pulsado el botón. En el momento en que aparezcan<br />
todos los dígitos <strong>de</strong>l LCD (véase al dorso), suéltelo. Luego mantenga otra vez pulsado el botón hasta que se pare. Después<br />
pue<strong>de</strong> poner en marcha el aparato <strong>de</strong> forma normal.<br />
38
I. INFORMAÇÕES GERAIS<br />
Acabou <strong>de</strong> adquirir um aparelho <strong>de</strong> alta precisão, fruto das mais mo<strong>de</strong>rnas tecnologias. Concebido para resistir a uma utilização intensiva, é no<br />
entanto aconselhável – para que conserve o seu aspecto e a sua precisão – manuseá-lo com cuidado e ler atentamente as instruções <strong>de</strong><br />
utilização.<br />
O SKYWATCH ® Xplorer é dotado <strong>de</strong> uma hélice e <strong>de</strong> sensores que permitem efectuar medições no exterior.<br />
Este fornece-lhe informações essenciais para todas as suas activida<strong>de</strong>s ao ar livre, tais como caminhadas, alpinismo, voo livre ou <strong>de</strong>sportos<br />
náuticos, indicando-lhe a velocida<strong>de</strong> instantânea e máxima do vento (Xplorer 1, 2, 3 e 4), a temperatura ambiente e efectiva (Xplorer 2, 3 e 4),<br />
a altitu<strong>de</strong>, a pressão e as tendências barométricas (Xplorer 4), possuindo ainda uma bússola electrónica (Xplorer 3 e 4).<br />
A gama SKYWATCH ® Xplorer foi concebida para suportar uma curta imersão na água, a uma profundida<strong>de</strong> máxima <strong>de</strong> 1 metro.<br />
ATENÇÃO!<br />
Este aparelho foi concebido para ajudar os utilizadores que se encontram num ambiente exterior, mas NÃO DEVE substituir as previsões da<br />
estação meteorológica local. Consequentemente, <strong>de</strong>ve verificar e comparar periodicamente as medições fornecidas pelo seu aparelho com as<br />
informações divulgadas pela estação meteorológica.<br />
Por vezes, as condições climáticas exteriores alteram-se radicalmente e em muito pouco tempo. Um tempo com sol po<strong>de</strong>, por exemplo,<br />
tornar-se pesado num espaço <strong>de</strong> meia hora ou, até, menos. Assim, <strong>de</strong>ve respeitar sempre as regras básicas <strong>de</strong> segurança ao praticar uma<br />
activida<strong>de</strong> ao ar livre.<br />
A <strong>JDC</strong> ELECTRONIC <strong>SA</strong> não po<strong>de</strong>rá ser responsabilizada por quaisquer consequências, directas ou indirectas, nem por todos os danos que<br />
possam resultar da utilização <strong>de</strong>ste aparelho.<br />
Características técnicas:<br />
Dimensões: 41mm x 93mm x 17mm<br />
Peso: 51g (Xplorer 1), 52g (Xplorer 2 e 3), 53g (Xplorer 4)<br />
Temperatura <strong>de</strong> utilização: entre -30°C e +60°C<br />
39
II. MANUTENÇÃO E CONSERVAÇÃO Xplorer 1 – 2 – 3 - 4<br />
A concepção e o fabrico <strong>de</strong>ste aparelho foram objecto <strong>de</strong> gran<strong>de</strong> minúcia. Para utilizar eficazmente as funções propostas, é aconselhável<br />
utilizar o aparelho <strong>de</strong> acordo com as seguintes indicações:<br />
• Evite, a todo o custo, a introdução <strong>de</strong> objectos estranhos – tais como cabelos, fios, areia e outras poeiras – no interior da hélice, pois<br />
tal po<strong>de</strong>rá provocar uma <strong>de</strong>ficiente rotação da mesma e, consequentemente, a perda <strong>de</strong> precisão. No entanto, se um cabelo ou um<br />
fio penetrarem na hélice, retire-o <strong>de</strong>licadamente, com o auxílio <strong>de</strong> uma pinça; no caso <strong>de</strong> poeiras ou <strong>de</strong> areia, passe a hélice por<br />
água limpa.<br />
• Evite expor o aparelho a condições climáticas extremas durante longos períodos <strong>de</strong> tempo. Apesar <strong>de</strong> utilizar componentes<br />
resistentes a estas temperaturas, recomendamos que não exponha o instrumento a fontes <strong>de</strong> calor intenso, como por baixo do párabrisas<br />
<strong>de</strong> um automóvel, por exemplo.<br />
• Evite as utilizações <strong>de</strong>scuidadas e os choques.<br />
• NÃO EXPONHA o aparelho a produtos químicos fortes, pois estes po<strong>de</strong>rão danificá-lo.<br />
III. Funcionamento Xplorer 1 – 2 – 3 - 4<br />
Para pôr o SKYWATCH® Xplorer a funcionar, basta efectuar uma curta pressão no botão (simbolizado por: no esquema abaixo). Ao ser<br />
ligado, o aparelho apresenta a versão do software e o mo<strong>de</strong>lo (vd. fig. D0.0 no esquema abaixo). Em seguida, o aparelho passa<br />
automaticamente para o modo <strong>de</strong> medição da velocida<strong>de</strong> instantânea do vento (Xplorer 1) ou para o último modo apresentado antes <strong>de</strong> ter<br />
<strong>de</strong>sligado o aparelho (Xplorer 2, 3 e 4).<br />
Organigramas completos das visualizações disponíveis em http://www.jdc.ch.<br />
40
IV. Desligar o aparelho Xplorer 1 – 2 – 3 - 4<br />
Desligar automaticamente (auto-off):<br />
O SKYWATCH ® Xplorer <strong>de</strong>sliga-se automaticamente 1 minuto após a última pressão no botão ou após a última medição do vento. Deste<br />
modo, enquanto a hélice estiver a girar (mais <strong>de</strong> 10 segundos), o SKYWATCH ® Xplorer continua a funcionar.<br />
Desligar manualmente:<br />
Para <strong>de</strong>sligar o Xplorer manualmente (válido em todos os modos), prima o botão até o Xplorer se <strong>de</strong>sligar e, em seguida, solte-o.<br />
ATENÇÃO! Funcionamento permanente possível:<br />
Ao <strong>de</strong>sligar manualmente, libertando o botão enquanto os dígitos maiores estão intermitentes, ou ao <strong>de</strong>sligar automaticamente, pressionando o<br />
botão por um curto período <strong>de</strong> tempo enquanto os dígitos estão intermitentes.<br />
Durante o funcionamento permanente, qualquer pressão no botão coloca o Xplorer no modo <strong>de</strong> <strong>de</strong>sligar automaticamente.<br />
Observação: se o aparelho estiver permanentemente ligado, a pilha <strong>de</strong>scarrega-se rapidamente (400 a 500 horas, consoante o mo<strong>de</strong>lo).<br />
VI. Alimentação Xplorer 1 – 2 – 3 - 4<br />
O SKYWATCH® Xplorer é alimentado por uma pilha “<strong>de</strong> relógio” <strong>de</strong> 3V, <strong>de</strong> tipo CR2032, que po<strong>de</strong>rá ser substituída. Substituição da pilha:<br />
ATENÇÃO! Operação a efectuar com cuidado!<br />
QUALQUER MANIPULAÇÃO INCORRECTA AQUANDO DA SUBSTITUIÇÃO DA PILHA PODE DANIFICAR<br />
DEFINITIVAMENTE O SEU APARELHO. EM CASO DE DÚVIDA, DIRIJA-SE AO SEU RELOJOEIRO.<br />
1. Desaparafuse a base metálica (6 parafusos).<br />
2. Desaparafuse o parafuso da tampa da pilha.<br />
3. Levante <strong>de</strong>licadamente a tampa para extrair a pilha.<br />
4. Coloque a nova pilha, tendo em atenção a polarida<strong>de</strong> (+ virado para cima), e, em seguida, aparafuse a tampa da pilha. Certifique-se<br />
<strong>de</strong> que a patilha a meio da tampa está bem levantada, <strong>de</strong> modo a que toque na superfície metálica.<br />
5. Antes <strong>de</strong> voltar a colocar a base, certifique-se <strong>de</strong> que a junta está limpa e correctamente posicionada no seu encaixe.<br />
6. Coloque a base e os 6 parafusos.<br />
Duração <strong>de</strong> vida normal da pilha:<br />
Xplorer 1, 2 e 3: cerca <strong>de</strong> 30.000 medições <strong>de</strong> 1 minuto (auto-off) e mais <strong>de</strong> 20 anos com o aparelho <strong>de</strong>sligado.<br />
Xplorer 4: sem históricos: igual ao Xplorer 1, 2 e 3.<br />
com históricos: cerca <strong>de</strong> 25.000 medições <strong>de</strong> 1 minuto (auto-off) porém, no máximo, 7 anos com o aparelho <strong>de</strong>sligado.<br />
41
1. Iluminação do mostrador (retroiluminação) Xplorer 1 – 2 – 3 – 4<br />
Para activar a retroiluminação, mantenha o botão premido durante 1 segundo e, quando esta se acen<strong>de</strong>r, solte o botão. A retroiluminação<br />
permanece activa durante 3 segundos; se, nos 5 segundos que se seguirem, voltar a activar a retroiluminação, esta permanece acesa<br />
15 segundos. Para lá <strong>de</strong>stes 5 segundos, esta acen<strong>de</strong>-se novamente durante 3 segundos.<br />
Observação: a retroiluminação é activada da mesma forma em todos os modos.<br />
ATENÇÃO: uma utilização intensiva da retroiluminação diminui a duração <strong>de</strong> vida da pilha! Consumo cerca <strong>de</strong> 100 x mais elevado do<br />
que sem retroiluminação.<br />
2. Modos e alteração <strong>de</strong> modo Xplorer 1 - 2 – 3 – 4<br />
Uma curta pressão no botão permite passar para o modo seguinte.<br />
MODOS:<br />
Xplorer 1 (1 modo) Xplorer 2 (3 modos) Xplorer 3 (4 modos) Xplorer 4 (9 modos)<br />
1. vento + vento máx. 1. vento + vento máx. 1. vento + vento máx. 1. vento + vento máx.<br />
2. vento + temperatura 2. vento + temperatura 2. vento + temperatura<br />
3. vento + temp. efectiva 3. vento + temp. efectiva 3. vento + temp. efectiva<br />
4. vento + bússola 4. vento + bússola<br />
5. vento + altitu<strong>de</strong> e altitu<strong>de</strong> máx.<br />
6. vento + pressão relativa e absoluta<br />
7. histórico da tendência barométrica<br />
8. histórico da pressão relativa<br />
9. histórico da altitu<strong>de</strong><br />
Reportar-se aos capítulos seguintes para consultar as funções disponíveis em cada um dos modos.<br />
42
3. Modo <strong>de</strong> medição da velocida<strong>de</strong> instantânea do vento com máximo Xplorer 1 – 2 – 3 – 4<br />
Selecção da unida<strong>de</strong> <strong>de</strong> medida:<br />
Mantendo o botão premido durante cerca <strong>de</strong> 4 segundos, as unida<strong>de</strong>s vão sendo sucessivamente visualizadas. Tem a<br />
possibilida<strong>de</strong> <strong>de</strong> seleccionar uma das seguintes unida<strong>de</strong>s: km/h (quilómetros por hora), mph (milhas por hora), knots<br />
(nós), m/s (metros por segundo) ou fps (pés por segundo). Quando visualizar a unida<strong>de</strong> <strong>de</strong> medida que preten<strong>de</strong>, solte o<br />
botão e esta será validada.<br />
Medição da velocida<strong>de</strong>:<br />
Para que a medição seja o mais exacta possível, é necessário alinhar o instrumento com a direcção do vento.<br />
Precisão: +/- 3 %<br />
Intervalo <strong>de</strong> medição: <strong>de</strong> 0 a 150 km/h (42 m/s, 81 nós, 93 mph, 136 fps)<br />
Ciclo <strong>de</strong> medição: 2 medições por segundo<br />
Visualização:<br />
A velocida<strong>de</strong> instantânea é apresentada nos dígitos maiores e a velocida<strong>de</strong> máxima atingida nos mais pequenos, ao lado da indicação .<br />
Resolução: à décima até 99,9 e, em seguida, à unida<strong>de</strong>.<br />
Apagar registo <strong>de</strong> máximo:<br />
O 'máx.' é conservado mesmo que o aparelho seja <strong>de</strong>sligado. Para o repor a zero, mantenha o botão premido durante, pelo menos,<br />
2 segundos e, em seguida, solte-o.<br />
43
4. Modo <strong>de</strong> medição da velocida<strong>de</strong> instantânea do vento com temperatura ambiente Xplorer 2 – 3 – 4<br />
Selecção da unida<strong>de</strong> <strong>de</strong> medida:<br />
Mantendo o botão premido durante, pelo menos, 2 segundos, as 2 unida<strong>de</strong>s existentes vão sendo sucessivamente<br />
visualizadas. Tem a possibilida<strong>de</strong> <strong>de</strong> seleccionar uma das seguintes unida<strong>de</strong>s: °C (graus Celsius) e °F (graus<br />
Fahrenheit). Quando visualizar a unida<strong>de</strong> <strong>de</strong> medida que preten<strong>de</strong>, solte o botão e esta será validada.<br />
Medição da temperatura ambiente:<br />
Observação: o sensor <strong>de</strong> temperatura está integrado na base metálica da caixa, sendo, portanto, a temperatura na<br />
base da caixa que é visualizada. Esta particularida<strong>de</strong> permite medir muito rapidamente e com muita precisão a<br />
temperatura <strong>de</strong> meios como:<br />
água (nascentes, rios, etc.): imergindo o aparelho alguns centímetros;<br />
superfícies (solo, metais, interiores <strong>de</strong> frigoríficos, etc.): aproximando, o mais possível, a base do aparelho da superfície a medir;<br />
ar ambiente: <strong>de</strong>ixando o aparelho atingir a temperatura do ar, o que po<strong>de</strong> <strong>de</strong>morar vários minutos ou, até, várias <strong>de</strong>zenas <strong>de</strong> minutos,<br />
conforme a velocida<strong>de</strong> do vento (evite os raios solares directos e o contacto da base da caixa com os seus <strong>de</strong>dos), ou, então, para uma<br />
medição rápida e exacta, coloque a base da caixa em contacto com um objecto que tenha a temperatura do ar (carroçaria <strong>de</strong> automóvel,<br />
barreira metálica, pare<strong>de</strong>s lisas etc., evitando as superfícies <strong>de</strong> cores escuras e expostas ao sol).<br />
Intervalo <strong>de</strong> medição do sensor: <strong>de</strong> -50°C a +100°C<br />
Ciclo <strong>de</strong> medição: uma medição <strong>de</strong> 0,5 segundos em 0,5 segundos<br />
Visualização:<br />
A velocida<strong>de</strong> instantânea do vento é apresentada nos dígitos maiores, ao passo que a temperatura ambiente é visualizada nos mais pequenos.<br />
Resolução (temperatura): à décima <strong>de</strong> grau<br />
44
5. Modo <strong>de</strong> medição da velocida<strong>de</strong> instantânea do vento com temperatura efectiva (wind chill temperature) Xplorer 2 – 3 – 4<br />
As baixas temperaturas representam um perigo para o corpo humano, po<strong>de</strong>ndo esse perigo ser agravado pela<br />
velocida<strong>de</strong> do vento. Os Xplorer 2, 3 e 4 indicam instantaneamente a temperatura sentida pelo corpo, prevenindo os<br />
riscos <strong>de</strong> frieiras e <strong>de</strong> hipotermia.<br />
N.B.: a temperatura efectiva é calculada tendo em conta a temperatura ambiente e a velocida<strong>de</strong> do vento. No caso<br />
da existência <strong>de</strong> vento, é indicada a perda <strong>de</strong> calor pelo corpo, se a temperatura for inferior a 10°C. Fórmula adoptada<br />
em Janeiro <strong>de</strong> 2003 pelo Office of the Fe<strong>de</strong>ral Coordinator for Meteorology dos Estados Unidos juntamente com o<br />
Meteorological Service of Canada (MSC), o Department of Defense dos Estados Unidos (DoD) e a National Oceanic<br />
and Atmospheric Administration dos Estados Unidos (NOAA).<br />
Exemplo: uma temperatura ambiente <strong>de</strong> 0°C e um vento <strong>de</strong> 30 km/h agem no corpo como uma temperatura <strong>de</strong><br />
-7,8°C!<br />
Selecção da unida<strong>de</strong> <strong>de</strong> medida da temperatura:<br />
Consultar capítulo 4, selecção da unida<strong>de</strong> <strong>de</strong> medida.<br />
Visualização:<br />
A velocida<strong>de</strong> instantânea do vento é apresentada nos dígitos maiores e a temperatura efectiva nos mais pequenos, com a indicação .<br />
Resolução (temperatura): à décima <strong>de</strong> grau<br />
Ciclo <strong>de</strong> medição: 2 medições por segundo<br />
45
6. Modo <strong>de</strong> medição da velocida<strong>de</strong> instantânea do vento com bússola electrónica Xplorer 3 – 4<br />
Selecção da unida<strong>de</strong> <strong>de</strong> medida (vento):<br />
Consultar capítulo 3, selecção da unida<strong>de</strong> <strong>de</strong> medida.<br />
Bússola:<br />
As indicações da bússola são apresentadas em graus nos dígitos mais pequenos.<br />
N.B.! O SKYWATCH ® Xplorer indica o norte magnético e não o norte<br />
geográfico!<br />
Medição:<br />
Para efectuar uma medição o mais exacta possível, mantenha o aparelho na vertical (fig. A). Se os algarismos forem<br />
substituídos por , tal significa que o aparelho se encontra <strong>de</strong>masiado inclinado ou que está a ser perturbado por uma<br />
fonte magnética próxima.<br />
Calibração:<br />
IMPORTANTE! Calibre o Xplorer antes <strong>de</strong> o utilizar pela primeira vez e sempre que mudar <strong>de</strong> ambiente ou <strong>de</strong> pilha.<br />
Quando o aparelho é ligado pela primeira vez, a bússola indica . Efectue a calibração da seguinte forma:<br />
Mantenha o botão premido durante cerca <strong>de</strong> 3 segundos e solte-o quando, nos dígitos maiores, surgir a indicação . Em<br />
seguida, ro<strong>de</strong> sobre si próprio até que o aparelho indique e, em seguida, para validar a calibração, efectue uma curta<br />
pressão no botão.<br />
Durante a calibração, o aparelho indica sucessivamente , , em seguida e, por fim, à frente dos dígitos mais<br />
pequenos.<br />
Esta operação <strong>de</strong>ve ser efectuada à velocida<strong>de</strong> <strong>de</strong> 1 rotação em 30 segundos, aproximadamente.<br />
Para uma calibração exacta, a hélice NÃO PODE rodar! Em caso <strong>de</strong> vento, coloque a hélice entre o polegar e o indicador.<br />
Observação: As linhas <strong>de</strong> campo magnético terrestre são perturbadas pelos ambientes metálicos, construções, postes<br />
eléctricos, interiores <strong>de</strong> veículos e embarcações metálicas, bem como pelos campos magnéticos gerados por máquinas,<br />
aparelhos eléctricos e ímanes. Assim, para medições exactas, é necessário afastar-se <strong>de</strong>stas fontes <strong>de</strong> perturbação ou<br />
proce<strong>de</strong>r a nova calibração.<br />
46
7. Modo <strong>de</strong> medição da velocida<strong>de</strong> instantânea do vento com altitu<strong>de</strong> actual Xplorer 4<br />
ATENÇÃO! Este aparelho calcula a altitu<strong>de</strong> através da pressão atmosférica. Assim, é perfeitamente natural que<br />
a altitu<strong>de</strong> se altere quando a pressão atmosférica se altera. Por este motivo, o aparelho necessita <strong>de</strong> ser<br />
calibrado tão frequentemente quanto possível.<br />
Selecção da unida<strong>de</strong>:<br />
Mantendo o botão premido durante cerca <strong>de</strong> 4 segundos, as unida<strong>de</strong>s vão sendo sucessivamente visualizadas. Tem a<br />
possibilida<strong>de</strong> <strong>de</strong> seleccionar uma das seguintes unida<strong>de</strong>s: m (metros) e ft (pés). Quando a unida<strong>de</strong> pretendida for<br />
visualizada, solte o botão; a unida<strong>de</strong> <strong>de</strong> medida é, assim, validada e o aparelho volta a ficar em modo <strong>de</strong> medição da<br />
velocida<strong>de</strong> instantânea do vento com visualização da altitu<strong>de</strong>.<br />
Visualização da altitu<strong>de</strong> máxima:<br />
Mantenha o botão premido durante cerca <strong>de</strong> 2 segundos e, no momento em que a indicação for visualizada, solte o botão;<br />
o aparelho fica, assim, em modo <strong>de</strong> medição da velocida<strong>de</strong> instantânea do vento com visualização da altitu<strong>de</strong> máxima. Para sair<br />
<strong>de</strong>ste modo, prima uma vez o botão, o aparelho volta ao modo vento/altitu<strong>de</strong>.<br />
Calibração da altitu<strong>de</strong>:<br />
Mantenha o botão premido durante cerca <strong>de</strong> 3 segundos e solte-o quando, nos dígitos maiores, surgir a indicação .<br />
Mantenha o botão premido para aumentar o valor da altitu<strong>de</strong>, em passos <strong>de</strong> 1 unida<strong>de</strong>. Para o diminuir, solte e, em seguida,<br />
mantenha novamente o botão premido.<br />
Uma curta pressão no botão valida a nova altitu<strong>de</strong>.<br />
Apagar registo <strong>de</strong> máximo:<br />
O 'máx.' é conservado mesmo que o aparelho seja <strong>de</strong>sligado. Para apagar o valor máximo, mantenha o botão premido durante<br />
aproximadamente 2 segundos, libertando-o então. Esta operação <strong>de</strong>verá ser efectuada no modo <strong>de</strong> visualização da altitute máxima.<br />
47
8. Modo <strong>de</strong> medição da velocida<strong>de</strong> do vento com visualização da pressão relativa e absoluta<br />
N.B.: O aparelho dispõe <strong>de</strong> 2 modos <strong>de</strong> visualização da pressão: a pressão QFE e a pressão QNH. Estas 2 abreviaturas (QFE e QNH) são<br />
extraídas do famoso código “Q”, instituído pela conferência <strong>de</strong> Londres, em 1912, que é constituído por uma lista <strong>de</strong> códigos com 3 letras,<br />
válidos em todos os países do mundo. Destinado principalmente às transmissões telegráficas e radiotelegráficas (em morse), é constituído por<br />
uma lista <strong>de</strong> abreviaturas que resumem em três letras, claramente e sem ambiguida<strong>de</strong>s, frases, perguntas ou respostas compridas, eliminando<br />
assim os riscos <strong>de</strong> erro <strong>de</strong> transmissão, <strong>de</strong> recepção, <strong>de</strong> língua e <strong>de</strong> interpretação.<br />
Hoje em dia, o código “Q” ainda é amplamente utilizado pelos navios e pelos radioamadores e continua a ser oficialmente utilizado em<br />
radiotelefonia. A aeronáutica não utiliza a totalida<strong>de</strong>, mas uma parte é <strong>de</strong> uso diário.<br />
CÓDIGO SIGNIFICADO<br />
QFE Pressão atmosférica no solo,<br />
também se fala em pressão absoluta.<br />
QNH Pressão atmosférica inferida pelo cálculo ao nível do mar, consi<strong>de</strong>rando as condições<br />
atmosféricas <strong>de</strong> referência,<br />
também se fala em pressão relativa.<br />
Trata-se da pressão anunciada nos boletins meteorológicos ou na televisão.<br />
Selecção da unida<strong>de</strong>:<br />
Mantendo o botão premido durante, pelo menos, 4 segundos, as unida<strong>de</strong>s vão sendo sucessivamente visualizadas; tem a possibilida<strong>de</strong> <strong>de</strong><br />
seleccionar uma das seguintes unida<strong>de</strong>s: hPa (hectopascals) e inHg (polegadas <strong>de</strong> mercúrio). Quando a unida<strong>de</strong> <strong>de</strong> medida pretendida for<br />
visualizada, solte o botão; esta é validada e o aparelho volta a ficar em modo vento/pressão relativa (QNH).<br />
Visualização da pressão absoluta (QFE):<br />
Mantenha o botão premido durante cerca <strong>de</strong> 2 segundos e solte-o, quando a indicação (QFE) for visualizada nos dígitos<br />
maiores. O aparelho coloca-se, assim, em modo <strong>de</strong> visualização da pressão absoluta. Para sair <strong>de</strong>ste modo, prima uma vez o<br />
botão; o aparelho volta ao modo vento/pressão relativa (QNH).<br />
Calibração da pressão relativa (QNH):<br />
Mantenha o botão premido durante cerca <strong>de</strong> 3 segundos e solte-o, quando for visualizado nos dígitos maiores. Em<br />
seguida, a regulação (aumento/diminuição) é efectuada da mesma forma que na calibração da altitu<strong>de</strong>. Consultar capítulo 7<br />
(calibração da altitu<strong>de</strong>).<br />
48
Observações:<br />
19. Se o valor <strong>de</strong> QNH estiver fixo (sem piscar), é indicada a pressão relativa (QNH) actual, com gran<strong>de</strong> fiabilida<strong>de</strong> uma vez ser<br />
calculada em condições <strong>de</strong> variação meteorológica lenta.<br />
20. A indicação <strong>de</strong> QNH ficará intermitente se a pressão tiver mudado <strong>de</strong>s<strong>de</strong> a última calibração.<br />
21. Se o valor <strong>de</strong> QNH estiver intermitente, é indicada a pressão <strong>de</strong> QNH introduzida na última calibração.<br />
22. Uma subida <strong>de</strong> altitu<strong>de</strong> ou uma variação meteorológica, sem que o histórico esteja activo, conduz à intermitência do valor <strong>de</strong> QNH.<br />
23. A calibração do QNH ou da altitu<strong>de</strong> (variável conhecida) permite reajustar o Xplorer em relação à pressão ambiente medida. Esta<br />
varia continuamente <strong>de</strong> acordo com a altitu<strong>de</strong> e as condições meteorológicas do momento.<br />
24. A única referência do Xplorer é a pressão do ar medida, da qual <strong>de</strong>duz a altitu<strong>de</strong>. Qualquer variação <strong>de</strong>sta pressão altera a altitu<strong>de</strong>:<br />
9 metros por hPa a baixa altitu<strong>de</strong>, 14 metros a 5.000 metros. É por este motivo que é necessário calibrar o aparelho tão<br />
frequentemente quanto possível, <strong>de</strong> modo a conservar uma indicação fiável (até os pilotos dos aviões comerciais têm esta<br />
condicionante!).<br />
9. Modos <strong>de</strong> histórico Xplorer 4<br />
N.B.: Os três modos <strong>de</strong> histórico funcionam <strong>de</strong> forma idêntica, estão relacionados e apresentam, <strong>de</strong> diversas<br />
formas, uma das 48 medições <strong>de</strong> pressão registada <strong>de</strong> hora a hora. Por pre<strong>de</strong>finição: é 24h que é apresentado.<br />
O histórico armazena apenas a pressão no sensor, sendo os valores <strong>de</strong> altitu<strong>de</strong> ou o QNH visualizados, calculados<br />
<strong>de</strong> acordo com a calibração actual.<br />
Tendência: Variação da pressão nas últimas 24h (ou 48h ou 1h, etc.). Válida se o Xplorer estiver no mesmo sítio<br />
(mesma altitu<strong>de</strong>). Um valor negativo indica uma baixa <strong>de</strong> pressão (chegada <strong>de</strong> uma <strong>de</strong>pressão), um valor<br />
positivo um aumento (anticiclone). A pressão varia naturalmente durante o dia, sendo a tendência<br />
barométrica mais exacta em 24h ou 48h (mesma hora do dia).<br />
QNH: Pressão relativa verificada há 24h (ou 48h…). Válido se o Xplorer estiver no mesmo sítio e se for<br />
recalibrado.<br />
Altitu<strong>de</strong>: Se for passear para a montanha ou voar em parapente, po<strong>de</strong> acompanhar as altitu<strong>de</strong>s atingidas <strong>de</strong> hora a<br />
hora. A altitu<strong>de</strong> será exacta se forçar a calibração do QNH do Xplorer com a pressão barométrica<br />
verificada quando o registo foi efectuado.<br />
Visualização <strong>de</strong> um <strong>de</strong>terminado momento do histórico:<br />
Exemplo: preten<strong>de</strong> conhecer a tendência, o QNH ou a altitu<strong>de</strong> <strong>de</strong> há 12 horas atrás. Mantenha o botão premido, soltando-o<br />
quando visualizar 12h nos dígitos maiores.<br />
49
Economia da pilha (<strong>de</strong>sactivação do registo histórico)<br />
Esta opção é possível <strong>de</strong>sactivando o sensor <strong>de</strong> pressão quando o aparelho estiver <strong>de</strong>sligado. As medições <strong>de</strong> pressão e<br />
<strong>de</strong> altitu<strong>de</strong> só estão activas quando o aparelho está ligado.<br />
Par <strong>de</strong>sactivar o sensor, coloque um dos três históricos em (zero horas).<br />
Observações:<br />
10. Se consultar o histórico e <strong>de</strong>ixar indicado 5h, por exemplo, da próxima vez que ligar o Xplorer, este apresentará 24h; se tiver havido<br />
nova medição <strong>de</strong> pressão, esta é gerida pelo relógio interno (uma medição por hora).<br />
11. Ao libertar o botão em 0h, o histórico <strong>de</strong>ixar <strong>de</strong> fazer medições <strong>de</strong> hora a hora (embora conserve o conteúdo actual), economizando<br />
a pilha.<br />
12. Ao regressar ao modo histórico activo (diferente <strong>de</strong> 0h), a medição actual é registada como valor inicial e visualizada com período <strong>de</strong><br />
1h.<br />
10. Reinicialização geral Xplorer 3 e4<br />
Este modo repõe todos os valores pre<strong>de</strong>finidos e elimina a calibração da bússola. Para fazer uma reinicialização geral, <strong>de</strong>sligue<br />
normalmente o aparelho. Em seguida, para o voltar a ligar, mantenha o botão premido. Quando visualizar todos os dígitos do<br />
mostrador (vd. figura adjacente), solte o botão e, <strong>de</strong>pois, mantenha-o novamente premido até se <strong>de</strong>sligar. Em seguida, po<strong>de</strong><br />
ligar o seu aparelho normalmente<br />
50
I. INFORMAZIONI GENERALI<br />
Congratulazioni per aver acquistato un apparecchio di alta precisione realizzato con le più mo<strong>de</strong>rne soluzioni tecnologiche. È stato concepito<br />
per resistere ad un impiego intensivo. Tuttavia per consentirgli di mantenere inalterati aspetto e precisione, si consiglia di trattarlo con cura e<br />
leggere attentamente le presenti istruzioni per l'uso.<br />
Lo SKYWATCH ® Xplorer è provvisto di un'elica e di sensori che permettono d'effettuare i rilevamenti all'esterno.<br />
L'apparecchio mette a disposizione informazioni essenziali per tutte le attività all'aria aperta come ad esempio il volo libero, le escursioni<br />
prolungate, l'alpinismo o gli sport nautici. Offre la velocità istantanea, il valore massimo <strong>de</strong>l vento (Xplorer 1, 2, 3 e 4), la temperatura ambiente<br />
e quella percepita (Xplorer 2, 3 e 4), una bussola elettronica (Xplorer 3 e 4) così come l'altitudine, la pressione e andamento meteorologico<br />
(Xplorer 4).<br />
La gamma SKYWATCH ® Xplorer è concepita per resistere a brevi immersioni in acqua ad una profondità massima di 1 metro.<br />
ATTENZIONE!<br />
Il presente apparecchio è concepito per facilitare i compiti <strong>de</strong>gli utenti che si trovano in ambienti all'aperto, ma NON PUÒ sostituire le indicazioni<br />
fornite dagli osservatori meteorologici locali. Per questo motivo si <strong>de</strong>ve verificare e confrontare periodicamente i rilevamenti forniti<br />
dall'apparecchio con le informazioni divulgate dagli osservatori meteorologici.<br />
Alle volte le condizioni climatiche esterne possono subire cambiamenti molto profondi e in un lasso di tempo molto breve. Una situazione<br />
meteorologica serena ad esempio può diventare piovosa nell'arco di una mezz'ora a alle volta anche meno. Quindi si <strong>de</strong>vono seguire sempre le<br />
regole fondamentali di sicurezza quando si svolge un'attività all'esterno.<br />
La <strong>JDC</strong> ELECTRONIC <strong>SA</strong> non potrà essere ritenuta responsabile di tutte le conseguenze, dirette o indirette, e di tutti i danni che potrebbero<br />
risultare dall'impiego di questo apparecchio.<br />
Caratteristiche tecniche:<br />
Dimensioni: 41 x 93 x 17 mm<br />
Peso: 51 gr (Xplorer 1), 52 gr (Xplorer 2 e 3), 53 gr (Xplorer 4)<br />
Temperatura d'impiego: da -30°C a +60°C<br />
51
II. RIPARAZIONE E MANUTENZIONE Xplorer 1 – 2 – 3 - 4<br />
La progettazione e la fabbricazione di quest'apparecchio impongono di utilizzarlo con molta cura. Per adoperare efficacemente le funzioni<br />
proposte, si consiglia di utilizzare l'apparecchio in conformità con le indicazioni riportate di seguito:<br />
• Evitare in ogni modo che oggetti come capelli, fili, sabbia e polveri penetrino all'interno <strong>de</strong>ll'elica provocando una cattiva rotazione<br />
<strong>de</strong>ll'elica e di conseguenza una perdita di precisione. Se un capello o un filo riescono comunque a penetrare nell'elica, rimuoverlo con<br />
<strong>de</strong>licatezza utilizzando una pinzetta da <strong>de</strong>pilazione, mentre se si tratta di polvere o sabbia, è possibile sciacquare l'elica con acqua.<br />
• Evitare di esporre l'apparecchio a condizioni climatiche estreme per periodi di tempo troppo prolungati. Sebbene siano stati impiegati<br />
componenti resistenti a queste temperature, si consiglia di non esporre la strumentazione a forti fonti di calore, come il parabrezza<br />
<strong>de</strong>ll'auto, ad esempio.<br />
• Evitare un impiego senza precauzioni e gli urti.<br />
• NON ESPORRE l'apparecchio a prodotti chimici potenti. Questi prodotti potrebbero danneggiarlo.<br />
III. Accensione Xplorer 1 – 2 – 3 - 4<br />
Per accen<strong>de</strong>re lo SKYWATCH ® Xplorer è necessario effettuare una breve pressione sul pulsante (indicato da: nello schema riportato di<br />
seguito). L'apparecchio si accen<strong>de</strong> e visualizza la versione <strong>de</strong>l software e il mo<strong>de</strong>llo <strong>de</strong>ll'apparecchio (ve<strong>de</strong>re fig. D0.0 nello schema riportato di<br />
seguito), poi passa automaticamente alla modalità di rilevamento <strong>de</strong>lla velocità istantanea <strong>de</strong>l vento (Xplorer 1) o sull'ultima modalità<br />
visualizzata prima <strong>de</strong>llo spegnimento <strong>de</strong>ll'apparecchio (Xplorer 2, 3 e 4).<br />
Organigramma completo <strong>de</strong>lle visualizzazioni disponibili su http://www.jdc.ch.<br />
52
IV. Spegnimento <strong>de</strong>llo strumento Xplorer 1 – 2 – 3 - 4<br />
Arresto automatico (auto off):<br />
Lo SKYWATCH ® Xplorer si spegne automaticamente 1 minuto dopo l'ultima pressione <strong>de</strong>l pulsante o dopo l'ultima misurazione <strong>de</strong>l vento. In<br />
questo modo non si arresta fino a quando l'elica continua a girare (più di 10 secondi).<br />
Arresto manuale:<br />
Per spegnere Xplorer in maniera manuale (valida in tutte le modalità), tenere il pulsante premuto fino all'arresto quindi rilasciarlo.<br />
ATTENZIONE! Funzionamento permanente possibile:<br />
Sia in caso d'arresto manuale rilasciando il bottone mentre lampeggiano i caratteri numerici grandi, sia in caso d'arresto automatico effettuando<br />
una breve pressione sul pulsante mentre lampeggia.<br />
Durante il funzionamento permanente, premendo il pulsante si reimposta Xplorer in modalità d'arresto automatico.<br />
Nota: se l'apparecchio rimane acceso in maniera permanente, la pila si scarica in modo rapido (da 400 a 500 ore a seconda <strong>de</strong>i mo<strong>de</strong>lli).<br />
VI. Alimentazione Xplorer 1 – 2 – 3 - 4<br />
Lo SKYWATCH ® Xplorer è alimentato elettricamente con una pila piatta da 3V tipo CR2032 sostituibile. Cambio <strong>de</strong>lla batteria:<br />
ATTENZIONE! Operazione da effettuare con cura!<br />
TUTTE LE EVENTUALI MANIPOLAZIONI NON ADEGUATE AL MOMENTO DELLA SOSTITUZIONE DELLA PILA POSSONO<br />
DANNEGGIARE GRAVEMENTE L'APPARECCHIO. SI CONSIGLIA DI RIVOLGERSI AD UN OROLOGIAIO IN CASO DI<br />
EVENTUALI DUBBI.<br />
1. Svitare il fondo in metallo (6 viti).<br />
2. Svitare la vite <strong>de</strong>l vano batterie.<br />
3. Sollevare <strong>de</strong>licatamente il vano per estrarre la pila.<br />
4. Sostituire la nuova pila facendo attenzione all'orientamento <strong>de</strong>lle polarità (+ verso l'alto), quindi riavvitare il vano batterie. Si consiglia di<br />
accertarsi che la linguetta al centro <strong>de</strong>l vano sia ben sollevata per permetterle di essere a contatto con la parte posteriore in metallo.<br />
5. Prima di sostituire il fondo, si consiglia di accertarsi che la tenuta sia correttamente collocata nella rispettiva scanalatura.<br />
6. Riposizionare il fondo e le 6 viti.<br />
Durata normale di una pila:<br />
Xplorer 1, 2 e 3: circa 30.000 misurazioni da 1 minuto (auto-off) o oltre 20 anni in stand-by.<br />
Xplorer 4: senza cronologia: come per Xplorer 1, 2 e 3.<br />
con cronologia: circa 25.000 misurazioni da 1 minuto (auto-off) ma 7 anni max in stand-by.<br />
53
1. Retroilluminazione Xplorer 1 – 2 – 3 – 4<br />
Per attivare la retroilluminazione, tenere il pulsante premuto per 1 secondo e quando si attiva la retroilluminazione, rilasciare il pulsante. La<br />
retroilluminazione rimane attiva per 3 secondi, se nell'arco <strong>de</strong>i 5 secondi successivi si attiva nuovamente la retroilluminazione, questa rimane<br />
attiva per 15 secondi. Un volta superati i 5 secondi, rimane nuovamente attiva per 3 secondi.<br />
Nota: la retroilluminazione si attiva in tutte le modalità nello stesso modo.<br />
ATTENZIONE: l'impiego intensivo <strong>de</strong>lla retroilluminazione riduce la durata <strong>de</strong>lla pila! I consumi sono circa 100 volte più elevati<br />
rispetto a quando non si impiega la retroilluminazione.<br />
2. Modalità e cambiamento <strong>de</strong>lla modalità Xplorer 1 - 2 – 3 – 4<br />
Con una breve pressione <strong>de</strong>l pulsante è possibile ottenere le seguenti modalità.<br />
MODALITÀ:<br />
Xplorer 1 (1 modalità) Xplorer 2 (3 modalità) Xplorer 3 (4 modalità) Xplorer 4 (9 modalità)<br />
1. vento + vento max 1. vento + vento max 1. vento + vento max 1. vento + vento max<br />
2. vento + temperatura 2. vento + temperatura 2. vento + temperatura<br />
3. vento + temperatura percepita 3. vento + temperatura percepita 3. vento + temperatura percepita<br />
4. vento + bussola 4. vento + bussola<br />
5. vento + altitudine e altitudine max<br />
6. vento + pressione relativa e assoluta<br />
7. cronologia <strong>de</strong>ll'andamento pressione<br />
8. cronologia <strong>de</strong>lla pressione relativa<br />
9. cronologia <strong>de</strong>ll'altitudine<br />
Si consiglia di consultare i capitoli seguenti per esaminare le funzioni disponibili in ogni modalità.<br />
54
3. Modalità di misurazione <strong>de</strong>lla velocità istantanea <strong>de</strong>l vento con valore max Xplorer 1 – 2 – 3 – 4<br />
Selezione <strong>de</strong>ll'unità di misura:<br />
Tenendo il pulsante premuto per 4 secondi circa, si passa in rassegna alle diverse unità. È possibile optare per una <strong>de</strong>lle<br />
seguenti unità: km/h (chilometri all’ora), mph (miglia all’ora), knots (nodi), m/s (metri al secondo) o fps (piedi al<br />
secondo). Non appena l'unità <strong>de</strong>si<strong>de</strong>rata viene visualizzata, rilasciare il pulsante, in questo modo viene convalidata l'unità<br />
di misura.<br />
Rilevamento <strong>de</strong>lla velocità:<br />
È necessario allineare lo strumento all'asse <strong>de</strong>l vento affinché il rilevamento sia il più preciso possibile.<br />
Precisione: +/- 3 %<br />
Campo di misura: da 0 a 150 km/h (43 m/s, 81 knots (nodi), 93 mph (miglia orarie), 136 fps (piedi al secondo)<br />
Ciclo di misura: 2 misurazioni al secondo<br />
Visualizzazione:<br />
La visualizzazione <strong>de</strong>lla velocità istantanea avviene con i caratteri numerici grandi mentre la velocità massima raggiunta con i caratteri numerici<br />
piccoli e con l'indicazione .<br />
Risoluzione: al <strong>de</strong>cimo fino a 99.9, quindi all'unità.<br />
Cancellazione <strong>de</strong>l valore massimo:<br />
Il valore massimo viene conservato anche ad apparecchio spento. Per azzeralo, tenere il pulsante premuto per almeno 2 secondi quindi<br />
rilasciarlo.<br />
55
4. Modalità di misurazione <strong>de</strong>lla velocità istantanea <strong>de</strong>l vento con la temperatura ambiente Xplorer 2 – 3 – 4<br />
Selezione <strong>de</strong>ll'unità di misura:<br />
Tenendo il pulsante premuto per almeno 2 secondi, si passa in rassegna alle 2 diverse unità. È possibile scegliere<br />
tra: °C (gradi Celsius) e °F (gradi Fahrenheit). Non appena l'unità <strong>de</strong>si<strong>de</strong>rata viene visualizzata, rilasciare il<br />
pulsante, in questo modo viene convalidata l'unità di misura.<br />
Rilevamento <strong>de</strong>lla temperatura ambiente:<br />
Nota: il sensore termico è integrato nel fondo in metallo <strong>de</strong>ll'alloggiamento, quindi viene visualizzata la temperatura<br />
<strong>de</strong>l fondo <strong>de</strong>ll'alloggiamento. Questa caratteristica consente di rilevare in maniera molto precisa e rapida la<br />
temperatura <strong>de</strong>gli ambienti come:<br />
acqua (fonti, fiumi, ecc.) immergendo l'apparecchio per qualche centimetro;<br />
superfici (suolo, parti metalliche, parti interne di frigoriferi, ecc.) accostando per quanto possibile il fondo <strong>de</strong>ll'apparecchio alla superficie da<br />
sottoporre a misurazione;<br />
aria ambiente, sia consentendo all'apparecchio di ottenere la temperatura <strong>de</strong>ll'aria, operazione che può richie<strong>de</strong>re diversi minuti o persino<br />
<strong>de</strong>cine di minuti a seconda <strong>de</strong>lla velocità <strong>de</strong>l vento (evitare di esporre direttamente ai raggi <strong>de</strong>l sole e di mettere il fondo <strong>de</strong>ll'alloggiamento<br />
a contatto con le dita <strong>de</strong>ll'utente), sia, per una misurazione rapida e precisa, mettendo il fondo <strong>de</strong>ll'alloggiamento a contatto con un oggetto<br />
che abbia la temperatura <strong>de</strong>ll'aria (carrozzeria di un'auto, protezioni metalliche, muri e parti lisci ecc., evitando le superfici di colori scuri ed<br />
esposte al sole).<br />
Intervallo di misurazione <strong>de</strong>l sensore: da -50°C a +100°C<br />
Ciclo di misura: una misurazione ogni 0.5 secondi<br />
Visualizzazione:<br />
La visualizzazione <strong>de</strong>lla velocità istantanea <strong>de</strong>l vento avviene con i caratteri numerici grandi mentre la temperatura ambiente con i caratteri<br />
numerici piccoli.<br />
Risoluzione (temperatura): al <strong>de</strong>cimo di grado<br />
56
5. Modalità di misurazione <strong>de</strong>lla velocità istantanea <strong>de</strong>l vento con la temperatura percepita Xplorer 2 – 3 – 4<br />
Le basse temperature rappresentano un pericolo per il corpo umano e tale pericolo è reso ancor più grave dalla<br />
velocità <strong>de</strong>l vento. Gli Xplorer 2, 3 e 4 indicano la temperatura percepita dal corpo in maniera istantanea prevenendo i<br />
rischi di geloni ed ipotermia.<br />
IN ALTRE PAROLE: Il fattore di raffreddamento viene calcolato tenendo conto <strong>de</strong>lla temperatura ambiente e <strong>de</strong>lla<br />
velocità <strong>de</strong>l vento. In presenza di vento offre un'indicazione <strong>de</strong>lla perdita di calore da parte <strong>de</strong>l corpo se la temperatura<br />
è inferiore a 10°C. La formula è stata adottata a gennaio <strong>de</strong>l 2003 dall'Ufficio Fe<strong>de</strong>rale di Coordinazione Meteorologica<br />
<strong>de</strong>gli Stati Uniti con il servizio meteorologico cana<strong>de</strong>se (MSC), il dipartimento <strong>de</strong>lla difesa US (DOD) e<br />
l'Amministrazione Oceanica e Atmosferica Nazionale <strong>de</strong>gli Stati Uniti (NOAA).<br />
Esempio: una temperatura ambiente di 0°C e un vento di 30 km/h hanno gli stessi effetti sul corpo di una temperatura<br />
di -7.8°C!<br />
Selezione <strong>de</strong>ll'unità di misura <strong>de</strong>lla temperatura:<br />
Ve<strong>de</strong>re capitolo 4, Selezione <strong>de</strong>ll'unità di misura.<br />
Visualizzazione:<br />
La visualizzazione <strong>de</strong>lla velocità istantanea <strong>de</strong>l vento avviene con i caratteri numerici grandi mentre la temperatura percepita con i caratteri<br />
numerici piccoli e con l'indicazione .<br />
Risoluzione (temperatura): al <strong>de</strong>cimo di grado<br />
Ciclo di misura: 2 misurazioni al secondo.<br />
57
6. Modalità di misurazione <strong>de</strong>lla velocità istantanea <strong>de</strong>l vento con bussola elettronica Xplorer 3 – 4<br />
Selezione <strong>de</strong>ll'unità di misura (vento):<br />
Ve<strong>de</strong>re capitolo 3, Selezione <strong>de</strong>ll'unità di misura.<br />
Visualizzazione <strong>de</strong>lla bussola:<br />
La visualizzazione <strong>de</strong>lla bussola avviene in gradi con i caratteri numerici piccoli.<br />
IN ALTRE PAROLE! Lo SKYWATCH ® Xplorer indica il nord magnetico e<br />
non il nord geografico!<br />
Rilevamento:<br />
Per effettuare il rilevamento più preciso possibile, tenere l'apparecchio in posizione verticale (fig. A). Quando le cifre vengono<br />
sostituite da , ciò indica che l'apparecchio è troppo inclinato o che è disturbato da una fonte magnetica nelle vicinanze.<br />
Calibrazione:<br />
IMPORTANTE! Calibrare Xplorer prima <strong>de</strong>l primo impiego e ogni volta che si opera cambiamento d'ambiente o una<br />
sostituzione <strong>de</strong>lla pila.<br />
Quando si effettua la prima messa sotto tensione <strong>de</strong>ll'apparecchio, la bussola indica . A questo punto effettuare la<br />
calibrazione come riportato di seguito:<br />
Tenere il pulsante premuto per 3 secondi circa, non appena viene visualizzato dalle cifre numeriche grandi, rilasciarlo.<br />
A questo punto ruotare su se stessi fino a quando l'apparecchio non indicherà , quindi per convalidare la calibrazione<br />
effettuare una breve pressione sul pulsante.<br />
Durante la calibrazione, l’apparecchio indica in successione , , ed infine prima <strong>de</strong>lle cifre numeriche piccole.<br />
Questa operazione <strong>de</strong>ve essere completata alla velocità di una rotazione in 30 secondi circa.<br />
Per una calibrazione precisa, l'elica NON DEVE ruotare! In presenza di vento, proteggere l'elica con il pollice e l'indice.<br />
Nota: Le linee <strong>de</strong>l campo magnetico terrestre sono disturbate da ambienti metallici, costruzioni, piloni elettrici, interni <strong>de</strong>i<br />
veicoli, imbarcazioni in metallo così come dai campi magnetici generati da tutti i meccanismi e gli strumenti elettrici e dai<br />
magneti. Per questo motivo è necessario per ottenere misurazioni precise, allontanarsi da queste fonti di disturbo o<br />
proce<strong>de</strong>re ad un'altra calibrazione.<br />
58
7. Modalità di misurazione <strong>de</strong>lla velocità istantanea <strong>de</strong>l vento con altitudine reale Xplorer 4<br />
ATTENZIONE! Questo apparecchio calcola l'altitudine attraverso la pressione <strong>de</strong>ll'aria. Pertanto assolutamente<br />
normale che l'altitudine cambi al cambiare <strong>de</strong>lla pressione <strong>de</strong>ll'aria. Per questo motivo è necessario calibrare<br />
l'apparecchio quanto più frequentemente possibile.<br />
Selezione <strong>de</strong>ll'unità:<br />
Tenendo il pulsante premuto per 4 secondi circa, si passa in rassegna alle diverse unità. È possibile optare per una <strong>de</strong>lle<br />
seguenti unità: m (metri) e ft (piedi). Non appena l'unità <strong>de</strong>si<strong>de</strong>rata viene visualizzata, rilascia re il pulsante, in questo<br />
modo viene convalidata l'unità di misura e l'apparecchio ritorna alla modalità di misurazione <strong>de</strong>lla velocità istantaneo <strong>de</strong>l<br />
vento con la visualizzazione <strong>de</strong>ll'altitudine.<br />
Visualizzazione <strong>de</strong>ll'altitudine massima:<br />
Tenere il pulsante premuto per 2 secondi circa e nel momento in cui l'indicazione viene visualizzata rilasciare il pulsante,<br />
l'apparecchio passa così in modalità di misurazione <strong>de</strong>lla velocità istantanea <strong>de</strong>l vento con la visualizzazione <strong>de</strong>ll'altitudine<br />
massima. Per uscire da questa modalità, premere una volta il pulsante, l'apparecchio ritorna in modalità vento/altitudine.<br />
Calibrazione <strong>de</strong>ll'altitudine:<br />
Tenere il pulsante premuto per 3 secondi circa, non appena viene visualizzato dalle cifre numeriche grandi, rilasciarlo.<br />
Tenere il pulsante premuto per far aumentare il valore <strong>de</strong>ll'altitudine ad intervalli di 1 unità. Per farlo diminuire, rilasciare e tenere<br />
nuovamente premuto il pulsante.<br />
Con una breve pressione <strong>de</strong>l pulsante si convalida la nuova altitudine.<br />
Cancellazione <strong>de</strong>l valore massimo:<br />
Il valore massimo viene conservato anche ad apparecchio spento. Per cancellare il valore massimo, tenere il pulsante premuto per 2 secondi<br />
circa quindi rilasciarlo. Quest'operazione <strong>de</strong>ve essere completata dopo la modalità visualizzazione <strong>de</strong>ll'altitudine massima.<br />
59
8. Modalità di misurazione <strong>de</strong>lla velocità <strong>de</strong>l vento con la visualizzazione <strong>de</strong>lla pressione relativa e assoluta<br />
IN ALTRE PAROLE: L'apparecchio dispone di 2 modalità di visualizzazione <strong>de</strong>lla pressione: la pressione QFE e la pressione QNH. Queste due<br />
abbreviazioni (QFE e QNH) sono <strong>de</strong>i passaggi <strong>de</strong>l celebre codice "Q". Questo codice è stato istituito dalla Conferenza di Londra <strong>de</strong>l 1912. È costituito da<br />
un lista di sigle di 3 lettere, vali<strong>de</strong> per il sistema <strong>de</strong>i pesi <strong>de</strong>l mondo. Destinato principalmente alle trasmissioni telegrafiche e radiotelegrafiche (in morse),<br />
rappresenta una lista di abbreviazioni che riassumono in tre lettere prive di eventuali ambiguità <strong>de</strong>lle frasi, <strong>de</strong>lle doman<strong>de</strong> o <strong>de</strong>lle risposte lunghe da<br />
formulare in maniera chiara, eliminando in questo modo gli errori di trasmissione, ricezione, lingua ed interpretazione.<br />
Al giorno d'oggi il codice "Q" viene ancora ampiamente utilizzato dalle navi e radioamatori. Ne rimane un impiego ufficiale nel settore <strong>de</strong>lla radiotelefonia.<br />
Il mondo <strong>de</strong>ll'aeronautica non lo utilizza nella sua totalità, ma solamente una parte viene impiegata quotidianamente.<br />
CODICE SIGNIFICATO<br />
QFE Pressione atmosferica al suolo,<br />
si parla anche di pressione assoluta.<br />
QNH Pressione atmosferica ottenuta con calcoli a livello <strong>de</strong>l mare in condizioni atmosferiche<br />
standard,<br />
si parla anche di pressione relativa.<br />
Si tratta <strong>de</strong>lla pressione riportata nei bollettini meteorologici o alla televisione.<br />
Selezione <strong>de</strong>ll'unità:<br />
Tenendo il pulsante premuto per almeno 4 secondi, si passa in rassegna alle diverse unità, è possibile scegliere tra le seguenti unità: hPa<br />
(ettopascal) e inHg (pollici di mercurio). Non appena l'unità <strong>de</strong>si<strong>de</strong>rata viene visualizzata, rilasciare il pulsante, in questo modo viene<br />
convalidata l'unità di misura e l'apparecchio ritorna alla modalità vento/pressione relativa (QNH).<br />
Visualizzazione <strong>de</strong>lla pressione assoluta (QFE):<br />
Tenere il pulsante premuto per 2 secondi circa e nel momento in cui viene visualizzata l'indicazione (QFE) con le cifre<br />
numeriche grandi, rilasciarlo. L'apparecchio ritorna in questo modo alla modalità di visualizzazione <strong>de</strong>lla pressione assoluta.<br />
Per uscire da questa modalità, premere una volta il pulsante, l'apparecchio ritorna in modalità vento/pressione relativa (QNH).<br />
Calibrazione <strong>de</strong>lla pressione relativa (QNH):<br />
Tenere il pulsante premuto per 3 secondi circa, quindi rilasciarlo al momento in cui viene visualizzato con le cifre<br />
numeriche grandi. Successivamente la regolazione (aumento/riduzione) può essere effettuata allo stesso modo <strong>de</strong>lla<br />
calibrazione <strong>de</strong>ll'altitudine, ve<strong>de</strong>re capitolo 7 (calibrazione altitudine).<br />
60
Note:<br />
25. Se il valore di QNH è fisso (non lampeggia), indica la pressione relativa (QNH) attuale, attendibile perché ricavato da una variazione<br />
meteorologica lenta.<br />
26. L'indicazione QNH lampeggia se questa pressione è stata modificata a partire dall'ultimo calcolo.<br />
27. Se il valore di QNH lampeggia, indica la pressione QNH registrata all'ultima calibrazione.<br />
28. La salita in altitudine o la presenza di una variazione meteorologica senza la cronologia attivata, fanno lampeggiare il valore di QNH.<br />
29. La calibrazione di QNH o <strong>de</strong>ll'altitudine (il dato noto) consente di adattare nuovamente Xplorer in rapporto alla pressione ambiente<br />
rilevata. Questo valore varia in maniera continua in base all'altitudine e alle condizioni meteorologiche <strong>de</strong>l momento.<br />
30. L'unico riferimento di Xplorer è dato dalla pressione <strong>de</strong>ll'aria che misura e da cui ricava l'altitudine. Tutte le variazioni di questa<br />
pressione fanno cambiare l'altitudine: 9 metri per hPa ad una bassa altitudine, 14 metri a 5.000 metri, dimostrano perché è necessario<br />
eseguire le calibrazioni quanto più spesso possibile per ottenere visualizzazioni attendibili (anche i piloti <strong>de</strong>gli aerei di linea sono<br />
soggetti a questo obbligo!).<br />
9. Modalità cronologia Xplorer 4<br />
IN ALTRE PAROLE: Le tre modalità <strong>de</strong>lla cronologia funzionano allo stesso modo e sono collegate. Visualizzano in<br />
diversi formati una <strong>de</strong>lle 48 misurazioni di pressione memorizzata ogni ora. Di <strong>de</strong>fault: vengono visualizzate le 24 h.<br />
La cronologia memorizza proprio la pressione presente sul sensore, QNH o l'altitudine visualizzata viene calcolata<br />
a seconda <strong>de</strong>lla calibrazione attuale.<br />
Ten<strong>de</strong>nza: si tratta <strong>de</strong>lla variazione di pressione a partire da 24h (o 48h o 1h ecc.). Può variare se Xplorer si trova<br />
nello stesso luogo (stessa altitudine). Una cifra negativa indica un abbassamento <strong>de</strong>lla pressione (arrivo<br />
di una <strong>de</strong>pressione) mentre una cifre positiva un aumento (anticiclone). È chiaro che la pressione varia nel<br />
corso <strong>de</strong>lla giornata, la ten<strong>de</strong>nza meteorologica è più precisa ad intervalli di 24 o 48 ore (alla stessa ora<br />
<strong>de</strong>l giorno).<br />
QNH : si tratta <strong>de</strong>lla pressione relativa <strong>de</strong>lle 24 (o 48 ore) ore prece<strong>de</strong>nti. Valido se Xplorer si trova nello stesso<br />
luogo e viene nuovamente calibrato.<br />
Altitudine: se si parte per una passeggiata in montagna o si pratica il parapendio, è possibile seguire le altitudini<br />
raggiunte ogni ora. L'altitudine sarà esatta se si forza la calibrazione QNH di Xplorer con la pressione<br />
meteorologica presente al momento <strong>de</strong>lla registrazione.<br />
Visualizzazione di un momento preciso <strong>de</strong>lla cronologia:<br />
Esempio: si <strong>de</strong>si<strong>de</strong>ra conoscere la ten<strong>de</strong>nza, QNH o l'altitudine <strong>de</strong>lle 12 ore prece<strong>de</strong>nti. Tenere il pulsante premuto, quindi<br />
rilasciarlo quando viene visualizzato 12h dalle cifre numeriche grandi.<br />
61
Economia <strong>de</strong>lla pilla (arresto <strong>de</strong>lle cronologie)<br />
Questa funzionalità è possibile disattivando il sensore <strong>de</strong>lla pressione quando l'apparecchio è spento. Le misurazioni <strong>de</strong>lla<br />
pressione e <strong>de</strong>ll'altitudine non sono attive quando l'apparecchio è acceso.<br />
Per disattivare il sensore, impostare una <strong>de</strong>lle tre cronologie su (ora zero).<br />
Note:<br />
13. Se si consulta la cronologia lasciando ad esempio visualizzate 5 ore, quando si riaccen<strong>de</strong>rà Xplorer, quest'ultimo visualizzerà le 24 ore se<br />
si è verificata una nuova misurazione <strong>de</strong>lla pressione, questa caratteristica viene gestita dall'orologio interno (una misurazione all'ora).<br />
14. Impostando su 0 ore, la cronologia non effettuerà più le misurazioni ad ogni ora (ma conserverà il contenuto attuale) con un risparmio<br />
energetico <strong>de</strong>lla pila.<br />
15. Ritornando in modalità cronologia attiva (diverso da 0 ore), la misurazione attuale viene salvata come orario iniziale e visualizzata sotto 1h.<br />
10. Reset generale Xplorer 3 e4<br />
Questa modalità porta tutti i valori alle impostazioni di <strong>de</strong>fault e rimuove la calibrazione <strong>de</strong>lla bussola. Per eseguire un reset<br />
generale, spegnere l'apparecchio in modo normale. Quindi per riaccen<strong>de</strong>rlo, tenere premuto il pulsante. Nel momento in cui tutte<br />
le cifre <strong>de</strong>l LCD vengono visualizzate (ve<strong>de</strong>re a fianco), rilasciarlo, quindi tenere nuovamente premuto il pulsante fino all'arresto.<br />
In seguito è possibile spegnere l'apparecchio in modo normale.<br />
62
I. ALLGEMEINE INFORMATIONEN<br />
Sie haben ein hochpräzises Gerät erworben, das unter Anwendung mo<strong>de</strong>rnster Technologie gebaut wur<strong>de</strong>. Dieses Gerät wur<strong>de</strong> für intensiven<br />
Gebrauch konzipiert. Damit das Gerät sein Aussehen und seine Präzision bewahrt, empfehlen wir Ihnen, es mit Sorgfalt zu behan<strong>de</strong>ln und die<br />
Bedienungsanleitung aufmerksam zu lesen.<br />
Der SKYWATCH ® Xplorer ist mit einem Flügelrad und Messfühlern für Messungen im Freien ausgerüstet.<br />
Das Gerät liefert wesentliche Informationen für all Ihre Tätigkeiten Natur, z.B. Gleitflug, Fußwan<strong>de</strong>rungen, Bergsteigen o<strong>de</strong>r Wassersport. Es<br />
gibt die Momentan- und Höchstwindgeschwindigkeit (Xplorer 1, 2, 3 und 4), die Umgebungstemperatur und die vom Körper gefühlte Temperatur<br />
(Xplorer 2, 3 und 4) an, hat einen elektronischen Kompass (Xplorer 3 und 4) und misst die Höhe, <strong>de</strong>n atmosphärischen Druck sowie die<br />
Witterungsten<strong>de</strong>nzen (Xplorer 4).<br />
Alle SKYWATCH ® Xplorer sind so konzipiert, dass sie ein kurzes Untertauchen bis max. 1 m Wassertiefe tolerieren.<br />
ACHTUNG!<br />
Dieses Gerät soll seinem Benutzer im Freien helfen, kann aber NICHT <strong>de</strong>n örtlichen Wetterbericht ERSETZEN. Sie müssen also die Messdaten<br />
Ihres Gerätes regelmäßig anhand <strong>de</strong>r Informationen <strong>de</strong>r Wetterstation nachprüfen bzw. mit diesen Informationen abgleichen.<br />
Die klimatischen Verhältnisse im Freien können sich manchmal innerhalb sehr kurzer Zeit drastisch verän<strong>de</strong>rn. Sonniges Wetter kann zum<br />
Beispiel innerhalb einer halben Stun<strong>de</strong> o<strong>de</strong>r weniger in ein Gewitter umschlagen. Sie müssen folglich immer die grundlegen<strong>de</strong>n<br />
Sicherheitsvorschriften bei all Ihren Unternehmungen in Freien beachten.<br />
<strong>JDC</strong> ELECTRONIC <strong>SA</strong> haftet nicht für irgendwelche direkten o<strong>de</strong>r indirekten Folgen und Schä<strong>de</strong>n, die sich durch die Benutzung dieses Gerätes<br />
ergeben.<br />
Technische Daten:<br />
Maße: 41 x 93 x 17 mm<br />
Gewicht: 51 g (Xplorer 1), 52 g (Xplorer 2 und 3), 53 g (Xplorer 4)<br />
Einsatztemperaturbereich: -30°C bis +60°C<br />
63
II. WARTUNG UND INSTANDHALTUNG Xplorer 1 – 2 – 3 - 4<br />
Dieses Gerät wur<strong>de</strong> mit größter Sorgfalt entwickelt und konstruiert. Zur effizienten Nutzung <strong>de</strong>r Gerätefunktionen wird folgen<strong>de</strong>s empfohlen:<br />
• Es dürfen keinesfalls Fremdkörper wie Haare, Fä<strong>de</strong>n, Drähte, Sand und Staub ins Innere <strong>de</strong>r Flügelschraube gelangen, da sonst die<br />
Drehung <strong>de</strong>r Flügelschraube und die Messgenauigkeit beeinträchtigt wer<strong>de</strong>n. Wenn ein Haar o<strong>de</strong>r ein Draht in die Flügelschraube<br />
hineingelangt ist, ziehen Sie <strong>de</strong>n Fremdkörper vorsichtig mit einer Pinzette heraus. Staub o<strong>de</strong>r Sand kann mit klarem Wasser<br />
ausgespült wer<strong>de</strong>n.<br />
• Setzen Sie das Gerät nicht zu lange Zeit extremen klimatischen Bedingungen aus. Die Geräteteile halten zwar hohen<br />
Außentemperaturen stand, doch sollte das Messinstrument nicht unbedingt intensiven Hitzequellen, z.B. hinter <strong>de</strong>r<br />
Windschutzscheibe eines Pkw, ausgesetzt wer<strong>de</strong>n.<br />
• Behan<strong>de</strong>ln Sie das Gerät vorsichtig und vermei<strong>de</strong>n Sie Erschütterungen.<br />
• Setzen Sie das Gerät niemals starken Chemikalien aus. Diese Produkte könnten das Gerät beschädigen.<br />
III. Einschalten Xplorer 1 – 2 – 3 - 4<br />
Zum Einschalten Ihres SKYWATCH ® Xplorer drücken Sie kurz <strong>de</strong>n Knopf (siehe Symbol im folgen<strong>de</strong>n Schema). Das Gerät schaltet sich<br />
ein und zeigt die jeweilige Softwareversion und das jeweilige Gerätemo<strong>de</strong>ll an (siehe Abbildung D0.0 im folgen<strong>de</strong>n Schema). Das Gerät geht<br />
automatisch zur Messung <strong>de</strong>r momentanen Windgeschwindigkeit (Xplorer 1) o<strong>de</strong>r zum letzten Modus vor Ausschalten <strong>de</strong>s Gerätes (Xplorer 2, 3<br />
und 4) über.<br />
Vollständige Organigramme: siehe http://www.jdc.ch.<br />
64
IV. Ausschalten <strong>de</strong>s Geräts Xplorer 1 – 2 – 3 - 4<br />
Automatische Abschaltung (Auto-off):<br />
Ihr SKYWATCH ® Xplorer schaltet sich 1 Minute nach <strong>de</strong>r letzten Betätigung <strong>de</strong>s Einschaltknopfes o<strong>de</strong>r <strong>de</strong>r letzten<br />
Windgeschwindigkeitsmessung sowie bei Stillstand <strong>de</strong>s Flügelra<strong>de</strong>s (über 10 Sekun<strong>de</strong>n) automatisch ab.<br />
Manuelle Abschaltung:<br />
Zum manuellen Abschalten <strong>de</strong>s Xplorers (in allen Modi) halten Sie <strong>de</strong>n Ausschaltknopf gedrückt, bis das Gerät abgeschaltet ist.<br />
ACHTUNG! Dauerbetrieb ist möglich :<br />
entwe<strong>de</strong>r bei manueller Abschaltung, wenn <strong>de</strong>r Knopf während <strong>de</strong>s Blinkens <strong>de</strong>r großen Zahlen losgelassen wird, o<strong>de</strong>r während <strong>de</strong>r<br />
automatischen Abschaltung, wenn während <strong>de</strong>s Blinkens <strong>de</strong>r großen Zahlen kurz <strong>de</strong>r Einschaltknopf betätigt wird.<br />
Während <strong>de</strong>s Dauerbetriebs wird <strong>de</strong>r Xplorer mit je<strong>de</strong>r Knopfbetätigung in <strong>de</strong>n Automatikmodus rückversetzt.<br />
Hinweis: Im Dauerbetriebsmodus entlädt sich die Batterie rasch (nach 400 bis 500 Stun<strong>de</strong>n je nach <strong>Mo<strong>de</strong></strong>ll).<br />
VI. Spannungsversorgung Xplorer 1 – 2 – 3 - 4<br />
Ihr SKYWATCH ® Xplorer wird über eine auswechselbare 3-Volt-Knopfbatterie CR2032 mit Strom versorgt. Batterie wechseln:<br />
ACHTUNG! Sehr sorgfältig und vorsichtig vorgehen!<br />
JEDE FEHLERHAFTE HANDHABUNG BEIM AUSWECHSELN DER BATTERIE KANN DAS GERÄT IRREPARABEL<br />
BESCHÄDIGEN. IM ZWEIFELSFALL WENDEN SIE SICH BITTE AN IHREN UHRMACHER.<br />
1. Metallbo<strong>de</strong>n abschrauben (6 Schrauben).<br />
2. Deckel <strong>de</strong>s Batteriefachs lösen.<br />
3. Deckel vorsichtig anheben und Batterie herausnehmen.<br />
4. Die neue Batterie einlegen. Dabei auf die richtige Polung achten (+ nach oben). Danach Batteriefach zuschrauben. Die kleine Zunge<br />
in <strong>de</strong>r Mitte <strong>de</strong>s Deckels muss richtig angehoben wer<strong>de</strong>n, damit sie <strong>de</strong>n Rücken aus Metall berührt.<br />
5. Vor <strong>de</strong>m Anlegen <strong>de</strong>s Bo<strong>de</strong>ns nachprüfen, ob die Dichtung sauber ist und or<strong>de</strong>ntlich in ihrer Rille liegt.<br />
6. Bo<strong>de</strong>n wie<strong>de</strong>r mit <strong>de</strong>n 6 Schrauben befestigen.<br />
Übliche Lebensdauer <strong>de</strong>r Batterie:<br />
Xplorer 1, 2, 3 : ungefähr 30.000 Messungen von 1 Minute (Auto-off) und über 20 Jahre bei Stillstand.<br />
Xplorer 4 : ohne Ereignisspeicher: wie beim Xplorer 1, 2 und 3<br />
mit Ereignisspeicher: ungefähr 25.000 Messungen von 1 Minute (Auto-off), höchstens 7 Jahre bei Stillstand.<br />
65
1. Hintergrundbeleuchtung Xplorer 1 – 2 – 3 – 4<br />
Zum Einschalten <strong>de</strong>r Hintergrundbeleuchtung <strong>de</strong>n Knopf 1 Sekun<strong>de</strong> lang gedrückt halten. Wenn das Licht aufleuchtet, <strong>de</strong>n Knopf loslassen. Die<br />
Hintergrundbeleuchtung leuchtet 3 Sekun<strong>de</strong>n. Wird sie binnen 5 Sekun<strong>de</strong>n wie<strong>de</strong>r betätigt, leuchtet sie 15 Sekun<strong>de</strong>n lang. An<strong>de</strong>rnfalls leuchtet<br />
sie erneut 3 Sekun<strong>de</strong>n lang.<br />
Hinweis: Die Hintergrundbeleuchtung ist in allen Modi i<strong>de</strong>ntisch.<br />
ACHTUNG: Die intensive Benutzung <strong>de</strong>r Hintergrundbeleuchtung verkürzt die Batterielebensdauer. Der Stromverbrauch ist ungefähr<br />
100x höher als ohne Hintergrundbeleuchtung!<br />
2. Modi und Modusumschaltung Xplorer 1 - 2 – 3 – 4<br />
Durch kurzen Knopfdruck wird zum nächsten Modus umgeschaltet.<br />
MODI:<br />
Xplorer 1 (1 Modus) Xplorer 2 (3 Modi) Xplorer 3 (4 Modi) Xplorer 4 (9 Modi)<br />
1. Wind + max. Wind- 1. Wind + max. Wind-<br />
1. Wind + max. Wind-<br />
1. Wind + max. Windgeschwindigkeit<br />
geschwindigkeitgeschwindigkeit<br />
2. Wind und Temperatur<br />
3. Wind + gefühlte Temperatur<br />
geschwindigkeit<br />
2. Wind und Temperatur<br />
3. Wind + gefühlte Temperatur<br />
2. Wind und Temperatur<br />
3. Wind + gefühlte Temperatur<br />
4. Wind und Kompass 4. Wind und Kompass<br />
5. Wind + Höhe und maximale Höhe<br />
6. Wind + relative und absoluter Druck<br />
7. Ereignisspeicher <strong>de</strong>r Luftdruckten<strong>de</strong>nz<br />
8. Ereignisspeicher <strong>de</strong>s relativen Drucks<br />
9. Ereignisspeicher <strong>de</strong>r Höhe<br />
Im nachstehen<strong>de</strong>n Kapiteln wer<strong>de</strong>n die in je<strong>de</strong>m Modus zur Verfügung stehen<strong>de</strong>n Funktionen beschrieben.<br />
66
3. Modus „Messung <strong>de</strong>r momentanen und höchsten Windgeschwindigkeit“ Xplorer 1 – 2 – 3 – 4<br />
Einstellung <strong>de</strong>r Maßeinheit:<br />
Für die Auswahl <strong>de</strong>r Maßeinheiten Knopf ungefähr 4 Sekun<strong>de</strong>n lang gedrückt halten. Sie können unter folgen<strong>de</strong>n<br />
Maßeinheiten wählen: km/h (Kilometer pro Stun<strong>de</strong>), mph (Meilen pro Stun<strong>de</strong>), knots (Knoten), m/s (Meter pro Sekun<strong>de</strong>)<br />
und fps (Fuß pro Sekun<strong>de</strong>). Wenn die gewünschte Maßeinheit erscheint, Knopf loslassen. Diese Maßeinheit wird damit<br />
gewählt.<br />
Messung <strong>de</strong>r Windgeschwindigkeit:<br />
Für eine möglichst präzise Messung muss das Messinstrument in die jeweilige Windrichtung gehalten wer<strong>de</strong>n.<br />
Genauigkeit: +/- 3 %<br />
Messbereich: 0 bis 150 km/h (42 m/s, 81 Knoten, 93 mph, 136 fps)<br />
Messzyklus: 2 Messungen pro Sekun<strong>de</strong><br />
Anzeige:<br />
Die Momentangeschwindigkeit wird mit <strong>de</strong>n großen Zahlen, die Höchstgeschwindigkeit mit <strong>de</strong>n kleinen Zahlen und <strong>de</strong>r Anzeige max.<br />
angezeigt.<br />
Auflösung: in Zehnteln bis 99,9, dann volle Einheit.<br />
Löschen <strong>de</strong>s Höchstwertes:<br />
„Max“ bleibt im Gerät gespeichert, auch wenn das Gerät ausgeschaltet ist. Zum Zurückstellen auf Null Knopf min<strong>de</strong>stens 2 Sekun<strong>de</strong>n lang<br />
drücken und dann loslassen.<br />
67
4. Modus „Messung <strong>de</strong>r momentanen Windgeschwindigkeit und <strong>de</strong>r Umgebungstemperatur“ Xplorer 2 – 3 – 4<br />
Einstellung <strong>de</strong>r Maßeinheit:<br />
Für die Auswahl <strong>de</strong>r 2 Maßeinheiten Knopf min<strong>de</strong>stens 2 Sekun<strong>de</strong>n lang gedrückt halten. Die bei<strong>de</strong>n Maßeinheiten<br />
sind: °C (Grad Celsius) und °F (Grad Fahrenheit). Wenn die gewünschte Maßeinheit erscheint, Knopf loslassen.<br />
Diese Maßeinheit wird damit gewählt.<br />
Messung <strong>de</strong>r Umgebungstemperatur:<br />
Hinweis: Der Temperaturmessfühler ist im Metallbo<strong>de</strong>n <strong>de</strong>s Gehäuses eingebaut, d.h. es wird die Temperatur <strong>de</strong>s<br />
Gehäusebo<strong>de</strong>ns angezeigt. Auf diese Weise wird sehr präzise und sehr schnell die Temperatur in folgen<strong>de</strong>n<br />
Umgebungen gemessen (z.B.):<br />
Wasser (Quellen, Flüsse usw.), in<strong>de</strong>m das Gerät einige Zentimeter tief eingetaucht wird;<br />
Oberflächen (Bo<strong>de</strong>n, Metallteile, Innenraum von Kühlschränken usw.), in<strong>de</strong>m <strong>de</strong>r Bo<strong>de</strong>n <strong>de</strong>s Gerätes möglichst nahe an die Oberfläche<br />
gebracht wird;<br />
Umgebungsluft: Lassen Sie das Gerät die Umgebungslufttemperatur übernehmen. Das kann einige Minuten bzw. je nach<br />
Windgeschwindigkeit Dutzen<strong>de</strong> von Minuten dauern. Setzen Sie das Gerät nicht direkt <strong>de</strong>r Sonne aus und berühren Sie <strong>de</strong>n Gerätebo<strong>de</strong>n<br />
nicht mit <strong>de</strong>n Fingern. Für eine schnelle und präzise Messung können Sie das Gerätegehäuse auch mit einem Objekt, das die<br />
Lufttemperatur aufweist (Fahrzeugkarosserie, Metallschranke, glätte Wän<strong>de</strong> und Mauern usw.), in Kontakt bringen. Vermei<strong>de</strong>n Sie dunkle<br />
und sonnenexponierte Flächen.<br />
Messbereich <strong>de</strong>s Messfühlers: -50°C bis +100°C<br />
Messzyklus: eine Messung alle halbe Sekun<strong>de</strong><br />
Anzeige:<br />
Die Anzeige <strong>de</strong>r momentanen Windgeschwindigkeit erfolgt über die großen Zahlen, während die Umgebungstemperatur mit <strong>de</strong>n kleinen Zahlen<br />
angezeigt wird.<br />
Auflösung (Temperatur): 1/10 Grad<br />
68
5. Modus „Messung <strong>de</strong>r momentanen Windgeschwindigkeit und <strong>de</strong>r gefühlten Temperatur“ Xplorer 2 – 3 – 4<br />
Einstellung <strong>de</strong>r Maßeinheit <strong>de</strong>r Temperatur:<br />
Siehe Kapitel 4, Einstellung <strong>de</strong>r Maßeinheit.<br />
Anzeige:<br />
Niedrige Temperaturen stellen eine Gefahr für <strong>de</strong>n menschlichen Körper dar. Diese Gefahr wird durch Wind erhöht.<br />
Die Xplorer 2, 3 und 4 geben die momentane, vom Körper gefühlte Temperatur an und verhin<strong>de</strong>rn somit Hautschä<strong>de</strong>n<br />
durch Kälte und Unterkühlung.<br />
WICHTIG: Bei <strong>de</strong>r Berechnung <strong>de</strong>r gefühlten Temperatur wer<strong>de</strong>n die Umgebungstemperatur und die<br />
Windgeschwindigkeit berücksichtigt. Bei Wind zeigt das Gerät <strong>de</strong>n Wärmeverlust <strong>de</strong>s Körpers an, wenn die<br />
Temperatur unter 10°C liegt. Diese Formel wur<strong>de</strong> im Januar 2003 vom Fe<strong>de</strong>ral Office of Meteorological Coordination<br />
<strong>de</strong>r Vereinigten Staaten gemeinsam mit <strong>de</strong>m kanadischen Wetterdienst (MSC), <strong>de</strong>m US-Verteidigungsministerium<br />
(DOD) und <strong>de</strong>r National Oceanic and Atmospherical Administration <strong>de</strong>r Vereinigten Staaten (NOAA) übernommen.<br />
Beispiel: Eine Umgebungstemperatur von O°C und eine Windgeschwindigkeit von 30 km/h empfin<strong>de</strong>t Ihr Körper wie<br />
minus 7,8°C!!<br />
Die momentane Windgeschwindigkeit wird mit großen Zahlen, die vom Körper gefühlte Temperatur mit kleinen Zahlen und <strong>de</strong>r Anzeige<br />
angezeigt.<br />
Auflösung (Temperatur): 1/10 Grad<br />
Messzyklus: 2 Messungen pro Sekun<strong>de</strong><br />
69
6. Modus „Messung <strong>de</strong>r momentanen Windgeschwindigkeit und elektronischer Kompass“ Xplorer 3 – 4<br />
Einstellung <strong>de</strong>r Maßeinheit (Wind):<br />
Siehe Kapitel 3, Einstellung <strong>de</strong>r Maßeinheit.<br />
Kompassanzeige:<br />
Die Kompassanzeige erfolgt in Grad mit kleinen Zahlen.<br />
WICHTIG! Ihr SKYWATCH ® Xplorer zeigt <strong>de</strong>n magnetischen, nicht <strong>de</strong>n<br />
geographischen Nordpol an!<br />
Messung:<br />
Für eine möglichst präzise Messung das Gerät senkrecht halten (siehe Abbildung A). Wenn an die Stelle <strong>de</strong>r Zahlen die<br />
Anzeige erscheint, ist das Gerät entwe<strong>de</strong>r geneigt o<strong>de</strong>r wird von einer magnetischen Quelle in <strong>de</strong>r Nähe gestört.<br />
Kalibrierung:<br />
WICHTIG! Ihr Xplorer muss vor <strong>de</strong>r ersten Benutzung und bei je<strong>de</strong>m Umgebungs- o<strong>de</strong>r Batteriewechsel kalibriert<br />
wer<strong>de</strong>n.<br />
Beim ersten Einschalten <strong>de</strong>s Gerätes erscheint in <strong>de</strong>r Kompassanzeige . Zur Kalibrierung gehen Sie folgen<strong>de</strong>rmaßen<br />
vor:<br />
Halten Sie <strong>de</strong>n Knopf ungefähr 3 Sekun<strong>de</strong>n lang gedrückt. Wenn in <strong>de</strong>n großen Anzeigen erscheint, lassen Sie <strong>de</strong>n<br />
Knopf los. Drehen Sie sich um die eigene Achse, bis erscheint. Zur Bestätigung <strong>de</strong>r Kalibrierung drücken Sie kurz auf <strong>de</strong>n<br />
Knopf.<br />
Während <strong>de</strong>r Kalibrierung zeigt das Gerät hintereinan<strong>de</strong>r , , dann und vor <strong>de</strong>n kleinen Ziffern an.<br />
Die Kalibrierung muss bei einer Geschwindigkeit von ungefähr 1 Umdrehung in 30 Sekun<strong>de</strong>n durchgeführt wer<strong>de</strong>n.<br />
Für eine präzise Kalibrierung darf sich das Flügelrad NICHT DREHEN! Bei Wind das Flügelrad zwischen Daumen und<br />
Zeigefinger halten.<br />
Hinweis: Die Linien <strong>de</strong>s Magnetfel<strong>de</strong>s <strong>de</strong>r Er<strong>de</strong> wer<strong>de</strong>n durch eine metallische Umgebung, Gebäu<strong>de</strong>, Strommasten, im<br />
Innern von Fahrzeugen, auf Schiffen aus Metall sowie von Magnetfel<strong>de</strong>rn, die von strombetriebenen Maschinen und<br />
Geräten sowie von Magneten hervorgerufen wer<strong>de</strong>n, gestört. Für präzise Messungen muss sich entwe<strong>de</strong>r von diesen<br />
Störquellen entfernt wer<strong>de</strong>n o<strong>de</strong>r das Gerät neu kalibriert wer<strong>de</strong>n.<br />
70
7. Modus „Messung <strong>de</strong>r momentanen Windgeschwindigkeit und Höhe“ Xplorer 4<br />
ACHTUNG! Dieses Gerät berechnet die Höhe anhand <strong>de</strong>s Luftdrucks. Es ist folglich normal, dass sich die<br />
Höhenanzeige mit <strong>de</strong>m atmosphärischen Druck än<strong>de</strong>rt. Aus diesem Grun<strong>de</strong> sollte das Gerät möglichst oft<br />
kalibriert wer<strong>de</strong>n.<br />
Einstellung <strong>de</strong>r Maßeinheit:<br />
Für die Auswahl <strong>de</strong>r Maßeinheiten Knopf ungefähr 4 Sekun<strong>de</strong>n lang gedrückt halten. Sie können unter folgen<strong>de</strong>n<br />
Maßeinheiten wählen: m (Meter) und ft (Fuß). Wenn die gewünschte Maßeinheit erscheint, lassen Sie <strong>de</strong>n Knopf los. Die<br />
Maßeinheit wird bestätigt, und das Gerät stellt sich auf <strong>de</strong>n Modus Messung <strong>de</strong>r momentanen Windgeschwindigkeit und<br />
Höhe ein.<br />
Anzeige <strong>de</strong>r maximalen Höhe:<br />
Halten Sie <strong>de</strong>n Knopf ungefähr 2 Sekun<strong>de</strong>n lang gedrückt. Wenn die Anzeige erscheint, lassen Sie <strong>de</strong>n Knopf los. Das<br />
Gerät stellt sich auf <strong>de</strong>n Modus Messung <strong>de</strong>r momentanen Windgeschwindigkeit und <strong>de</strong>r maximalen Höhe ein. Um diesen Modus<br />
zu verlassen, betätigen Sie <strong>de</strong>n Knopf einmal. Der Modus Wind/Höhe erscheint wie<strong>de</strong>r.<br />
Kalibrierung <strong>de</strong>r Höhenanzeige:<br />
Halten Sie <strong>de</strong>n Knopf ungefähr 3 Sekun<strong>de</strong>n lang gedrückt. Wenn in <strong>de</strong>n großen Anzeigen erscheint, lassen Sie <strong>de</strong>n Knopf<br />
los. Für Zunahme <strong>de</strong>s Höhenwertes um 1 Einheit <strong>de</strong>n Knopf gedrückt halten. Für Abnahme <strong>de</strong>s Höhenwertes Knopf loslassen<br />
und erneut gedrückt halten.<br />
Per kurzen Knopfdruck wird <strong>de</strong>r neue Höhenwert bestätigt.<br />
Löschen <strong>de</strong>s Höchstwertes:<br />
„Max“ bleibt im Gerät gespeichert, auch wenn das Gerät ausgeschaltet ist. Zum Löschen <strong>de</strong>s Maximalwertes <strong>de</strong>n Knopf ungefähr 2 Sekun<strong>de</strong>n<br />
lang gedrückt halten und dann loslassen. Das Löschen muss im Modus <strong>de</strong>r maximalen Höhenwertanzeige erfolgen.<br />
71
8. Modus „Windgeschwindigkeitsmessung mit Anzeige <strong>de</strong>s relativen und absoluten Luftdrucks“<br />
WICHTIG: Das Gerät kann zwei Drücke anzeigen, <strong>de</strong>n absoluten Luftdruck (QFE°) und <strong>de</strong>m relativen Luftdruck (QNH). Die bei<strong>de</strong>n Abkürzungen QFE<br />
und QNH sind aus <strong>de</strong>m „Q“-Co<strong>de</strong> abgeleitet. Dieser Co<strong>de</strong> wur<strong>de</strong> von <strong>de</strong>r Londoner Konferenz im Jahre 1912 eingeführt und besteht aus einer weltweit<br />
gültigen Liste von Co<strong>de</strong>s, die aus drei Buchstaben bestehen. Diese Co<strong>de</strong>s wer<strong>de</strong>n bei telegrafischen und radiotelegrafischen Übertragungen<br />
(Morsezeichen) benutzt. Die Abkürzungen in dieser Liste fassen in drei unzwei<strong>de</strong>utigen Buchstaben Sätze, Fragen o<strong>de</strong>r Antworten zusammen, die im<br />
Klartext zu lang wären, und heben somit Irrtümer beim Sen<strong>de</strong>n und Empfangen, sprachliche Missverständnisse und Fehl<strong>de</strong>utungen auf.<br />
Der Q-Co<strong>de</strong> wird heutzutage noch weitgehend im Schiffsverkehr und von Amateurfunkern benutzt. Er ist weiterhin offizieller Funkverkehrsstandard. In <strong>de</strong>r<br />
Luftfahrt wird er zwar nur zum Teil, dieser Teil aber täglich angewandt.<br />
CODE BEDEUTUNG<br />
QFE Atmosphärischer Druck am Bo<strong>de</strong>n.<br />
Dies ist <strong>de</strong>r absolute Luftdruck.<br />
QNH Atmosphärischer Druck, <strong>de</strong>r auf <strong>de</strong>n Druck auf Meereshöhe unter normalen atmosphärischen<br />
Bedingungen umgerechnet wird.<br />
Dies ist <strong>de</strong>r relative Luftdruck.<br />
Dieser Luftdruck wird in meteorologischen Berichten und im Fernsehen verwen<strong>de</strong>t.<br />
Einstellung <strong>de</strong>r Maßeinheit:<br />
Zum Durchlauf <strong>de</strong>r Maßeinheiten <strong>de</strong>n Knopf min<strong>de</strong>stens 4 Sekun<strong>de</strong>n lang gedrückt halten. Folgen<strong>de</strong> Maßeinheiten stehen zur Wahl: hPa<br />
(Hektopascal) und inHg (Inch auf <strong>de</strong>r Quecksilbersäule). Erscheint die gewünschte Maßeinheit, <strong>de</strong>n Knopf loslassen, um die Maßeinheit zu<br />
bestätigen. Das Gerät stellt auf <strong>de</strong>n Modus Wind/relativer Luftdruck (QNH) ein.<br />
Anzeige <strong>de</strong>s absoluten Luftdrucks (QFE):<br />
Halten Sie <strong>de</strong>n Knopf ungefähr 2 Sekun<strong>de</strong>n lang gedrückt. Wenn (QFE) in <strong>de</strong>n großen Anzeigen erscheint, lassen Sie<br />
<strong>de</strong>n Knopf los. Der Modus „Anzeige <strong>de</strong>s absoluten Luftdruck“ ist eingestellt. Zum Verlassen dieses Modus einmal <strong>de</strong>n Knopf<br />
betätigen. Der Modus „Wind/relativer Luftdruck“ (QNH) stellt sich ein.<br />
Kalibrierung <strong>de</strong>s relativen Luftdrucks (QNH):<br />
Halten Sie <strong>de</strong>n Knopf ungefähr 3 Sekun<strong>de</strong>n lang gedrückt und lassen Sie ihn los, wenn in <strong>de</strong>n großen Zahlen erscheint.<br />
Die nachfolgen<strong>de</strong> Feineinstellung erfolgt wie bei <strong>de</strong>r Höhenkalibrierung, die unter Kapitel 7 beschrieben wird.<br />
72
Anmerkungen:<br />
31. Wenn <strong>de</strong>r QNH-Wert unverän<strong>de</strong>rt bleibt (nicht blinkt), wird <strong>de</strong>r relative Momentandruck (QNH) angezeigt. Diese Anzeige ist aus einer<br />
langfristigen meteorologischen Messung abgeleitet und daher durchaus verlässlich.<br />
32. Die QNH-Anzeige blinkt, wenn <strong>de</strong>r Druck sich seit <strong>de</strong>r letzten Kalibrierung geän<strong>de</strong>rt hat.<br />
33. Wenn die QNH-Anzeige blinkt, zeigt sie <strong>de</strong>n QNH-Druck an, <strong>de</strong>r bei <strong>de</strong>r letzten Kalibrierung eingegeben wur<strong>de</strong>.<br />
34. Eine Höhenzunahme o<strong>de</strong>r eine meteorologische Schwankung ohne aktivierten Ereignisspeicher bewirkt das Blinken <strong>de</strong>r QNH-<br />
Anzeige.<br />
35. Die Kalibrierung <strong>de</strong>s QHN o<strong>de</strong>r <strong>de</strong>r Höhe (bekannte Information) erlaubt die Abstimmung <strong>de</strong>s Xplorers auf <strong>de</strong>n gemessenen<br />
Umgebungsluftdruck. Dieser Druck än<strong>de</strong>rt sich ständig mit <strong>de</strong>r Höhe und <strong>de</strong>n jeweiligen meteorologischen Bedingungen.<br />
36. Der einzige Bezugswert für <strong>de</strong>n Xplorer ist <strong>de</strong>r von ihm gemessene Luftdruck, von <strong>de</strong>m er die Höhe ableitet. Je<strong>de</strong> Druckschwankung<br />
verän<strong>de</strong>rt die Höhenanzeige, und zwar um 9 m/hPa auf niedriger Höhe bzw. 14 m/hPa in 5.000 Metern! Aus diesem Grun<strong>de</strong> sollte<br />
das Gerät möglichst oft kalibriert wer<strong>de</strong>n, damit die Anzeige zuverlässig bleibt. Auch Flugzeugpiloten kommen daran nicht vorbei!<br />
9. Ereignisspeichermodus Xplorer 4<br />
WICHTIG: Die drei Ereignisspeichermodi funktionieren alle gleich und sind miteinan<strong>de</strong>r verbun<strong>de</strong>n. Sie zeigen in<br />
unterschiedlicher Form einen von 48 stündlich (1 Wert pro Stun<strong>de</strong>) gespeicherten Druckwerten an. Die<br />
Standardanzeige ist 24 Stun<strong>de</strong>n.<br />
Gespeichert wird nur <strong>de</strong>r Druck am Messfühler. QNH o<strong>de</strong>r die anzeigte Höhe wird ausgehend von <strong>de</strong>r jeweiligen<br />
Kalibrierung berechnet.<br />
Ten<strong>de</strong>nz: Druckverän<strong>de</strong>rung in <strong>de</strong>n letzten 24 (48, 1...) Stun<strong>de</strong>(n), sofern <strong>de</strong>r Xplorer in dieser Zeit am gleichen Ort<br />
(gleiche Höhe) bleibt. Eine negative Zahl weist auf fallen<strong>de</strong>n Luftdruck (Einzug eines Tiefs) hin, eine<br />
positive Zahl auf steigen<strong>de</strong>n Luftdruck (Hoch). Der Druck schwankt natürlich im Laufe <strong>de</strong>s Tages. Der<br />
Wetterdienst ist nach 24 o<strong>de</strong>r 48 Stun<strong>de</strong>n (gleiche Tageszeit) präziser.<br />
QNH : Der relative Druck vor 24 Stun<strong>de</strong>n (o<strong>de</strong>r 48 ...Stun<strong>de</strong>n), wenn <strong>de</strong>r Xplorer am gleichen Ort bleibt und neu<br />
kalibriert wur<strong>de</strong>.<br />
Höhe: Wenn Sie eine Bergwan<strong>de</strong>rung unternehmen o<strong>de</strong>r einen Deltaflug starten, können Sie die stündlich<br />
erreichte Höhe verfolgen. Die Höhe stimmt, wenn Sie am Xplorer eine QNH-Zwangskalibrierung auf <strong>de</strong>n<br />
vor <strong>de</strong>r Aufzeichnung herrschen<strong>de</strong>n atmosphärischen Druck vornehmen.<br />
Anzeige eines gespeicherten „Ereignisses“:<br />
Beispiel: Wenn Sie die Ten<strong>de</strong>nz, <strong>de</strong>n QNH o<strong>de</strong>r die Höhe von vor 12 Stun<strong>de</strong>n erfahren möchten, halten Sie <strong>de</strong>n Knopf<br />
gedrückt. Wenn die Anzeige 12h in großen Zahlen erscheint, lassen Sie <strong>de</strong>n Knopf los.<br />
73
Batteriesparbetrieb (Abstellen <strong>de</strong>s Ereignisspeichers):<br />
Zur Benutzung dieser Son<strong>de</strong>rfunktion setzen Sie <strong>de</strong>n Druckmessfühler bei ausgeschaltetem Gerät außer Betrieb. Die<br />
Messung <strong>de</strong>s Drucks und <strong>de</strong>r Höhe sind dann nur bei eingeschaltetem Gerät aktiviert.<br />
Zur Außerbetriebsetzung <strong>de</strong>s Messfühlers einen <strong>de</strong>r drei Ereignisspeicher auf (null Stun<strong>de</strong>n) setzen.<br />
Anmerkungen:<br />
16. Wenn Sie <strong>de</strong>n Ereignisspeicher abrufen und die Anzeige 5h lassen, zeigt <strong>de</strong>r Xplorer beim nächsten Einschalten 24h an. Wenn eine<br />
neue Druckmessung erfolgt ist, wird diese von <strong>de</strong>r internen Uhr gesteuert (eine Messung pro Stun<strong>de</strong>).<br />
17. Wenn Sie bei 0h loslassen, erfolgt keine stündliche Messung mehr. Der vorhan<strong>de</strong>ne Speicher wird jedoch nicht gelöscht. Dies spart<br />
Batterieenergie.<br />
18. Beim Eintritt in <strong>de</strong>n aktiven Ereignisspeicher (abweichend von 0h) wird die Momentanmessung als zeitlicher Ausgangspunkt<br />
gespeichert und als 1h angezeigt.<br />
10. Komplette Rückstellung Xplorer 3 und 4<br />
In diesem Modus wer<strong>de</strong>n alle Standardwerte eingesetzt und die Kompasskalibrierung wird aufgehoben. Für die komplette<br />
Rückstellung schalten Sie das Gerät aus und schalten es mit eingedrücktem Knopf wie<strong>de</strong>r an. Sobald alle LCD-Zahlen wie<strong>de</strong>r<br />
erscheinen (siehe nebenstehen<strong>de</strong> Abbildung), lassen Sie <strong>de</strong>n Kopf los und halten Sie erneut bis zum Stillstand <strong>de</strong>s Gerätes<br />
gedrückt. Danach kann das Gerät wie<strong>de</strong>r normal eingeschaltet wer<strong>de</strong>n.<br />
74
!"#$% & '<br />
( (<br />
) *' +(,(- ./(<br />
*' ,(- ./( *' - ./ ( *' ./<br />
0120# $3<br />
!"#$% & ' ) +<br />
( (<br />
75<br />
9<br />
( 4#1561226127#8<br />
:%282%$; 65% # ( (<br />
# < .+)=-)+><br />
1 < ?+ *' +/(?, *' , -/(?- *' ./<br />
1 < @-AB%CDEAB%<br />
2
9 FFFFFFFFFFFFFFFFFFFFFFFFFFFFFFFFFFFFFFFFFFFFFFFFFFFFFFFFFFFFFFFFFFFFFFE-G>.<br />
• 7 ( (<br />
( 5<br />
(<br />
• )<br />
• 9<br />
• $28 6 5$98 $<br />
76<br />
(<br />
<<br />
(<br />
! "! #$ %<br />
!"#$% & ' * H <<br />
/ *<br />
AA /I<br />
*' +/<br />
*' ,(- ./<br />
7 J H( < K
& ' (( ( )( ! "! #$ %<br />
)(* ( )( +)($ ,<br />
!"#$% & ' + ( L<br />
* +A /<br />
) )(<br />
' * / (<br />
- - . / - * ( 0 * 1<br />
$ ( (<br />
< *.AA ?AA /<br />
& & 2 ! "! #$ %<br />
!"#$% & ' -7 H %;,A-,( 3 (( 1<br />
- - . / 3 4 2 4 )2 )( /<br />
5 & 6 ' 3 73 . ' & & & 3 6 7 8 59 - & 3<br />
6 .:' 3 & & 9 7 ; : : - 59 ' 8<br />
+ *E /<br />
, 4<br />
- 6<br />
. 9 ( *D /( 7<br />
? 7 (<br />
E 9 E<br />
* 2)) 2 (( 1<br />
' +(, -< -AJAAA + * @ / ,A<br />
' .< < ' +(, -<br />
4 < ,?JAAA + *<br />
77<br />
@ /( ) ><br />
(
& ( 2 2 <br />
M<br />
=<br />
D<br />
L<br />
78
# 2) 2 1 * ( 2 0 2* (* >*)* $"! #$%<br />
. ( 2 * ( 2<br />
.<br />
<<br />
*@ * /(* * /( ( * /(*@ * / *<br />
/8 (<br />
( 2 2<br />
6 < DK@ -N<br />
4 < A +?A K *., K(M+ (=- (+-E /<br />
4 H < ,<br />
2)2<br />
; < ===(<br />
9 (* >*)*<br />
J )J<br />
, (<br />
)<br />
79<br />
) (
% 2) 2 * ( 2 1 2 2 0 2* ( * (* ()) "! #! %<br />
. ( 2 * ( 2<br />
,<br />
( 2 * (* ())<br />
80<br />
< A:* % / A * O /8<br />
(<br />
< P (<br />
* ( ( / I<br />
/L<br />
* ( ( ( /<br />
I<br />
( ( (<br />
( *<br />
4 < @?AB% D+AAB%<br />
4 H < QQ A(?<br />
2)2<br />
; * /<<br />
* ( ( ( (<br />
/<br />
(<br />
B 2) 2 * ( 2 1 2 2 0 2* ( (* ()) "! #! %<br />
' ,(- .<br />
R K @ H<br />
6#4285: <<br />
5<br />
+AB% O ,A- O 4<br />
% S 7 % *4 %/( 4 8<br />
* / 6 # 7 *6 #/<br />
7 < AB% -A K<br />
@>MB%3<br />
. ( 2 * ( 2 2 (* ())<br />
L .(<br />
2)2<br />
; * /<<br />
4 H < ,<br />
81
C 2) 2 * ( 2 1 2 2 0 2* ( ( * #! %<br />
(<br />
8 (<br />
. ( 2 * ( 2+0 2,<br />
L -(<br />
2)2 ( *<br />
78 / !"#$% & ' (<br />
6 3<br />
82<br />
* #/"<br />
6 78/ 8 )0 ( ( ) ( 0 * ( 1<br />
2 20 2(<br />
" 7<br />
<<br />
- (<br />
( ( (<br />
$ ( (<br />
7 652$ ;##5263 5<br />
+ -A
( (<br />
( ( (<br />
K 9 ( (<br />
(<br />
D 2) 2 * ( 2 1 2 2 0 2* ( () ( %<br />
- - . / 3( ( (2 ( 2 * 2 2 ) (2) ' ( 2) * 2 (2<br />
( 2 (0 2 ) (2) 2 ( 3 * * ( ( (4 2 0 1 * 1<br />
20 2<br />
. ( 2 2<br />
2)2 2 * >*)* (<br />
,<br />
) (<br />
K<br />
8 ( 2 (<br />
- (<br />
" (<br />
.<br />
83<br />
(<br />
< * * / (* /8<br />
+ (<br />
9 (* >*)*<br />
J )J ) I<br />
, )
E 2) 2 * ( 2 2 2 0 2* ( 2)2 2 ( )( 2)<br />
6#4285: < , < TO2 T6 , *TO2 T6 /<br />
UTU 8 +=+,<br />
- ( (<br />
* 4 / ( ( ( (<br />
( R ( @<br />
UTU V<br />
5 (<br />
. ( 2 2<br />
: 3 6 8 .<br />
TO2 # (<br />
T6 #<br />
. (<br />
< - * 0 / ' * / 8 (<br />
K *T6 /<br />
2)2 2 )( 2) +F ,<br />
, *TO2/<br />
QQ ( K *T6 /<br />
84<br />
(
8 ( 2 ( 2) +F ',<br />
>* /<br />
- (<br />
* K / (<br />
*<br />
-> " T6 * / *T6 /(<br />
-M H T6<br />
-= " T6 T6<br />
.A 2 T6<br />
.+ T6 * / '<br />
., ' ( #<br />
< = 0 (+. ?JAAA (<br />
3/<br />
? ' ( * 2 %<br />
78 3 2 ( * 2 0 2 4 2 0 14 41 2 2 G1 2<br />
2 * HH 2 %E* ( 2 2) 0 2 * ()) 0 20 2 - 2 )(<br />
"% 0 2(0 3 ( 0 ( 2 2) 2 ;2 F ' 2 2)2 (<br />
0 2( 2; 1 2 () (<br />
2 ,. * .M( +( /1 ' 2 4 2<br />
( * / 2 * /(<br />
* H / (<br />
,. .M * /<br />
F ' ,. * .M W/ 1 '<br />
85<br />
*
' ( 5<br />
) T6 '<br />
2)2 * * ( 2 (<br />
7<br />
+,<br />
< ( T6 +, (<br />
6 (( 1 ( 2+)( 2 ( ,<br />
9<br />
QQ * / /<br />
*<br />
+= " ? '<br />
,. I<br />
*QQ /<br />
,A A * /<br />
2 (( 1<br />
,+ * A/<br />
+<br />
= * ( # (%<br />
(<br />
86<br />
8% * /<br />
@<br />
(
I. INFORMACJE OGÓLNE<br />
Jest to przyrz d o wysokiej dokładno ci zbudowany na podstawie najnowszych technologii. Został on tak skonstruowany, by spełniał swe<br />
zadanie równie przy intensywnym u ytkowaniu. Jednak e by mógł on zachowa swoj dokładno , prosimy o uwa ne przeczytanie niniejszej<br />
instrukcji obsługi oraz o u ytkowanie aparatu zgodnie z zawartymi w niej wskazówkami.<br />
SKYWATCH ® Xplorer jest wyposa ony w wirnik i czujniki, które umo liwiaj wykonywanie pomiarów na zewn trz.<br />
Dostarczy on najwa niejszych informacji podczas uprawiania zarówno swobodnego spadania, pieszych wycieczek, czy te alpinizmu lub<br />
eglowania. Informacji dotycz cych chwilowej i maksymalnej pr dko ci wiatru (Xplorer 1, 2, 3 i 4), temperatury otoczenia i temperatury<br />
odczuwalnej (Xplorer 2, 3 i 4), elektronicznej busoli (Xplorer 3 i 4), a tak e wysoko ci nad poziomem morza, ci nienia oraz ten<strong>de</strong>ncji zmiany<br />
warunków atmosferycznych (Xplorer 4).<br />
Gama SKYWATCH ® Xplorer jest odporny na krótkie zanurzenia w wodzie na gł boko ci do 1 metra.<br />
UWAGA!<br />
Przyrz d ma za zadanie pomóc u ytkownikom znajduj cym si w plenerze, ale NIE MO E on zast pi informacji oraz wskazówek udzielanych<br />
przez lokaln stacj meteorologiczn . Nale y wi c koniecznie sprawdza i porównywa okresowo wyniki pomiarów dokonanych przez<br />
urz dzenie z informacjami ogłaszanymi przez stacj meteorologiczn .<br />
Warunki meteorologiczne mog czasem zmieni si radykalnie i to w bardzo krótkim czasie. Na przykład pi kna, słoneczna pogoda mo e w<br />
przeci gu pół godziny, a czasem nawet szybciej, zmieni si w burzow . Nale y wi c pami ta o tym, aby zawsze zachowywa podstawowe<br />
zasady bezpiecze stwa podczas plenerowych wypraw.<br />
<strong>JDC</strong> ELECTRONIC <strong>SA</strong> nie ponosi odpowiedzialno ci za jakiekolwiek konsekwencje, zarówno bezpo rednie jak i po rednie, a tak e za<br />
ewentualne szkody, które mogłyby wynikn z korzystania z niniejszego urz dzenia.<br />
Dane techniczne:<br />
Wymiary: 41 x 93 x 17 mm<br />
Waga: 51 g (Xplorer 1), 52 g (Xplorer 2 i 3), 53 g (Xplorer 4)<br />
Temperatura u ytkowania: od -30°C do +60°C<br />
87
II. UTRZYMANIE I KONSERWACJA Xplorer 1 – 2 – 3 - 4<br />
Wło yli my wiele stara w przygotowanie projektu naszego przyrz du, jak i jego produkcj . Aby móc skutecznie wykorzystywa wszystkie jego<br />
mo liwo ci, nale y posługiwa si nim zgodnie z nast puj cymi wskazówkami:<br />
• Nale y unika za wszelk cen dostania si do wn trza wirnika, piasku, nitek, włosów, itp., gdy przeszkadzałoby to w jego<br />
prawidłowym wirowaniu, a w konsekwencji brak dokładno ci pomiaru. Je li mimo wszystko włos lub nitka dostałyby si do wirnika,<br />
nale y go <strong>de</strong>likatnie wyci gn za pomoc pincety, natomiast pył lub piasek, mo na opłuka czyst wod .<br />
• Nale y unika sytuacji, w których przyrz d byłby zbyt długo poddany działaniu skrajnych warunków pogodowo – klimatycznych. Mimo<br />
zastosowania cz ci odpornych na skrajne temperatury, prosimy nie nara a urz dzenia na wysokie temperatury(np. poprzez<br />
umieszczenie urz dzenia za szyb samochodow wystawiaj c go na działanie sło ca).<br />
• Nale y unika nara ania urz dzenia na wstrz sy, u<strong>de</strong>rzenia, itp.<br />
• Prosimy NIE WYSTAWIA aparatu na działanie silnych substancji chemicznych. Substancje mogłyby uszkodzi urz dzenie.<br />
III. Wł czanie przyrz du Xplorer 1 – 2 – 3 - 4<br />
Aby wł czy SKYWATCH ® Xplorer, wystarczy krótko nacisn na przycisk (oznaczony na poni szym schemacie : ). Aparat wł cza si i<br />
prezentuje wersj oprogramowania i mo<strong>de</strong>l urz dzenia (zob. rys. D0.0 na poni szym schemacie), nast pnie przyrz d przechodzi automatycznie<br />
do trybu pomiaru bie cej pr dko ci wiatru (Xplorer 1) lub te do ostatniego trybu prezentowanego przed wył czeniem urz dzenia (Xplorer 2, 3<br />
et 4).<br />
Pełne schematy urz dzenia dost pne s na stronie http://www.jdc.ch.<br />
88
IV. Wył czenie przyrz du Xplorer 1 – 2 – 3 - 4<br />
Wył czenie automatyczne (auto-off):<br />
Urz dzenie SKYWATCH ® Xplorer wył cza si automatycznie minut po ostatnim naci ni ciu przycisku lub te po ostatnim pomiarze wiatru. Nie<br />
wył cza si natomiast dopóki wirnik obraca si (dłu ej ni 10 sekund).<br />
Wył czenie r czne:<br />
Aby wył czy Xplorer r cznie (wa ne przy wszystkich trybach), nale y nacisn przycisk a do wył czenia si urz dzenia, a nast pnie zwolni<br />
przycisk.<br />
UWAGA! Funkcjonowanie ci głe:<br />
Przy wył czaniu r cznym, poprzez puszczenie przycisku podczas migania du ych cyfr, albo przy wył czaniu automatycznym poprzez krótkie<br />
naci ni cie przycisku podczas migania.<br />
Podczas stałego funkcjonowania, ka <strong>de</strong> naci ni cie na przycisk ustawia l'Xplorer w pozycji wył czania automatycznego.<br />
Uwaga: je li urz dzenie jest ci gle wł czone, bateria wyładowuje si bardzo szybko (od 400 do 500 godzin zale nie od mo<strong>de</strong>lu).<br />
VI. Zasilanie Xplorer 1 – 2 – 3 - 4<br />
SKYWATCH ® Xplorer jest zasilany przez wymienn bateri 3V typu CR2032. Wymiana baterii:<br />
UWAGA! Przy wykonywaniu czynno ci nale y zachowa ostro no !<br />
WSZELKIE NIEWŁA CIWE OBCHODZENIE SI Z URZ DZENIEM PODCZAS WYMIANY BATERII MO E CAŁKOWICIE I<br />
NIEODWRACALNIE USZKODZI URZ DZENIE. W RAZIE W TPLIWO CI NALE Y ZWRÓCI SI DO ZEGARMISTRZA.<br />
1. Nale y odkr ci metalowy spód (6 rub).<br />
2. Nale y odkr ci rub pokrywy baterii.<br />
3. Nale y <strong>de</strong>likatnie podnie pokryw i wyj bateri .<br />
4. Nale y wło y now bateri zwracaj c uwag na kierunek biegunów (+ do góry), a nast pnie przykr ci pokryw baterii. Nale y si<br />
upewni czy mały j zyczek na rodku pokrywy jest uniesiony i czy dotyka metalowego wierzchu.<br />
5. Przed zało eniem spodu nale y upewni si , czy uszczelka jest wła ciwie umieszczona w przew eniu.<br />
6. Nale y przykr ci spód za pomoc 6 rub.<br />
Trwało baterii w normalnych warunkach:<br />
Xplorer 1, 2 et 3: około 30'000 1 minutowych pomiarów (auto-off) i ponad 20 lat przy wył czonym urz dzeniu.<br />
Xplorer 4: bez pami ci: tak jak Xplorer 1, 2 i 3.<br />
z pami ci : około 25'000 1 minutowych pomiarów (auto-off), ale maksymalnie 7 lat przy wył czonym urz dzeniu.<br />
89
1. Pod wietlenie wy wietlacza (backlight) Xplorer 1 – 2 – 3 – 4<br />
Aby wł czy pod wietlenie nale y nacisn przycisk na 1 sekund i pu ci przycisk, w momencie gdy pod wietlenie si wł czy. Pod wietlenie<br />
funkcjonuje przez 3 sekundy; je li w przeci gu nast pnych 5 sekund wł cz Pa stwo ponownie funkcj pod wietlenia, b dzie wł czona przez<br />
15 sekund. Je li Pa stwo ponownie wł cz pod wietlenie, ale ju po upływie 5 sekund, funkcja ta b dzie wł czona znowu przez 3 sekundy.<br />
Uwaga: Funkcja pod wietlenia przy wszystkich ustawieniach urz dzenia wł cza si w ten sam sposób.<br />
UWAGA: cz ste u ywanie funkcji pod wietlenia zmniejsza trwało baterii! Zu ycie około 100 x wy sze ni bez korzystania z funkcji.<br />
2. Tryby i zmiany trybów Xplorer 1 - 2 – 3 – 4<br />
Krótkie naci ni cie przycisku pozwala wł czy kolejny tryb.<br />
TRYBY:<br />
Xplorer 1 (1 tryb) Xplorer 2 (3 tryby) Xplorer 3 (4 tryby) Xplorer 4 (9 tryby)<br />
1. wiatr + wiatr max 1. wiatr + wiatr max 1. wiatr + wiatr max 1. wiatr + wiatr max<br />
2. wiatr + temperatura 2. wiatr + temperatura 2. wiatr + temperatura<br />
3. wiatr + temp. odczuwalna 3. wiatr + temp. odczuwalna 3. wiatr + temp. odczuwalna<br />
4. wiatr + busola 4. wiatr + busola<br />
5. wiatr + wysoko i wysoko max<br />
6. wiatr + ci nienie wzgl dne i bezwzgl dne.<br />
7. pami ten<strong>de</strong>ncji ci nienia<br />
8. pami ci nienia wzgl dnego<br />
9. pami wysoko ci<br />
Aby zapozna si z funkcjami mo liwymi w ka dym trybie prosimy zapozna si z nast pnymi rozdziałami.<br />
90
3. Tryb pomiaru chwilowej pr dko ci wiatru oraz pr dko ci maksymalnej Xplorer 1 – 2 – 3 – 4<br />
Wybór jednostki pomiaru:<br />
Naciskaj c przycisk przez ok. 4 sek.: b d si pojawiały jednostki pomiaru. Istnieje mo liwo wyboru nast puj cych<br />
jednostek: km/h (kilometry na godzin ), mph (mile na godzin ), knots (w zły), m/s (metry na sekund ) lub fps (stopy<br />
na sekund ). Gdy dana jednostka pojawi si , nale y pu ci przycisk, w ten sposób jednostka pomiaru zostaje<br />
zatwierdzona.<br />
Pomiar pr dko ci:<br />
Aby pomiar był jak najbardziej dokładny, nale y ustawi przyrz d przo<strong>de</strong>m do wiatru.<br />
Dokładno : +/- 3 %<br />
Strefa pomiaru: od 0 do 150 km/h (42 m/s, 81 knots, 93 mph, 136 fps)<br />
Cykl pomiarów: 2 pomiary na sekund<br />
Prezentacja:<br />
Pr dko chwilowa wy wietlana jest na du ych cyfrach, natomiast, pr dko maksymalna na małych cyfrach z oznaczeniem .<br />
Wynik: z dokładno ci do dziesi tnej jednostki, a do 99.9, nast pnie jednostkami.<br />
Wymazanie pr dko ci maksymalnej:<br />
Pr dko maksymalna jest zachowana nawet wówczas, gdy urz dzenie zostanie wył czone. Aby j wyzerowa , nale y wcisn przycisk na co<br />
najmniej 2 sekundy, a nast pnie pu ci .<br />
91
4. Tryb pomiaru chwilowej pr dko ci wiatru oraz temperatury otoczenia Xplorer 2 – 3 – 4<br />
Wybór jednostki pomiaru:<br />
Nale y nacisn przycisk na co najmniej 2 sekundy: pojawi si na przemian 2 jednostki. Istnieje mo liwo wyboru<br />
mi dzy °C (stopniami Celsjusza) i °F (stopniami Fahrenheita). Gdy dana jednostka pojawi si , nale y pu ci<br />
przycisk, w ten sposób jednostka pomiaru zostaje zatwierdzona.<br />
Pomiar temperatury otoczenia:<br />
Uwaga: Poniewa czujnik temperatury jest scalony z metalowym spo<strong>de</strong>m obudowy, uzyskujemy dane dotycz ce<br />
temperatury dna obudowy. Fakt ten pozwala na bardzo dokładne i bardzo szybkie wykonywanie pomiarów<br />
temperatury takich rodowisk jak:<br />
woda ( ródła, rzeki, itd.) - poprzez zanurzenie przyrz du na gł boko kilku centymetrów;<br />
powierzchnie (ziemia, cz ci metalowe, wn trza lodówek, itd.) - przykładaj c tak jak to tylko mo liwe dno przyrz du do powierzchni, której<br />
temperatur chc Pa stwo zmierzy ;<br />
powietrze otoczenia – albo poprzez oczekiwanie, a Urz dzenie osi gnie temperatur powietrza: mo e to zaj kilka, a nawet kilkadziesi t<br />
minut, w zale no ci od pr dko ci wiatru (nale y unika bezpo redniego oddziaływania promieni słonecznych, a tak e kontaktu palców ze<br />
spo<strong>de</strong>m obudowy), albo poprzez przyło enie spodu obudowy do przedmiotu b d powierzchni maj cej temperatur powietrza (np.<br />
karoserii samochodowej, metalowej bariery, gładkiej ciany, itp., unikaj c powierzchni w ciemnych kolorach oraz wystawionych na sło ce),<br />
co pozwoli szybko uzyska dokładny wynik pomiaru.<br />
Strefa pomiaru czujnika: od -50°C do +100°C<br />
Cykl pomiarów: pomiar co pół sekundy<br />
Prezentacja:<br />
Chwilowa pr dko wiatru wy wietla si na du ych cyfrach, natomiast temperatury otoczenia na małych cyfrach.<br />
Wynik (temperatura): z dokładno ci do dziesi tej stopnia<br />
92
5. Tryb pomiaru chwilowej pr dko ci wiatru oraz odczuwalnej temperatury Xplorer 2 – 3 – 4<br />
Wybór jednostki pomiaru temperatury:<br />
Zob. rozdział 4, wybór jednostki pomiaru.<br />
Prezentacja:<br />
Niskie temperatury stanowi zagro enie dla człowieka, a pr dko wiatru wzmaga jeszcze to niebezpiecze stwo.<br />
Xplorer 2, 3 i 4 pokazuj natychmiast odczuwaln przez organizm temperatur i ostrzegaj przed ryzykiem odmro e<br />
lub hipotermii.<br />
WYJA NIENIE: Przy obliczaniu odczuwalnej temperatury bierze si pod uwag temperatur otoczenia oraz pr dko<br />
wiatru. W wypadku wiatru urz dzenie udziela informacji o utracie ciepła przez organizm, je li temperatura wynosi<br />
mniej ni 10°C. Formuła przyj ta w styczniu 2003 r. przez Fe<strong>de</strong>ralny Urz d Koordynacji Meteorologicznej Stanów<br />
Zjednoczonych oraz kanadyjskie słu by meteorologiczne (MSC), <strong>de</strong>partament obrony U<strong>SA</strong> (DOD), a tak e Narodow<br />
Administracj Oceaniczn i Atmosferyczn Stanów Zjednoczonych (NOAA).<br />
Przykład: temperatura otoczenia 0°C przy pr dko ci wiatru 30 km/h działa na organizm jak temperatura -7.8°C !<br />
Chwilowa pr dko wiatru wy wietlana jest du ymi cyframi, natomiast temperatura odczuwalna małymi cyframi z oznaczeniem .<br />
Wynik (temperatura): z dokładno ci do dziesi tej stopnia<br />
Cykl pomiarów: 2 pomiary na sekund .<br />
93
6. Tryb pomiaru chwilowej pr dko ci wiatru za pomoc elektronicznej busoli Xplorer 3 – 4<br />
Wybór jednostki pomiaru (wiatr):<br />
Zob. rozdział 3, wybór jednostki pomiaru.<br />
Wy wietlenie busoli:<br />
Busola wy wietlana jest w stopniach na małych cyfrach.<br />
WYJA NIENIE! SKYWATCH ® Xplorer wskazuje biegun północny<br />
magnetyczny, nie biegun północny geograficzny!<br />
Pomiar:<br />
Aby wykona pomiar jak najdokładniej, nale y ustawi Urz dzenie w pozycji pionowej (rys. A). Je li zamiast cyfr pojawia si<br />
, oznacza to, e przyrz d jest zbyt pochylony lub jego prac zakłóca znajduj ce si w pobli u ródło magnetyczne.<br />
Kalibracja:<br />
WA NE! Przed pierwszym u yciem nale y wykalibrowa Xplorer, jak równie w wypadku zmiany otoczenia, czy te<br />
zmiany baterii.<br />
Przy pierwszym wł czeniu urz dzenia, busola wskazuje . Przyrz d nale y kalibrowa w sposób nast puj cy:<br />
Przez ok. 3 sekundy nale y trzyma wci ni ty przycisk, a do momentu gdy na du ych cyfrach pojawi si , nast pnie<br />
pu ci . Nast pnie nale y si obróci a do momentu, gdy przyrz d wska e . W celu zatwierdzenia kalibrowania nale y<br />
nacisn krótko przycisk.<br />
Podczas kalibrowania, Urz dzenie wskazuje kolejno , , nast pnie i wreszcie przed małymi cyframi.<br />
Operacja powinna zosta wykonana z pr dko ci 1 obrotu na około 30 sekund.<br />
Aby kalibrowanie było dokładne, wirnik NIE MO E si obraca ! W razie wiatru nale y zasłoni wirnik trzymaj c mi dzy<br />
kciukiem i palcem wskazuj cym.<br />
Uwaga: Linie ziemskiego pola magnetycznego s zakłócane przez o rodki metalowe, konstrukcje, słupy wysokiego<br />
napi cia, wn trza pojazdów, statki, jak równie przez pola magnetyczne wszelkich maszyn i urz dze elektrycznych oraz<br />
magnesy. W celu wykonania dokładnych pomiarów konieczne jest oddalenie si od ró<strong>de</strong>ł zakłóce , lub te ponowne<br />
kalibrowanie urz dzenia.<br />
94<br />
7. Tryb pomiaru chwilowej pr dko ci wiatru rzeczywista wysoko nad poziomem morza Xplorer 4<br />
UWAGA! Przyrz d oblicza wysoko bezwzgl dn nad poziomem morza za pomoc ci nienia powietrza. Jest<br />
wi c normaln rzecz , e wysoko ulega zmianie, gdy zmienia si ci nienie powietrza. Z tej przyczyny nale y<br />
kalibrowa przyrz d tak cz sto jak to tylko mo liwe.<br />
Wybór jednostki:<br />
Naciskaj c przycisk przez ok. 4 sek.: b d si pojawiały jednostki pomiaru. Istnieje mo liwo wyboru nast puj cych<br />
jednostek: m (metry) i ft (stopy). Gdy pojawia si dana jednostka, nale y pu ci przycisk: w ten sposób jednostka<br />
pomiaru zostanie zatwierdzona i urz dzenie wraca ponownie do trybu pomiaru chwilowej pr dko ci wiatru, przekazuj c<br />
informacj dotycz c wysoko ci bezwzgl dnej nad poziomem morza.<br />
Wy wietlanie maksymalnej wysoko ci:<br />
Nale y nacisn przycisk na około 2 sekundy, w chwili gdy pojawi si oznaczenie nale y pu ci przycisk. Urz dzenie<br />
ustawia si w tryb pomiaru chwilowej pr dko ci wiatru wy wietlaj c informacj dotycz c maksymalnej wysoko ci. Aby wróci do<br />
funkcji wiatr/wysoko nale y nacisn 1 raz przycisk.<br />
Kalibracja wysoko ci:<br />
Przez ok. 3 sekundy nale y trzyma wci ni ty przycisk, a do momentu gdy na du ych cyfrach pojawi si , nast pnie pu ci .<br />
Aby zwi kszy warto wysoko ci, nale y naciska przycisk, warto zwi ksza si sukcesywnie po 1 jednostce. Aby j<br />
zmniejszy nale y pu ci przycisk, a nast pnie znowu nacisn przycisk.<br />
Krótkie naci ni cie na przycisk zatwierdzi now wysoko .<br />
Wymazanie pr dko ci maksymalnej:<br />
Pr dko maksymalna jest zachowana nawet wówczas, gdy urz dzenie zostanie wył czone. W celu wymazania warto ci maksymalnej nale y<br />
nacisn przycisk na ok. 2 sekundy, a nast pnie pu ci . Czynno t powinno si dokona od ustawienia prezentacji wysoko ci maksymalnej.<br />
95
8. Tryb pomiaru pr dko ci wiatru z wy wietleniem ci nienia wzgl dnego i bezwzgl dnego<br />
WYJA NIENIE: Przyrz d dysponuje 2 trybami wy wietlania ci nienia: ci nienie QFE i ci nienie QNH. Te 2 skróty (QFE i QNH) stanowi cz znanego<br />
kodu "Q". Kod ten został ustanowiony przez konferencj w Londynie w 1912 r. Kod ten stanowi lista sygnałów, z których ka dy składa si z 3 liter,<br />
obowi zuj cych we wszystkich krajach wiata. Przeznaczony jest on głównie do transmisji telegraficznych i radiotelegraficznych (Morsem). Stanowi go<br />
lista skrótów, streszczaj cych za pomoc 3 liter, bez dwuznaczno ci, długie zdania, pytania lub odpowiedzi, unikaj c w ten sposób ryzyka popełnienia<br />
bł dów w nadawaniu, odbiorze czy interpretacji komunikatu, lub te bł dów j zykowych.<br />
Kod "Q" jest do dzisiaj powszechnie u ywany na statkach oraz przez radioamatorów. Oficjalnie nadal jest u ywany w radiotelefonii. wiat aeronautyczny<br />
nie u ywa go w cało ci, ale jego cz wykorzystuje w u ytku codziennym.<br />
Wybór jednostki:<br />
CODE ZNACZENIE<br />
QFE Ci nienie atmosferyczne na ziemi,<br />
mówi si równie ci nienie bezwzgl dne.<br />
QNH Ci nienie atmosferyczne doprowadzone arytmetycznie do poziomu morza w normalnych<br />
warunkach atmosferycznych,<br />
mówi si równie ci nienie wzgl dne.<br />
Chodzi o ci nienie ogłaszane w komunikatach meteorologicznych lub w telewizji.<br />
Nale y nacisn przycisk na co najmniej 4 sekundy, pojawi si na przemian 2 jednostki. Istnieje mo liwo wyboru mi dzy nast puj cymi<br />
jednostkami: hPa (hektopaskale) i inHg (wysoko słupa rt ci). Gdy wy wietli si dana jednostka, nale y pu ci przycisk. W ten sposób<br />
jednostka pomiaru zostanie zatwierdzona, a Urz dzenie ustawia si na funkcj wiatr/ci nienie wzgl dne (QNH).<br />
Prezentacja ci nienia bezwzgl dnego (QFE):<br />
Nale y nacisn przycisk na ok. 2 sekundy i w chwili gdy na du ych cyfrach pojawi si oznaczenie (QFE) nale y pu ci<br />
przycisk. Przyrz d jest w ten sposób ustawiony na wy wietlanie ci nienia bezwzgl dnego. Aby wróci do ustawienia<br />
urz dzenia na funkcj wiatr/ci nienie wzgl dne (QNH), nale y nacisn 1 raz przycisk.<br />
Kalibracja ci nienia wzgl dnego (QNH):<br />
Nale y nacisn przycisk na ok. 3 sekundy. Gdy na du ych cyfrach pojawi si , nale y pu ci przycisk. Nast pnie,<br />
regulacja (zwi kszanie/zmniejszanie) dokonuje si w ten sam sposób jak przy kalibracji wysoko ci bezwzgl dnej nad<br />
poziomem morza, zob. rozdział 7 (kalibracja wysoko ci).<br />
96
Uwagi:<br />
43. Je li warto QNH jest zapalona na stałe (nie miga), oznacza ona aktualne ci nienie wzgl dne (QNH), wiarygodne, poniewa<br />
obliczone na podstawie powolnych zmian meteorologicznych.<br />
44. Symbol QNH miga, je li ci nienie wzgl dne uległo zmianie od momentu ostatniej kalibracji.<br />
45. Je li warto QNH miga, oznacza ona ci nienie QNH, które było w chwili ostatniej kalibracji.<br />
46. Wzrost wysoko ci nad poziomem morza lub zmiany warunków meteorologicznych bez aktywnej pami ci, powoduj e warto QNH<br />
miga.<br />
47. Kalibracja QNH lub wysoko ci (warto znana) pozwala ponownie wyregulowa Xplorer w stosunku do mierzonego ci nienia<br />
powietrza. Zmienia si ono ci gle w zale no ci od wysoko ci i warunków meteorologicznych w danej chwili.<br />
48. Jedynym odno nikiem Xplorer’a jest ci nienie powietrza, które on mierzy, z którego nast pnie oblicza wysoko . Ka da zmiana<br />
warto ci ci nienia powoduje zmian wysoko ci: 9 metrów na hektopaskal na niskiej wysoko ci, 14 metrów na 5000 metrów. Aby wi c<br />
uzyska wiarygodny wynik, nale y kalibrowa urz dzenie tak cz sto, jak to tylko mo liwe (s do tego zmuszeni nawet piloci linii<br />
lotniczych!).<br />
49.<br />
9. Tryb pami ci Xplorer 4<br />
WYJA NIENIE: Trzy tryby pami ci funkcjonuj w ten sam sposób i s ze sob powi zane. Wy wietlaj w ró nych<br />
formach jedn z 48 miar ci nienia zapisywanego co godzin . Domy lnie: wy wietla si 24 h.<br />
W pami ci zapisywane jest naci ni cie na czujnik; wy wietlenie QNH lub wysoko ci zostaje przeliczone, w<br />
zale no ci od aktualnej kalibracji.<br />
Ten<strong>de</strong>ncja: S to zmiany ci nienia od 24h (lub 48h, 1h, itd.). Pomiar wa ny, je li Xplorer znajduje si w tym samym<br />
miejscu (równie pod wzgl <strong>de</strong>m wysoko ci). Liczba ujemna oznacza spa<strong>de</strong>k ci nienia (na skutek ni u),<br />
liczba dodatnia oznacza wzrost (wy ). Ci nienie naturalnie zmienia si w ci gu dnia, prognozy<br />
meteorologiczne co 24h lub 48h (o tej samej porze dnia) s dokładniejsze.<br />
QNH : Jest to ci nienie wzgl dne sprzed 24h lub 48h. Pomiar wa ny, je li Xplorer znajduje si w tym samym<br />
miejscu i jest ponownie kalibrowany.<br />
Wysoko : W przypadku wyj cia w góry lub latania na paralotni, mo na co godzin dokonywa pomiaru osi gni tej<br />
wysoko ci. Pomiar wysoko ci b dzie dokładny, je li przeprowadzona zostanie kalibracja QNH Xplorer’a<br />
według ci nienia meteorologicznego, które miało miejsce podczas rejestracji.<br />
Prezentacja danego pomiaru z pami ci:<br />
97
Przykład: je li pragn Pa stwo zna ten<strong>de</strong>ncj , ci nienie wzgl dne lub wysoko sprzed 12 godzin, nale y nacisn<br />
przycisk, a nast pnie, gdy pojawi si na du ych cyfrach symbol 12h, nale y pu ci przycisk.<br />
Oszcz dno baterii (wył czenie opcji pami ci)<br />
Istnieje mo liwo wył czenia czujnika ci nienia podczas gdy urz dzenie jest wył czone. Pomiary ci nienia i wysoko ci<br />
mo na wykonywa jedynie gdy przyrz d jest wł czony.<br />
Aby wył czy czujnik nale y ustawi 1 z trzech pami ci na (zero godzin).<br />
Uwagi:<br />
22. W przypadku wy wietlania danych z pami ci, je li wy wietlony zostanie np. symbol 5h, nast pnym razem gdy zostanie wł czony<br />
Xplorer, wy wietli si symbol 24h, je li był wykonywany nowy pomiar ci nienia, jest on sterowany przez wewn trzny zegar (je<strong>de</strong>n<br />
pomiar na godzin ).<br />
23. w przypadku obni enia do 0h, pami nie b dzie rejestrowała pomiarów co godzin (lecz zapami ta aktualn zawarto )<br />
oszcz dzaj c bateri .<br />
24. Po wł czeniu trybu pami ci (inne ni 0h), aktualny pomiar b dzie przechowywany jako pocz tek godzinowy i wy wietlony pod 1h.<br />
10. Zerowanie urz dzenia Xplorer 3 et4<br />
Ten tryb umo liwia wyzerowanie wszystkich warto ci oraz skasowanie kalibracji busoli. Aby wykona całkowite zerowanie, nale y<br />
normalnie wył czy urz dzenie. Nast pnie przy ponownym wł czeniu, nale y przytrzyma wci ni ty przycisk. Gdy pojawi si<br />
wszystkie cyfry na wy wietlaczu LCD (patrz obok), zwolni przycisk, a nast pnie ponownie nacisn przycisk a do wył czenia.<br />
Po tej czynno ci, mo na normalnie wł czy urz dzenie.<br />
98
VISIT OUR<br />
WEB SITE :<br />
WWW.<strong>JDC</strong>.CH<br />
99
100<br />
Developed and manufactured by :<br />
<strong>JDC</strong> ELECTRONIC <strong>SA</strong><br />
UTTINS 40<br />
1400 YVERDON-LES-BAINS<br />
SWITZERLAND<br />
FAX +41 24 445 21 23