Operating manual - JDC Electronic SA
Operating manual - JDC Electronic SA
Operating manual - JDC Electronic SA

You also want an ePaper? Increase the reach of your titles
YUMPU automatically turns print PDFs into web optimized ePapers that Google loves.
<strong>Operating</strong> <strong>manual</strong><br />
<strong>JDC</strong> ELECTRONIC <strong>SA</strong><br />
Rue des Uttins 40<br />
CH-1400 Yverdon<br />
Switzerland<br />
www.jdc.ch<br />
info@jdc.ch<br />
P: +41 24 445 21 21<br />
F: +41 24 445 21 23
Index<br />
English<br />
F<br />
Introduction<br />
Items included ......................................................................4<br />
Warranty ..............................................................................4<br />
General description of operation .............................................5<br />
Meteorological measurements and transmitter ........................5<br />
Publication of the measurements ...........................................5<br />
Clock and time synchronization ..............................................5<br />
Technical Specifications<br />
General data .........................................................................6<br />
Meteorological transmitter .....................................................6<br />
SIM card and GSM subscription ..............................................7<br />
MeteoLogic software<br />
Installation of the software ....................................................8<br />
USB driver ............................................................................8<br />
Connecting to the station .......................................................8<br />
Setting the time ....................................................................9<br />
Programming the station .......................................................9<br />
Installation guide<br />
Step 1 - Inserting the SIM card ............................................10<br />
Step 2 - Installation of the meteorological transmitter ............11<br />
Step 3 - Connecting up the connectors .................................11<br />
Step 4 - Software configuration of the station .......................12<br />
Step 5 - Secure and orientate the station ..............................12<br />
Step 6 - Connection to earth ................................................12<br />
Technical assistance<br />
Contact ..............................................................................13<br />
3
Introduction<br />
4<br />
Items included<br />
Warranty<br />
1x N.E.W.S. weather station<br />
1x MeteoLogic CD<br />
2x clamps<br />
1x mini USB cable<br />
1x transmitter<br />
Your SKYWATCH® N.E.W.S. is guaranteed by <strong>JDC</strong> ELECTRONIC <strong>SA</strong> for one year<br />
starting on the date of purchase in respect of all material defects of manufacture. The<br />
warranty does not cover damage caused by incorrect use. <strong>JDC</strong> ELECTRONIC <strong>SA</strong> cannot<br />
be held responsible in any case for any consequences, direct or indirect, nor for any<br />
damage that may result from the use of this instrument or from any fault or breakdown<br />
in it.
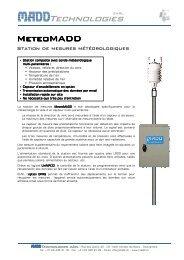
General description of operation<br />
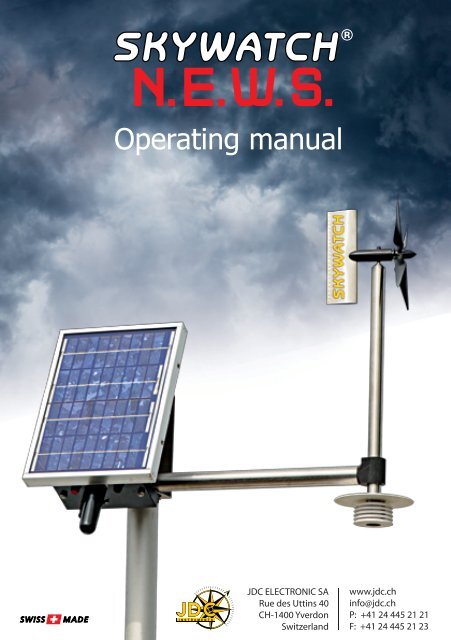
Skywatch® N.E.W.S. is an autonomous meteorological station designed for monitoring<br />
the atmospheric conditions at a site.<br />
It is fitted with a meteorological transmitter that measures wind, temperature, relative<br />
humidity, and (as an option) barometric pressure.<br />
Powered from a small solar panel and a battery, the station can easily be installed on<br />
sites that are isolated and have extreme conditions.<br />
Finally, with its GPRS modem, it automatically and periodically transmits its measurements<br />
to the Internet site http://meteo.jdc.ch.<br />
Meteorological measurements and transmitter<br />
The Skywatch® N.E.W.S. station acquires and records a series of measurements from<br />
the transmitter every 10 minutes (recommendation of the WMO).<br />
The meteorological transmitter is fitted with an anemometer to measure the mean<br />
direction, the mean speed and the maximum speed of the wind, with a humidity and<br />
temperature sensor and optionally with a pressure sensor.<br />
Publication of the measurements<br />
The site meteo.jdc.ch publishes the measurements in graphical form for the 3 preceding<br />
days. This data is sent by the station via GPRS at regular intervals and in a defined daily<br />
time limit.<br />
Since each transmission consumes a large amount of energy, the sending of measurements<br />
for publication can be made different between summer and winter. From the start of<br />
October to the end of March, when the solar panel receives less solar energy, perhaps<br />
none, the daily time limit and the frequency of transmissions can be reduced. These<br />
parameters are defined when the station is set up by using the MeteoLogic software.<br />
Clock and time synchronization<br />
The station has an internal clock which enables time stamping of the measurements and<br />
synchronization of the measurements and transmissions. At the end of each sending of<br />
data, the clock is resynchronized with the date and time of the GSM network. The local<br />
time zone is also included in this synchronization.<br />
5<br />
F
Technical Specifications<br />
6<br />
General data:<br />
Dimensions (L x H x D) Housing: 210 x 330 x 220 mm<br />
Transmitter: 540 x 500 x 150 mm<br />
Weight Housing: 6.5 kg<br />
Transmitter: 1 kg<br />
Protection class Housing: IP 67<br />
Transmitter: IP 67<br />
Materials Housing: stainless steel<br />
Transmitter: stainless steel and<br />
PVC shock<br />
Power Supply Solar panel 12 V, 5 W<br />
Battery 6 V, 12 Ah<br />
Battery operation (without sun) Approx. 3 months<br />
(transmitting 10 times per day)<br />
Measuring channels Wind direction, mean wind speed,<br />
maximum wind speed, air temperature,<br />
relative air humidity. Pressure as an option.<br />
Recording 90,000 time-stamped measurements in<br />
non-volatile memory<br />
Clock Internal with time zone<br />
Configuration connector mini USB<br />
<strong>Operating</strong> temperature Measurement and recording: -30 … +80 °C<br />
Data transmission: -25 … +70 °C<br />
Meteorological transmitter:<br />
Wind<br />
Sampling 1 measurement per second<br />
Average wind direction<br />
Measuring range<br />
Precision<br />
Resolution<br />
Mean and maximum wind speed<br />
Measuring range<br />
Precision<br />
Resolution<br />
0 to 360°<br />
± 5°<br />
1°<br />
3 to 200 km/h<br />
± 3%<br />
0.1 km/h
Temperature and humidity<br />
Air temperature<br />
Measuring range<br />
Precision<br />
Resolution<br />
Air relative humidity<br />
Measuring range<br />
Precision<br />
Resolution<br />
Barometric pressure (option)<br />
Measuring range<br />
Absolute precision<br />
Resolution<br />
SIM card and GSM subscription<br />
-40 to +90 °C<br />
± 0.6 °C (0 to +50 °C)<br />
± 1.5 °C (-40 to +90 °C)<br />
0.1 °C<br />
0 to 100 %RH<br />
± 1.8 %RH (10 to 90 %RH)<br />
0.1 %RH<br />
10 to 1100 mbar<br />
± 1.5 mbar (750 to 1100 mbar)<br />
0.1 mbar<br />
The Skywatch® N.E.W.S. station has a GPRS modem for data transmission via the GSM<br />
network. To make use of the latter, an active SIM card must be installed, with or without<br />
a subscription. The type of subscription linked to this SIM card needs to permit data<br />
transmission via GPRS. Options that include the volume of data could be appropriate.<br />
For information, one data transmission can be between 5 kB and 30 kB, depending on<br />
the interval between sendings.<br />
Please note: the SIM card should be configured without a security PIN code before it is<br />
inserted into the device. This can be carried out on an ordinary mobile telephone.<br />
7<br />
F
MeteoLogic software<br />
8<br />
The MeteoLogic software was developed as a user interface for setting up the station.<br />
Installation of the software<br />
To start the installation of the software, double-click on the file setup.exe on the CD<br />
under software. Then all that is required is to follow the instructions.<br />
USB driver<br />
When the station is connected to the PC by using the USB cable, a new virtual serial<br />
port is installed on the computer. If necessary, the driver is available on the CD under //<br />
misc/driver.<br />
Connecting to the station<br />
Once installed, the MeteoLogic software can be run<br />
and the first step is to select the serial port to be<br />
used. By clicking on Serial port in the Configuration<br />
menu, the list of available serial ports is generated<br />
and displayed for selection. Click OK after making the<br />
selection.<br />
Remark: the USB cable must be connected to the station before carrying out this<br />
configuration.<br />
Click on the menu Connect to open communications with the Skywatch® N.E.W.S.<br />
weather station. The following window appears and displays the configuration and<br />
parameters of the station.
Setting the time<br />
Use the software to set the time in the<br />
station by clicking on Time set in the<br />
Device menu.<br />
The times of measurement and<br />
transmission are automatically<br />
synchronised using the new time.<br />
Programming the station<br />
By clicking on Programming in the Device menu, the user can program the name of the<br />
site in the Station tab. In the tab GPRS transmissions the transmission intervals and daily<br />
time limit can be defined depending on the season.<br />
9<br />
F
Installation guide<br />
10<br />
Step 1 - Inserting the SIM card<br />
1<br />
2<br />
3<br />
1<br />
2<br />
3<br />
4<br />
Unscrew the two nuts<br />
shown in the diagram.<br />
Withdraw the station from<br />
the housing, being careful 1<br />
with the wires.<br />
Orientate the station as shown in the<br />
illustration opposite, and insert the<br />
SIM card in the location provided as<br />
shown.<br />
2<br />
3<br />
Remember to remove the PIN<br />
code protection of the SIM card<br />
by using a separate mobile<br />
telephone.<br />
Replace the station into the housing,<br />
being careful with the wires.<br />
nut nut<br />
2<br />
3<br />
MADD - DL1 - V1.1 1
Step 2 - Installation of the meteorological transmitter<br />
1<br />
1<br />
2<br />
2<br />
3<br />
3<br />
1<br />
2<br />
3<br />
Pass the horizontal bar of the<br />
transmitter through the two clamps at<br />
the rear of the station and tighten the<br />
screws of the clamps.<br />
Step 3 - Connecting up the connectors<br />
Connect the transmitter to socket A as<br />
shown below.<br />
AB<br />
Connect the solar panel to socket CB<br />
as<br />
shown below.<br />
C<br />
A B<br />
C<br />
A<br />
B<br />
A<br />
C<br />
B<br />
A<br />
C<br />
B<br />
C<br />
Connector of the<br />
MeteoLogic transmitter<br />
Solar panel connector<br />
USB connector<br />
F<br />
11
12<br />
Step 4 - Software configuration<br />
Refer to the previous chapter “MeteoLogic Software”.<br />
Step 5 - Secure and orientate the station<br />
1<br />
2<br />
3<br />
Accurate orientation of the<br />
station is crucial for the validity<br />
of the measurements of wind<br />
direction.<br />
The arm of the sensor must<br />
point accurately to the east.<br />
The solar panel will then face<br />
the south.<br />
Step 6 - Connection to earth<br />
1<br />
2<br />
3<br />
Place the station against its support pole,<br />
position the clamps in the holes provided<br />
for this purpose and screw them into<br />
place.<br />
The clamps are available in 3 different<br />
diameters:<br />
Ø 45 - 60 mm<br />
Ø 60 - 74 mm<br />
Ø 74 - 90 mm<br />
The choice of diameter must be specified<br />
with the order.<br />
To improve protection of the station when there is lightning or overvoltage from<br />
electromagnetic effects, it is advisable to provide a good earth connection for<br />
the housing. Suitable materials can be obtained as an option.<br />
O<br />
N<br />
S<br />
View from above<br />
E
Technical assistance<br />
Contact<br />
If there is a problem and for all technical questions, please contact us directly:<br />
E-mail: support@jdc.ch<br />
Telephone: +41 24 445 21 21<br />
Fax: +41 24 445 21 23<br />
www.jdc.ch<br />
F<br />
13