Installation Guide: Suspended Ceiling - USG Corporation
Installation Guide: Suspended Ceiling - USG Corporation
Installation Guide: Suspended Ceiling - USG Corporation

You also want an ePaper? Increase the reach of your titles
YUMPU automatically turns print PDFs into web optimized ePapers that Google loves.
<strong>Installation</strong> <strong>Guide</strong>:<br />
<strong>Suspended</strong> <strong>Ceiling</strong><br />
Planning the Job<br />
Use graph paper; choose a convenient scale, such as one square<br />
per two feet. Measure the length of each wall at ceiling level.<br />
Tools and Materials<br />
– Lag Screws to attach<br />
wire hangers to wood<br />
joists every 4 ft. o.c.<br />
– 18-gauge steel wire<br />
(residential installation)<br />
or 12-gauge<br />
steel wire (commercial<br />
installation)<br />
– Screws to attach wall<br />
angles<br />
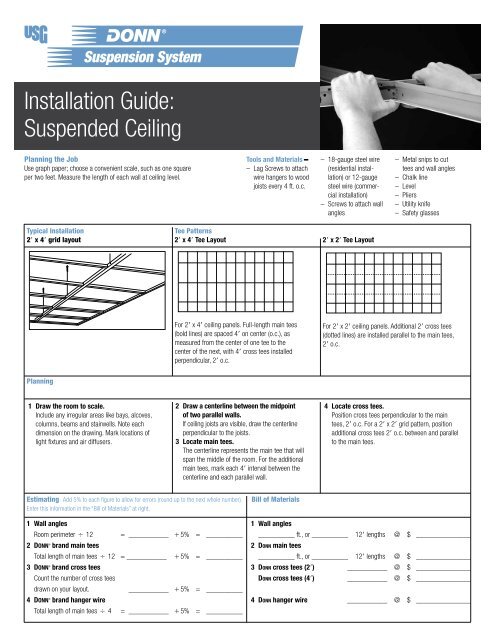
Typical <strong>Installation</strong> Tee Patterns<br />
2 x 4 grid layout 2 x 4 Tee Layout 2 x 2 Tee Layout<br />
Planning<br />
1 Draw the room to scale.<br />
Include any irregular areas like bays, alcoves,<br />
columns, beams and stairwells. Note each<br />
dimension on the drawing. Mark locations of<br />
light fixtures and air diffusers.<br />
For 2 x 4 ceiling panels. Full-length main tees<br />
(bold lines) are spaced 4 on center (o.c.), as<br />
measured from the center of one tee to the<br />
center of the next, with 4 cross tees installed<br />
perpendicular, 2 o.c.<br />
2 Draw a centerline between the midpoint<br />
of two parallel walls.<br />
If ceiling joists are visible, draw the centerline<br />
perpendicular to the joists.<br />
3 Locate main tees.<br />
The centerline represents the main tee that will<br />
span the middle of the room. For the additional<br />
main tees, mark each 4 interval between the<br />
centerline and each parallel wall.<br />
Estimating Add 5% to each figure to allow for errors (round up to the next whole number). Bill of Materials<br />
Enter this information in the “Bill of Materials” at right.<br />
1 Wall angles<br />
Room perimeter 3 12<br />
2 DONN<br />
= ___________ `5% = __________<br />
® brand main tees<br />
Total length of main tees 3 12 = ___________ `5% = __________<br />
3 DONN ® brand cross tees<br />
Count the number of cross tees<br />
drawn on your layout.<br />
4 DONN<br />
___________ `5% = __________<br />
® brand hanger wire<br />
Total length of main tees 3 4 = ___________ `5% = __________<br />
– Metal snips to cut<br />
tees and wall angles<br />
– Chalk line<br />
– Level<br />
– Pliers<br />
– Utility knife<br />
– Safety glasses<br />
For 2 x 2 ceiling panels. Additional 2 cross tees<br />
(dotted lines) are installed parallel to the main tees,<br />
2 o.c.<br />
4 Locate cross tees.<br />
Position cross tees perpendicular to the main<br />
tees, 2 o.c. For a 2 x 2 grid pattern, position<br />
additional cross tees 2 o.c. between and parallel<br />
to the main tees.<br />
1 Wall angles<br />
__________ ft., or __________ 12 lengths<br />
2 Donn main tees<br />
@ $ _______________<br />
__________ ft., or __________ 12 lengths @ $ _______________<br />
3 Donn cross tees (2) ___________ @ $ _______________<br />
Donn cross tees (4) ___________ @ $ _______________<br />
4 Donn hanger wire ___________ @ $ _______________
How to Install<br />
A <strong>Suspended</strong> <strong>Ceiling</strong><br />
Choose a ceiling<br />
height. Allow clearance<br />
of at least 4 below the<br />
lowest air duct, pipe or<br />
beam. Snap a chalk line<br />
3/4 above the desired<br />
ceiling height.<br />
Pull each hanger wire<br />
through a round hole<br />
below the bulb of the<br />
main tee and bend up,<br />
twisting the end 3 turns<br />
(within a 3 span).<br />
Install wall angles.<br />
Align the top of each<br />
wall angle along the<br />
chalk line. Space<br />
screws every 2 o.c.<br />
or closer.<br />
Install cross tees.<br />
Insert tabs into slots in<br />
the main tee. Where<br />
two cross tees occupy<br />
the same slot, insert the<br />
second cross tee to the<br />
left of the first cross tee.<br />
Manufactured by<br />
<strong>USG</strong> Interiors, Inc.<br />
550 West Adams Street<br />
Chicago, IL 60661<br />
OUTSIDE<br />
INSIDE<br />
Cut the corners.<br />
At outside corners,<br />
miter wall angles to<br />
45 degrees. At inside<br />
corners. cut angles to<br />
90 degrees and butt<br />
together.<br />
To remove a cross tee,<br />
push up on the main tee<br />
and twist away until the<br />
cross tee pops out.<br />
Product Information<br />
See usg.com for the most<br />
up-to-date product information.<br />
Mark tees. Stretch<br />
string across the room<br />
at each main-tee location.<br />
Stretch one string<br />
perpendicular to mark<br />
the first row of cross<br />
tees. (Main tees have<br />
pre-punched slots that<br />
will align the remaining<br />
cross tees.)<br />
Cutting tees is easiest<br />
with metal snips. First,<br />
cut the bulb and stem,<br />
then bend the tee at the<br />
cut and snip the face<br />
flanges. Sand or file<br />
rough edges. If metal<br />
snips are not available,<br />
use a hacksaw to saw<br />
down from the bulb<br />
through the stem and<br />
flanges; file rough edges<br />
smooth.<br />
6"<br />
Install hanger wires.<br />
Install lag screws at 4<br />
intervals along the maintee<br />
string lines. Attach<br />
a hanger wire to each<br />
screw and cut 6 below<br />
the string line. Bend<br />
each hanger wire to a<br />
90-degree angle 3/4<br />
above the string line.<br />
If arrows are printed on<br />
panel backs, install so<br />
arrows point in the same<br />
direction. Panels without<br />
arrows may be installed<br />
in any direction. Simply<br />
angle panel up through<br />
an opening, then straighten<br />
and lower until it rests<br />
evenly on the tees.<br />
800 <strong>USG</strong>-4YOU (874-4968)<br />
usg.com<br />
90<br />
R38/rev. 6-07<br />
© 2007, <strong>USG</strong> Interiors, Inc.<br />
Printed in U.S.A.<br />
O<br />
3/4"<br />
Install main tees.<br />
Trim main tees so that a<br />
cross-tee slot lines up<br />
with the cross-tee string.<br />
Cutting Tees Installing Panels Perimeter Panels<br />
Trademarks<br />
The following are trademarks of <strong>USG</strong><br />
Interiors, Inc. or a related company:<br />
Donn.<br />
Notice<br />
We shall not be liable for incidental<br />
and consequential damages, directly<br />
or indirectly sustained, nor for any loss<br />
cause by application of these goods<br />
not in accordance with current printed<br />
instructions or for other than the intended<br />
use. Our liability is expressly limited to<br />
replacement of defective goods. Any<br />
claim shall be deemed waived unless<br />
made in writing to us within thirty (30)<br />
days from date it was or reasonably<br />
should have been discovered.<br />
To cut panels for the<br />
perimeter of the ceiling,<br />
measure each of these<br />
openings between the<br />
wall and web (vertical leg)<br />
of parallel tee; check<br />
dimensions at ends and<br />
center of opening to be<br />
sure module is straight.<br />
Lay panel face-side up<br />
on flat cutting surface,<br />
mark measurement and<br />
cut with utility knife and<br />
straight edge.<br />
To trim for shadowline<br />
edge: Install panel with cut<br />
edge against wall and<br />
factory edge tight against<br />
opposite tee. Draw line on<br />
panel face along wall angle.<br />
Remove and cut panel on<br />
line to match depth of<br />
shadowline recess, then<br />
cut in from panel edge to<br />
complete shadowline detail.<br />
Safety First!<br />
Follow good safety and industrial<br />
hygiene practices during handling and<br />
installation of all products and systems.<br />
Take necessary precautions and wear<br />
the appropriate personal protective<br />
equipment as needed. Read material<br />
safety data sheets and related literature<br />
on products before specification and/<br />
or installation.
Guía de instalación:<br />
Techos suspendidos<br />
Planificación del Trabajo<br />
Use papel cuadriculado; seleccione una escala<br />
conveniente, como un cuadro por cada dos pies.<br />
Mida la longitud de cada pared al nivel del techo.<br />
Herramientas<br />
y materiales<br />
– Tornillos para madera<br />
para fijar los alambres de<br />
suspensión a las viguetas<br />
de madera a cada cuatro<br />
pies entre centros.<br />
– Alambre de acero calibre<br />
18 (en instalaciones<br />
residenciales) o alambre<br />
de acero calibre 12 (en<br />
instalaciones comerciales)<br />
– Tornillos para fijar los<br />
ángulos de pared<br />
– Tijeras de hojalatero para<br />
cortar las T y los ángulos<br />
de pared<br />
– Línea de tiza<br />
Instalación típica Patrones de T<br />
Distribución de rejilla de 2 x 4 Distribución de T de 2 x 4 Distribución de T de 2 x 2<br />
Planificación<br />
Acoustical Tiles<br />
1 Dibuje la habitación a escala.<br />
Incluya todos los detalles de áreas irregulares como<br />
ventanas panorámicas, alcobas, columnas, vigas y<br />
escaleras. Anote todas las dimensiones en el dibujo.<br />
Marque las ubicaciones de las luminarias y los<br />
difusores de aire.<br />
Para paneles de techo de 2 x 4. Las T principales<br />
de longitud completa (líneas gruesas) se colocan a 4<br />
entre centros (e.c.), según se mide desde el centro<br />
de una T hasta el centro de la siguiente, con T transversales<br />
de 4 instaladas perpendicularmente, a 2<br />
entre centros.<br />
2 Dibuje una línea central en el punto intermedio<br />
entre dos paredes paralelas.<br />
Si las viguetas son visibles, dibuje la línea central de<br />
la habitación perpendicular a las viguetas del techo.<br />
3 Ubique las T principales.<br />
La línea central representa la T principal que se<br />
instalará en la parte media de la habitación. Para<br />
las T principales adicionales, marque un intervalo a<br />
cada 4 entre la línea central y cada pared paralela.<br />
Cálculo Añada el 5% a cada cifra para compensar los errores (redondee al númer Lista de Materiales<br />
o entero próximo mayor). Ingrese esta información en la “Lista de Materiales” a la derecha.<br />
1 Ángulos de pared<br />
Perímetro de la habitación 3 12 = _________ `5% = _________<br />
2 T principales DONN ®<br />
Longitud total de las T principales 3 12 = _________ `5% = _________<br />
3 T tranversales DONN ®<br />
Cuente el número de T transversales<br />
dibujadas en su esquema. _________ `5% = _________<br />
4 Alambre de suspensión DONN ®<br />
Longitud total de las T principales 3 4 = _________ `5% = _________<br />
– Nivel<br />
– Alicates<br />
– Cuchillo para uso general<br />
– Gafas de seguridad<br />
Para paneles de techo de 2 x 2. Se instalan T<br />
transversales (líneas punteadas) adicionales de 2<br />
paralelas a las T principales, a 2 entre centros.<br />
4 Ubique las T transversales.<br />
Coloque las T transversales perpendiculares a las<br />
T principales, a 2 entre centros. Para un patrón<br />
de rejilla de 2 x 2, coloque T transversales<br />
adicionales a 2 entre centros, entre y paralelas<br />
a las T principales.<br />
1 Ángulos de pared<br />
__________ pies, o __________ 12 longitudes a<br />
2 T principales DONN<br />
$ _______________<br />
__________ pies, o __________ 12 longitudes a $ _______________<br />
3 T transversales DONN (2) ___________ a $ _______________<br />
T transversales DONN (4) ___________ a $ _______________<br />
4 Alambre de suspensión DONN ___________ a $ _______________
Cómo instalar un<br />
techo suspendido<br />
Seleccione una altura<br />
de techo. Deje una<br />
distancia libre mínima de<br />
4 debajo del conducto de<br />
aire, tubería o viga más<br />
bajos. Trace una línea de<br />
tiza a 3/4 arriba de la<br />
altura de techo deseada.<br />
Tire de cada alambre de<br />
suspensión a través de<br />
un orificio circular debajo<br />
del bulbo de la T principal<br />
y dóblela hacia arriba,<br />
girando el extremo 3<br />
vueltas (en un claro de 3).<br />
Instale los ángulos<br />
de pared.<br />
Alinee la parte superior de<br />
cada ángulo de pared con<br />
la línea de tiza. Separe los<br />
tornillos a cada 2 entre<br />
centros o menos.<br />
Instale las T<br />
transversales.<br />
Inserte las lengüetas<br />
en las ranuras en la T<br />
principal. Donde dos T<br />
transversales ocupen la<br />
misma ranura, inserte la<br />
segunda T transversal a la<br />
izquierda de la primera T<br />
transversal.<br />
Fabricado por<br />
<strong>USG</strong> Interiors, Inc.<br />
550 West Adams Street<br />
Chicago, IL 60661<br />
OUTSIDE<br />
INSIDE<br />
Corte las esquinas.<br />
En las esquinas exteriores,<br />
corte en inglete los ángulos<br />
de pared a 45 grados.<br />
En las esquinas interiores,<br />
corte los ángulos a 90<br />
grados y colóquelos a tope.<br />
Para retirar una T<br />
transversal, empuje hacia<br />
arriba la T principal y gírela<br />
hasta que la T transversal<br />
sobresalga.<br />
Información sobre productos<br />
Visite usg.com para obtener<br />
la información más actualizada<br />
sobre productos.<br />
Marque las T. Temple<br />
la cuerda a través de<br />
la habitación en cada<br />
ubicación de T principal.<br />
Temple una cuerda<br />
perpendicular a la marca<br />
en la primera fila de T<br />
transversales. (Las T<br />
principales tienen ranuras<br />
perforadas previamente<br />
que permitirán alinear las<br />
T transversales restantes.)<br />
Las T se cortan con mayor<br />
facilidad con una tijera<br />
de hojalatero. Primero,<br />
corte el bulbo y el vástago,<br />
después doble la T en<br />
el corte y separe los<br />
rebordes de la superficie.<br />
Lije o lime los bordes<br />
ásperos. Si no dispone de<br />
tijeras de hojalatero, use<br />
una sierra de mano para<br />
cortar desde el bulbo a<br />
través del vástago y los<br />
rebordes; lime los bordes<br />
ásperos para dejarlos lisos.<br />
6"<br />
Instale los alambres<br />
de suspensión.<br />
Instale tornillos con rosca<br />
para madera a intervalos<br />
de 4 a lo largo de las<br />
líneas de cordel de las T<br />
principales. Fije un alambre<br />
de suspensión en cada<br />
tornillo y corte 6 debajo<br />
de la línea de la cuerda.<br />
Pliegue cada alambre de<br />
suspensión con un ángulo<br />
de 90 grados a 3/4 arriba<br />
de la línea de la cuerda.<br />
Si hay flechas impresas en<br />
los dorsos de los paneles,<br />
instálelos de manera que<br />
las flechas apunten en una<br />
sola dirección. Los paneles<br />
sin flechas se pueden<br />
instalar en cualquier<br />
dirección. Sencillamente<br />
incline el panel hacia arriba<br />
a través de una abertura,<br />
después nivélelo y bájelo<br />
hasta que se apoye<br />
uniformemente en las T.<br />
800 <strong>USG</strong>-4YOU (874-4968)<br />
usg.com<br />
R38/rev. 6-07<br />
© 2007, <strong>USG</strong> Interiors, Inc.<br />
Impreso en EE.UU.<br />
90<br />
O<br />
3/4"<br />
Instale las T principales.<br />
Recorte las T principales de<br />
manera que una ranura de<br />
la T transversal se alinee<br />
con la cuerda de las T<br />
transversales.<br />
Corte de T Instalación de paneles Paneles perimetrales<br />
Marcas comerciales<br />
Las marcas comerciales que se indican<br />
a continuación y que se utilizan en el<br />
presente documento son propiedad de<br />
<strong>USG</strong> <strong>Corporation</strong> o de sus subsidiarias:<br />
Donn.<br />
Aviso<br />
No nos haremos responsables<br />
por daños incidentales o indirectos,<br />
sostenidos directa o indirectamente, ni<br />
por cualquier pérdida causada por la<br />
aplicación de estos productos sin seguir<br />
las instrucciones impresas incluidas, o por<br />
el uso que no sea el correspondiente a su<br />
diseño. Nuestra responsabilidad se limita<br />
expresamente al reemplazo de productos<br />
defectuosos. Cualquier reclamación será<br />
considerada nula a menos que se nos<br />
haga llegar a nosotros por escrito en un<br />
plazo de treinta (30) días a partir de<br />
la fecha en que se descubrió el problema<br />
o en que, razonablemente, debió haberse<br />
descubierto.<br />
Para cortar los paneles para<br />
el perímetro del techo, mida<br />
cada una de estas aberturas<br />
entre la pared y el alma (pata<br />
vertical) de la T paralela;<br />
verifique las dimensiones en<br />
los extremos y el centro de<br />
la abertura para cerciorarse<br />
de que el módulo esté recto.<br />
Coloque el panel con el frente<br />
hacia arriba sobre una superficie<br />
de corte plana, marque<br />
las medidas y corte con un<br />
cuchillo para uso general y<br />
una regla de borde recto.<br />
Para recortar el borde<br />
“shadowline”: Instale el panel<br />
con el borde de corte contra<br />
la pared y el borde de fábrica<br />
ajustado contra la T opuesta.<br />
Marque una línea en la<br />
superficie del panel a lo largo<br />
del ángulo de pared. Retire<br />
y corte el panel en la línea<br />
con la misma medida que la<br />
profundidad del rebajo en el<br />
“shadowline”, después corte<br />
desde el borde del panel<br />
para completar el detalle<br />
“shadowline”.<br />
¡La seguridad es lo primero!<br />
Siga todas las prácticas de seguridad<br />
e higiene industrial durante el manejo<br />
y la instalación de todos los productos<br />
y sistemas. Tome las precauciones<br />
necesarias y lleve puesto el equipo de<br />
protección personal apropiado según<br />
sea necesario. Lea las hojas de datos<br />
de seguridad del material y cualquier<br />
información relacionada sobre los<br />
productos antes de la especificación<br />
y/o la instalación.