ajustador de flujo - Rain Bird
ajustador de flujo - Rain Bird
ajustador de flujo - Rain Bird

You also want an ePaper? Increase the reach of your titles
YUMPU automatically turns print PDFs into web optimized ePapers that Google loves.
ENGLISH ▼<br />
GENERAL INFORMATION<br />
The R-50 can be set to full circle (360º) or part circle operation<br />
(25º–350º) without the use of tools. The sprinklers are factory preset<br />
to approximately 180º or half circle.<br />
The left si<strong>de</strong> of the arc is fixed. This fixed position on<br />
the sprinkler can be i<strong>de</strong>ntified by finding double ribs<br />
on the outsi<strong>de</strong> of the body (see illustration #1).<br />
Because the left si<strong>de</strong> of the arc is fixed, it is necessary<br />
to install the sprinkler taking into consi<strong>de</strong>ration its<br />
position with respect to the boundaries of area to be<br />
watered. It is possible to turn the entire sprinkler, once<br />
installed on its fitting, to modify the position of the<br />
double ribs and thereby affect the left si<strong>de</strong> of the arc.<br />
The nozzle turret can be turned manually during<br />
operation to check the arc you have set.<br />
R-50 Series Rotor<br />
Installation Instructions<br />
CONTENTS ▼<br />
General Information pg. 1 pág. Información General<br />
Tips on Installation 2 Sugerencias para la instalación<br />
Adjustable Bypass 2 Control <strong>de</strong> <strong>flujo</strong><br />
“Quick Change” Nozzles 4 Cambio <strong>de</strong> la boquilla<br />
Part Circle Adjustment 5 Ajuste <strong>de</strong>l arco–círculo parcial<br />
Full Circle Adjustment 6 Ajuste <strong>de</strong>l arco–círculo completo<br />
▼ ESPAÑOL<br />
▲ CONTENIDO<br />
INFORMAClON GENERAL<br />
El arco <strong>de</strong>l aspersor R-50 pue<strong>de</strong> ser ajustado manualmente <strong>de</strong><br />
círculo completo (360º) o <strong>de</strong> círculo parcial (25º a 350º). Los<br />
aspersores R-50 son <strong>de</strong>spachados <strong>de</strong> fábrica con su arco prefijado<br />
<strong>de</strong> aproximadamente 180º, o medio círculo.<br />
1<br />
2<br />
El lado izquierdo <strong>de</strong>l arco es fijo. Pue<strong>de</strong> i<strong>de</strong>ntificarse la<br />
posición <strong>de</strong>l límite izquierdo <strong>de</strong>l arco (el “stop”) localizando<br />
las varillas dobles sobresalientes en la parte<br />
superior <strong>de</strong>l cuerpo <strong>de</strong>l aspersor (vea la ilustración #1).<br />
Como el límite izquierdo <strong>de</strong>l arco es fijo, es necesario<br />
instalar el aspersor tomando en cuenta su posición<br />
respecto al bor<strong>de</strong> izquierdo <strong>de</strong>l area a regar. Es posible<br />
girar el aspersor completo, una vez instalado, para<br />
modificar la posición <strong>de</strong> las varillas dobles, así<br />
moviendo el lado izquierdo <strong>de</strong>l arco.<br />
Es posible girar la cabeza <strong>de</strong>l aspersor manualmente<br />
cuando está en operación para chequear el arco que<br />
Usted ha ajustado.
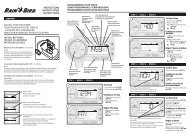
R-50 Installation Instructions R-50 Instrucciones para la Instalación<br />
A unit set to full is a true, not a<br />
reversing full circle, and it operates<br />
in only one direction for superior irrigation<br />
efficiency. (See pages 5 and<br />
6 to set the arc.)<br />
3<br />
The vandal collar located on the riser<br />
shaft must be spread and pushed<br />
down to allow adjustments to the arc. When properly pushed down,<br />
it will return to its track automatically when it pops down if you<br />
forget to do so.<br />
TIPS ON INSTALLATION<br />
As with all sprinkler products, you must flush the system<br />
thoroughly prior to installing the R-50s.<br />
You must use only teflon tape to make your water tight sealed connections.<br />
The use of other compounds may chemically damage and<br />
weaken the body to fitting thread connections.<br />
The finished installation height is correct when the part<br />
of the cap as indicated is at finished gra<strong>de</strong> level.<br />
The optimum operating pressure of R-50 sprinklers is<br />
45 PSI. After installation, if you have the means to set<br />
your system pressure, adjust it to the <strong>de</strong>sired 45 PSI.<br />
The radius adjustment screw, located on top of the nozzle<br />
turret in the colored nozzle retainer, can be used to<br />
reduce radius of throw by up to 25%. Simply use a<br />
small flat bla<strong>de</strong> screwdriver to turn the screw into the<br />
water stream. The screw is captive and cannot fly out.<br />
2<br />
Un aspersor R-50 con su arco prefijado<br />
en círculo completo gira en una<br />
sola dirección, sin que se <strong>de</strong>vuelva su<br />
chorro, para una mayor eficiencia<br />
<strong>de</strong>l riego. (Vea las páginas 5 y 6 para<br />
ajustar el arco.)<br />
4 Cuando se ajusta el arco, primero es<br />
necesario abrir el collar protector<br />
(“vandal collar”) y empujarlo hacia abajo en el elevador. No lo<br />
quite. De esta manera, el collar se <strong>de</strong>volverá a su posición original<br />
automáticamente cuando el aspersor se retracte, aunque Usted<br />
haya olvidado hacerlo.<br />
SUGERENCIAS PARA LA INSTALAClON<br />
Al igual que todos los productos <strong>de</strong> riego, se <strong>de</strong>be limpiar el<br />
sistema cuidadosamente antes <strong>de</strong> instalar los R-50s.<br />
Use unicamente cinta <strong>de</strong> teflón en las conexiones para evitar fugas<br />
<strong>de</strong> agua. El uso <strong>de</strong> pegamentos u otros compuestos podría producir<br />
reacciones químicas que pue<strong>de</strong>n dañar y <strong>de</strong>bilitar el cuerpo <strong>de</strong>l<br />
aspersor, impidiendo un sellado apropiado.<br />
5<br />
6<br />
La altura final <strong>de</strong> la instalación <strong>de</strong>l aspersor R-50 es<br />
correcta cuando la parte <strong>de</strong> la tapa indicada en la<br />
ilustración que<strong>de</strong> al nivel <strong>de</strong>l suelo.<br />
La óptima presión <strong>de</strong> operación es <strong>de</strong> 45 libras (PSI).<br />
Si el sistema posee los mecanismos reguladores <strong>de</strong><br />
presión, ajuste la presión a 45 libras <strong>de</strong>spués <strong>de</strong> completar<br />
la instalación.<br />
El tornillo <strong>de</strong> ajuste <strong>de</strong>l radio <strong>de</strong> tiro, localizado en la<br />
parte superior <strong>de</strong> la cabeza <strong>de</strong>l aspersor, pue<strong>de</strong> ser<br />
usado para reducir el radio <strong>de</strong> tiro hasta un 25%.<br />
Simplemente use un <strong>de</strong>stornillador plano para introducir<br />
el tornillo en el <strong>flujo</strong> <strong>de</strong> agua. El tornillo está<br />
seguro y no pue<strong>de</strong> salirse.
R-50 Installation Instructions R-50 Instrucciones para la Instalación<br />
ADJUSTABLE BYPASS<br />
STANDARD MODELS<br />
The adjustable bypass featured on the base of the standard<br />
mo<strong>de</strong>ls of the R-50 allows you to balance the flow of water<br />
through the drive mechanism to the nozzle.<br />
Always check to ensure that the position of the bypass<br />
matches the nozzle size of the sprinkler.<br />
Follow these steps to change the bypass setting:<br />
❶<br />
❷<br />
❶<br />
❷<br />
Insert a flat bla<strong>de</strong> screwdriver into the slot at the<br />
bottom of the sprinkler inlet.<br />
Turn the slot so that it aligns with the <strong>de</strong>sired setting<br />
based on the nozzle size in the unit. (illustration<br />
shows changing from 2.0 to 3.0 to match a nozzle<br />
with a size 3 GPM).<br />
ADJUSTABLE BYPASS:<br />
SAM AND SHRUB MODELS<br />
Remove the internal assembly from the case. The<br />
lower portion of the internal assembly is composed<br />
of two white parts: a screen and the drive housing.<br />
There are two ridges on the screen and the drive<br />
housing has two series of markings. These marks<br />
indicate the size of the nozzle (see key below.)<br />
Grasp the drive housing and turn the screen until the<br />
ridges on the screen align with the <strong>de</strong>sired nozzle<br />
size.<br />
Key: 1.5 2.0 3.0 4.0 6.0<br />
AJUSTADOR DE FLUJO<br />
MODELO ESTANDAR<br />
El mo<strong>de</strong>lo estándar <strong>de</strong>l aspersor R-50 posee un <strong>ajustador</strong> <strong>de</strong> <strong>flujo</strong><br />
(“adjustable bypass”) en la base, el cual regula el <strong>flujo</strong> <strong>de</strong> agua<br />
que pasa por el interior y sale por la boquilla.<br />
7<br />
8<br />
9<br />
10<br />
11<br />
Siempre chequée que la posición <strong>de</strong>l <strong>ajustador</strong> <strong>de</strong> <strong>flujo</strong><br />
coincida con el tamaño <strong>de</strong> la boquilla.<br />
Siga estos pasos para cambiar la posición <strong>de</strong>l <strong>ajustador</strong><br />
<strong>de</strong> <strong>flujo</strong>:<br />
❶<br />
❷<br />
❶<br />
❷<br />
Inserte un <strong>de</strong>stornillador plano en el tornillo blanco<br />
en la base <strong>de</strong>l aspersor.<br />
Gire el tornillo hasta alinearlo con el número indicando<br />
el tamaño <strong>de</strong> la boquilla instalada. (La ilustración<br />
muestra el cambio <strong>de</strong> control <strong>de</strong> <strong>flujo</strong> <strong>de</strong> 2<br />
o 3 galones para alinear con una boquilla <strong>de</strong> 3<br />
galones.)<br />
AJUSTADOR DE FLUJO:<br />
MODELOS COMERCIAL (“SAM”)<br />
Y ENANO (“SHRUB”)<br />
Quite el ensamblaje <strong>de</strong>l casco. La parte blanca <strong>de</strong>l<br />
ensamblaje interno consiste en dos piezas: el filtro<br />
(abajo) y el casco (arriba). En el filtro hay dos orejitas<br />
sobresalientes mientras que el casco tiene dos<br />
series <strong>de</strong> ranuras o marcas. Estas marcas indican<br />
el tamaño <strong>de</strong> la boquilla (vea la clave abajo).<br />
Sujete el casco blanco y gire el filtro hasta que las<br />
orejitas se alinéen con las marcas que indican el<br />
tamaño correcto <strong>de</strong> la boquilla instalada.<br />
Clave: 1.5 2.0 3.0 4.0 6.0<br />
3
R-50 Installation Instructions R-50 Instrucciones para la Instalación<br />
❸ ❸<br />
When returning the internal assembly to the case,<br />
ensure that you align the double ribs on the outsi<strong>de</strong><br />
of the case with the larger opening on the top of the<br />
drive housing.<br />
In some low pressure applications, you may be able to<br />
increase rotation speed by setting the bypass position<br />
one less than the nozzle size.<br />
Ex: For a 3.0 nozzle at 25 PSI set the bypass to 2.0 setting<br />
if you are experiencing slow rotation.<br />
“QUICK CHANGE” NOZZLES<br />
To change the nozzle follow these steps:<br />
❶<br />
❷<br />
❸<br />
❹<br />
❺<br />
❻<br />
❼<br />
4<br />
The first step on nozzle changing is to reset the<br />
adjustable bypass setting as previously discussed<br />
to the size of the nozzle you are inserting.<br />
To lift the riser stem place a small, flathead screwdriver<br />
in the slot on either si<strong>de</strong> of the top and pull<br />
up on the screwdriver, as indicated in illustrations<br />
#13 & 14.<br />
Once you have lifted the riser up, grasp at the<br />
base to hold it up.<br />
Use a regular flathead screwdriver to pop the<br />
nozzle retainer out as pictured in illustrations<br />
#15, 16, & 17<br />
Insert the screwdriver into<br />
the cavity where the retainer<br />
was, position the screw<br />
driver in the slot on the top<br />
of the nozzle and push it out.<br />
Align the new nozzle with<br />
the open cavity making sure<br />
it is properly positioned.<br />
The lip of the nozzle goes<br />
on the top.<br />
Snap a new color co<strong>de</strong>d<br />
retainer in place to secure<br />
the nozzle. Do not reuse the<br />
old retainer.<br />
12<br />
Para reinstalar el ensamblaje interno al casco,<br />
asegúrese <strong>de</strong> alinear la doble marca en el interior<br />
<strong>de</strong>l casco <strong>de</strong>l aspersor con la ranura ancha en la<br />
parte superior <strong>de</strong>l casco blanco.<br />
En algunas instalaciones con situaciones <strong>de</strong> baja presión,<br />
es posible aumentar la velocidad con que rota el<br />
aspersor fijando el <strong>ajustador</strong> <strong>de</strong> <strong>flujo</strong> en un número<br />
menos que el tamaño <strong>de</strong> la boquilla.<br />
Ej: Para una boquilla <strong>de</strong> 3 galones con una presión <strong>de</strong><br />
25 libras, fije el <strong>ajustador</strong> <strong>de</strong> <strong>flujo</strong> en 2.0 si la rotación<br />
<strong>de</strong>l aspersor es lenta.<br />
CAMBIO DE LA BOQUILLA<br />
Para cambiar la boquilla <strong>de</strong>l R-50, siga estos pasos:<br />
15 16 17<br />
18<br />
13<br />
14<br />
❶<br />
❷<br />
❸<br />
❹<br />
El primer paso para cambiar la boquilla es alinear<br />
el <strong>ajustador</strong> <strong>de</strong> <strong>flujo</strong> con el tamaño <strong>de</strong> la nueva<br />
boquilla, como se <strong>de</strong>cribió anteriormente.<br />
Para levantar el elevador inserte un pequeño<br />
<strong>de</strong>stornillador plano en la tapa y levántela como se<br />
indica en las ilustraciones #13 y 14.<br />
Una vez levantada, sosténgalo en la base para<br />
evitar que se retracte.<br />
Use un <strong>de</strong>stornillador pequeño para quitar el<br />
retenedor <strong>de</strong> la boquilla como se indica en las ilustraciones<br />
#15, 16 & 17.<br />
19<br />
❺<br />
❻<br />
❼<br />
Inserte el <strong>de</strong>stornillador en la<br />
cavidad don<strong>de</strong> estaba el<br />
retenedor, coloque el <strong>de</strong>stornillador<br />
sobre la ranura<br />
<strong>de</strong> la boquilla y empújela<br />
hacia afuera.<br />
Inserte la nueva boquilla en<br />
el hueco con la ranura hacia<br />
arriba.<br />
Instale un retenedor nuevo<br />
que coinci<strong>de</strong> en color y<br />
tamaño con la nueva boquilla.<br />
No reuse el viejo.
R-50 Installation Instructions R-50 Instrucciones para la Instalación<br />
ARC ADJUSTMENT<br />
PART CIRCLE<br />
To change the arc, follow these steps:<br />
❶<br />
❷<br />
❸<br />
Ensure the left, fixed trip is where you want it. This<br />
position is indicated by the double ribs on the<br />
body below the cap as previously discussed on<br />
page #1 (illustration #1).<br />
While the sprinkler is up and operating, spread the<br />
vandal collar and sli<strong>de</strong> it down the riser shaft as<br />
previously illustrated on page #2 (illustrations #3<br />
& 4). Do not remove the vandal collar.<br />
You may add arc by turning the nozzle turret<br />
in a clockwise direction. Hold the riser in<br />
one hand. With the other push down on the nozzle<br />
turret and while still holding down, dial in the<br />
additional arc you need. Remember the preset arc<br />
is 180º and you need to add the additional amount<br />
you need, not the entire arc you want to end up<br />
with.<br />
Ex: The sprinkler’s arc is preset to 180º and you want<br />
270º. While holding down and turning to the right, add<br />
90º only. 180º + 90º = 270º.<br />
Remember to return the vandal collar to its original<br />
position.<br />
❹<br />
You may <strong>de</strong>crease arc by turning the nozzle<br />
turret in a counterclockwise direction. Hold<br />
the riser with one hand. With the other push<br />
down on the nozzle turret and while still pushing<br />
down, subtract the amount of arc you wish to<br />
remove from the existing arc. Once again, the<br />
arc is preset to 180º and you need to subtract arc<br />
to get to where you wish it to be set.<br />
Ex: The sprinkler’s arc is preset to 180º and you want 90º.<br />
While holding down and turning to the left, subtract 90º<br />
only. 180º– 90º=90º.<br />
Remember to return the vandal collar to its original position.<br />
Para ajustar el arco, siga estos pasos.<br />
20<br />
21<br />
22<br />
❶<br />
❷<br />
❸<br />
AJUSTE DEL ARCO<br />
CIRCULO PARCIAL<br />
Asegúrese <strong>de</strong> que el aspersor esté instalado para<br />
que el límite izquierdo <strong>de</strong> su arco esté en posición<br />
correcta. Esta posición se indica por las dos marcas<br />
en el cuerpo <strong>de</strong>l aspersor, como se explicó en la<br />
página #1 (ilustración #1).<br />
Cuando el aspersor esté levantado y funcionando,<br />
abra el collar protector y bájelo en el elevador,<br />
como ya se ha indicado en la página #2 (ilustraciones<br />
#3 y 4). No quite el collar protector<br />
Se incrementa el arco girando la cabeza <strong>de</strong>l aspersor<br />
a la <strong>de</strong>recha (en sentido <strong>de</strong> las manecillas <strong>de</strong>l<br />
reloj). Sostenga el elevador con una mano. Con la<br />
otra presione hacia abajo en la cabeza <strong>de</strong>l aspersor<br />
y simultáneamente gírela a la <strong>de</strong>recha para incrementar<br />
el arco. Recuer<strong>de</strong> que el arco prefijado en<br />
la fábrica es <strong>de</strong> 180º; si Usted necesita un mayor<br />
arco, solo es necesario adicionar el arco <strong>de</strong>seado<br />
menos 180º y no el arco total que <strong>de</strong>sea obtener.<br />
Ej: El aspersor viene con su arco prefijado a 180º y<br />
Usted quiere que sea <strong>de</strong> 270º. Mientras presione la<br />
cabeza <strong>de</strong>l aspersor hacia abajo, gírela a la <strong>de</strong>recha<br />
90º solamente. 270º – 180º = 90º.<br />
Recuer<strong>de</strong> <strong>de</strong>volver el collar protector a su posición<br />
original.<br />
❹<br />
Se reduce el arco girando la cabeza <strong>de</strong>l aspersor a<br />
la izquierda (en sentido contrario a las manecillas<br />
<strong>de</strong>l reloj). Sostenga el elevador con una mano. Con<br />
la otra presione hacia abajo en la cabeza <strong>de</strong>l<br />
aspersor y simultáneamente gírela a la izquierda<br />
para reducir el arco. Recuer<strong>de</strong> que el arco prefijado<br />
en la fábrica es <strong>de</strong> 180º; si Usted necesita un<br />
arco menor, solo es necesario reducir el arco por la<br />
diferencia entre 180º y el arco <strong>de</strong>seado.<br />
Ej: El aspersor viene con su arco prefijado a 180º y Usted quiere<br />
que sea <strong>de</strong> 90º. Mientras presione la cabeza <strong>de</strong>l aspersor hacia<br />
abajo, gírela a la izquierda 90º solamente. 90º–l80º=90º.<br />
Recuer<strong>de</strong> <strong>de</strong>volver el collar protector a su posición original.<br />
5
R-50 Installation Instructions R-50 Instrucciones para la Instalación<br />
ARC ADJUSTMENT<br />
FULL CIRCLE<br />
To change from the existing arc to full circle<br />
operation, follow these steps:<br />
❶<br />
❷<br />
❸<br />
❹<br />
❺<br />
❻<br />
❼<br />
Remove the internal assembly from the case by<br />
unscrewing the cap.<br />
Spread the vandal collar and push it down as previously<br />
discussed (illustrations #3 & 4).<br />
Push down on the nozzle turret. Ensure that the<br />
vandal collar gap <strong>de</strong>creases to indicate you have<br />
moved into the adjustment mo<strong>de</strong> (illustration #20).<br />
While holding down, turn the nozzle turret clockwise<br />
(right) until a strong resistance is felt. It<br />
should feel as though it is locked into place.<br />
Release the nozzle and return the vandal collar to<br />
its original position place.<br />
Turn the nozzle to the right (clockwise) to verify<br />
full circle set. You should feel no resistance anywhere<br />
in the 360º turn.<br />
To convert the arc once again to a part circle, open<br />
the vandal collar, push down on the nozzle turret<br />
and while still pushing down, turn it to the right<br />
past the trip. Once past the trip you will be <strong>de</strong>fining<br />
the new part circle arc.<br />
<strong>Rain</strong> <strong>Bird</strong> Sales, Inc. – Contractor Division<br />
145 North Grand Avenue<br />
Glendora, California 91741 USA P/N 114194 Rev. C<br />
6<br />
FOR TECHNICAL ADVICE CALL: 1-800-247-3782<br />
23<br />
24<br />
25<br />
AJUSTE DEL ARCO<br />
CIRCULO COMPLETO<br />
Para cambiar el arco <strong>de</strong> círculo parcial a círculo<br />
completo, siga estos pasos:<br />
❶<br />
❷<br />
❸<br />
❹<br />
❺<br />
❻<br />
❼<br />
Quite el ensamblaje interno <strong>de</strong>l aspersor <strong>de</strong>senroscando<br />
la tapa.<br />
Abra el collar protector y bájelo como se <strong>de</strong>talló<br />
anteriormente (ilustraciones # 3 y 4).<br />
Presione hacia abajo en la cabeza <strong>de</strong>l aspersor. La<br />
ranura don<strong>de</strong> estaba el collar <strong>de</strong>be parecer<br />
reducirse ilustración #20).<br />
Todavía presionando hacia abajo, gire la cabeza a<br />
la <strong>de</strong>recha (en sentido <strong>de</strong> las manecillas <strong>de</strong>l reloj)<br />
hasta que se sienta una resistencia fuerte. La<br />
cabeza parece no po<strong>de</strong>r girar mas.<br />
Devuelva el collar protector a su posición original.<br />
Gire la cabeza a la <strong>de</strong>recha para chequear que el<br />
arco esté en círculo completo. No se <strong>de</strong>be sentir<br />
ninguna resistencia al giro <strong>de</strong> 360º.<br />
Para convertir el arco nuevamente en un circulo<br />
parcial, abra el collar protector, presione la cabeza<br />
<strong>de</strong>l aspersor hacia abajo y gírela a la <strong>de</strong>recha<br />
hasta pasar el “trip” (don<strong>de</strong> estaba el límite <strong>de</strong>l<br />
arco). Una vez pasado el trip, Usted estará<br />
<strong>de</strong>finiendo el nuevo arco.<br />
<strong>Rain</strong> <strong>Bird</strong> – Conserving more than water.<br />
Printed on recycled paper.