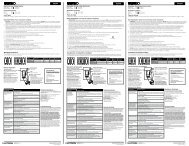
Wallbox Input Closure Interface Install 041381a - Lutron
Wallbox Input Closure Interface Install 041381a - Lutron
Wallbox Input Closure Interface Install 041381a - Lutron

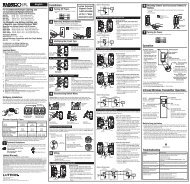
Create successful ePaper yourself
Turn your PDF publications into a flip-book with our unique Google optimized e-Paper software.
<strong>Install</strong>ation Instructions<br />
Please Read Before <strong>Install</strong>ing<br />
Important Notes<br />
Codes: <strong>Install</strong> in accordance<br />
with all local and national<br />
electrical codes.<br />
Environment: Ambient<br />
operating temperature: 0 °C<br />
to 40 °C (32 °F to 104 °F), 0 to<br />
90% relative humidity, noncondensing.<br />
Designed for indoor<br />
use only.<br />
English<br />
<strong>Wallbox</strong>: <strong>Lutron</strong> recommends<br />
using a wallbox which is 60 mm (2 1 ⁄2 in) deep x 60 mm (2 1 ⁄2 in)<br />
wide, when installing the QSE-CI-WCI with most controls. Note:<br />
Some applications may require a deeper wallbox.<br />
QS Link Limits: The QSE-CI-WCI consumes 1 Power Draw Unit<br />
(PDU). For more information on PDUs, see “Power Draw Units on<br />
®<br />
the QS Link”, <strong>Lutron</strong>R PN 369405, at www.lutron.com/qs<br />
MUX MUX PWR COM<br />
4<br />
3<br />
2<br />
Terminals: Accept up to two 1.0 mm 2<br />
(18 AWG) wires, one twisted shielded pair<br />
0.5 mm 2 (22 AWG) wire or one 4.0 mm 2<br />
(12 AWG) wire typical. For wiring limits, see<br />
chart below:<br />
Length Wire Gauge <strong>Lutron</strong>R Cable<br />
Less than Common (terminal 1) one 1.0 mm<br />
153 m<br />
(500 ft)<br />
2 (18 AWG) GRX-CBL-346S<br />
Power (terminal 2) one 1.0 mm (non-plenum)<br />
GRX-PCBL-346S<br />
(plenum)<br />
2 (18 AWG)<br />
Data (terminals 3 and 4) one twisted,<br />
shielded pair 0.5 mm2 (22 AWG)<br />
153 m to Common (terminal 1) one 4.0 mm<br />
610 m<br />
(500 ft to<br />
2000 ft)<br />
2 (12 AWG) GRX-CBL-46L<br />
Power (terminal 2) one 4.0 mm<br />
(non-plenum)<br />
GRX-PCBL-46L<br />
(plenum)<br />
2 (12 AWG)<br />
Data (terminals 3 and 4) one twisted,<br />
shielded pair 0.5 mm( (22 AWG)<br />
Note: The QSW-CI-WCI is designed to work with a contact<br />
closure keypad. The contact closure keypad must be provided by<br />
the customer. It is not included with the QSE-CI-WCI.<br />
Application Programming: When the QSE-CI-WCI is part of a<br />
HomeWorksR QS or QuantumR system, program the QSE-CI-WCI<br />
through the appropriate system setup software. For installations<br />
without a processor (standalone), please refer to the “QS <strong>Wallbox</strong><br />
<strong>Closure</strong> <strong>Interface</strong> Programming Guide”, <strong>Lutron</strong>R P/N 041395, at<br />
www.lutron.com<br />
Technical Assistance:<br />
U.S.A. / Canada: 1.800.523.9466<br />
Mexico: +1.888.235.2910<br />
Brazil: +55 11 3257 6745<br />
United Kingdom:<br />
+44.(0)20.7680.4481<br />
India: +91.124.471.1900<br />
<strong>Lutron</strong> Elec tron ics Co., Inc.<br />
7200 Suter Road<br />
Coopersburg, PA 18036-1299<br />
P/N 041381 Rev. A 10/2012<br />
1<br />
Instrucciones de instalación<br />
Por favor lea antes de instalar<br />
Notas importantes<br />
Códigos: Instale de acuerdo con<br />
todos los códigos eléctricos locales<br />
y nacionales.<br />
Entorno: Temperatura ambiental de<br />
operación: 0 °C a 40 °C, humedad<br />
relativa 0 a 90% , sin condensación.<br />
diseñado para uso bajo techo<br />
únicamente.<br />
®<br />
<strong>Wallbox</strong> <strong>Input</strong> <strong>Closure</strong> <strong>Interface</strong>:<br />
QSE-CI-WCI<br />
IEC PELV/NECR Class 2<br />
24 V- 20 mA<br />
1 2 3 4 5 6 7 8<br />
QSE-CI-WCI<br />
INPUTS<br />
ENTRADA<br />
ENTRÉES<br />
COM<br />
1 2 3 4 5 6 7 8<br />
United Arab Emirates:<br />
+971.4.299.1224<br />
China: 10.800.120.1536<br />
Singapore: 800.120.4491<br />
Other Countries:<br />
+1.610.282.3800<br />
Caja de empotrar: <strong>Lutron</strong><br />
recomienda el uso de una caja de<br />
empotrar que sea de 60 mm de<br />
profundidad x 60 mm de ancho, al instalar el QSE-CI-WCI con la mayoría<br />
de los controles. Nota: Algunas aplicaciones podrían requerir una caja de<br />
empotrar más profunda.<br />
Límites de QS Link: La QSE-CI-WCI consume una unidad de consumo<br />
de energía (PDU). Para obtener más información sobre las PDU, consulte<br />
“Unidades de Consumo de energía en el enlace QS”, <strong>Lutron</strong>R NP 369405, en<br />
®<br />
www.lutron.com/qs<br />
Longitud<br />
Menor<br />
que<br />
153 m<br />
153 m a<br />
610 m<br />
MUX MUX PWR COM<br />
4<br />
3<br />
2<br />
Terminales: Aceptan hasta dos cables de<br />
1,0 mm 2 , un par retorcido blindado de 0,5 mm 2 o<br />
típicamente un cable de 4,0 mm 2 . Para los límites<br />
del cableado, consulte la siguiente tabla:<br />
Calibre del cable Cable <strong>Lutron</strong>R<br />
Común (terminal 1) uno de 1,0 mm 2 GRX-CBL-346S<br />
Alimentación eléctrica (terminal 2) uno de<br />
1,0 mm 2<br />
Datos (terminales 3 y 4) un par retorcido<br />
blindado de 0,5 mm 2<br />
®<br />
ON<br />
1 2<br />
(sin plenum)<br />
GRX-PCBL-346S<br />
(con plenum)<br />
Común (terminal 1) uno de 4.0 mm 2 GRX-CBL-46L<br />
Alimentación eléctrica (terminal 2) uno de<br />
4,0 mm 2<br />
Datos (terminales 3 y 4) un par retorcido<br />
blindado de 0,5 mm 2<br />
(sin plenum)<br />
GRX-PCBL-46L<br />
(con plenum)<br />
Nota: El QSW-CI-WCI está diseñado para trabajar con un teclado<br />
de cierre de contactos. El teclado de cierre de contactos debe ser<br />
proporcionado por el cliente. No se incluye con el QSE-CI-WCI.<br />
Programación de la aplicación: Cuando el QSE-CI-WCI sea parte de un<br />
sistema HomeWorksR QS o QuantumR, programe el QSE-CI-WCI por medio<br />
del software de configuración de sistema apropiado. Para instalaciones<br />
sin un procesador (autónomas), consulte la “Guía de programación de la<br />
interfaz de cierre de la caja de empotrar de QS”, <strong>Lutron</strong>R N/P 041395, en<br />
www.lutron.com<br />
Asistencia técnica:<br />
E.U.A. / Canadá: 1.800.523.9466<br />
México: +1.888.235.2910<br />
Brasil: +55 11 3257 6745<br />
Reino Unido:<br />
+44.(0)20.7680.4481<br />
India: +91.124.471.1900<br />
<strong>Lutron</strong> Electronics Co., Inc.<br />
7200 Suter Road<br />
Coopersburg, PA 18036-1299<br />
P/N 041381 Rev. A 10/2012<br />
1<br />
®<br />
Español<br />
Interfaz de cierre de la entrada de<br />
la caja de empotrar: QSE-CI-WCI<br />
IEC PELV/NECR Clase 2<br />
24 V- 20 mA<br />
1 2 3 4 5 6 7 8<br />
QSE-CI-WCI<br />
INPUTS<br />
ENTRADA<br />
ENTRÉES<br />
COM<br />
1 2 3 4 5 6 7 8<br />
Emiratos Árabes Unidos:<br />
+971.4.299.1224<br />
China: 10.800.120.1536<br />
Singapur: 800.120.4491<br />
Otros países:<br />
+1.610.282.3800<br />
®<br />
ON<br />
1 2<br />
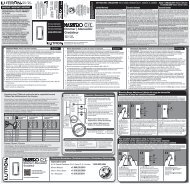
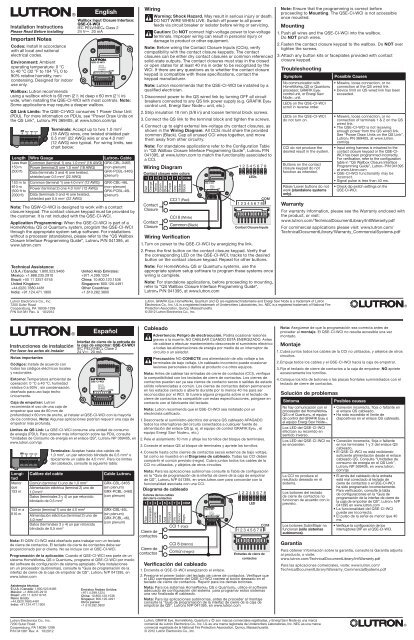
Wiring<br />
Warning: Shock Hazard. May result in serious injury or death.<br />
DO NOT WIRE WHEN LIVE. Switch off power to all power<br />
feeds via circuit breaker or isolator before wiring or servicing.<br />
Caution: Do NOT connect high-voltage power to low-voltage<br />
terminals. Improper wiring can result in personal injury or<br />
damage to product or other equipment.<br />
Note: Before wiring the Contact <strong>Closure</strong> <strong>Input</strong>s (CCIs), verify<br />
compatibility with the contact closure keypads. The contact<br />
closures can be either dry contact closures or common referenced<br />
solid-state outputs. The contact closures must stay in the closed<br />
or open states for at least 40 ms in order to be recognized by the<br />
WCI. If there are any questions as to whether the contact closure<br />
keypad is compatible with these specifications, contact the<br />
keypad manufacturer.<br />
Note: <strong>Lutron</strong> recommends that the QSE-CI-WCI be installed by a<br />
qualified electrician.<br />
1. Disconnect power to the QS wired link by turning OFF all circuit<br />
breakers connected to any QS link power supply (e.g. GRAFIK EyeR<br />
control unit, Energi Savr NodeTM unit, etc.).<br />
2. Strip insulation 10 mm (3/8 in) and loosen terminal block screws.<br />
3. Connect the QS link to the terminal block and tighten the screws.<br />
4. Connect up to eight external low-voltage dry contact closures, as<br />
shown in the Wiring Diagram. All CCIs must share the provided<br />
common (Black). Cap all unused CCI wires together, and move<br />
them away from other circuitry.<br />
Note: For standalone applications refer to the Configuration Table<br />
in “QS <strong>Wallbox</strong> <strong>Closure</strong> <strong>Interface</strong> Programming Guide”, <strong>Lutron</strong>R P/N<br />
041395, at www.lutron.com to match the functionality associated to<br />
a CCI.<br />
Wiring Diagram<br />
1 2 3 4 5 6 7 8<br />
1 2 3 4 5 6 7 8<br />
ON<br />
Contact closure wire colors<br />
1 2<br />
1 2 3 4 5 6 7 8 COM<br />
LEDs<br />
Red<br />
Orange<br />
Yellow<br />
Green<br />
Contact<br />
<strong>Closure</strong><br />
Contact<br />
<strong>Closure</strong><br />
Blue<br />
Purple<br />
Grey<br />
White<br />
Black<br />
CCI 1 (Red)<br />
CCI 8 (White)<br />
Common (Black)<br />
®<br />
QSE-CI-WCI<br />
INPUTS<br />
ENTRADA<br />
ENTRÉES<br />
COM<br />
1 2 3 4 5 6 7 8<br />
COM<br />
1 2 3 4 5 6 7 8<br />
Contact <strong>Closure</strong> <strong>Input</strong>s<br />
Wiring Verification<br />
1. Turn on power to the QSE-CI-WCI by energizing the link.<br />
2. Press the first button on the contact closure keypad. Verify that<br />
the corresponding LED on the QSE-CI-WCI, tracks to the desired<br />
button on the contact closure keypad. Repeat for other buttons.<br />
Note: For HomeWorksR QS or QuantumR systems, use the<br />
appropriate system setup software to program these systems once<br />
wiring is complete.<br />
Note: For standalone applications, before proceeding to mounting,<br />
refer to “QS <strong>Wallbox</strong> <strong>Closure</strong> <strong>Interface</strong> Programming Guide”,<br />
<strong>Lutron</strong>R P/N 041395, at www.lutron.com<br />
<strong>Lutron</strong>, GRAFIK Eye, HomeWorks, Quantum and ) are registered trademarks and Energi Savr Node is a trademark of <strong>Lutron</strong><br />
Electronics Co., Inc. UL is a registered trademark of Underwriters Laboratories, Inc. NEC is a registered trademark of National Fire<br />
Protection Association, Quincy, Massachusetts.<br />
© 2012 <strong>Lutron</strong> Electronics Co., Inc.<br />
Cableado<br />
Advertencia: Peligro de electrocución. Podría ocasionar lesiones<br />
graves o la muerte. NO CABLEAR CUANDO ESTÁ ENERGIZADO. Antes<br />
de cablear o efectuar mantenimiento desconecte el suministro eléctrico<br />
a todas las alimentaciones de energía por medio de un interruptor de<br />
circuito o un aislador.<br />
Precaución: NO CONECTE una alimentación de alto voltaje a los<br />
terminales de bajo voltaje. Un cableado incorrecto puede ocasionar<br />
lesiones personales o daños al producto o a otros equipos.<br />
Nota: Antes de cablear las entradas de cierre de contactos (CCI), verifique<br />
la compatibilidad con los teclados de cierre de contactos. Los cierres de<br />
contactos pueden ser ya sea cierres de contacto secos o salidas de estado<br />
sólido referenciadas a común. Los cierres de contactos deben permanecer<br />
en los estados cerrado o abierto durante por lo menos 40 ms para ser<br />
reconocidos por el WCI. Si tuviera alguna pregunta sobre si el teclado de<br />
cierre de contactos es compatible con estas especificaciones, póngase en<br />
contacto con el fabricante del teclado.<br />
Nota: <strong>Lutron</strong> recomienda que el QSE-CI-WCI sea instalado por un<br />
electricista calificado.<br />
1. Desconecte el suministro eléctrico del enlace QS cableado APAGADO<br />
todos los interruptores del circuito conectados a cualquier fuente de<br />
alimentación del enlace QS (p. ej. el equipo de control GRAFIK EyeR , el<br />
equipo Energi Savr NodeTM, etc.)<br />
2. Pele el aislamiento 10 mm y afloje los tornillos del bloque de terminales.<br />
3. Conecte el enlace QS al bloque de terminales y apriete los tornillos.<br />
4. Conecte hasta ocho cierres de contactos secos externos de bajo voltaje,<br />
tal como se muestra en el Diagrama de cableado. Todas las CCI deben<br />
compartir el común previsto (negro). Cubra juntos todos los cables de la<br />
CCI no utilizados, y aléjelos de otros circuitos.<br />
Nota: Para las aplicaciones autónomas consulte la Tabla de configuración<br />
en la “Guía de programación de la interfaz de cierre de la caja de empotrar<br />
de QS”, <strong>Lutron</strong>R N/P 041395, en www.lutron.com para concordar con la<br />
funcionalidad asociada con una CCI.<br />
Diagrama de cableado<br />
1 2 3 4 5 6 7 8<br />
Colores de los cables<br />
1 2 3 4 5 6 7 8<br />
del cierre contactos<br />
ON<br />
1 2<br />
1 2 3 4 5 6 7 8 COM<br />
LED<br />
Rojo<br />
Anaranjado<br />
Amarillo<br />
Verde<br />
Cierre de<br />
contactos<br />
Cierre de<br />
contactos<br />
Azul<br />
Púrpura<br />
Gris<br />
Blanco<br />
Negro<br />
CCI 1 (rojo)<br />
CCI 8 (blanco)<br />
Común (negro)<br />
®<br />
QSE-CI-WCI<br />
INPUTS<br />
ENTRADA<br />
ENTRÉES<br />
COM<br />
1 2 3 4 5 6 7 8<br />
COM<br />
1 2 3 4 5 6 7 8<br />
Entradas de cierre de<br />
contactos<br />
Verificación del cableado<br />
1. Encienda el QSE-CI-WCI energizando el enlace.<br />
2. Presione el primer botón del teclado de cierre de contactos. Verifique que<br />
el LED correspondiente del QSE-CI-WCI rastree el botón deseado en el<br />
teclado de cierre de contactos. Repetir para los demás botones.<br />
Nota: Para los sistemas HomeWorksR QS o QuantumR, utilice el software<br />
adecuado de configuración del sistema para programar estos sistemas<br />
una vez finalizado el cableado.<br />
Nota: Para las aplicaciones autónomas, antes de proceder al montaje<br />
consulte la “Guía de programación de la interfaz de cierre de la caja de<br />
empotrar de QS”, <strong>Lutron</strong>R N/P 041395, en www.lutron.com<br />
Note: Ensure that the programming is correct before<br />
proceeding to Mounting. The QSE-CI-WCI is not accessible<br />
once mounted.<br />
Mounting<br />
1. Push all wires and the QSE-CI-WCI into the wallbox.<br />
Do NOT pinch wires.<br />
2. Fasten the contact closure keypad to the wallbox. Do NOT over<br />
tighten the screws.<br />
3. Attach any button kits or faceplates provided with contact<br />
closure keypad.<br />
Troubleshooting<br />
Symptom Possible Causes<br />
No communication with<br />
HomeWorksR QS or QuantumR<br />
processor, GRAFIK EyeR<br />
control unit, or Energi Savr<br />
NodeT unit.<br />
LEDs on the QSE-CI-WCI<br />
scroll in reverse order.<br />
LEDs on the QSE-CI-WCI<br />
do not turn on.<br />
CCI do not produce the<br />
desired result in the system.<br />
Buttons on the contact<br />
closure keypad do not<br />
function as intended.<br />
Raise / Lower buttons do not<br />
work (standalone systems<br />
only).<br />
<strong>Lutron</strong>, GRAFIK Eye, HomeWorks, Quantum y ) son marcas comerciales registradas, y Energi Savr Node es una marca<br />
comercial de <strong>Lutron</strong> Electronics Co., Inc. UL es una marca registrada de Underwriters Laboratories, Inc. NEC es una marca<br />
comercial registrada de la National Fire Protection Association, Quincy, Massachusetts.<br />
© 2012 <strong>Lutron</strong> Electronics Co., Inc.<br />
• Miswire, loose connection, or no<br />
connection at the QS wired link.<br />
• Device limit on QS wired link has been<br />
exceeded.<br />
• Miswire, loose connection, or no<br />
connection of terminals 1 & 2 on the QS<br />
wired link.<br />
• The QSE-CI-WCI is not receiving<br />
enough power from the QS wired link.<br />
See “Power Draw Units on the QS Link”,<br />
<strong>Lutron</strong>R PN 369405, at www.lutron.<br />
com/qs<br />
• <strong>Input</strong> wiring harness is miswired to the<br />
contact closure keypad or the QSE-CI-<br />
WCI has been programmed incorrectly.<br />
For verification, refer to the configuration<br />
table in “QS <strong>Wallbox</strong> <strong>Closure</strong> <strong>Interface</strong><br />
Programming Guide”, <strong>Lutron</strong>® P/N 041395<br />
at www.lutron.com<br />
• QSE-CI-WCI functionality may be<br />
incorrect.<br />
• Signal pulse is less than 40 ms.<br />
• Check dip switch settings on the<br />
QSE-CI-WCI.<br />
Warranty<br />
For warranty information, please see the Warranty enclosed with<br />
the product, or visit:<br />
www.lutron.com/TechnicalDocumentLibrary/IntlWarranty.pdf<br />
For commercial applications please visit: www.lutron.com/<br />
TechnicalDocumentLibrary/Warranty_CommercialSystems.pdf<br />
Nota: Asegúrese de que la programación sea correcta antes de<br />
proceder al montaje. El QSE-CI-WCI no resulta accesible una vez<br />
montado.<br />
Montaje<br />
1. Cubra juntos todos los cables de la CCI no utilizados, y aléjelos de otros<br />
circuitos.<br />
2. Empuje todos los cables y el QSE-CI-WCI hacia la caja de empotrar.<br />
3. Fije el teclado de cierre de contactos a la caja de empotrar. NO apriete<br />
excesivamente los tornillos.<br />
4. Coloque los kits de botones o las placas frontales suministrados con el<br />
teclado de cierre de contactos.<br />
Solución de problemas<br />
Síntoma Posibles causas<br />
No hay comunicación con el<br />
procesador del HomeWorksR<br />
QS o el QuantumR, el equipo<br />
de control del GRAFIK EyeR o<br />
el equipo Energi Savr NodeT.<br />
Los LED del QSE-CI-WCI<br />
efectúan su recorrido en<br />
sentido inverso.<br />
Los LED del QSE-CI-WCI no<br />
se encienden.<br />
La CCI no produce el<br />
resultado deseado en el<br />
sistema.<br />
Los botones del teclado<br />
de cierre de contactos no<br />
funcionan de acuerdo con lo<br />
previsto.<br />
Los botones Subir/Bajar no<br />
funcionan (sólo sistemas<br />
autónomos).<br />
Garantía<br />
• Conexión incorrecta, floja o faltante en<br />
el enlace QS cableado.<br />
• Ha sido excedido el límite de<br />
dispositivos en el enlace QS cableado.<br />
• Conexión incorrecta, floja o faltante<br />
en los terminales 1 y 2 del enlace QS<br />
cableado.<br />
• El QSE-CI-WCI no está recibiendo<br />
suficiente alimentación desde el enlace<br />
cableado QS. Consulte “Unidades de<br />
consumo de energía en el QS Link”,<br />
<strong>Lutron</strong>R NP 369405, en www.lutron.<br />
com/qs<br />
• El arnés del cableado de la entrada<br />
está mal conectado al teclado de<br />
cierre de contactos o el QSE-CI-WCI<br />
ha sido programado incorrectamente.<br />
Para verificación, consulte la tabla<br />
de configuraciones en la “Guía de<br />
programación de la interfaz de cierre de<br />
la caja de empotrar de QS”, <strong>Lutron</strong>® N/P<br />
041395 en www.lutron.com<br />
• La funcionalidad del QSE-CI-WCI<br />
puede ser incorrecta.<br />
• El pulso de la señal es menor que 40<br />
ms.<br />
• Verifique la configuración de los<br />
interruptores DIP en el QSE-CI-WCI.<br />
Para obtener información sobre la garantía, consulte la Garantía adjunta<br />
al producto, o visite:<br />
www.lutron.com/TechnicalDocumentLibrary/IntlWarranty.pdf<br />
Para las aplicaciones comerciales, visite: www.lutron.com/<br />
TechnicalDocumentLibrary/Warranty_CommercialSystems.pdf<br />
®<br />
®
Instructions d'installation<br />
Veuillez lire avant l'installation<br />
Remarques importantes<br />
Codes : Effectuez l'installation<br />
en conformité avec les codes<br />
électriques locaux et nationaux.<br />
Environnement : Température<br />
ambiante de fonctionnement :<br />
0 °C à 40 °C, 0 à 90 %<br />
d'humidité relative, sans<br />
condensation. Conçu pour<br />
une utilisation à l'intérieur<br />
uniquement.<br />
Boîtier d'encastrement : <strong>Lutron</strong> recommande d'utiliser un<br />
boîtier d'encastrement de 60 mm de profondeur par 60 mm de<br />
large, lorsque vous installez le QSE-CI-WCI avec la plupart des<br />
commandes. Remarque : Certaines applications peuvent exiger<br />
un boîtier d'encastrement plus profond.<br />
Limites du QS Link : Le QSE-CI-WCI consomme 1 Unité de<br />
consommation électrique (ECU). Pour plus d'informations sur<br />
les ECU, voir « Power Draw Units on the QS Link » (Unités de<br />
consommation électrique du QS Link), <strong>Lutron</strong>R n° de pièce 369405,<br />
®<br />
sur www.lutron.com/qs<br />
Bornes : Accepte jusqu'à deux câbles de<br />
1,0 mm2 , une paire de câbles torsadés et<br />
blindés de 0,5 mm2 et un câble de 4,0 mm2 .<br />
Pour les limites du câblage, voir le tableau<br />
ci-dessous :<br />
Longueur<br />
Diamètre des câbles Câble <strong>Lutron</strong>R<br />
Moins de Commun (borne 1) un câble de 1,0 mm<br />
153 m<br />
2 GRX-CBL-346S<br />
Alimentation (borne 2) un câble de 1,0 mm (non-plénum)<br />
GRX-PCBL-346S<br />
(plénum)<br />
2<br />
Données (bornes 3 et 4) une paire torsadée<br />
et blindée de 0,5 mm2 153 m à Commun (borne 1) un câble de 4,0 mm<br />
610 m<br />
2 GRX-CBL-46L<br />
Alimentation (borne 2) un câble de 4,0 mm<br />
(non-plénum)<br />
GRX-PCBL-46L<br />
(plénum)<br />
2<br />
Données (bornes 3 et 4) une paire torsadée<br />
et blindée de 0,5 mm2 MUX MUX PWR COM<br />
4 3 2 1<br />
Remarque : Le QSW-CI-WCI est conçu pour fonctionner avec un<br />
clavier à contacts secs. Le clavier à contacts secs doit être fourni<br />
par le client. Il n'est pas inclus avec le QSE-CI-WCI.<br />
Programmation d'application : Lorsque le QSE-CI-WCI fait partie<br />
d'un système HomeWorksR QS or QuantumR, programmez le QSE-<br />
CI-WCI à l'aide du logiciel de paramétrage du système approprié.<br />
Pour les installations sans processeur (autonomes), veuillez<br />
consultez le « QS <strong>Wallbox</strong> <strong>Closure</strong> <strong>Interface</strong> Programming Guide<br />
» (Guide de programmation de l'interface de contact du boîtier<br />
d'encastrement QS), <strong>Lutron</strong>R n° de pièce 041395, sur<br />
www.lutron.com<br />
Assistance technique :<br />
États-Unis / Canada : 1.800.523.9466<br />
Mexique : +1.888.235.2910<br />
Brésil : +55 11 3257 6745<br />
Royaume-Uni :<br />
+44.(0)20.7680.4481<br />
Inde : +91.124.471.1900<br />
<strong>Lutron</strong> Electronics Co., Inc.<br />
7200 Suter Road<br />
Coopersburg, PA 18036-1299<br />
P/N 041381 Rev. A 10/2012<br />
Instruções de instalação<br />
Ler antes de efectuar a instalação<br />
Notas importantes<br />
Códigos: Instalar em conformidade<br />
com todos os códigos eléctricos<br />
locais e nacionais.<br />
Ambiente: Temperatura operacional<br />
do ambiente: 0 °C a 40 °C, 0 a<br />
90% de humidade relativa, sem<br />
condensação. Concebida para<br />
utilização apenas em espaços<br />
interiores.<br />
Caixa embutida na parede: A<br />
<strong>Lutron</strong> recomenda a utilização de<br />
uma caixa embutida na parede de 60 mm de profundidade x 60 mm de<br />
largura, quando instalar o QSE-CI-WCI com a maioria dos controlos.<br />
Nota: Algumas aplicações podem exigir uma caixa embutida na parede<br />
com uma maior profundidade.<br />
Limites da ligação QS: O QSE-CI-WCI consume 1 Unidade de<br />
Distribuição de Energia (PDU). Para obter mais informações sobre as<br />
Unidades de Distribuição de Energia (PDUs), consultar “Unidades de<br />
Distribuição de Energia na Ligação QS”, da <strong>Lutron</strong>R PN 369405, em<br />
®<br />
www.lutron.com/qs<br />
Comprimento<br />
Inferior a<br />
153 m<br />
153 m a<br />
610 m<br />
MUX MUX PWR COM<br />
4<br />
3<br />
2<br />
Terminais: Aceita até dois cabos de 1,0 mm 2 ,<br />
um cabo par trançado blindado de 0,5 mm 2 ou<br />
um cabo normal de 4,0 mm 2 . Para os limites de<br />
instalação eléctrica, consultar a tabela abaixo:<br />
Calibre do fio Cabo <strong>Lutron</strong>R<br />
Fio comum (terminal 1) um de 1,0 mm 2 GRX-CBL-346S<br />
Alimentação (terminal 2) um de 1,0 mm 2<br />
Dados (terminais 3 e 4) um par torcido,<br />
blindado de 0,5 mm 2<br />
Português<br />
(sem pleno)<br />
GRX-CBL-346S<br />
(classificação<br />
pleno)<br />
Fio comum (terminal 1) um de 4,0 mm2 GRX-CBL-46L<br />
Alimentação (terminal 2) um de 4,0 mm<br />
(sem pleno)<br />
GRX-PCBL-46L<br />
(classificação<br />
pleno)<br />
2<br />
Dados (terminais 3 e 4) um par torcido,<br />
blindado de 0,5 mm2 Nota: O QSW-CI-WCI foi concebido para funcionar com um teclado de<br />
fechamento de contacto. O teclado de fechamento de contacto tem de<br />
ser fornecido pelo cliente. Não é fornecido com o QSE-CI-WCI.<br />
Programação da aplicação: Quando oQSE-CI-WCI fizer parte de um<br />
sistema QS ou QuantumR da HomeWorksR, programar o QSE-CI-WCI<br />
através do software de configuração apropriado para o sistema. Para<br />
instalações sem um processador (autónomas), consultar o “Guia de<br />
Programação da <strong>Interface</strong> de Fechamento da Caixa Embutida na Parede<br />
QS”, da <strong>Lutron</strong>R P/N 041395, em www.lutron.com<br />
Assistência técnica:<br />
E.U.A. / Canadá: 1.800.523.9466<br />
México: +1.888.235.2910<br />
Brasil: +55 11 3257 6745<br />
Reino Unido:<br />
+44.(0)20.7680.4481<br />
Índia: +91.124.471.1900<br />
<strong>Lutron</strong> Electronics Co., Inc.<br />
7200 Suter Road<br />
Coopersburg, PA 18036-1299<br />
P/N 041381 Rev. A 10/2012<br />
1<br />
®<br />
®<br />
Français<br />
<strong>Interface</strong> de contact d'entrée du<br />
boîtier d'encastrement :<br />
QSE-CI-WCI<br />
IEC PELV/NECR de classe 2<br />
24 V- 20 mA<br />
1 2 3 4 5 6 7 8<br />
QSE-CI-WCI<br />
INPUTS<br />
ENTRADA<br />
ENTRÉES<br />
COM<br />
1 2 3 4 5 6 7 8<br />
Émirats arabes unis :<br />
+9714.299,1224<br />
Chine : 10.800.120.1536<br />
Singapour : 800120.4491<br />
Autres pays :<br />
+1.610.282.3800<br />
<strong>Interface</strong> de fechamento de<br />
entradas da caixa embutida na<br />
parede: QSE-CI-WCI<br />
IEC PELV/NECR Classe 2<br />
24 V- 20 mA<br />
1 2 3 4 5 6 7 8<br />
QSE-CI-WCI<br />
INPUTS<br />
ENTRADA<br />
ENTRÉES<br />
COM<br />
1 2 3 4 5 6 7 8<br />
Emirados Árabes Unidos:<br />
+971,4.299,1224<br />
China: 10.800.120.1536<br />
Singapura: 800,120.4491<br />
Outros países:<br />
+1.610.282.3800<br />
®<br />
®<br />
ON<br />
ON<br />
1 2<br />
1 2<br />
Câblage<br />
Avertissement : Risque d'électrocution. Peut causer des blessures<br />
graves ou la mort. NE PAS CÂBLER SOUS TENSION. Coupez<br />
l'alimentation de toutes les entrées d'alimentation au niveau du<br />
disjoncteur ou de l'isolateur avant d'effectuer le câblage ou l'entretien<br />
de l'appareil.<br />
Attention : Ne connectez PAS l'alimentation haute-tension aux bornes<br />
basse-tension. Un câblage incorrect peut causer des blessures ou<br />
endommager le produit ou d'autres équipements.<br />
Remarque : Avant de câbler les entrées à contacts secs (CCI), vérifiez leur<br />
compatibilité avec les claviers à contacts secs. Les contacts secs peuvent<br />
être soit des contacts secs ou des sorties à semi-conducteur référencées à<br />
la commun. Les contacts secs doivent rester en position fermée ou ouverte<br />
pendant au moins 40 ms afin d'être reconnus par l'interface WCI. Pour<br />
toute question concernant la compatibilité du clavier à contacts secs avec<br />
ces caractéristiques, veuillez contacter le fabricant.<br />
Remarque : <strong>Lutron</strong> recommande de faire installer le QSE-CI-WCI par un<br />
électricien qualifié.<br />
1. Déconnectez l'alimentation de la liaison câblée du QS en DÉSACTIVANT<br />
tous les disjoncteurs connectés à l'alimentation du QS link (ex. : une unité<br />
de commande GRAFIK EyeR une unité Energi Savr NodeTM, etc.).<br />
2. Retirez la gaine d'isolation sur 10 mm et desserrez les vis des borniers.<br />
3. Connectez le QS link au bornier et serrez les vis.<br />
4. Connectez jusqu'à 8 contacts secs externes basse-tension, comme<br />
représenté sur le Schéma de câblage. Tous les CCI doivent partager<br />
le commun fourni (Noir). Sécurisez tous les câbles des CCI non-utilisés<br />
ensemble, et placez-les loin du reste du circuit.<br />
Remarque : Pour les applications autonomes consultez le Tableau de<br />
configuration dans le « QS <strong>Wallbox</strong> <strong>Closure</strong> <strong>Interface</strong> Programming Guide »<br />
(Guide de programmation de l'interface de contact du boîtier d'encastrement<br />
QS), <strong>Lutron</strong>R n° de pièce 041395, sur www.lutron.com pour trouver la<br />
correspondance de fonctionnalité associée à une CCI.<br />
Schéma de câblage<br />
1 2 3 4 5 6 7 8<br />
1 2 3 4 5 6 7 8<br />
ON<br />
Couleurs des câbles des contacts<br />
secs<br />
1 2<br />
LED<br />
1 2 3 4 5 6 7 8 COM<br />
Rouge<br />
Orange<br />
Jaune<br />
Vert<br />
Bleu<br />
Violet<br />
Gris<br />
Blanc<br />
Noir<br />
Contact<br />
Sec<br />
Contact<br />
Sec<br />
Vérification du câblage<br />
1. Activez le QSE-CI-WCI en alimentant la liaison.<br />
2. Appuyez sur le premier bouton du clavier à contacts secs. Vérifiez que la<br />
LED correspondante du QSE-CI-WCI suive le bouton souhaité sur le clavier<br />
à contacts secs. Recommencez avec les autres boutons.<br />
Remarque : Pour les systèmes HomeWorksR QS ou QuantumR, utilisez<br />
le logiciel de paramétrage du système approprié pour programmer ces<br />
systèmes une fois que le câblage est terminé.<br />
Remarque : Pour les applications autonomes, avant de procéder au<br />
montage, consultez le « QS <strong>Wallbox</strong> <strong>Closure</strong> <strong>Interface</strong> Programming Guide »<br />
(Guide de programmation de l'interface de contact du boîtier d'encastrement<br />
QS), <strong>Lutron</strong>R n° de pièce 041395, sur www.lutron.com<br />
<strong>Lutron</strong>, GRAFIK Eye, HomeWorks, Quantum et ) sont des marques déposées et Energi Savr Node est une marque de<br />
<strong>Lutron</strong> Electronics Co., Inc. UL est une marque déposée de Underwriters Laboratories, Inc. NEC est une marque déposée de<br />
la National Fire Protection Association, Quincy, Massachusetts.<br />
© 2012 <strong>Lutron</strong> Electronics Co., Inc.<br />
Ligação eléctrica<br />
Aviso: Risco de choque eléctrico. Pode resultar em lesões graves<br />
ou morte. NÃO EFECTUAR LIGAÇÕES ELÉCTRICAS QUANDO SOB<br />
TENSÃO. Desligar a alimentação eléctrica a todos os fios de energia<br />
eléctrica através do disjuntor ou isolador antes de efectuar uma<br />
instalação eléctrica ou reparações.<br />
Atenção: NÃO ligar a alimentação de alta tensão a terminais de baixa<br />
tensão. Uma instalação eléctrica inapropriada pode resultar em lesões<br />
pessoais ou danos no produto ou noutro equipamento.<br />
Nota: Antes de efectuar a instalação eléctrica de Entradas de Fechamento<br />
de Contacto (CCIs), verificar a compatibilidade com os teclados de<br />
Fechamento de contacto. Os fechamentos de contacto podem ser saídas<br />
de fechamentos de contacto secos ou de estado sólido de ligação comum.<br />
Os fechamentos de contacto têm de permanecer no estado fechado ou<br />
aberto durante, pelo menos, 40 ms a fim de serem reconhecidos pela WCI.<br />
Se surgirem quaisquer dúvidas quanto à compatibilidade do teclado de<br />
fechamentos de contacto com estas especificações, contactar o fabricante<br />
do teclado.<br />
Nota: A <strong>Lutron</strong> recomenda que o QSE-CI-WCI seja instalado por um<br />
electricista qualificado.<br />
1. Cortar a alimentação à ligação com fios QS ao DESLIGAR (OFF) todos os<br />
disjuntores ligados a qualquer fonte de alimentação de ligação QS (ou seja<br />
unidade de controlo GRAFIK EyeR, unidade Energi Savr NodeTM, etc.).<br />
2. Descarnar o isolamento cerca de 10 mm e soltar os parafusos do bloco<br />
terminal.<br />
3. Efectuar a ligação QS ao bloco terminal e apertar os parafusos.<br />
4. Proceder à ligação de até oito fechamentos de contacto secos externos de<br />
baixa tensão, conforme demonstrado no Esquema de Ligações. Todas as<br />
entradas de fechamento de contacto (CCIS) devem partilhar o fio comum<br />
fornecido (Preto). Cobrir conjuntamente todos os fios da CCI não usados,<br />
afastando-os de outros circuitos.<br />
Nota: Para aplicações autónomas, consultar a Tabela de Configuração no<br />
“Guia de Programação da <strong>Interface</strong> de Fechamento da Caixa Embutida na<br />
Parede QS”, da <strong>Lutron</strong>R P/N 041395, em www.lutron.com para corresponder<br />
à funcionalidade associada a uma CCI.<br />
Esquema de ligações<br />
Cores dos fios de fechamento de<br />
contacto<br />
1 2 3 4 5 6 7 8 COM<br />
Vermelho<br />
Laranja<br />
Fechamento<br />
de<br />
contacto<br />
Fechamento<br />
de<br />
contacto<br />
CCI 1 (Rouge)<br />
CCI 8 (Blanc)<br />
Commun (Noir)<br />
Amarelo<br />
Verde<br />
Azul<br />
Púrpura<br />
Cinzento<br />
Branco<br />
Preto<br />
CCI 1 (Vermelho)<br />
CCI 8 (Branco)<br />
Fio comum (Preto)<br />
Verificação das ligações eléctricas<br />
®<br />
QSE-CI-WCI<br />
INPUTS<br />
ENTRADA<br />
ENTRÉES<br />
COM<br />
1 2 3 4 5 6 7 8<br />
1 2 3 4 5 6 7 8<br />
®<br />
QSE-CI-WCI<br />
INPUTS<br />
ENTRADA<br />
ENTRÉES<br />
COM<br />
1 2 3 4 5 6 7 8<br />
1. Ligar a alimentação ao QSE-CI-WCI ao activar a ligação.<br />
2. Premir o primeiro botão no teclado do fechamento de contacto. Verificar se<br />
o LED correspondente no QSE-CI-WCI segue a via de percurso do botão<br />
pretendido no teclado de fechamento de contacto. Repetir esta verificação<br />
nos outros botões.<br />
Nota: Para os sistemas da QuantumR ou HomeWorksR QS, usar o<br />
software de configuração do sistema apropriado para programar estes<br />
sistemas depois de terminada a ligação eléctrica.<br />
Nota: Para aplicações autónomas, antes de proceder à instalação,<br />
consultar o “Guia de Programação da <strong>Interface</strong> de Fechamento da Caixa<br />
Embutida na Parede QS”, da <strong>Lutron</strong>R P/N 041395, em www.lutron.com<br />
Nota: Certificar-se de que a programação está correcta antes de seguir<br />
ON<br />
1 2<br />
COM<br />
1 2 3 4 5 6 7 8<br />
Entrées à contacts secs<br />
1 2 3 4 5 6 7 8<br />
LEDs (díodos emissores<br />
de luz)<br />
COM<br />
1 2 3 4 5 6 7 8<br />
Entradas de fechamento<br />
de contacto<br />
Remarque : Assurez-vous que la programmation est correcte avant de<br />
procéder au Montage. Le QSE-CI-WCI n'est pas accessible une fois<br />
monté.<br />
Montage<br />
1. Sécurisez tous les câbles des CCI non-utilisés ensemble, et placez-les<br />
loin du reste du circuit.<br />
2. Placez tous les câbles et le QSE-CI-WCI dans le boîtier d'encastrement.<br />
3. Fixez le clavier à contacts secs au boîtier d'encastrement. Ne serrez<br />
PAS les vis trop fortement.<br />
4. <strong>Install</strong>ez tous les kits de boutons ou toutes les plaques frontales fournis<br />
avec le clavier à contacts secs.<br />
Dépannage<br />
Symptôme Causes possibles<br />
Aucune communication<br />
avec le processeur du<br />
HomeWorksR QS or<br />
QuantumR l'unité de<br />
commande du GRAFIK<br />
EyeR ou l'unité Energi Savr<br />
NodeT.<br />
Les LED du QSE-CI-WCI<br />
défilent en sens inverse.<br />
Les LED du QSE-CI-WCI ne<br />
s'allument pas.<br />
Les CCI ne produisent pas<br />
le résultat souhaité dans le<br />
système.<br />
Les boutons du clavier<br />
à contacts secs ne<br />
fonctionnent pas comme<br />
prévu.<br />
Les boutons Monter/<br />
Baisser ne fonctionnent<br />
pas (systèmes autonomes<br />
uniquement).<br />
Garantie<br />
para a Instalação. O QSE-CI-WCI não pode ser acedido depois de<br />
instalado<br />
Instalação<br />
1. Cobrir conjuntamente todos os fios de entrada de fechamento de<br />
contacto (CCI) não usados, afastando-os de outros circuitos.<br />
2. Empurrar todos os fios e o QSE-CI-WCI para dentro da caixa embutida<br />
na parede.<br />
3. Fixar o teclado do fechamento de contacto na caixa embutida na<br />
parede. NÃO apertar os parafusos em excesso.<br />
4. Unir quaisquer kits de botões ou painel frontal fornecido ao teclado de<br />
fechamento de contacto.<br />
Resolução de problemas<br />
Sintoma Causas possíveis<br />
Sem comunicação com<br />
processador QS ou<br />
QuantumRda HomeWorksR<br />
unidade de controlo GRAFIK<br />
EyeR ou unidade Energi Savr<br />
NodeT<br />
Os LEDs no QSE-CI-WCI<br />
deslocam-se por ordem<br />
inversa.<br />
Os LEDs no QSE-CI-WCI<br />
não acendem.<br />
A CCI não produz o<br />
resultado desejado no<br />
sistema.<br />
Os botões no teclado de<br />
fechamento de contacto não<br />
funcionam como deve ser.<br />
Os botões de Subir / Baixar<br />
não funcionam (apenas nos<br />
itens autónomos).<br />
Garantia<br />
<strong>Lutron</strong>, GRAFIK Eye, HomeWorks, Quantum e ) são marcas comerciais registadas e Energi Savr Node é uma marca comercial da<br />
<strong>Lutron</strong> Electronics Co., Inc. UL é uma marca comercial registada dos Underwriters Laboratories, Inc. NEC é uma marca comercial<br />
registada da National Fire Protection Association (Associação Nacional de Protecção contra Incêndios), Quincy, Massachusetts.<br />
© 2012 <strong>Lutron</strong> Electronics Co., Inc.<br />
• Mauvais raccord, faux contact ou<br />
absence de connexion sur la liaison<br />
câblée du QS.<br />
• Limite d'appareils dépassée sur la<br />
liaison câblée du QS.<br />
• Mauvais raccord, faux contact ou<br />
absence de connexion sur les bornes 1<br />
& 2 de la liaison câblée du QS.<br />
• Le QSE-CI-WCI ne reçoit pas<br />
suffisamment de courant de la liaison<br />
câblée du QS. Consultez « Power<br />
Draw Units on the QS Link » (Unités de<br />
consommation électrique du QS Link),<br />
<strong>Lutron</strong>R n° de pièce 369405, sur www.<br />
lutron.com/qs<br />
• Le faisceau de câbles d'entrée est mal<br />
raccordé au clavier à contacts secs ou<br />
le QSE-CI-WCI a été mal programmé.<br />
Pour vérifier, consultez le tableau de<br />
configuration du « QS <strong>Wallbox</strong> <strong>Closure</strong><br />
<strong>Interface</strong> Programming Guide » (Guide<br />
de programmation de l'interface de<br />
contact du boîtier d'encastrement QS),<br />
<strong>Lutron</strong>® n° de pièce 041395 sur www.<br />
lutron.com<br />
• La fonctionnalité du QSE-CI-WCI peut<br />
être incorrecte.<br />
• Le signal d'impulsion est inférieur à 40<br />
ms.<br />
• Vérifiez les réglages des commutateurs<br />
DIP sur le QSE-CI-WCI.<br />
Pour des renseignements sur la garantie, veuillez lire la garantie incluse<br />
avec le produit, ou consultez :<br />
www.lutron.com/TechnicalDocumentLibrary/IntlWarranty.pdf<br />
Pour les applications commerciales, veuillez consulter : www.lutron.com/<br />
TechnicalDocumentLibrary/Warranty_CommercialSystems.pdf<br />
• Ligação dos fios incorrecta, conexão<br />
solta ou sem conexão na ligação com<br />
fios QS.<br />
• O limite do dispositivo na ligação com<br />
fios QS foi excedido.<br />
• Ligação dos fios incorrecta, conexão<br />
solta ou sem conexão nos terminais 1 e<br />
2 na ligação com fios QS.<br />
• O QSE-CI-WCI não está a receber<br />
alimentação suficiente proveniente<br />
da ligação com fios QS. Consultar<br />
“Unidades de Distribuição de Energia na<br />
Ligação QS”, da <strong>Lutron</strong>R PN 369405, em<br />
www.lutron.com/qs<br />
• O feixe de fios de entrada está ligado<br />
inapropriadamente ao teclado de<br />
fechamento de contacto ou o QSE-<br />
CI-WCI foi programado de forma<br />
incorrecta. Para verificar, consultar<br />
a tabela de configuração no “Guia<br />
de Programação da <strong>Interface</strong> de<br />
Fechamento da Caixa Embutida na<br />
Parede QS”, da <strong>Lutron</strong>® P/N 041395 em<br />
www.lutron.com<br />
• A funcionalidade do QSE-CI-WCI pode<br />
estar incorrecta.<br />
• O impulso de sinalização é inferior a<br />
40 ms.<br />
• Verificar as definições do interruptor DIP<br />
no QSE-CI-WCI.<br />
Para obter informações sobre a garantia, queira consultar a Garantia que<br />
acompanha o produto, ou visitar:<br />
www.lutron.com/TechnicalDocumentLibrary/IntlWarranty.pdf<br />
Para obter informações sobre aplicações comerciais, queira visitar:<br />
www.lutron.com/TechnicalDocumentLibrary/Warranty_<br />
CommercialSystems.pdf<br />
®<br />
®
Istruzioni per l'installazione<br />
Si prega di leggere prima di<br />
procedere all’installazione<br />
Note importanti<br />
Codici: <strong>Install</strong>are in conformità<br />
a tutte le normative elettriche<br />
nazionali e locali.<br />
Condizioni ambientali:<br />
Temperatura ambiente di<br />
funzionamento: da 0 °C a 40 °C,<br />
, umidità relativa da 0% a 90%,<br />
senza condensa. Destinato<br />
esclusivamente all’uso in interno.<br />
Italiano<br />
Scatola da parete: <strong>Lutron</strong><br />
raccomanda l’utilizzo di una<br />
scatola a parete con 60 mm di profondità x 60 mm di larghezza,<br />
quando si installa il dispositivo QSE-CI-WCI con la maggior<br />
parte dei controlli. Nota: Per alcune applicazioni potrebbe essere<br />
necessaria una scatola a parete di maggiore profondità.<br />
Limiti del link QS: Il dispositivo QSE-CI-WCI consuma 1 unità<br />
di assorbimento (PDU). Ulteriori informazioni sulle PDU sono<br />
disponibili nel documento “Unità di assorbimento sul link QS”,<br />
<strong>Lutron</strong>R codice articolo 369405, alla pagina web<br />
www.lutron.com/qs<br />
®<br />
Morsetti: Accettano fino a due conduttori da<br />
1,0 mm2 , un doppino intrecciato schermato<br />
da 0,5 mm2 oppure un conduttore da<br />
4,0 mm2 tipico. I limiti del cablaggio sono<br />
illustrati nella seguente tabella:<br />
Lunghezza<br />
Sezione del conduttore Cavo <strong>Lutron</strong>R<br />
Meno di Comune (morsetto 1) uno da 1,0 mm<br />
153 m<br />
2 GRX-CBL-346S<br />
Alimentazione (morsetto 1) uno da 1,0 mm (non plenum)<br />
GRX-PCBL-346S<br />
(plenum)<br />
2<br />
Dati (terminali 3 e 4) un doppino intrecciato<br />
schermato con una sezione di 0,5 mm2 da 153 m Comune (morsetto 1) uno da 4,0 mm<br />
a 610 m<br />
2 GRX-CBL-46L<br />
Alimentazione (morsetto 1) uno da 4,0 mm<br />
(non plenum)<br />
GRX-PCBL-46L<br />
(plenum)<br />
2<br />
Dati (morsetti 3 e 4) un doppino intrecciato<br />
schermato da 0,5 mm2 MUX MUX PWR COM<br />
4 3 2 1<br />
Nota: Il dispositivo QSW-CI-WCI è realizzato in modo da funzionare con<br />
un tastierino dei contatti. Il tastierino dei contatti deve essere fornito dal<br />
cliente. Non è fornito in dotazione insieme al QSE-CI-WCI.<br />
Programmazione delle applicazioni: Quando il dispositivo QSE-CI-<br />
WCI fa parte di un sistema HomeWorksR QS o QuantumR, programmare<br />
il dispositivo QSE-CI-WCI tramite il software appropriato di impostazione<br />
del sistema. Per le installazioni senza processore (indipendenti), si prega<br />
far riferimento alla “Guida di programmazione dell’interfaccia per scatola a<br />
parete QS”, <strong>Lutron</strong>R codice articolo041395, alla pagina web<br />
www.lutron.com<br />
Assistenza tecnica:<br />
U.S.A. / Canada: 1.800.523.9466<br />
Messico: +1.888.235.2910<br />
Brasile: +55 11 3257 6745<br />
Regno Unito:<br />
+44.(0)20.7680.4481<br />
India: +91.124.471.1900<br />
<strong>Lutron</strong> Electronics Co., Inc.<br />
7200 Suter Road<br />
Coopersburg, PA 18036-1299<br />
P/N 041381 Rev. A 10/2012<br />
<strong>Install</strong>ationsanleitung<br />
Bitte vor der <strong>Install</strong>ation lesen<br />
Wichtige Hinweise<br />
Vorschriften: Die <strong>Install</strong>ation muss<br />
gemäß allen örtlichen Vorschriften<br />
erfolgen.<br />
Umgebung: Umgebungstemperatur<br />
(Betrieb): 0 °C bis 40 °C, 0 % bis<br />
90% relative Luftfeuchtigkeit,<br />
nicht kondensierend. Nur für den<br />
Innenbereich.<br />
®<br />
Interfaccia per scatola a parete:<br />
QSE-CI-WCI<br />
Classe 2 IEC PELV/NECR<br />
24 V- 20 mA<br />
1 2 3 4 5 6 7 8<br />
QSE-CI-WCI<br />
INPUTS<br />
ENTRADA<br />
ENTRÉES<br />
COM<br />
1 2 3 4 5 6 7 8<br />
Emirati Arabi Uniti:<br />
+971,4.299,1224<br />
Cina: 10.800.120.1536<br />
Singapore: 800,120.4491<br />
Altri Paesi:<br />
+1.610.282.3800<br />
Unterputzdose: Bei <strong>Install</strong>ation<br />
der QSE-CI-WCI mit den meisten<br />
Steuerungen empfiehlt <strong>Lutron</strong> die<br />
Verwendung einer Unterputzdose mit einer Tiefe von 60 mm und einer<br />
Breite von 60 mm. Hinweis: Bei manchen Anwendungen ist eine tiefere<br />
Unterputzdose zu verwenden.<br />
QS-Link-Einschränkungen: Die QSE-CI-WCI nimmt eine 1<br />
Leistungsaufnahmeeinheit (PDU) auf. Weitere Informationen zu PDUs<br />
siehe „Power Draw Units on the QS Link“ [mit Informationen zur<br />
Leistungsaufnahme über das QS-Link in PDU], <strong>Lutron</strong>R Bestellnummer<br />
®<br />
369405 unter www.lutron.com/qs.<br />
Anschlüsse: Nehmen bis zu zwei 1,0 mm2-Kabel auf, ein abgeschirmtes, verdrilltes Leitungspaar<br />
0,5 mm2 oder ein 4,0 mm2 MUX MUX PWR COM<br />
4 3 2 1<br />
-Kabel auf. Informationen<br />
zu Einschränkungen mit Hinsicht auf die<br />
Verkabelung entnehmen Sie bitte der folgenden<br />
Tabelle:<br />
Länge Leiterquerschnitt <strong>Lutron</strong>R Kabel<br />
Weniger<br />
als 153 m<br />
153 m bis<br />
610 m<br />
Common (Anschluss 1) 1x 1,0 mm 2 GRX-CBL-346S<br />
Netz (Anschluss 2) 1x 1,0 mm 2<br />
Daten (Anschluss 3 und 4) 1x ein abgeschirmtes,<br />
verdrilltes Leitungspaar 0,5 mm 2<br />
®<br />
ON<br />
1 2<br />
(Non-Plenum)<br />
GRX-PCBL-346S<br />
(Plenum)<br />
Common (Anschluss 1) 1x 4,0 mm2 GRX-CBL-46L<br />
Netz (Anschluss 2) 1x 4,0 mm<br />
(Non-Plenum)<br />
GRX-PCBL-46L<br />
(Plenum)<br />
2<br />
Daten (Anschluss 3 und 4) 1x ein abgeschirmtes,<br />
verdrilltes Leitungspaar 0,5 mm2 Hinweis: Die QSW-CI-WCI wurde für eine Bedienstelle mit potenzialfreien<br />
Kontakten konzipiert. Diese Bedienstelle muss vom Kunden bereitgestellt<br />
werden. Sie ist nicht im Lieferumfang der QSE-CI-WCI inbegriffen.<br />
Anwendungsprogrammierung: Wenn die QSE-CI-WCI in ein HomeWorksR<br />
QS- oder QuantumR System integriert ist, wird die QSE-CI-WCI über<br />
die entsprechende System-Einrichtungssoftware programmiert. Bei<br />
eigenständigen Anwendungen ohne Prozessor siehe „QS <strong>Wallbox</strong> <strong>Closure</strong><br />
<strong>Interface</strong> Programming Guide“ (QS-Programmierhandbuch), <strong>Lutron</strong>R<br />
Bestellnummer 041395 unter www.lutron.com.<br />
Technische Unterstützung:<br />
USA / Kanada: 1.800.523.9466<br />
Mexiko: +1.888.235.2910<br />
Brasilien: +55 11 3257 6745<br />
Großbritannien:<br />
+44.(0)20.7680.4481<br />
Indien: +91.124.471.1900<br />
<strong>Lutron</strong> Electronics Co., Inc.<br />
7200 Suter Road<br />
Coopersburg, PA 18036-1299, USA<br />
P/N 041381 Rev. A 10/2012<br />
®<br />
Deutsch<br />
Unterputzdose-Eingangsschnittstelle:<br />
QSE-CI-WCI<br />
IEC PELV/NECR Klasse 2<br />
24 V- 20 mA<br />
QSE-CI-WCI<br />
1 2 3 4 5 6 7 8<br />
INPUTS<br />
ENTRADA<br />
ENTRÉES<br />
COM<br />
1 2 3 4 5 6 7 8<br />
Vereinigte Arabische<br />
Emirate:<br />
+971,4.299,1224<br />
China: 10.800.120.1536<br />
Singapur: 800,120.4491<br />
Sonstige Länder:<br />
+1.610.282.3800<br />
®<br />
ON<br />
1 2<br />
Cablaggio<br />
Avvertenza: Pericolo di scossa elettrica. Può causare lesioni<br />
gravi o mortali. NON CABLARE QUANDO IL DISPOSITIVO È SOTTO<br />
TENSIONE. Scollegare l’alimentazione da tutte le fonti mediante<br />
interruttore o sezionatore prima di procedere al cablaggio o a interventi<br />
di riparazione o manutenzione.<br />
Attenzione: NON collegare l’alimentazione da alta tensione ai terminali<br />
per la bassa tensione. Un cablaggio non corretto può causare infortuni<br />
o danni al prodotto o ad altre apparecchiature.<br />
Nota: Prima di procedere al cablaggio dei contatti di ingresso (CCI),<br />
verificare la compatibilità con i tastierini dei contatti. I contatti d’ingresso<br />
si possono usare con contatti a secco o uscite allo stato solido riferite a<br />
comune. I contatti devono rimanere negli stati chiuso o aperto per almeno<br />
40 ms per essere riconosciute dal dispositivo WCI. In caso di dubbio in<br />
merito alla compatibilità del tastierino dei contatti rispetto a tali specifiche,<br />
si prega contattare il produttore del tastierino.<br />
Nota: <strong>Lutron</strong> raccomanda di fare installare il dispositivo QSE-CI-WCI da un<br />
elettricista qualificato.<br />
1. Scollegare l’alimentazione al link cablato QS spostando in posizione OFF<br />
(aperto) tutti gli interruttori collegati a qualsiasi fonte di alimentazione del<br />
link QS (per es. centralina GRAFIK EyeR, unità Energi Savr NodeTM, ecc.).<br />
2. Spelare 10 mm di isolante e allentare le viti della morsettiera.<br />
3. Collegare il link QS alla morsettiera e serrare le viti.<br />
4. Collegare fino a otto contatti di ingresso a secco per bassa tensione,<br />
secondo quanto illustrato nello Schema elettrico. Tutti i contatti di<br />
ingresso devono condividere il conduttore comune in dotazione (Nero).<br />
Coprire tutti i conduttori dei contatti di ingresso insieme e posizionarli<br />
lontani dagli altri circuiti.<br />
Nota: Per le applicazioni indipendenti, far riferimento alla Tabella di<br />
Configurazione nella “Guida di programmazione dell’interfaccia per scatola a<br />
parete QS”, <strong>Lutron</strong>R codice articolo 041395, alla pagina web www.lutron.com<br />
per far corrispondere la funzionalità associata a un contatto di ingresso.<br />
Schema elettrico<br />
Colori dei conduttori dei contatti<br />
1 2 3 4 5 6 7 8 COM<br />
Rosso<br />
Arancione<br />
Contatto<br />
Contatto<br />
Giallo<br />
Verde<br />
Blu<br />
Viola<br />
Grigio<br />
Bianco<br />
Nero<br />
CCI 1 (Rosso)<br />
CCI 8 (Bianco)<br />
Comune (Nero)<br />
1 2 3 4 5 6 7 8<br />
®<br />
QSE-CI-WCI<br />
INPUTS<br />
ENTRADA<br />
ENTRÉES<br />
COM<br />
1 2 3 4 5 6 7 8<br />
Verifica cablaggio<br />
1. Accendere il dispositivo QSE-CI-WCI alimentando il link.<br />
2. Premere il primo tasto sul tastierino dei contatti. Verificare che il LED<br />
corrispondente sul dispositivo QSE-CI-WCI, indichi il tasto desiderato sul<br />
tastierino dei contatti. Ripetere la procedura per gli altri tasti.<br />
Nota: Per i sistemi HomeWorksR QS o QuantumR, usare il software<br />
appropriato di impostazione del sistemaper la programmazione di tali<br />
sistemi dopo aver completato il cablaggio.<br />
Nota: Per le applicazioni indipendenti, prima di procedere al cablaggio,<br />
far riferimento alla “Guida di programmazione dell’interfaccia per scatola a<br />
parete QS”, <strong>Lutron</strong>R codice articolo 041395, alla pagina web www.lutron.com<br />
ON<br />
1 2<br />
1 2 3 4 5 6 7 8<br />
<strong>Lutron</strong>, GRAFIK Eye, HomeWorks, Quantum e )sono marchi registrati e Energi Savr Node è un marchio registrato della<br />
<strong>Lutron</strong> Electronics Co., Inc. UL è un marchio registrato di Underwriters Laboratories, Inc. NEC è un marchio registrato della<br />
National Fire Protection Association, Quincy, Massachusetts, USA.<br />
© 2012 <strong>Lutron</strong> Electronics Co., Inc.<br />
Verkabelung<br />
LED<br />
COM<br />
1 2 3 4 5 6 7 8<br />
Contatti d’ingresso<br />
Achtung: Stromschlaggefahr. Kann zu schweren oder tödlichen<br />
Verletzungen führen. NICHT UNTER SPANNUNG VERKABELN. Vor<br />
der Verkabelung oder vor Wartungs- und Reparaturarbeiten muss<br />
die Stromversorgung für alle Eingänge über die Sicherung oder<br />
Trennschalter ausgeschaltet werden.<br />
Vorsicht: Hochspannungsleitungen NICHT mit<br />
Niederspannungsleitungen verbinden. Die falsche Verkabelung kann<br />
zu Verletzungen oder Schäden am Produkt bzw. an anderen Geräten<br />
führen.<br />
Hinweis: Vor Anschluss der Eingänge mit potenzialfreien Kontakten ist die<br />
Kompatibilität mit den Bedienstellen sicherzustellen. Die potenzialfreien<br />
Kontakte können entweder als Trockenkontakte oder Halbleiterausgänge<br />
mit gemeinsamem Bezug ausgelegt sein. Die potenzialfreien Kontakte<br />
müssen mindestens 40 ms lang offen oder geschlossen bleiben, um von<br />
der Schnittstelle (WCI) erkannt zu werden. Bei Fragen mit Hinsicht auf die<br />
Kompatibilität der Bedienstelle mit potenzialfreien Kontakten mit diesen<br />
Spezifikationen setzen Sie sich bitte mit dem Hersteller der Bedienstelle mit<br />
potenzialfreien Kontakten in Verbindung.<br />
Hinweis: <strong>Lutron</strong> empfiehlt die <strong>Install</strong>ation der QSE-CI-WCI durch einen<br />
ausgebildeten Elektriker.<br />
1. Stromversorgung zum QS-Link unterbrechen. Dazu alle Sicherungen am<br />
QS-Link-Netzteil (d. h. GRAFIK EyeR Steuereinheit, Energi Savr NodeTM<br />
usw.) ausschalten.<br />
2. Die Leitungen werden auf 10 mm abisoliert und die Schrauben an den<br />
Anschlussleisten gelockert.<br />
3. QS-Link an der Anschlussleiste anschließen und Schrauben festziehen.<br />
4. Bis zu 8 externe Niederspannungstrockenkontakte werden gemäß dem<br />
Schaltplan angeschlossen. Alle Eingänge mit potenzialfreien Kontakten<br />
müssen denselben Commonleiter (schwarz) verwenden. Ungenutzte<br />
Eingangskabel zusammenbringen und von den Schaltkreisen entfernt<br />
fixieren.<br />
Hinweis: Bei eigenständigen Anwendungen siehe Konfigurationstabelle<br />
im „QS <strong>Wallbox</strong> <strong>Closure</strong> <strong>Interface</strong> Programming Guide“<br />
(QS-Programmierhandbuch), <strong>Lutron</strong>R Bestellnummer 041395 unter www.lutron.<br />
com, um die Funktionalität mit dem Eingang abzustimmen.<br />
Schaltplan<br />
Potenzialfreier Kontakt – Aderfarbe<br />
1 2 3 4 5 6 7 8 COM<br />
Rot<br />
Orange<br />
Gelb<br />
Grün<br />
Potenzialfreier<br />
Kontakt<br />
Potenzialfreier<br />
Kontakt<br />
Blau<br />
Violett<br />
Grau<br />
Weiß<br />
Schwarz<br />
CCI 1 (rot)<br />
CCI 8 (weiß)<br />
Common (schwarz)<br />
1 2 3 4 5 6 7 8<br />
®<br />
QSE-CI-WCI<br />
INPUTS<br />
ENTRADA<br />
ENTRÉES<br />
COM<br />
1 2 3 4 5 6 7 8<br />
Bestätigung der Verkabelung<br />
1. Stromversorgung zur QSE-CI-WCI einschalten. Dazu das Link an das Netz<br />
anschließen.<br />
2. Erste Taste auf der Bedienstelle mit potenzialfreien Kontakten betätigen.<br />
Sicherstellen, dass die entsprechende LED auf der QSE-CI-WCI mit der<br />
gewünschten Taste auf der Bedienstelle verbunden ist. Vorgang für die<br />
anderen Tasten wiederholen.<br />
ON<br />
1 2<br />
1 2 3 4 5 6 7 8<br />
Nota: Accertarsi che la programmazione sia corretta prima di procedere<br />
alla fase di Montaggio. Una volta installato, il dispositivo QSE-CI-WCI<br />
non è accessibile.<br />
Montaggio<br />
1. Coprire tutti i conduttori inutilizzati dei contatti di ingresso insieme e<br />
posizionarli lontani dagli altri circuiti.<br />
2. Spingere tutti i conduttori e il dispositivo QSE-CI-WCI all’interno della<br />
scatola a parete.<br />
3. Fissare il tastierino dei contatti alla scatola a parete. NON serrare<br />
eccessivamente le viti.<br />
4. Collegare gli eventuali kit per tasti o piastre in dotazione con il tastiero<br />
dei contatti.<br />
Individuazione e risoluzione guasti<br />
Sintomo Cause possibili<br />
Non c’è comunicazione con<br />
il processore HomeWorksR<br />
QS o QuantumR, la<br />
centralina GRAFIK EyeR, o<br />
l’unità Energi Savr NodeT.<br />
I LED sul dispositivo QSE-<br />
CI-WCI scorrono in ordine<br />
inverso.<br />
I LED sul dispositivo QSE-<br />
CI-WCI non si accendono.<br />
I contatti CCI non portano<br />
al risultato desiderato nel<br />
sistema.<br />
I tasti sul tastierino dei<br />
contatti non funzionano nel<br />
modo previsto.<br />
I tasti alza/abbassa non<br />
funzionano (solo per<br />
sistemi indipendenti).<br />
Garanzia<br />
<strong>Lutron</strong>, GRAFIK Eye, HomeWorks, Quantum und ) sind eingetragene Marken und Energi Savr Node ist eine Marke von<br />
<strong>Lutron</strong> Electronics Co., Inc. UL ist eine eingetragene Marke der Underwriters Laboratories, Inc. NEC ist eine eingetragene<br />
Marke der National Fire Protection Association, Quincy, Massachusetts (USA).<br />
© 2012 <strong>Lutron</strong> Electronics Co., Inc.<br />
LEDs<br />
COM<br />
1 2 3 4 5 6 7 8<br />
Eingänge mit potenzialfreien<br />
Kontakten (CCI)<br />
• Errore di cablaggio, collegamento<br />
allentato o nessun collegamento al link<br />
cablato QS.<br />
• Il limite del dispositivo sul link cablato<br />
QS è stato superato.<br />
• Errore di cablaggio, collegamento<br />
allentato o nessun collegamento dei<br />
morsetti 1 e 2 sul link cablato QS.<br />
• Il dispositivo QSE-CI-WCI non è<br />
alimentato a sufficienza dal link<br />
cablato QS. Far riferimento a “Unità<br />
di assorbimento sul link QS”, <strong>Lutron</strong>R<br />
codice articolo 369405, alla pagina web<br />
www.lutron.com/qs<br />
• Il cablaggio di ingresso è collegato in<br />
modo erroneo al tastierino dei contatti,<br />
oppure il dispositivo QSE-CI-WCI non<br />
è stato programmato correttamente.<br />
Per la verifica, far riferimento alla<br />
tabella di configurazione nella “Guida<br />
di programmazione dell’interfaccia per<br />
scatola a parete QS”, <strong>Lutron</strong>® codice<br />
articolo 041395 alla pagina web www.<br />
lutron.com<br />
• La funzionalità QSE-CI-WCI potrebbe<br />
non essere corretta.<br />
• L’impulso del segnale è di meno di 40<br />
ms.<br />
• Controllare le impostazioni degli<br />
interruttori Dip sul dispositivo<br />
QSE-CI-WCI.<br />
Per le informazioni relative alla garanzia, si prega far riferimento alla<br />
Garanzia allegata al prodotto, oppure visitare la pagina web:<br />
www.lutron.com/TechnicalDocumentLibrary/IntlWarranty.pdf<br />
Per le applicazioni commerciali, si prega visitare la pagina web:<br />
www.lutron.com/TechnicalDocumentLibrary/Warranty_<br />
CommercialSystems.pdf<br />
Hinweis: Bei HomeWorksR QS- oder QuantumR Systemen ist die<br />
entsprechende System-Einrichtungssoftware für die Programmierung<br />
dieser Komponenten zu verwenden, wenn die Verkabelung<br />
abgeschlossen ist.<br />
Hinweis: Bei eigenständigen Anwendungen siehe „QS <strong>Wallbox</strong> <strong>Closure</strong><br />
<strong>Interface</strong> Programming Guide“ (QS-Programmierhandbuch), <strong>Lutron</strong>R<br />
Bestellnummer 041395 unter www.lutron.com<br />
Hinweis: Vor der Befestigung. ist sicherzustellen, dass die<br />
Programmierung stimmt. Die QSE-CI-WCI ist nach Befestigung nicht<br />
mehr zugänglich.<br />
Befestigung<br />
1. Ungenutzte Eingangskabel zusammenbringen und von den<br />
Schaltkreisen entfernt fixieren.<br />
2. Alle Kabel und die QSE-CI-WCI in die Unterputzdose bringen.<br />
3. Bedienstelle an der Unterputzdose befestigen. Schrauben jedoch<br />
NICHT zu stark festziehen.<br />
4. Tasten- oder Frontplattenkits aus dem Lieferumfang an der Bedienstelle<br />
anbringen.<br />
Fehlersuche und -behebung<br />
Symptom Mögliche Ursachen<br />
Keine Kommunikation mit<br />
HomeWorksR QS oder dem<br />
QuantumR Prozessor, der<br />
GRAFIK EyeR Steuereinheit<br />
oder der Energi Savr NodeT<br />
Einheit.<br />
LEDs auf der QSE-CI-WCI<br />
leuchten in umgekehrter<br />
Richtung auf.<br />
LEDs auf der QSE-CI-WCI<br />
leuchten nicht auf.<br />
Eingang mit potenzialfreien<br />
Kontakten führt im System<br />
nicht zu dem gewünschten<br />
Ergebnis.<br />
Tasten auf der Bedienstelle<br />
mit potenzialfreien Kontakten<br />
funktionieren nicht wie<br />
beabsichtigt.<br />
Aufwärts-/Abwärtspfeiltasten<br />
funktionieren nicht (nur<br />
eigenständige Systeme).<br />
Garantie<br />
• Vertauschte Litzen/Kabel, lockere<br />
Verbindung oder gar keine Verbindung<br />
mit dem QS-Link.<br />
• Gerätegrenze auf dem QS-Link<br />
überschritten.<br />
• Vertauschte Litzen/Kabel, lockere<br />
Verbindung oder gar keine Verbindung<br />
mit Anschluss 1 und 2 auf dem QS-Link.<br />
• Die QSE-CI-WCI wird nicht ausreichend<br />
über das QS-Link gespeist. Siehe<br />
„Power Draw Units on the QS<br />
Link“, <strong>Lutron</strong>R, Best.-Nr. 369405 [mit<br />
Informationen zur Leistungsaufnahme<br />
über das QS-Link in PDU], unter www.<br />
lutron.com/qs.<br />
• Am Kabelbaum am Eingang wurden<br />
die Litzen/Kabel zur Bedienstelle mit<br />
potenzialfreien Kontakten vertauscht<br />
oder die QSE-CI-WCI wurde falsch<br />
programmiert. Siehe „QS <strong>Wallbox</strong><br />
<strong>Closure</strong> <strong>Interface</strong> Programming Guide“<br />
(QS-Programmierhandbuch), <strong>Lutron</strong>®<br />
Best.-Nr. 041395 unter www.lutron.com<br />
• QSE-CI-WCI-Funktionalität stimmt ggf.<br />
nicht.<br />
• Signalimpuls ist kürzer als 40 ms.<br />
• DIP-Schalter-Einstellungen auf der<br />
QSE-CI-WCI überprüfen.<br />
Garantieinformationen entnehmen Sie bitte der Produktgarantie im<br />
Lieferumfang oder informieren Sie sich unter:<br />
www.lutron.com/TechnicalDocumentLibrary/IntlWarranty.pdf<br />
Informationen zu gewerblichen Anwendungen finden Sie unter:<br />
www.lutron.com/TechnicalDocumentLibrary/Warranty_<br />
CommercialSystems.pdf<br />
®<br />
®
安装说明<br />
安装之前请参阅<br />
安装<br />
重要注释<br />
规范: 按照所有当地和国家的电<br />
气规定进行安装。<br />
环境: 工作环境温度:0 °C 至<br />
40 °C (32 °F 至 104 °F), 0-90%<br />
相对湿度,非凝结。仅限室内使用。<br />
墙盒:安装带大多数控制器的<br />
QSE-CI-WCI时,<strong>Lutron</strong>建议使用<br />
60 mm(2 1 ⁄2英寸)深 x 60 mm<br />
(2 1 1 2 3 4 5 6 7 8<br />
ON<br />
1 2<br />
®<br />
QSE-CI-WCI<br />
INPUTS<br />
ENTRADA<br />
ENTRÉES<br />
COM<br />
1 2 3 4 5 6 7 8<br />
⁄2 英 寸)宽 的 墙 盒。注:某 些<br />
应用可能需要更深的墙盒。<br />
QS链路限制:QSE-CI-WCI 消耗1个用电单元(PDU)。<br />
关于PDU的更多信息,请参见www.lutron.com/qs上“QS链路<br />
®<br />
上用电单元,<strong>Lutron</strong>R PN 369405<br />
MUX MUX PWR COM<br />
4<br />
3<br />
2<br />
端子: 通常最多允许两根1.0 mm 2 (18 AWG)<br />
接线,一根双绞线0.5 mm 2 (22 AWG) 或一根<br />
4.0 mm 2 (12 AWG) 线。对于接线限制,请参<br />
见下表:<br />
长度 线规 <strong>Lutron</strong>R电缆<br />
不到 共极(端子1)一根1.0 mm<br />
153 m<br />
(500 ft)<br />
2 (18 AWG) GRX-CBL-346S<br />
电源(端子2)一根1.0 mm (非阻燃型)<br />
GRX-PCBL-<br />
346S(阻燃型)<br />
2 (18 AWG)<br />
数据(端子3和4)一根屏蔽双绞线0.5 mm2 (22 AWG)<br />
153 米至 共极(端子1)一根4.0 mm<br />
610 米<br />
(500至<br />
2000英<br />
尺)<br />
2 (12 AWG) GRX-CBL-46L<br />
电源(端子2)一根4.0 mm<br />
(非阻燃型)<br />
GRX-PCBL-<br />
46L(阻燃型)<br />
2 (12 AWG)<br />
数据(端子3和4)一根屏蔽双绞线0.5 mm(<br />
(22 AWG)<br />
注:QSW-CI-WCI 设计用于触点闭合墙控器。触点闭合墙控器必须由客<br />
户 提 供 。它 不包 括 在 QSE-CI-WCI中。<br />
应用设置:当QSE-CI-WCI是HomeWorksR QS或QuantumR系统<br />
的一部分,通过相应的系统设置软件设置QSE-CI-WCI。对于不带处<br />
理器(单独)的安装,请参考www.lutron.com上“QS墙盒闭合接口设<br />
置指南”中的配置表,<strong>Lutron</strong>R P/N 041395<br />
<strong>Lutron</strong> Electronics Co., Inc.<br />
7200 Suter Road<br />
Coopersburg, PA 18036-1299<br />
P/N 041381 Rev. A 10/2012<br />
1<br />
技术支持<br />
美国/加拿大: 1.800.523.9466<br />
墨西哥: +1.888.235.2910<br />
巴西: +55 11 3257 6745<br />
英国<br />
+44.(0)20.7680.4481<br />
印度:+91.124.471.1900<br />
®<br />
墙盒输入闭合接口:QSE-CI-WCI<br />
IEC PELV/NECR Class 2<br />
24 V- 20 mA<br />
阿联酋:<br />
+971.4.299.1224<br />
中国:10.800.120.1536<br />
新加坡: 800.120.4491<br />
其它国家:<br />
+1.610.282.3800<br />
接线<br />
警 告:电击 危 险。 可导致严重受伤事故或死亡。不要带电进行接线!<br />
进行接线或维修之前,要通过断路器或隔离开关切断至所有电力馈<br />
电的电源。<br />
注意:不要将高压电源连接到低压端子上。不正确的接线会引起人<br />
身伤害或引起产品或其他设备的损坏。<br />
注:连接触点闭合输入(CCI)前,要确认与触点闭合墙控器的兼容性。<br />
触点闭合既可以与干接触点闭合配用,也可以与以电路公共端为基准的固<br />
态输出配用。触点闭合必须能保持在闭合状态或断开状态至少 40 毫秒,<br />
以使WCI能够识别。如果怀疑触点闭合墙控器是否与这些规格相配,请与<br />
墙控器制造商联系。<br />
注:<strong>Lutron</strong> 建议,QSE-CI-WCI 应由合资格的电工来安装。<br />
1. 关闭连接到任何 QS 链 路电 源(如 GRAFIK EyeR 控制器、Energi Savr<br />
NodeTM 控 制 器 等)上的所有断 路 器,断 开 QS接线链路的电源。<br />
2. 剥线10 mm(3/8英 寸),松 开 接 线 端 子 螺 钉。<br />
3. 连接 QS 链路到接线端子上,拧紧螺钉。<br />
4. 最多连接八个外部低压干式触点闭合,如接线图所示。所有CCI必须共享<br />
提供的共极(黑色)。盖上所有未使用的CCI接 线,将它们 远离其<br />
他电路。<br />
注: 对 于单 独 应 用,请 参考www.lutron.com 上“QS墙盒闭合接口设置<br />
指南”中的配置表,<strong>Lutron</strong>R P/N 041395,来配合 CCI的功能。<br />
接线图<br />
触点闭合接线颜色<br />
1 2 3 4 5 6 7 8 COM<br />
红色<br />
橙色<br />
黄色<br />
绿色<br />
蓝色<br />
紫色<br />
灰色<br />
白色<br />
黑色<br />
触点<br />
闭合<br />
触点<br />
闭合<br />
CCI 1 (红色)<br />
CCI 8 (白色)<br />
共用(黑色)<br />
1 2 3 4 5 6 7 8<br />
®<br />
QSE-CI-WCI<br />
INPUTS<br />
ENTRADA<br />
ENTRÉES<br />
COM<br />
1 2 3 4 5 6 7 8<br />
接线验证<br />
1. 通 过向 链 路 通电,打开 到 QSE-CI-WCI 的电源。<br />
2. 按下触点闭合墙控器上的首个按键。检查 QSE-CI-WCI上的相应LED<br />
灯,跟踪触点闭合墙控器上的所需按键。对其他按键重复该步骤。<br />
注:对于 HomeWorksR QS 或 QuantumR 系统,接线完成后使用适合<br />
的系统设置软件设置这些系统。<br />
注:对于单独的应用,进行安装前,请参考www.lutron.com 上的“QS墙<br />
盒闭合接口设置指南”,<strong>Lutron</strong>R P/N 041395<br />
注:执行安装前,确保设置正确安装后,将不能接触到QSE-CI-WCI。<br />
ON<br />
1 2<br />
1 2 3 4 5 6 7 8<br />
LED指示灯<br />
COM<br />
1 2 3 4 5 6 7 8<br />
触点闭合输入<br />
安装<br />
1. 将所有接线和QSE-CI-WCI 推入墙盒。请勿挤压接线。<br />
2. 将触点闭合墙控器固定在墙盒上。请勿过度拧紧螺钉。<br />
3. 安装随触点闭合墙控器提供的将按键套装或面板。<br />
疑难排解<br />
表征 可能原因<br />
没有与HomeWorksR QS或<br />
QuantumR 处理器、GRAFIK<br />
EyeR 控制器、或Energi Savr<br />
NodeT控制器通信。<br />
QSE-CI-WCI上的LED灯以相<br />
反顺序显示。<br />
QSE-CI-WCI上的LED灯没<br />
有打开。<br />
CCI未在系统中产生期望的<br />
结果。<br />
触点闭合墙控器上的按键不能<br />
按既定用途工作。<br />
Raise / Lower(升/降)按键<br />
不工作(仅限单独系统)。<br />
质量保证<br />
<strong>Lutron</strong>、GRAFIK Eye、HomeWorks、Quantum 和 ) 是 <strong>Lutron</strong> Electronics Co., Inc.的商标,Energi Savr Node是<br />
<strong>Lutron</strong> Electronics Co., Inc. 的注册商标。UL 是 Underwriters Laboratories, Inc. 的商标。NEC是National Fire Protection Association,<br />
Quincy, Massachusetts 的注册商标<br />
© 2012 <strong>Lutron</strong> Electronics Co., Inc.<br />
• QS有线链路发生接线错误、连线松脱或<br />
无连接。<br />
• QS有线链路上的设备限制已经超过。<br />
• QS有线链路上的端子1和2发生接线错<br />
误、连线松脱或无连接。<br />
• QSE-CI-WCI 没有从QS有线链路上获得<br />
足够的电源。请参见www.lutron.com/qs<br />
上“QS链路上用电单元”,<br />
<strong>Lutron</strong>R PN 369405<br />
• 输入线束误接到触点闭合墙控器上或<br />
QSE-CI-WCI设置错误。为了验证,请参考<br />
www.lutron.com上“QS墙盒闭合接口设置<br />
指南”中的配置表,<strong>Lutron</strong>® P/N 041395<br />
• QSE-CI-WCI功能可能不正确。<br />
• 信号脉冲小于40 ms。<br />
• 检查QSE-CI-WCI上的DIP开关设置。<br />
有关质量保证的信息,请参阅产品随附的质量保证,或访问:<br />
www.lutron.com/TechnicalDocumentLibrary/IntlWarranty.pdf<br />
有关 商 业 应 用,请 访 问 :www.lutron.com/<br />
TechnicalDocumentLibrary/Warranty_CommercialSystems.pdf<br />
®