Model: 26-0300 Lit. #: 91-0231/12-05 iNstructioN ... - Bushnell
Model: 26-0300 Lit. #: 91-0231/12-05 iNstructioN ... - Bushnell
Model: 26-0300 Lit. #: 91-0231/12-05 iNstructioN ... - Bushnell

You also want an ePaper? Increase the reach of your titles
YUMPU automatically turns print PDFs into web optimized ePapers that Google loves.
4<br />
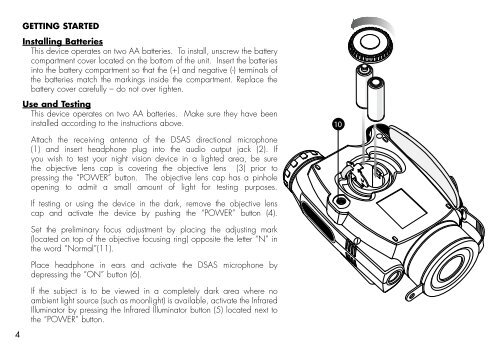
GETTING STARTED<br />
Installing Batteries<br />
This device operates on two AA batteries. To install, unscrew the battery<br />
compartment cover located on the bottom of the unit. Insert the batteries<br />
into the battery compartment so that the (+) and negative (-) terminals of<br />
the batteries match the markings inside the compartment. Replace the<br />
battery cover carefully – do not over tighten.<br />
Use and Testing<br />
This device operates on two AA batteries. Make sure they have been<br />
installed according to the instructions above.<br />
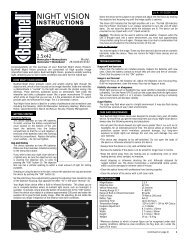
Attach the receiving antenna of the DSAS directional microphone<br />
(1) and insert headphone plug into the audio output jack (2). If<br />
you wish to test your night vision device in a lighted area, be sure<br />
the objective lens cap is covering the objective lens (3) prior to<br />
pressing the “POWER” button. The objective lens cap has a pinhole<br />
opening to admit a small amount of light for testing purposes.<br />
If testing or using the device in the dark, remove the objective lens<br />
cap and activate the device by pushing the “POWER” button (4).<br />
Set the preliminary focus adjustment by placing the adjusting mark<br />
(located on top of the objective focusing ring) opposite the letter “N” in<br />
the word “Normal”(11).<br />
Place headphone in ears and activate the DSAS microphone by<br />
depressing the “ON” button (6).<br />
If the subject is to be viewed in a completely dark area where no<br />
ambient light source (such as moonlight) is available, activate the Infrared<br />
Illuminator by pressing the Infrared Illuminator button (5) located next to<br />
the “POWER” button.<br />
Infrared<br />
power<br />
Direct the device at an object at a distance approximately 100 yards and rotate the eyepiece<br />
(7) to give the best quality image. After the adjusting, do not rotate the eyepiece any longer irrespective<br />
of the distance and other conditions. Direct the device at the subject to be viewed and adjust the final focus by rotating the objective<br />
lens focusing ring until the image quality is optimal.<br />
Adjust sound amplification volume to an optimal level by pressing the volume control buttons (8). If the sound is to be recorded,<br />
insert the tape recorder plug into the jack (9) and start recording.<br />
The Green LED indicates that the light amplifier unit is on. The Red LED indicates that the Infrared Illuminator is on. The Yellow<br />
LED indicates that the DIRECTIONAL SOUND AMPLIFICATION SYSTEM is operating. Always remember to turn off the unit when<br />
done. Do not store this device while the indicators are lit. This device can be mounted on any tripod with a 1/4“ tripod socket (10).<br />
5