Telescope Instruction Manual - Bushnell
Telescope Instruction Manual - Bushnell
Telescope Instruction Manual - Bushnell

Create successful ePaper yourself
Turn your PDF publications into a flip-book with our unique Google optimized e-Paper software.
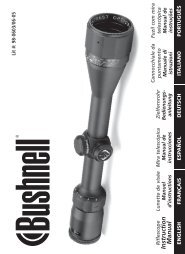
Lit. #: 91-0264/08-01<br />
<strong>Telescope</strong><br />
<strong>Instruction</strong><br />
<strong>Manual</strong><br />
78-9500 60mm RefraCtor
2.<br />
Never Look Directly At The Sun With<br />
Your <strong>Telescope</strong><br />
Permanent Damage<br />
To Your Eyes May Occur
WHERE DO I START?<br />
Your <strong>Bushnell</strong> telescope can bring the wonders of the universe to your eyes. While<br />
this manual is intended to assist you in the set-up and basic use of this instrument,<br />
it does not cover everything you might like to know about astronomy. Although<br />
Northstar will give a respectable tour of the night sky, it is recommended you obtain<br />
a very simple star chart and a flashlight with a red bulb or red cellophane over the<br />
end. For objects other than stars and constellations, a basic guide to astronomy is<br />
a must. Some recommended sources appear on our website at www.bushnell.com.<br />
Also on our website will be current events in the sky for suggested viewing. But,<br />
some of the standbys that you can see are:<br />
The Moon—A wonderful view of our lunar neighbor can be enjoyed with any<br />
magnification. Try viewing at different phases of the moon. Lunar highlands, lunar<br />
maria (lowlands called "seas" for their dark coloration), craters, ridges and<br />
mountains will astound you.<br />
Saturn—Even at the lowest power you should be able to see Saturn’s rings and<br />
moons. This is one of the most satisfying objects in the sky to see simply because<br />
it looks like it does in pictures. Imagine seeing what you’ve seen in textbooks or<br />
NASA images from your backyard!<br />
Jupiter—The largest planet in our solar system is spectacular. Most noted features<br />
are its dark stripes or bands both above and below its equator. These are the north<br />
and south equatorial belts. Also interesting are Jupiter’s four major moons. Pay<br />
close attention to their positions from night to night. They appear to be lined up on<br />
either side of Jupiter.<br />
Mars—The Great Red Planet appears as a reddish-orange disk. Look at different<br />
times of the year and try to catch a glimpse of the white polar ice caps.<br />
Venus—Just like the moon, Venus changes phases from month to month. At times<br />
Venus appears brilliantly in the night sky, just as if you were looking at a distant crescent<br />
moon.<br />
Nebulae—The Great Orion Nebula is a very well known night sky object. This and many<br />
others are brought to you by this telescope.<br />
Star Clusters—View millions of stars densely packed in a cluster that resembles a ball.<br />
Galaxies—One of the greatest and most interesting galaxies is our neighbor, the<br />
Andromeda Galaxy. Enjoy this and many others.<br />
3.
4.<br />
4.<br />
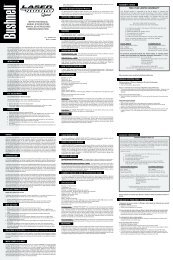
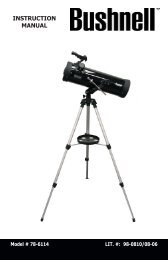
1. Red Dot Wide Field Finderscope<br />
2. Eyepiece<br />
3. <strong>Telescope</strong> Main Tube<br />
4. 60mm Objective Lens<br />
5. Latitude Lock Knob<br />
6. Tripod Leg<br />
7. Accessory Tray Braces<br />
78-9500 60mm Refractor<br />
5.<br />
12.<br />
11.<br />
7.<br />
3.<br />
13.<br />
10.<br />
<strong>Telescope</strong> Parts Diagram<br />
8.<br />
Parts Diagrams<br />
6.<br />
9.<br />
8. Accessory Tray<br />
9. Rack and Pinion Focusing Mechanism<br />
10. Declination Lock Knob<br />
11. Counterweight Shaft<br />
12. Counterweight<br />
13. Fine Adjustment Cables<br />
1.<br />
2.
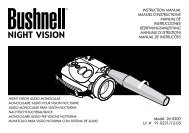
• Adjustable Aluminum Tripod Assembly<br />
(Three Legs)<br />
• Accessory Tray<br />
• Refractor <strong>Telescope</strong> Assembly<br />
• Equatorial Mount<br />
78-9500 60mm<br />
RefRactor<br />
QUICK ASSEMBLY DIAGRAM<br />
PARTS LIST<br />
Step 2<br />
1. Spread tripod legs and attach accessory tray.<br />
• Red Dot Wide Field Finderscope<br />
• 20mm, 12mm, 4mm Eyepieces<br />
• Erect Image Eyepiece (For Land Use)<br />
• Barlow Lens<br />
Step 1<br />
2. Attach telescope tube, finderscope, counterweight and fine<br />
adjustment cables to pre-assembled Equatorial Mount<br />
with pre-attached tripod legs.<br />
5.
6.<br />
DETAILED ASSEMBLY<br />
Remove all components from the carton and identify all components. READ THROUGH ASSEMBLY<br />
INSTRUCTION BEFORE YOU ASSEMBLE YOUR TELESCOPE.<br />
Attach Accessory Tray and <strong>Telescope</strong><br />
1. Fold down the accessory tray braces and place the Accessory Tray on top of braces. Attach<br />
Accessory Tray with included three small accessory tray bolts and nuts.<br />
2. Locate the pre-assembled Tripod and Equatorial Mount. Remove attachment bolts at top of<br />
Equatorial Mount. Attach <strong>Telescope</strong> Main Tube to the top of the Equatorial Mount. Secure in place<br />
by reinserting bolts through Equatorial Mount into base plate.<br />
Attach Fine Adjustment Cables, Counterweight, and Finderscope<br />
1. Locate the Fine Adjustment Cables. Screw the silver collars, located at the end of the Fine Adjustment<br />
Cables, to the corresponding silver posts found on the Equatorial Mount.<br />
2. Locate the Counterweight and Counterweight Shaft. Loosen the thumb screw located on the<br />
Counterweight and slide the Counterweight onto the Counterweight Shaft, and tighten thumb screw to<br />
secure the Counterweight. Thread the Counterweight Shaft into the hole located directly below the<br />
Declination Lock Knob. Make sure that the shaft is securely locked into mount.<br />
3. Locate the Finderscope with pre-assembled Finderscope Mount. Remove the two nuts located near<br />
the front of the telescope (closet to the eyepiece) and place the Finderscope and Finderscope Mount<br />
over the exposed screws. Replace the nuts, and securely tighten the Finderscope and Finderscope<br />
Mount in place.<br />
4. Adjust tripod leg height to suit by opening tripod leg lock and extending tripod legs to desired height.<br />
TightenTripod Leg Lock when complete.<br />
5. Remove objective dust cover ensuring that the entire diameter of the telescope tube is exposed.<br />
6. Insert Eyepiece into Diagonal Mirror then both into the focusing tube to begin viewing.
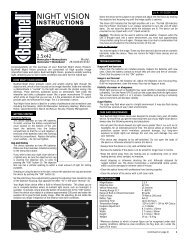
HOW TO USE YOUR NEW TELESCOPE<br />
Selecting an Eyepiece<br />
1. You should always start viewing with the lowest power eyepiece, which in this case is the<br />
20 mm lens. Note: the base power of each eyepiece is determined by the focal length of the<br />
telescope objective lens. A formula can be used to determine the power of each eyepiece:<br />
telescope OBJECTIVE lens focal length divided by EYEPIECE focal length =<br />
MAGNIFICATION (e.g. Using the 20 mm lens, a sample calculation would look like this:<br />
700 mm / 20mm = 35x or 35 power. <strong>Telescope</strong> models will vary in focal length).<br />
2. Included with this telescope is a Barlow lens. Barlow lenses are used to double or triple the<br />
power of your telescope. Place your Barlow between the focusing tube and the eyepiece.<br />
Using the example above, your 3x Barlow lens would give you a total power of 105x or<br />
135 power. (35 x 3 = 105x or 105 power). The magnification calculation would look like this:<br />
700 mm/ 20mm =35 power. 35 power x 3 = 105 power.<br />
Focusing <strong>Telescope</strong><br />
1. After selecting the desired eyepiece, aim main telescope tube at a land-based target at least<br />
200 yards away (e.g. a telephone pole or building).<br />
2. Fully extend focusing tube by turning Rack and Pinion Focusing Mechanism.<br />
3. While looking through selected eyepiece (in this case the 20 mm), slowly retract focusing tube<br />
by turning Rack and Pinion Focusing Mechanism until object comes into focus.<br />
Aligning Finderscope<br />
1. Look through Main <strong>Telescope</strong> Tube and establish a well-defined target. (see Focusing<br />
<strong>Telescope</strong> section)<br />
2. Looking through Wide Field Finderscope, alternate tightening each Finderscope Adjustment<br />
Screw until the red dot of Wide Field Finderscope are precisely centered on the same object<br />
already centered in Main <strong>Telescope</strong> Tube's field of view.<br />
3. Now, objects located first with the Wide Field Finderscope will be centered in the field of view<br />
of the main telescope.<br />
Never Look Directly At The Sun With<br />
Your <strong>Telescope</strong><br />
Permanent Damage<br />
To Your Eyes May Occur<br />
7.
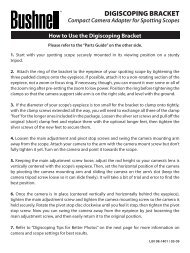
POLAR<br />
AXIS<br />
8.<br />
HOW TO USE YOUR NEW TELESCOPE (CONTINUED)<br />
Understanding the Equatorial Mount<br />
The Equatorial Mount is designed to move in any direction. It can be set to allow manual controls<br />
to track the movements of celestial bodies across the sky. This is referred to as diurnal movement:<br />
movement of celestial bodies in the direction opposite to that of the earth’s rotation and around<br />
the earth’s axis.<br />
By aligning the telescope’s polar axis at celestial North, you will place the telescope in parallel with<br />
the earth’s axis and thus be able to locate stars in the sky based on star atlas information.<br />
1. Set up the telescope at night. Loosen the Declination Lock Knob and rotate the telescope<br />
around the declination axis until the arrow on the declination scale points to 90 degrees.<br />
Tighten the Declination Lock Knob.<br />
2. Look up the latitude of your area in any geographical atlas. Loosen the Latitude Lock Knob<br />
and set the latitude scale to the correct latitude for your area. Aim the Finderscope at Polaris.<br />
You will probably notice that Polaris is not dead center in the Finderscope’s field of view. This<br />
is probably because your telescope is not absolutely level with the ground. Loosen the<br />
Horizontal Axis Lock Knob again and turn the telescope so that it is directly aimed at Polaris.<br />
Tighten both the Horizontal Axis Lock Knob and Latitude Lock Knob. Polaris is 1 degree from<br />
the North celestial pole. Therefore, the sighting of stars will have to be slightly adjusted as you<br />
locate them in the heavens.<br />
LATITUDE<br />
N<br />
N<br />
S S<br />
EARTH’S AXIS<br />
(CELESTIAL AXIS)<br />
POLAR AXIS & EARTH’S AXIS
M ENJOYING YOUR NEW TELESCOPE<br />
1. First determine your targeted object. Any bright object in the night sky is a good starting<br />
point. One of the favorite starting points in astronomy is the moon. This is an object sure<br />
to please any budding astronomer or experienced veteran. When you have developed<br />
proficiency at this level, other objects become good targets. Saturn, Mars, Jupiter, and<br />
Venus are good second steps to take.<br />
2. The first thing you need to do after assembling the telescope as planned is center the<br />
desired object in the finderscope’s crosshairs. Provided you did a reasonable job aligning<br />
the finderscope, a quick look through the main telescope tube at low power should reveal<br />
the same image. With the lowest power eyepiece (the one with the largest number printed<br />
on it) you should be able to focus the same image that you saw through the finderscope.<br />
Avoid the temptation to move directly to the highest power. The low power eyepiece<br />
will give you a wider field of view, and brighter image—thus making it very easy to<br />
find your target object. At this point with a focused image in both scopes, you’ve passed<br />
the first obstacle. If you don’t see an image after attempting to focus it in, you might<br />
consider aligning your finderscope again. Once you pass this step, you will enjoy the time<br />
spent ensuring a good alignment. Every object you center in the finderscope will be easily<br />
found in the main telescope tube, which is important for continuing your exploration of<br />
the night sky.<br />
3. The low power eyepieces are perfect for viewing the full moon, planets, star clusters,<br />
nebulae, and even constellations. These should build your foundation. However, for more<br />
detail, try bumping up in magnification to higher power eyepieces on some of these<br />
objects. During calm and crisp nights, the light/dark separation line on the moon (called the<br />
"Terminator") is marvelous at high power. You can see mountains, ridges and craters jump<br />
out at you due to the highlights. Similarly, you can move up to higher magnifications on the<br />
planets and nebulae. Star clusters and individual stars are best viewed through the low<br />
power no matter what.<br />
4. The recurring astronomical theater we call the night sky is an ever-changing billboard. In<br />
other words, the same movie doesn’t play all the time. Rather, the positions of the stars<br />
change not only hourly as they seem to rise and set, but also throughout the year. As the<br />
earth orbits the sun our perspective on the stars changes on a yearly cycle about that orbit.<br />
The reason the sky seems to move daily just as the sun and the moon "move" across our<br />
sky is that the earth is rotating about its axis. As a result you may notice that after a few<br />
minutes or a few seconds depending on what power you are viewing at, the objects in your<br />
telescope will move. At higher magnifications especially, you will notice that the moon or<br />
Jupiter will "race" right out of the field of view. To compensate, just move your telescope to<br />
"track" it in the necessary path.<br />
9.
M HELPFUL HINTS<br />
1. Your telescope is a very sensitive instrument. For best results and fewer vibrations set your telescope up on a level location<br />
on the ground rather than your concrete driveway or your wooden deck. This will provide a more stable foundation for viewing,<br />
especially if you’ve drawn a crowd with your new telescope.<br />
2. If possible view from a location that has relatively few lights. This will allow you to see much fainter objects. You’d be surprised<br />
how much more you’ll see from your local lake or park when compared to a backyard in the city.<br />
3. Using your telescope out a window is NEVER recommended.<br />
4. View objects that are high in the sky if possible. Waiting until the object rises well above the horizon will provide a<br />
brighter and crisper image. Objects on the horizon are viewed through several layers of earth’s atmosphere. Ever<br />
wonder why the moon appears orange as it sets on the horizon? It’s because you are looking through a considerable<br />
more amount of atmosphere than you would directly overhead. (Note: If objects high in the sky are distorted or wavy,<br />
you are probably viewing on a very humid night.) During nights of unstable atmosphere, viewing through a telescope<br />
can be frustrating if not impossible. Astronomers refer to crisp, clear nights as nights of "good seeing."<br />
10.<br />
WARRANTY / REPAIR<br />
Your <strong>Bushnell</strong>® telescope is warranted to be free of defects in materials and workmanship for the lifetime of the original<br />
owner. The Lifetime Limited Warranty is an expression of our confidence in the materials and mechanical workmanship of<br />
our products and is your assurance of a lifetime of dependable service.<br />
If your telescope contains electrical components the electronic components are warranted to be free of defects in materials<br />
and workmanship for one year after date of purchase.<br />
In the event of a defect under this warranty, we will, at our option, repair or replace the product, provided that you return<br />
the product postage prepaid. This warranty does not cover damages caused by misuse or improper handling, installation<br />
or maintenance of the product.<br />
Any return made under this warranty<br />
must be accompanied by the items listed below:<br />
1) A check in the amount of $15.00 to cover the cost of handling<br />
2) Name and address for product return<br />
3) An explanation of the defect<br />
4) Product should be well packed in a sturdy outside shipping carton to prevent damage in<br />
transit and return postage prepaid to the address listed below:<br />
IN U.S.A. Send To: IN CANADA Send To:<br />
<strong>Bushnell</strong> Performance Optics <strong>Bushnell</strong> Performance Optics<br />
8500 Marshall Drive 25A East Pearce Street, Unit 1<br />
Lenexa, Kansas 66214 Richmond Hill, Ontario L4B 2M9<br />
For products purchased outside the United States and Canada please contact your local dealer for applicable warranty<br />
information. This warranty gives you specific legal rights. You may have other rights which vary from country to country.<br />
Copyright 2001 <strong>Bushnell</strong> Performance Optics
M NOTES<br />
11.