Guía de Uso Y Cuidado Use And Care Guide - Whirlpool Corporation
Guía de Uso Y Cuidado Use And Care Guide - Whirlpool Corporation
Guía de Uso Y Cuidado Use And Care Guide - Whirlpool Corporation

You also want an ePaper? Increase the reach of your titles
YUMPU automatically turns print PDFs into web optimized ePapers that Google loves.
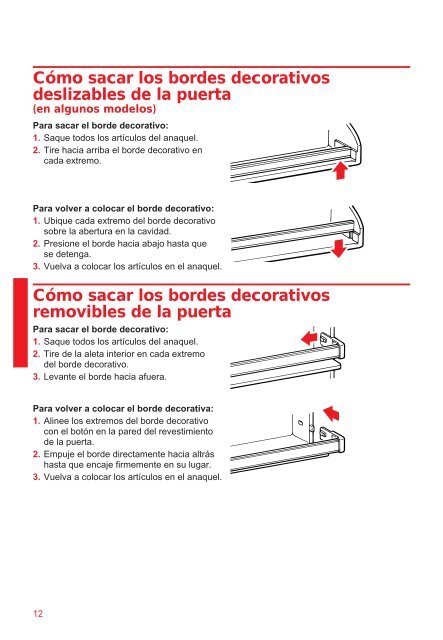
Cómo sacar los bor<strong>de</strong>s <strong>de</strong>corativos<br />
<strong>de</strong>slizables <strong>de</strong> la puerta<br />
(en algunos mo<strong>de</strong>los)<br />
Para sacar el bor<strong>de</strong> <strong>de</strong>corativo:<br />
1. Saque todos los artículos <strong>de</strong>l anaquel.<br />
2. Tire hacia arriba el bor<strong>de</strong> <strong>de</strong>corativo en<br />
cada extremo.<br />
Para volver a colocar el bor<strong>de</strong> <strong>de</strong>corativo:<br />
1. Ubique cada extremo <strong>de</strong>l bor<strong>de</strong> <strong>de</strong>corativo<br />
sobre la abertura en la cavidad.<br />
2. Presione el bor<strong>de</strong> hacia abajo hasta que<br />
se <strong>de</strong>tenga.<br />
3. Vuelva a colocar los artículos en el anaquel.<br />
Cómo sacar los bor<strong>de</strong>s <strong>de</strong>corativos<br />
removibles <strong>de</strong> la puerta<br />
Para sacar el bor<strong>de</strong> <strong>de</strong>corativo:<br />
1. Saque todos los artículos <strong>de</strong>l anaquel.<br />
2. Tire <strong>de</strong> la aleta interior en cada extremo<br />
<strong>de</strong>l bor<strong>de</strong> <strong>de</strong>corativo.<br />
3. Levante el bor<strong>de</strong> hacia afuera.<br />
Para volver a colocar el bor<strong>de</strong> <strong>de</strong>corativa:<br />
1. Alinee los extremos <strong>de</strong>l bor<strong>de</strong> <strong>de</strong>corativo<br />
con el botón en la pared <strong>de</strong>l revestimiento<br />
<strong>de</strong> la puerta.<br />
2. Empuje el bor<strong>de</strong> directamente hacia altrás<br />
hasta que encaje firmemente en su lugar.<br />
3. Vuelva a colocar los artículos en el anaquel.<br />
12