Kenmore - Sears
Kenmore - Sears
Kenmore - Sears

Create successful ePaper yourself
Turn your PDF publications into a flip-book with our unique Google optimized e-Paper software.
Use & Care Guide<br />
Guia de uso y cuidada<br />
English / Espanol<br />
Model/Modelos: 587.1402"<br />
<strong>Kenmore</strong><br />
3-s<br />
avavaj°llas<br />
* ....colo_ numbe_, num(_m de couleu_<br />
P/N 154885201<br />
<strong>Sears</strong> Brands Management Corporation,<br />
Hoffman Estates,<br />
IL 60179 U.S.A.<br />
www.kenmore.com<br />
www.sears.com
Table of Contents<br />
<strong>Kenmore</strong> Limited Warranty ....................................................2<br />
IMPORTANT SAFETY INSTRUCTIONS ................................. 3<br />
Before Using Your Dishwasher .................................................4<br />
Dishwasher Features .................................................................5<br />
Operating Instructions ..........................................................6-7<br />
Preparing and Loading Dishes ............................................8-9<br />
<strong>Kenmore</strong> Limited Warranty<br />
Dishwasher Dispenser and Detergents ............................10-11<br />
Care & Cleaning ......................................................................12<br />
Before You Call - Solutions to common problems ......... 13-14<br />
Protection Agreements ............................................................15<br />
<strong>Sears</strong> Service ............................................................Back Cover<br />
When installed, operated and maintained according to all instructions supplied with the product, if this appliances fails<br />
due to a defect in material or workmanship within one year fromt he date of purchase, Call 1-800-4-MY-HOME® to<br />
arrange for free repair. If this appliance is used for other than private family purposes, this warranty applies for only 90<br />
days from the date of purchase.<br />
This warranty covers only defects in material and workmanship. <strong>Sears</strong> will NOT pay for:<br />
1. Expendable items that can wear out from normal use, including but not limited to filters, belts, light bulbs, and bags.<br />
2. A service technician to instruct the user in correct product installation, operation or maintenance.<br />
3. A service technician to clean or maintain this product.<br />
4. Damage to or failure of this product if it is not istalled, operated or maintained according to all instructions supplied<br />
with the product.<br />
5. Damage to or failure of this product resulting from accident, abuse, misuse or use for other than its intended purpose.<br />
6. Damage to or failure of this product caused by the use of detergents, cleaners, chemicals or utensils other than those<br />
recommended in all instructions supplied with the product.<br />
7. Damage to or failure of parts or systems resulting from unauthorized modifications made to this product.<br />
Disclaimer of implied warranties; limitation of remedies<br />
Customer's sole and exclusive remedy under this limited warranty shall be product repair as provided herein. Implied<br />
warranties, including warranties of merchantability or fitness for a particular purpose, are limited to one year or the<br />
shortest period allowed by law. <strong>Sears</strong> shall not be liable for incidental or consequential damages. Some states and<br />
provinces do not allow the exclusion or limitation of incidental or consequential damages, or limitation on the duration of<br />
implied warranties of merchantability or fitness, so these exclusions or limitations may not apply to you.<br />
This warranty applies only while this appliance is used in the United States or Canada.<br />
This warranty gives you specific legal rights, and you may also have other rights which vary from state to state.<br />
<strong>Sears</strong> Brand Management Corporation, Hoffman Estates, IL 60179 USA<br />
<strong>Sears</strong> Canada Inc., Toronto, Ontario, Canada MSB 2B8<br />
Product Record<br />
In this space below, record the date of purchase, model<br />
and serial number of your product. You will find the<br />
model and serial number printed on an identification<br />
plate. See page 5 Dishwasher Features for serial label<br />
location.<br />
Model No. 587.<br />
Serial No.<br />
Date of Purchase<br />
Save sales receipt for future reference.<br />
All rights reserved. Printed in the USA.
This manual contains important safety symbols and<br />
instructions. Please pay attention to these symbols and<br />
follow all instructions given.<br />
Definitions<br />
This is the safety alert symbol. It is used to alert you to<br />
potential personal injury hazards. Obey all safety<br />
messages that follow this symbol to avoid possible injury or<br />
death.<br />
Read all instructionsbefore usingthis appliance.<br />
Do not attempt to install or operate your appliance until<br />
you have read the safety precautions in this manual.<br />
Safety items throughout this manual are labeled with a<br />
WARNING or CAUTION statement based on the risk type.<br />
- indicates a potentially hazardous<br />
situation which, if not avoided, may result in death or<br />
serious injury.<br />
ImportantSafety Instructions<br />
- indicates a potentially hazardous<br />
situation which, if not avoided, may result in minor or<br />
moderate injury.<br />
When using the dishwasher, follow basic precautions, including the following:<br />
• Read all instructions before using the dishwasher.<br />
• Use your dishwasher only as instructed in this Use<br />
and Care Guide.<br />
• Use only detergents or rinse agents recommended<br />
for use in a dishwasher, and keep them out of reach<br />
of children.<br />
• When loading items to be washed:<br />
- Locate sharp items and knives so that they are not<br />
likely to damage the door seal or tub.<br />
- Load sharp items and knives with the handles up<br />
to reduce the risk of cut-type injuries.<br />
• Do not wash plastic items unless marked<br />
"dishwasher safe" or the equivalent. Check with<br />
manufacturer for recommendations, if not marked.<br />
Items that are not dishwasher safe may melt and<br />
create a potential fire hazard.<br />
• Do not touch the heating element during or<br />
immediately after use.<br />
• Do not operate your dishwasher unless all enclosure<br />
panels are properly in place.<br />
• If the dishwasher drains into a food disposer, make<br />
sure disposer is completely empty before running<br />
dishwasher.<br />
Save these instructions for future reference.<br />
• Disconnect electrical power to dishwasher before<br />
servicing.<br />
• Do no tamper with controls.<br />
• Do not let children abuse, sit, stand or play on door<br />
or racks of a dishwasher.<br />
• Keep young children and infants away from<br />
dishwasher when it is operating.<br />
• Under certain conditions, hydrogen has may be<br />
produced in a hot water system that has not been<br />
used for two weeks or more. HYDROGEN GAS IS<br />
EXPLOSIVE. If the hot water system has not been<br />
used for such a period, before using the dishwasher<br />
turn on all hot water faucets and let the water flow<br />
from each for serveral minutes. This will release any<br />
accumulated hydrogen gas. As the gas is<br />
flammable, do not smoke or use an open flame<br />
during this time.<br />
• Remove the door to the washing compartment when<br />
removing an old dishwasher from service or<br />
discarding it.
Tip Over Hazard<br />
Do not use dishwasher until completely<br />
installed.<br />
Do not push down on open door.<br />
Doing so can result in serious injury or<br />
cuts.<br />
Electrical Shock Hazard<br />
Electrically ground dishwasher.<br />
Connect ground wire to green ground nut in<br />
terminal box.<br />
Do not use an extension cord.<br />
Failure to do so can result in death, fire, or<br />
electrical shock.<br />
Before Using Your Dishwasher<br />
GROUNDING INSTRUCTIONS<br />
• For a grounded, cord-connected dishwasher:<br />
The dishwasher must be grounded. In the event of<br />
a malfunction or breakdown, grounding will reduce<br />
the risk of electric shock by providing a path of<br />
least resistance for electric current. The dishwasher<br />
is equipped with a cord having an plug. The plug<br />
must be plugged into an appropriate outlet that is<br />
installed and grounded in accordance with all local<br />
codes and ordinances.<br />
: Improper connection of the<br />
equipment-grounding conductor can result in a risk of<br />
electric shock. Check with a qualified electrician or<br />
service representative if you are in doubt whether the<br />
dishwasher is properly grounded. Do not modify the<br />
plug provided with the dishwasher. If it will not fit the<br />
outlet, have a proper outlet installed by a qualified<br />
electrician.<br />
• For a permanently connected dishwasher:<br />
The dishwasher must be connected to a grounded<br />
metal, permanent wiring system, or a equipment-<br />
grounding conductor must be run with the circuit<br />
conductors and connected to the equipmentgrounding<br />
terminal or lead on the dishwasher.<br />
SAVE THESE INSTRUCTIONS
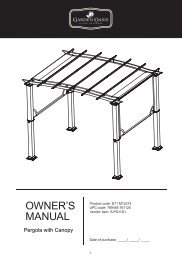
Dishwasher Features<br />
Tub Gasket<br />
Middle Spray Arm<br />
Lower Spray Arm<br />
\<br />
Overfill Protector<br />
Rinse Aid<br />
Dispenser<br />
Detergent Dispenser<br />
Funnel Nozzle or Spray Arm<br />
Top Rack<br />
Serial Label<br />
(located on right<br />
side of tub)<br />
_,!!i!!i!!i_i_!!_iii!_i_i_iiiii<br />
!!_!i_ii_i_!i;i_i!i_!i_ii_!iiiiiiiii_iii!!i<br />
iii_i!iii!i!!i!iiiiiiiiii_ii_iiiii_ii_iiiii_ii<br />
¸_ ....iii!_i_ii':_f!'i!:!ii'_i_!!_<br />
CYCE ©_TION_<br />
Bottom Rack<br />
Silverware Basket<br />
Glass Trap<br />
Self-Cleaning Filter<br />
Heating Element<br />
Appearance may vary from your model.<br />
w,_s nr<br />
O;t/OL S t_ Zll<br />
;t_;t STR<br />
c._ucl<br />
Appearance may vary from your model.
Operating Instructions<br />
Wash System<br />
Your <strong>Kenmore</strong> dishwasher filters 100% of the<br />
water for optimum cleaning. The wash system<br />
uses alternating arms to save water and energy<br />
and includes a heavy-duty stainless steel food<br />
disposer that grinds up large food particles.<br />
How the wash system works<br />
1. Load the dishwasher (See Preparing and Loading<br />
Dishes).<br />
2. Hot water enters the dishwasher, covers the filter, and<br />
rises to the bottom of the heater clips.<br />
3. Detergent is dispensed at the appropriate time and<br />
mixed with the hot water. This mixture is pumped<br />
through the lower spray arm and sprays against the<br />
soiled surfaces of the dishes to remove food particles.<br />
4. Water passes through the fine mesh primary filter<br />
where food soil is removed and the clean water is then<br />
recirculated.<br />
Wash Cycle Selections<br />
5. Ports under the lower wash arm direct the food soil<br />
through a secondary filter into a collection chamber.<br />
6. Food soil is held in the collection chamber until it is<br />
flushed away during the drain cycle.<br />
7. Clean, hot water enters the dishwasher and the<br />
sequence is repeated.<br />
8. Beginning with the third water fill, the wash action<br />
switches between the lower spray arm and middle<br />
spray arm in 90 second intervals. You may notice a<br />
change in sound as the wash action pauses and<br />
switches to the other arm.<br />
9. The dishwasher may pause during the cycle while<br />
water is being heated. Wash action will continue<br />
during this time.<br />
10. Rinse aid is automatically dispensed in the final rinse<br />
to aid in drying.<br />
Note: Cycle times are approximate and will vary with options selected. Not all cycles available on all models.<br />
Cycle Chart * Includes dry time.<br />
Cycle Description To Select Cycle Water Time*<br />
(approx.) (approx.)<br />
Heavy For heavily soiled dishes • Select HEAVY WASH. 9.1 gal. 21/4 to<br />
Wash and silverware. • Select desired OPTIONS. 34.6 liters 2 1/2 hrs.<br />
Normal<br />
Wash<br />
Hi-<br />
Temp<br />
or<br />
Sanitize<br />
Normal<br />
Wash<br />
Light<br />
Wash<br />
Eco<br />
Wash<br />
Rinse<br />
Only<br />
For heavier, greasy soils<br />
and for Sanitization<br />
For regularly soiled dishes<br />
and silverware.<br />
For lightly soiled or prerinsed<br />
dishes and<br />
silverware.<br />
For lightly soiled or prerinsed<br />
dishes and<br />
silverware.<br />
For lightly soiled or prerinsed<br />
dishes and<br />
silverware.<br />
• Select NORMAL WASH.<br />
• Select desired options including H<br />
Temp Wash or Sanitize.<br />
• Select NORMAL WASH.<br />
• Select desired options. Selecting<br />
Hi-Temp On or Sanitize will result<br />
in a longer cycle.<br />
• Select LIGHT WASH.<br />
• Select desired options.<br />
• Select ECO WASH.<br />
• Select desired options.<br />
• Select LIGHT WASH.<br />
• Select desired options.<br />
8.0 gal.<br />
30.3 liters<br />
8.0<br />
30.3<br />
4.7 gal.<br />
17.8 liters<br />
4.6 gal.<br />
17.4 liters<br />
2.3 gal.<br />
8.9 liters<br />
2 hrs.<br />
2 hrs.<br />
11/2 hrs.<br />
1 1/2 hrs.<br />
1/4 hrs.<br />
Washes/<br />
Rinses<br />
4 washes<br />
4 rinses<br />
5 washes<br />
2 rinses<br />
5 washes<br />
2 rinses<br />
2 washes<br />
2 rinses<br />
2 washes<br />
2 rinses<br />
2 washes
Operating Instructions<br />
Getting Started<br />
1. Load dishwasher (See Preparing and Loading Dishes).<br />
2. Add detergent (See Dishwasher Dispenser &<br />
Detergents).<br />
3. Add rinse aid, if needed (See Rinse Aid).<br />
4. Select desired CYCLE (See Cycle Chart).<br />
5. Select desired OPTIONS (See Option Selections). The<br />
indicator will glow when selected.<br />
6. If using WASH DELAY, follow Delay Start instructions<br />
on page 8.<br />
7. Run hot water faucet nearest dishwasher until water is<br />
hot. Turn water off.<br />
8. To start, press START/CANCEL pad.<br />
StatusIndicator Lights<br />
The WASHING light comes on at the beginning of cycle<br />
and remains on until the end of the final rinse.<br />
The DRYING light indicates the drying portion of the cycle.<br />
The light will come on when either drying option is selected.<br />
The CLEAN light will come on at end of cycle and remain<br />
on until door is opened.<br />
Option Selections<br />
Hi Temp Wash Option<br />
When HI TEMP WASH option is selected the dishwasher<br />
adds temperature, time, and water to the cycle. The<br />
dishwasher heats the water in the main wash to<br />
approximately 140°F (60°C). The hotter water provided<br />
by this option helps activate dishwasher detergent to clean<br />
food grease and soil from dishes.<br />
When HI TEMP WASH option is selected, the light above<br />
the pad will come on and remain on until end of cycle. To<br />
turn off the HI TEMP WASH option, press the pad a<br />
second time. The light above the pad will turn off.<br />
To turn off the HI TEMP option, press the pad a second<br />
time. The light above the pad will turn off.<br />
Delay Start<br />
The DELAY START option allows you to automatically<br />
delay starting your dishwasher from 2-4 or 2-4-6 hours<br />
depending on your model.<br />
On models with 2-4-6 hour delay, press the pad once for a<br />
2 hour delay, twice for 4 hours and three times for 6 hours.<br />
A light will come on indicating the delay start hours and<br />
will remain on until cycle starts.<br />
To cancel the DELAY STARToption and begin the cycle<br />
before the delay period is over, press the START/CANCEL<br />
pad.<br />
Child Lock Controls<br />
To prevent children from accidently changing the dishwasher<br />
cycle or starting the dishwasher, lock the dishwasher<br />
controls by pressing and releasing the HEAT DRY<br />
pad for 3 seconds while the door is latched. An indicator<br />
light on the lock graphic pad will illuminate when the<br />
controls are locked and no new selections can be made<br />
until the lock is released. To unlock the controls, press the<br />
HEAT DRY pad until the indicator light goes out.<br />
Heat Dry Option<br />
The HEAT DRY option in combination with rinse aid will<br />
give you excellent drying results. The energy to use HEAT<br />
DRYcosts pennies per cycle. You may turn off the HEAT<br />
DRYoption, however you will have items in your dish load<br />
that will not be dry at the end of the cycle.<br />
With either option, you may see water vapor coming from<br />
vent during the drying portion of the cycle. Some models<br />
have a vent that is closed during washing to hold moisture<br />
and sound inside and then opens for drying.<br />
To turn off the HEAT DRY option, press the pad a second<br />
time. The light above the pad will turn off.<br />
The drying option may be changed at any time during the<br />
cycle and affects only the drying period.<br />
To Cancel a Cycle<br />
You can cancel a cycle anytime during the cycle. Press<br />
START/CANCEL pad and the dishwasher will start a 90<br />
second drain. At the end of the drain, select the desired<br />
cycle.
Preparing and Loading Dishes<br />
Dish Preparation<br />
Scrape away large pieces of food, bones, pits, toothpicks,<br />
etc. The continuous filtered wash system will remove<br />
remaining food particles. Burned-on foods should be<br />
loosened before loading. Empty liquids from glasses and<br />
cups.<br />
Foods such as mustard, mayonnaise, vinegar, lemon juice<br />
and tomato based products may cause discoloration of<br />
stainless steel and plastics if allowed to sit for a long<br />
period of time. Unless the dishwasher is to be operated at<br />
once, it is best to rinse off these food soils.<br />
Load racks so that large items do not prevent the<br />
detergent<br />
dispenser<br />
from opening, x _" " _<br />
manufacturer's<br />
recommendations<br />
before washing<br />
•<br />
items in question.<br />
Check If the dishwasher<br />
drains into a food<br />
_ ___<br />
/<br />
disposer, be sure disposer is<br />
completely empty before starting<br />
dishwasher.<br />
Adding a Dish<br />
To add or remove items after wash cycle starts:<br />
• Unlatch door and wait a few seconds until wash action<br />
stops before opening.<br />
• Add the item and wait a few seconds to allow cold air<br />
to slowly expand inside dishwasher.<br />
• Close door firmly to latch and resume cycle.<br />
Loadingthe Top Rack<br />
Features and appearance of racks and silverware basket<br />
may vary from your model.<br />
IMPORTANT: Do not cover the funnel when<br />
Loading.<br />
The top rack is designed for flexibility in loading a wide<br />
variety of items including cups, glasses, stemware, small<br />
plates, bowls, etc.<br />
Load glasses in top rack. Damage may occur if placed in<br />
bottom rack.<br />
Load plastic items in top rack only. Melting may occur if<br />
placed in bottom rack.<br />
Load items with open ends facing down for better<br />
cleaning and draining.<br />
Damage may occur if delicate items touch each other<br />
during dishwasher operation.<br />
Long-handled knives and utensils can be placed in top<br />
rack.<br />
Be sure nothing protrudes through the bottom of the rack<br />
to block rotation of middle spray arm.<br />
Do not cover funnel<br />
Some models have a fold-down cup shelf or a cup shelf/<br />
stemware holder. They can be used to load two levels of<br />
cups, juice glasses, and other short items. Stagger items on<br />
upper level so that water can reach all inside surfaces.<br />
Fold up to load tall glasses.<br />
10 place setting
Preparing and Loading Dishes<br />
12 place setting<br />
Loading the Bottom Rack<br />
Features and appearance of racks and silverware basket<br />
may vary from your model.<br />
The bottom rack is best for plates, saucers, bowls, and<br />
cookware. Large items should be placed along the edge<br />
so they do not block the spray arm rotation. For best<br />
results, place bowls, casseroles, and sauce pans with soiled<br />
surface facing down or toward the center. Tilt slightly for<br />
better drainage.<br />
Make sure tall items do not block spray arm rotation.<br />
Be sure pan handles do not protrude through the bottom<br />
of the rack and block the spray arm rotation.<br />
10 place setting<br />
12 place setting<br />
Loading the Silverware Basket<br />
Cut InJury<br />
Load sharp items (knives, skewers, etc.) pointing<br />
down. Failure to do so may result in injury.<br />
Load the silverware basket while it is in the bottom rack or<br />
take the basket out for loading on a counter or table.<br />
Place small items like baby bottle caps, jar lids, corn cob<br />
holders, etc., in a covered section. Close the cover to hold<br />
small items in place.<br />
Features and appearance of racks and silverware basket<br />
may vary from your model.<br />
Use suggested loading patterns, as shown, to increase<br />
washability of your silverware.<br />
Be sure nothing protrudes through bottom of basket or<br />
rack to block the spray arm.<br />
Do not mix silver and stainless to avoid damaging the<br />
silver finish.<br />
The silverware basket can be separated and placed in<br />
several locations in the bottom rack. Load silverware in all<br />
sections or just one, depending on your load.<br />
When covers are up, mix items in each section of the<br />
basket with some pointing up and some down to avoid<br />
nesting. Water spray cannot reach nested items.
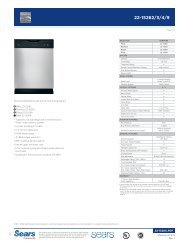
Dishwasher Dispenser & Detergents<br />
Filling the Detergent Dispenser<br />
The detergent dispenser has one main wash cup and<br />
one prewash cup. The covered cup opens automatically<br />
to release detergent.<br />
• Use only fresh automatic dishwashing detergent.<br />
Other detergents will cause oversudsing.<br />
• When using automatic dishwashing detergent tabs,<br />
place one tab in main wash cup and close.<br />
• Add detergent just before starting cycle.<br />
• Store detergent in a cool, dry location. Moist or<br />
caked detergent will not dissolve properly.<br />
The use of industrial grade detergent can damage<br />
the heating coil and other parts of the dishwasher<br />
leading to damage to the unit and surrounding<br />
property. Use only household grade automatic<br />
dishwasher detergents.<br />
How much Detergent to use<br />
The amount of detergent to use depends on the water<br />
hardness. Water hardness is measured in grains per<br />
gallon. Using too little detergent can result in poor<br />
cleaning and hard water filming or spotting. Using too<br />
much detergent in soft water can cause a permanent film<br />
called etching. Your local water company, water softener<br />
company or county extension agent can tell you the water<br />
hardness in your area.<br />
Detergent Usage Guide<br />
Main Wash Cup<br />
Cover Latch<br />
Pre Wash Cup<br />
Note: If the cover is closed on the Main Wash Cup,<br />
open by pressing the cover latch.<br />
Cycle Soft Water Medium Hard Water Hard Water Very Hard Water _<br />
(0-3 grains) (4-8 grains) (9-12grains) (over 12grains)<br />
Heavy Wash<br />
or<br />
Normal Wash<br />
Light Wash<br />
2 teaspoons<br />
(each cup-<br />
1/4 full)<br />
2 teaspoons<br />
(each cup-<br />
1/4 full)<br />
5 teaspoons<br />
(each cup-fill to line<br />
above "Regular")<br />
5 teaspoons<br />
(each cup-fill to<br />
line above "Regular")<br />
8 teaspoons<br />
(each cup-<br />
completely full)<br />
8 teaspoons<br />
(each cupcompletely<br />
full)<br />
Each Cup-<br />
Completely Full<br />
(water softener<br />
recommended)<br />
Each Cup-<br />
Completely Full<br />
(water softener<br />
recommended)<br />
*Note: As a rule, use 1 teaspoon for each grain above 12. For very hard water, detergent alone may not be enough. A<br />
water softener is recommended to improve water quality and dishwashing performance.<br />
10
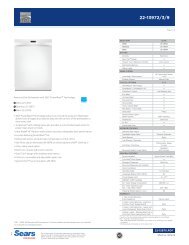
Dishwasher Dispenser & Detergents<br />
RinseAid<br />
Rinse aid greatly improves drying and reduces<br />
water spots and filming. Water "sheets" off dishes<br />
rather than forming water droplets that cling and leave<br />
spots.<br />
A dispenser, located next to the detergent cup,<br />
automatically releases a measured amount of rinse aid<br />
during the last rinse. If spotting and poor drying are<br />
problems, increase the amount of rinse aid dispensed by<br />
rotating the dial to a higher number. The dial is located<br />
under the dispenser cap. The indicator will be dark when<br />
full and will show clear when it is time to refill.<br />
To add liquid rinse aid, turn dispenser cap 1/4 turn<br />
counterclockwise and lift out. Pour in rinse aid until liquid<br />
touches the indicated fill level. Replace cap.<br />
Do not overfill since this can cause oversudsing.<br />
Wipe up any spills with a damp cloth.<br />
The dispenser holds enough for 35 to 140 washes,<br />
depending on setting.<br />
Dispenser Opening<br />
Dispenser Cap<br />
RINSE AID<br />
Indicator<br />
l<br />
More<br />
Adjustable setting<br />
11<br />
Factors Affecting Performance<br />
Water Pressure<br />
The hot water line to dishwasher must provide water<br />
pressure between 20 and 120 psi.<br />
Low water pressure may occur when laundry or showers<br />
are in operation. Wait until water use is reduced before<br />
starting dishwasher.<br />
Water Temperature<br />
Hot water is needed for best dishwashing and drying<br />
results. Water entering dishwasher should be 120°F (49°C)<br />
to give satisfactory results.<br />
To check water temperature entering dishwasher:<br />
• Turn on hot water faucet nearest dishwasher for several<br />
minutes to clear cool water from pipes.<br />
• Hold a candy or meat thermometer in stream<br />
of water to check the temperature.<br />
• If temperature is below 120°F (49°C), have a qualified<br />
person raise the hot water heater thermostat setting.<br />
Important: Before starting a cycle, run hot water<br />
to clear cool water from pipe.<br />
The HEAT DRY option in combination with rinse aid<br />
will give you excellent drying results. The energy<br />
to use HEAT DRY costs pennies per cycle. You may<br />
turn off the HEAT DRY option, however you will<br />
have items in your dish load that will not be dry<br />
at the end of the cycle.
Care & Cleaning<br />
Burn Hazard<br />
Allow heating element to cool<br />
before cleaning the interior.<br />
Failure to do so can result in burns.<br />
Outside--Occasionally wipe with a mild nonabrasive<br />
detergent and water. Rinse and dry.<br />
Inside--The inside of the dishwasher is self-cleaning with<br />
normal use. If needed, clean around the tub gasket area<br />
with a damp cloth.<br />
The filter is self-cleaning. A glass trap located in the<br />
center of the filter is designed to collect pieces of broken<br />
glass, straws, bones and pits. To remove items in glass<br />
trap, grasp handle, lift out, empty and replace.<br />
Note: Hard water may cause lime deposit buildup on the<br />
interior of the dishwasher. For cleaning instructions see<br />
"Removing Spots and Film" section.<br />
Overfill Protector--keeps dishwasher from overfilling<br />
and is located in the left front corner of the tub.<br />
• Clean occasionally with household cleaner containing<br />
vinegar or bleach to dissolve<br />
any buildup.<br />
• Overfill Protector should<br />
move up and down freely<br />
about one inch. If it does not<br />
move, lift and clean<br />
underneath.<br />
12<br />
Care of Drain Air Gap<br />
If a drain air gap was installed for your built-in<br />
dishwasher, check to make sure it is clean so the<br />
dishwasher will drain properly. A drain air gap is usually<br />
mounted on countertop and can be inspected by<br />
removing the cover. This is not part of your dishwasher<br />
and is not covered by warranty.<br />
Property Damage Hazard<br />
Freezing temperatures may cause water lines to<br />
rupture. Be sure all supply lines to and circulating<br />
lines within dishwasher are protected.<br />
Failure to do so could result in property damage.<br />
Winterizing<br />
A dishwasher left in an unheated place should be<br />
protected from freezing. Have a qualified person do<br />
the following:<br />
To Disconnect Service:<br />
1.<br />
Turn off electrical power to the dishwasher at the<br />
supply source by removing fuses or tripping circuit<br />
breaker.<br />
2. Shut off water supply.<br />
3. Place a pan under the inlet valve. Disconnect water<br />
line from inlet valve and drain into pan.<br />
4. Disconnect drain line from pump and drain water into<br />
pan.<br />
Note: See Installation Instructions for more details.<br />
To Restore Service:<br />
1. Reconnect the water, drain and electrical power<br />
supply,<br />
2. Turn on water and electrical power supply.<br />
3. Fill both detergent cups and run dishwasher through a<br />
NORMAL cycle.<br />
4. Check connections to make sure they do not leak.<br />
Note: See Installation Instructions for more details.
Solutionsto Common Dishwashing Problems<br />
Before calling for service, review this list. It may save you both time and expense. This<br />
list includes common experiences that are not the result of defective workmanship or<br />
material in your dishwasher.<br />
Food Soils Left on Dishes<br />
• Choose another cycle for longer washing time.<br />
• Check rack loading section for proper loading--avoid<br />
nesting items.<br />
• Home water pressure may be too low--should be 20 to<br />
120 pounds per square inch (psi).<br />
• Check incoming water temperature. It should be 120°F<br />
(49°C). (See Factors Affecting Performance.)<br />
• Check water hardness. For extremely hard water, it<br />
may be necessary to install a water softener. (See<br />
Detergent Chart.)<br />
• Use flesh detergent.<br />
Check to make sure funnel in top rack is not blocked.<br />
Make sure items are not blocking the spray arms,<br />
preventing them from rotating.<br />
Dishes not Dry<br />
• Select HEAT DRY option.<br />
• Make sure the rinse aid dispenser is filled.<br />
• Increase the amount of rinse aid. (See Rinse Aid.)<br />
• Check the incoming water temperature. It should be<br />
120°F (49°C).<br />
• Check for proper loading--avoid nesting items.<br />
• Plastic items may need to be towel dried.<br />
• Cups with a concave bottom will collect water.<br />
Glassware/Flatware Spotted or Cloudy<br />
• Check water hardness. For extremely hard water, it<br />
may be necessary to install a water softener. (See<br />
Dishwasher Dispenser & Detergents.)<br />
• Water temperature may be low. Avoid extremely low<br />
or high temperatures. (See Factors Affecting<br />
Performance.)<br />
• Avoid overloading and improper loading. (See<br />
Preparing and Loading Dishes.)<br />
• Use fresh detergent. Old detergent is ineffective.<br />
• Make sure rinse aid dispenser is filled.<br />
• Check to see that proper amount of detergent is being<br />
used for cycle selected. Also, check phosphate level.<br />
(See Detergent Usage Guide.)<br />
• Home water pressure may be too low--it should be 20<br />
to 120 pounds per square inch (psi).<br />
13<br />
Dishware Chipped<br />
• Load with care and do not overload. (See Preparing<br />
and Loading Dishes.)<br />
• Place delicate items in top rack.<br />
• Place glasses securely against pins and not over pins.<br />
• Load items so they are secure and don't jar loose when<br />
moving racks in and out. Move racks in and out slowly.<br />
• Make sure tall glasses and stemware will clear top of<br />
tub when rack is pushed in.<br />
• Fine antique china and crystal should be hand-washed.<br />
Dishware Stained or Discolored<br />
• Tea and coffee can stain cups. Remove the stains by<br />
hand washing in a solution of 1/2 cup (120 ml) bleach<br />
and one quart (1 L) of warm water. Rinse thoroughly.<br />
• Iron deposits in water can cause a yellow or brown<br />
film. A special filter installed in the water supply line<br />
will correct this problem. (See Removing Spots and<br />
Film.)<br />
• Aluminum utensils can leave gray/black marks when<br />
they rub against other items. Load properly.<br />
• Certain high acid foods can cause discoloration of<br />
stainless steel and plastics if allowed to sit for a long<br />
period.<br />
• Mixing stainless steel and silver utensils in silverware<br />
basket can cause pitting of the stainless steel blades.<br />
Avoid mixing stainless steel and silver.<br />
Etching<br />
• Using too much detergent in soft or softened water<br />
causes this film that cannot be removed.<br />
• Adjust the amount of detergent based on the water<br />
hardness. (Check Detergent Usage Guide.)<br />
• Lower the water temperature.<br />
Detergent Left in Cups<br />
• Detergent may be old. Discard and use fresh detergent.<br />
• Be sure water action can reach the dispenser.<br />
• Check to see if cycle has been completed.<br />
• Make sure items do not prevent the detergent dispenser<br />
from opening.
Solutionsto Common Dishwashing Problems<br />
Dishwasher Leaks<br />
• Use only fresh detergent designed for automatic<br />
dishwashers. Measure detergent carefully. Try a<br />
different brand.<br />
• Spilled rinse aid can cause foam and lead to<br />
overflowing. Wipe up any spills with a damp cloth.<br />
• Check to see that dishwasher is level.<br />
(See Installation Instructions.)<br />
Normal Sounds You Will Hear<br />
• Normal sounds include water fill, water circulation and<br />
motor sounds.<br />
There is a noticeable change in sound when the wash<br />
action switches between the lower and middle spray<br />
arm. This is normal since each spray arm has its own<br />
sound.<br />
• It is normal for dishwasher to pause (no sound) when<br />
the wash action is switching between the lower and<br />
middle spray arms.<br />
Water in Bottomof Tub<br />
• Water left in bottom of tub after cycle is complete is<br />
not normal. If water remains in the bottom of the tub,<br />
dishwasher may not be draining properly. (See<br />
Dishwasher Does Not Drain Properly.)<br />
Vapor at Vent<br />
• Water vapor escapes from the vent during the drying<br />
part of cycle. This is normal.<br />
Dishwasher Won't Start<br />
• Check to see if circuit breaker is tripped or if a fuse is<br />
blown.<br />
• Make sure water supply is turned on.<br />
• Check to see if cycle is set correctly.<br />
(See Operating Instructions.)<br />
• Is dishwasher set for delay start option?<br />
• Make sure door is closed and latched.<br />
Dishwasher Does Not Drain Properly<br />
• If unit is hooked up to a food waste disposer, make sure<br />
the disposer is empty.<br />
• Check to see if the knockout plug has been removed<br />
from inside the food waste disposer inlet.<br />
• Check to see if drain hose is kinked.<br />
• Make sure cycle is complete, not in a pause.<br />
14<br />
Cycle Takes a Long Time<br />
• Is cycle in a water heating delay?<br />
• Check incoming water temperature. It should be 120°F<br />
(49 °C).<br />
• Has the delay start option been selected?<br />
Dishwasher Won't Fill<br />
• Is water supply turned on?<br />
• Does overfill protector move up and down freely? (See<br />
Overfill Protector section.)<br />
• The normal full water level of the dishwasher will only<br />
reach the bottom of the heater clips.<br />
Dishwasher Has an Odor<br />
• Soiled dishes left in dishwasher too long can create an<br />
odor.<br />
• There will be a "new" smell when first installed. This is<br />
normal.<br />
• Check to see if unit is draining properly. (See<br />
Dishwasher Does Not Drain Properly.)<br />
Stains on Tub Interior<br />
Washing large amounts of dishware with tomato based<br />
soil can cause a pink/orange appearance. This will not<br />
affect performance and will gradually fade over time.<br />
Pre-rinsing will reduce the chance of staining. Using the<br />
heat dry off option will lessen staining.<br />
Removing Spots and Film<br />
Hard water can cause lime deposit buildup on the<br />
interior of the dishwasher. Dishes and glasses may also<br />
get spots and film for a number of reasons. (See<br />
Glassware/Flatware Spotted or Cloudy section.) To<br />
remove buildup, spots and film, clean using the<br />
following instructions:<br />
1. Load clean dishes and glasses in normal manner.<br />
Do not load any metal utensils or silverware.<br />
2. Do not add detergent.<br />
3. Select the HEAVY WASH cycle. Close and latch<br />
door.<br />
4. Allow dishwasher to run for 20 minutes to reach the<br />
main wash portion of cycle.<br />
5. Unlatch and open door and pour 2 cups<br />
of white vinegar into the bottom of dishwasher.<br />
6. Close and latch door and allow cycle to finish.<br />
Note: If these conditions persist, a home water softener<br />
should be considered.
Master ProtectionAgreements<br />
Congratulations on making a smart purchase. Your new<br />
<strong>Kenmore</strong>
Tabla de Materias<br />
Garantia ......................................................................................... 16<br />
Instrucciones de Seguridad .................................................. 17<br />
Antes de Usar su Lavavajillas ................................................18<br />
Caracteristicas del lavavajillas ..............................................19<br />
Instrucciones de Funcionamiento .....................................20-21<br />
Preparacion y Carga de la Vajilla ................................. 22-24<br />
Garantia de Electrodomesticos<strong>Kenmore</strong><br />
Garantla limitada de un aho<br />
Distribuidor y Detergentes del Lavavajillas .................. 25-26<br />
Cuidado y Limpieza ................................................................... 27<br />
Soluciones a Problemas Comunes del Lavado<br />
de Vajillas ................................................................................ 28-30<br />
Contratos de Proteccion ............................................................31<br />
$ervicio ................................................................ Portada trasera<br />
$i esta cubierta, cuando se instala y se utiliza de acuerdo con las instrucciones de instalacion y la guia de uso y cuidado,<br />
falla debido a defectos de material o mano de obra durante el primer ano a partir de la fecha de compra, Ilame al 1-<br />
800-4-MY-HOME® para hacer arreglos para que sea reparada (o reemplazada si no se puede reparar) gratuitamente.<br />
Si este electrodomestico se usa para fines que no sean privados de familia, esta garantia es valida unicamente por 90<br />
dias a partir de la fecha de compra.<br />
Esta garantla cubre tlnicamente los defectos de material y mano de obra. <strong>Sears</strong> NO pagar_i Io<br />
siguiente:<br />
1. Articulos desechables que se desgasten por uso normal, incluyendo sin limitarse a los filtros, correas, bombillas y bolsas.<br />
2. Tecnicos de servicio que instruyan al usuario en la manera adecuada de instalar, utilizar o mantener el producto.<br />
3. Tecnicos de servicio que limpien o realicen mantenimiento al producto.<br />
4. Dahos o fallas de este producto si el mismo no rue instalado, utilizado o mantenido de acuerdo con todas las<br />
instrucciones proporcionadas con el producto.<br />
5. Dahos o fallas de este producto por accidente, abuso o mal uso del producto o uso para fines para los cuales no fue<br />
disehado.<br />
6. Dahos o fallas de este producto por el uso de detergentes, limpiadores, quimicos o utensilios que no sean los<br />
recomendados en todas las instrucciones proporcionadas con el producto.<br />
7. Dahos o fallas de piezas o sistemas por modificaciones al producto que no hayan sido autorizadas.<br />
Renuncia de responsabilidades de garantlas implicitas; limitaci0n de acciones legales<br />
La unica y exclusiva opcion del cliente bajo esta garantia limitada es la reparacion del producto segun se indica. Las<br />
garantias implicitas, incluyendo las garantias de comercializacion o aptitud del producto para un proposito especifico,<br />
estan limitados a un aho o al periodo minimo permitido por ley. <strong>Sears</strong> no sera responsable por dahos consecuentes o<br />
incidentales. Algunos estados y provincias no permiten la exclusion o limitacion de dahos incidentales o consecuentes o<br />
las limitaciones de duracion de las garantias implicitas de comercializacion o aptitud, por Io que estas exclusiones<br />
o limitaciones pueden no aplicarse en su caso.<br />
Esta garantia se aplica tmicamente mientras este electrodomestico este en uso dentro de los Estados Unidos o Canad&<br />
Esta garantia le otorga derechos legales especificos. Usted puede tener ademas otros derechos que varian de un estado<br />
a otto.<br />
<strong>Sears</strong> Brand Management Corporation, Hoffman Estates, IL 60179 USA<br />
<strong>Sears</strong> Canada Inc., Toronto, Ontario, Canada MSB 2B8<br />
En el espacio a continuacion, anote su nt]mero de modelo<br />
completo, el nt]mero de serie y la fecha de compra. Esta<br />
informacion puede encontrarse en la etiqueta del nt]mero<br />
de modelo y serie que se encuentra en el lugar que se<br />
muestra en la seccion de Caracteristicas del Lavavajillas<br />
de este libro. Tenga esta informacion a mano para que le<br />
ayude a obtener ayuda y servicio r@idamente cuando<br />
Ilame a <strong>Sears</strong> con respecto a su aparato domestico.<br />
Nt]mero de Modelo: 587.<br />
Nt]mero de Serie:<br />
Fecha de Compra:<br />
Guarde estas instrucciones y su recibo de compra para referencia futura.<br />
16
Seguridad del Lavavajillas<br />
Se seguridad y la seguridad de ostros son muy importantes.<br />
Hemos incluido muchos mensajes de seguridad importantes<br />
en el manual yen su aparato domestico. Siempre lea y<br />
obedezca todos los mensajes de seguridad.<br />
Definitions<br />
Este es el simbolo de alerta de seguridad.<br />
Este simbolo le avisa de posibles peligros que pueden<br />
causar la muerte o lesionarlo a usted y a otros.<br />
Todos los mensajes de seguridad seguiran al simbolo de<br />
alerta de seguridad con la palabra "PELIGRO" o<br />
"ADVERTENCIA'. Estas palabras significan:<br />
, Usted pUede morir o ser lesionado<br />
gravemente sin O sigue as instrucci0ne s de inmediato<br />
- Usted pued e morir 0 set lesionado<br />
gravemente si nosigue las instrucciones,<br />
Todos los mensajes de seguridad le diran cual es el posible peligro, como reducir la posibilidad de ser lesionado y Io que<br />
puede suceder si no se siguen las instrucciones.<br />
Instrucciones de Seguridad Importantes<br />
ADVERTENCIA: AI usar su lavavajillas, siga las precauciones basicas de seguridad, incluyendo:<br />
Lea todas las instrucciones antes de usar el<br />
lavavajillas.<br />
Use su lavavajillas s01o como se indica en esta Guia<br />
de Uso y Cuidado.<br />
S01ouse los detergentes y agentes de enjuague que<br />
se recomiendan para usarse en un lavavajillas, y<br />
mantengalos fuera del alcance de los ninos.<br />
AI colocar los articulos para lavarlos:<br />
- Coloque los cuchillos y los articulos afilados<br />
de manera que no danen el sello de la<br />
puerta o la tin&<br />
Coloque los cuchillos y los articulos afilados<br />
con los mangos hacia arriba para evitar<br />
cortaduras.<br />
No lave ningun articulo de plastico, a menos que<br />
tenga una marca que indique que es "seguro para<br />
lavarse en lavavajillas" o algo similar. Si no tiene<br />
dicha marca, verifique las recomendaciones con el<br />
fabricante. Los articulos que no son seguros para<br />
lavarse en el lavavajillas pueden derretirse y crear<br />
un posible peligro de incendio.<br />
No toque el elemento calefactor durante ni<br />
inmediatamente despues del uso.<br />
• No opere su lavavajillas a menos que todos los<br />
paneles esten instalados debidamente en su lugar.<br />
Guarde Estas Instrucciones<br />
17<br />
• Si el lavavajillas drena en un triturador de<br />
desperdicios de comida, asegurese de que el<br />
triturador este completamente vacio antes de<br />
operar el lavavajillas.<br />
• Desconecte la corriente electrica al lavavajillas<br />
antes de darle servicio.<br />
• No manipule Ioscontroles.<br />
No permita que los ninos abusen, se sienten, se<br />
paren ojueguen en la puerta o los estantes del<br />
lavavajillas.<br />
Mantenga a los ninos pequenos y a los bebes lejos<br />
del lavavajillas cuando este funcionando.<br />
En ciertas condiciones, se puede producir gas de<br />
hidrogeno en un sistema de agua caliente que ha<br />
estado sin usarse durante dos o mas semanas. EL<br />
GAS DE HIDROGENO ES EXPLOSIVO. Si el sistema<br />
de agua caliente no se ha usado durante tal<br />
periodo, antes de usar el lavavajillas, abra todos los<br />
grifos de agua caliente y permita que el agua fluya<br />
pot varios minutos de cada uno de ellos. Esto<br />
liberara cualquier gas de hidrogeno que se haya<br />
acumulado. Debido a que el gas es inflamable, no<br />
fume ni use una llama abierta durante este tiempo.<br />
• Quite la puerta al compartimiento que se lava al<br />
quitar un viejo lavaplatos de servicio o<br />
desechandolo.
Antes de Usar su Lavavajillas<br />
Peligro de que se vuelque<br />
No use el lavavajillas hasta que estO<br />
completamente instalado,<br />
No presione la puerta abierta hacia aba.jo,<br />
Esto puede resultar en lesiones o<br />
cortaduras graves.<br />
Peligro de choque el_ctrico<br />
Conecte a tierra el lavava.jillas,<br />
Conecte un alambre de tierra a la tuerca<br />
redonda verde de la caja de terminales,<br />
Me use un cable de extension,<br />
No seguir estas instrucciones puede dar causar<br />
la muerte, un incendio o un cheque eldctrico,<br />
18<br />
INSTRUCCIONES PARA CONEXION A TIERRA<br />
Para un lavavajillas conectado con<br />
cable y conectado a tierra:<br />
El lavavajillas debe estar conectado a tierra. En<br />
caso de mal funcionamiento o averia, la<br />
conexi6n a tierra reducira el riesgo de un<br />
choque electrico al proporcionar un paso de<br />
menor resistencia a la corriente electrica. El<br />
lavavajillas esta equipado con un cable que<br />
tiene un conductor de conexi6n a tierra del<br />
equipo y un enchufe de conexion a tierra. El<br />
enchufe debe conectarse en un tomacorriente<br />
apropiado que este instalado y conectado a<br />
tierra de acuerdo con todos los c6digos y<br />
ordenanzas locales.<br />
ADVERTENCIA: Una conexion incorrecta del<br />
conductor de conexi6n a tierra del equipo<br />
puede resultar en un riesgo de choque electrico.<br />
Verifique con un electricista o representante de<br />
servicio calificado si tiene duda de que el<br />
lavavajillas este debidamente conectado a<br />
tierra. No modifique el enchufe que viene con el<br />
lavavajillas. Si no entra en el tomacorriente,<br />
haga que un electricista calificado instale un<br />
tomacorriente adecuado.<br />
Para un lavava_illas conectado<br />
permanentemente:<br />
El lavavajillas debe set conectado a un sistema<br />
de cableado permanente, de metal y conectado<br />
a tierra, o un conductor de conexi6n a tierra del<br />
equipo debe tendersejunto con los conductores<br />
del circuito y conectarse al terminal o alambre<br />
de conexi6n a tierra del equipo en el<br />
lavavajillas.<br />
GUARDE ESTAS INSTRUCCIONES
Caracteristicas del Lavavajillas<br />
Empaquetadura<br />
de la Tina X<br />
Brazo Rociador<br />
Medio<br />
Brazo Rociador<br />
Inferi<br />
Protector de<br />
Sobrellenado_<br />
Taza de Detergente de<br />
Prelavado<br />
Distribuidor de<br />
Respiradero<br />
Detergente<br />
\<br />
do Boquilla<br />
Estante Superior<br />
Etiqueta de Serie<br />
(ubicada en el lado<br />
derecho de la tina)<br />
Estante Inferior<br />
Canasta de Cubiertos<br />
Trampa de Vidrio<br />
Filtro Autolimpiante<br />
Calefactor<br />
Distribuidor de<br />
Agente de Enjuague<br />
La apariencia de/ aparato puede variar de/ modelo que usted tiene.<br />
CYI C PTION5<br />
tarl J L_A_,<br />
..... /<br />
La apariencia de/ aparato puede variar de/ modelo que usted tiene.<br />
19
Instruccionesde Funcionamiento<br />
Sistema de Lavado<br />
Su lavavajillas <strong>Kenmore</strong> filtra el 100% del agua para una limpieza Optima. El sistema de lavado utiliza<br />
brazes alternos para ahorrar agua y energia, e incluye un triturador de desperdicios de acero<br />
inoxidable y de uso pesado que tritura las particulas grandes de alimentos.<br />
Como funciona el sistema<br />
1. Cargue el lavavajillas (Vease Preparacion y Carga de<br />
la Vajilla).<br />
2. El agua caliente entra en el lavavajillas, cubre el filtro<br />
y sube hasta la parte inferior de los sujetadores del<br />
calentador.<br />
3. El detergente es distribuido en el momento apropiado<br />
y se mezcla con el agua caliente. Esta mezcla es<br />
bombeada a traves del brazo rociador inferior y<br />
rociada contra las superficies sucias de la vajilla para<br />
remover las particulas de alimentos.<br />
4. El agua pasa a traves del filtro primario de malla fina<br />
donde los desperdicios de comida son eliminados y el<br />
agua limpia vuelve a circular de nuevo.<br />
5. Las salidas bajo el brazo rociador inferior dirigen los<br />
desperdicios de comida, a traves de un filtro<br />
secundario, a una camara de recogido.<br />
6. Los desperdicios permanecen en la camara de<br />
recogido hasta que son lavados fuera durante el ciclo<br />
de drenado.<br />
7. Agua limpia y caliente entre al lavavajillas y la<br />
secuencia se repite.<br />
8. Comenzando con el tercer Ilenado de agua, la accion<br />
de lavado cambia entre el brazo rociador inferior y el<br />
brazo rociador del medio a intervalos de 90 segundos.<br />
Es posible que note un cambio en el sonido a medida<br />
que la accion de lavado pausa y cambia al otro<br />
brazo.<br />
9. El lavavajillas puede pausar durante el ciclo mientras<br />
el agua es calentada. La accion de lavado continuara<br />
durante este tiempo.<br />
10. El agente de enjuague es distribuido automaticamente<br />
para el agua de enjuague para ayudar con el secado.<br />
Tabla de Ciclos - Incluye tiempode secado.<br />
Ciclos Para Seleccionar el Ciclo Agua Tiempo*<br />
(aprox.) (aprox.)<br />
Heavy Wash<br />
Para ollas, sartenes, cacerolas<br />
y vajillas con desperdicios<br />
adheridos, secos o de<br />
horneado.<br />
Normal Wash Hi-Temp et<br />
Sanitize<br />
Para los mas pesados, grasas y<br />
suelos para desinfectar<br />
Normal Wash<br />
Para platos y cubiertos con<br />
suciedad normal.<br />
Light/Eco Wash<br />
Para platos y cubiertos no muy<br />
sucios o preejuagados<br />
Upper Rack/Energy Saver<br />
Para platos levemente sucious<br />
cuando no sea una carga<br />
completa<br />
Rinse Only<br />
Para el enjuague de platos que<br />
seran lavados despues.<br />
Seleccione HEAVY WASH<br />
y las otras OPTIONS<br />
deseadas.<br />
Seleccione NORMAL WASH<br />
y las otras OPTIONS<br />
deseadas. Seleccionar HI-<br />
TEMP ON et SANITIZE<br />
tendra como resultado un<br />
ciclo mas largo.<br />
Seleccione NORMAL WASH<br />
y las otras OPTIONS<br />
deseadas.<br />
Seleccione LIGHT/ECO<br />
WASH y las otras OPTIONS<br />
deseadas.<br />
Seleccione UPPERRACK/<br />
ENERGY SAVER y las otras<br />
OPTIONS deseadas.<br />
Seleccione LIGHT WASH y<br />
las otras OPTIONS<br />
deseadas.<br />
2O<br />
9,1 gal.<br />
34,6 litros<br />
8,0 gal.<br />
30,3 litros<br />
4,1 gal.<br />
15,4 litros<br />
4,7 gal.<br />
17,8 litros<br />
4,6 gal.<br />
17,4 litros<br />
4,8 gal.<br />
18,3 litros<br />
21/4 to<br />
2 1/2 hrs<br />
2 hrs<br />
1 3/4 hrs<br />
11/2 hrs<br />
1 1/2 hrs<br />
11/2 hrs<br />
Lavados/<br />
En.jua9ues<br />
4 lavados<br />
4 enjuagues<br />
5 lavados<br />
2 enjuagues<br />
3 lavados<br />
2 enjuagues<br />
2 lavados<br />
2 enjuagues<br />
2 lavados<br />
2 enjuagues<br />
2 lavados<br />
2 enjuagues
Instruccionesde Funcionamiento<br />
C6mo comenzar<br />
1. Cargue el lavavajillas (vease Preparacion y Carga de<br />
la Vajilla).<br />
2. Agregue detergente (vease Distribuidor y Detergentes<br />
del Lavavajillas).<br />
3. Agregue agente de enjuague, si se necesita (vease<br />
Agente de Enjuague).<br />
4. Gire la perilla hacia la derecha para seleccionar el<br />
ciclo (Vet la Tabla de Ciclos).<br />
5. Seleccione las OPCIONES deseadas (vease Seleccion<br />
de Opciones). El indicador sobre la almohadilla brilla.<br />
6. Si se usa WASH DELAY, seguir las instrucciones del<br />
DELAY HOURS en la pagina 25.<br />
7. Haga cotter el agua caliente del grifo mas cercano al<br />
lavavajillas hasta que salga caliente. Cierre el agua.<br />
8. Para arrancar, apriete 'START/CANCEL'.<br />
Luces indicadoras<br />
La luz 'WASHING' (lavado) se enciende al principio del<br />
ciclo y permanece encendida hasta el final del ciclo<br />
principal.<br />
La luz 'DRYING' (secado) indica la porcion de secado del<br />
ciclo. Esta luz se enciende cuando se selecciona cualquiera<br />
de las opciones de secado.<br />
La luz 'CLEAN' (limpio) se enciende cuando se completa un<br />
ciclo y permanece encendida hasta que se abra la puerta.<br />
Opciones de energia<br />
OpciOn Hi Temp Wash<br />
Cuando se selecciona la opcion HI TEMP el lavaplatos<br />
agrega temperatura, tiempo, y agua al ciclo. El<br />
lavavajillas calienta el agua en el ciclo principal hasta<br />
aproximadamente 140°F (60°C). El agua mas caliente<br />
proporcionada pot esta opcion ayuda a activar el<br />
detergente del lavavajillas para limpiar la grasa y la<br />
suciedad de los platos.<br />
Cuando la opcion 'HI TEMP' es seleccionada, la luz debajo<br />
de la tecla se encendera y permanecera encendida hasta<br />
el final del ciclo. Para apagar esta opcion presione la<br />
tecla una segunda vez. La luz encima de la tecla se<br />
apagar&<br />
OpciOn Heat Dry<br />
La opci6n de Secado con Calor, en combinaci6n con el<br />
ayudante de enjuague, le proporciona excelentes<br />
resultados de secado. La energia que esta funci6n<br />
consume le cuesta pocos centavos por cada ciclo. Usted<br />
puede desactivar la opci6n de Secado con Calor. Sin<br />
embargo, algunos articulos de la carga del lavavajillas no<br />
quedaran secos al final del ciclo.<br />
21<br />
Con cualquiera de las opciones, puede ser que usted vea<br />
vapor de agua saliendo del respiradero durante la etapa<br />
de secado del ciclo. Algunos modelos tienen este<br />
ventilador eso esta cerrado durante el lavado para<br />
mantener encerrados la humedad y el ruido.<br />
La opcion de secado puede ser cambiada en cualquier<br />
momento durante el ciclo y solo afecta el periodo de<br />
secado.<br />
Cuando la opcion 'HEAT DRY' es seleccionada, la luz<br />
debajo de la tecla se encendera y permanecera<br />
encendida hasta el final del ciclo. Para apagar esta<br />
opcion presione la tecla una segunda vez. La luz encima<br />
de la tecla se apagar&<br />
Comienzo Diferido 'Delay Hours'<br />
La opcion 'DELAY HOURS' (Comienzo Diferido) le permite<br />
diferir automaticamente la puesta en marcha del<br />
lavavajillas desde 2-4-6 horas.<br />
En los modelos con tiempo diferido de 2-4-6 horas, optima<br />
la tecla una vez para diferir la puesta en marcha en 2<br />
horas, dos veces para 4 horas y tres veces para 6 horas.<br />
Se encendera una luz indicando las horas del tiempo<br />
diferido y permanecera encendida hasta que comience el<br />
ciclo.<br />
Para cancelar la opcion 'DELAY HOURS' y empezar el<br />
ciclo antes de que el periodo de demora finalize, presione<br />
el boron 'START/CANCEL'.<br />
Controles a prueba de ninos<br />
A fin de evitar que los ninos cambien accidentalmente el<br />
ciclo del lavavajillas o que pongan en marcha el<br />
lavavajillas, bloquee los controles oprimiendo<br />
momentaneamente la tecla 'HEAT DRY' durante 3<br />
segundos cuando la puerta este bien cerrada. Se iluminara<br />
una luz indicadora en la tecla con el simbolo de bloqueo<br />
cuando los controles esten bloqueados y no se podran<br />
hacer nuevas selecciones hasta que no se cancele el<br />
bloqueo. Para desbloquear los controles, optima la tecla<br />
'HEAT DRY' hasta que se apague la luz indicadora.<br />
Para cancelar un ciclo<br />
Uste puede cancelar un ciclo en cualquier momento.<br />
Presione la tecla 'START/CANCEL' y el lavaplatos<br />
empezara un desaguadop pot 90 segundos. AI final,<br />
seleccione el ciclo deseado.
Preparacion y Carga de la Vajilla<br />
Preparacion de la Vajilla<br />
Quite los pedazos grandes de comida, huesos, pepitas de<br />
frutas, palillos de dientes, etc. El sistema de lavado<br />
continuamente filtrado removera las particulas de comida<br />
restantes. La comida pegada debe removerse de la vajilla<br />
antes de colocarse en el lavavajillas. Vacie los liquidos de<br />
los vasos y las tazas.<br />
Los alimentos tales como mostaza, mayonesa, vinagre,<br />
jugo de limon y productos que contienen tomate pueden<br />
causar el descoloramiento de los articulos de acero<br />
inoxidable y de plastico si se permite que permanezcan<br />
en contacto pot mucho tiempo. A menos que el<br />
lavavajillas se opere en seguida, es me jot enjuagar estos<br />
alimentos de la vajilla.<br />
Cargue los<br />
estantes de<br />
manera que los<br />
articulos grandes<br />
no impidan que el _..<br />
distribuidor de<br />
detergente se<br />
abra.<br />
Consulte las recomendaciones del fabricante antes de<br />
lavar cualquier articulo del que se tenga duda.<br />
Si el lavavajillas desagua en un triturador de<br />
desperdicios de comida, asegOrese de que el<br />
triturador este completamente vacio antes de<br />
comenzar el lavavajillas.<br />
Para cargar el Estante Superior<br />
Las caracterfsticas y el aspecto de los estantes y la<br />
canasta de cubiertos pueden ser distintos a los de su<br />
modelo.<br />
IMPORTANTE: No cubra el embudo cuando<br />
cargue el lavavajillas.<br />
El estante superior se ha disenado para flexibilidad en la<br />
carga de varios articulos, incluyendo tazas, vasos, copas,<br />
platos pequenos, tazones, etc.<br />
Coloque los vasos en el estante superior, ya que pueden<br />
danarse si se colocan en el estante inferior.<br />
Coloque los articulos de plastico solo en el estante superior,<br />
ya que pueden derretirse si se colocan en el estante<br />
inferior.<br />
Coloque los articulos con los extremos abiertos hacia<br />
abajo para una mejor limpieza y drenaje.<br />
22<br />
Los articulos delicados pueden danarse si estan tocandose<br />
unos con otros durante el funcionamiento del lavavajillas.<br />
Los utensilios y los cuchillos con mangos largos pueden<br />
colocarse en el estante superior.<br />
Asegorese de que nada sobresalga a traves del rondo del<br />
estante que pueda obstruir la rotacion del brazo rociador<br />
del medio.<br />
Algunos modelos tienen rejillas para tazas que se pueden<br />
doblar o bien tienen un soporte para tazas/utensilios<br />
para cocer al vapor. Estas rejillas pueden usarse para<br />
colocar en dos niveles tazas, vasos para jugo y otros<br />
utensilios cortos. Coloque los articulos en el nivel superior<br />
de una forma escalonada, para que el agua Ilegue a<br />
todas las superficies interiores. Levante las rejillas para<br />
colocar vasos altos.<br />
No cubra el embudo
Preparacion y Carga de la Vajilla<br />
,_ i_ _ _ ii;7 iii:; _<br />
10 puestos<br />
12 puestos<br />
COmo Cargar el Estante Inferior<br />
Las caracteristicas y el aspecto de los estantes y la<br />
canasta de cubiertos pueden set distintos a los de su<br />
modelo.<br />
El estante inferior es mejor para platos, platillos, tazones y<br />
ollas. Los articulos grandes deben colocarse a Io largo del<br />
borde, de manera que no obstruyan la rotacion del brazo<br />
rociador. Para mejores resultados, coloque los tazones,<br />
cacerolas y ollas con la superficie sucia hacia abajo o<br />
hacia el centro. Inclinelos ligeramente para un mejor<br />
drenaje.<br />
Asegurese de que los articulos grandes no obstruyan la<br />
rotacion del brazo rociador.<br />
23<br />
Asegt]rese de que los mangos de las ollas no sobresalgan<br />
pot el rondo del estante y obstruyan la rotacion del brazo<br />
rociador.<br />
10 puestos<br />
12 puestos
Preparacion y Carga de la Vajilla<br />
COmoCargar la Canasta de Cubiertos<br />
Cortaduras<br />
Coloque los articulos afilados (cuchillos, pinchos de<br />
brocheta, etc.) con las puntas hacia abajo.<br />
No hacerlo puede causar lesiones.<br />
Cargue la canasta de cubiertos mientras esta en el<br />
estante inferior, o saque la canasta para cargarla sobre<br />
el gabinete o la mesa.<br />
Coloque los articulos pequeflos como tapas de biberones,<br />
tapas dejarros, sostenedores de mazorcas de maiz, etc.<br />
en una seccion cubierta. Cierre la cubierta para<br />
mantener los articulos pequeflos en su lugar.<br />
Asegurese de que nada sobresalga por el rondo de la<br />
canasta o del estante que pueda obstruir el brazo<br />
rociador.<br />
No mezcle los cubiertos de plata con los de acero<br />
inoxidable para evitar daflar el acabado de plata.<br />
La canasta de cubiertos puede sacarse y colocarse en<br />
varios lugares del estante inferior.<br />
24<br />
Coloque los cubiertos en todas las secciones o solo en<br />
una, dependiendo de su carga.<br />
Cuando las cubiertas estan hacia arriba, mezcle los<br />
articulos de cada seccion de la canasta, con unos<br />
apuntando hacia arriba y otros hacia abajo, para que<br />
no se peguen unos con otros. El rocio de agua no puede<br />
Ilegar a los articulos que estan pegados unos con otros.<br />
Para agregar un articulo<br />
Para agregar o sacar articulos despues de que haya<br />
comenzado el ciclo de lavado:<br />
• Destrabe el cierre de la puerta y espere unos segundos<br />
en Io que la accion de lavado se detiene antes de abrir<br />
la puerta.<br />
• Coloque el articulo y espere unos segundos para<br />
permitir que el aire ffio se expanda lentamente dentro<br />
del lavavajillas.<br />
• Cierre la puerta firmemente para trabarla y reanudar<br />
el ciclo.
Distribuidory Detergentsdel Lavavajillas<br />
COmo Llenar el Distribuidor de<br />
Detergente<br />
El distribuidor de detergente tiene una taza cubierta y<br />
una descubierta. El detergente en la taza descubierta<br />
cae dentro del lavavajillas cuando la puerta se cierra.<br />
La taza cubierta se abre automaticamente para soltar<br />
el detergente.<br />
• S01o use detergente para lavavajillas automaticos<br />
fresco. Otros detergentes produciran demasiada<br />
espuma.<br />
• Cuando use tabletas de detergente para<br />
lavavajillas, coloque una tableta en el distribuidor<br />
principal y cierre la tap&<br />
• Agregue el detergente justo antes de comenzar el<br />
ciclo.<br />
• Guarde el detergente en un lugar fresco y seco. El<br />
detergente humedo o aterronado no se disolvera<br />
debidamente.<br />
El uso de detergentes industriales puede dahar el<br />
serpentin de calentamiento y otras piezas del<br />
lavavajillas, Io que causaria dahos a la unidad y a la<br />
propiedad que Io rodea. S01o use detergentes para<br />
lavavajillas automaticos para el hogar.<br />
Ciclo<br />
Heavy Wash<br />
(lavado pesado) o<br />
Normal Wash<br />
(lavado normal)<br />
Light Wash<br />
(lavado ligero)<br />
Agua blanda<br />
(0-3 granos)<br />
2 cucharillas<br />
(cada taza-<br />
1/4 Ilena)<br />
2 cucharillas<br />
(cada taza-<br />
1/4 Ilena)<br />
Guia de Uso del Detergente<br />
Agua medianamente dura<br />
(4-8 granos)<br />
5 cucharillas<br />
(cada taza - Ilena hasta la<br />
linea "Regular")<br />
5 cucharillas<br />
(cada taza - Ilena hasta<br />
la linea "Regular")<br />
CuSnto Detergente Usar<br />
La cantidad de detergente que debe usar depende de la<br />
dureza del agua. La dureza del agua se mide en granos<br />
pot galon. Usar muy poco detergente puede resultar en<br />
una limpieza deficiente yen que el agua dura produzca<br />
una pelicula o manchas en la vajilla. Usar demasiado<br />
detergente en agua blanda puede causar una pelicula<br />
permanente Ilamada aguafuerte. Su empresa de agua<br />
local, compahia de ablandador de agua o agente de<br />
extension del condado puede decirle cual es la dureza del<br />
agua en su area.<br />
Taza de Prelavado<br />
pa<br />
Taza de Lavado<br />
Principal<br />
Cierre de la<br />
cubierta<br />
Nota: Si la cubierta esta cerrada en la copa de lavado<br />
principal, abrir presionando el cierre de la cubierta.<br />
Agua dura<br />
(9-12 granos)<br />
8 cucharillas<br />
(cada taza<br />
completamente<br />
Ilena)<br />
8 cucharillas<br />
(cada taza<br />
completamente<br />
Ilena)<br />
Agua muy dura*<br />
(mas de 12 granos)<br />
Cada taza -<br />
completamente Ilena<br />
(se recomienda usar<br />
ablandador de agua)<br />
Cada taza-<br />
completamente Ilena<br />
(se recomienda usar<br />
ablandador de agua)<br />
*Nota: Para agua muy dura, es posible que el detergente solo no sea suficiente. Se recomienda usar un ablandador de agua para<br />
mejorar la calidad del agua y el lavado de la vajilla. Pruebe agregando mas detergente al comienzo de la parte del lavado principal<br />
del ciclo. Por Io general, use 1 cucharilla por cada grano por encima de 12. Destrabe la puerta, abrala lentamente y agregue<br />
detergente en el fondo de la tina. Cierre la puerta para que trabe y el lavavajillas continuara el ciclo.<br />
25
Distribuidory Detergentsdel Lavavajillas<br />
Agente de Enjuague<br />
El agente de enjuague mejora grandemente el<br />
secado y reduce la pelicula y las manchas de<br />
agua en la vajilla. El agua se desliza de la vajilla, en<br />
lugar de formar gotas de agua que se adhieren y dejan<br />
manchas.<br />
Un distribuidor, ubicadojunto a la taza de detergente,<br />
suelta automaticamente una cantidad medida del agente<br />
de enjuague durante el t]ltimo enjuague. Si las manchas y<br />
un secado deficiente son problemas, aumente la cantidad<br />
de agente de enjuague girando la esfera a un nt]mero<br />
mas alto. La esfera esta ubicada debajo de la tapa del<br />
distribuidor. El indicador estara oscuro cuando este Ileno y<br />
se vera claro cuando sea tiempo de volver a Ilenarlo.<br />
Para agregar agente de enjuague liquido, gire la tapa del<br />
distribuidor 1/4 de vuelta hacia la izquierda y saquela.<br />
Vierta el agente de enjuague hasta que el liquido Ilegue al<br />
nivel de Ilenado indicado. Vuelva a taparlo.<br />
No Io Ilene demasiado, ya que esto puede causar que se<br />
forme demasiada espuma. Limpie cualquier derrame con<br />
un patio ht]medo.<br />
El distribuidor tiene cabida para 35 a 140 lavadas,<br />
dependiendo de la posici0n en que se ajuste.<br />
Abertura del distribuidor Indicador<br />
Menos<br />
Tapa del<br />
distribuidor<br />
RINSE AID<br />
f. .... -.<br />
PosiciOn ajustable<br />
J<br />
26<br />
Factoresque Afectan el Rendimiento<br />
PresiOn de Agua<br />
La linea de agua caliente al lavavajillas debe<br />
suministrar una presion de agua de entre 20 y 120 psi.<br />
La baja presi0n de agua puede ocurrir cuando se esta<br />
lavando ropa o tomando duchas a la misma vez.<br />
Espere hasta que se reduzca el uso del agua para<br />
comenzar el lavavajillas.<br />
Temperatura del Agua<br />
Se necesita agua caliente para obtener los mejores<br />
resultados de lavado y secado. El agua que entra al<br />
lavavajillas debe ser de 120°F (49°C) para Iograr los<br />
mejores resultados.<br />
Para comprobar la temperatura de agua que entra al<br />
lavavajillas:<br />
• Abra el grifo de agua caliente que este mas cerca<br />
del lavavajillas por varios minutos para despejar el<br />
agua fria de la tuberia.<br />
• Ponga un term0metro de dulce o de came bajo el<br />
chorro de agua para comprobar la temperatura.<br />
• Si la temperatura esta por debajo de 120°F<br />
(49°C)., haga que una persona calificada suba el<br />
ajuste del termostato del calentador de agua.<br />
Importante: Antes de comenzar un ciclo, deje<br />
correr el agua caliente para despejar el agua<br />
fria de la tuberfa.<br />
La opci0n de Secado con Calor, en combinaci0n con el<br />
ayudante de enjuague, le proporciona excelentes<br />
resultados de secado. La energia que esta funci0n<br />
consume le cuesta pocos centavos por cada ciclo. Usted<br />
puede desactivar la opci0n de Secado con Calor. Sin<br />
embargo, algunos articulos de la carga del lavavajillas no<br />
quedaran secos al final del ciclo.
Cuidado y Limpieza<br />
Peligro de quemaduras<br />
Permita que el elemento calefactor<br />
se enfrie antes de limpiar el interior.<br />
No hacerlo puede causar quemaduras.<br />
Exterior - Ocasionalmente limpie el exterior con agua y<br />
un detergente no abrasivo. Enjuaguelo y sequelo.<br />
Interior - El interior del lavavajillas se limpia solo con el<br />
uso normal. Si se necesita, limpie alrededor del area de la<br />
empaquetadura de la tina con un patio ht]mero.<br />
El filtro se limpia solo. La trampa de vidrio ubicada en el<br />
centro del filtro esta diseflada para recoger pedazos de<br />
vidrios rotos, pajillas, huesos y pepitas. Para remover los<br />
articulos de la trampa de vidrio, agarre el mango,<br />
saquela, vaciela y vuelva a colocarla en su lugar.<br />
Nota: El agua dura puede causar una acumulacion de<br />
depositos de cal en el interior del lavavajillas. Para las<br />
instrucciones de limpieza, vease la seccion "Como Quitar<br />
las Manchas y la Graza".<br />
Protector de Sobrellenado - evita que el lavavajillas<br />
se Ilene demasiado y esta ubicado en la esquina izquierda<br />
delantera de la tin&<br />
• Limpie ocasionalmente con un limpiador<br />
que contenga vinagre o<br />
blanqueador para disolver<br />
cualquier acumulacion.<br />
• El Protector de<br />
Sobrellenado debe<br />
moverse hacia arriba y<br />
hacia abajo libremente<br />
como una pulgada. Si no<br />
se mueve, saquelo y<br />
limpielo pot debajo.<br />
27<br />
Cuidado del Espacio de Aire de Drenaje<br />
Si se instal6 un espacio de aire de drenaje en su<br />
lavavajillas empotrado, inspecci6nelo para asegurar que<br />
este limpio, de manera que el lavavajillas drene<br />
debidamente. Un espacio de aire de drenaje por Io<br />
general esta montado sobre el gabinete y puede<br />
inspeccionarse quitando la tapa. Esto no es parte de su<br />
lavavajillas y no esta cubierto por la garantia.<br />
Peligro de da_os a la propiedad<br />
Las temperaturas heladas pueden causar que las<br />
lineas de agua se rompan. Asegt]rese de que todas<br />
las lineas de suministro y circulaci6n dentro del<br />
lavavajillas esten protegidas.<br />
No hacerlo puede resultar en daflos a la propiedad.<br />
PreparaciOn para el Invierno<br />
Un lavavajillas que se deje en un lugar sin calefacci6n<br />
debe estar protegido para que no se congele. Busque una<br />
persona calificada para que haga Io siguiente:<br />
Para desconectar el servicio:<br />
1. Cierre todo el suministro de corriente electrica al<br />
lavavajillas en la fuente de suministro quitando los<br />
fusibles o cerrando el disyuntor.<br />
2. Cierre el suministro de agua.<br />
3. Coloque un recipiente debajo de la valvula de<br />
entrada. Desconecte la linea de agua de la valvula de<br />
entrada y drene en el recipiente.<br />
4. Desconecte la linea de drenaje de la bombay drene<br />
el agua en el recipiente.<br />
Nota: Veanse las Instrucciones de Instalaci6n para mas<br />
detalles.<br />
Para restaurar el servicio:<br />
1. Vuelva a conectar el suministro de agua, drenaje<br />
y corriente electrica.<br />
2. Abra el agua y el suministro de corriente electrica.<br />
3. Llene ambas tazas de detergente y opere el<br />
lavavajillas en el ciclo NORMAL.<br />
4. Verifique las conexiones para asegurar que no tengan<br />
fugas.<br />
Nora: Veanse las Instrucciones de Instalacion para mas<br />
detalles.
Solucionesa Problemas Comunes del Lavado de Vajillas<br />
Antes de Ilamar para solicitar servicio, revise esta<br />
lista, ya que podria ahorrarle tiempo y dinero.<br />
Esta lista incluye las experiencias comunes que no<br />
son el resultado de manufactura o materiales<br />
defectuosos en su lavavajillas.<br />
La vajilla queda sucia<br />
• Elija otro ciclo para un tiempo de lavado mas largo.<br />
• Verifique la seccion de carga de los estantes para la<br />
forma correcta de cargar el lavavajillas - evite que los<br />
articulos queden pegados unos con los otros.<br />
• La presion de agua de la casa puede que sea muy<br />
baja - debe ser de 20 a 120 libras por pulgada<br />
cuadra (psi).<br />
• Verifique la temperatura del agua entrante. Debe ser<br />
de 120°F (49°C). (Veanse los Factores que Afectan el<br />
Rendimiento.)<br />
• Verifique la dureza del agua. En casos de agua<br />
sumamente dura, podria ser necesario instalar un<br />
ablandador de agua. (Vease la Tabla de Detergentes.)<br />
• Use un detergente fresco.<br />
• Verifique que el embudo en el estante superior no este<br />
obstruido.<br />
• Asegt]rese de que ningun articulo este obstruyendo los<br />
brazos rociadores, evitando que giren.<br />
La vajilla no est_ seca<br />
• Seleccione la opci6n de secado con calor.<br />
• Asegurese de que el distribuidor del agente de<br />
enjuague este Ileno.<br />
• Aumente la cantidad del agente de enjuague. (Vease<br />
Agente de Enjuague.)<br />
• Verifique la temperatura del agua entrante. Debe ser<br />
de 120°F (49°C).<br />
• Verifique la carga correcta - evite colocar los articulos<br />
pegados unos con los otros.<br />
• Es posible que necesite secar los articulos de plastico<br />
con una toalla.<br />
• Puede quedar agua en las tazas que tienen fondos<br />
c6ncavos.<br />
28<br />
Cristalerla y/o cubiertos manchados o<br />
empanados<br />
• Verifique la dureza del agua. En caso de agua<br />
sumamente dura, podria ser necesario instalar un<br />
ablandador de agua. (Vease Distribuidor y Detergentes<br />
del Lavavajillas.)<br />
• La temperatura del agua podria estar baja. Evite<br />
temperaturas extremadamente bajas o altas. (Veanse<br />
los Factores que Nectan el Rendimiento.)<br />
• Evite sobrecargar o cargar incorrectamente el<br />
lavavajillas. (Vease Preparaci6n y Carga de la Vajilla.)<br />
• Use un detergente fresco. El detergente viejo es<br />
ineficaz.<br />
• Asegt]rese de que el distribuidor del agente de<br />
enjuague este Ileno.<br />
• Verifique que se este usando la cantidad correcta de<br />
detergente para el ciclo seleccionado. Ademas,<br />
verifique el nivel de fosfato. (Vease la Guia de Uso del<br />
Detergente.)<br />
• La presion de agua de la casa podria ser muy baja -<br />
debe ser de 20 a 120 libras por pulgada cuadrada<br />
(psi).<br />
La vajilla est8 astillada<br />
• Col6quela con cuidado y no sobrecargue el<br />
lavavajillas. (Vease Preparaci6n y Carga de la Vajilla.)<br />
• Coloque los articulos delicados en el estante superior.<br />
• Coloque los vasos asegurados contra los ganchos y no<br />
sobre los ganchos.<br />
• Coloque los articulos de manera que esten seguros y no<br />
se muevan al sacar o meter los estantes. Saque y meta<br />
los estantes despacio.<br />
• Asegurese de que los vasos altos y las copas despejen<br />
la parte superior de la tina al mover el estante hacia<br />
adentro.<br />
• Los articulos finos y antiguos de porcelana y cristal<br />
deben lavarse a mano.
Solucionesa Problemas Comunes del Lavado de Vajillas<br />
La vajilla est_ manchada 0 descolorida<br />
• El te y el care pueden manchar las tazas. Quite las<br />
manchas lavandolas a mano en una soluci6n de 1/2<br />
taza (120 ml) de blanqueador en un cuarto de gal6n (1<br />
L) de agua tibia. Enjuaguelas bien.<br />
• Los dep6sitos de hierro en el agua pueden causar una<br />
pelicula amarilla o marr6n. Un filtro especial instalado<br />
en la linea de suministro de agua puede corregir este<br />
problema (Vease Como Quitar las Manchas y la<br />
Pelicula.)<br />
• Los utensilios de aluminio pueden dejar manchas grises<br />
o negras cuando tropiezan con otros articulos.<br />
Col6quelos correctamente.<br />
• Ciertos alimentos muy acidos pueden causar el<br />
descoloramiento del acero inoxidable y los plasticos si<br />
se dejan en la vajilla pot mucho tiempo.<br />
• Mezclar utensilios de acero inoxidable y de plata en la<br />
canasta de cubiertos puede causar que las hojas de<br />
acero inoxidable se corroan. Evite mezclar acero<br />
inoxidable y plata.<br />
Aguafuerte<br />
• Usar demasiado detergente en agua blanda o<br />
ablandada causa esta pelicula que no puede quitarse.<br />
• Ajuste la cantidad de detergente de acuerdo con la<br />
dureza del agua. (Consulte la Guia de Uso del<br />
Detergente.)<br />
• Baje la temperatura del agua.<br />
• Use la opci6n HEAT DRY OFF.<br />
Queda detergente ann en las tazas<br />
• El detergente podria ser viejo. Desechelo y use<br />
detergente fresco.<br />
• Asegt]rese de que la acci6n del agua puede Ilegar al<br />
distribuidor.<br />
• Verifique que el ciclo se haya completado.<br />
• Asegt]rese de que algt]n articulo no evite que el<br />
distribuidor de detergente abra.<br />
29<br />
El lavavajillas gotea<br />
Solo use detergente fresco disenado para lavavajillas<br />
automaticos. Mida el detergente cuidadosamente.<br />
Trate otra marca diferente.<br />
El agente de enjuague derramado puede producir<br />
espuma y causar que el agua se desborde. Limpie<br />
cualquier derrame del agente con un pano ht]medo.<br />
Verifique que el lavavajillas este nivelado. (Veanse las<br />
Instrucciones de Instalacion.)<br />
Sonidos normales que escuchar_<br />
• Lossonidos normales incluyen el Ilenado de agua, la<br />
circulaci6n del agua y los sonidos del motor.<br />
• Hay un cambio perceptible en el sonido cuando la<br />
acci6n de lavado cambia entre el brazo rociador<br />
inferior y el del medio. Esto es normal ya que cada<br />
brazo rociador tiene su propio sonido.<br />
• Es normal que el lavavajillas se detenga (ningt]n sonido)<br />
cuando la acci6n de lavado esta cambiando entre el<br />
brazo rociador inferior y el del medio.<br />
Agua en el rondo de la tina<br />
El agua que queda en el rondo de la tina despues de<br />
haber terminado el ciclo no es normal. Si queda agua<br />
en el rondo de la tina, el lavavajillas puede que no este<br />
drenando correctamente. (Vease El Lavavajillas No<br />
Drena Correctamente.)<br />
Vapor en el respiradero<br />
• El vapor de agua sale del respiradero durante la parte<br />
de secado del ciclo. Esto es normal.<br />
El lavavajillas no funciona<br />
Verifique para vet si el disyuntor se ha disparado o si<br />
un fusible esta quemado.<br />
• Asegt]rese de que el suministro de agua este abierto.<br />
• Verifique si el ciclo esta ajustado correctamente.<br />
(Veanse las Instrucciones de Funcionamiento.)<br />
• LEsta el lavavajillas ajustado para la opcion de<br />
comienzo demorado?<br />
Asegt]rese de que la puerta esta cerrada y trabada.
Solucionesa Problemas Comunes del Lavado de Vajillas<br />
El lavavajillas no drena correctamente<br />
• Si la unidad esta conectada a un triturador de<br />
desperdicios de comida, asegt]rese de que el triturador<br />
este vacio.<br />
• Verifique que el tap6n removible se haya quitado del<br />
interior de la entrada del triturador de desperdicios de<br />
comida.<br />
• Verifique que la manguera de drenaje no este<br />
doblada,<br />
• Asegt]rese de que el ciclo haya completado y no este<br />
en una pausa.<br />
El ciclo demora demasiado tiempo<br />
• LEsta el ciclo en una demora para calentar el agua?<br />
• Verifique la temperatura del agua entrante. Debe ser<br />
de 120°F (49°C),<br />
• LSe ha seleccionado la opci6n de comienzo demorado?<br />
El lavavajillas no se Ilena<br />
LEsta abierto el suministro de agua?<br />
LSe mueve el protector de sobrellenado hacia arriba y<br />
hacia abajo libremente? (Vease la seccion del Protector<br />
de Sobrellenado.)<br />
• El nivel maximo de agua del lavavajillas s01o alcanzara<br />
la parte inferior de los sujetadores del calentador.<br />
El lavavajillas tiene mal olor<br />
• La vajilla sucia que se deja demasiado tiempo en el<br />
lavavajillas puede producir mal olor.<br />
• Habra un olor a "nuevo" cuando se instale pot primera<br />
vez. Esto es normal.<br />
• Verifique que la unidad este drenando debidamente.<br />
(Vease El Lavavajillas No Drena Debidamente.)<br />
30<br />
Manchas en el interior de la tina<br />
Lavar grandes cantidades de articulos con comida que<br />
contiene tomate puede causar un aspecto rosado o<br />
anaranjado. Esto no afectara el rendimiento y se<br />
desvanecera gradualmente con el tiempo.<br />
COmo quitar las manchas y la graza<br />
El agua dura puede causar la acumulaci6n de dep6sitos<br />
de cal en el interior del lavavajillas. Los platos y vasos<br />
tambien pueden tener manchas y una graza por varias<br />
razones. (Vease la secci6n de Cristaleria/Cubiertos<br />
Manchados o Empanados.) Para quitar la acumulaci6n,<br />
las manchas y la graza, siga estas instrucciones:<br />
1. Coloque los platos y los vasos de la forma normal. No<br />
cargue ningun utensilio ni cubierto de metal.<br />
2. No agregue detergente.<br />
3. Seleccione el ciclo HEAVY WASH. Cierre y trabe la<br />
puerta.<br />
4. Permita que el lavavajillas funcione por 20 minutos<br />
hasta alcanzar la porci6n del ciclo que corresponde al<br />
lavado principal.<br />
5. Destrabe y abra la puerta y vierta 2 tazas de vinagre<br />
blanco en el rondo del lavavajillas.<br />
6. Cierre y trabe la puerta y permita que el ciclo<br />
termine.<br />
Nora: Si estas condiciones persisten, debera considerarse<br />
instalar un ablandador de agua para el hogar.
Contratosde Proteccion<br />
Enhorabuena por haber hecho una compra<br />
inteligente. Su nuevo producto <strong>Kenmore</strong> ® esta<br />
dise_ado y fabricado para brindarle anos de<br />
funcionamiento fiable. Pero, como cualquier<br />
producto0 puede necesitar mantenimiento<br />
preventivo o reparaciones peri6dicas. Es por eso<br />
que tener un Acuerdo maestro de protecci6n<br />
podria ahorrarle dinero y molestias.<br />
El Acuerdo maestro de protecciOn tambidn sirve<br />
para prolongar la durabilidad de su nuevo<br />
producto. El acuerdo* incluye Io siguiente:<br />
[] Piezas y mano de obra necesarias para contribuir a<br />
mantener el funcionamiento adecuado de los<br />
productos utilizados en condiciones normales de uso,<br />
no s01o en caso de defectos de los productos. Nuestra<br />
cobertura va mucho mas alia que la garantia<br />
del producto. No se aplican deducibles ni exclusiones<br />
pot fallas del funcionamiento: es decir, verdadera<br />
protecciOn.<br />
[] Servicio tecnico por expertos (mas de 10000<br />
tecnicos autorizados de <strong>Sears</strong>), Io cual significa<br />
que quien repare o realice el mantenimiento de su<br />
producto sera un profesional de confianza.<br />
[] Servicio tecnico a escala nacional y numero<br />
ilimitado de Ilamadas de solicitud de servicio<br />
tecnico: se puede poner en contacto con nosotros<br />
cuantas veces Io desee y cuando Io desee.<br />
[] Garantia "sin sorpresas": se reemplaza el<br />
producto cubierto pot el acuerdo si ocurren cuatro o<br />
mas fallas del producto en un periodo de 12 meses.<br />
[] Reemplazo del producto: en caso de que no se<br />
pueda reparar el producto cubierto pot el acuerdo.<br />
[] Revision anual preventiva de mantenimiento<br />
del producto: puede solicitarla en cualquier<br />
momento, sin costo alguno.<br />
[] Rapida asistencia telefonica, la cual<br />
denominamos Solucion rapida: es decir, asistencia<br />
telefonica a traves de cualquiera de nuestros<br />
representantes de <strong>Sears</strong>, sobre cualquiera de nuestros<br />
productos. Piense en nosotros como en un "manual<br />
parlante del usuario".<br />
[] ProtecciOn contra fallas electricas, contra danos<br />
debidos a fluctuaciones de la corriente electric&<br />
[] $250 al arlo para cubrir cualquier posible<br />
deterioro de alimentos que haya tenido que desechar<br />
debido a una falla mecanica de cualquiera de<br />
nuestros refrigeradores o congeladores cubiertos pot<br />
este acuerdo.<br />
31<br />
[] Devoluci0n de gastos de alquiler de<br />
electrodomesticos si la reparacion de su producto<br />
asegurado toma masque el tiempo prometido.<br />
[] 10% de descuento aplicable tanto a los costos del<br />
servicio de reparacion, como de las piezas instaladas<br />
relacionadas que no hayan quedado cubiertos pot<br />
este acuerdo.<br />
Una vez que haya realizado el pago de este acuerdo,<br />
bastara una simple Ilamada telefonica para concertar una<br />
visita de servicio. Puede Ilamar a cualquier hora del dia o<br />
de la noche, o bien concertar una visita de servicio pot<br />
Internet.<br />
La adquisicion del Acuerdo maestro de proteccion es una<br />
inversion exenta de riesgos. Si pot cualquier motivo decide<br />
cancelar dicho acuerdo durante el periodo de garantia<br />
del producto, le haremos un reintegro total del valor. O<br />
bien un importe proporcional si cancela el acuerdo en<br />
cualquier otto momento posterior al vencimiento del<br />
periodo de garantia del producto, iAdquiera hoy mismo su<br />
Acuerdo maestro de protecci0n!<br />
Algunas limitaciones y exclusiones podrian<br />
aplicarse. Para solicitar precios e informaci0n<br />
adicional, Ilame al 1-800-827-6655 (en los<br />
EE.UU.).<br />
* La cobertura en Canada varla en el caso de<br />
algunos articulos. Para obtener detalles completos<br />
al respecto, Ilame al 1-800-361-6665 de <strong>Sears</strong> de<br />
Canada.<br />
Servicio de instalaciOn de <strong>Sears</strong><br />
Para solicitar la instalacion por profesionales de <strong>Sears</strong> de<br />
electrodomesticos, abridores de puertas de garaje,<br />
calentadores de agua y otros articulos de uso prioritario en<br />
el hogar, Ilame al 1-800-4-MY-HOME en los EE.UU. o<br />
Canada.
® Registered Trademark / TMTrademark of KCD IP, LLC in the United States, or <strong>Sears</strong> Brands, LLC in other countries<br />
® Marca Registrada / TMMarca de F_brica de KCD IP, LLC en Estados Unidos, o <strong>Sears</strong> Brands, LLC in otros paises<br />
MCMarque de commerce / MDMarque d_pos6e de <strong>Sears</strong> Brands, LLC<br />
32