

Libretto MIR90 03-A - Jotnor Oy
Libretto MIR90 03-A - Jotnor Oy
Libretto MIR90 03-A - Jotnor Oy

You also want an ePaper? Increase the reach of your titles
YUMPU automatically turns print PDFs into web optimized ePapers that Google loves.
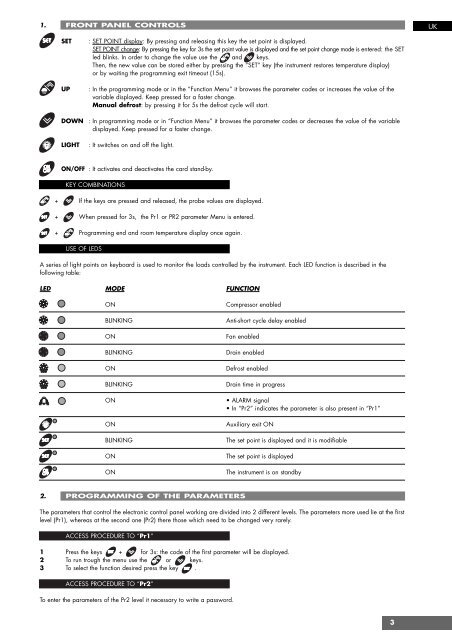
1. FRONT PANEL CONTROLS<br />
UK<br />
SET<br />
UP<br />
DOWN<br />
LIGHT<br />
: SET POINT display: By pressing and releasing this key the set point is displayed.<br />
SET POINT change: By pressing the key for 3s the set point value is displayed and the set point change mode is entered: the SET<br />
led blinks. In order to change the value use the and keys.<br />
Then, the new value can be stored either by pressing the “SET” key (the instrument restores temperature display)<br />
or by waiting the programming exit timeout (15s).<br />
: In the programming mode or in the “Function Menu” it browses the parameter codes or increases the value of the<br />
variable displayed. Keep pressed for a faster change.<br />
Manual defrost: by pressing it for 5s the defrost cycle will start.<br />
: In programming mode or in “Function Menu” it browses the parameter codes or decreases the value of the variable<br />
displayed. Keep pressed for a faster change.<br />
: It switches on and off the light.<br />
ON/OFF : It activates and deactivates the card stand-by.<br />
KEY COMBINATIONS<br />
+ If the keys are pressed and released, the probe values are displayed.<br />
+ When pressed for 3s, the Pr1 or PR2 parameter Menu is entered.<br />
+ Programming end and room temperature display once again.<br />
USE OF LEDS<br />
A series of light points on keyboard is used to monitor the loads controlled by the instrument. Each LED function is described in the<br />
following table:<br />
LED MODE FUNCTION<br />
ON<br />
BLINKING<br />
ON<br />
BLINKING<br />
ON<br />
BLINKING<br />
ON<br />
ON<br />
BLINKING<br />
ON<br />
ON<br />
Compressor enabled<br />
Anti-short cycle delay enabled<br />
Fan enabled<br />
Drain enabled<br />
Defrost enabled<br />
Drain time in progress<br />
• ALARM signal<br />
• In “Pr2” indicates the parameter is also present in “Pr1”<br />
Auxiliary exit ON<br />
The set point is displayed and it is modifiable<br />
The set point is displayed<br />
The instrument is on standby<br />
2. PROGRAMMING OF THE PARAMETERS<br />
The parameters that control the electronic control panel working are divided into 2 different levels. The parameters more used lie at the first<br />
level (Pr1), whereas at the second one (Pr2) there those which need to be changed very rarely.<br />
ACCESS PROCEDURE TO “Pr1”<br />
1 Press the keys + for 3s: the code of the first parameter will be displayed.<br />
2 To run trough the menu use the or keys.<br />
3 To select the function desired press the key .<br />
ACCESS PROCEDURE TO “Pr2”<br />
To enter the parameters of the Pr2 level it necessary to write a password.<br />
3