www.ako.es HOJA TÃCNICA 1412H800 Edición 02 (01 de 02)
www.ako.es HOJA TÃCNICA 1412H800 Edición 02 (01 de 02)
www.ako.es HOJA TÃCNICA 1412H800 Edición 02 (01 de 02)

Create successful ePaper yourself
Turn your PDF publications into a flip-book with our unique Google optimized e-Paper software.
<strong>HOJA</strong> TÉCNICA <strong>1412H800</strong> Edición <strong>02</strong> (<strong>01</strong> <strong>de</strong> <strong>02</strong>)<br />
<strong>www</strong>.<strong>ako</strong>.<strong>es</strong><br />
E<br />
Termómetros y termostatos con 1 sonda y 1 relé:<br />
AKO-14<strong>02</strong>3, AKO-146<strong>02</strong>, AKO-14128,<br />
AKO-14123, AKO-14610, AKO-14129.<br />
GB<br />
Thermometers and thermostats with 1 probe and 1 relay:<br />
AKO-14<strong>01</strong>2 AKO-146<strong>02</strong>, AKO-14128,<br />
AKO-14123, AKO-14610, AKO-14129.<br />
DESCRIPCIÓN GENERAL:<br />
Termómetros y termostatos electrónicos (panelabl<strong>es</strong> y <strong>de</strong> superficie), a<strong>de</strong>cuados para visualizar, controlar y regular generador<strong>es</strong><br />
<strong>de</strong> frio (con d<strong>es</strong><strong>es</strong>carche automático programable y manual) o <strong>de</strong> calor.<br />
VERSIONES:<br />
MODELO FUNCIÓN ANCLAJE RELÉ ALIMENTACIÓN, 50/60 Hz<br />
AKO-146<strong>02</strong> Termómetro Superficie - 230 V ±10% 6,7 mA,<br />
AKO-14610 Termostato Superficie 16(4)A, cos =1 230 V ±10% 8,4 mA,<br />
AKO-14128 Termostato Panelable 16(4)A, cos =1 230 V ±10% 9,6 mA,<br />
AKO-14129 Termostato Panelable 18(5)A, cos =1 230 V ±10% 11,7 mA,<br />
GENERAL DESCRIPTION:<br />
Electronic thermometers and thermostats (for panel and for surface), suitable for displaying, controlling and adjusting cold<br />
(with manual and automatic programmable <strong>de</strong>frosting) or heat generators.<br />
VERSIONS:<br />
MODEL FUNCTION FASTENING RELAY<br />
POWER SUPPLY 50/60Hz<br />
AKO-146<strong>02</strong> Thermometer Surface - 230 V ±10% 6,7 mA,<br />
AKO-14610 Thermostat Surface 16(4)A, cos =1 230 V ±10% 8,4 mA,<br />
AKO-14128 Thermostat For panel 16(4)A, cos =1 230 V ±10% 9,6 mA,<br />
AKO-14129 Thermostat For panel 18(5A, cos =1 230 V ±10% 11,7 mA,<br />
DATOS TÉCNICOS:<br />
Rango <strong>de</strong> temperatura: ..........................................................................................................................................-50ºC a 99ºC<br />
Entrada sonda NTC: ........................................................................................................................................Ref. AKO-149XX<br />
Precisión <strong>de</strong>l controlador: .................................................................................................................................................. ±1ºC<br />
Tolerancia <strong>de</strong> la sonda a 25ºC: ........................................................................................................................................±0,4ºC<br />
Temp. ambiente <strong>de</strong> trabajo: ......................................................................................................................................5ºC a 50ºC<br />
Temp. ambiente <strong>de</strong> almacenaje: ............................................................................................................................-30ºC a 70ºC<br />
Categoría <strong>de</strong> instalación: ...................................................................................................................... II según norma CEI 664<br />
Display: ..........................................................................................................................2 dígitos <strong>de</strong> 7 segmentos <strong>de</strong> 14,2 mm,<br />
más un LED rectangular <strong>de</strong> signo<br />
Aislamiento doble entre alimentación, circuito secundario y salida relé.<br />
TECHNICAL DATA:<br />
Temperature range: .............................................................................................................................................. -50ºC to 99ºC<br />
NTC probe input: ............................................................................................................................................ Ref. AKO-149XX<br />
Controller accuracy: ............................................................................................................................................................ ±1ºC<br />
Probe tolerance at 25ºC: .................................................................................................................................................. ±0,4ºC<br />
Working ambient temperature: ................................................................................................................................ 5ºC to 50ºC<br />
Storage ambient temperature: .............................................................................................................................. -30ºC to 70ºC<br />
Installation category:.......................................................................................................................... II un<strong>de</strong>r CEI 664 standard<br />
Display:.......................................................................................................... 2 digits with seven 14.2 mm segments each one,<br />
plus a rectangular sign LED<br />
Double insulation between power supply, secondary circuit and relay output.<br />
INSTALACIÓN:<br />
INSTALLATION:<br />
Controlador:<br />
El termómetro o termostato <strong>de</strong>be ser instalado en un sitio protegido <strong>de</strong> las vibracion<strong>es</strong>,<br />
<strong>de</strong>l agua y <strong>de</strong> los gas<strong>es</strong> corrosivos, y don<strong>de</strong> la temperatura ambiente no<br />
supere los valor<strong>es</strong> reflejados en los datos técnicos.<br />
Para que los equipos panelabl<strong>es</strong> tengan un grado <strong>de</strong> protección IP65 <strong>de</strong>berá<br />
instalarse correctamente la junta entre el aparato y el perímetro <strong>de</strong>l hueco <strong>de</strong>l<br />
panel don<strong>de</strong> <strong>de</strong>ba montarse.<br />
Sonda:<br />
Para que la lectura sea correcta, la sonda se ha <strong>de</strong> instalar en un sitio sin<br />
influencias térmicas ajenas a la temperatura que se d<strong>es</strong>ea medir o controlar.<br />
Conexionado:<br />
Ver <strong>es</strong>quema en la etiqueta <strong>de</strong> características <strong>de</strong> los aparatos.<br />
La sonda y su cable corr<strong>es</strong>pondiente NUNCA <strong>de</strong>ben instalarse en una conducción<br />
junto con cabl<strong>es</strong> <strong>de</strong> potencia, control o alimentación.<br />
El circuito <strong>de</strong> alimentación <strong>de</strong>be <strong>es</strong>tar provisto <strong>de</strong> un interruptor para su d<strong>es</strong>conexión<br />
<strong>de</strong> mínimo 2A, 230V, situado cerca <strong>de</strong>l aparato. Los cabl<strong>es</strong> entrarán por<br />
la parte posterior y serán <strong>de</strong>l tipo H05VV-F 2x05 mm 2 o H05V-K 1x05mm 2 .<br />
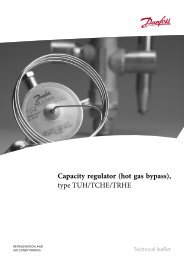
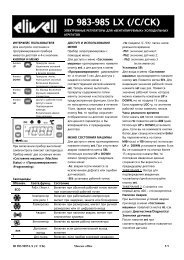
Anclaje <strong>de</strong> mo<strong>de</strong>los panelabl<strong>es</strong> :<br />
Para la fijación <strong>de</strong>l aparato situar los anclaj<strong>es</strong> 1 sobre las guias 2 en la posición<br />
<strong>de</strong> la figura. D<strong>es</strong>plazar el anclaje en el sentido <strong>de</strong> la flecha. Pr<strong>es</strong>ionando la p<strong>es</strong>taña<br />
3 pue<strong>de</strong> d<strong>es</strong>plazarse el anclaje en sentido contrario a la flecha.<br />
Anclaje <strong>de</strong> mo<strong>de</strong>los <strong>de</strong> superficie:<br />
44<br />
máx.<br />
18 mm<br />
3<br />
1<br />
2<br />
28,5<br />
HUECO PANELABLE<br />
PANEL CUT-OUT<br />
61,5 70,5<br />
Pr<strong>es</strong>ionar ligeramente para abrir la tapa<br />
Pr<strong>es</strong>s down lightly to open the cover<br />
80<br />
Detalle taladros para fijación<br />
Detail of fixing screw-hol<strong>es</strong><br />
Ø7<br />
3 14<br />
17<br />
Ø4<br />
60<br />
35<br />
120<br />
Controller:<br />
The thermometer or thermostat must be installed in a place protected from vibrations,<br />
water and corrosive gas<strong>es</strong>, and where the ambient temperature do<strong>es</strong> not<br />
surpass the valu<strong>es</strong> specified in the technical data.<br />
For the equipment for panel to be suitable having IP65 protection the gasket<br />
should be installed properly between the apparatus and the perimeter of the<br />
panel cut-out where it is to be fitted.<br />
Probe:<br />
To give a correct reading, the probe has to be installed in a place without heat<br />
influenc<strong>es</strong> other than the temperature that is to be measured or controlled.<br />
Connection:<br />
See diagram in the unit rating plate.<br />
The probe and its lead should NEVER be installed in a conduct next to power,<br />
control or power supply wiring systems.<br />
The power supply circuit should be connected with a switch for disconnection of<br />
minimum 2A, 230V, located near the unit. The connection cabl<strong>es</strong> should be<br />
H05VV-F 2x0,5mm 2 or H05V-K 1x0,5mm 2 type, to posterior part of the unit.<br />
Fastening of mo<strong>de</strong>ls for panel:<br />
To fix the unit, place the fasteners 1 via the sli<strong>de</strong>rs 2 as shown in the figure.<br />
Move the fasteners in the direction of the arrow. Pr<strong>es</strong>s tab 3 to move the fasteners<br />
in the opposite direction of the arrow.<br />
Surface mo<strong>de</strong>ls fixing:<br />
FUNCIONES DEL FRONTAL<br />
FRONT PANEL FUNCTIONS:<br />
Funcion<strong>es</strong> para termostatos:<br />
Pulsando durante 5 segundos se activa un d<strong>es</strong><strong>es</strong>carche manual <strong>de</strong> la<br />
duración que se haya programado.<br />
En programación, sube el valor que se <strong>es</strong>tá visualizando.<br />
Pulsando durante 5 segundos se visualiza la temperatura <strong>de</strong>l PUNTO DE<br />
AJUSTE (Set Point).<br />
En programación, baja el valor que se <strong>es</strong>tá visualizando.<br />
LEDS indicador<strong>es</strong>:<br />
LED 1: Indicador <strong>de</strong> d<strong>es</strong><strong>es</strong>carche activado.<br />
LED 2: Indicador <strong>de</strong> relé activado (ON).<br />
LED 2 intermitente: Fase <strong>de</strong> programación.<br />
LED 2 LED 1 TECLA SUBIR<br />
KEY UP<br />
TECLA BAJAR<br />
KEY DOWN<br />
Functions for thermostats:<br />
Pr<strong>es</strong>s for 5 seconds to activate manual <strong>de</strong>frost of the<br />
programmed duration.<br />
In programming, it increas<strong>es</strong> the displayed value.<br />
Pr<strong>es</strong>s for 5 seconds to displays the Set Point temperature.<br />
In programming it reduc<strong>es</strong> the displayed value.<br />
Indicator LEDS:<br />
LED 1: Defrost activated indicator.<br />
LED 2: Relay ON indicator.<br />
LED 2 flashing: Programming phase.<br />
AJUSTE DE LA TEMPERATURA:<br />
TEMPERATURE ADJUSTMENT:<br />
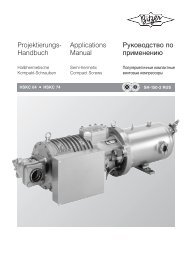
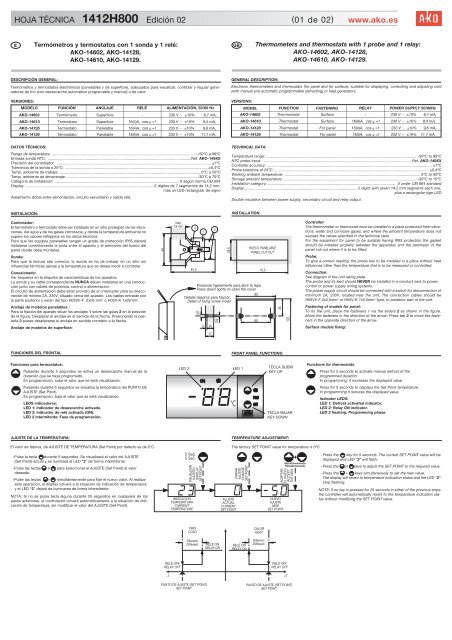
El valor <strong>de</strong> fábrica, <strong>de</strong> AJUSTE DE TEMPERATURA (Set Point) por <strong>de</strong>fecto <strong>es</strong> <strong>de</strong> 0°C.<br />
-Pulse la tecla durante 5 segundos. Se visualizará el valor <strong>de</strong>l AJUSTE<br />
(Set Point) actual y se iluminará el LED “2” <strong>de</strong> forma intermitente.<br />
-Pulse las teclas ó para seleccionar el AJUSTE (Set Point) al valor<br />
d<strong>es</strong>eado.<br />
-Pulse las teclas + simultáneamente para fijar el nuevo valor. Al realizar<br />
<strong>es</strong>ta operación, el display volverá a la situación <strong>de</strong> indicación <strong>de</strong> temperatura<br />
y el LED “2” <strong>de</strong>jará <strong>de</strong> iluminarse <strong>de</strong> forma intermitente.<br />
NOTA: Si no se pulsa tecla alguna durante 25 segundos en cualquiera <strong>de</strong> los<br />
pasos anterior<strong>es</strong>, el controlador volverá automáticamente a la situación <strong>de</strong> indicación<br />
<strong>de</strong> temperatura, sin modificar el valor <strong>de</strong>l AJUSTE (Set Point).<br />
5 Seg.<br />
5 Sec.<br />
INDICACION<br />
TEMPERATURA<br />
CURRENT<br />
TEMPERATURE<br />
VISUALIZAR<br />
AJUSTEz<br />
DISPLAY<br />
SET POINT<br />
AJUSTE<br />
ACTUAL<br />
CURRENT<br />
SET POINT<br />
The factory SET POINT value for temperature is 0ºC.<br />
VARIAR<br />
AJUSTE<br />
CHANGE<br />
SET POINT<br />
NUEVO<br />
AJUSTE<br />
NEW<br />
SET POINT<br />
ACEPTAR<br />
EL NUEVO<br />
ACCEPT<br />
THE NEW<br />
-Pr<strong>es</strong>s the key for 5 seconds. The current SET POINT value will be<br />
displayed and LED “2” will flash.<br />
-Pr<strong>es</strong>s the or keys to adjust the SET POINT to the required value.<br />
-Pr<strong>es</strong>s the + keys simultaneously to set the new value.<br />
The display will revert to temperature indication status and the LED “2”<br />
stop flashing.<br />
NOTE: If no key is pr<strong>es</strong>sed for 25 seconds in either of the previous steps<br />
the controller will automatically revert to the temperature indication status<br />
without modifying the SET POINT value.<br />
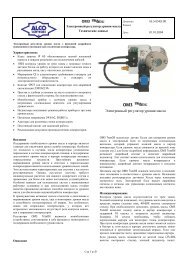
FRIO<br />
COLD<br />
CALOR<br />
HEAT<br />
Diferenc.<br />
Different.<br />
RELÉ ON<br />
RELAY ON<br />
RELÉ ON<br />
RELAY ON<br />
Diferenc.<br />
Different.<br />
RELÉ OFF<br />
RELAY OFF<br />
RELÉ OFF<br />
RELAY OFF<br />
-T +T<br />
PUNTO DE AJUSTE (SET POINT)<br />
SET POINT<br />
PUNTO DE AJUSTE (SET POINT)<br />
SET POINT
<strong>HOJA</strong> TÉCNICA <strong>1412H800</strong> Edición <strong>02</strong> (<strong>02</strong> <strong>de</strong> <strong>02</strong>)<br />
<strong>www</strong>.<strong>ako</strong>.<strong>es</strong><br />
PROGRAMACIÓN<br />
Los parámetros sólo <strong>de</strong>ben ser programados o modificados por personal<br />
que conozca el funcionamiento y las posibilidad<strong>es</strong> <strong>de</strong>l equipo don<strong>de</strong> se<br />
aplica.<br />
INDICACIÓN<br />
TEMPERATURA<br />
TEMPERATURE<br />
DISPLAY<br />
10 Sec./10 Seg.<br />
NIVEL 1<br />
PARAMETROS<br />
LEVEL 1<br />
PARAMETERS<br />
NIVEL 2<br />
VALORES<br />
LEVEL 2<br />
VALUES<br />
PROGRAMMING<br />
The parameters may only be programmed or modified by staff that are fully<br />
acquainted with how the machine operat<strong>es</strong> and the characteristics of the unit<br />
where it is to be applied.<br />
Programación <strong>de</strong> parámetros:<br />
Programming parameters:<br />
Nivel 1:<br />
-Pulse simultáneamente las teclas + durante 10 segundos. El LED “2” se<br />
iluminará <strong>de</strong> forma intermitente y en el display aparecerá el primer parámetro<br />
“C0”.<br />
-Pulse la tecla para acce<strong>de</strong>r al parámetro siguiente y la tecla para retroce<strong>de</strong>r<br />
al parámetro anterior.<br />
-Situándonos en el último parámetro EP, pulsando las teclas + simultánemente,<br />
el controlador volverá a la situación <strong>de</strong> indicación <strong>de</strong> temperatura<br />
y el LED “2” <strong>de</strong>jará <strong>de</strong> iluminarse <strong>de</strong> forma intermitente.<br />
Nivel 2:<br />
-Para ver el valor actual <strong>de</strong> cualquier parámetro, sitú<strong>es</strong>e en el que se d<strong>es</strong>ea y<br />
pulse las teclas + simultáneamente. Una vez visualizado, si quiere modificarlo<br />
pulse las teclas ó .<br />
- Pulse las teclas + simultáneamente para fijar el nuevo valor. Al realizar<br />
<strong>es</strong>ta operación la programación volverà al nivel 1 (parámetros).<br />
NOTA: Si no se pulsa tecla alguna durante 25 segundos en cualquiera <strong>de</strong> los<br />
pasos anterior<strong>es</strong>, el controlador volverá automáticamente a la situación <strong>de</strong> indicación<br />
<strong>de</strong> temperatura, sin modificar el valor <strong>de</strong> los parámetros.<br />
DISPLAY<br />
VALUE<br />
VISUALIZAR<br />
VALOR<br />
VARIAR<br />
VALOR<br />
CHANGE<br />
VALUE<br />
VALOR ACTUAL<br />
CURRENT VALUE<br />
ACEPTAR<br />
EL NUEVO<br />
ACCEPT<br />
THE NEW<br />
NUEVO VALOR<br />
NEW VALUE<br />
Level 1:<br />
- Pr<strong>es</strong>s the + keys simultaneously for 10 seconds. LED “2” will flash and th<br />
first parameter “C0” will appear on the display.<br />
- Pr<strong>es</strong>s the key to acc<strong>es</strong>s the next parameter and the key to go back to the<br />
previous one.<br />
-In the last parameter, EP, pr<strong>es</strong>sing the + keys simultaneously the controller<br />
will revert to temperature indication status and the LED “2” stop flashing.<br />
Level 2:<br />
-To display the current value of any parameter, go to the required parameter and<br />
pr<strong>es</strong>s the + keys simultaneously. Once it is on screen, pr<strong>es</strong>s the<br />
or keys to modify it.Pr<strong>es</strong>s the + keys simultaneously to set the new<br />
value. The programming will revert to level 1 (parameters).<br />
NOTE: If no key is pr<strong>es</strong>sed for 25 seconds in either of the previous steps the controller<br />
will automatically revert to the temperature indication status without modifying<br />
the parameter value.<br />
SALIDA<br />
PROGRAMACIÓN<br />
EXIT<br />
PROGRAMMING<br />
DESCRIPCIÓN DE LOS PARÁMETROS<br />
Para programar el PUNTO DE AJUSTE (Set Point) ver AJUSTE DE LA TEMPERATURA<br />
Los valor<strong>es</strong> <strong>de</strong> la columna DEF. vienen programados <strong>de</strong> fábrica.<br />
PARÁMETRO<br />
C0<br />
C1<br />
C2<br />
DESCRIPCIÓN<br />
Calibración <strong>de</strong> la sonda (Offset)<br />
Incremento / Decremento <strong>de</strong> temperatura que se aña<strong>de</strong> a la temperatura <strong>de</strong>tectada por el termostato<br />
para ajustar la sonda al valor real.<br />
Diferencial (Hystér<strong>es</strong>is)<br />
Incremento <strong>de</strong> temperatura por encima o por <strong>de</strong>bajo <strong>de</strong> la temperatura indicada por el<br />
PUNTO DE AJUSTE (Set Point) para que actue el relé<br />
Limitador máximo <strong>de</strong>l PUNTO DE AJUSTE (Set point)<br />
No se podrá fijar un SET POINT por encima <strong>de</strong> <strong>es</strong>te valor,<br />
apareciendo la indicación <strong>de</strong> alarma AH si la temperatura <strong>es</strong> superior a C2.<br />
C3 Limitador mínimo <strong>de</strong>l PUNTO DE AJUSTE (Set point)<br />
No se podrá fijar un SET POINT por <strong>de</strong>bajo <strong>de</strong> <strong>es</strong>te valor, apareciendo la indicación <strong>de</strong> alarma<br />
AL si la temperatura <strong>es</strong> inferior a C3.<br />
C4 Tipo <strong>de</strong> retardo para protección <strong>de</strong>l compr<strong>es</strong>or<br />
0=(off/on): Retardo a la conexión <strong>de</strong>l relé d<strong>es</strong><strong>de</strong> su última d<strong>es</strong>activación.<br />
1=(on): Retardo a la conexión <strong>de</strong>l relé d<strong>es</strong><strong>de</strong> que la temperatura manda activarlo.<br />
C5<br />
C6<br />
C7<br />
C8<br />
d0<br />
d1<br />
d2<br />
d3<br />
P0<br />
P1<br />
P2<br />
P3<br />
EP<br />
RANGO<br />
MIN. MAX.<br />
–20ºC<br />
VALOR<br />
DEF.<br />
+20ºC 0ºC<br />
1ºC 20ºC 2ºC<br />
xxºC<br />
-50ºC<br />
99ºC 99ºC<br />
xxºC<br />
-50ºC<br />
0 1 0<br />
Tiempo <strong>de</strong> retardo <strong>de</strong> la protección<br />
Valor numérico <strong>de</strong> la opción elegida en el parámetro C4 0 min. 99 min. 0 min.<br />
Estado <strong>de</strong>l relé con sonda averiada<br />
Selección 0<br />
Secuencia ON/OFF promedio <strong>de</strong> las últimas 24 horas. Realiza los d<strong>es</strong><strong>es</strong>carch<strong>es</strong> r<strong>es</strong>petando<br />
su tiempo programado.<br />
Selección 1<br />
Secuencia <strong>de</strong> funcionamiento (OFF/ON) según lo programado en C7 y C8.<br />
Tiempo relé conectado (ON) en caso <strong>de</strong> fallo <strong>de</strong> sonda<br />
Periodo en que el controlador permanece con el relé conectado, (Ej. marcha compr<strong>es</strong>or).<br />
Programando C7=0 y C8≠0, el relé <strong>es</strong>tará siempre d<strong>es</strong>conectado (OFF).<br />
Tiempo relé d<strong>es</strong>conectado (OFF) en fallo <strong>de</strong> sonda<br />
Periodo en que el controlador permanece con el relé d<strong>es</strong>conectado, (Ej. paro compr<strong>es</strong>or).<br />
Programando C8=0 y C7≠0 , el relé <strong>es</strong>tará siempre conectado (ON).<br />
Frecuencia <strong>de</strong> d<strong>es</strong><strong>es</strong>carch<strong>es</strong> (funcionamiento frío)<br />
Tiempo entre 2 inicios <strong>de</strong> d<strong>es</strong><strong>es</strong>carche<br />
Duración <strong>de</strong> los d<strong>es</strong><strong>es</strong>carch<strong>es</strong> (funcionamiento frío)<br />
Durante <strong>es</strong>te tiempo se activará el LED indicador <strong>de</strong> d<strong>es</strong><strong>es</strong>carchey se d<strong>es</strong>activará la salida<br />
(OFF: compr<strong>es</strong>or)<br />
Tipo <strong>de</strong> mensaje durante el d<strong>es</strong><strong>es</strong>carche<br />
0=El controlador mostrará la temperatura real<br />
1=El controlador mostrará la temperatura inicio d<strong>es</strong><strong>es</strong>carche<br />
2=El controlador mostrará el mensaje dF<br />
Tiempo máx. añadido <strong>de</strong> mensaje d<strong>es</strong>pués <strong>de</strong>l d<strong>es</strong><strong>es</strong>carche<br />
Al finalizar <strong>es</strong>te retardo el controlador volverá a la situación <strong>de</strong> indicación <strong>de</strong> temperatura.<br />
Tipo <strong>de</strong> funcionamiento (frio/calor)<br />
Selección <strong>de</strong>l funcionamiento <strong>de</strong>l termostato para aplica-cion<strong>es</strong> <strong>de</strong>l frio o <strong>de</strong>l calor<br />
Selección 0=Frio<br />
Diferencial por encima <strong>de</strong>l PUNTO DE AJUSTE (Set point)<br />
Selección 1=Calor<br />
Diferencial por <strong>de</strong>bajo <strong>de</strong>l PUNTO DE AJUSTE (Set point)<br />
Retardo <strong>de</strong> todas las funcion<strong>es</strong><br />
Retardo <strong>de</strong> todas las funcion<strong>es</strong> cuando el aparato recibe alimentación eléctrica.<br />
Bloqueo <strong>de</strong> parámetros programados<br />
1=sí, opción que bloquea la posibilidad <strong>de</strong> modificación <strong>de</strong> los parámetros que se hayan<br />
programado.<br />
0=no, opción que d<strong>es</strong>bloquea la anterior.<br />
Volver a los parámetros inicial<strong>es</strong><br />
1=sí, configura todos los parámetros <strong>de</strong>l equipo con los<br />
valor<strong>es</strong> <strong>de</strong> la columna DEF <strong>de</strong> <strong>es</strong>tas instruccion<strong>es</strong> y sale inmediatamente <strong>de</strong> programación.<br />
Salida <strong>de</strong> programación<br />
0<br />
0 min. 99 min. 5 min.<br />
0 h 99 h 1 h<br />
0 min. 99 min. 0 min.<br />
0 min 99 min 5 min<br />
0 1 0<br />
0=no. 1=si 0=no<br />
—<br />
1 0<br />
0 min. 99 min. 10 min.<br />
0 2 2<br />
0 min. 99 min 0 min<br />
1 —<br />
DESCRIPTION OF THE PARAMETERS:<br />
See TEMPERATURE ADJUSTMENT (Set Point) for programming it.<br />
The valu<strong>es</strong> of the DEF column are factory-set.<br />
PARAMETER<br />
C0<br />
C1<br />
C2<br />
C3<br />
C7<br />
C8<br />
d0<br />
d1<br />
d2<br />
d3<br />
P0<br />
P1<br />
P2<br />
P3<br />
EP<br />
DESCRIPTION<br />
Probe calibration (Offset)<br />
Temperature Increase / Decrease ad<strong>de</strong>d to the temperature <strong>de</strong>tected by the thermostat to adjust<br />
the probe to the real value.<br />
Differential (Hyster<strong>es</strong>is)<br />
Temperature increase above or below the temperature indicated by the SET POINT for operation<br />
relay.<br />
Maximum SET POINT limiter<br />
The SET POINT cannot be set above this value, with the AH temperature alarm activated if the<br />
temperature is above C2.<br />
Minimum SET POINT limiter<br />
The SET POINT cannot be set below this value, with the AL temperature alarm activated if the<br />
temperature is below C3.<br />
C4 Type of <strong>de</strong>lay for compr<strong>es</strong>sor protection<br />
0=(off/on): Delays relay connection as of last <strong>de</strong>activation.<br />
1=(on): Delays relay connection once the temperature has it activated.<br />
C5 Protection <strong>de</strong>lay time<br />
Number value of the option selected in parameter C4<br />
C6 Relay status in case of probe failure<br />
Selection 0<br />
Sequence ON/OFF equal to the mean of tim<strong>es</strong> of the last 24 hours. It carri<strong>es</strong> out <strong>de</strong>frosts, observing<br />
the programmed time.<br />
Selection 1<br />
Operating sequence (OFF/ON) as programmed in C7 and C8.<br />
Time relay is ON in case of probe failure<br />
Period for which the controller relay stays ON, (e.g. compr<strong>es</strong>sor on).<br />
With C7=0 and C8≠0 programmed, the relay will always be OFF.<br />
Time relay is OFF in case of probe failure<br />
Period for which the controller relay stays OFF (e.g. compr<strong>es</strong>sor off).<br />
With C8=0 and C7≠0 programmed, the relay will always be ON.<br />
Defrost frequency (in cold operation)<br />
Time elapsed between 2 <strong>de</strong>frost starts-ups.<br />
Defrost duration (in cold operation)<br />
During this time the <strong>de</strong>frost indicator LED will come on and the relay output will be off<br />
(OFF: compr<strong>es</strong>sor)<br />
Type of m<strong>es</strong>sage during <strong>de</strong>frost<br />
0=The controller will display the real temperature<br />
1=The controller will display the <strong>de</strong>frost start temperature<br />
2=The controller will display the dF m<strong>es</strong>sage<br />
Maximum ad<strong>de</strong>d m<strong>es</strong>sage time after <strong>de</strong>frost<br />
Once this <strong>de</strong>lay is over the controller will revert to temperature indication status.<br />
Type of operation (cold/heat)<br />
Selects thermostat operation for cold or heat applications<br />
Selection 0=Cold<br />
Differential above the SET POINT<br />
Selection 1=Heat<br />
Differential below the SET POINT<br />
Delay all functions<br />
Delays all functions when the apparatus is powered up.<br />
Block programmed parameters<br />
1=y<strong>es</strong>, option that blocks the possibility of modifying the programmed parameters.<br />
0=no, option to unblock the previous one.<br />
Revert to initial parameters<br />
1=y<strong>es</strong>, configur<strong>es</strong> all the parameters of the unit with the valu<strong>es</strong> of the DEF column of th<strong>es</strong>e<br />
instructions and exit from programming.<br />
Exit programming<br />
RANGE VALUE<br />
MIN.<br />
–20ºC<br />
MAX.<br />
+20ºC<br />
DEF.<br />
0ºC<br />
1ºC 20ºC 2ºC<br />
xxºC 99ºC 99ºC<br />
-50ºC xxºC -50ºC<br />
0 1 0<br />
0 min. 99 min. 0 min.<br />
0 1 0<br />
0 min. 99 min. 10 min.<br />
0 min. 99 min. 5 min.<br />
0 h 99 h 1 h<br />
0 min. 99 min. 0min.<br />
0 2 2<br />
0 min. 99 min. 5 min.<br />
0 1 0<br />
0 min. 99 min. 0 min.<br />
0=no. 1=y<strong>es</strong> 0=no<br />
– 1 –<br />
NOTA: Cuando se modifican los parámetros <strong>de</strong> tiempo, los nuevos valor<strong>es</strong>, los aplicará una vez finalizado el ciclo que <strong>es</strong>taba<br />
realizando. Para que lo haga inmediatamente, d<strong>es</strong>conectar y volver a conectar el controlador. Los tiempos programados<br />
funcionarán correctamente al cabo <strong>de</strong> 1 minuto como máximo <strong>de</strong> haber conectado el controlador.<br />
MENSAJES DE FUNCIONAMIENTO<br />
VISUALIZACIÓN<br />
dF<br />
AL<br />
AH<br />
E1<br />
EE<br />
MANTENIMIENTO<br />
D<strong>es</strong><strong>es</strong>carche activado.<br />
Temperatura por <strong>de</strong>bajo <strong>de</strong>l limitador mínimo <strong>de</strong>l Punto <strong>de</strong> Ajuste (C3)<br />
Temperatura por encima <strong>de</strong>l limitador máximo <strong>de</strong>l Punto <strong>de</strong> Ajuste (C2) o bien entre 99ºC< temp. 110ºC ó