Ford Explorer 2011-up (Without Ford MyTouch) 99-5828CH - Autotoys
Ford Explorer 2011-up (Without Ford MyTouch) 99-5828CH - Autotoys
Ford Explorer 2011-up (Without Ford MyTouch) 99-5828CH - Autotoys

Create successful ePaper yourself
Turn your PDF publications into a flip-book with our unique Google optimized e-Paper software.
INSTALLATION INSTRUCTIONS FOR PART <strong>99</strong>-<strong>5828CH</strong><br />
APPLICATIONS<br />
<strong>Ford</strong> <strong>Explorer</strong> <strong>2011</strong>-<strong>up</strong> (<strong>Without</strong> <strong>Ford</strong> <strong>MyTouch</strong>)<br />
<strong>99</strong>-<strong>5828CH</strong><br />
KIT FEATURES<br />
• ISO DIN head unit provision with pocket<br />
• DDIN head unit provision<br />
• Painted Charcoal Grey<br />
Table of Contents<br />
Dash Disassembly<br />
– <strong>Ford</strong> <strong>Explorer</strong> <strong>2011</strong>-<strong>up</strong> ......................................... 2<br />
Kit Assembly<br />
– ISO DIN head unit provision with pocket ............... 3<br />
– DDIN head unit provision ...................................... 3<br />
– Rear A/C controls & LCD color adjustment ............ 4<br />
REV. 2/12/2013 INST<strong>99</strong>-<strong>5828CH</strong><br />
KIT COMPONENTS<br />
• A) Radio Trim panel • B) Radio Brackets • C) Pocket • D) (4) #8 x 3/8” Phillips screws for pocket<br />
• E) (2) #4 x 1/2” Phillips screws for A/C Vent to Housing • F) (4) #8 x 3/8” Phillips screws for OE Display to<br />
Housing • G) (2) <strong>Ford</strong> Panel Clips<br />
A B C D E<br />
F<br />
G<br />
WIRING & ANTENNA CONNECTIONS (sold separately)<br />
Wiring Harness: • AX-ADBOX1 Interface<br />
• AX-ADBOX2 Interface • AX-ADFD02 Harness<br />
Antenna Adapter: • 40-EU10 Multi-App Antenna Adapter<br />
TOOLS REQUIRED<br />
• Panel removal tool • Phillips screwdriver<br />
• Socket Wrench • Torx screwdrivers<br />
CAUTION: Metra recommends disconnecting the<br />
negative battery terminal before beginning any<br />
installation. All accessories, switches, and especially<br />
air bag indicator lights must be plugged in before<br />
reconnecting the battery or cycling the ignition.<br />
NOTE: Refer to the instructions included with the<br />
aftermarket radio.<br />
METRA. The World’s best kits. <br />
1-800-221-0932 metraonline.com © COPYRIGHT 2004-<strong>2011</strong> METRA ELECTRONICS CORPORATION
<strong>99</strong>-<strong>5828CH</strong><br />
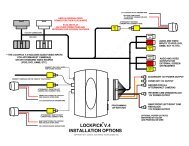
Dash Disassembly<br />
1. Unclip and remove the (2) trim<br />
panels from the left and right side<br />
of the factory radio. (Figure A)<br />
2. Remove (4) 9/32” screws securing<br />
the radio/climate control panel to<br />
the dash. (Figure B)<br />
3. Unclip and remove the factory<br />
radio/climate control panel.<br />
(Figure C)<br />
4. Remove (4) 9/32” screws securing<br />
the radio chassis. (Figure D)<br />
(Figure B)<br />
5. Remove (2) Torx screws from the<br />
a/c vents then unclip and remove<br />
the vents from the radio panel.<br />
(Figure E)<br />
6. Remove (4) 9/32” screws securing<br />
the display in the sub-dash.<br />
(Figure F)<br />
7. Remove (4) 9/32” screws securing<br />
the display to the display brackets<br />
and keep display for kit assembly.<br />
(Figure G)<br />
Continue to kit assembly<br />
(Figure E)<br />
(Figure F)<br />
(Figure A) (Figure C) (Figure D)<br />
(Figure G)<br />
2
<strong>99</strong>-<strong>5828CH</strong><br />
Kit Assembly<br />
ISO DIN head unit provisions<br />
1. Twist the provided clips to the round posts<br />
on either side of the hazard assembly on<br />
the back of the radio trim panel.<br />
2. Attach the a/c vents to the radio trim<br />
panel using the s<strong>up</strong>plied (2) #4 x 1/2”<br />
Phillips screws.<br />
3. Attach the factory display to the radio<br />
trim panel using the s<strong>up</strong>plied<br />
(4) #8 x 3/8” Phillips screws.<br />
4. Mount the pocket to the radio brackets<br />
with the (4) #8 x 3/8” Phillips pan head<br />
screws s<strong>up</strong>plied. (Figure A)<br />
5. Slide the radio into radio brackets and<br />
secure with the screws s<strong>up</strong>plied with<br />
the radio. (Figure B)<br />
6. Locate the factory wiring harness in<br />
the dash. Metra recommends using<br />
the proper mating adapter from Metra<br />
or AXXESS. Re-connect the negative<br />
battery terminal and test the unit for<br />
proper operation.<br />
7. Mount the new radio assembly into the<br />
dash, snap-in the radio trim panel, and<br />
reassemble dash in reverse order<br />
of disassembly.<br />
Double DIN head unit provisions<br />
1. Twist the provided clips to the round posts<br />
on either side of the hazard assembly on<br />
the back of the radio trim panel.<br />
2. Attach the a/c vents to the radio trim<br />
panel using the s<strong>up</strong>plied (2) #4 x 1/2”<br />
Phillips screws.<br />
3. Attach the factory display to the radio<br />
trim panel using the s<strong>up</strong>plied<br />
(4) #8 x 3/8” Phillips screws.<br />
(Figure A)<br />
4. Mount the DDIN radio to the radio<br />
(Figure A)<br />
brackets using the screws s<strong>up</strong>plied<br />
with the radio. (Figure A)<br />
5. Locate the factory wiring harness in<br />
the dash. Metra recommends using<br />
the proper mating adapter from Metra<br />
or AXXESS. Re-connect the negative<br />
battery terminal and test the unit for<br />
proper operation.<br />
6. Mount the new radio assembly into the<br />
(Figure B)<br />
dash, snap-in the radio trim panel, and<br />
reassemble dash in reverse order of<br />
disassembly.<br />
Continued on back<br />
3
INSTALLATION INSTRUCTIONS FOR PART <strong>99</strong>-<strong>5828CH</strong><br />
Controlling the Rear Air Conditioning:<br />
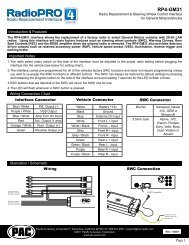
Color Adjustment:<br />
REV. 2/12/2013 INST<strong>99</strong>-<strong>5828CH</strong><br />
1. To turn on the rear a/c press the<br />
REAR power button. The LED will<br />
begin to blink.<br />
2. While the LED is blinking you<br />
can adjust the fan speed and<br />
temperature of the rear a/c with the<br />
buttons on the control panel.<br />
3. If no buttons are pressed in<br />
5-seconds the LED will go solid<br />
and the controls will go back to<br />
controlling the front a/c.<br />
4. To give the rear passengers control in<br />
the rear press the REAR CTRL button<br />
once.<br />
5. Press the REAR CTRL button again to<br />
stop rear control.<br />
6. At anytime you can press the REAR<br />
power button and it will blink and the<br />
control panel will control the rear fan<br />
speed and temperature.<br />
7. To turn off the rear a/c off press the<br />
REAR power button twice.<br />
1. Press and hold the bottom left hot<br />
key for 5-seconds until the a/c icon<br />
begins to blink.<br />
2. Press and hold the MAX button to<br />
increase Red.<br />
3. Press and hold the A/C button to<br />
decrease Red.<br />
4. Press and hold the Recirculation<br />
button to increase Green.<br />
5. Press and hold the Mode button<br />
to decrease Green.<br />
6. Press and hold the Rear Defrost<br />
button to increase Blue.<br />
7. Press and hold the Front Defrost<br />
button to decrease Blue.<br />
8. After you choose your color stop<br />
pressing the buttons and after<br />
10-seconds the color chosen will<br />
stay and the display will<br />
stop blinking.<br />
Red<br />
Green<br />
Blue<br />
-<br />
+<br />
Press and hold 5-seconds to<br />
enter LCD color change mode<br />
KNOWLEDGE IS POWER<br />
Enhance your installation and fabrication skills by<br />
enrolling in the most recognized and respected<br />
mobile electronics school in our industry.<br />
Log onto www.installerinstitute.com or call<br />
800-354-6782 for more information and take steps<br />
toward a better tomorrow.<br />
Metra recommends MECP<br />
certified technicians<br />
METRA. The World’s best kits. <br />
1-800-221-0932 metraonline.com © COPYRIGHT 2004-<strong>2011</strong> METRA ELECTRONICS CORPORATION
INSTRUCCIONES DE INSTALACIÓN PARA LA PIEZA <strong>99</strong>-<strong>5828CH</strong><br />
cArActerísticAs del kit<br />
• Provisión de unidad central ISO DIN con cavidad<br />
• Provisión de unidad central DDIN<br />
• Pintura gris oscuro<br />
AplicAciones<br />
<strong>Ford</strong> <strong>Explorer</strong> <strong>2011</strong>y mas (sin <strong>Ford</strong> <strong>MyTouch</strong>)<br />
<strong>99</strong>-<strong>5828CH</strong><br />
Indice<br />
Desmontaje del tablero<br />
– <strong>Ford</strong> <strong>Explorer</strong> <strong>2011</strong> y mas .................................... 2<br />
Ensamble del kit<br />
– Provisión de unidad central ISO DIN con cavidad .... 3<br />
– Provisión de unidad central DDIN ........................... 3<br />
REV. 2/13/2013 INST<strong>99</strong>-<strong>5828CH</strong><br />
componentes del kit<br />
• A) Panel de moldura para radio • B) Soportes para radio • C) Cavidad • D) (4) tornillos Phillips #8 x 3/8” para<br />
la cavidad • E) (2) tornillos Phillips #4 x 1/2” para rejillas de aire acondicionado a la carcasa • F) (4) tornillos<br />
Phillips #8 x 3/8” para pantalla de equipo original a la carcasa • G) (2) ganchos para panel <strong>Ford</strong><br />
A B C D E<br />
cABleAdo Y coneXiones de AntenA (se venden por separado)<br />
Arnés de cableado: • Interfase AX-ADBOX1 • Interfase AX-ADBOX2 • Arnés AX-ADFD02<br />
Adaptador de antena: • Adaptador de antena 40-EU10 de aplicaciones múltiples<br />
F<br />
G<br />
HerrAmientAs requeridAs<br />
• Herramienta para quitar paneles • Destornillador<br />
Phillips • Llave para dados • Destornilladores Torx<br />
PRECAUCIÓN: Metra recomienda desconectar el terminal<br />
negativo de la batería antes de comenzar cualquier<br />
instalación. Todos los accesorios, interr<strong>up</strong>tores y,<br />
especialmente, las luces indicadoras de airbag deben<br />
estar enchufados antes de volver a conectar la batería o<br />
comenzar el ciclo de ignición.<br />
Nota: Remítase a las instrucciones incluidas con el radio<br />
de posventa.<br />
METRA. The World’s best kits. <br />
1-800-221-0932 metraonline.com © COPYRIGHT 2004-<strong>2011</strong> METRA ELECTRONICS CORPORATION
1. Desenganche y quite los (2) paneles de<br />
moldura del lado izquierdo y derecho<br />
del radio de fábrica. (Figura A)<br />
2. Quite los (4) tornillos de 9/32” que<br />
sujetan el radio/panel de control de<br />
clima al tablero. (Figura B)<br />
3. Desenganche y quite el panel de radio<br />
de fábrica/control del clima. (Figura C)<br />
4. Quite los (4) tornillos de 9/32” que<br />
sujetan el chasís del radio. (Figura D)<br />
(Figura B)<br />
<strong>99</strong>-<strong>5828CH</strong><br />
Desmontaje del tablero<br />
5. Quite los (2) tornillos Torx de las<br />
rejillas del aire acondicionado y luego<br />
desenganche y retire las rejillas del<br />
panel del radio. (Figura D)<br />
6. Quite los (4) tornillos de 9/32” que<br />
sujetan la pantalla de fábrica.<br />
(Figura D)<br />
7. Quite los (4) tornillos de 9/32” que<br />
sujetan la pantalla a los soportes de<br />
la pantalla y conserve la pantalla para<br />
el ensamble del kit. (Figura D)<br />
Continuará la ensamble del kit<br />
(Figura E)<br />
(Figura F)<br />
(Figura A)<br />
(Figura C)<br />
2<br />
(Figura D) (Figura G)
<strong>99</strong>-<strong>5828CH</strong><br />
Ensamble del kit<br />
Provisiones de unidad central ISO DIN<br />
Provisiones de unidad central DDIN<br />
1. Una los ganchos proporcionados al panel de la<br />
moldura del radio.<br />
2. Una las rejillas del aire acondicionado al panel<br />
de la moldura del radio con los (2) tornillos<br />
Phillips suministrados #4 x 1/2”.<br />
3. Una la pantalla de fábrica al panel de la<br />
moldura del radio con los (4) tornillos Phillips<br />
suministrados #8 x 3/8”.<br />
4. Monte la cavidad en los soportes del radio con<br />
los (4) tornillos Phillips de cabeza troncocónica<br />
#8 de 3/8” suministrados. (Figura A)<br />
5. Deslice la unidad central en los soportes del<br />
radio y sujétela con los tornillos suministrados<br />
con la unidad. (Figura B)<br />
6. Localice el arnés de cables de fábrica en<br />
el tablero. Metra recomienda el uso de un<br />
adaptador adecuado de acoplamiento de Metra<br />
o de AXXESS. Vuelva a conectar la terminal<br />
negativa de la batería y pruebe la unidad para<br />
verificar que funcione correctamente.<br />
7 . Monte el conjunto del radio en el tablero,<br />
coloque a presión el panel de la moldura del<br />
radio y vuelva a armar el tablero al revés de<br />
como lo desarmó.<br />
(Figura A)<br />
(Figura B)<br />
1. Una los ganchos proporcionados al panel de<br />
la moldura del radio.<br />
2. Una las rejillas del aire acondicionado al<br />
panel de la moldura del radio con los (2)<br />
tornillos Phillips suministrados #4 x 1/2”.<br />
3. Una la pantalla de fábrica al panel de la<br />
moldura del radio con los (4) tornillos Phillips<br />
suministrados #8 x 3/8”.<br />
4. Monte el radio DDIN en los soportes de radio<br />
con los tornillos que vienen con el radio.<br />
(Figura A)<br />
5. Localice el arnés de cables de fábrica en<br />
el tablero. Metra recomienda el uso de un<br />
adaptador adecuado de acoplamiento de<br />
Metra o de AXXESS. Vuelva a conectar la<br />
terminal negativa de la batería y pruebe<br />
la unidad para verificar que funcione<br />
correctamente.<br />
6. Monte el conjunto del radio en el tablero,<br />
coloque a presión el panel de la moldura del<br />
radio y vuelva a armar el tablero al revés de<br />
como lo desarmó.<br />
(Figura A)<br />
3
INSTRUCCIONES DE INSTALACIÓN PARA LA PIEZA <strong>99</strong>-<strong>5828CH</strong><br />
Control del aire acondicionado trasero:<br />
Ajuste de color:<br />
REV. 2/13/2013 INST<strong>99</strong>-<strong>5828CH</strong><br />
1. Para encender el aire acondicionado trasero,<br />
presione el botón de encendido REAR (sección<br />
trasera). El foco LED empezará a parpadear.<br />
2. Mientras el foco LED esté parpadeando,<br />
puede ajustar la velocidad del ventilador y la<br />
temperatura del aire acondicionado trasero con<br />
los botones del panel de control.<br />
3. Si no se presiona ningún botón en 5 segundos,<br />
el LED se quedará encendido sin parpadear<br />
y los controles volverán a controlar el aire<br />
acondicionado delantero.<br />
4. Para dar el control a los pasajeros de los<br />
asientos traseros, presione el botón REAR CTRL<br />
una vez.<br />
5. Presione el botón REAR CTRL otra vez para<br />
detener el control trasero.<br />
6. En cualquier momento puede presionar el botón<br />
de encendido trasero (REAR) y parpadeará y<br />
el panel de control controlará la velocidad y la<br />
temperatura del ventilador trasero.<br />
7. Para apagar el aire acondicionado trasero,<br />
presione el botón de encendido REAR (sección<br />
trasera) dos veces.<br />
1. Presione y mantenga la parte inferior<br />
izquierda tecla de acceso rápido para el<br />
5-segundos hasta que el icono a/c<br />
comienza a parpadear.<br />
2. Presione y mantenga presionado el botón<br />
MAX para aumentar el rojo.<br />
3. Presione y mantenga presionado el botón<br />
del aire acondicionado para disminuir el rojo.<br />
4. Presione y mantenga presionado el botón de<br />
recirculación para aumentar el verde.<br />
5. Presione y mantenga presionado el botón de<br />
modo para disminuir el verde.<br />
6. Presione y mantenga presionado el botón de<br />
descongelador trasero para aumentar<br />
el azul.<br />
7. Presione y mantenga presionado el botón de<br />
descongelador delantero para disminuir<br />
el azul.<br />
8. Después de elegir el color deseado, deje<br />
de presionar los botones y después de 5<br />
segundos, el color seleccionado se quedará<br />
y la pantalla dejará de parpadear.<br />
Rojo<br />
Verde<br />
Azul<br />
-<br />
+<br />
Mantenga pulsado 5-segundos para<br />
entrar en modo de cambio de color LCD.<br />
KNOWLEDGE EL CONOCIMIENTO IS POWER<br />
ES PODER<br />
Enhance Mejore sus your habilidades installation de and instalación fabrication y fabricación skills by<br />
enrolling inscribiéndose the en most la escuela recognized de dispositivos and respected electrónicos<br />
mobile móviles electronics más reconocida school y respetada in our industry. de nuestra industria.<br />
Log<br />
Regístrese<br />
onto www.installerinstitute.com<br />
en www.installerinstitute.com<br />
or call<br />
o llame al<br />
800-354-6782 for more information and take steps<br />
800-354-6782 para obtener más información y avance<br />
toward a better tomorrow.<br />
hacia un futuro mejor.<br />
Metra recomienda técnicos<br />
con certificación del Programa<br />
de Certificación en Electrónica<br />
Móvil (Mobile Electronics<br />
Certification Program, MECP).<br />
METRA. The World’s best kits. <br />
1-800-221-0932 metraonline.com © COPYRIGHT 2004-<strong>2011</strong> METRA ELECTRONICS CORPORATION