You also want an ePaper? Increase the reach of your titles
YUMPU automatically turns print PDFs into web optimized ePapers that Google loves.
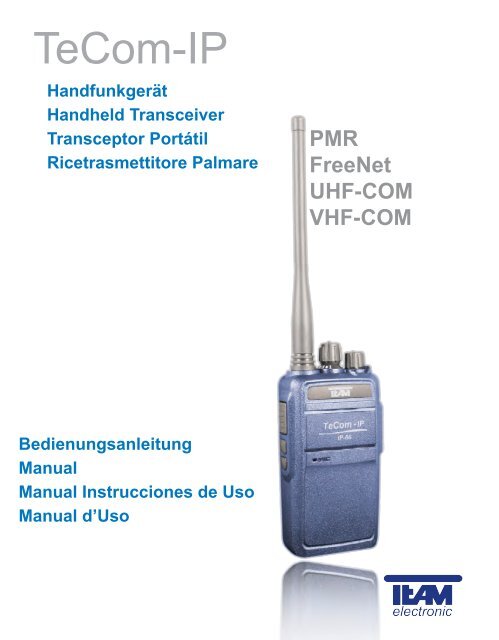
<strong>TeCom</strong>-<strong>IP</strong><br />
Handfunkgerät<br />
Handheld Transceiver<br />
Transceptor Portátil<br />
Ricetrasmettitore Palmare<br />
PMR<br />
FreeNet<br />
UHF-COM<br />
VHF-COM<br />
Bedienungsanleitung<br />
Manual<br />
Manual Instrucciones de Uso<br />
Manual d’Uso
Sehr geehrte Kundin, sehr geehrter Kunde,<br />
es freut uns, dass Sie sich für den Kauf eines TEAM <strong>TeCom</strong>-<strong>IP</strong> entschieden<br />
haben. Um einen einwandfreien Betrieb zu gewährleisten und um die verfügbaren<br />
Funktionen im vollen Umfang nutzen zu können, bitten wir Sie die nachfolgende<br />
Bedienungsanleitung vor Inbetriebnahme des Gerätes gründlich zu lesen.<br />
Das <strong>TeCom</strong>-<strong>IP</strong> ist in den folgenden vier Versionen erhältlich.<br />
<strong>TeCom</strong>-<strong>IP</strong> Freenet - Art-Nr. PR8086<br />
Das FreeNet-Funkgerät darf jeder anmelde- und gebührenfrei in den Ländern<br />
gemäß der beiliegenden Konformitätserklärung betreiben. Es sind die sechs<br />
FreeNet-Kanäle auf 149 MHz mit der maximal zulässigen Ausgangsleistung von<br />
500 mW programmiert. Eine Veränderung der programmierten Frequenzen, der<br />
Sendeleistung oder der Bandbreite des Geräts ist nicht zulässig und führt zum<br />
Erlöschen der Betriebsgenehmigung.<br />
<strong>TeCom</strong>-<strong>IP</strong> PMR - Art-Nr. PR8084<br />
Das PMR-Funkgerät darf jeder anmelde- und gebührenfrei in den Ländern<br />
gemäß der beiliegenden Konformitätserklärung betreiben. Es sind die acht PMR-<br />
Kanäle auf 446 MHz mit der maximal zulässigen Ausgangsleistung von 500 mW<br />
programmiert. Eine Veränderung der programmierten Frequenzen, der Sendeleistung<br />
oder der Bandbreite des Geräts ist nicht zulässig und führt zum Erlöschen<br />
der Betriebsgenehmigung.<br />
<strong>TeCom</strong>-<strong>IP</strong> (VHF-COM) - Art.-Nr. PR8087<br />
Das Betriebsfunkgerät ist genehmigungs- und gebührenpflichtig und darf nur in<br />
den Ländern gemäß der beiliegenden Konformitätserklärung betrieben werden.<br />
Es dürfen nur behördlich genehmigte Funkfrequenzen zwischen 146-174 MHz,<br />
Sendeleistungen und Bandbreiten programmiert werden. Die Programmierung<br />
darf nur von einem autorisierten Fachhändler durchgeführt werden.<br />
<strong>TeCom</strong>-<strong>IP</strong> (UHF-COM) - Art.-Nr. PR8085<br />
Das Betriebsfunkgerät ist genehmigungs- und gebührenpflichtig und darf nur in<br />
den Ländern gemäß der beiliegenden Konformitätserklärung betrieben werden.<br />
Es dürfen nur behördlich genehmigte Funkfrequenzen zwischen 410-470 MHz,<br />
Sendeleistungen und Bandbreiten programmiert werden. Die Programmierung<br />
darf nur von einem autorisierten Fachhändler durchgeführt werden.<br />
Für die Programmierung des <strong>TeCom</strong>-<strong>IP</strong> benötigen Sie die optional erhältliche<br />
Software T-UP24 (CD-ROM ab Windows XP und USB-Datenüberspielkabel), erhältlich<br />
in den Versionen PMR-FN und COM.<br />
Inhaltsverzeichnis<br />
ALLGEMEIN 4<br />
Vor Inbetriebnahme 4<br />
Lieferumfang 4<br />
Pflege 4<br />
<strong>IP</strong>66 4<br />
Gerätebeschreibung 5<br />
GRUNDFUNKTIONEN 6<br />
Anschluss der Antenne 6<br />
Akkupack 6<br />
Laden des Akkupacks 6<br />
Ein- und Ausschalten 6<br />
Einstellen der Lautstärke 6<br />
Kanalwahl 7<br />
Senden 7<br />
Empfang 7<br />
TASTENFUNKTIONEN<br />
PTT Sendetaste 8<br />
Multifunktionstasten 1 & 2 8<br />
WEITERE FUNKTIONEN<br />
Suchlauf 9<br />
VOX 9<br />
CTCSS/DCS 9<br />
Rauschsperre 9<br />
Warnton 10<br />
Sprachansage 10<br />
Scrambler 10<br />
Compander 10<br />
Epilogue 10<br />
Purge Voice 10<br />
Sendesperre 10<br />
Sendezeitbegrenzung 11<br />
Batteriesparfunktion 11<br />
Incept Alarm 11<br />
Bandbreite 11<br />
UKW Radio 11<br />
ANSCHLUSS 11<br />
CTCSS / DCS 42<br />
TECHNISCHE DATEN 43<br />
Seite
ALLGEMEIN<br />
Gerätebeschreibung<br />
1<br />
Vor Inbetriebnahme<br />
Bitte überprüfen Sie die Ware sofort beim Empfang auf Vollständigkeit gemäß der<br />
folgenden Liste. Informieren Sie Ihren Händler sofort bei Unvollständigkeit.<br />
Lieferumfang<br />
1 x <strong>TeCom</strong>-<strong>IP</strong> inkl. Antenne 1 x Ladegerät 1 x Gürtelclip<br />
1 x Akkupack (1800 mAh/7,4V) 1 x Bedienungsanleitung<br />
Pflege<br />
Bitte beachten Sie die folgenden Hinweise um die optimale Lebensdauer und Funktionstüchtigkeit<br />
Ihres Gerätes zu gewährleisten.<br />
w Öffnen Sie nicht das Gehäuse. Unsachgemäßes Öffnen kann Schaden zur Folge<br />
haben. Des weiteren verlieren Sie jegliche Gewährleistungsansprüche.<br />
w Verwenden Sie zum Laden des Akkupacks nur das im Lieferumfang enthaltene<br />
Ladegerät.<br />
w Bewahren Sie das Gerät niemals an Plätzen auf die dem direkten Sonnenlicht<br />
oder anderen Hitzequellen ausgesetzt sind. Hohe Temperaturen können die Lebensdauer<br />
bestimmter elektronischer Bauteile beeinträchtigen und Plastikteile<br />
können schmelzen.<br />
w Bitte bewahren Sie das Gerät nicht in staubigen oder verschmutzen Räumen auf.<br />
w Sollte das Gerät ungewöhnlich heiß werden, ungewöhnliche Gerüche abgeben<br />
oder es zu einer Rauchentwicklung kommen, schalten Sie bitte das Gerät sofort<br />
ab und entnehmen den Akkupack. Kontaktieren Sie bitte sofort Ihren Händler.<br />
w Senden Sie niemals ohne Antenne. Eine Beschädigung der Endstufe wäre die Folge.<br />
w Damit keine Feuchtigkeit eindringt, prüfen und reinigen Sie die Gummidichtung auf der<br />
Innenseite des Akkupacks. Prüfen Sie auch, ob der Akku-Verschluß fest schließt.<br />
1 - Antenne<br />
2 - Lautsprecher<br />
3 - Mikrofon<br />
4 - Kanalwahldrehschalter<br />
5 - Ein/Aus - Lautstärkeregler<br />
6 - LED<br />
7 - PTT Sendetaste<br />
8 - Funktionstasten (Monitor, Alarm,<br />
Sendeleistungsumschaltung)<br />
9 - Akkupack Verschluss<br />
10 - Anschluss für Ohrhörer-Mikrofon<br />
und Programmierkabel<br />
3,5 / 2,5 mm<br />
11 - Polymer Li-Ion Akkupack<br />
1800 mAh / 7,4 V<br />
12 - Gürtelclip<br />
10<br />
7<br />
8<br />
3<br />
2<br />
4<br />
5<br />
6<br />
2<br />
10<br />
<strong>IP</strong> 66<br />
Das <strong>TeCom</strong>-<strong>IP</strong> ist spritzwasser- und staubgeschützt nach dem ICE Standard <strong>IP</strong>66.<br />
Die <strong>IP</strong>66 Schutzklasse berücksichtigt keine Alterung des Geräts und kann deshalb<br />
nicht über die gesamte Lebensdauer des Geräts gewährleistet werden.<br />
Bitte beachten Sie folgende Hinweise wenn Ihr <strong>TeCom</strong>-<strong>IP</strong> nass geworden sein sollte:<br />
1. Schalten Sie das Radio aus.<br />
2. Entfernen Sie den Akkupack.<br />
3. Trocknen Sie den Akkupack, das Gehäuse, sowie das Batteriefach mit einem<br />
trockenem, staubfreien Tuch.<br />
4. Lassen Sie das Radio für einige Zeit im trockenem Raum liegen bevor Sie den<br />
Akkupack wieder montieren und das Gerät einschalten.<br />
4 5<br />
12<br />
9<br />
7<br />
8<br />
10<br />
11
GRUNDFUNKTIONEN<br />
Anschluss der Antenne<br />
Hinweis: in der PMR Version <strong>TeCom</strong>-<strong>IP</strong> PMR ist die Antenne gemäß gesetzlicher Vorgaben<br />
fest mit dem Gerät verbunden. In der Variante <strong>TeCom</strong>-<strong>IP</strong> COM ist die Antenne<br />
abnehmbar.<br />
Den Antennenfuß gerade auf das Gewinde setzen und im Uhrzeigersinn festdrehen.<br />
Beim Lösen der Antenne bitte darauf achten, die Antenne am Fuß, und nicht an der<br />
Spitze, zu drehen.<br />
Akkupack<br />
Um den Akkupack (11) an das Gerät zu montieren, fügen Sie die Führungsnasen am<br />
oberen Teil des Akkupacks in die entsprechenden Führungslöcher am Gerät ein.<br />
Drücken Sie den Akkupack am unteren Ende fest gegen das Gerät. Legen Sie die<br />
Akku-Arretierung (9) gegen den Akkupack und drücken Sie diesen gegen das Gerät<br />
bis der Verschluß einrastet.<br />
Zum Entfernen des Akkupack, öffnen Sie den Verschluss (9) (zwischen den Batteriekontakten,<br />
beschriften mit OPEN) mit dem Zeigefinger.<br />
Hinweis: Achten Sie darauf, die im Akkupack hellblau gekennzeichnete Gummidichtung<br />
nicht zu beschädigen.<br />
Kanalwahl<br />
Für die Kanalwahl steht der Kanalwahldrehschalter (4) zur Verfügung.<br />
Senden<br />
Zum Senden halten Sie bitte die Sendetaste (7) bis kurz nach Beendigung Ihrer<br />
Nachricht gedrückt. Für eine optimale Signalübertragung sprechen Sie bitte mit mittellauter<br />
Stimme in einem Abstand von ca. 10 cm zum Mikrofon (3).<br />
Während des Sendevorgangs leuchtet die Kontroll-LED (6) rot auf. Nach dem Loslassen<br />
der Sendetaste kehrt das Gerät automatisch wieder in den Empfangsmodus zurück.<br />
Empfang<br />
Beim Empfang eines Signales leuchtet die Kontroll-LED (6) grün.<br />
Wenn die Frequenz mit einer CTCSS- / DQT-Kodierung belegt ist, werden alle Signale<br />
die nicht mit derselben Kodierung versehen sind, stummgeschaltet. D.h. die<br />
grüne Kontroll-LED leuchtet, jedoch ist kein Signal im Lautsprecher hörbar.<br />
Laden des Akkupacks<br />
Vor dem ersten Betrieb sollte der Akkupack komplett geladen werden. Die durchschnittliche<br />
Ladedauer beträgt etwa 6 Stunden.<br />
Verbinden Sie das Kabel des Netzadapters mit der Ladeschale und stecken dann den<br />
Netzadapter in eine 220 V Steckdose. In Betriebsbereitschaft leuchtet die LED grün.<br />
Stellen Sie das Gerät in die Ladeschale und achten Sie auf die richtige Platzierung.<br />
Während des Ladevorgangs leuchtet die LED rot. Ist der Ladevorgang abgeschlossen,<br />
schaltet die LED auf grün um. Nehmen Sie das Gerät nach Ende des Ladevorgangs<br />
aus der Ladeschale.<br />
Hinweis: Überladen des Akkus verkürzt dessen Lebensdauer.<br />
Ein- und Ausschalten<br />
Um das Gerät einzuschalten, drehen Sie den Ein- / Ausschalter (5) im Uhrzeigersinn<br />
über die Sperre hinweg. Bei aktiviertem Beepton wird der Einschaltvorgang akustisch<br />
bestätigt, bei aktivierter Sprachansage in gewählter Sprache angesagt.<br />
Um das Gerät auszuschalten, drehen Sie bitte den Ein- / Ausschalter (5) gegen den<br />
Uhrzeigersinn über die Sperre hinweg.<br />
Einstellen der Lautstärke<br />
Zum Einstellen der optimalen Lautstärke, drücken Sie bitte die mit der Monitorfunktion<br />
belegten Funktionstaste (8) und stellen mit dem kombinierten Ein-/Aus-/Lautstärkeregler<br />
(5) die gewünschte Lautstärke ein.<br />
6<br />
Hinweis: Die Programmierung der Funktionstaste geschieht mit der optionalen Software<br />
T-UP24.<br />
7
TASTENFUNKTIONEN<br />
PTT Sendetaste<br />
Die Sendetaste (7) befindet sich auf der linken Geräteseite. Drücken der Sendetaste<br />
schaltet das Gerät in den Sendemodus. Während des Sendens leuchtet die LED (6)<br />
rot auf.<br />
Multifunktionstaste 1 / 2<br />
Die beiden Funktionstasten 1 und 2 (8) befindet sich unterhalb der PTT-Sendetaste<br />
(7). Sie können per Software jeweils wahlweise mit einer der folgenden Funktionen<br />
belegt werden.<br />
Aus (Off)<br />
Monitor (Monmome)<br />
Leistungsumschaltung (H/L Power)<br />
Notruf (Alarm)<br />
Aus<br />
Der Taste ist keine Funktion zugewiesen.<br />
Monitor<br />
Die Rauschsperre wird deaktiviert und das typische Rauschen des Frequenzbandes<br />
ist hörbar. Diese Funktion ermöglicht es schwache Signale hörbar zu machen, welche<br />
von der Rauschsperre ausgefiltert werden.<br />
Leistungsumschaltung<br />
Es wird zwischen der hohen (High) und niedrigen (Low) Sendeleistung umgeschaltet.<br />
In der PMR-FreeNet Version betragen die Werte High = 500 mW und Low = 300 mW.<br />
Notruf Alarm<br />
Es wird ein konstanter Notrufton am eigenen Gerät ausgesendet, der nicht auf dem<br />
eingestellten Kanal hörbar ist.<br />
Zum Ausschalten des Alarms die Funktionstaste drücken oder das Gerät ausschalten.<br />
WEITERE FUNKTIONEN<br />
Die Einstellungsänderungen der folgenden Funktionen werden via Software vorgenommen.<br />
Suchlauf<br />
Die Suchlauffunktion wird zum Auffinden von Signalen auf Frequenzen der Kanalsuchlaufliste<br />
eingesetzt. Die programmierten Kanäle können per optionaler Software<br />
der Kanalsuchlaufliste hinzugefügt werden. Die Suchlauffunktion wird via Sofware aktiviert<br />
bzw. deaktiviert.<br />
Bei aktivierter Funktion ist der Kanal 16 mit der Suchlauffunktion belegt. Dieser Kanal<br />
ist dann nicht für die Funkkommunikation verfügbar.<br />
Zum Starten des Kanalsuchlaufs, den Kanalwahldrehschalter (4) auf Kanal 16 stellen.<br />
Sobald ein Signal auf einem der Kanäle der Kanalsuchlaufliste gefunden wird, leuchtet<br />
die LED grün. Endet das Signal erlöscht die LED. 3 Sekunden nach Signalende<br />
fährt die Suchfunktion fort.<br />
Mit Verlassen des Kanals 16, wird der Kanalsuchlauf beendet.<br />
VOX<br />
Die Aktivierung und Einstellung der VOX Funktion wird via Software vorgenommen.<br />
Bei aktiver VOX Funktion schaltet das Gerät automatisch in den Sendebetrieb, sobald<br />
das Sprachsignal einen gewissen Pegel erreicht hat. Die VOX-Empfindlichkeit kann<br />
auf einer Skala von 1-9 via Software den individuellen Bedürfnissen angepasst werden.<br />
Weiterhin steht eine VOX-Sendesperre bei Signalempfang zur Verfügung.<br />
CTCSS/DCS<br />
Die 39 CTCSS und 166 DCS Kodierungen (83 x einfach und 83 x umgekehrt) dienen<br />
der Blockade unerwünschter Signale. D.h. bei aktivierter Kodierung werden nur Signale<br />
mit der entsprechenden Kodierung im Lautsprecher hörbar.<br />
Jedem Kanal kann via Software eine Empfangs- und eine Sendekodierung zugewiesen<br />
werden.<br />
Hinweis: kodierte Signale sind für andere Teilnehmer unter Umständen hörbar, z.B.<br />
mit Hilfe der Monitorfunktion, und sind somit nicht geeignet für ein privates Funknetz.<br />
Rauschsperre<br />
Via Software kann die Empfindlichkeit der Rauschsperre zwischen 0 und 9 eingestellt<br />
werden, wobei die Stufe 0 der geringsten Empfindlichkeit entspricht. Die Rauschsperre<br />
ist bei dieser Einstellung komplett geöffnet. Auf Stufe 9 muss das Signal sehr<br />
stark sein um die Rauschsperre zu deaktivieren.<br />
8 9
Warnton<br />
Bei aktivierter Warntonfunktion wird das Einschalten, der Kanalwechsel und das Umschalten<br />
der Sendeleistung, bei entsprechender Programmierung der Funktionstaste,<br />
durch einen kurzen Ton angekündigt. Diese Funktion wird via Software aktiviert bzw.<br />
deaktiviert.<br />
Sprachansage<br />
Bei aktivierter Sprachansage wird die aktuelle Kanalnummer nach dem Umschalten in<br />
englischer Sprache angesagt.<br />
Diese Funktion wird via Software aktiviert bzw. deaktiviert.<br />
Sendezeitebegrenzung<br />
Allgemein: Im Sendebetrieb ist der Stromverbrauch höher als im Empfangs- bzw.<br />
Ruhezustand. Überlanges Senden reduziert somit die Akku-Kapazität sehr schnell und<br />
erhitzt das Gerät übermäßig. Um überlanges Senden zu verhindern, kann die max.<br />
Sendezeit via Software zwischen 15 und 600 Sekunden in 15-Sekunden-Intervallen<br />
eingestellt werden.<br />
Batteriesparfunktion<br />
Zwecks Stromsparung kann die Umschaltung in den StandBy-Betrieb gesteuert werden.<br />
Via Software sind die Auswahlmöglichkeiten 1:1, 1:2; 1:3 und 1:4 verfügbar.<br />
Scrambler<br />
Die Sprachverschleierung (Scrambler) ist via Software für jeden Kanal individuell einstellbar.<br />
Bei aktiver Scrambler Funktion ist das verschlüsselte Signal für Empfänger ohne passende<br />
Entschlüsselung schlecht verständlich, d.h. sehr stark verzerrt. Somit wird das<br />
Mithören anderer Teilnehmern, welche nicht als Empfänger bestimmt sind erschwert.<br />
Hinweis: Da es allgemein verschiedene Scrambler-Verschlüsselungsraten gibt, kann<br />
es mit Geräten anderer Hersteller oder anderen Modellen Kompatibilitätsprobleme<br />
geben.<br />
Compander<br />
Für die Signal-Optimierung steht die Compander Funktion, d.h. sendeseitige Kompression<br />
und empfangsseitige Expansion, zur Verfügung. Diese Funktion kann für<br />
jeden Kanal individuell via Software aktiviert bzw. deaktiviert werden.<br />
Epilogue<br />
Eine weitere Funktion für die Signaloptimierung steht mit der Epilogue-Funktion zur Verfügung.<br />
Eventuell auftretende Störgeräusche am Ende des Signals, wie z.B. Klickgeräusche,<br />
können reduziert werden. Diese Funktion ist individuell für jeden Kanal einstellbar.<br />
Purge Voice<br />
Die Signaloptimierung Purge Voice empfiehlt bei lauten Hintergrundkulissen. Die Funktion<br />
dient der klareren Abtrennung von Stimme zu Hintergrundgeräuschen und wird per<br />
Software programmiert. Es stehen drei Abstufungen zur Auswahl.<br />
Sendesperre<br />
Diese Funktion verhindert das versehentliche Senden auf besetzten Kanälen. Wird die<br />
Sendetaste (7) während des Empfangs eines Signales auf dem aktuell eingestellten<br />
Kanal gedrückt, ertönt bei aktivierter Warnton-Funktion eine lauter Beepton und der Sendemodus<br />
ist blockiert. Die Sendesperre (Busy Lock) kann für jeden Kanal individuell via<br />
Software aktiviert bzw. deaktiviert werden.<br />
Incept Alarm<br />
Nach dem Empfang eines Signals ertönt ein lauter Warnton, der den Benutzer, welcher<br />
sich nicht in unmittelbarer Nähe des Funkgerätes befindet, über den Signalempfang informiert.<br />
Ein- und Ausschaltung dieser Funktion geschieht via Software.<br />
Bandbreite<br />
Für die anmelde- und gebührenfreien Versionen PMR und FreeNet ist die Bandbreite<br />
fest auf 12,5 kHz (Narrow) eingestellt.<br />
Für die anmelde- und gebührenpflichtigen Betriebsfunkversionen UHF- und VHF-COM<br />
sind via Software die Bandbreiten 12,5 kHz (Narrow), 20 kHz (Middle) und 25 kHz<br />
(Wide) wählbar. In Deutschland sind für den Betriebsfunk 12,5 / 20 kHz Bandbreite vorgeschrieben.<br />
UKW Radio<br />
Zum Einschalten des Radios bitte die obere Funktionstaste (8) während des Einschaltens<br />
gedrückt halten. Zum Einstellen eines gewünschten Kanals ist das <strong>TeCom</strong>-<strong>IP</strong> mit<br />
einer Suchlauffunktion ausgestattet. Kurzes Drücken der Funktionstaste (8) startet die<br />
Suchlauffunktion welche nach Auffinden eines Kanals automatisch endet.<br />
Zum Ausschalten der Radiofunktion die obere Funktionstaste (8) gedrückt halten bis<br />
ein Doppelton zu hören ist.<br />
Die Radiofunktion wird automatisch beim Empfang und Senden eines Funksignals<br />
ausgeschaltet.<br />
ANSCHLUSS<br />
Das <strong>TeCom</strong>-<strong>IP</strong> verfügt über eine Kenwood-kompatible Anschlussbuchse (10) für den<br />
Anschluss von Zubehör, wie z.B. Ohrhörer-Mikrofone (3,5/2,5 mm - Stereo/Stereo)<br />
und das PC-Übertragungskabel für die Software. Passendes Zubehör finden Sie auf<br />
der Webseite www.team-electronic.de.<br />
10 11
English<br />
Dear Customer,<br />
We are proud that you decided to purchase a TEAM <strong>TeCom</strong>-<strong>IP</strong> handheld transceiver.<br />
Please read the following instructions prior to the first use for your safety, a smooth operation<br />
of the radio and full knowledge of your radios capabilities.<br />
The <strong>TeCom</strong>-<strong>IP</strong> is available in these four versions:<br />
<strong>TeCom</strong>-<strong>IP</strong> FreeNet : programmed with 6 FreeNet** channels,<br />
PR8086<br />
500 mW tx power, bandwidth 12.5 kHz,<br />
no registration or fees apply<br />
<strong>TeCom</strong>-<strong>IP</strong> PMR<br />
PR8084<br />
: programmed with 8 PMR* channels,<br />
500 mW tx power, bandwidth 12.5 kHz,<br />
no registration or fees apply<br />
<strong>TeCom</strong>-<strong>IP</strong> UHF-COM: commercial radio; 16 channels programmable;<br />
PR8085<br />
registration and fees apply; only assigned frequencies<br />
and parameters are allowed to be programmed;<br />
bandwidth 12.5 / 20 / 25 kHz;<br />
max. TX power 4 W; UHF 400 - 470 MHz<br />
<strong>TeCom</strong>-<strong>IP</strong> VHF-COM<br />
PR8087<br />
: commercial radio; 16 channels programmable;<br />
registration and fees apply; only assigned frequencies<br />
and parameters are allowed to be programmed;<br />
bandwidth 12.5 / 20 / 25 kHz;<br />
max. TX power 5 W; VHF 136 - 174 MHz<br />
Programming of the <strong>TeCom</strong>-<strong>IP</strong> is done via the additional software T-UP24.<br />
A USB data transfer cable is included in the scope of delivery. The software is available<br />
in the versions T-UP24 COM for the commercial versions VHF- and UHF-COM<br />
and T-UP24 PMR/FN for PMR and FreeNet.<br />
* = PMR Frequencies ** = FreeNet Frequencies<br />
1 - 446.00625 MHz 1 - 149.0250 MHz<br />
2 - 446.01875 MHz 2 - 149.0375 MHz<br />
3 - 446.03125 MHz 3 - 149.0500 MHz<br />
4 - 446.04375 MHz 4 - 149.0875 MHz<br />
5 - 446.05625 MHz 5 - 149.1000 MHz<br />
6 - 446.06875 MHz 6 - 149.1125 MHz<br />
7 - 446.08125 MHz<br />
8 - 446.09375 MHz<br />
English<br />
Table of Contents<br />
page<br />
GENERAL<br />
prior to first use 14<br />
scope of delivery 14<br />
maintenance 14<br />
<strong>IP</strong>66 14<br />
elements 15<br />
BASIC FUNCTIONS<br />
antenna connection 16<br />
battery pack 16<br />
charging of the battery 16<br />
on / off 16<br />
volume 16<br />
channel selection 17<br />
transmission 17<br />
reception 17<br />
KEY FUNCTIONS<br />
PTT key 18<br />
function key 1 / 2 18<br />
ADDITIONAL FUNCTIONS<br />
scan 19<br />
VOX 19<br />
CTCSS/DCS 19<br />
squelch 19<br />
warn tone 19<br />
voice annunciation 20<br />
scrambler 20<br />
compander 20<br />
epilogue 20<br />
voice purge 20<br />
busy lock 20<br />
time-out-timer 21<br />
battery saving functions 21<br />
incept alarm 21<br />
vol inhibit 21<br />
bandwidth 21<br />
fm radio 21<br />
CONNECTION 21<br />
CTCSS / DCS 42<br />
SPECIFICATIONS 43<br />
12 13
English<br />
GENERAL<br />
Scope of Delivery<br />
Unpack the equipment carefully. Identify and check the listed items. Keep packaging,<br />
manual and declaration of conformity in a save place. If any items have been damaged<br />
during shipment or are missing, please contact your dealer immediately.<br />
Supplied Accessories<br />
1 x antenna (attached with PMR version) 1 x belt clip 1 x battery pack<br />
1 x charger 1 x manual<br />
Maintenance<br />
For best performance and functionality of the <strong>TeCom</strong>-<strong>IP</strong>, please pay attention to the following<br />
advices.<br />
w Do not open the case of the radio. Improper opening may cause damages and<br />
warranty claims are forfeited.<br />
w For charging of the rechargeable battery pack, only use the charger SLG-<strong>TeCom</strong>-<strong>IP</strong><br />
that is included in the scope of delivery.<br />
w Never expose the radio to direct sunlight or other heat sources. High temperatures<br />
will diminish the longevity of certain components and plastic parts may melt and deform.<br />
w Never store the radio in dusty or dirty areas.<br />
w Should the radio generate unusual heat or emit unusual smell or even smoke, please<br />
turn the radio off immediately and remove the battery pack. Contact your dealer.<br />
w Never transmit without antenna. A damage of the power amplifier may be the result.<br />
w To ensure that no liquid enters the radio case, check and clean the rubber seal on<br />
the inside of the battery pack. Also, always make sure that the latch of the battery<br />
pack is closed properly.<br />
1 - antenna<br />
2 - speaker<br />
3 - microphone<br />
4 - rotary channel selector<br />
5 - on/off - volume control<br />
6 - LED<br />
7 - PTT key<br />
8 - function keys 1 / 2 (monitor,<br />
alarm, tx power switch)<br />
9 - lock battery pack<br />
10 - connector for ear-/microphone<br />
and programming cable<br />
3.5 / 2.5 mm<br />
11 - Polymer Li-Ion battery pack<br />
1800 mAh / 7.4 V<br />
12 - Beltclip<br />
10<br />
7<br />
8<br />
3<br />
1<br />
2<br />
4<br />
5<br />
English<br />
6<br />
2<br />
10<br />
<strong>IP</strong> 66<br />
The <strong>TeCom</strong>-<strong>IP</strong> is approved according to the ICE standard <strong>IP</strong>66. This Ingress Protection<br />
Rating, issued by the international electrotechnical commision (IEC) indicates<br />
protection against dust and from low water pressure. The <strong>IP</strong>66 protection rating does<br />
not consider advanced wear and tear of the equipment and, therefore, cannot be guaranteed<br />
for the entire lifespan.<br />
Nevertheless, should the <strong>TeCom</strong>-<strong>IP</strong> have been exposed to splashwater, please follow<br />
these steps for prolonged longevity.<br />
12<br />
9<br />
7<br />
8<br />
10<br />
11<br />
1. Turn the radio off.<br />
2. Take off the battery pack.<br />
3. Dry off excessive water on the case and in the battery compartment.<br />
4. Let the radio air out until completely dry before reusing.<br />
14 15
English<br />
BASIC FUNCTIONS<br />
Antenna<br />
Due to governmental regulations, with the PMR version the antenna is fixed, i.e. nondetachable.<br />
All other versions have a detachable antenna. To mount antenna, place<br />
the antenna-base onto the connection thread at the top of the radio, and turn tight in<br />
clockwise direction.<br />
For detachment, turn the antenna at the base - not at the tip - counterclockwise.<br />
Battery Pack<br />
To mount the battery pack (11) onto the radio, place the grooves at the top of the battery<br />
pack onto the battery compartment of the radio-case and push the battery pack into final<br />
position. Then close the latch and push it until it locks in.<br />
To remove the battery pack, open the lock (9) by pulling the closure, which is labeled<br />
OPEN, with your index finger.<br />
Charging<br />
Prior to first use, the battery pack (11) has to be fully charged. A complete charging<br />
cycle takes approximately 6 hours.<br />
Connect the cable of the power supply with the base of the charger before connecting<br />
with a 220 V plug. The LED shorty lights up red and then green. Now, place the radio<br />
with the attached battery pack (11) into the charger. Pay attention to proper placement.<br />
During the charging process, the LED lights red.<br />
Once charging is completed, the LED lights green. Take the radio out of the base.<br />
Overcharging reduces the battery pack’s longevity.<br />
English<br />
Channel Selection<br />
For channel selection use the channel selector (5). If the warn tone and the voice annunciation<br />
are activated, a beep tone is emitted and the actual channel number is announced<br />
once the channel has changed.<br />
Note:<br />
The scan function operates on channel 16. If scan is enabled, channel 16 is no longer<br />
available for radio communication.<br />
If no frequency is programmed on the selected channel, a constant warn tone is audible.<br />
Transmit<br />
For transmission hold the PTT key (7) until the end of the message.<br />
For best sound quality, talk into the microphone (3) at a middle volume level at a distance<br />
of approximatly 10 cm. During transmission the control LED (6) lights red.<br />
Upon release of the PTT key (7) the radio returns automatically into reception mode.<br />
Once a signal is present on the selected frequency, the LED lights green.<br />
Reception<br />
Once a signal is present on the selected frequency, the LED lights green.<br />
Note:<br />
If the selected frequency is decoded with a CTCSS-/DCS-code, all signals that are<br />
encoded with a different code will be muted. The green LED will light but no signal will<br />
be audible.<br />
On / Off<br />
To switch on the radio, turn the combined on/off-volume switch (5) clockwise beyond<br />
the barrier. If the warn tone and the voice annunciation are activated, a beep tone is<br />
emitted and the actual channel number is announced.<br />
To switch off the radio, turn the on/off-volume knob (5) counterclockwise beyond the<br />
barrier.<br />
Volume Control<br />
Use the combined on/off-volume knob (5) for volume control. Turning clockwise increases<br />
the volume level and turning counterclockwise reduces it.<br />
To set a comfortable volume level after turning the radio on, hold the function key (8) -<br />
key has to be programmed with the monitor function - while adjusting the volume level<br />
with the combined on/off-volume switch (5).<br />
Note:<br />
The function key (8) can be programmed via software with one of these functions: monitor,<br />
tx-power high/low and alarm.<br />
16 17
English<br />
English<br />
KEYPAD FUNCTIONS<br />
PTT Key<br />
The PTT key (7) is located at the left side of the radio. Pressing the PTT key will activate<br />
transmission mode. The LED (6) will light red.<br />
Function Key 1 / 2<br />
The function keys 1 and 2 (8) are located under the PTT key (7). They can be indiviually<br />
programmed with one of these functions:<br />
Off<br />
no function available<br />
Alarm<br />
By pressing the function key (8) a constant alarm tone is audible. Transmission and<br />
reception modes are blocked. To turn off the alarm, press the function key (8) or turn<br />
the radio off.<br />
Monitor<br />
The monitor function deactivates the squelch and the typical constant noise is audible.<br />
Weak signals that would not pass the squelch and signals that are CTCSS/DCS<br />
encoded can be heard with the monitor function.<br />
TX Power<br />
The low tx power is indicated by a single warn tone and the high tx power by a double-tone.<br />
Note:<br />
With the versions PMR and FreeNet, the low tx power are fixed to 300 mW and the<br />
high value to 500 mW. With the COM versions the max. tx power is 4 W for UHF<br />
and 5 W for VHF. The low and high tx power values can be set via software according<br />
to the commercial radio licence.<br />
ADDITIONAL FUNCTIONS<br />
The following functions are managed via software. This applies to activation and change<br />
of settings.<br />
scan<br />
The scan function searches signals on the programmed frequencies that are added to<br />
the scan list. A programmed channel can be added or deleted from the scan list via<br />
software. The scan list needs to contain at least two channels.<br />
If the scan function is actived, channel 16 is reserved for this function and communication<br />
is no longer possible on this channel. Once a signal is detected the LED lights<br />
green, the scan function is paused and the radio remains on the channel until the end<br />
of the signal. Then, after appr. 3 seconds, the scan function continuous.<br />
To end the scan function leave channel 16 by switching to another channel.<br />
VOX<br />
VOX, the voice-activated transmission mode has to be activated via software.<br />
As soon as the voice reaches a certain volume level, transmission starts automatically,<br />
no pushing of the PTT key is required. The VOX sensitivity can be set according<br />
to the individual need in the range between 1-9.<br />
To deactive the VOX function while receiving signals, the function VOX Inhibit can be<br />
activated.<br />
CTCSS/DCS<br />
39 CTCSS and 166 DCS (83 plus 83 reversed) codes are available to filter-out unwanted<br />
signals, i.e. with activated CTCSS/DCS coding, only signals with the matching<br />
code are audible. Signals with differing codes are muted.<br />
Each channel can be assigned to one CTCSS/DCS code for the transmission frequency<br />
and one code for the reception frequency.<br />
Note: CTCSS/DCS does not guarantee privacy. Encoded signals are received by radios<br />
that do not use CTCSS/DCS. Also, using the monitor function makes<br />
CTCSS/DCS encoded signals audible.<br />
squelch<br />
The squelch sensitivity can be set via software, on a scale between 0 and 9. With the<br />
value 0, the squelch is turned off and the entire frequency is audible. With value 9,<br />
only the strongest signals will pass through the filter.<br />
warn tone<br />
A short beep tone is audible when another channel is selected or when the radio is<br />
turned on.<br />
The warn tone function has to be activated via software.<br />
18 19
English<br />
voice annunciation<br />
With activated voice annunciation, upon change, the selected channel is announced<br />
in english language.<br />
Activate and deacitvate this function via software.<br />
scrambler<br />
The scrambling function can be assigned to each individual channel via software.<br />
When transmitting, the scrambling function removes a certain frequency part of the signal.<br />
For receivers without activated scrambler, the signal sounds distorted and voice messages<br />
are often not understandable. When receiving, the scrambling function adds<br />
the removed frequency part to the signal and, therefore, the signals sounds complete.<br />
Note: Since there are different scrambling procedures, the scrambler function from differing<br />
radio models or radios from different manufacturers might not be compatible.<br />
compander<br />
For signal improvement, the compander function compresses the signal upon transmission<br />
and expands it upon reception.<br />
This function can be activated for each channel individually, .<br />
epilogue<br />
A further signal improvement function is the epilogue function. Sometimes disturbing<br />
noises at the end of the signal, e.g. a clicking sound, can be surpressed with the epilogue<br />
function.<br />
This function can be activated for each channel individually.<br />
voice purge<br />
For communication in loud environments, we recommend the voice purge function,<br />
another signal improvement feature that helps separating the voice from loud background<br />
noises for a better understanding.<br />
This function can be activated for each channel individually.<br />
busy lock<br />
This function prevents transmission during reception of a signal. When the PTT key is<br />
pushed while a signal is present on the selected channel, transmission is blocked and<br />
a warn tone is emitted.<br />
This function can be activated for each channel individually.<br />
time-out-timer<br />
In general, the power consumption in transmission mode is higher than in reception or<br />
standby mode. Further, overlong transmission reduces the battery capacity quicker and<br />
the radios temperature increases quicker.<br />
To prevent overlong transmission, the time-out-timer can be set via software between<br />
15 and 600 seconds in 15-seconds-steps.<br />
battery save<br />
The battery save function prolongs the battery capacity by switching to the standby<br />
mode in the<br />
avaiable ratios 1:1, 1:2; 1:3 and 1:4.<br />
incept alarm<br />
If the radio has to be placed out-of-reach and the operator wants to be informed about an<br />
incoming call, the incept alarm function can be activated via software. After the receipt of<br />
a call, a loud warning tone is emitted to inform the radio operator, who might be in further<br />
distance from the radio, about the call.<br />
bandwidth<br />
For the commercial radio version UHF and VHF, the bandwidths 12.5 kHz (narrow), 20<br />
kHz (middle) and 25 kHz (wide) can be selected via software. For the PMR and FreeNet<br />
version, the bandwidth 12.5 kHz is fixed.<br />
fm radio<br />
To activate the fm radio function hold function key 1 while turning the radio on. The<br />
<strong>TeCom</strong>-<strong>IP</strong> is equipped with a frequency scan for setting a radio channel. Push the<br />
function key 1 shorty to start the scan function. Once a channel is detected the scan<br />
function stops automatically.<br />
To deactivate the fm radio function hold the function key 1 until a double-tone is heard.<br />
When transmitting or receiving a signal, the radio function stops automatically.<br />
CONNECTION<br />
The <strong>TeCom</strong>-<strong>IP</strong> is equipped with a Kenwood compatible connector (3.5/2.5 mm -<br />
Stereo/Stereo) for earphone/microphones and also the pc connection cable for the<br />
software T-UP24. For infos about available accessory please visit our website at<br />
www.team-electronic.de.<br />
English<br />
20 21
Estimado cliente,<br />
Gracias por adquirir el <strong>TeCom</strong>-<strong>IP</strong> TEAM. TEAM Electronic es conocido por la gran calidad<br />
de sus aparatos de radiocomunicación.<br />
Para entender todas las funciones, los posibles ajustes y para asegurar el funcionamiento<br />
adecuado de la radio, le recomendamos que lea este manual antes de utilizar la radio.<br />
El <strong>TeCom</strong>-<strong>IP</strong> está disponible en estas cuatro versiones:<br />
<strong>TeCom</strong>-<strong>IP</strong> FreeNet<br />
PR8086<br />
<strong>TeCom</strong>-<strong>IP</strong> PMR<br />
PR8084<br />
<strong>TeCom</strong>-<strong>IP</strong> UHF<br />
PR8085<br />
<strong>TeCom</strong>-<strong>IP</strong> VHF<br />
PR8087<br />
: programado con 6 canales FreeNet**,<br />
potencia TX 500 mW, ancho de banda 12,5 kHz<br />
n o necesita licencia ni pago de tasas<br />
: programado con 8 canales PMR*,<br />
potencia TX 500 mW, ancho de banda 12,5 kHz<br />
no necesita licencia ni pago de tasas<br />
: radio comercial; 16 canales programables<br />
Necesita licencia y pago de tasas. Solo se permite la<br />
programación de las frecuencias y parámetros asignados.<br />
Ancho de banda: 12,5 / 20 / 25 kHz;<br />
máx. Potencia TX: 4 W; UHF 400 - 470 MHz.<br />
: radio comercial; 16 canales programables;<br />
Necesita licencia y pago de tasas. Sólo se permite la<br />
programación de las frecuencias y parámetros asignados.<br />
Ancho de banda: 12,5 / 20 / 25 kHz; máx.<br />
potencia TX 5 W; VHF 136 - 174 MHz<br />
La programación del <strong>TeCom</strong>-<strong>IP</strong> se hace mediante software adicional T-UP24. La entrega<br />
incluye un cable de transferencia de datos. El software está disponible en las versiones<br />
T-UP24 COM para las radios comerciales VHF y UHF- COM; y el T-UP24 PMR/FN para<br />
PMR y FreeNet.<br />
Tabla de contenidos<br />
Página<br />
GENERAL<br />
Antes del primer uso 24<br />
Embalaje 24<br />
Mantenimiento 24<br />
<strong>IP</strong>66 24<br />
Vista general de las funciones 25<br />
FUNCIONES BÁSICAS<br />
Conexión de la antena 26<br />
Pack de Baterías 26<br />
Carga de la batería 26<br />
On / off 26<br />
Volumen 26 - 27<br />
Selección de canal 27<br />
Transmisión 27<br />
Recepción 27<br />
FUNCIONES DE LAS TECLAS<br />
Tecla de transmisión PTT 28<br />
Tecla función 28<br />
FUNCIONES ADICIONALES<br />
Escaneo 29<br />
VOX 29<br />
CTCSS/DCS 29<br />
Squelch 29<br />
Tono de aviso 30<br />
Aviso por voz 30<br />
Secrafonía 30<br />
Compresor 30<br />
Epílogo 30<br />
Limpieza de voz 30<br />
Bloqueo de transmisión 30<br />
Time-out-timer 31<br />
Funciones ahorro de batería 31<br />
Incept alarm 31<br />
Espaciado de canal 31<br />
Función Radio 31<br />
* = Frecuencias PMR ** = Frecuencias FreeNet<br />
1 - 446.00625 MHz 1 - 149.0250 MHz<br />
2 - 446.01875 MHz 2 - 149.0375 MHz<br />
3 - 446.03125 MHz 3 - 149.0500 MHz<br />
4 - 446.04375 MHz 4 - 149.0875 MHz<br />
5 - 446.05625 MHz 5 - 149.1000 MHz<br />
CONEXIÓN 31<br />
6 - 446.06875 MHz 6 - 149.1125 MHz<br />
7 - 446.08125 MHz<br />
CTCSS / DCS 42<br />
8 - 446.09375 MHz<br />
ESPECIFICACIONES 43<br />
22 23
GENERAL<br />
Embalaje<br />
Desembale el equipo con cuidado. Por favor, compruebe que estén todos los elementos<br />
de la lista antes de deshechar el embalaje. Si le falta alguno de ellos o viene dañado,<br />
pongáse en contacto inmediatamente con el proveedor.<br />
Accesorios suministrados<br />
1 x <strong>TeCom</strong>-<strong>IP</strong> con antenna 1 x Clip 1 x Batería<br />
1 x Cargador 1 x Manual 1 x manual<br />
Mantenimiento<br />
Para un funcionamiento y una funcionalidad óptima del <strong>TeCom</strong>-<strong>IP</strong>, le aconsejamos lo<br />
siguiente:<br />
No abra el chasis de la radio. Abrirlo inadecuadamente podría causar daños que no<br />
cubriría la garantía del aparato.<br />
Para cargar el pack de baterías recargables, utilice sólo el cargador SLG-<strong>TeCom</strong>-<strong>IP</strong><br />
incluido en el paquete.<br />
No exponga nunca la radio a los rayos del sol u otras fuentes de calor. Las altas temperaturas<br />
podrían acortar la vida de algunos de los componentes y las partes de plástico<br />
podrían derretirse y deformarse.<br />
No coloque nunca la radio en zonas con altos niveles de polvo o suciedad.<br />
Para que no entre humedad, compruebe y limpie la junta de goma de la parte interior del<br />
pack de baterías. Compruebe también que el cierre de la batería quede bien ajustado.<br />
Si la radio genera una calor inusual o emite un olor o humo, por favor, apáguela inmediatamente<br />
y extraiga la batería. A continuación, póngase en contacto con su distribuidor.<br />
No transmite nunca sin antena; podría producirse un daño irreversible.<br />
1 - Antena<br />
2 - Altavoz<br />
3 - Micrófono<br />
4 - Selector canal rotatorio<br />
5 - On/Off & Control Volumen<br />
6 - LED<br />
7 - Pulsador PTT<br />
8 - Botón de función (monitor, alarma,<br />
interruptor de potencia de transmisión)<br />
9 - cierre de pack de baterías<br />
10 - conexión para auricular/micrófono para<br />
cable de conexión a PC<br />
3,5 / 2,5 mm<br />
11 - Pack de baterías Polymer Li-Ion<br />
1800 mAh / 7,4 V<br />
12 - Clip<br />
10<br />
7<br />
8<br />
3<br />
1<br />
2<br />
4<br />
5<br />
6<br />
2<br />
10<br />
<strong>IP</strong> 66<br />
El <strong>TeCom</strong>-<strong>IP</strong> ha sido validado de acuerdo a la normativa del IEC <strong>IP</strong>66. Este Valor de<br />
Protección de Acceso, decretado por el IEC (Comisión Internacional Electrotécnica)<br />
indica la protección contra polvo y presión de agua leve. Sin embargo, si el <strong>TeCom</strong>-<strong>IP</strong><br />
ha sido expuesto a salpicaduras de agua, por favor, siga los siguientes pasos para<br />
prolongar la vida del aparato.<br />
El tipo de protección <strong>IP</strong>66 no tiene que ver con el envejecimiento del aparato y por lo<br />
tanto, no es una garantía de la durabilidad.<br />
12<br />
9<br />
7<br />
8<br />
10<br />
11<br />
1. Apague la radio.<br />
2. Extraiga las baterías.<br />
3. Seque el exceso de agua de la carcasa y del compartimento de baterías.<br />
4. Deje la radio al aire hasta que esté completamente seca antes de volverla utilizar.<br />
24 25
FUNCIONES BÁSICAS<br />
Antena<br />
Debido a regulaciones gubernamentales, la antena en la versión PMR es fija, es<br />
decir, no se puede extraer del aparato. Para montar la antena, coloque la base de antena<br />
en la rosca de conexión en la parte superior de la radio, y gire con fuerza en el<br />
sentido de las agujas del reloj.<br />
Para desmontarla, gire la antena desde la base – no desde la punta- en el sentido<br />
contrario a las agujas del reloj.<br />
Pack de Baterías<br />
Para montar el pack de baterías (11) en la radio, coloque las muescas, en la parte superior<br />
del pack de baterías, en el compartimento de las baterías de la carcasa de la<br />
radio y presiónelas hasta la posición final. A continuación, cierre el pasador (9) y empuje<br />
hasta que quede bien cerrado.<br />
Para extraer el pack de baterías, abra el seguro tirando del cierre (9), el cual aparece<br />
etiquetado como OPEN (abrir), con su dedo índice.<br />
Carga<br />
Antes del primer uso, deberá cargar el pack de batería (11) al completo. Una carga<br />
completa dura aproximadamente 6 horas.<br />
Conecte el cable de alimentación a la base del cargador antes de conectarlo a una<br />
toma de 220 V. El LED se iluminará en verde. A continuación, coloque la radio con el<br />
pack de batería incluido (11) en el cargador. Por favor, compruebe que esté colocada<br />
adecuadamente. Durante el proceso de carga, el LED se iluminará en rojo. Una vez se<br />
haya completado la carga, el LED se volverá a iluminar en verde. Extraiga la radio de<br />
la base, ya que la sobrecarga reduce la longevidad de la batería.<br />
Nota: La tecla función (8) se puede programar mediante software con una de estas<br />
funciones: monitor, potencia TX high/low y alarma.<br />
Selección de canal<br />
Para seleccionar un canal utilice el selector de canal (5). Si el tono de aviso y el aviso<br />
por voz están activados, se emitirá un tono beep y el número de canal actual se<br />
podrá visualizar una vez que el canal ha cambiado.<br />
Nota: La función escaneo funciona en el canal 16. Cuando la función escaneo está<br />
activada, el canal 16 no estará disponible para la radiocomunicación. Si no se ha programado<br />
ninguna frecuencia en el canal seleccionado, se escuchará un tono de aviso<br />
continuo.<br />
Transmisión<br />
Para transmitir pulse la tecla PTT (7) hasta el final del mensaje.<br />
Para una mejor calidad de sonido, hable por el micrófono (3) a un nivel de volumen<br />
medio a una distancia de aproximadamente 10 cm. Durante la transmisión el control<br />
LED (6) se iluminará en rojo.<br />
Al soltar la tecla PTT (7) la radio volverá automáticamente al modo recepción. Una vez<br />
la señal esté presente en la frecuencia seleccionada, el LED se iluminará en verde.<br />
Recepción<br />
Una vez que una señal esté presente en la frecuencia seleccionada, se iluminará el<br />
LED en verde.<br />
Nota: Si la frecuencia seleccionada está descodificada con un código CTCSS / DCS,<br />
todas las señales que estén codificadas con un código diferente se silenciarán. El<br />
LED en verde permanecerá iluminado, pero no habrá ninguna señal audible.<br />
On / Off<br />
Para encender la radio, gire el conmutador de volumen on/off (5) en el sentido de las<br />
agujas del reloj hasta la raya. Si el tono de aviso y el aviso por voz están activados,<br />
se emitirá un tono beep y se visualizará el número de canal actual.<br />
Para apagar la radio, gire el botón de volumen on/off en el sentido contrario a las<br />
agujas del reloj hasta la raya.<br />
Control del volumen<br />
Utilice el botón combinado de volumen on/off (5) para el control de volumen. Girándolo<br />
en el sentido de las agujas del reloj aumentará el nivel de volumen y girándolo<br />
en el sentido contrario, lo disminuirá.<br />
Para establecer un nivel de volumen confortable después de encender la radio, mantenga<br />
pulsada la tecla función (8) – la tecla se tiene que programar previamente con<br />
la función monitor- mientras ajusta el nivel de volumen con el conmutador de volumen<br />
26<br />
combinado on/off (5).<br />
27
FUNCIONES DEL TECLADO<br />
Tecla PTT<br />
La tecla PTT (7) está situada en la parte izquierda de la radio. Pulsando la tecla PTT<br />
se activará el modo transmisión. El LED se iluminará en rojo.<br />
Tecla Función 1 / 2<br />
Las teclas funciónes 1 y 2 (8) están situada debajo de la tecla PTT (7). Se pueden<br />
programar con una de estas funciones:<br />
Off<br />
Ninguna función disponible<br />
Alarma<br />
Al pulsar la tecla función (5) un tono de alarma constante, sólo en el modo transmisión,<br />
será audible. Los modos transmisión y recepción se bloquearán.<br />
Para desactivar la alarma, pulse la tecla función (5) o apague la radio.<br />
Monitorización<br />
La función Monitorización desactiva el squelch, con lo que se escuchará el típico ruido<br />
continuo. Las señales débiles que no pasen el squelch y las señales que están codificadas<br />
con códigos CTCSS/DCS se podrán escuchar con la función monitorización.<br />
PotenciaTX<br />
La potencia baja TX se indica con un sólo tono de aviso y la alta, con un tono doble.<br />
Nota: para las versiones PMR y FreeNet, la potencia baja TX está establecida en 300<br />
mW y la alta, en 500 mW. Con las versiones COM, la máxima potencia TX es de 4 W<br />
para UHF y 5 W para VHF. Los valores de las potencias bajas y altas TX se pueden<br />
establecer mediante software, de acuerdo a la licencia de radio comercial.<br />
FUNCIONES ADICIONALES<br />
Las funciones siguientes son las que se controlan mediante software, lo que significa<br />
activar y cambiar ajustes.<br />
Escaneo<br />
La función escaneo busca señales en las frecuencias programadas que se añadirán a<br />
la lista de escaneos. Un canal programado se puede añadir o eliminar de la lista de escaneo<br />
mediante software.<br />
Si la función escaneo está activa, el canal 16 estará reservado para esta función y la<br />
comunicación no será posible en este canal.<br />
Para comenzar la función escaneo, seleccione el canal 16 con el selector de canal<br />
(4). El modo de escaneo activo se indicará mediante una doble iluminación parpadeante<br />
en verde. Una vez que se haya detectado la señal, la función escaneo se detendrá<br />
y la radio permanecerá en el canal hasta el final de la señal. Entonces, después<br />
de un periodo determinado de tiempo, continuará la función escaneo.<br />
Para finalizar la función escaneo salga del canal 16 cambiando a otro canal.<br />
VOX<br />
VOX, el modo de transmisión activado por voz, estará disponible con sólo un microauricular.<br />
Esta función se debe activar mediante software.<br />
Tan pronto como la voz alcance un cierto nivel de volumen, la transmisión empieza automáticamente,<br />
es decir, no necesitará pulsar la tecla PTT. La sensibilidad del VOX puede<br />
establecerse de acuerdo a las necesidades de cada persona dentro del rango de 1-9.<br />
Para desactivar la función VOX mientra recibe señales, la función Inhibir VOX puede<br />
activarse.<br />
CTCSS/DCS<br />
Hay 39 códigos CTCSS y 166 DCS (83 plus 83 reversos) para filtrar las señales indeseadas,<br />
p. ej con codificación CTCSS/DCS activada, sólo señales con código coincidentes<br />
serán audibles. Las señales con códigos distintos se silenciarán.<br />
Cada canal puede asignarse a uno de los códigos CTCSS/DCS para la frecuencia de<br />
transmisión y un código para la frecuencia de recepción.<br />
Nota: Los códigos CTCSS/DCS no garantizan privacidad. Las radios reciben señales<br />
codificadas que no utilizan estos códigos. También, el uso de la función monitorización<br />
hace que los las señales codificadas CTCSS/DCS sean audibles.<br />
Squelch<br />
La sensibilidad del squelch se puede establecer mediante software en una escala de<br />
entre 0 y 9. Con el valor 0, el squelch se apagará y la frecuencia entera será audible.<br />
Con el valor 9, sólo las señales más fuertes se filtrarán.<br />
28 29
Tono de aviso<br />
Se escuchará un tono beep corto cuando otro canal sea seleccionado o cuando la<br />
radio se encienda. La función tono de aviso se deberá activar mediante software.<br />
Aviso por voz<br />
Con el aviso por voz activado, el canal seleccionado se anunciará en el idioma inglés. Cuando<br />
el nivel de la batería es bajo, le avisará con la frase “Por favor, cargue la batería”.<br />
Esta función se activa y desactiva mediante software.<br />
Secrafonía<br />
La función secrafonía se puede asignar a cada uno de los canales mediante software.<br />
Al transmitir, la función secrafonía elimina una cierta parte de la señal. Para receptores<br />
sin la secrafonía activada, la señal se escuchará distorsionada y los mensajes de voz<br />
podrían no entenderse muy bien. Al recibir, la función secrafonía añade la parte de frecuencia<br />
eliminada a la señal, con lo cual la señal se escuchará completamente.<br />
Nota: ya que hay diferentes procedimientos de secrafonía, la función secrafonía de diferentes<br />
modelos de radio o radios de diferentes proveedores podría no ser compatible.<br />
Compresor<br />
Para una mejora en la señal, la función Compresor comprime la señal hasta la transmisión<br />
y la expande hasta la recepción. Esta función se puede activar para cada uno<br />
de los canales.<br />
Epílogo<br />
La función Epílogo es una función que mejora mucho más la señal. A veces, los ruidos<br />
molestos al final de la señal, como un chasquido, se puede suprimir con esta función.<br />
Esta función se puede activar para cada uno de los canales.<br />
Limpieza de voz<br />
Para comunicaciones en ambientes ruidosos, le recomendamos la función “Limpieza<br />
de voz”. Se trata de otra característica más para la mejora de la señal la cual separa<br />
la voz del ambiente ruidoso de fondo para facilitar la compresión.<br />
Esta función puede activarse para cada canal.<br />
Bloqueo ocupado<br />
Esta función previene la transmisión durante la recepción de una señal. Cuando la tecla<br />
PTT está pulsada mientras una señal está presente en el canal seleccionado, la transmisión<br />
se bloqueará y se emitirá un tono de aviso. Esta función se puede activar para cada<br />
uno de los canales.<br />
Time-out-timer<br />
En general, el consumo de potencia en modo de transmisión es más elevado que en<br />
recepción o en modo standby. Además, las transmisiones prolongadas reducen la capacidad<br />
de la batería mucho más rápido y la temperatura de las radios aumenta también<br />
más rápido.<br />
Para prevenir transmisiones prolongadas, el time-out-time puedes establecerse mediante<br />
software entre 15 y 600 segundos en pasos de 15 segundos.<br />
Ahorro de batería<br />
La función de ahorro de batería prolonga la capacidad de la batería pulsando el<br />
modo standby en los ratios disponibles 1:1, 1:2; 1:3 y 1:4.<br />
Alarma incept<br />
Si la radio se ha de colocar fuera del alcance del operador y éste quiere estar informado<br />
de las llamadas entrantes, la función Alarma Incept puede activarse mediante<br />
software. Después de la recepción de una llamada, se emitirá un tono de aviso alto<br />
para informar al operador, el cual podría estar situado a una gran distancia de la<br />
radio, de la llamada.<br />
Espaciado de canales<br />
Para la radio comercial versión UHF y VHF, los espaciados de canales 12,5 kHz<br />
(estrecho), 20 kHz (medio) y 25 kHz (ancho) pueden seleccionarse mediante software.<br />
Para las versiones PMR y FreeNet, el espaciado de canales es fijo a 12,5 kHz.<br />
Función Radio<br />
Al encender la radio, por favor, mantenga pulsada la tecla función 1 mientras se pone<br />
en marcha. Para sintonizar un canal deseado, el <strong>TeCom</strong>-<strong>IP</strong> viene provisto de una función<br />
de búsqueda automática. Al pulsar brevemente la tecla función 1 se activa la función<br />
búsqueda automática, y se detiene automáticamente cuando encuentra algún<br />
canal.<br />
Al apagar la función radio, mantenga pulsada la tecla función 1 hasta que escuche<br />
dos tonos.<br />
La función radio se activará automáticamente al recibir y enviar una señal.<br />
CONEXIÓN<br />
El <strong>TeCom</strong>-<strong>IP</strong> viene equipado con un conector compatible con Kenwood (3,5/2,5 mm –<br />
Estéreo/Estéreo) para auriculares/microauriculares y también con cable de conexión<br />
a PC para el software T-UP24.<br />
30 31
Gentile cliente,<br />
Nel congratularci con voi per l’acquisto del ricetrasmettitore TEAM <strong>TeCom</strong>-<strong>IP</strong>, raccomandiamo<br />
di leggere questo manuale prima dell’uso, per la vostra sicurezza, la conoscienza<br />
e il buon funzionamento della radio.<br />
Il <strong>TeCom</strong>-<strong>IP</strong> è disponibile nelle seguenti versioni:<br />
<strong>TeCom</strong>-<strong>IP</strong> FreeNet<br />
PR8086<br />
<strong>TeCom</strong>-<strong>IP</strong> PMR<br />
PR8084<br />
<strong>TeCom</strong>-<strong>IP</strong> UHF-COM<br />
PR8085<br />
<strong>TeCom</strong>-<strong>IP</strong> VHF-COM<br />
PR8087<br />
: programmabile con 6 canali FreeNet**, 500 mW tx power,<br />
larghezza di banda 12.5 kHz,<br />
nessuna registrazione uso libero<br />
: programmabile con 8 canali PMR*, 500 mW tx power,<br />
larghezza di banda 12.5 kHz,<br />
nessuna registrazione uso libero<br />
: commercial radio; 16 canali programmabili<br />
utilizzo solamente con frequenze assegnate.<br />
Larghezza di banda 12.5 / 20 / 25 kHz;<br />
max. TX power 4 W; UHF 400 - 470 MHz<br />
: commercial radio; 16 canali programmabili<br />
utilizzo solamente con frequenze assegnate.<br />
Larghezza di banda 12.5 / 20 / 25 kHz;<br />
max. TX power 5 W; VHF 136 - 174 MHz<br />
La programmazione del <strong>TeCom</strong>-<strong>IP</strong> viene effettuata utilizzando il software T-UP24. Il<br />
cavo usb per il trasferimento dati è incluso nella confezione del software. Il software è<br />
disponibile nelle versioni T-UP24 COM per la versione commerciale VHF- UHF-COM e<br />
T-UP24 PMR/FN per PMR e FreeNet.<br />
* = Frequenze PMR ** = Frequenze FreeNet<br />
1 - 446.00625 MHz 1 - 149.0250 MHz<br />
2 - 446.01875 MHz 2 - 149.0375 MHz<br />
3 - 446.03125 MHz 3 - 149.0500 MHz<br />
4 - 446.04375 MHz 4 - 149.0875 MHz<br />
5 - 446.05625 MHz 5 - 149.1000 MHz<br />
6 - 446.06875 MHz 6 - 149.1125 MHz<br />
7 - 446.08125 MHz<br />
8 - 446.09375 MHz<br />
GENERALE<br />
Contenuto<br />
Contenuto della confezione 34<br />
Dotazione 34<br />
Manutenzione 34<br />
<strong>IP</strong>66 34<br />
Panoramica delle funzioni 35<br />
FUNZIONI DI BASE<br />
Connessione antenna 36<br />
battery pack 36<br />
carica della batteria 36<br />
on / off 36<br />
volume 36<br />
selezione canali 36<br />
trasmissione 37<br />
ricezione 37<br />
32 33<br />
pagina<br />
FUNZIONI TASTI<br />
PTT 37<br />
Funzioni tasti 1 / 2 37 - 38<br />
FUNZIONI AGGIUNTIVE<br />
scan 38<br />
VOX 38<br />
CTCSS/DCS 38<br />
squelch 38<br />
tono 38<br />
annuncio vocale 39<br />
compander 39<br />
epilogo 39<br />
scrambler 39<br />
blocco trasmissione 39<br />
time-out-timer 39<br />
funzione salva batteria 39<br />
allarme 40<br />
larghezza di banda 40<br />
fm radio 40<br />
CONNESSIONI 40<br />
CTCSS / DCS 42<br />
CARATTERISTICHE 43
GENERALE<br />
Contenuto della confezione<br />
Disimballare il contenuto con attenzione. Identificare e controllare gli elementi indicati.<br />
Conservare la confezione, il manuale e la dichiarazione di conformità in un luogo sicuro.<br />
Se qualche elemento risulta danneggiato o mancante, contattare immediatamente il rivenditore.<br />
Accessori in dotazione<br />
1 x <strong>TeCom</strong>-<strong>IP</strong> 1 x clip cintura 1 x batteria<br />
1 x caricatore 1 x manuale<br />
Manutenzione<br />
Per ottenere migliori prestazioni con il <strong>TeCom</strong>-<strong>IP</strong>, si prega di fare attenzione alle seguenti<br />
avvertenze.<br />
1 - antenna<br />
2 - speaker<br />
3 - microfono<br />
4 - manopola selettore canale<br />
5 - on/off - volume<br />
6 - LED light<br />
7 - PTT<br />
8 - funzioni tasti (monitor, allarme,<br />
tx power switch)<br />
9 - blocco batteria<br />
10 - connessione microfono, pc.<br />
11 - Polmyer Li-Ion battery pack<br />
1800 mAh / 7,4 V<br />
12 - clip cintura<br />
7<br />
8<br />
3<br />
1<br />
4<br />
5<br />
6<br />
2<br />
10<br />
- Non aprire l’involucro della radio. Questa operazione potrebbe danneggiarla e cessare<br />
la validità della garanzia.<br />
- Per la ricarica della batteria utilizzare solamente il caricatore originale SLG-<strong>TeCom</strong>-<strong>IP</strong><br />
incluso nella confezione.<br />
- Non esporre la radio alla luce diretta del sole o fonti di calore, l’esposizione diretta<br />
potrebbe causare danni ai componenti di pastica.<br />
- Non conservare la radio in ambienti sporchi o polverosi.<br />
- Per garantire che il liquido non entri nella scocca della radio, controllare e pulire la gu<br />
arnizione in gomma sulla parte interna della batteria. Inoltre, assicurarsi sempre che il<br />
fermo della batteria sia chiuso correttamente.<br />
- Se la radio dovesse generare calore, fumo e odore, togliere immediatamente la batteria<br />
e contattare il rivenditore.<br />
- Non trasmettere senza antenna, la Radio Potrebbe danneggiarsi.<br />
10<br />
2<br />
<strong>IP</strong> 66<br />
Il <strong>TeCom</strong>-<strong>IP</strong> è omologato secondo la norma IEC <strong>IP</strong>66. Questo Grado di protezione Ingress,<br />
rilasciato dalla IEC (International Electrotechnical Commision) indica la protezione<br />
contro polvere e acqua a bassa pressione.<br />
Tuttavia, qualora il <strong>TeCom</strong>-<strong>IP</strong> sia stato esposto a spruzzi d'acqua, si prega di attenersi<br />
alla seguente procedura.<br />
l grado di protezione <strong>IP</strong>66 non considera ovviamente usura e rottura del materiale che,<br />
pertanto, non può essere garantita per l'intera vita dell’articolo.<br />
12<br />
9<br />
7<br />
8<br />
10<br />
11<br />
1. Spegnere la radio<br />
2. Togliere la batteria<br />
3. Asciugare l'acqua sulla cover e nel vano batterie<br />
34<br />
4. Lasciate che la radio sia completamente asciutta prima dell'uso<br />
35
FUNZIONI DI BASE<br />
Antenna<br />
L’antenna nella versione PMR è fissa (per legge) non staccabile. Tutte le altre versioni<br />
hanno l’antenna staccabile. Per montare l’antenna, posizionarla sulla filettatura e ruotarla<br />
in senso orario.<br />
Per staccarla, ruotare in senso antiorario.<br />
Pacco Batteria<br />
Per montare la batteria (11) sulla radio, posizionare le scanalature nella parte superiore<br />
della radio e spingere la batteria nella posizione finale. Quindi chiudere il dispositivo di<br />
chiusura (9) e spingerlo fino a bloccarlo.<br />
Per rimuovere la batteria, aprire il fermo tirando la chiusura (9), che è indicato con<br />
“OPEN”.<br />
Trasmissione<br />
Per trasmettere premere il tasto PTT (7) fino alla fine del messaggio.<br />
Per una migliore qualità del suono, parlare nel microfono (3) ad un livello di volume<br />
medio ad una distanza di circa 10 cm. Durante la trasmissione il LED rosso di controllo<br />
(6) sarà acceso.<br />
Al rilascio del tasto PTT (7) la radio ritorna automaticamente in modalità di ricezione.<br />
Una volta che un segnale è presente sulla frequenza selezionata si accende la luce<br />
LED verde.<br />
Ricezione<br />
Ogni volta che un segnale è presente sulla frequenza selezionata, si accende il LED verde.<br />
Note: Se la frequenza selezionata viene decodificata con un codice CTCSS-/DCS, tutti i<br />
segnali che vengono codificati con un codice diverso non verranno uditi. Il LED verde si<br />
accende ma nessun segnale è udibile.<br />
Ricarica<br />
Prima del primo utilizzo, la batteria (11) deve essere completamente carica. Il ciclo completo<br />
di carica dura circa 6 ore.<br />
Collegare il cavo di alimentazione alla base prima di connettere la spina alla presa 220V. Il<br />
Led (6) è di colore verde, poi posizionare la batteria. Durante la carica il Led è di colore<br />
rosso.<br />
Quando la carica è completata il led acceso è di colore verde. Togliere la radio dalla base.<br />
On / Off<br />
Per accendere la radio, ruotare il tasto on/off-volume (5) in senso orario. Se il tono vocale<br />
è attivato la radio emetterà un suono e annuncerà il numero del canale attuale.<br />
Per spegnere la radio, ruotare il tasto on/off-volume (5) in senso anti-orario.<br />
Volume Control<br />
Utilizzare il tasto on/off-volume (5) per il controllo del volume. Per alzare il livello ruotare<br />
il tasto in senso orario, ruotando il tasto in senso contrario il volume si riduce .<br />
Per impostare il livello di volume dopo aver acceso la radio, tenere premuto il tasto funzione<br />
(8).<br />
Note: Il tasto funzione (8) può essere programmato via software con una di queste funzioni:<br />
monitor, tx-alta / bassa potenza e di allarme.<br />
FUNZIONI TASTIERA<br />
TASTO PTT<br />
IL tasto PTT (7) è posizionato sul lato sinistro della radio. Tenendo premuto il tasto PTT<br />
si attiverà la trasmissione. Il LED rosso(6) si accenderà.<br />
Tasto funzione 1 / 2<br />
Il tasto funzione 1 e 2 (8) si trova sotto il tasto PTT (7). Può essere programmato con<br />
una di queste funzioni.<br />
Off<br />
Nessuna funzione<br />
Allarme<br />
Premendo il tasto funzione (5) si udirà un tono di allarme costante, sulla radio che trasmette.<br />
Modalità di trasmissione e ricezione sono bloccati.<br />
Per disattivare l'allarme, premere il tasto funzione (5) o spegnere la radio<br />
Monitor<br />
La funzione di controllo disattiva lo squelch e il tipico rumore costante è udibile. I segnali<br />
deboli che non passano lo squelch e quelli codificati CTCSS / DCS possono essere ascoltati<br />
con la funzione monitor.<br />
Selezione Canale<br />
Per la selezione dei canali, utilizzare il tasto (5). Se il tono vocale è attivo, una voce annuncerà<br />
TX Power<br />
il numero del canale selezionato.<br />
La bassa potenza tx è indicata da un unico segnale e l'alta potenza tx da un doppio tono.<br />
Note:<br />
Nota: Con la versione PMR e Freenet, la bassa potenza tx è a 300 mW e l'alta di<br />
La funzione di scansione opera sul canale 16. Quando la scansione è attivata, il canale<br />
500 mW. Con le versioni COM il max. tx potenza è 4 W per UHF e 5 W per VHF. I bassi<br />
16 non è più disponibile per la comunicazione radio.<br />
valori di potenza e di alta TX possono essere impostati via software secondo la licenza<br />
Se verrà selezionato il canale 16, si udirà un tono costante.<br />
36<br />
radio commerciale.<br />
37
FUNZIONI AGGIUNTIVE<br />
Le seguenti funzioni sono gestite via software. Questo vale per l'attivazione e la modifica<br />
delle impostazioni.<br />
scan<br />
Ricerca i segnali sulle frequenze programmate che vengono aggiunti alla lista di scansione.<br />
Un canale programmato può essere aggiunto o eliminato dalla lista di scansione<br />
via software.<br />
Se la funzione di scansione è attivata, il canale 16 è riservato per questa funzione e la<br />
comunicazione non è più possibile su questo canale. Per avviare la funzione di scansione,<br />
selezionare il canale 16 con il selettore di canale (4). La modalità di scansione<br />
attiva è indicata da una luce lampeggiante verde. Una volta che viene rilevato un segnale,<br />
la funzione di scansione è in pausa e la radio rimane sul canale fino al termine<br />
del segnale. Poi la scansione continua.<br />
Per terminare la funzione di scansione passare a un altro canale.<br />
VOX<br />
VOX, l’attivazione della trasmissione tramite voce è disponibile solamente con il<br />
micro-auricolare collegato. Questa funzione viene attivata via software.<br />
Non appena la voce raggiunge un certo livello di volume, la trasmissione inizia automaticamente,<br />
nessuna spinta del tasto PTT è richiesta. La sensibilità è impostata secondo<br />
necessità nel range tra 1-9.<br />
CTCSS/DCS<br />
39 CTCSS e 166 DCS (83 più 83) codici sono disponibili per filtrare i-segnali indesiderati,<br />
cioè con CTCSS attivo / codifica DCS, solo i segnali con il codice corrispondente<br />
sono udibili. I segnali con codici diversi sono disattivati.<br />
Ciascun canale può essere assegnato ad un codice CTCSS / DCS per la frequenza di<br />
trasmissione e un codice per la frequenza di ricezione.<br />
Nota: CTCSS / DCS non garantiscono la privacy. I Segnali codificati sono ricevuti da<br />
radio che non utilizzano CTCSS / DCS.<br />
squelch<br />
La sensibilità dello squelch può essere impostata via software, su una scala tra 0 e 9.<br />
Con il valore 0, il silenziamento viene spento e la frequenza intera è udibile. Con valore<br />
9, soltanto i segnali più forti passeranno attraverso il filtro.<br />
Tono di avviso<br />
Un breve segnale acustico viene emesso quando un canale viene selezionato o<br />
quando la radio viene accesa.<br />
La funzione di segnale di avviso deve essere attivato via software<br />
Annuncio vocale<br />
Con l’annuncio vocale, il canale selezionato viene annunciato in lingua inglese. Un livello<br />
di batteria quasi scarica è annunciato con la dicitura "Si prega di caricare la batteria."<br />
Attivare e disattivare questa funzione via software.<br />
compander<br />
Per il miglioramento del segnale, la funzione compander comprime il segnale dopo la<br />
trasmissione e lo espande alla ricezione. Questa funzione può essere attivata per ogni<br />
canale.<br />
epilogo<br />
Un ulteriore funzione di miglioramento del segnale è la funzione epilogo. Talvolta il segnale<br />
potrebbe essere disturbato, ad esempio da un ticchettio.<br />
Questa funzione può essere attivata per ogni canale.<br />
scrambler<br />
Questa funzione può essere assegnata a ciascun canale via software.<br />
Durante la trasmissione, la funzione di scrambling rimuove una parte del segnale. Per i<br />
ricevitori senza scrambler attivato, il segnale suona distorto e i messaggi vocali spesso<br />
non sono comprensibili. Durante la ricezione, la funzione di scrambling aggiunge la<br />
parte rimossa e quindi, i segnali sono completi.<br />
Nota: Dato che ci sono molte procedure diverse, la funzione di scrambler potrebbe non<br />
essere compatibile con altri modelli di radio.<br />
busy lock (blocco)<br />
Questa funzione impedisce la trasmissione durante la ricezione di un segnale. Quando<br />
il tasto PTT viene premuto mentre è presente un segnale sul canale selezionato, la trasmissione<br />
viene bloccata e viene emesso un segnale. Questa funzione può essere attivata<br />
per ogni canale.<br />
time-out-timer<br />
In generale, il consumo di energia in modalità di trasmissione è superiore che in ricezione<br />
o standby. Inoltre, la trasmissione overlong riduce la capacità della batteria più rapidamente<br />
e la temperatura della radio aumenta rapidamente.<br />
Per prevenire la trasmissione troppo lunga, il time-out-timer può essere impostato via<br />
software tra 15 e 600 secondi.<br />
battery save (risparmio batteria)<br />
La funzione di risparmio della batteria prolunga la capacità della batteria passando alla<br />
modalità di attesa in rapporti 1:1, 1:2, 1:3 e 1:4<br />
38 39
allarme<br />
Se la radio deve essere posizionato fuori portata dell'operatore e vuole essere informato<br />
su una chiamata in arrivo, la funzione di allarme può essere attivata via software.<br />
Dopo la ricezione di una chiamata, viene emesso un segnale forte per<br />
informarlo.<br />
Bandwidth (larghezza di banda)<br />
Per la radio versione commerciale UHF e VHF, la larghezza di banda 12.5 kHz, 20<br />
kHz e 25 kHz può essere selezionata via software. Per la versione PMR e Freenet, la<br />
larghezza di banda 12,5 kHz è fissa.<br />
Chiarificazione voce<br />
Per la comunicazione in ambienti rumorosi, si consiglia la funzione di Chiarificazione<br />
voce, un elemento di miglioramento del segnale che consente di separare la voce da<br />
forti rumori di fondo per una migliore comprensione.<br />
Questa funzione può essere attivata per ogni canale.<br />
Radio FM<br />
Per attivare la funzione fm radio tenere premuto il tasto funzione 1 al momento dell’accensione.<br />
Il <strong>TeCom</strong>-<strong>IP</strong> è dotato della modalità scansione frequenza per impostare un canale<br />
radio. Premere il tasto funzione 1 brevemente per avviare la funzione di scansione.<br />
Una volta che viene rilevato un canale, la funzione di scansione si arresta automaticamente.<br />
Per disattivare la funzione fm radio tenere premuto il tasto funzione 1 fino a un doppio<br />
segnale sonoro.<br />
Durante la trasmissione o la ricezione di un segnale, la funzione si interrompe automaticamente.<br />
CONNESSIONI<br />
Il <strong>TeCom</strong>-<strong>IP</strong> è dotato di un connettore compatibile Kenwood (3.5/2.5 mm - Stereo /<br />
Stereo) per auricolare / microfono e cavo di collegamento PC per il software T-UP24.<br />
(Accessorio opzionale).<br />
40 41
39 CTCSS frequency code (Hz)<br />
67.0 88.5 114.8 151.4 203.5<br />
69.3 91.5 118.8 156.7 210.7<br />
71.9 94.8 123.0 162.2 218.1<br />
74.4 97.4 127.3 167.9 225.7<br />
77.0 100.0 131.8 173.8 233.6<br />
79.7 103.5 136.5 179.9 241.8<br />
82.5 107.2 141.3 186.2 250.3<br />
85.4 110.9 146.2 192.8<br />
Technische Daten / Specifications / Especificaciones / Caratteristiche<br />
Frequenz Bereich / Frequency Range<br />
Rango de Frecuencia / Range di Frequenza<br />
UHF: 400 - 470 MHZ<br />
VHF: 136 - 174 MHz<br />
Betriebstemperatur / Working Temperate<br />
-20°C - +50°C<br />
Temperatura Funcionamiento / Temperatura di Lavoro<br />
Betriebsspannung / Operating Voltage DC 7.4V<br />
Voltaje Funcionamiento / Voltaggio<br />
Gewicht / Weight / Peso<br />
185g<br />
Antennen Impedanz / Antenna impedance<br />
50Ω<br />
Impedancia de Antena / Antenna Impedenza<br />
83 DCS frequency codes N/I<br />
D023 D114 D174 D315 D445 D631<br />
D025 D115 D205 D331 D464 D632<br />
D026 D116 D223 D343 D465 D654<br />
D031 D125 D226 D346 D466 D662<br />
D032 D131 D243 D351 D503 D664<br />
D043 D132 D244 D364 D506 D703<br />
D047 D134 D245 D365 D516 D712<br />
D051 D143 D251 D371 D532 D723<br />
D054 D152 D261 D411 D546 D731<br />
D065 D155 D263 D412 D565 D732<br />
D071 D156 D265 D413 D606 D734<br />
D072 D162 D271 D423 D612 D743<br />
D073 D165 D306 D431 D624 D754<br />
D074 D172 D311 D432 D627<br />
Sender / Transmitter / Transmisor / Transmissore<br />
Frequenz Stabilität / Frequency Stability<br />
±2.5PPM<br />
Estabilidad Frecuencia / Stabilità di frequenza<br />
Sendeleistung / Output Power<br />
UHF: max. 4 W<br />
Potencia RF Portadora / Potere dell'uscita<br />
VHF: max. 5 W<br />
Max. Frequenz Hub / Max Frequency Deviation<br />
≤ 2.5kHz (N)<br />
Desviación Máx. Frecuencia / Deviazione<br />
≤ 5kHz (W)<br />
Audio Verzerrung / Audio Distortion ≤ 5%<br />
Deformación Audio / Audio Distorsione<br />
Nachbarkanalleistung / Adjacent Channel Power<br />
≥ −65dB<br />
Potencia de Canal Adyacent / Potere a canale adiacente<br />
Nebenwellen-Abstrahlung / Radiated Harmonics<br />
-45dBm<br />
Radiación Espuria / Spurie Radiation<br />
Empfänger / Receiver Receptor / Ricezione<br />
Empfindlichkeit / RF Sensitivity (SINAD)<br />
Sensibilidad / Sensibilità<br />
W: 0.15uV>12dB<br />
N: 0.15uV>12dB<br />
Audio Verzerrung / Audio Distortion ≤ 3%<br />
Deformación Audio / Audio Distorsione<br />
Nebenkanal Auswahl / Adjacent Channel Selectivity ≥ 65dB<br />
Selección Canal Adyacente / Selettività a canale adiacente<br />
Intermodulation / Intermodulation Rejection<br />
≥ 60dB<br />
Intermodulación / Intermodulazione<br />
Nebenwellenabstrahlung / Spurious radiation<br />
≥ 60dBm<br />
Radiación Espuria / Spurie Radiation<br />
Widerstand / Spurious response rejection<br />
≥ 60dB<br />
Resistencia / Resistance<br />
42 43
Zum Vertrieb und Betrieb in<br />
For sale and use in<br />
Para venta y uso en<br />
<strong>TeCom</strong>-<strong>IP</strong> FreeNet<br />
<strong>TeCom</strong>-<strong>IP</strong> PMR<br />
<strong>TeCom</strong>-<strong>IP</strong> UHF-COM<br />
<strong>TeCom</strong>-<strong>IP</strong> VHF-COM<br />
: DE<br />
: AT, BG, CH, CY, CZ, DE, DK, EE,<br />
ES, FI, FR, GB, GR, HU, IE, IT, LT,<br />
LU, NL, NO, PL, PT, RO, SE, SI, SK<br />
: AT, BG, CH, CY, CZ, DE, DK, EE,<br />
ES, FI, FR, GB, GR, HU, IE, IT*, LT,<br />
LU, NL, NO, PL, PT, RO, SE, SI, SK<br />
: AT, BG, CH, CY, CZ, DE, DK, EE,<br />
ES^, FI, FR, GB, GR, HU, IE, IT*, LT,<br />
LU, NL, NO, PL, PT, RO, SE, SI, SK<br />
^ La banda de frecuencias VHF permitida en Espana es de 147 - 174 MHz<br />
* In Italia il passo di canalizzazione a 25 kHz non è consentito<br />
WEEE - Reg. Nr. DE 91930360 8 ( EAR ), 50635 ( ERA )<br />
GRS-Nr. 10001374<br />
DSD 2617305, ARA 2284<br />
TEAM Electronic GmbH<br />
Bolongarostrasse 88; D-65929 Frankfurt am Main, Germany<br />
phone ++49 / 69 / 300 950 0 - fax ++49 / 69 / 31 43 82<br />
www.team-electronic.de - team-electronic@t-online.de<br />
Irrtümer und technische Änderungen sind vorbehalten. / Mistakes and technical changes are reserved. (V 03-13)


