instrucciones de uso instrucciones de mantenimiento para el ... - Andis
instrucciones de uso instrucciones de mantenimiento para el ... - Andis
instrucciones de uso instrucciones de mantenimiento para el ... - Andis

Create successful ePaper yourself
Turn your PDF publications into a flip-book with our unique Google optimized e-Paper software.
DATE: 10/20/08 JOB #: 2008-426 FORM #: 33741 DESCRIPTION: MARCEL CURLING IRON UC FLAT SIZE: 17" x 8.5" FOLDED SIZE: 4.25" x 8.5" COLOR: B/W TRANSLATIONS: __NEED __REQUESTED __PLACED X NOTES: J PELTON FINAL<br />
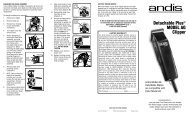
Pinza<br />
Soporte <strong>de</strong> seguridad<br />
incorporado<br />
Disco <strong>de</strong> encendido/<br />
apagado y control<br />
<strong>de</strong> la temperatura<br />
Cilindro<br />
Agarra<strong>de</strong>ra<br />
giratoria principal<br />
Agarra<strong>de</strong>ra<br />
giratoria Marc<strong>el</strong><br />
INSTRUCCIONES DE USO<br />
Este a<strong>para</strong>to <strong>el</strong>éctrico tiene una clavija <strong>de</strong> contacto polarizada (una <strong>de</strong> las<br />
patillas <strong>de</strong> conexión es más ancha que la otra). Como medida <strong>de</strong> seguridad, la<br />
clavija se pue<strong>de</strong> conectar en una sola posición en un tomacorriente polarizado.<br />
Si la clavija no entra completamente <strong>de</strong>ntro <strong>de</strong>l tomacorriente, invierta la<br />
posición <strong>de</strong> la clavija. Si aún así no entra, llame a un <strong>el</strong>ectricista calificado<br />
<strong>para</strong> que instale un tomacorriente apropiado. No intente <strong>de</strong>sactivar esta<br />
característica <strong>de</strong> seguridad.<br />
ADVERTENCIA: Estas tenacillas <strong>de</strong> rizar han sido diseñadas <strong>para</strong> cab<strong>el</strong>lo muy<br />
grueso, abundante o difícil <strong>de</strong> rizar. El cilindro se calentará mucho al usarse los<br />
ajustes altos. Tenga cuidado al usarlas:<br />
• Mantenga las tenacillas <strong>de</strong> rizar lejos <strong>de</strong> la pi<strong>el</strong>. No toque <strong>el</strong> cilindro caliente<br />
con las yemas <strong>de</strong> los <strong>de</strong>dos.<br />
• Para cab<strong>el</strong>lo más corto, coloque un peine plástico <strong>de</strong>lgado entre <strong>el</strong> cuero<br />
cab<strong>el</strong>ludo y <strong>el</strong> cilindro <strong>para</strong> evitar tocar <strong>el</strong> cuero cab<strong>el</strong>ludo.<br />
• Pruebe en una pequeña sección <strong>de</strong> cab<strong>el</strong>lo <strong>para</strong> <strong>de</strong>terminar <strong>el</strong> ajuste <strong>de</strong> calor<br />
que mejor funcione.<br />
Desenrolle <strong>el</strong> cable <strong>el</strong>éctrico antes <strong>de</strong> usar <strong>el</strong> a<strong>para</strong>to. Después <strong>de</strong> usarlo, vu<strong>el</strong>va<br />
a enrollar <strong>el</strong> cable <strong>el</strong>éctrico y guár<strong>de</strong> la unidad en un lugar seguro. No enrolle <strong>el</strong><br />
cable <strong>el</strong>éctrico muy apretado en <strong>el</strong> a<strong>para</strong>to. No cu<strong>el</strong>gue <strong>el</strong> a<strong>para</strong>to por <strong>el</strong> cordón<br />
<strong>el</strong>éctrico.<br />
PARA USAR SUS TENACILLAS DE RIZAR MARCEL DE ANDIS<br />
1. Para obtener resultados óptimos, asegúrese <strong>de</strong> que <strong>el</strong> cab<strong>el</strong>lo esté limpio y<br />
seco antes <strong>de</strong> crear <strong>el</strong> peinado.<br />
2. Utilice una temperatura <strong>de</strong> peinado más baja <strong>para</strong> cab<strong>el</strong>lo que sea fino,<br />
blanqueado o esté en malas condiciones. Utilice un ajuste más alto<br />
<strong>para</strong> cab<strong>el</strong>lo normal. Una vez que las tenacillas lleguen a la temperatura<br />
s<strong>el</strong>eccionada, mantendrán dicha temperatura a lo largo <strong>de</strong>l proceso <strong>de</strong><br />
creación <strong>de</strong>l peinado, <strong>para</strong> lograr rizos perfectos y uniformes cada vez.<br />
3. Comience dividiendo <strong>el</strong> cab<strong>el</strong>lo en secciones <strong>de</strong> no más <strong>de</strong> 1/2" <strong>de</strong> grosor y<br />
2" <strong>de</strong> ancho. Cuanto mayor sea la sección, tanto más flojo será <strong>el</strong> rizo.<br />
4. Abra la pinza y coloque una sección <strong>de</strong> cab<strong>el</strong>lo a la vez sobre los extremos<br />
<strong>de</strong>l cilindro. Cierre la pinza y asegúrese <strong>de</strong> que los extremos <strong>de</strong>l cab<strong>el</strong>lo se<br />
extiendan un poco más allá <strong>de</strong> la pinza.<br />
5. Mantenga la sección <strong>de</strong> cab<strong>el</strong>lo bien estirado mientras lo enrolla alre<strong>de</strong>dor<br />
<strong>de</strong>l cilindro, girando la agarra<strong>de</strong>ra con una mano. Enrolle <strong>el</strong> rizo en dirección<br />
<strong>de</strong>l cuero cab<strong>el</strong>ludo al máximo que <strong>de</strong>see–asegurándose <strong>de</strong> no tocar <strong>el</strong> cuero<br />
cab<strong>el</strong>ludo con <strong>el</strong> cilindro caliente.<br />
6. Para rizos apretados o cab<strong>el</strong>lo que es difícil <strong>de</strong> rizar, mantenga <strong>el</strong> rizo en<br />
posición durante más tiempo. Manténgalo durante menos tiempo <strong>para</strong><br />
cab<strong>el</strong>lo que es fácil <strong>de</strong> rizar, <strong>para</strong> rizos más flojos o <strong>para</strong> ondas.<br />
7. La dirección <strong>de</strong>l rizo <strong>de</strong>pen<strong>de</strong> <strong>de</strong> la manera en que enrolla <strong>el</strong> cab<strong>el</strong>lo alre<strong>de</strong>dor<br />
<strong>de</strong>l cilindro. Para enrollar <strong>el</strong> cab<strong>el</strong>lo hacia arriba, coloque la pinza <strong>de</strong>bajo <strong>de</strong><br />
la sección, con <strong>el</strong> cilindro arriba y enrolle <strong>el</strong> cab<strong>el</strong>lo hacia arriba. Para un<br />
peinado enrollado hacia a<strong>de</strong>ntro, coloque la pinza sobre la sección, con <strong>el</strong><br />
cilindro <strong>de</strong>bajo, y enrolle <strong>el</strong> cab<strong>el</strong>lo hacia abajo.<br />
NOTA: Al usar las tenacillas, mantenga su mano lejos <strong>de</strong>l extremo <strong>de</strong> la<br />
agarra<strong>de</strong>ra <strong>para</strong> evitar bloquear la acción giratoria <strong>de</strong>l cordón.<br />
Manufacturer’s 12 Month Limited Warranty<br />
This <strong>Andis</strong> product is warranted against <strong>de</strong>fective material or workmanship for one year from the<br />
date of purchase. All implied warranties arising and by virtue of State law shall also be limited to<br />
one year. Any <strong>Andis</strong> product <strong>de</strong>termined to be <strong>de</strong>fective in material or workmanship during the<br />
warranty period will be repaired or replaced without cost to the consumer for parts and labor. The<br />
<strong>de</strong>fective product must be returned via parc<strong>el</strong> post insured or U.P.S., with proof of purchase to any<br />
<strong>Andis</strong> Authorized Service Station or to <strong>Andis</strong>, 1800 Renaissance Blvd., Sturtevant, WI 53177 USA.<br />
Attach a letter <strong>de</strong>scribing the nature of the problem. <strong>Andis</strong> will not be responsible for cost of repairs<br />
or alterations ma<strong>de</strong> by any other person, agency or company, nor for inci<strong>de</strong>ntal or consequential<br />
damages of any type, or for the use of unauthorized attachments. Some states may not allow<br />
exclusion of limitation of inci<strong>de</strong>ntal or consequential damages, so the limitation or exclusion may<br />
not apply to you.<br />
Date Purchased_______________________ Mo<strong>de</strong>l____________________________________<br />
To find an <strong>Andis</strong> Authorized Service Station near you log on to www.andis.com or<br />
contact our customer service <strong>de</strong>partment: 1-800-558-9441<br />
GARANTÍA LIMITADA DEL FABRICANTE DE 12 MESES<br />
Este producto <strong>Andis</strong> está garantizado contra material o mano <strong>de</strong> obra <strong>de</strong>fectuosos durante un año<br />
a partir <strong>de</strong> la fecha <strong>de</strong> compra. Todas las garantías implícitas provenientes y en virtud <strong>de</strong> las leyes<br />
estatales también <strong>de</strong>berán ser limitadas a un año. Cualquier producto <strong>Andis</strong> <strong>de</strong>terminado como<br />
<strong>de</strong>fectuoso en cuanto a materiales o mano <strong>de</strong> obra durante <strong>el</strong> período <strong>de</strong> garantía será reemplazado<br />
o re<strong>para</strong>do sin costo al consumidor por piezas y mano <strong>de</strong> obra. El producto <strong>de</strong>fectuoso <strong>de</strong>be ser<br />
<strong>de</strong>vu<strong>el</strong>to junto con <strong>el</strong> comprobante <strong>de</strong> compra a cualquiera <strong>de</strong> las Estaciónes <strong>de</strong> Servicio Autorizado<br />
<strong>de</strong> <strong>Andis</strong> o a: <strong>Andis</strong>, 1800 Renaissance Blvd., Sturtevant, WI 53177 EEUU. Adjunte también una<br />
carta explicando la naturaleza <strong>de</strong>l problema. <strong>Andis</strong> no será responsable por <strong>el</strong> costo <strong>de</strong> ninguna<br />
re<strong>para</strong>ción realizada por otra persona, agencia o compañía, ni por daños inci<strong>de</strong>ntales o consecuentes<br />
<strong>de</strong> ningún tipo, ni por <strong>el</strong> <strong>uso</strong> <strong>de</strong> accesorios no autorizados. Algunos estados prohíben la exclusión <strong>de</strong><br />
daños consecuentes o inci<strong>de</strong>ntales, <strong>de</strong> forma que dicha limitación o exclusión podría no aplicarse<br />
a su caso.<br />
Fecha <strong>de</strong> compra______________________ Mo<strong>de</strong>lo___________________________________<br />
Para encontrar una Estación <strong>de</strong> Servicio Autorizado <strong>de</strong> <strong>Andis</strong> cerca <strong>de</strong> su localidad,<br />
inicie una session en www.andis.com o póngase en contacto con nuestro <strong>de</strong>partamento<br />
<strong>de</strong> servicio al cliente: 1-800-558-9441<br />
®<br />
PRECALENTAMIENTO:<br />
1. Coloque las tenacillas en <strong>el</strong> soporte <strong>de</strong> seguridad sobre una superficie lisa y<br />
plana, y enchúf<strong>el</strong>as en un tomacorriente <strong>el</strong>éctrico.<br />
2. Gire <strong>el</strong> disco <strong>de</strong> encendido/apagado hasta llegar al ajuste <strong>de</strong>seado <strong>de</strong> calor.<br />
La luz indicadora <strong>de</strong> potencia se encen<strong>de</strong>rá. Las tenacillas <strong>de</strong>morarán<br />
aproximadamente 3-6 minutos en calentarse.<br />
INSTRUCCIONES DE<br />
MANTENIMIENTO PARA EL USARIO<br />
No es necesario dar ningún tipo <strong>de</strong> <strong>mantenimiento</strong>, limpieza o lubricación<br />
especiales a este a<strong>para</strong>to <strong>el</strong>éctrico. Si la varilla rizadora no se calienta, <strong>de</strong>vu<strong>el</strong>va<br />
<strong>el</strong> a<strong>para</strong>to a un centro <strong>de</strong> servicio <strong>Andis</strong> autorizado <strong>para</strong> revisión. Repár<strong>el</strong>o sólo<br />
en los Centros Autorizados <strong>de</strong> Re<strong>para</strong>ción <strong>Andis</strong>.<br />
KEEP THIS FOR YOUR RECORDS<br />
Guar<strong>de</strong> este documento en sus archivos<br />
<strong>Andis</strong> Company<br />
1800 Renaissance Blvd. Sturtevant, WI 53177<br />
1-800-558-9441<br />
info@andisco.com www.andis.com<br />
Form #33741 ©2008 <strong>Andis</strong> Company, USA Printed in P.R.C.<br />
MODEL CI-74M<br />
MODEL CI-71M<br />
Item pictured may differ from actual product<br />
El artículo ilustrado pue<strong>de</strong> diferir <strong>de</strong>l producto real<br />
Congratulations—you just went First Class when you bought this <strong>Andis</strong><br />
appliance. Careful workmanship and quality <strong>de</strong>sign have been hallmarks of<br />
<strong>Andis</strong> products since 1922.<br />
¡F<strong>el</strong>icitaciones! Usted escogió un producto <strong>de</strong> primera clase al comprar<br />
este a<strong>para</strong>to <strong>el</strong>éctrico <strong>Andis</strong>. El diseño <strong>de</strong> primera calidad y la mano <strong>de</strong> obra<br />
utilizada en su fabricación han distinguido a los productos <strong>Andis</strong> <strong>de</strong>s<strong>de</strong> 1922.
Important Safeguards<br />
When using <strong>el</strong>ectrical appliances, especially when children are present,<br />
basic safety precautions should always be followed, including the<br />
following:<br />
Read all instructions before using.<br />
KEEP AWAY FROM WATER.<br />
DANGER: As with most <strong>el</strong>ectrical appliances, <strong>el</strong>ectrical<br />
parts are <strong>el</strong>ectrically live even when the switch is off. To reduce the<br />
risk of <strong>de</strong>ath by <strong>el</strong>ectric shock:<br />
1. Always “unplug it” immediat<strong>el</strong>y after using.<br />
2. Do not use while bathing.<br />
3. Do not place or store appliance where it can fall or be pulled into a<br />
tub or sink.<br />
4. Do not place in or drop into water or other liquid.<br />
5. If an appliance falls into water, “unplug it” immediat<strong>el</strong>y. Do not<br />
reach into the water.<br />
WARNING: To reduce the risk of burns, <strong>el</strong>ectrocution, fire,<br />
or injury to persons:<br />
1. An appliance should never be left unatten<strong>de</strong>d when plugged in.<br />
2. Close supervision is necessary when this appliance is used by, on<br />
or near children or individuals with certain disabilities.<br />
3. Use this appliance only for its inten<strong>de</strong>d use as <strong>de</strong>scribed in this<br />
manual. Do not use attachments not recommen<strong>de</strong>d by <strong>Andis</strong><br />
Company.<br />
4. Never operate this appliance if it has a damaged cord or plug. If<br />
it is not working properly, or if it has been dropped, damaged, or<br />
dropped into water return the appliance to an <strong>Andis</strong> Authorized<br />
Service Station for examination and repair.<br />
5. Keep the cord away from heated surfaces. Do not wrap the cord<br />
around the appliance.<br />
6. Never use while sleeping.<br />
7. Do not use outdoors or operate where aerosol (spray) products are<br />
being used or where oxygen is being administered.<br />
8. Do not use an extension cord with this appliance.<br />
9. This curling iron and clamp are hot when in use. Do not let eyes<br />
and bare skin touch heated surfaces.<br />
10. Do not place the heated curling iron directly on any surface while it<br />
is hot or plugged in. Use the stand provi<strong>de</strong>d.<br />
SAVE THESE INSTRUCTIONS<br />
This appliance is inten<strong>de</strong>d for profesSional use<br />
Clamp<br />
Built-In<br />
Safety Stand<br />
On/Off Dial/<br />
Temperature Control<br />
Barr<strong>el</strong><br />
Rotating<br />
Main Handle<br />
Rotating<br />
Marc<strong>el</strong> Handle<br />
OPERATING INSTRUCTIONS<br />
This appliance has a polarized plug (one bla<strong>de</strong> is wi<strong>de</strong>r than the other). As a<br />
safety feature, the plug will fit in a polarized outlet only one way. If the plug<br />
does not fit fully in the outlet, reverse the plug. If it still does not fit, contact a<br />
qualified <strong>el</strong>ectrician to install the proper outlet. Do not attempt to <strong>de</strong>feat this<br />
safety feature.<br />
WARNING: This curling iron has been <strong>de</strong>signed for very coarse, thick, or hardto-curl<br />
hair. The barr<strong>el</strong> will get very hot when using the high settings. Be careful<br />
when using it:<br />
• Keep curling iron away from skin. Do not touch the hot barr<strong>el</strong> with fingertips.<br />
• For shorter hair, place a thin plastic comb between scalp and barr<strong>el</strong> to avoid<br />
touching the scalp.<br />
• Test a small section of hair to <strong>de</strong>termine the heat setting which works best.<br />
PRE-HEATING:<br />
1. Rest the iron on the safety stand on a flat, smooth surface and plug into an<br />
<strong>el</strong>ectrical outlet.<br />
2. Turn the on/off dial to <strong>de</strong>sired heat setting. The power indicator light will go<br />
on. The iron will take approximat<strong>el</strong>y 3-6 minutes to heat up.<br />
USER-MAINTENANCE INSTRUCTIONS<br />
This appliance does not require special maintenance, cleaning or lubrication.<br />
If metal tube does not get hot, return for servicing. Service only through <strong>Andis</strong><br />
Authorized Service Stations.<br />
Untwist cord before use. After use, re-wrap cord and store in a safe place. Do<br />
not wrap cord tightly around appliance. Do not hang the unit by the power cord.<br />
TO USE YOUR ANDIS MARCEL CURLING IRON<br />
1. For best results, make sure that hair is clean and dry before styling.<br />
2. Use a lower styling temperature for hair that is fine, bleached or in poor<br />
condition. Use a higher setting for normal hair. Once your iron reaches the<br />
temperature you s<strong>el</strong>ect, it maintains it all through styling, for even, perfect<br />
curls every time.<br />
3. Start by dividing the hair into sections not more than 1/2" thick and 2" wi<strong>de</strong>.<br />
The larger the section, the looser the curl.<br />
4. Open the clamp and place one section of hair at a time over the ends of the<br />
barr<strong>el</strong>. Close the clamp and make sure that the ends of the hair extend just a<br />
bit beyond the clamp.<br />
5. Keep the section of hair taut as you wind it around the barr<strong>el</strong> by turning the<br />
handle with one hand. Wind the curl toward the scalp as far as you wish to<br />
go–making sure you do not touch the scalp with the hot barr<strong>el</strong>.<br />
6. For tight curls or hair that is hard to curl, hold the curl in place for longer.<br />
Hold for less time for hair that is easy to curl, for looser curls or waves.<br />
7. The direction of the curl <strong>de</strong>pends on the way you wind the hair around the<br />
barr<strong>el</strong>. To turn hair up, place clamp un<strong>de</strong>r the section, with barr<strong>el</strong> on top, and<br />
wind hair upwards. For a turned-un<strong>de</strong>r look, place clamp over the section,<br />
with barr<strong>el</strong> un<strong>de</strong>rneath, and wind hair un<strong>de</strong>r.<br />
NOTE: When using the iron keep your hand away from the end of the handle to<br />
avoid blocking the swiv<strong>el</strong> action of the cord.<br />
SPANISH<br />
PRECAUCIONES IMPORTANTES<br />
Cuando use cualquier a<strong>para</strong>to <strong>el</strong>éctrico, especialmente en presencia<br />
<strong>de</strong> niños, siempre cumpla con las precauciones básicas <strong>de</strong> seguridad,<br />
incluyendo las siguientes:<br />
LEA TODAS LAS INSTRUCCIONES ANTES DE USAR ESTE APARATO.<br />
NO LO ACERQUE AL AGUA.<br />
PELIGRO - Como es <strong>el</strong> caso con todos los a<strong>para</strong>tos<br />
<strong>el</strong>éctricos, las piezas <strong>el</strong>éctricas tienen corriente incl<strong>uso</strong> cuando<br />
<strong>el</strong> interruptor <strong>de</strong> encendido está en la posición <strong>de</strong> apagado. Para<br />
reducir <strong>el</strong> p<strong>el</strong>igro <strong>de</strong> muerte por <strong>de</strong>scargas <strong>el</strong>éctricas:<br />
1. Siempre <strong>de</strong>sconecte <strong>el</strong> a<strong>para</strong>to inmediatamente al terminar <strong>de</strong> usarlo.<br />
2. No use <strong>el</strong> a<strong>para</strong>to mientras se esté bañando.<br />
3. No coloque ni guar<strong>de</strong> <strong>el</strong> a<strong>para</strong>to don<strong>de</strong> éste pueda caer <strong>de</strong>ntro <strong>de</strong><br />
una bañera o un lavamanos.<br />
4. No ponga <strong>el</strong> a<strong>para</strong>to ni lo <strong>de</strong>je caer en agua ni en ningún otro líquido.<br />
5. Si algún a<strong>para</strong>to <strong>el</strong>éctrico llegara a caer en agua, <strong>de</strong>sconéct<strong>el</strong>o <strong>de</strong><br />
inmediato. ¡No meta la mano al agua <strong>para</strong> tratar <strong>de</strong> sacarlo!<br />
ADVERTENCIA - Para reducir <strong>el</strong> riesgo <strong>de</strong> sufrir<br />
quemaduras, <strong>el</strong>ectrocución, o lesiones, o <strong>para</strong> evitar un incendio:<br />
1. No <strong>de</strong>je a<strong>para</strong>tos <strong>el</strong>éctricos <strong>de</strong>satendidos cuando estén conectados.<br />
2. Es necesaria una supervisión muy <strong>de</strong> cerca cuando este artefacto<br />
sea usado por, en o cerca <strong>de</strong> niños o personas con ciertas<br />
discapacida<strong>de</strong>s.<br />
3. Use este a<strong>para</strong>to <strong>el</strong>éctrico solamente con <strong>el</strong> propósito <strong>para</strong> <strong>el</strong><br />
que está <strong>de</strong>stinado y como se <strong>de</strong>scribe en este folleto. No use<br />
accesorios que no sean los recomendados por la compañía <strong>Andis</strong>.<br />
4. Nunca use este a<strong>para</strong>to si la clavija <strong>de</strong> contacto o <strong>el</strong> cable están<br />
dañados. Si <strong>el</strong> a<strong>para</strong>to no funciona correctamente, o si se ha caído,<br />
dañado o si ha sido sumergido en agua, <strong>de</strong>vuélvalo a un Centro<br />
Autorizado <strong>de</strong> Servicio <strong>Andis</strong> <strong>para</strong> que sea revisado y re<strong>para</strong>do.<br />
5. Mantenga <strong>el</strong> cable alejado <strong>de</strong> cualquier superficie caliente. No<br />
enrolle <strong>el</strong> cable en <strong>el</strong> a<strong>para</strong>to.<br />
6. Nunca use este a<strong>para</strong>to mientras duerma.<br />
7. No use este a<strong>para</strong>to al aire libre, ni lo haga funcionar en don<strong>de</strong> se<br />
estén usando productos en aerosol, o don<strong>de</strong> se esté administrando<br />
oxígeno.<br />
8. No use un cable <strong>de</strong> extensión <strong>para</strong> conectar este a<strong>para</strong>to.<br />
9. Las tenazas y <strong>el</strong> pinzas están calientes mientras se usa <strong>el</strong> a<strong>para</strong>to.<br />
No permita que las superficies calientes hagan contacto con la pi<strong>el</strong><br />
ni con los ojos.<br />
10. No coloque las tenazas rizadoras calientes sobre ninguna superficie<br />
mientras estén calientes o conectadas. Utilice <strong>el</strong> soporte que se<br />
incluye con <strong>el</strong> a<strong>para</strong>to.<br />
GUARDE ESTAS INSTRUCCIONES<br />
Este producto ha sido diseñado <strong>para</strong> <strong>uso</strong> profesional