mise en garde gardez Précieusement ces directiVes ... - Andis
mise en garde gardez Précieusement ces directiVes ... - Andis
mise en garde gardez Précieusement ces directiVes ... - Andis

Create successful ePaper yourself
Turn your PDF publications into a flip-book with our unique Google optimized e-Paper software.
IMPORTANT SAFEGUARDS<br />
Wh<strong>en</strong> using electrical applian<strong>ces</strong>, especially wh<strong>en</strong> childr<strong>en</strong><br />
are pres<strong>en</strong>t, basic safety precautions should always be<br />
followed, including the following:<br />
Read all instructions before using.<br />
KEEP AWAY FROM WATER.<br />
DANGER: As with most electrical applian<strong>ces</strong>,<br />
electrical parts are electrically live ev<strong>en</strong> wh<strong>en</strong> the switch<br />
is off. To reduce the risk of death by electric shock:<br />
1. Always “unplug it” immediately after using.<br />
2. Do not use while bathing.<br />
3. Do not place or store appliance where it can fall or be<br />
pulled into a tub or sink.<br />
4. Do not place in or drop into water or other liquid.<br />
5. If an appliance falls into water, “unplug it” immediately.<br />
Do not reach into the water.<br />
WARNING: To reduce the risk of burns,<br />
electrocution, fire, or injury to persons:<br />
1. An appliance should never be left unatt<strong>en</strong>ded wh<strong>en</strong><br />
plugged in.<br />
2. Close supervision is ne<strong>ces</strong>sary wh<strong>en</strong> this appliance<br />
is used by, on or near childr<strong>en</strong> or individuals with<br />
certain disabilities.<br />
3. Use this appliance only for its int<strong>en</strong>ded use as<br />
described in this manual. Do not use attachm<strong>en</strong>ts not<br />
recomm<strong>en</strong>ded by <strong>Andis</strong> Company.<br />
4. Never operate this appliance if it has a damaged cord<br />
or plug. If it is not working properly, or if it has be<strong>en</strong><br />
dropped, damaged, or dropped into water return the<br />
appliance to an <strong>Andis</strong> Authorized Service Station for<br />
examination and repair.<br />
5. Keep the cord away from heated surfa<strong>ces</strong>. Do not wrap<br />
the cord around the appliance.<br />
6. Never use while sleeping.<br />
7. Do not use outdoors or operate where aerosol (spray)<br />
products are being used or where oxyg<strong>en</strong> is being<br />
administered.<br />
8. Do not use an ext<strong>en</strong>sion cord with this appliance.<br />
9. This iron is hot wh<strong>en</strong> in use. Do not let eyes and bare<br />
skin touch heated surfa<strong>ces</strong>.<br />
10. Do not place the heated flat iron directly on any surface<br />
while it is hot or plugged in.<br />
11. Before plugging in, read the information about dual<br />
voltage contained in the instruction section of this<br />
manual.<br />
SAVE THESE INSTRUCTIONS<br />
This appliance is int<strong>en</strong>ded for household use<br />
OPERATING INSTRUCTIONS<br />
This appliance has a polarized plug (one blade is wider than the other).<br />
As a safety feature, the plug will fit in a polarized outlet only one way.<br />
If the plug does not fit fully in the outlet, reverse the plug. If it still does<br />
not fit, contact a qualified electrician. Do not attempt to defeat this<br />
safety feature.<br />
Confirm the voltage available at each overseas location before using the<br />
appliance. For connection to a 240-volt supply, use an attachm<strong>en</strong>t plug<br />
adapter of the proper configuration for the power supply receptacle.<br />
USER-MAINTENANCE<br />
INSTRUCTIONS<br />
This appliance does not require special maint<strong>en</strong>ance, cleaning or<br />
lubrication. If metal plates do not get hot, return for servicing. Service<br />
only through <strong>Andis</strong> Authorized Service Stations. Untwist cord before<br />
use. After use, allow unit to cool, re-wrap cord and store in a safe place.<br />
Do not wrap cord around appliance. Do not hang the unit by the power<br />
cord.<br />
CAUTION: Care should be used wh<strong>en</strong> using this appliance on damaged<br />
or color treated hair.<br />
Temperature settings<br />
STYLING TEMPERATURE – dep<strong>en</strong>ds on hair<br />
texture and condition.<br />
G<strong>en</strong>erally . . .for:<br />
Fine, bleached or hair in poor condition<br />
LOWER SETTINGS<br />
Normal hair<br />
HIGHER SETTINGS<br />
Adjustable<br />
Heat Dial<br />
Once your iron reaches the temperature you select, it maintains it all<br />
through styling.<br />
TO USE YOUR ANDIS FLAT IRON<br />
1. To pre-heat your <strong>Andis</strong> Flat Iron, plug into an electrical outlet. (Please<br />
refer to the Operating Instructions of this manual for more detail).<br />
Turn switch to the “ON” position and select operating temperature.<br />
Indicator Lights<br />
The red light is the power indicator. Wh<strong>en</strong> the unit is in use, the red<br />
light will stay on. The gre<strong>en</strong> light is the temperature light. Wh<strong>en</strong> the<br />
unit is first turned on, the gre<strong>en</strong> light will be on. As it starts heating<br />
up, the gre<strong>en</strong> light will begin to blink. Wh<strong>en</strong> it reaches the selected<br />
temperature, the gre<strong>en</strong> light will go out.<br />
2. Always make certain that your hair is completely dry before styling<br />
with your iron. Comb through hair to smooth out any snarls. Hold<br />
<strong>en</strong>ds taut with one hand. Part off a section of hair to be straight<strong>en</strong>ed,<br />
starting at the back nape area towards the crown, moving along the<br />
sides and finishing at the front top area.<br />
3. Op<strong>en</strong> clamp and grip hair within one inch of scalp.<br />
4. Pull the iron away from the scalp, letting the hair glide through the<br />
plates.<br />
5. Repeat as ne<strong>ces</strong>sary. Do not repeat on the same section of hair for an<br />
ext<strong>en</strong>ded period of time.<br />
6. Allow hair to cool off. Do not comb or brush since this will undo the<br />
hairstyle.<br />
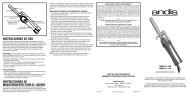
Hot Plate<br />
SPANISH<br />
Finger Pad<br />
Gre<strong>en</strong> -<br />
Temperature Indicator<br />
Adjustable<br />
Heat Dial<br />
Switch<br />
Button<br />
Red -<br />
Power Indicator<br />
Plate Locking Feature<br />
PLATE LOCKING FEATURE AND STORING<br />
Note: Not all models have plate locks<br />
1. Wh<strong>en</strong> finished, turn switch to the “OFF” position. Allow iron to cool<br />
before storing.<br />
2. Engage the plate locking feature for easy storage. Hold plates<br />
together and rotate the lock clockwise. To unlock plates, rotate the<br />
lock counter clockwise.<br />
3. Re-wrap cord and store in a safe place. Do not wrap cord around<br />
appliance. Do not hang the unit by the power cord.<br />
PRECAUCIONES IMPORTANTES<br />
Cuando use cualquier aparato eléctrico, especialm<strong>en</strong>te <strong>en</strong><br />
pres<strong>en</strong>cia de niños, siempre cumpla con las precauciones<br />
básicas de seguridad, incluy<strong>en</strong>do las sigui<strong>en</strong>tes:<br />
LEA TODAS LAS INSTRUCCIONES ANTES DE USAR ESTE<br />
APARATO. NO LO ACERQUE AL AGUA.<br />
PELIGR0 - Como es el caso con todos los<br />
aparatos eléctricos, las piezas eléctricas ti<strong>en</strong><strong>en</strong> corri<strong>en</strong>te<br />
incluso cuando el interruptor de <strong>en</strong>c<strong>en</strong>dido está <strong>en</strong> la<br />
posición de apagado. Para reducir el peligro de muerte<br />
por descargas eléctricas:<br />
1. Siempre desconecte el aparato inmediatam<strong>en</strong>te al<br />
terminar de usarlo.<br />
2. No use el aparato mi<strong>en</strong>tras se esté bañando.<br />
3. No coloque ni guarde el aparato donde éste pueda caer<br />
d<strong>en</strong>tro de una bañera o un lavamanos.<br />
4. No ponga el aparato ni lo deje caer <strong>en</strong> agua ni <strong>en</strong><br />
ningún otro líquido.<br />
5. Si algún aparato eléctrico llegara a caer <strong>en</strong> agua,<br />
desconéctelo de inmediato. ¡No meta la mano al agua<br />
para tratar de sacarlo!<br />
ADVERTENCIA - Para reducir el riesgo de<br />
sufrir quemaduras, electrocución, lesiones, o para evitar<br />
un inc<strong>en</strong>dio:<br />
1. No deje aparatos eléctricos desat<strong>en</strong>didos cuando estén<br />
conectados.<br />
2. Es ne<strong>ces</strong>aria una supervisión muy de cerca cuando<br />
este artefacto sea usado por, <strong>en</strong> o cerca de niños o<br />
personas con ciertas discapacidades.<br />
3. Use este aparato eléctrico solam<strong>en</strong>te con el propósito<br />
para el que está destinado y como se describe <strong>en</strong> este<br />
folleto. No use ac<strong>ces</strong>orios que no sean los recom<strong>en</strong>da<br />
dos por la compañía <strong>Andis</strong>.<br />
4. Nunca use este aparato si la clavija de contacto o el<br />
cable están dañados. Si el aparato no funciona<br />
correctam<strong>en</strong>te, o si se ha caído, dañado o si ha sido<br />
sumergido <strong>en</strong> agua, devuélvalo a un C<strong>en</strong>tro Autorizado<br />
de Servicio <strong>Andis</strong> para que sea revisado y reparado.<br />
5. Mant<strong>en</strong>ga el cable alejado de cualquier superficie<br />
cali<strong>en</strong>te. No <strong>en</strong>rolle el cable <strong>en</strong> el aparato.<br />
6. Nunca use este aparato mi<strong>en</strong>tras duerma.<br />
7. No use este aparato al aire libre, ni lo haga funcionar <strong>en</strong><br />
donde se estén usando productos <strong>en</strong> aerosol, o donde<br />
se esté administrando oxíg<strong>en</strong>o.<br />
8. No use un cable de ext<strong>en</strong>sión para conectar este aparato.<br />
9. Estas t<strong>en</strong>acillas están cali<strong>en</strong>tes al estar <strong>en</strong> uso.<br />
No permita que los ojos o la piel desnuda <strong>en</strong>tr<strong>en</strong> <strong>en</strong><br />
contacto con las superficies cal<strong>en</strong>tadas.<br />
10. No coloque las t<strong>en</strong>acillas cal<strong>en</strong>tadas directam<strong>en</strong>te<br />
sobre cualquier superficie mi<strong>en</strong>tras estén cali<strong>en</strong>tes<br />
o <strong>en</strong>chufadas.<br />
11. Antes de <strong>en</strong>chufarlo, lea la información sobre el voltaje<br />
doble, cont<strong>en</strong>ida <strong>en</strong> la sección de instrucciones de este<br />
manual.<br />
GUARDE ESTAS INSTRUCCIONES<br />
Este artefacto está destinado para uso <strong>en</strong> el hogar<br />
INSTRUCCIONES DE USO<br />
Este artefacto ti<strong>en</strong>e un <strong>en</strong>chufe polarizado (una patilla es más ancha que<br />
la otra). Como característica de seguridad, el <strong>en</strong>chufe podrá colocarse<br />
<strong>en</strong> un tomacorri<strong>en</strong>te polarizado de una sola manera. Si el <strong>en</strong>chufe<br />
no puede insertarse completam<strong>en</strong>te <strong>en</strong> el tomacorri<strong>en</strong>te, invierta el<br />
<strong>en</strong>chufe. Si aún no puede insertarse, póngase <strong>en</strong> contacto con un<br />
electricista calificado. No trate de anular esta característica de seguridad.<br />
Como característica de seguridad adicional, estas t<strong>en</strong>acillas se apagan<br />
automáticam<strong>en</strong>te al cabo de 1 hora (algunos modelos solam<strong>en</strong>te).<br />
Confirme el voltaje disponible <strong>en</strong> cada ubicación del exterior antes de<br />
usar el artefacto. Para conexión a una fu<strong>en</strong>te de 240 voltios, use un<br />
adaptador de <strong>en</strong>chufe de la configuración correcta para el receptáculo<br />
de suministro eléctrico.<br />
INSTRUCCIONES DE<br />
MANTENIMIENTO PARA EL USUARIO<br />
Este artefacto no requiere mant<strong>en</strong>imi<strong>en</strong>to, limpieza o lubricación<br />
especiales. Si las placas metálicas no se cali<strong>en</strong>tan, devuélvalo para<br />
prestarle servicio técnico. Realice el servicio técnico únicam<strong>en</strong>te por<br />
medio de las estaciones de reparación autorizadas de <strong>Andis</strong>. Elimine la<br />
torsión del cable eléctrico antes de usar. Después del uso, deje que la<br />
unidad se <strong>en</strong>fríe, vuelva a <strong>en</strong>volver el cable eléctrico, y almac<strong>en</strong>e <strong>en</strong> un<br />
lugar seguro. No <strong>en</strong>vuelva el cable eléctrico alrededor del artefacto. No<br />
cuelgue la unidad por su cable eléctrico.<br />
PRECAUCIÓN: Debe t<strong>en</strong>erse cuidado al utilizar este artefacto <strong>en</strong> cabello<br />
dañado o tratado con color.<br />
Ajustes de temperatura<br />
TEMPERATURA PARA CREAR PEINADOS –<br />
dep<strong>en</strong>de de la textura y condición del cabello.<br />
Por lo g<strong>en</strong>eral . . .para:<br />
Cabello fino, teñido o <strong>en</strong> malas condiciones<br />
AJUSTES MÁS BAJOS<br />
Cabello normal<br />
AJUSTES MÁS ALTOS<br />
Disco de<br />
ajuste del<br />
calor<br />
Una vez que las t<strong>en</strong>acillas llegu<strong>en</strong> a la temperatura seleccionada,<br />
mant<strong>en</strong>drán dicha temperatura a lo largo del pro<strong>ces</strong>o de creación del<br />
peinado.<br />
PARA USAR SUS TENACILLAS ANDIS<br />
1. Para precal<strong>en</strong>tar sus t<strong>en</strong>acillas <strong>Andis</strong>, <strong>en</strong>chúfelas <strong>en</strong> un tomacorri<strong>en</strong>te<br />
eléctrico. (Sírvase consultar las instrucciones operativas de este<br />
manual, para conocer más detalles al respecto). Gire el interruptor<br />
a la posición “ON” (<strong>en</strong>c<strong>en</strong>dido) y seleccione la temperatura operativa.<br />
Lu<strong>ces</strong> indicadoras<br />
La luz roja es el indicador de <strong>en</strong>c<strong>en</strong>dido. Esta luz roja permanece<br />
<strong>en</strong>c<strong>en</strong>dida mi<strong>en</strong>tras la unidad está si<strong>en</strong>do utilizada. La luz verde indica<br />
la temperatura. Al <strong>en</strong>c<strong>en</strong>der la unidad se <strong>en</strong>ci<strong>en</strong>de la luz verde. Mi<strong>en</strong>tras<br />
aum<strong>en</strong>ta la temperatura, esta luz verde parpadea. La luz verde se apaga<br />
cuando la unidad llega a la temperatura seleccionada.<br />
2. Siempre asegúrese de que su cabello esté completam<strong>en</strong>te seco antes<br />
de crear peinados con sus t<strong>en</strong>acillas. Peine muy bi<strong>en</strong> el cabello para<br />
eliminar cualquier tipo de <strong>en</strong>redo. Sujete los extremos firmem<strong>en</strong>te<br />
con una mano. Separe una sección del cabello que se desee<br />
alisar, com<strong>en</strong>zando <strong>en</strong> la zona posterior del cuello hacia la corona,<br />
desplazándose por los costados y terminando <strong>en</strong> la zona frontal<br />
superior.<br />
3. Abra las t<strong>en</strong>acillas y sujete el cabello a la distancia de una pulgada del<br />
cuero cabelludo.<br />
4. Aleje las t<strong>en</strong>acillas del cuero cabelludo, dejando que el cabello se<br />
deslice a través de las placas.<br />
5. Repita el pro<strong>ces</strong>o según resulte ne<strong>ces</strong>ario. No lo repita <strong>en</strong> la misma<br />
sección de cabello por un período ext<strong>en</strong>so de tiempo.<br />
6. Deje que el cabello se <strong>en</strong>fríe. No peine ni cepille el cabello ya que esto<br />
desarmaría el peinado.<br />
Placa cali<strong>en</strong>te<br />
Almohadilla para el dedo<br />
Verde -<br />
Temperatura<br />
Rojo –<br />
Enc<strong>en</strong>dido<br />
Disco de<br />
ajuste del calor<br />
Botón<br />
interruptor<br />
Característica de<br />
bloqueo de la placa