Vanity Top Installation Instructions - Transolid
Vanity Top Installation Instructions - Transolid
Vanity Top Installation Instructions - Transolid
You also want an ePaper? Increase the reach of your titles
YUMPU automatically turns print PDFs into web optimized ePapers that Google loves.
<strong>Vanity</strong> <strong>Top</strong> <strong>Installation</strong> <strong>Instructions</strong><br />
Solid Surface Custom Series, ITB, TITB, Décor<br />
Thank you for purchasing a <strong>Transolid</strong> ® <strong>Vanity</strong> <strong>Top</strong>. Please read the instructions carefully<br />
prior to installing the top. These are basic instructions for installation in a step-by-step<br />
sequence that will work in most types of installations. If you have an installation that is not<br />
covered here, please contact <strong>Transolid</strong> for additional information.<br />
Tools and Supplies Needed for <strong>Installation</strong><br />
• Silicone Caulk • Shims / Blocks<br />
1. Unpack the vanity top (ITB) and inspect it for any damage, report<br />
any problems to your place of purchase.<br />
2. Make sure the vanity top sits securely on the cabinet, with a solid<br />
point of contact at least every 12-16 inches around the perimeter<br />
of the cabinet. <strong>Transolid</strong> recommends using shims/solid blocks in<br />
areas where there is not a solid point of contact or where the<br />
vanity top is not level on the cabinet. Solid blocks can be of wood<br />
or other solid material.<br />
3. If your vanity top did not come with the faucet holes already<br />
drilled, you will need to drill them at this time. See <strong>Instructions</strong><br />
for Faucet Hole Drilling.<br />
4. Install the faucet and the drain assembly according to the<br />
manufacturer’s instructions.<br />
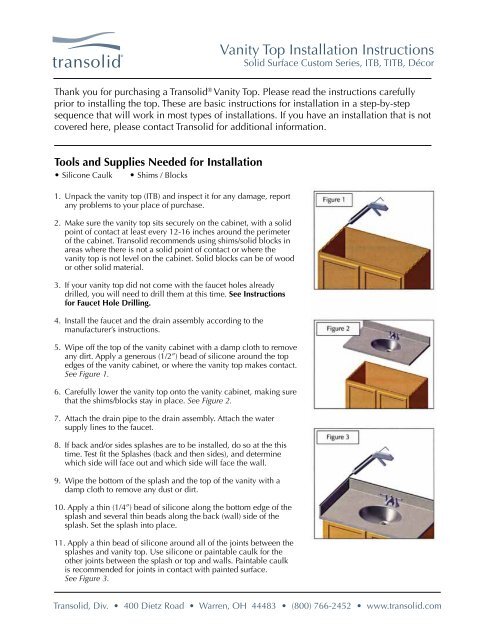
5. Wipe off the top of the vanity cabinet with a damp cloth to remove<br />
any dirt. Apply a generous (1/2”) bead of silicone around the top<br />
edges of the vanity cabinet, or where the vanity top makes contact.<br />
See Figure 1.<br />
6. Carefully lower the vanity top onto the vanity cabinet, making sure<br />
that the shims/blocks stay in place. See Figure 2.<br />
7. Attach the drain pipe to the drain assembly. Attach the water<br />
supply lines to the faucet.<br />
8. If back and/or sides splashes are to be installed, do so at the this<br />
time. Test fit the Splashes (back and then sides), and determine<br />
which side will face out and which side will face the wall.<br />
9. Wipe the bottom of the splash and the top of the vanity with a<br />
damp cloth to remove any dust or dirt.<br />
10. Apply a thin (1/4”) bead of silicone along the bottom edge of the<br />
splash and several thin beads along the back (wall) side of the<br />
splash. Set the splash into place.<br />
11. Apply a thin bead of silicone around all of the joints between the<br />
splashes and vanity top. Use silicone or paintable caulk for the<br />
other joints between the splash or top and walls. Paintable caulk<br />
is recommended for joints in contact with painted surface.<br />
See Figure 3.<br />
<strong>Transolid</strong>, Div. • 400 Dietz Road • Warren, OH 44483 • (800) 766-2452 • www.transolid.com
Instrucciones para instalar una cubierta de lavabo de las líneas<br />
Serie de encargo superficie sólida, ITB, TITB y Décor<br />
Gracias por comprar una cubierta de lavabo <strong>Transolid</strong>. Por favor, lea cuidadosamente<br />
las instrucciones antes de instalar la cubierta. Estas son las instrucciones básicas para su<br />
instalación en una secuencia paso a paso que funcionará en la mayoría de los tipos de<br />
instalaciones. Si usted una tiene una instalación que no está cubierta aquí, por favor<br />
pónganse en contacto con <strong>Transolid</strong> para obtener información adicional.<br />
Herramientas y suministros necesarios para la instalación<br />
• Sellador de silicón<br />
• Calzas / Bloques<br />
1. Desempaque la cubierta de lavabo (ITB) e inspeccione si tiene<br />
algún daño, y en su caso si lo tuviera, informe cualquier problema<br />
al lugar de compra.<br />
2. Asegúrese de que el ITB quede seguro en el gabinete, con un<br />
sólido punto de contacto en al menos una vez cada 12-16 pulgadas<br />
alrededor del perímetro del gabinete. <strong>Transolid</strong> recomienda<br />
el uso de calzas o bloques sólidos en las zonas donde no existe un<br />
punto de contacto, o cuando el ITB no está nivelado con el<br />
gabinete. Los bloques pueden ser de madera u otros materiales<br />
sólidos.<br />
3. Si su ITB no trae los agujeros de la llave mezcladora ya perforados,<br />
será necesario hacerlos en este momento. Vea las instrucciones<br />
para el barrenado de los hoyos.<br />
..<br />
4. Instale la llave mezcladora y el montaje del desague de acuerdo<br />
con las instrucciones del fabricante.<br />
5. Limpie la parte superior del gabinete con una franela húmeda para<br />
eliminar cualquier suciedad. Aplique una generosa cantidad (1/2“)<br />
de silicón en la parte superior de los bordes de la superficie del<br />
gabinete, o donde la cubierta haga contacto. (Ver Fig. 1).<br />
6. Cuidadosamente coloque el ITB sobre el gabinete, asegúrandose<br />
de que las calzas o bloques permanezcan en su lugar. (Ver Fig. 2).<br />
7. Conecte la tubería al drenaje. Conecte las líneas del suministro de<br />
agua en la llave mezcladora.<br />
8. Si se van a instalar respaldos laterales o traseros, hacerlo en este<br />
momento. Pruebe que encajen los respaldos, asegurándose que<br />
la cara terminada de estos quede hacia el frente.<br />
9. Limpie la parte inferior de los respaldos y la parte superior de la<br />
cubierta con una franela húmeda para quitar cualquier polvo o<br />
suciedad.<br />
10. Aplique una fina capa (1/4”) de silicón a lo largo del borde<br />
inferior del respaldo y varias capas finas a lo largo de la parte<br />
trasera del respaldo (pared). Ajuste el respaldo en su lugar.<br />
11. Aplique una línea delgada de silicón alrededor de todas las juntas<br />
entre los respaldos y la cubierta de lavabo. Use silicón o sellador<br />
pintable para las demás uniones entre los respaldos o en la parte<br />
superior y las paredes. Se recomienda usar sellador pintable para<br />
las uniones que estén en contacto con superficies pintadas.<br />
(Ver Fig. 3).<br />
<strong>Transolid</strong>, Div. • 400 Dietz Road • Warren, OH 44483 • (800) 766-2452 • www.transolid.com


