Kreg Jig R3 Manual 3.5x6.5.indd - Kreg Tool
Kreg Jig R3 Manual 3.5x6.5.indd - Kreg Tool
Kreg Jig R3 Manual 3.5x6.5.indd - Kreg Tool

Create successful ePaper yourself
Turn your PDF publications into a flip-book with our unique Google optimized e-Paper software.
<strong>Jig</strong> Settings<br />
<strong>Jig</strong> Settings<br />
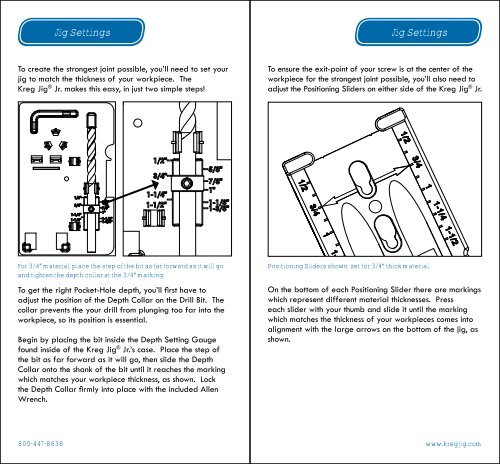
To create the strongest joint possible, you’ll need to set your<br />
jig to match the thickness of your workpiece. The<br />
<strong>Kreg</strong> <strong>Jig</strong> ® Jr. makes this easy, in just two simple steps!<br />
To ensure the exit-point of your screw is at the center of the<br />
workpiece for the strongest joint possible, you’ll also need to<br />
adjust the Positioning Sliders on either side of the <strong>Kreg</strong> <strong>Jig</strong> ® Jr.<br />
For 3/4” material, place the step of the bit as far forward as it will go<br />
and tighten the depth collar at the 3/4” marking.<br />
To get the right Pocket-Hole depth, you’ll fi rst have to<br />
adjust the position of the Depth Collar on the Drill Bit. The<br />
collar prevents the your drill from plunging too far into the<br />
workpiece, so its position is essential.<br />
Begin by placing the bit inside the Depth Setting Gauge<br />
found inside of the <strong>Kreg</strong> <strong>Jig</strong> ® Jr.’s case. Place the step of<br />
the bit as far forward as it will go, then slide the Depth<br />
Collar onto the shank of the bit until it reaches the marking<br />
which matches your workpiece thickness, as shown. Lock<br />
the Depth Collar fi rmly into place with the included Allen<br />
Wrench.<br />
Positioning Sliders shown set for 3/4” thick material.<br />
On the bottom of each Positioning Slider there are markings<br />
which represent different material thicknesses. Press<br />
each slider with your thumb and slide it until the marking<br />
which matches the thickness of your workpieces comes into<br />
alignment with the large arrows on the bottom of the jig, as<br />
shown.<br />
800-447-8638 www.kregjig.com