SM645-1P & SM645-2P - Superior Sewing Machine and Supply Corp.
SM645-1P & SM645-2P - Superior Sewing Machine and Supply Corp.
SM645-1P & SM645-2P - Superior Sewing Machine and Supply Corp.

You also want an ePaper? Increase the reach of your titles
YUMPU automatically turns print PDFs into web optimized ePapers that Google loves.
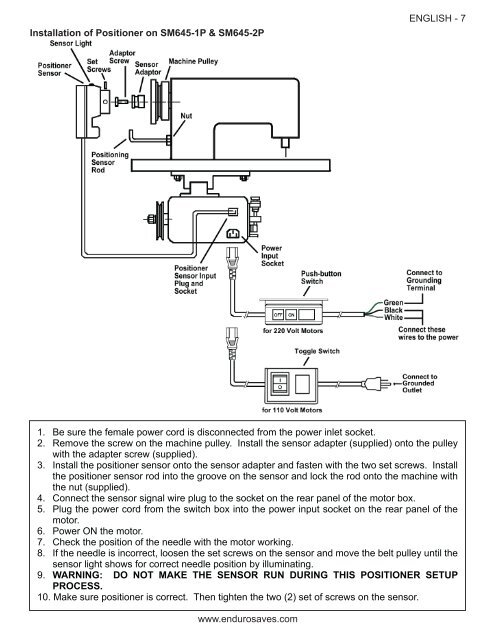
Installation of Positioner on <strong>SM645</strong>-<strong>1P</strong> & <strong>SM645</strong>-<strong>2P</strong><br />
ENGLISH - <br />
1. Be sure the female power cord is disconnected from the power inlet socket.<br />
2. Remove the screw on the machine pulley. Install the sensor adapter (supplied) onto the pulley<br />
with the adapter screw (supplied).<br />
3. Install the positioner sensor onto the sensor adapter <strong>and</strong> fasten with the two set screws. Install<br />
the positioner sensor rod into the groove on the sensor <strong>and</strong> lock the rod onto the machine with<br />
the nut (supplied).<br />
4. Connect the sensor signal wire plug to the socket on the rear panel of the motor box.<br />
5. Plug the power cord from the switch box into the power input socket on the rear panel of the<br />
motor.<br />
6. Power ON the motor.<br />
7. Check the position of the needle with the motor working.<br />
8. If the needle is incorrect, loosen the set screws on the sensor <strong>and</strong> move the belt pulley until the<br />
sensor light shows for correct needle position by illuminating.<br />
9. WARNING: DO NOT MAKE THE SENSOR RUN DURING THIS POSITIONER SETUP<br />
PROCESS.<br />
10. Make sure positioner is correct. Then tighten the two (2) set of screws on the sensor.<br />
www.endurosaves.com