REF-METER-OCTA 4679462 - Refco Manufacturing Ltd.
REF-METER-OCTA 4679462 - Refco Manufacturing Ltd.
REF-METER-OCTA 4679462 - Refco Manufacturing Ltd.

Create successful ePaper yourself
Turn your PDF publications into a flip-book with our unique Google optimized e-Paper software.
<strong>REF</strong>-<strong>METER</strong>-<strong>OCTA</strong><br />
<strong>4679462</strong><br />
Instruction Manual<br />
Electronic Charging scale<br />
Bedienungsanleitung<br />
Elektronische Füllwaage<br />
Mode d’emploi<br />
Appareil de charge électronique<br />
Istruzioni per l’uso<br />
Bilancia elettrica<br />
Manual de instrucciones<br />
Báscula eléctrica
English<br />
<strong>REF</strong>-<strong>METER</strong>-<strong>OCTA</strong> User’s Guide<br />
Introduction<br />
Thank you for your purchase of the <strong>REF</strong>-<strong>METER</strong>-<strong>OCTA</strong> Digital Charging Scale. The <strong>REF</strong>-<br />
<strong>METER</strong>-<strong>OCTA</strong> is the most accurate and precise refrigerant meter available today with<br />
features that cannot be found anywhere else. It is ideal for HVAC and Refrigeration service,<br />
including Critical Charging of small refrigeration systems.<br />
With the <strong>REF</strong>-<strong>METER</strong>-<strong>OCTA</strong>, you can measure weight in both kgs and lbs units. The <strong>REF</strong>-<br />
<strong>METER</strong>-<strong>OCTA</strong> is programmable, and has a built in alarm to indicate a programmed<br />
threshold has been exceeded. Attaching the <strong>REF</strong>-<strong>METER</strong>-<strong>OCTA</strong> to the <strong>REF</strong>-<strong>METER</strong>-<br />
<strong>OCTA</strong>-PLUS allows automatic refrigerant charging for A/C systems.<br />
Features<br />
• Large, high-visibility LCD display<br />
• Measures weight in kgs, lbs and oz<br />
• Built-in memory remembers all previous settings<br />
• Refrigerant Tank Capacity Indicator<br />
• Rugged, Compact Design<br />
• Long Battery Life<br />
• High Accuracy and Resolution<br />
• Programmable<br />
• Can be calibrated in the field with inexpensive reference weights<br />
• Thread for mounting 10612-<strong>REF</strong> for liquid filling and charging of refrigerants cans<br />
• Expandable with <strong>REF</strong>-<strong>METER</strong>-<strong>OCTA</strong>-PLUS<br />
Specifications<br />
Capacity<br />
100 kilograms (220 Pounds)<br />
Accuracy<br />
0.5% of Reading +/- 1 Least Significant Digit<br />
Resolution<br />
2g, 0.005 lbs., 0.1 oz.<br />
Power<br />
4 x 1.5V ‘AAA’ Alkaline Batteries<br />
Battery Life<br />
30 hours continuous use<br />
Operating Temperature 10C – 40C (50F – 104F)<br />
Weight<br />
3.8 kg (6.4 lbs.)<br />
Dimensions 30.5 cm x 30.5 cm x 4.5 cm (12.0” x 12.0” x 1.8”)<br />
NOTE: To prevent damage, never exceed the rated capacity of the <strong>REF</strong>-<strong>METER</strong>-<strong>OCTA</strong>.<br />
1
<strong>REF</strong>-<strong>METER</strong>-<strong>OCTA</strong> User’s Guide<br />
English<br />
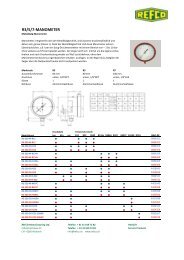
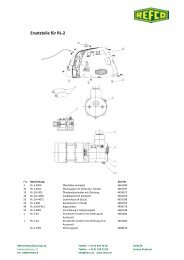
Parts Diagram<br />
10612-<strong>REF</strong> (optional)<br />
Thread to mount<br />
10612-<strong>REF</strong><br />
Refrigerant Can (optional)<br />
Keypad<br />
LCD Display<br />
Weighing<br />
Platform<br />
Button for Cable<br />
auto reel<br />
Storage Dock<br />
Mounting<br />
Clip<br />
Speaker<br />
Grill<br />
Optical Port<br />
for <strong>REF</strong>-<br />
<strong>METER</strong>-<br />
<strong>OCTA</strong>-PLUS<br />
Battery<br />
Cover<br />
Control Box Rear View<br />
2
English<br />
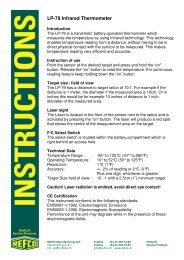
LCD Display<br />
A<br />
B<br />
<strong>REF</strong>-<strong>METER</strong>-<strong>OCTA</strong> User’s Guide<br />
C<br />
E<br />
F<br />
D<br />
G<br />
H<br />
I<br />
J K L M N O P<br />
Item<br />
A<br />
B<br />
C<br />
D<br />
E<br />
F<br />
G<br />
H<br />
I<br />
J<br />
K<br />
L<br />
M<br />
N<br />
O<br />
P<br />
Function<br />
Main Numeric Display<br />
Alternate Numeric Display<br />
Tank Capacity Percent Indication<br />
Units Indicators<br />
Sound Mute Indicator<br />
“Floating” Negative Indicator (Indicates weight removed from platform)<br />
Battery Level Indicator<br />
Fast Adjustment Indicator<br />
Set Mode Indicator<br />
Tank Capacity Mode Indicator<br />
Run Mode Indicator<br />
Hold Mode Indicator<br />
Program Complete Indicator<br />
Calibration Mode Indicator<br />
Valve Open/Closed Indicator for use with <strong>REF</strong>-<strong>METER</strong>-<strong>OCTA</strong>-PLUS<br />
Resolution Indicator<br />
3
<strong>REF</strong>-<strong>METER</strong>-<strong>OCTA</strong> User’s Guide<br />
English<br />
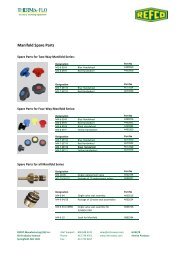
Keypad<br />
Press for power-on, press/hold for power off.<br />
Press to cycle through displayed units.<br />
Press to select low, medium, or high display resolution.<br />
Press to “zero-out” current reading on display.<br />
Use to adjust various settings and programming values/Backlight.<br />
For faster adjustments. Used in conjunction with and .<br />
“Freezes” display.<br />
Starts programming mode<br />
Activates / Deactivates stored program.<br />
4
English<br />
<strong>REF</strong>-<strong>METER</strong>-<strong>OCTA</strong> User’s Guide<br />
Quick Start<br />
To operate the <strong>REF</strong>-<strong>METER</strong>-<strong>OCTA</strong> as a basic weigh scale, perform the following steps:<br />
Setup<br />
1. Unpack the scale as described in the “Unpacking the <strong>REF</strong>-<strong>METER</strong>-<strong>OCTA</strong>” section<br />
below.<br />
2. Install the batteries into the control box as described in the “Battery Installation” section<br />
below.<br />
3. Place the Weighing Platform on a firm, level surface.<br />
4. Turn the <strong>REF</strong>-<strong>METER</strong>-<strong>OCTA</strong> on by pressing .<br />
5. Select the proper measurement units by repeated pressing . The units will cycle as<br />
follows:<br />
kilograms pounds pounds and ounces ounces<br />
6. Select the desired display resolution by repeatedly pressing as described in the<br />
RESOLUTION section.<br />
Basic Weighing Operation<br />
1. If using a container to hold the objects being measured, place it empty on the center of<br />
the platform.<br />
2. Press to “zero-out” the scale. The display will read zero.<br />
3. Place the material to measure in the container or on the center of the platform.<br />
4. Read the weight on the display.<br />
5. A positive number indicates the applied weight is greater than the zero value. A<br />
negative number indicates the applied weight is less than the zero value.<br />
6. Turn the <strong>REF</strong>-<strong>METER</strong>-<strong>OCTA</strong> off by pressing down.<br />
7. To conserve battery life, the <strong>REF</strong>-<strong>METER</strong>-<strong>OCTA</strong> will turn itself off after 30 minutes of<br />
inactivity, unless it is currently running a program (see Programming section). The last<br />
state of the <strong>REF</strong>-<strong>METER</strong>-<strong>OCTA</strong> will be restored upon power-up.<br />
5
<strong>REF</strong>-<strong>METER</strong>-<strong>OCTA</strong> User’s Guide<br />
English<br />
Unpacking the <strong>REF</strong>-<strong>METER</strong>-<strong>OCTA</strong><br />
1. Remove the <strong>REF</strong>-<strong>METER</strong>-<strong>OCTA</strong> from the carry bag.<br />
2. Push the signed part of the control box to remove it from the storage dock. The storage<br />
dock is placed on the low side of the weighing platform.<br />
3. Pull out the control box from the storage dock. When using the <strong>REF</strong>-<strong>METER</strong>-<strong>OCTA</strong>,<br />
ensure the cable does not touch the top of the weighing platform to avoid inaccuracies.<br />
4. If desired, extend the mounting hook.<br />
Repacking the <strong>REF</strong>-<strong>METER</strong>-<strong>OCTA</strong><br />
1. If extended, restore the easel of the control box to the retracted position.<br />
2. Hold the control box and press the yellow auto reel button on the side of the platform.<br />
3. Push the control box firmly into the storage dock of the weighing platform until it snaps<br />
in place.<br />
4. Replace the <strong>REF</strong>-<strong>METER</strong>-<strong>OCTA</strong> into the carry bag.<br />
Battery Installation & Replacement<br />
1. Remove the battery cover from the rear of the control box by compressing tab at the<br />
base of the battery cover.<br />
2. If necessary, remove old set of batteries.<br />
3. Insert 4 ‘AAA’. Replace battery cover by aligning tabs and snapping back into place.<br />
IMPORTANT: TO PREVENT DAMAGE TO THE <strong>REF</strong>-<strong>METER</strong>-<strong>OCTA</strong>, CA<strong>REF</strong>ULLY<br />
OBSERVE BATTERY POLARITY AS MARKED INSIDE THE BATTERY COMPARTMENT.<br />
DO NOT LEAVE DEAD BATTERIES INSIDE THE CONTROL BOX. REMOVE<br />
BATTERIES IF THE <strong>REF</strong>-<strong>METER</strong>-<strong>OCTA</strong> IS NOT TO BE USED FOR AN EXTENDED<br />
PERIOD OF TIME.<br />
6
English<br />
<strong>REF</strong>-<strong>METER</strong>-<strong>OCTA</strong> User’s Guide<br />
Resolution<br />
The resolution (minimum incremental weight or volume) that can be displayed by the <strong>REF</strong>-<br />
<strong>METER</strong>-<strong>OCTA</strong> can be adjusted to make the display easier to read. Unstable loads or high<br />
winds can cause the display to fluctuate erratically. By reducing the display resolution,<br />
external influences can be minimized. As shipped, the <strong>REF</strong>-<strong>METER</strong>-<strong>OCTA</strong> is set to<br />
MEDIUM resolution, suitable for most purposes. The resolution can be changed to LOW,<br />
MEDIUM or HIGH by repeated pressing on the keypad. Table 1 illustrates the displayed<br />
resolution for each units mode vs. resolution. Regardless of the resolution setting, the scale<br />
operates internally with the highest resolution; therefore, only the displayed value is affected.<br />
Units<br />
Pounds<br />
&<br />
Resolution Kilograms Pounds Ounces Ounces<br />
HIGH 2 g<br />
0.005<br />
lbs<br />
0.1 oz. 0.1 oz.<br />
MEDIUM 5 g<br />
0.010<br />
lbs.<br />
0.2 oz. 0.2 oz.<br />
LOW 10 g<br />
0.020<br />
lbs.<br />
0.5 oz. 0.5 oz.<br />
TABLE 1. Resolution Settings<br />
7
<strong>REF</strong>-<strong>METER</strong>-<strong>OCTA</strong> User’s Guide<br />
English<br />
Over Range Indication<br />
If the weight applied to the weighing platform exceeds the maximum capacity of the <strong>REF</strong>-<br />
<strong>METER</strong>-<strong>OCTA</strong> (100 kg), a single “1” will be shown on the left side of the display. To prevent<br />
damage to the <strong>REF</strong>-<strong>METER</strong>-<strong>OCTA</strong>, immediately remove the weight from the platform.<br />
Hold Mode<br />
A special feature of the <strong>REF</strong>-<strong>METER</strong>-<strong>OCTA</strong> allows the emptying or replacing bins or<br />
containers used for weighing without affecting the weight shown on the display. This Hold<br />
Mode may be used as follows:<br />
1. Allow load to settle until display is steady.<br />
2. Press . The current weight is now locked on the display.<br />
3. Remove, empty, or replace objects, bins, or containers on the platform.<br />
4. Wait 5 seconds for the new load to stabilize.<br />
5. Press . Measurements will continue from where they left off prior to initiating Hold<br />
Mode.<br />
Programming<br />
With the <strong>REF</strong>-<strong>METER</strong>-<strong>OCTA</strong>, a programmable threshold weight will sound an alarm. The<br />
alarm will sound when the displayed weight (either positive for increasing weight, or<br />
negative for decreasing weight) equals the programmed weight. To program the alarm,<br />
perform the following steps:<br />
1. Set up the <strong>REF</strong>-<strong>METER</strong>-<strong>OCTA</strong> with the desired units and resolution as described in the<br />
Quick Start Setup section above.<br />
2. If measuring decreasing weight, place the objects or container with the objects or<br />
material that will be removed on the weighing platform.<br />
3. Press to start the SET Mode, indicated by the SET enunciator on the LCD display.<br />
4. Press and/or hold the or keys to set the desired alarm set point. To change<br />
the set point faster, press . This will activate the FAST SET mode which will change<br />
the set point 10x faster than normal. Press again to return to the normal speed SET<br />
mode.<br />
8
English<br />
<strong>REF</strong>-<strong>METER</strong>-<strong>OCTA</strong> User’s Guide<br />
5. Press . The display will automatically change to zero and the RUN indicator will<br />
show to indicate that the program is running.<br />
6. When the applied (or removed) weight exceeds the programmed amount, the alarm will<br />
sound and the DONE indicator will flash on the display.<br />
7. Press any key to stop the alarm.<br />
8. To cancel the RUN mode at any time, press the key.<br />
NOTE: The RUN mode can only be initiated from the SET mode. If you cancel the RUN<br />
mode by pressing , and wish to RUN again, press (the previous set point will be<br />
restored) followed by again. The display will be zeroed when the program restarts. You<br />
may program the SET mode without starting the RUN mode by pressing after setting<br />
the program set point. The new value will be saved until next time the SET mode is<br />
activated. can be used during the RUN mode similarly as described in the HOLD MODE<br />
section. The <strong>REF</strong>-<strong>METER</strong>-<strong>OCTA</strong>-PLUS provides additional functionality when using the RUN<br />
mode. Refer to the <strong>REF</strong>-<strong>METER</strong>-<strong>OCTA</strong>-PLUS User’s Guide for details.<br />
Tank Capacity Mode<br />
It is often convenient to know the relative amount of material (i.e. refrigerant) remaining in a<br />
container (tank). The <strong>REF</strong>-<strong>METER</strong>-<strong>OCTA</strong>’s Tank Capacity Mode allows a continuous<br />
display of the percentage of material remaining in a tank. In order to compute the<br />
percentage accurately, the <strong>REF</strong>-<strong>METER</strong>-<strong>OCTA</strong> must be trained to know the weights of an<br />
empty and full tank. To train the <strong>REF</strong>-<strong>METER</strong>-<strong>OCTA</strong> Tank Capacity Mode, perform the<br />
following steps:<br />
9
<strong>REF</strong>-<strong>METER</strong>-<strong>OCTA</strong> User’s Guide<br />
English<br />
Tank Capacity Mode Training<br />
1. While holding down, press . The SET TANK indicator will turn on, and OFF will<br />
show on the display. This indicates that the Tank Capacity Mode is currently off.<br />
2. Turn the Tank Capacity Mode on by pressing . The display will show ON, and the<br />
Alternate Numeric Display and Percent Indicator will turn on.<br />
3. Press to proceed to the first step of training. 0% will flash in the Alternate Numeric<br />
Display indicating that the weight of an empty container must be registered.<br />
4. Apply an empty container (or a load representing the weight of an empty container) on<br />
the platform. Wait 5 seconds for the load to stabilize, then press . 100% will flash in<br />
the Alternate Numeric Display indicating that the weight of a full container must be<br />
registered.<br />
5. Apply a full container (or a load representing the weight of a full container) on the<br />
platform. Wait 5 seconds for the load to stabilize, then press . This completes the<br />
training process, and the SET TANK indicator will turn off.<br />
6. From this point forward, the Alternate Numeric Display will show the percent of material<br />
remaining in the container from 0% to 100%.<br />
NOTE: The 100% weight must be larger than the 0% weight by at least 200g. If not, “Err”<br />
will show on the Alternate Numeric Display. To clear the error, retrain as above using a<br />
100% weight that is at least 200g larger than the 0% weight. During training, the ZERO key<br />
may be used to assist in setting the 0% and 100% values. This will have no effect on the<br />
training, as the Tank Capacity Mode relies on absolute, not relative, weights.<br />
10
English<br />
<strong>REF</strong>-<strong>METER</strong>-<strong>OCTA</strong> User’s Guide<br />
Perform the following steps to turn the Tank Capacity Mode Off:<br />
Turning Tank Capacity Mode Off<br />
1. While holding down, press . The SET TANK indicator will turn on, and ON will<br />
show on the display. This indicates that the Tank Capacity Mode is currently on.<br />
2. Turn the Tank Capacity Mode off by pressing . The display will show OFF, and the<br />
Alternate Numeric Display will turn off.<br />
3. Press to return to normal operation.<br />
The Tank Capacity Mode can be turned back on without retraining. The <strong>REF</strong>-<strong>METER</strong>-<br />
<strong>OCTA</strong> will remember the previous 0% and 100% set points until the unit is re-trained as<br />
above. To turn the Tank Capacity Mode on without re-training, perform the following steps:<br />
Turning the Tank Capacity Mode On without Re-training<br />
1. While holding down, press . The SET TANK indicator will turn on, and OFF will<br />
show on the display. This indicates that the Tank Capacity Mode is currently off.<br />
2. Turn the Tank Capacity Mode on by pressing . The display will show ON, and the<br />
Alternate Numeric Display and Percent Indicator will turn on.<br />
3. Press to return to normal operation.<br />
Battery Level Indicator<br />
The battery level indicator shows the relative strength of the batteries. Full power is<br />
indicated by four bars. As the batteries are depleted, the number of bars displayed<br />
decreases, until no bars are left. At this point, it is necessary to replace the batteries (refer<br />
to the Battery Installation section above). If the battery power drops to the point where the<br />
<strong>REF</strong>-<strong>METER</strong>-<strong>OCTA</strong> can no longer function accurately, the power will turn off automatically.<br />
When the batteries are replaced, and the scale is turned back on, the <strong>REF</strong>-<strong>METER</strong>-<strong>OCTA</strong><br />
will resume operation with all previous setting intact.<br />
11
<strong>REF</strong>-<strong>METER</strong>-<strong>OCTA</strong> User’s Guide<br />
English<br />
Calibration<br />
The <strong>REF</strong>-<strong>METER</strong>-<strong>OCTA</strong> is calibrated at the factory to provide high accuracy. While<br />
recalibration should seldom, if ever, be necessary, recalibration is performed easily without<br />
sending the product to the manufacturer for service. A known calibration weight (in<br />
kilograms) is required to recalibrate the scale, and can be any value between 5 kg and 100<br />
kg. 25 kg is recommend. Best accuracy is obtained by using the largest weight available (i.e.<br />
a 50 kg calibration weight will provide better calibration accuracy than a 5 kg calibration<br />
weight). In addition, it is necessary to know the weight to within 2 grams.<br />
To recalibrate the <strong>REF</strong>-<strong>METER</strong>-<strong>OCTA</strong>, perform the following steps:<br />
1. Place the <strong>REF</strong>-<strong>METER</strong>-<strong>OCTA</strong> weighing platform on a firm, level surface.<br />
2. Turn the power to the <strong>REF</strong>-<strong>METER</strong>-<strong>OCTA</strong> off.<br />
3. Remove all objects from the platform.<br />
4. While holding , press and release . The <strong>REF</strong>-<strong>METER</strong>-<strong>OCTA</strong> will turn on, and<br />
after a few seconds the display will show SET CAL and 25.000 kg.<br />
5. Using or adjust the displayed value (in 1g increments) so that it is equal to the<br />
weight of the reference calibration weight. Use the<br />
key to adjust in 1 kg increments.<br />
6. Press . A number representing the weight of the unloaded platform will appear on<br />
the display. Press to lock in this value. The display will read zero.<br />
7. Apply the calibration weight to the platform. A number representing the applied<br />
reference weight will appear on the display. Allow at least 10 seconds for this number to<br />
stabilize.<br />
8. Press . The <strong>REF</strong>-<strong>METER</strong>-<strong>OCTA</strong> is now recalibrated to the reference weight.<br />
9. Refer to the Quick Start section above for setting the desired Units and Resolution.<br />
12
English<br />
<strong>REF</strong>-<strong>METER</strong>-<strong>OCTA</strong> User’s Guide<br />
Restoring Factory Calibration<br />
If you make a mistake recalibrating the <strong>REF</strong>-<strong>METER</strong>-<strong>OCTA</strong>, you can always restore the<br />
factory calibration (and factory defaults) of the scale.<br />
To restore the factory settings perform the following steps:<br />
1. Turn the power to the <strong>REF</strong>-<strong>METER</strong>-<strong>OCTA</strong> off.<br />
2. Remove any objects from the platform.<br />
3. While holding , press and release . The <strong>REF</strong>-<strong>METER</strong>-<strong>OCTA</strong> will turn on and<br />
beep 10 times. The factory settings are now restored.<br />
4. Refer to the Quick Start section above for setting the desired Units and Resolution.<br />
5. Calibrate<br />
Sound<br />
As delivered from the factory, the <strong>REF</strong>-<strong>METER</strong>-<strong>OCTA</strong> beeps when turning on and when<br />
keys are pressed. This sound can be muted as follows:<br />
1. Make sure the power is on.<br />
2. While holding , press . The musical symbol on the left of the display will turn<br />
off to indicate that the sound has been muted.<br />
Repeat steps 1 and 2 to turn the sound back on.<br />
NOTE: The Mute function only affects the power-on and key-press beeps. It has no effect<br />
on the alarm.<br />
13
<strong>REF</strong>-<strong>METER</strong>-<strong>OCTA</strong> User’s Guide<br />
English<br />
HVAC Service<br />
Because of its high stability and accuracy, the <strong>REF</strong>-<strong>METER</strong>-<strong>OCTA</strong> is ideal for automotive,<br />
commercial, and residential A/C refrigerant charging and recovery. Its high resolution also<br />
allows accurate critical charging of small refrigeration systems such as commercial freezers.<br />
To use the <strong>REF</strong>-<strong>METER</strong>-<strong>OCTA</strong> for refrigerant charging, perform the following steps:<br />
1. Press to set the desired display units.<br />
2. If desired, set up the Tank Capacity Mode as described in the Tank Capacity Mode<br />
section. This will allow you to know at any time the percent of refrigerant remaining in<br />
the refrigerant cylinder.<br />
3. Carefully set the refrigerant cylinder on the weighing platform.<br />
4. Attach the cylinder to the charging manifold via a utility hose. Open the cylinder valve<br />
and purge air from the hose (ie. <strong>REF</strong>CO CL hoses).<br />
5. Program the desired refrigerant charge weight as described in the Programming section.<br />
Activate the program by pressing .<br />
6. Open the manifold valve(s).<br />
7. The display will indicate the weight charged as negative, indicating refrigerant is being<br />
removed from the charging cylinder.<br />
8. If the refrigerant cylinder empties while charging:<br />
a. Close all valves.<br />
b. Press to “freeze” the display .<br />
c. Replace the empty refrigerant cylinder with a full one. Attach and purge hoses.<br />
d. Press to exit the Hold Mode.<br />
e. Open manifold valve(s). Charging will continue from where it left off.<br />
9. When charging is complete, the alarm will sound. Close all valves and press any key to<br />
cancel the alarm<br />
14
Deutsch<br />
<strong>REF</strong>-<strong>METER</strong>-<strong>OCTA</strong> Bedienungsanleitung<br />
Einleitung<br />
Wir gratulieren Ihnen zum Kauf der digitalen Füllwaage <strong>REF</strong>-<strong>METER</strong>-<strong>OCTA</strong>. Der <strong>REF</strong>-<br />
<strong>METER</strong>-<strong>OCTA</strong> ist eine der genauesten Füllwaagen welche am Markt erhältlich sind. Der<br />
<strong>REF</strong>-<strong>METER</strong>-<strong>OCTA</strong> verfügt über zusätzliche Funktionen welche heute von keinem anderen<br />
Hersteller angeboten werden. Der <strong>REF</strong>-<strong>METER</strong>-<strong>OCTA</strong> ist speziell geeignet für die Kälteund<br />
Klimaindustrie auch für sehr kleine Füllmengen von Kältemittel.<br />
Der <strong>REF</strong>-<strong>METER</strong>-<strong>OCTA</strong> ist programmierbar und hat eine integrierte Alarmfunktion welche<br />
bei Erreichen der vorgegebenen Füllmenge ein Tonsignal abgibt. Als Option besteht auch<br />
die Möglichkeit den <strong>REF</strong>-<strong>METER</strong>-<strong>OCTA</strong> mit dem Zusatzmodul <strong>REF</strong>-<strong>METER</strong>-<strong>OCTA</strong>-PLUS<br />
(Magnetventil) als <strong>REF</strong>-<strong>METER</strong>-<strong>OCTA</strong>-KIT aufzurüsten, welches eine automatische<br />
Befüllung ermöglicht.<br />
Merkmale<br />
• Grosse sehr gut lesbare LCD Anzeige<br />
• Masseinheit in Kg, lbs und oz<br />
• Speichermöglichkeit<br />
• Anzeige der Füllmenge im Kältemittelzylinder<br />
• Robustes und kompaktes Design<br />
• Geringer Stromverbrauch<br />
• Genaue Anzeigeauflösung<br />
• Programmierbarkeit<br />
• Kalibrierbarkeit<br />
• Vorhandenes Gewinde für 10612-<strong>REF</strong> zum Befüllen von Kältemitteln ab Dosen<br />
• Ausbaumöglichkeit zu <strong>REF</strong>-<strong>METER</strong>-<strong>OCTA</strong>-KIT<br />
Technische Daten<br />
Maximalgewicht 100 Kg<br />
Genauigkeit<br />
0.5% der Anzeige<br />
Auflösung<br />
2g<br />
Stromversorgung 4 x 1.5V ‘AAA’ Alkaline Batterien<br />
Batterielebenszeit 30 Std.<br />
Betriebstemperatur +10°C bis +40°C<br />
Gewicht<br />
2.8 kg<br />
Abmessungen<br />
30.5 cm x 30.5 cm x 4.5 cm<br />
Achtung: Um eine Beschädigung der Waage zu verhindern, das Maximalgewicht nicht<br />
überschreiten.<br />
15
<strong>REF</strong>-<strong>METER</strong>-<strong>OCTA</strong> Bedienungsanleitung<br />
Deutsch<br />
Teilediagram<br />
10612-<strong>REF</strong> (optional)<br />
Kältemitteldose<br />
(optional)<br />
LCD Display<br />
Gewinde zum<br />
Befestigen des<br />
10612-<strong>REF</strong><br />
Tastatur<br />
Wiegeplattform<br />
Automatischer<br />
Kabeleinzugs-Knopf<br />
Staukasten<br />
Aufhängebügel<br />
Lautsprecher<br />
Optischer<br />
Empfänger für<br />
<strong>REF</strong>-<strong>METER</strong>-<br />
<strong>OCTA</strong>-PLUS<br />
Batteriefach<br />
Steuergerät Rückseite<br />
16
Deutsch<br />
<strong>REF</strong>-<strong>METER</strong>-<strong>OCTA</strong> Bedienungsanleitung<br />
LCD Anzeige<br />
A<br />
B<br />
C<br />
E<br />
F<br />
D<br />
G<br />
H<br />
I<br />
J K L M N O P<br />
Item<br />
Funktion<br />
A Numerische Anzeige<br />
B Zusatzanzeige<br />
C Kältmittelzylinder Füllzustandsanzeige in %<br />
D Masseinheiten<br />
E Stummschaltung<br />
F Negativanzeige<br />
G Batteriezustandsanzeige<br />
H Anzeige für Schnelleinstellung<br />
I Speichermodusanzeige<br />
J Anzeige Füllstandmodus<br />
K Alarmmodus Ein<br />
L Haltmodusanzeige<br />
M Anzeige für Programbeendigung<br />
N Kalibriermodusanzeige<br />
O Ventil offen/geschlossen Anzeige bei <strong>REF</strong>-<strong>METER</strong>-<strong>OCTA</strong>-PLUS<br />
P Auflösungsanzeige<br />
17
<strong>REF</strong>-<strong>METER</strong>-<strong>OCTA</strong> Bedienungsanleitung<br />
Deutsch<br />
Tastatur<br />
Ein / Ausschalter<br />
Auswahl für Masseinheit<br />
Anzeigeauflösungswahl klein, mittel, gross<br />
Nullstellung<br />
Vorwärts/Backlight / Rückwärts bei Programmierung<br />
Schnelleinstellung mit und .<br />
Speicherung der momentanen Anzeige<br />
Programmiermodus<br />
Aktivieren/deaktivieren von Programmierungen<br />
18
Deutsch<br />
<strong>REF</strong>-<strong>METER</strong>-<strong>OCTA</strong> Bedienungsanleitung<br />
Schnellstart<br />
Um den <strong>REF</strong>-<strong>METER</strong>-<strong>OCTA</strong> als einfache Füllwaage zu benützen:<br />
Vorbereitung<br />
1. Den <strong>REF</strong>-<strong>METER</strong>-<strong>OCTA</strong> gemäss der Beschreibung unten auspacken.<br />
2. Installieren der Batterien gemäss Beschreibung unten.<br />
3. Die Waage auf flachen und stabilen Untergrund stellen.<br />
4. <strong>REF</strong>-<strong>METER</strong>-<strong>OCTA</strong> mit Taste einschalten.<br />
5. Masseinheit wählen mit Taste . Es stehen folgende Masseinheiten zur Auswahl:<br />
Kilogramm Pfund Pfund und Unzen Unzen<br />
6. Anzeigeauflösung durch Betätigung der Taste gemäss Beschreibung unten<br />
auswählen.<br />
Bedienung<br />
1. Stellen Sie eine Kältemittelflasche auf die Wiegeplattform.<br />
2. Durch drücken der Taste die Anzeige auf 0 stellen.<br />
3. Starten Sie den Füllvorgang.<br />
4. Lesen Sie das Gewicht vom Anzeigedisplay ab.<br />
5. Ein Minuszeichen bedeutet Gewichtsabnahme, also das Ausfliessen des Kältemittels<br />
aus der Kältemittelflasche beim Füllvorgang. Wenn die gewünschte Einfüllmenge an der<br />
Anzeige erreicht wird, den Füllvorgang beenden.<br />
6. Den <strong>REF</strong>-<strong>METER</strong>-<strong>OCTA</strong> durch drücken der Taste ausschalten.<br />
7. Um die Lebensdauer der Batterie zu verlängern schaltet der <strong>REF</strong>-<strong>METER</strong>-<strong>OCTA</strong> nach<br />
30 Minuten Nichtgebrauch automatisch aus. Dies trifft bei einer Vorprogrammierten<br />
Füllung nicht zu. Der letzte Anzeigewert wird bei einem Ausschalten automatisch<br />
gespeichert und erscheint wieder beim Einschalten.<br />
19
<strong>REF</strong>-<strong>METER</strong>-<strong>OCTA</strong> Bedienungsanleitung<br />
Deutsch<br />
Auspacken des <strong>REF</strong>-<strong>METER</strong>-<strong>OCTA</strong><br />
1. Nehmen Sie den <strong>REF</strong>-<strong>METER</strong>-<strong>OCTA</strong> aus der Umhängetasche.<br />
2. Drücken Sie auf das “ push“ Signet auf dem Steuergerät, welches sich auf der unteren<br />
Seite der Füllwaage befindet, um dieses aus dem Staukasten zu nehmen.<br />
3. Ziehen Sie das Steuergerät heraus und stellen Sie sicher, dass das Kabel nicht auf der<br />
Plattform zu liegen kommt.<br />
Einpacken des <strong>REF</strong>-<strong>METER</strong>-<strong>OCTA</strong><br />
1. Ständer einklappen.<br />
2. Das Steuergerät festhalten und den gelben Knopf für den automatischen Kabeleinzug<br />
betätigen.<br />
3. Das Steuergerät in den Staukasten einführen bis dieses einschnappt.<br />
4. Den <strong>REF</strong>-<strong>METER</strong>-<strong>OCTA</strong> wieder in der Umhängetasche verstauen.<br />
Installation und Wechsel der Batterie<br />
1. Batteriekastendeckel öffnen.<br />
2. Evtl. alte Batterien entfernen.<br />
3. 4 x ‘AAA’ Batterien in der angegebenen Reihenfolge einlegen. Batterienkastendeckel<br />
wieder schliessen. Achten Sie darauf, dass dieser richtig einschnappt.<br />
ACHTUNG: BEACHTEN SIE UNBEDINGT DIE RICHTIGE POLARITÄT BEIM EINLEGEN<br />
DER BATTERIEN. LASSEN SIE AUFGEBRAUCHTE BATTERIEN NICHT IM<br />
BATTERIEFACH. FALLS SIE DEN <strong>REF</strong>-<strong>METER</strong>-<strong>OCTA</strong> FÜR LÄNGERE ZEIT NICHT<br />
GEBRAUCHEN ENTFERNEN SIE DIE BATTERIEN VOM BATTERIEFACH.<br />
20
Deutsch<br />
<strong>REF</strong>-<strong>METER</strong>-<strong>OCTA</strong> Bedienungsanleitung<br />
Anzeigeauflösung<br />
Um die Ablesung von Werten zu erleichtern, kann die Anzeigeauflösung geändert werden.<br />
Instabile Gewichte, Einfluss von Wind oder Vibrationen können zu einer starken Fluktuation<br />
der Anzeige führen. Durch Reduzieren der Anzeigeauflösung können diese Fluktuationen<br />
minimiert werden. Standardeinstellung des <strong>REF</strong>-<strong>METER</strong>-<strong>OCTA</strong> ist die mittlere Auflösung.<br />
Die Auflösung kann durch betätigen der Taste auf klein, mittel oder gross eingestellt<br />
werden. Die untenstehende Tabelle zeigt die Anzeigeauflösung der jeweiligen Stufe.<br />
Masseinheit<br />
Pounds<br />
&<br />
Auflösung Kilogramm Pounds Ounces Ounces<br />
HIGH<br />
0.005<br />
2 g<br />
(Hoch)<br />
lbs<br />
0.1 oz. 0.1 oz.<br />
MEDIUM<br />
0.010<br />
5 g<br />
(Mittel)<br />
lbs.<br />
0.2 oz. 0.2 oz.<br />
LOW<br />
0.020<br />
10 g<br />
(Klein)<br />
lbs.<br />
0.5 oz. 0.5 oz.<br />
Tabelle 1. Anzeigeauflösungen<br />
21
<strong>REF</strong>-<strong>METER</strong>-<strong>OCTA</strong> Bedienungsanleitung<br />
Deutsch<br />
Überlastanzeige<br />
Falls das Maximalgewicht des <strong>REF</strong>-<strong>METER</strong>-<strong>OCTA</strong> (100 kg) überschritten wird, erscheint<br />
auf dem Display eine “1”. In diesem Fall muss die Waage sofort entlastet werden um eine<br />
Beschädigung des <strong>REF</strong>-<strong>METER</strong>-<strong>OCTA</strong> zu vermeiden.<br />
Anzeigespeicherung<br />
Um bei der Befüllung ein Wechsel der Kältemittelflasche auf der Waage zu ermöglichen<br />
kann die aktuelle Anzeige am Display gespeichert werden. Verfahren Sie wie folgt:<br />
1. Stellen Sie sicher, dass die Displayanzeige stabil ist.<br />
2. Betätigen Sie die Taste . Der angezeigte Wert ist jetzt gespeichert.<br />
3. Nehmen Sie die leere Kältemittelflasche von der Plattform und stellen Sie eine volle<br />
darauf.<br />
4. Warten Sie 5 Sekunden damit sich die Waage stabilisiert.<br />
5. Drücken Sie wieder die Taste . Die Messung kann nun mit dem gleichen Wert<br />
fortgeführt werden.<br />
Programmierung<br />
Der <strong>REF</strong>-<strong>METER</strong>-<strong>OCTA</strong> kann mit einem bestimmten Gewicht vorprogrammiert werden, so<br />
dass bei Erreichen dieses Gewichtes in der Anzeige ein Summton ertönt. Verfahren Sie wie<br />
folgt:<br />
1. Stellen Sie den <strong>REF</strong>-<strong>METER</strong>-<strong>OCTA</strong> mit den gewünschten Masseinheit und Auflösung<br />
ein.<br />
2. Falls Sie ein abnehmendes Gewicht programmieren möchten, stellen Sie die<br />
Kältemittelflasche auf die Waage.<br />
3. Betätigen Sie die Taste um die Programmierung zu starten. Das Anzeigedisplay<br />
zeigt nun die Anzeige SET.<br />
4. Drücken und halten Sie die oder Tasten um den Zeitpunkt des Alarms<br />
einzustellen. Um die Anzeige zu beschleunigen drücken Sie die Taste . Dies macht<br />
die Einstellung des Wertes 10 x schneller. Drücken Sie wieder um auf<br />
Normalgeschwindigkeit zurückzuwechseln.<br />
22
Deutsch<br />
<strong>REF</strong>-<strong>METER</strong>-<strong>OCTA</strong> Bedienungsanleitung<br />
5. Wenn Sie das gewünschte Gewicht eingestellt haben, drücken Sie die Taste . Die<br />
Anzeige geht automatisch auf 0 und auf dem Display erscheint der Vermerk RUN. Die<br />
Waage ist nun bereit im Alarmmodus.<br />
6. Wenn das eingestellte Füllgewicht erreicht wird ertönt ein Alarmsignal.<br />
7. Drücken Sie eine beliebige Taste um den Alarm auszuschalten.<br />
8. Um den Alarmmodus zu verlassen betätigen Sie erneut die Taste<br />
Beachten: Der Alarmmodus RUN kann nur vom Programmiermodus SET her eingestellt<br />
werden. Um wieder in den Alarmmodus RUN nach erneuter Betätigung der zu<br />
gelangen, müssen Sie zuerst die Taste (der zuletzt eingestellte Wert bleibt gespeichert)<br />
gefolgt von der Taste betätigen. Die Anzeige zeigt erneut 0 wenn das Alarmprogramm<br />
wieder gestartet wird. Mit der Taste kann auch im Alarmmodus die momentane Anzeige<br />
gespeichert und die Kältemittelflasche ausgewechselt werden.<br />
Programmierung des Füllstandes der Kältemittelflasche<br />
Der relative Füllzustand einer Kältemittelflasche kann mit dem <strong>REF</strong>-<strong>METER</strong>-<strong>OCTA</strong><br />
angezeigt werden. Dazu muss das Gewicht der vollen, sowie der leeren Flasche<br />
eingegeben werden. Verfahren Sie dazu wie folgt:<br />
Einstellung des Füllzustandmodus<br />
1. Drücken und halten Sie die Taste , betätigen Sie gleichzeitig die Taste . Die<br />
Füllstandsanzeige erscheint auf dem Display gleichzeitig mit dem Vermerk OFF. Diese<br />
Anzeige bedeutet, dass der Füllstandmodus im Moment nicht aktiviert ist.<br />
2. Aktivieren Sie den Füllzustandmodus durch betätigen der Taste . Auf dem Display<br />
erscheint jetzt die Anzeige ON, gleichzeitig erscheint die Zusatzanzeige sowie das<br />
Symbol %.<br />
3. Drücken Sie für den ersten Schritt. Die Anzeige 0% erscheint blinkend auf dem<br />
Display.<br />
23
<strong>REF</strong>-<strong>METER</strong>-<strong>OCTA</strong> Bedienungsanleitung<br />
Deutsch<br />
4. Stellen Sie eine leere Kältemittelflasche auf die Waage. Warten Sie 5 Sekunden damit<br />
sich die Anzeige stabilisiert, drücken Sie dann die Taste . Die Anzeige 100%<br />
erscheint nun blinkend auf dem Display.<br />
5. Stellen Sie eine volle Kältemittelflasche auf die Waage. Warten Sie 5 Sekunden damit<br />
sich die Anzeige stabilisiert, drücken Sie dann die Taste<br />
jetzt programmiert.<br />
. Die Füllstandsanzeige ist<br />
6. Das Display zeigt nun konstant die relative Füllmenge der sich auf der Wiegeplattform<br />
befindlichen Kältemittelflasche zwischen 0% und 100%.<br />
BEACHTEN: Das 100% Gewicht muss mindestens 200g höher als das 0% Gewicht sein.<br />
Ist dies nicht der Fall erscheint “Err” auf der Zusatzanzeige.<br />
Um den Füllstandmodus zu deaktivieren verfahren Sie wie folgt:<br />
Ausschalten des Füllzustandmodus<br />
1. Drücken und halten Sie die Taste , betätigen Sie gleichzeitig die Taste . Die<br />
Füllstandsanzeige erscheint auf dem Display gleichzeitig mit dem Vermerk ON. Diese<br />
Anzeige bedeutet, dass der Füllstandmodus im Moment aktiviert ist.<br />
2. Deaktivieren Sie den Füllzustandmodus durch betätigen der Taste . Auf dem Display<br />
erscheint jetzt die Anzeige OFF und die % Anzeige verschwindet.<br />
3. Drücken Sie die Taste um zum Normalmodus zurückzukehren.<br />
Der Füllzustandmodus kann ohne Programmierung ein- und ausgeschaltet werden. Der<br />
programmierte Wert bleibt gespeichert bis ein neuer Wert programmiert wird.<br />
Batteriezustandsanzeige<br />
Bei voller Batteriespannung zeigt das Display 4 Striche. Je nach Zustand der Batterie nimmt<br />
diese Anzeige ab bis kein Strich mehr sichtbar ist. Die Batterien sollten dann so bald als<br />
möglich ausgewechselt werden. Falls die Batteriespannung für ein normales Funktionieren<br />
des <strong>REF</strong>-<strong>METER</strong>-<strong>OCTA</strong>s zu tief ist, schaltet dieser automatisch aus. Nach dem<br />
Auswechseln der Batterien arbeitet der <strong>REF</strong>-<strong>METER</strong>-<strong>OCTA</strong> wieder mit allen zuletzt<br />
programmierten Werten.<br />
24
Deutsch<br />
<strong>REF</strong>-<strong>METER</strong>-<strong>OCTA</strong> Bedienungsanleitung<br />
Kalibrierung<br />
Der <strong>REF</strong>-<strong>METER</strong>-<strong>OCTA</strong> wird Werkseitig bereits kalibriert angeliefert. Ein Neukalibrieren<br />
wird nur selten nötig sein und kann falls trotzdem nötig einfach und ohne das Gerät dem<br />
Hersteller zurückzusenden vom Benützer selbst ausgeführt werden. Dazu benötigen Sie<br />
einzig ein Ihnen bekanntes Referenzgewicht (Kalibriergewicht), welches zwischen 5 kg und<br />
100 kg wiegt. Die beste Kalbriergenauigkeit wird mit einem möglichst schweren Gewicht<br />
erreicht. Wichtig ist auch, dass Sie das Kalibriergewicht auf 2g genau bestimmen. Um den<br />
<strong>REF</strong>-<strong>METER</strong>-<strong>OCTA</strong> zu kalibrieren verfahren Sie wie folgt:<br />
1. Stellen Sie den <strong>REF</strong>-<strong>METER</strong>-<strong>OCTA</strong> auf einen flachen und stabilen Untergrund.<br />
2. Schalten Sie den <strong>REF</strong>-<strong>METER</strong>-<strong>OCTA</strong> aus.<br />
3. Stellen Sie sicher, dass sich nichts mehr auf der Wiegeplattform befindet.<br />
4. Drücken und halten Sie die Taste , und drücken Sie kurz die Taste . Der <strong>REF</strong>-<br />
<strong>METER</strong>-<strong>OCTA</strong> schaltet sich ein. Nach einigen Sekunden erscheint auf dem Display die<br />
Anzeige SET CAL und 25.000 kg.<br />
5. Stellen Sie Ihr Referenzgewicht mit Hilfe der Tasten oder ein. Die Anzeige<br />
wechselt nun in 1g Schritten. Um die Einstellung zu beschleunigen drücken Sie die<br />
Taste<br />
um den Wert in 1 kg Schritten zu verändern.<br />
6. Drücken Sie die Taste . Eine Nummer erscheint jetzt auf dem Display. Betätigen Sie<br />
die Taste . Das Display zeigt jetzt 0.<br />
7. Stellen Sie Ihr Kalibriergewicht auf die Wiegeplattform. Das Display zeigt erneut eine<br />
Nummer. Warten Sie 10 Sekunden damit sich die Anzeige stabilisieren kann.<br />
8. Drücken Sie die Taste . Der <strong>REF</strong>-<strong>METER</strong>-<strong>OCTA</strong> ist jetzt gemäss Ihrem<br />
Referenzgewicht kalibriert.<br />
9. Stellen Sie nun Ihre Masseinheiten wieder ein.<br />
25
<strong>REF</strong>-<strong>METER</strong>-<strong>OCTA</strong> Bedienungsanleitung<br />
Deutsch<br />
Wiedereinstellen der Werkseinstellungen<br />
Falls Ihnen beim Kalibrieren ein Fehler unterlaufen sollte, können Sie den <strong>REF</strong>-<strong>METER</strong>-<br />
<strong>OCTA</strong> jederzeit wieder auf die original Werkseinstellungen zurückstellen.<br />
Um die Werkseinstellungen wiedereinzustellen verfahren Sie wie folgt:<br />
1. Schalten Sie den <strong>REF</strong>-<strong>METER</strong>-<strong>OCTA</strong> aus.<br />
2. Stellen Sie sicher, dass sich nichts mehr auf der Wiegeplattform befindet.<br />
3. Drücken und halten Sie die Taste , Betätigen Sie kurz die Taste . Der <strong>REF</strong>-<br />
<strong>METER</strong>-<strong>OCTA</strong> schaltet sich jetzt ein und es ertönt 10x einen Piepston. Die<br />
Werkseinstellungen sind jetzt wiederhergestellt.<br />
4. Stellen Sie nun Ihre Masseinheiten wieder ein.<br />
5. Kalibrierung<br />
Ton<br />
Werkseitig ist der <strong>REF</strong>-<strong>METER</strong>-<strong>OCTA</strong> so eingestellt, dass beim Ein- und Ausschalten sowie<br />
bei betätigen einer Taste jeweils ein kurzer Ton ertönt. Diesen Ton können Sie wie folgt<br />
deaktivieren:<br />
1. Schalten Sie den <strong>REF</strong>-<strong>METER</strong>-<strong>OCTA</strong> ein.<br />
2. Drücken und halten Sie die Taste , betätigen Sie kurz die Taste . Der Ton ist nun<br />
deaktiviert und das Tonsymbol verschwindet auf dem Display.<br />
Wiederholen Sie Schritt 1 und 2 um den Ton wieder einzuschalten.<br />
Beachten: Das Aktivieren oder Deaktivieren des Tons hat keinen Einfluss auf den<br />
Alarmtonmodus.<br />
26
Deutsch<br />
<strong>REF</strong>-<strong>METER</strong>-<strong>OCTA</strong> Bedienungsanleitung<br />
Klima- und Kälteservice<br />
Aufgrund der hohen Stabilität und Genauigkeit des <strong>REF</strong>-<strong>METER</strong>-<strong>OCTA</strong>s ist dieser ideal<br />
geeignet für den Klima- und Kältebereich sowie für die Fahrzeugklimaindustrie. Die hohe<br />
Anzeigeauflösung eignet sich ausgezeichnet für Anwendungen wo die genaue Menge<br />
Kältemittel sehr wichtig ist, wie zum Beispiel bei kleinen Kältesystemen und kommerzieller<br />
Kälte.<br />
Bei der Kältemittelbefüllung verfahren Sie wie folgt:<br />
1. Betätigen Sie die Taste um die gewünschte Masseinheit einzustellen.<br />
2. Falls gewünscht programmieren Sie den Füllzustandsmodus. Dies ermöglicht Ihnen<br />
jederzeit festzustellen wie viel Kältemittel sich noch in der Flasche befindet.<br />
3. Stellen Sie den Kältemittelzylinder vorsichtig auf die Waage.<br />
4. Verbinden Sie den Kältemittelzylinder mit einer Monteurhilfe mittels eines geeigneten<br />
Kältmittelschlauches (z.B. <strong>REF</strong>CO CL Schläuche).<br />
5. Programmieren Sie die gewünschte Füllmenge wie in dieser Anleitung beschrieben.<br />
Aktivieren Sie das Füllprogramm durch Betätigen der Taste .<br />
6. Öffnen Sie die Ventile an der Monteurhilfe.<br />
7. Das Display zeigt nun die einfliessende Menge an Kältemittel als Negativwert an.<br />
8. Bei leeren Kältemittelzylinder vor der Beendigung der Befüllung:<br />
a. Alle Ventile schliessen.<br />
b. Drücken Sie um den aktuellen Wert zu speichern.<br />
c. Ersetzen Sie den leeren Kältemittelzylinder.<br />
d. Drücken Sie wieder um weiterzufüllen.<br />
e. Öffnen Sie die Ventile. Das Befüllen kann jetzt beim zuletzt gespeicherten Wert<br />
fortgeführt werden.<br />
10. Wenn die Füllung abgeschlossen ist ertönt das Alarmsignal gemäss programmiertem<br />
Wert im Alarmmodus. Betätigen Sie eine beliebige Taste um den Alarm auszuschalten.<br />
27
<strong>REF</strong>-<strong>METER</strong>-<strong>OCTA</strong> Mode d’emploi<br />
Français<br />
Introduction<br />
Merci pour votre achat de la balance de charge digitale <strong>REF</strong>-<strong>METER</strong>-<strong>OCTA</strong>. La balance<br />
<strong>REF</strong>-<strong>METER</strong>-<strong>OCTA</strong> est l’appareil de contrôle le plus précis existant sur le marché avec des<br />
caractéristiques incomparables. C’est un appareil idéal pour l’entretien des installations de<br />
réfrigération et d’air conditionné ainsi que pour les charges critiques des petites unités.<br />
L’unité de mesure du poids de la <strong>REF</strong>-<strong>METER</strong>-<strong>OCTA</strong> peut être sélectionnée en kg ou lbs.<br />
La <strong>REF</strong>-<strong>METER</strong>-<strong>OCTA</strong> est programmable, et possède une alarme indiquant que le seuil<br />
programmé a été dépassé. Avec le module supplémentaire <strong>REF</strong>-<strong>METER</strong>-<strong>OCTA</strong>-PLUS<br />
(valve magnétique), vous avez la possibilité de mettre votre <strong>REF</strong>-<strong>METER</strong>-<strong>OCTA</strong> au niveau<br />
de la <strong>REF</strong>-<strong>METER</strong>-<strong>OCTA</strong>-KIT. Ce module en option permet un remplissage automatique.<br />
Avantages<br />
• Afficheur LCD de grande Large, high-visibility LCD display<br />
• Unités de mesure en kg and lbs<br />
• Mémorisation du dernier réglage<br />
• Indicateur de la capacité de la bouteille<br />
• Compacte<br />
• Longue durée de vie des piles d’alimentation<br />
• Grande précision et haute résolution<br />
• Programmable<br />
• Etalonnage aisé avec des poids standard.<br />
• Filetage pour fixer la vanne 10612-<strong>REF</strong> nécessaire avec les cartouches de fluides<br />
frigorigènes<br />
• Extension possible vers <strong>REF</strong>-<strong>METER</strong>-<strong>OCTA</strong>-KIT<br />
Spécifications<br />
Capacité<br />
100 kilogrammes (220 Pounds)<br />
Précision<br />
0.5% de la lecture au dernier chiffre significatif près<br />
Résolution<br />
2g, 0.005 lbs., 0.1 oz.<br />
Alimentation<br />
4 x 1.5V ‘AAA’ piles alcalines<br />
Durée de vie des piles 30 heures en service continu<br />
T° d’utilisation 10°C – 40°C (50°F – 104°F)<br />
Poids<br />
2.8 kg<br />
Dimensions<br />
30.5 cm x 30.5 cm x 4.5 cm<br />
NOTE: Pour éviter tout endommagement, ne jamais dépasser la capacité maximale de la<br />
balance <strong>REF</strong>-<strong>METER</strong>-<strong>OCTA</strong>.<br />
28
Français<br />
Définition des<br />
composants<br />
10612-<strong>REF</strong> (optionelle)<br />
<strong>REF</strong>-<strong>METER</strong>-<strong>OCTA</strong> Mode d’emploi<br />
Cartouche de fluide<br />
frigorigène (optionelle)<br />
Afficheur LCD<br />
Filetage pour fixation de la<br />
vanne 10612-<strong>REF</strong><br />
Clavier<br />
Plateau<br />
Enrouleur<br />
automatique de<br />
câble<br />
Attache de<br />
suspension<br />
Haut<br />
parleur<br />
Base de<br />
rangement<br />
Port optique<br />
pour <strong>REF</strong>-<br />
<strong>METER</strong>-<br />
<strong>OCTA</strong>-PLUS<br />
Logement<br />
des piles<br />
Vue arrière du boîtier<br />
29
<strong>REF</strong>-<strong>METER</strong>-<strong>OCTA</strong> Mode d’emploi<br />
Français<br />
Afficheur LCD<br />
A<br />
B<br />
C<br />
E<br />
F<br />
D<br />
G<br />
H<br />
I<br />
J K L M N O P<br />
Pos.<br />
A<br />
B<br />
C<br />
D<br />
E<br />
F<br />
G<br />
H<br />
I<br />
J<br />
K<br />
L<br />
M<br />
N<br />
O<br />
P<br />
Fonction<br />
Afficheur principal<br />
Afficheur alternatif numérique<br />
Indication en pourcentage de la capacité de la bouteille<br />
Unité de mesure<br />
Indicateur du son<br />
Signe négatif (Indique le poids retire de la plateforme)<br />
Indicateur du niveau de charge des piles<br />
Indicateur de règlage rapide<br />
Indicateur de la fonction règlage<br />
Indication de la fonction Tank Capacity<br />
Indication de la fonction RUN<br />
Indication de la fonction HOLD<br />
Indication du programme<br />
Indication de la fonction Calibration<br />
Indication de la valve Ouverte/fermée avec <strong>REF</strong>-<strong>METER</strong>-<strong>OCTA</strong>-<br />
PLUS<br />
Indication de la résolution<br />
30
Français<br />
<strong>REF</strong>-<strong>METER</strong>-<strong>OCTA</strong> Mode d’emploi<br />
Clavier<br />
Appuyer pour mise en route, appuyer sur hold pour arrêter<br />
Appuyer pour le choix de l’unité de mesure<br />
Appuyer pour sélectionner la résolution basse, moyenne ou haute de<br />
l’indication<br />
Appuyer pour la mise à zéro de l’afficheur<br />
Avance/Rétro-éclairage/Retour lors de la programmation<br />
Pour réglage rapide. A utiliser en même temps que et .<br />
Blocage de l’indication de l’afficheur<br />
Choix des programmes<br />
Activer / Désactiver les valeurs programmées.<br />
31
<strong>REF</strong>-<strong>METER</strong>-<strong>OCTA</strong> Mode d’emploi<br />
Français<br />
Démarrage rapide<br />
Pour utiliser la <strong>REF</strong>-<strong>METER</strong>-<strong>OCTA</strong> comme simple balance, suivre les étapes suivantes:<br />
Préparation<br />
1. Mettre en train la balance comme décrit dans le paragraphe ci-dessous “Mise en train<br />
de la <strong>REF</strong>-<strong>METER</strong>-<strong>OCTA</strong>” .<br />
2. Mettre en place les piles comme décrit dans le paragraphe ci-dessous ”Installation des<br />
piles” .<br />
3. Placer la balance sur une surface plane et ferme.<br />
4. Mettre en route la <strong>REF</strong>-<strong>METER</strong>-<strong>OCTA</strong> en appuyant sur .<br />
5. Sélectionner l’unité de mesure en appuyant plusieurs fois sur . Les unités défileront<br />
comme suit:<br />
kilograms pounds pounds and ounces ounces<br />
6. Sélectionner la résolution en appuyant plusieurs fois sur comme décrit dans le<br />
paragraphe RESOLUTION .<br />
Simple pesage<br />
1. En cas d’utilisation d’un récipient pour contenir les pièces à peser, placer celui-ci au<br />
centre du plateau.<br />
2. Appuyer sur . L’afficheur indiquera alors zéro.<br />
3. Placer le matériel à peser dans le récipient ou directement au centre du plateau.<br />
4. Lire la valeur indiquée.<br />
5. Le signe moins indique une perte de poids donc un écoulement du réfrigérant hors de la<br />
bouteille de réfrigérant lors du remplissage. Lorsque l’affichage indique que le volume<br />
souhaité est atteint, arrêter le remplissage.<br />
6. Éteindre la <strong>OCTA</strong>-WIRELESS en appuyant sur la touche .<br />
7. Pour économiser l’énergie des piles, la balance <strong>REF</strong>-<strong>METER</strong>-<strong>OCTA</strong> s’arrêtera<br />
automatiquement après 30 minutes d’inactivité. Sauf en cas de remplissage programmé<br />
au préalable. A la remise en route le programme reprendra où il en était au moment de<br />
la coupure.<br />
32
Français<br />
<strong>REF</strong>-<strong>METER</strong>-<strong>OCTA</strong> Mode d’emploi<br />
Mise en train de la balance <strong>REF</strong>-<strong>METER</strong>-<strong>OCTA</strong><br />
1. Sortir la balance <strong>REF</strong>-<strong>METER</strong>-<strong>OCTA</strong> de sa sacoche.<br />
2. Appuyer sur le boîtier de commande à l’endroit marqué “push“ situé sur le plateau<br />
inférieur de la balance pour sortir celui-ci de son logement.<br />
3. Sortir le boîtier de commande en veillant au déroulement correct du câble.<br />
4. Relevez l’attache de suspension si nécessaire.<br />
Rangement de la balance <strong>REF</strong>-<strong>METER</strong>-<strong>OCTA</strong><br />
1. Replier le pied si nécessaire.<br />
2. Retenir le boîtier de commande tout en appuyant sur le bouton jaune pour procéder au<br />
rembobinage du câble.<br />
3. Ranger le boîtier dans son logement en appuyant fermement.<br />
4. Replacer la <strong>REF</strong>-<strong>METER</strong>-<strong>OCTA</strong> dans sa sacoche.<br />
Installation des piles et remplacement<br />
1. Enlever le couvercle du compartiment en appuyant sur la patte située à la base.<br />
2. Si nécessaire, remplacer les anciennes piles.<br />
3. Insérer 4 ‘AAA’. Remettre en place le couvercle.<br />
IMPORTANT: POUR EVITER TOUT ENDOMMAGEMENT DE LA <strong>REF</strong>-<strong>METER</strong>-<strong>OCTA</strong>,<br />
OBSERVER SCRUPULEUSEMENT LES POLARITES DES PILES COMME INDIQUE<br />
DANS LE COMPARTIMENT. NE PAS LAISSER EN PLACE DE PILES DECHARGEES.<br />
ENLEVER LES PILES SI LA <strong>REF</strong>-<strong>METER</strong>-<strong>OCTA</strong> N’EST PAS UTILISEE PENDANT UNE<br />
LONGUE PERIODE.<br />
33
<strong>REF</strong>-<strong>METER</strong>-<strong>OCTA</strong> Mode d’emploi<br />
Français<br />
Résolution<br />
La résolution (augmentation minimale du poids ou du volume) peut être ajustée pour<br />
faciliter la lecture de la mesure. Une charge instable ou un souffle important peut affecter la<br />
précision de la mesure. En réduisant la résolution, les influences externes sont diminuées.<br />
La <strong>REF</strong>-<strong>METER</strong>-<strong>OCTA</strong> est livrée avec le réglage MEDIUM convenant à la plupart des<br />
applications. La résolution peut être changée de LOW, MEDIUM ou HIGH en appuyant<br />
plusieurs fois sur . Le tableau 1 montre les différentes résolutions affichées pour<br />
chaque mode. Intérieurement la balance opère avec la résolution maximale; les réglages<br />
n’affectent que l’affichage.<br />
Unités<br />
Pounds<br />
&<br />
Résolution Kilograms Pounds Ounces Ounces<br />
HIGH 2 g<br />
0.005<br />
lbs<br />
0.1 oz. 0.1 oz.<br />
MEDIUM 5 g<br />
0.010<br />
lbs.<br />
0.2 oz. 0.2 oz.<br />
LOW 10 g<br />
0.020<br />
lbs.<br />
0.5 oz. 0.5 oz.<br />
TABLE 1. Valeurs des résolutions<br />
34
Français<br />
<strong>REF</strong>-<strong>METER</strong>-<strong>OCTA</strong> Mode d’emploi<br />
Indication se surcharge<br />
Si le poids appliqué sur le plateau excède la capacité maximale de la <strong>REF</strong>-<strong>METER</strong>-<strong>OCTA</strong><br />
(100 kg), un simple “1” sera indiqué sur le coté gauche de l’afficheur. Pour éviter tout<br />
endommagement de la <strong>REF</strong>-<strong>METER</strong>-<strong>OCTA</strong>, retirer immédiatement la charge du plateau.<br />
Fonction Hold<br />
Un avantage particulier de la <strong>REF</strong>-<strong>METER</strong>-<strong>OCTA</strong> permet la vidange ou le remplacement du<br />
contenant utilisé pour le pesage sans affecter le poids indiqué sur l’afficheur. Le mode Hold<br />
doit être utilisé comme suit:<br />
1. L’afficheur doit être stable.<br />
2. Appuyer sur . La valeur indiquée est alors bloquée sur l’afficheur.<br />
3. Enlever alors les objets vides ou à remplacer du plateau.<br />
4. Attendre 5 secondes que la nouvelle charge soit stabilisée.<br />
5. Appuyer sur . La mesure continue à partir de la valeur indiquée précédemment.<br />
Programmation<br />
Avec la <strong>REF</strong>-<strong>METER</strong>-<strong>OCTA</strong>, un seuil d’alarme peut être programmé. L’alarme sonore se<br />
déclenchera quand le poids affiché (positif ou négative) égale le poids programme. Suivre<br />
les étapes suivantes pour programmer l’alarme :<br />
1. Régler la <strong>REF</strong>-<strong>METER</strong>-<strong>OCTA</strong> avec les unités et la résolution désirées.<br />
2. Pour une mesure décroissante du poids, placer les objets ou le récipient sur le plateau.<br />
3. Appuyer sur pour démarrer le mode de réglage. SET sera indiqué sur l’afficheur.<br />
4. Appuyer et/ou tenir enfoncer les clés ou pour obtenir la valeur souhaitée. Pour<br />
accélérer le réglage, appuyer sur . La vitesse de réglage sera alors de 10 x<br />
supérieure à la vitesse normale. Appuyer à nouveau sur pour revenir à la vitesse<br />
normale.<br />
5. Appuyer sur l’indication reviendra automatiquement sur zéro et RUN sera indiqué<br />
sur l’afficheur pour indiquer que le programme est enregistré.<br />
35
<strong>REF</strong>-<strong>METER</strong>-<strong>OCTA</strong> Mode d’emploi<br />
Français<br />
6. Si le poids excède la valeur programmée, l’alarme sonore se déclenchera et l’indication<br />
DONE clignotera sur l’afficheur.<br />
7. Appuyer sur n’importe quelle clé pour arrêter l’alarme.<br />
8. Pour annuler la fonction RUN à tout moment, appuyer sur .<br />
NOTE: La fonction RUN peut seulement être initialisé à partir de la fonction SET. Si vous<br />
annulez la fonction RUN en appuyant sur , et désirez redémarrer le programme,<br />
appuyer à nouveau sur (le précédent seuil sera restauré) puis sur à nouveau..<br />
L’indication de l’afficheur reviendra sur zéro au redémarrage du programme. Il est possible<br />
de programmer la fonction SET sans démarrer la fonction RUN, en appuyant sur après<br />
avoir fixer le seuil d’alarme. La nouvelle valeur sera sauvegardée jusqu’à la prochaine<br />
activation de la fonction SET. peut être utilisé durant la fonction RUN comme décrit<br />
dans le chapitre FONCTION HOLD. Le <strong>REF</strong>-<strong>METER</strong>-<strong>OCTA</strong>-PLUS apporte des fonctions<br />
supplémentaires en fonction RUN. Voir le mode d’emploi du <strong>REF</strong>-<strong>METER</strong>-<strong>OCTA</strong>-PLUS<br />
pour plus de détails.<br />
Fonction Tank Capacity<br />
Il est parfois nécessaire de connaître la charge du matériel (par exemple le réfrigérant)<br />
contenue dans le récipient (bouteille). La fonction Tank Capacity de la <strong>REF</strong>-<strong>METER</strong>-<strong>OCTA</strong><br />
permet de connaître à tout moment le pourcentage de matériel dans le récipient. Il est<br />
nécessaire pour cela de connaître le poids du récipient vide et en charge. Procéder de la<br />
manière suivante :<br />
1. Tout en appuyant sur , appuyer sur . La fonction SET TANK se mettra en route<br />
et OFF apparaîtra sur l’afficheur.<br />
2. Mettre en route la fonction Tank Capacity en appuyant sur . L’afficheur indiquera ON,<br />
et l’indication numérique et pourcentage se mettra en route.<br />
3. Appuyer sur pour procéder au démarrage de l’opération. 0% clignotera indiquant<br />
que le poids du récipient vide doit être enregistré.<br />
36
Français<br />
<strong>REF</strong>-<strong>METER</strong>-<strong>OCTA</strong> Mode d’emploi<br />
4. Poser le récipient vide (ou un poids équivalent) sur le plateau. Attendre 5 secondes<br />
pour que la charge se stabilise et appuyer alors sur<br />
le poids du récipient chargé doit être enregistré.<br />
. 100% clignotera indiquant que<br />
5. Poser le récipient plein (ou un poids équivalent) sur le plateau. Attendre 5 secondes et<br />
appuyer alors sur<br />
. Cette opération terminera le réglage.<br />
6. A partir de ce point, l’afficheur indiquera en haut à droite le pourcentage du matériel<br />
dans le recipient de 0 à 100%.<br />
NOTE: Les 100% de charge doivent supérieurs de 200 g au moins au 0 % si non le signe<br />
“Err” apparaîtra. Pour annuler cette erreur recommencer l’opération ci-dessus en réglant<br />
une différence de 200 g entre les deux pourcentages. Le bouton ZERO peut être utilisé<br />
pendant le réglage des valeurs 0% et 100%. Ceci n’aura aucune incidence sur le mode<br />
opératoire puisque la fonction Tank Capacity travaille en poids absolus et non relatifs.<br />
Suivre les étapes suivantes pour fermer la fonction Tank Capacity.<br />
Fermeture de la fonction Tank Capacity<br />
1. Tout en appuyant sur , appuyer sur . La fonction SET TANK se mettra en route<br />
et ON apparaîtra sur l’afficheur.<br />
2. Mettre en route la fonction Tank Capacity en appuyant sur . L’afficheur indiquera<br />
OFF, et l’indication numérique se mettra en route.<br />
3. Appuyer sur pour revenir au fonctionnement normal.<br />
Il est possible de revenir à la fonction Tank Capacity sans réglage. La <strong>REF</strong>-<strong>METER</strong>-<strong>OCTA</strong><br />
gardera en mémoire les derniers réglages. Pour revenir à la fonction Tank Capacity sans<br />
réglages, procéder comme suit :<br />
37
<strong>REF</strong>-<strong>METER</strong>-<strong>OCTA</strong> Mode d’emploi<br />
Français<br />
Mise en route de la fonction Tank Capacity sans nouveaux réglages<br />
1. Tout en appuyant sur , appuyer sur . L’afficheur se mettra en route et indiquera<br />
OFF.<br />
2. Mettre en route la fonction Tank Capacity en appuyant sur . L’afficheur indiquera ON,<br />
et l’indication numérique se mettra en route.<br />
3. Appuyer sur pour revenir au fonctionnement normal.<br />
Indication du niveau de charge des piles<br />
La charge complète est indiquée par 4 barres. Le nombre de barres diminue au fur et à<br />
mesure de la décharge des piles jusque la disparition entière des barres. A ce moment il est<br />
nécessaire de changer les piles. Si le niveau des piles est trop faible pendant le<br />
fonctionnement de la balance, celle-ci s’arrêtera automatiquement. Après remplacement<br />
des piles et remise en route, la <strong>REF</strong>-<strong>METER</strong>-<strong>OCTA</strong> reviendra aux réglages initiaux.<br />
Etalonnage<br />
La <strong>REF</strong>-<strong>METER</strong>-<strong>OCTA</strong> est étalonnée en usine pour assurer la plus grande précision<br />
possible. Si un étalonnage s’avère nécessaire, il n’est pas utile de renvoyer la balance au<br />
fabricant. Un poids de valeur connue compris entre 5 et 100 kg est nécessaire (25 kg est<br />
recommandé). Une meilleure précision est obtenue en utilisant un poids le plus lourd<br />
possible (par exemple un étalonnage avec un poids de 50 kg sera plus précis qu’avec un<br />
poids de 5 kg). Par contre il est nécessaire de connaître le poids à 2 g près.<br />
Pour étalonner la <strong>REF</strong>-<strong>METER</strong>-<strong>OCTA</strong>, suivre les étapes suivantes:<br />
1. Placer la <strong>REF</strong>-<strong>METER</strong>-<strong>OCTA</strong> sur une surface stable et plate.<br />
2. Mettre en route la <strong>REF</strong>-<strong>METER</strong>-<strong>OCTA</strong>.<br />
3. Enlever tout objet du plateau.<br />
4. Tout en appuyant sur , appuyer une fois sur . Après quelques secondes,<br />
l’afficheur indiquera SET CAL et 25.000 kg.<br />
5. En utilisant ou régler la valeur indiquée sur le poids utilisé pour l’étalonnage<br />
(résolution 1 g). Utiliser le bouton<br />
pour régler le poids avec une résolution de 1 kg.<br />
38
Français<br />
<strong>REF</strong>-<strong>METER</strong>-<strong>OCTA</strong> Mode d’emploi<br />
6. Appuyer sur . Un nombre représentant le poids du plateau seul apparaîtra sur<br />
l’afficheur. Appuyer sur<br />
pour bloquer cette valeur. L’afficheur indiquera alors zéro.<br />
7. Poser le poids de reference sur le plateau. Un nombre représentant ce poids apparaîtra<br />
sur l’afficheur. Attendre au moins 10 secondes pour que la mesure se stabilise.<br />
8. Appuyer sur . La <strong>REF</strong>-<strong>METER</strong>-<strong>OCTA</strong> est maintenant étalonnée.<br />
9. Se référer au chapitre Quick Start pour le choix de l’unité de mesure et de résolution.<br />
Restauration de l’étalonnage d’usine<br />
Si une erreur se produit pendant l’opération d’étalonnage, il est possible de revenir au<br />
réglage initial pratiqué en l’usine.<br />
Suivre les étapes suivantes:<br />
1. Mettre la balance hors fonctionnement.<br />
2. Enlever tout objet du plateau.<br />
3. Tout en appuyant sur , appuyer une fois sur . La <strong>REF</strong>-<strong>METER</strong>-<strong>OCTA</strong> se mettra<br />
en route et un bip retentira 10 fois. L’étalonnage initial sera alors restauré.<br />
4. Se référer au chapitre Quick Start pour le choix de l’unité de mesure et de résolution.<br />
5. Étalonnage<br />
Tonalité<br />
La <strong>REF</strong>-<strong>METER</strong>-<strong>OCTA</strong> émet un son à la mise en route et lors de l’utilisation des boutons<br />
de réglage. Ce son peut être supprimé de la manière suivante.<br />
1. Vérifier que la balance est en fonctionnement.<br />
2. Tout en appuyant sur , appuyer sur . Le symbole musical à gauche de l’afficheur<br />
sera supprimé indiquant que la tonalité est désactivée.<br />
Répéter les étapes 1 et 2 pour activer la tonalité.<br />
NOTE: La désactivation de la tonalité n’affecte pas l’alarme.<br />
39
<strong>REF</strong>-<strong>METER</strong>-<strong>OCTA</strong> Mode d’emploi<br />
Français<br />
HVAC Service<br />
Grâce à sa grande stabilité et sa grande précision, la <strong>REF</strong>-<strong>METER</strong>-<strong>OCTA</strong> est idéale pour la<br />
charge et la récupération du réfrigérant dans les unités de climatisation automobile,<br />
climatisation résidentielle et commerciale. Sa haute résolution permet la charge de faible<br />
quantité dans les petites unités telles que les réfrigérateurs.<br />
Pour utiliser la <strong>REF</strong>-<strong>METER</strong>-<strong>OCTA</strong> pour la charge de réfrigérant, procéder comme suit:<br />
1. Appuyer sur pour le choix de l’unité de mesure.<br />
2. Si désiré, mettre en route la fonction Tank Capacity Mode comme décrit dans le<br />
chapitre Fonction Tank Capacity. Ceci permettra de connaître à tout moment le<br />
pourcentage de réfrigérant dans la bouteille.<br />
3. Poser délicatemet la bouteille sur le plateau de la balance.<br />
4. Relier la bouteille au by-pass avec le tuyau adapté. Ouvrir la vanne de la bouteille et<br />
purger le tuyau.<br />
5. Programmer la charge désirée comme décrit dans le chapitre programmation. Activer le<br />
programme en appuyant sur .<br />
6. Ouvrir les vannes du by-pass.<br />
7. L’afficheur indiquera le poids chargé en négatif confirmant ainsi que le réfrigérant sort<br />
bien de la bouteille.<br />
8. Si la bouteille est entièrement vidée pendant la charge :<br />
a. Fermer toutes les vannes.<br />
b. Appuyer sur pour “bloquer” l’affichage<br />
c. Remplacer la bouteille vide et brancher le tuyau de charge en le purgeant<br />
également.<br />
d. Appuyer sur pour annuler la fonction Hold.<br />
e. Ouvrir les vannes du by-pass. Le chargement reprendra où il s’est arrêté.<br />
9. Quand la charge est terminée, l’alarme retentit. Fermer toutes les vannes et appuyer sur<br />
n’importe quel bouton pour arrêter l’alarme.<br />
40
Italiano<br />
<strong>REF</strong>-<strong>METER</strong>-<strong>OCTA</strong> Manuale d’uso<br />
Introduzione<br />
La ringraziamo per aver acquistato una bilancia digitale <strong>REF</strong>-<strong>METER</strong>-<strong>OCTA</strong>. La <strong>REF</strong>-<br />
<strong>METER</strong>-<strong>OCTA</strong> è una delle più precise bilance che si trovano sul mercato. La <strong>REF</strong>-<strong>METER</strong>-<br />
<strong>OCTA</strong> ha delle funzioni in più, che oggi non si trovano ancora sul mercato. La bilancia e<br />
ideale sia per la refrigerazione e sia per il condizionamento, incluso le cariche per i piccoli<br />
impianti.<br />
La <strong>REF</strong>-<strong>METER</strong>-<strong>OCTA</strong> é programmabile e ha integrato un segnale acustico che suona<br />
dopo aver raggiunto la carica prevista. È possibile ottenere un upgrade facoltativo della<br />
<strong>REF</strong>-<strong>METER</strong>-<strong>OCTA</strong>, il <strong>REF</strong>-<strong>METER</strong>-<strong>OCTA</strong>-KIT, integrando la bilancia con il modulo<br />
aggiuntivo <strong>REF</strong>-<strong>METER</strong>-<strong>OCTA</strong>-PLUS (elettrovalvola) che consente un riempimento<br />
automatico.<br />
Dotazioni<br />
• Gran display LCD per ottima lettura<br />
• Unita di misura in kg, lbs e oz<br />
• Possibilità di memoria<br />
• Indicatore capacita della Bombola refrigerante.<br />
• Design compatto e robusto<br />
• Lunga durata delle Batterie<br />
• Alta precisione e risoluzione<br />
• Programmabile<br />
• Calibrabile<br />
• Incluso raccordo per 10612-<strong>REF</strong> per caricare dalla bomboletta refrigerante<br />
• Possibilità di upgrade (<strong>REF</strong>-<strong>METER</strong>-<strong>OCTA</strong>-KIT)<br />
Caratteristiche tecniche<br />
Portata<br />
100 kg<br />
Precisione +/- 0,5%<br />
Risoluzione<br />
2g, 0,005 lbs., 0,1 oz.<br />
Alimentazione<br />
4 x 1.5V ‘AAA’<br />
Durata delle batterie 30 ore in continuo uso.<br />
Temperatura di lavoro 10°C – 40°C<br />
Peso<br />
2,8 kg<br />
Dimensioni<br />
30,5 cm x 30,5 cm x 4,5 cm<br />
NOTA: Per prevenire i danni alla bilancia, non superare il peso massimo indicato.<br />
41
<strong>REF</strong>-<strong>METER</strong>-<strong>OCTA</strong> Manuale d’uso<br />
Italiano<br />
Le parti della bilancia<br />
10612-<strong>REF</strong> (optional)<br />
Bombola refrigerante<br />
(optional)<br />
Display LCD<br />
Raccordo per<br />
10612-<strong>REF</strong><br />
Pannello<br />
Piattaforma<br />
Bottone per<br />
avvolgimento<br />
automatico del cavo<br />
Vano porta<br />
pannello<br />
Gancio<br />
Indicatore<br />
acustico<br />
Ricevitore<br />
ottico per<br />
<strong>REF</strong>-<strong>METER</strong>-<br />
<strong>OCTA</strong>-PLUS<br />
Vano porta<br />
batterie<br />
Pannello visto dal retro<br />
42
Italiano<br />
<strong>REF</strong>-<strong>METER</strong>-<strong>OCTA</strong> Manuale d’uso<br />
Display LCD<br />
E<br />
A<br />
B<br />
C<br />
F<br />
D<br />
G<br />
H<br />
I<br />
J K L M N O P<br />
Pos<br />
Funzione<br />
A Display principale<br />
B Indicatore supplementare<br />
C Indicatore capacità Bombola in %<br />
D Unita di misura<br />
E Indicatore acustico muto<br />
F Indicatore negativo<br />
G Livello batteria<br />
H Indicatore per modus rapido<br />
I Indicatore modus memoria<br />
J Indicatore modus carica<br />
K Modus allarme inserito<br />
L Indicatore modus Halt<br />
M Indicatore fine programma<br />
N Modus calibrazione<br />
O Valvola aperta / chiusa con uso <strong>REF</strong>-<strong>METER</strong>-<strong>OCTA</strong>-PLUS<br />
P Risoluzione<br />
43
<strong>REF</strong>-<strong>METER</strong>-<strong>OCTA</strong> Manuale d’uso<br />
Italiano<br />
Panello<br />
Interruttore ON/OFF<br />
Scelta unita<br />
Scelta risoluzione bassa media alta<br />
Azzeramento<br />
Avanti/Retroilluminazione / Indietro nella programmazione<br />
Regolazione rapida con e .<br />
Memorizzazione del valore attuale<br />
Modus programma<br />
Attivare / disattivare del programma<br />
44
Italiano<br />
<strong>REF</strong>-<strong>METER</strong>-<strong>OCTA</strong> Manuale d’uso<br />
Inizio rapido<br />
Come usare la <strong>REF</strong>-<strong>METER</strong>-<strong>OCTA</strong> come semplice bilancia:<br />
Preparazione<br />
1. Sballare la <strong>REF</strong>-<strong>METER</strong>-<strong>OCTA</strong> descritta sotto.<br />
2. Installare le batterie come descritto sotto.<br />
3. Mettere la bilancia su una superficie stabile e piana.<br />
4. Accendere la <strong>REF</strong>-<strong>METER</strong>-<strong>OCTA</strong> con il tasto .<br />
5. Scegliere l’unità .<br />
kilogrammos libbras libbras e oncias oncias<br />
6. Scegliere la risoluzione come descritto sotto con il tasto .<br />
Istruzioni<br />
1. Porre la bombola di gas refrigerante sulla piattaforma.<br />
2. Premere il tasto per azzerare il display.<br />
3. Iniziare la carica.<br />
4. Leggere il valore del peso.<br />
5. Il segno di meno significa che il peso è in diminuzione, vale a dire che il gas refrigerante<br />
fuoriesce dalla bombola durante la carica. Quando si è raggiunto la quantità desiderata<br />
sul display, terminare la carica.<br />
6. Spegnere la <strong>REF</strong>-<strong>METER</strong>-<strong>OCTA</strong> premendo il tasto .<br />
7. Per allungare la vita delle batterie, la <strong>REF</strong>-<strong>METER</strong>-<strong>OCTA</strong> si spegne automaticamente<br />
dopo 30 minuti di non uso, in caso di una carica programmata no. L’ultimo valore è<br />
memorizzato automaticamente e riappare quando si accende di nuovo la bilancia.<br />
45
<strong>REF</strong>-<strong>METER</strong>-<strong>OCTA</strong> Manuale d’uso<br />
Italiano<br />
Sballare la <strong>REF</strong>-<strong>METER</strong>-<strong>OCTA</strong><br />
1. Prelevare la bilancia <strong>REF</strong>-<strong>METER</strong>-<strong>OCTA</strong> dalla borsa.<br />
2. Premere il tasto “push” sulla unità di controllo, quale si trova sotto la bilancia per fare<br />
fuoriuscire il panello.<br />
3. Estrarre il panello e controllare che il cavo non passa sopra la piattaforma.<br />
4. Se necessario, sollevare il gancio.<br />
Imballare la <strong>REF</strong>-<strong>METER</strong>-<strong>OCTA</strong><br />
1. Riposizionare il piedistallo.<br />
2. Mantenere il panello e premere il tasto per l’avvolgimento automatico del cavo.<br />
3. Incastrare il panello nell’apposito vano.<br />
4. Mettere la <strong>REF</strong>-<strong>METER</strong>-<strong>OCTA</strong> dentro la valigia.<br />
Istallazione e cambi batterie<br />
1. Aprire il vano porta batterie.<br />
2. Rimuovere evtl. batterie esaurite.<br />
3. Sostituire 4 batterie ‘AAA’ in fila come descritto,è chiudere il coperchio. Controllare bene<br />
che il coperchio sia ben chiuso.<br />
ATTENZIONE: PRESTARE ATTENZIONE ALLA POLARITA DELLE BATTERIE. NON<br />
LASCIARE BATTERIE SCARICHE NEL VANO. SE NON USATE LA BILANCIA PER UN<br />
LUNGO PERIODO, TOGLIERE LE BATTERIE DAL VANO.<br />
46
Italiano<br />
<strong>REF</strong>-<strong>METER</strong>-<strong>OCTA</strong> Manuale d’uso<br />
Risoluzione<br />
Per semplificare la lettura, la risoluzione si può cambiare. Pesi instabili, venti o vibrazioni<br />
possono influenzare la lettura e le fluitazioni. Con la riduzione della risoluzione si possono<br />
minimare le fluitazioni. La posizione standard del <strong>REF</strong>-<strong>METER</strong>-<strong>OCTA</strong> e la risoluzione<br />
media. La risoluzione si regola da basso, medio e alto premendo il tasto . La tabella<br />
seguente dimostra le differenti risoluzioni d’ogni posizione.<br />
Unita di misura<br />
Pounds<br />
&<br />
Risoluzione Kilogrammi Pounds Ounces Ounces<br />
HIGH<br />
0.005<br />
2 g<br />
(Alta)<br />
lbs<br />
0.1 oz. 0.1 oz.<br />
MEDIUM<br />
0.010<br />
5 g<br />
(Media)<br />
lbs.<br />
0.2 oz. 0.2 oz.<br />
LOW<br />
0.020<br />
10 g<br />
(Bassa)<br />
lbs.<br />
0.5 oz. 0.5 oz.<br />
Tabella 1.Risoluzione<br />
47
<strong>REF</strong>-<strong>METER</strong>-<strong>OCTA</strong> Manuale d’uso<br />
Italiano<br />
Sovraccarico<br />
In caso che si sovraccarica la bilancia <strong>REF</strong>-<strong>METER</strong>-<strong>OCTA</strong> (100 kg), sull’ display appare “1”.<br />
In questo caso alleggerire subito la bilancia per evitare danni.<br />
Memorizzazione dei valori<br />
Se durante la carica si deve cambiare la bombola del refrigerante, è possibile memorizzare<br />
il valore attuale letto sul display. Procedere come segue:<br />
1. Controllare che il valore letto sul display e costante.<br />
2. Premere il tasto . Il valore indicato adesso e memorizzato.<br />
3. Togliere la bombola vuota dalla piattaforma é mettere una piena.<br />
4. Attendere 5 secondi cosi la bilancia si stabilisce.<br />
5. Preme il tasto . La misurazione può continuare al valore che e stato memorizzato.<br />
Programmazione<br />
Il peso della carica può essere pre-programmata con la <strong>REF</strong>-<strong>METER</strong>-<strong>OCTA</strong>, cosi un<br />
segnale acustico suona quando si raggiunge il valore imposto. Procedere come segue:<br />
1. Impostate la bilancia <strong>REF</strong>-<strong>METER</strong>-<strong>OCTA</strong> con l’unità e la risoluzione desiderata.<br />
2. Per programmare la bilancia con il peso in diminuzione, è necessario di posare prima la<br />
bombola sopra la bilancia.<br />
3. Premere il tasto per iniziare la programmazione. Sull’ display è indicato SET.<br />
4. Premere i tasti o per imprimere il punto del segnale acustico. Per accelerare<br />
l’impostazione premere il tasto . In questo modus l’impostazione e 10 x più veloce.<br />
Preme di nuovo il tasto per ritornare alla velocità normale.<br />
5. Quando avete imposto il peso desiderato, premere il tasto . Il display dell’unità<br />
segna automaticamente 0, è sul display appare RUN. Adesso la bilancia e pronta con il<br />
modus allarme (segnale acustico).<br />
6. Dopo aver raggiunto il peso programmato si sente un segnale acustico.<br />
7. Preme un tasto qualunque per spegnere il segnale acustico.<br />
48
Italiano<br />
<strong>REF</strong>-<strong>METER</strong>-<strong>OCTA</strong> Manuale d’uso<br />
8. Per uscire dal modus allarme premere di nuovo il tasto<br />
Osservazioni: Il modus allarme RUN può essere solo attivato dal modus programmatile<br />
SET. Per ritornare nel modus RUN dopo aver premuto il tasto<br />
, si deve premere prima il<br />
Tasto (l’ultimo valore imposto rimane memorizzato) dopodiché premere il tasto . Il<br />
valore indica di nuovo 0 quando inizia il programma allarme. Con il tasto anche nel<br />
modus allarme si memorizza il valore, per poi cambiare la bombola di refrigerante.<br />
Programmazione dell’indicatore capacità bombola<br />
Il livello relativo della bombola può essere indicato con la bilancia <strong>REF</strong>-<strong>METER</strong>-<strong>OCTA</strong>. Per<br />
quest’operazione si deve impostare il peso di una bombola piena e il peso di una bombola<br />
vuota. Procedere come segue:<br />
Attivare il modus indicatore capacità Bombola<br />
1. Premere e mantenere il tasto , e premere contemporaneamente il tasto .<br />
L’indicatore di capacità appare sul display insieme alla nota OFF. Questa informazione<br />
significa che il modus capacità Bombola e disattivato.<br />
2. Attivare il modus capacità bombola con il tasto . Sull’ display appare ON e<br />
contemporaneamente è indicato il simbolo %.<br />
3. Premere il tasto per il primo passo. Il simbolo % appare lampeggiando sul display.<br />
4. Posare la bombola vuota sulla bilancia. Attendere 5 secondi cosi la bilancia si stabilisce,<br />
e premere il tasto . Sul display appare lampeggiando 100%.<br />
5. Posare la bombola piena sulla bilancia. Attendere 5 secondi cosi la bilancia si stabilisce,<br />
e premere il tasto . Adesso l’indicatore della capacità della bombola programmata.<br />
6. Sull’ display viene indicato costantemente tra il 0% e il 100% la capacita relativa della<br />
bombola di refrigerante posata sulla piattaforma.<br />
Osservazione: Il 100% del peso deve essere come minimo 200g più pesante che del peso<br />
0%. Se non e il caso appare “Err” sul display.<br />
49
<strong>REF</strong>-<strong>METER</strong>-<strong>OCTA</strong> Manuale d’uso<br />
Italiano<br />
Per disattivare il modus indicatore capacità Bombola. Procedere come segue:<br />
Disattivare il modus indicatore capacità Bombola<br />
1. Premere e mantenere il tasto , e premere contemporaneamente il tasto .<br />
L’indicatore di capacità appare sul display insieme alla nota ON. Questa informazione<br />
significa che il modus capacità Bombola e attivato.<br />
2. Deattivare il modus indicatore capacità bombola con il tasto . Sull’ display appare<br />
adesso OFF e l’indicazione % scompare.<br />
3. Premere il tasto per ritornare nel modus normale.<br />
Il modus capacità bombola può essere attivata e disattivata senza programma. Il valore<br />
programmato rimane memorizzato finché non s’imposta un nuovo valore.<br />
Indicatore livello batteria<br />
Con le batterie carche sul display appaiano 4 trattini. A secondo come sono le condizioni<br />
delle batterie, i trattini diminuiscono finché non si vedono più. In questo caso le batterie<br />
vanno sostituite al più presto. Se le batterie non hanno la capacita sufficiente per un uso<br />
normale delle funzioni della bilancia, la <strong>REF</strong>-<strong>METER</strong>-<strong>OCTA</strong> si spegne automaticamente.<br />
Dopo la sostituzione delle batterie, la <strong>REF</strong>-<strong>METER</strong>-<strong>OCTA</strong> lavora con tutti gli ultimi valori<br />
memorizzati.<br />
Calibrare la bilancia<br />
La bilancia <strong>REF</strong>-<strong>METER</strong>-<strong>OCTA</strong> viene consegnata gia calibrata. Una calibrazione nuova<br />
viene effettuata raramente, ma in caso di necessita si può effettuare semplicemente dall’<br />
utente stesso, senza inviare l’apparecchio al costruttore.<br />
Avete unicamente bisogno un peso di riferimento da voi conosciuto (Peso di calibrazione),<br />
che pesa tra 5kg e 100 Kg. La maggiore precisione si raggiunge con un peso pesante.<br />
Molto importante è anche che il peso di calibrazione sia conosciuto con esattezza di 2g. Per<br />
calibrare la <strong>REF</strong>-<strong>METER</strong>-<strong>OCTA</strong> procedere come segue:<br />
1. Porre la bilancia su una superficie stabile e piana.<br />
2. Spegnere la bilancia <strong>REF</strong>-<strong>METER</strong>-<strong>OCTA</strong><br />
3. Verificare che la piattaforma della bilancia e libera.<br />
50
Italiano<br />
<strong>REF</strong>-<strong>METER</strong>-<strong>OCTA</strong> Manuale d’uso<br />
4. Premere il tasto , e brevemente il tasto . La bilancia <strong>REF</strong>-<strong>METER</strong>-<strong>OCTA</strong> si<br />
accende. Dopo pochi secondi sul display appare SET CAL e 25.000 Kg.<br />
5. Impostate il peso di referenza con aiuto dei tasti o . Il valore sul display è a<br />
passi di 1g. Per accelerare l’impostazione premere il tasto , per arrivare a passi da 1<br />
kg.<br />
6. Premere il tasto . Adesso appare un numero sul display. Confermate il numero con il<br />
tasto . Il display indica adesso 0.<br />
7. Posare il peso di calibrazione sulla piattaforma. Il display indica un numero, attendere<br />
10 secondi, cosi la bilancia si stabilisce.<br />
8. Premere il tasto . La <strong>REF</strong>-<strong>METER</strong>-<strong>OCTA</strong> è calibrata secondo il vostro peso di<br />
referenza.<br />
9. Imporre la vostra unita di misura<br />
51
<strong>REF</strong>-<strong>METER</strong>-<strong>OCTA</strong> Manuale d’uso<br />
Italiano<br />
Impostazioni della Fabbrica<br />
In caso d’errori durante la calibrazione, la bilancia <strong>REF</strong>-<strong>METER</strong>-<strong>OCTA</strong> Vi offre la possibilità<br />
di ri-impostare i valori della casa costruttrice<br />
Per ri-impostare i valori della casa procedere come segue:<br />
1. Spegnere la bilancia <strong>REF</strong>-<strong>METER</strong>-<strong>OCTA</strong>.<br />
2. Verificare che la piattaforma della bilancia e libera.<br />
3. Premere e mantenere il tasto , e brevemente il tasto . La bilancia <strong>REF</strong>-<strong>METER</strong>-<br />
<strong>OCTA</strong> si accende e il bip suona per 10 volte. I valori della casa costruttrice sono di<br />
nuovo imposti.<br />
4. Imporre la vostra unita di misura.<br />
5. Taratura<br />
Segnale acustico<br />
La bilancia <strong>REF</strong>-<strong>METER</strong>-<strong>OCTA</strong> è programmata dalla fabbrica con un segnale acustico che<br />
si sente quando si accende o si spegne la bilancia e quando si premono i tasti. Questo<br />
segnale caustico so può de-attivare come segue:<br />
1. Accendere la bilancia <strong>REF</strong>-<strong>METER</strong>-<strong>OCTA</strong>.<br />
2. Premere e mantenere il tasto , e premere brevemente il tasto . Il segnale<br />
acustico e de-attivato il simbolo del suono non è più segnato sul display.<br />
Ripetere le posizioni 1 e 2 per riattivare il suono acustico<br />
Osservazione: L’attivazione o la disattivazione del suono acustico non influisce il modus<br />
allarme.<br />
52
Italiano<br />
<strong>REF</strong>-<strong>METER</strong>-<strong>OCTA</strong> Manuale d’uso<br />
Assistenza condizionamento e refrigerazione.<br />
Per la robustezza e precisione della <strong>REF</strong>-<strong>METER</strong>-<strong>OCTA</strong>, è la bilancia ideale per<br />
l’assistenza del condizionamento e refrigerazione come anche nel condizionamento auto.<br />
L’alta risoluzione è ideale per le applicazioni, dove è importante avere la quantità precisa di<br />
gas refrigerante, come esempio piccoli impianti e impianti commerciali.<br />
Per una carica di gas refrigerante procedere come segue:<br />
1. Premere il tasto per imporre l’unita desiderata.<br />
2. Se desiderato, programmare il modus capacita bombola. Cosi si hanno sempre la<br />
possibilità di verificare lo stato del refrigerante che e nella bombola.<br />
3. Posare prudentemente il cilindro con il gas refrigerante sulla bilancia.<br />
4. Raccordare la bombola del refrigerante a un gruppo manomterico con un tubo per<br />
refrigerante idoneo (per esempio tubi <strong>REF</strong>CO CL).<br />
5. Programmate la quantità desiderata come descritto in questa descrizione. Attivate il<br />
programma di carica premendo il tasto .<br />
6. Aprire le valvole del gruppo manometrico.<br />
7. Il display indica adesso la quantità che fuoriesce come valore negativo.<br />
8. Quando la bombola e vuota prima che sia terminato la carica:<br />
a. Chiudere tutte le valvole.<br />
b. Premere il tasto per memorizzare i valori.<br />
c. Cambiare la bombola di refrigerante.<br />
d. Premere di nuovo il tasto per continuare.<br />
e. Aprire le valvole. La carica continua adesso con l’ultimo valore che e stato<br />
memorizzato.<br />
9. Quando la carica è terminata si sente un segnale acustico come programmato nel<br />
modus allarme. Premere un tasto qualsiasi per spegnere l’allarme.<br />
53
<strong>REF</strong>-<strong>METER</strong>-<strong>OCTA</strong> Manual del Usuario<br />
Español<br />
Introducción<br />
Gracias por la compra de la balanza de carga digital <strong>REF</strong>-<strong>METER</strong>-<strong>OCTA</strong> - La <strong>REF</strong>-<strong>METER</strong>-<br />
<strong>OCTA</strong> es la balanza de carga de refrigerantes mas precisa disponible, con características<br />
que no se encuentran en ningún otro lugar. Es ideal para servicios de aire acondicionado y<br />
refrigeración incluyendo la carga critica en sistemas de refrigeración pequeños.<br />
Con la <strong>REF</strong>-<strong>METER</strong>-<strong>OCTA</strong> se puede medir peso tanto en libras como en kilogramos, es<br />
programable y contiene una alarma para indicar que un determinado umbral de peso ha sido<br />
excedido. Opcionalmente, también existe la posibilidad de equipar la balanza <strong>REF</strong>-<strong>METER</strong>-<br />
<strong>OCTA</strong> con el módulo adicional <strong>REF</strong>-<strong>METER</strong>-<strong>OCTA</strong>-PLUS (válvula magnética) y convertirla<br />
en el KIT <strong>REF</strong>-<strong>METER</strong>-<strong>OCTA</strong> para efectuar la carga de forma automática.<br />
Características<br />
• Pantalla LCD grande con alta visibilidad<br />
• Mide peso en kilogramo, libra y onza<br />
• Memoria interna permite recordar todos los ajustes previos<br />
• Indicador de Capacidad del Tanque de Refrigerante<br />
• Diseño compacto y resistente<br />
• Larga duración de la batería<br />
• Alta Precisión y Resolución<br />
• Programable<br />
• Puede ser calibrada en el sitio de trabajo utilizando pesos de referencia poco costosos<br />
• Rosca disponible para 10612-<strong>REF</strong> para llenar los refrigerantes del envase<br />
• Posibilidad de convertir la balanza en el KIT <strong>REF</strong>-<strong>METER</strong>-<strong>OCTA</strong><br />
Especificaciones<br />
Capacidad<br />
100 kilogramos (220 Libras)<br />
Precisión<br />
0.5% de la Lectura +/- 1 Digito Menos Significativo<br />
Resolución<br />
2g, 0.005 lb., 0.1 oz.<br />
Energía<br />
4 x 1.5V ‘AAA’ Baterías Alcalinas<br />
Vida de las baterías<br />
30 horas de uso continuo<br />
Temperatura de operación 10C – 40C (50F – 104F)<br />
Peso<br />
2.8 kg<br />
Dimensiones<br />
30.5 cm x 30.5 cm x 4.5 cm<br />
NOTA: Para prevenir daños nunca exceda la capacidad de carga del <strong>REF</strong>-<strong>METER</strong>-<br />
<strong>OCTA</strong><br />
54
Español<br />
Diagrama de Partes<br />
10612-<strong>REF</strong> (opcional)<br />
Rosca para fijador<br />
el 10612-<strong>REF</strong><br />
<strong>REF</strong>-<strong>METER</strong>-<strong>OCTA</strong> Manual del Usuario<br />
Envase de refrigerante<br />
(opcional)<br />
Pantalla LCD<br />
Teclado<br />
Plataforma de<br />
Pesado<br />
Cavidad de<br />
almacenamiento<br />
Botón por cable<br />
alimentador automático<br />
Gancho para<br />
colgar<br />
Parrilla<br />
del<br />
altavoz<br />
Receptor óptico<br />
para el módulo<br />
<strong>REF</strong>-<strong>METER</strong>-<br />
<strong>OCTA</strong>-PLUS<br />
Cubierta de<br />
las baterías<br />
Vista posterior de la caja de<br />
controles<br />
55
<strong>REF</strong>-<strong>METER</strong>-<strong>OCTA</strong> Manual del Usuario<br />
Español<br />
Pantalla LCD<br />
A<br />
B<br />
C<br />
E<br />
F<br />
D<br />
G<br />
H<br />
I<br />
J K L M N O P<br />
Parte<br />
A<br />
B<br />
C<br />
D<br />
E<br />
F<br />
G<br />
H<br />
I<br />
J<br />
K<br />
L<br />
M<br />
N<br />
O<br />
P<br />
Función<br />
Pantalla Numérica Principal<br />
Pantalla Numérica Alterna<br />
Indicación de Porciento de Capacidad del Tanque<br />
Indicadores de Unidades<br />
Indicador de Sonido Apagado<br />
“Flotante” Indicador Negativo (Indica peso removido de la<br />
plataforma)<br />
Indicador de Duración de la Batería<br />
Indicador de Ajuste Rápido<br />
Indicador de Modo de Ajuste<br />
Indicador del Modo de Capacidad del Tanque<br />
Indicador de Modo de Corrida<br />
Indicador de Modo de Espera<br />
Indicador de Programa Completado<br />
Indicador de Modo de Calibración<br />
Indicador de Válvula Abierta/Cerrada para uso con <strong>REF</strong>-<strong>METER</strong>-<br />
<strong>OCTA</strong>-PLUS<br />
Indicador de Resolución<br />
56
Español<br />
<strong>REF</strong>-<strong>METER</strong>-<strong>OCTA</strong> Manual del Usuario<br />
Teclado<br />
Oprima para encender, oprima y sostenga para apagar.<br />
Oprima para pasar por las diferentes unidades en la pantalla.<br />
Oprima para seleccionar baja, mediana o alta resolución.<br />
Oprima para llevar a cero la lectura corriente en pantalla.<br />
Avanzar/luz trasera/ retroceder durante la programación<br />
Para ajustes más rápidos. Se utiliza en conjunto con y .<br />
“Congela” la pantalla.<br />
Comienza el modo de programación.<br />
Activa/Desactiva programas almacenados.<br />
57
<strong>REF</strong>-<strong>METER</strong>-<strong>OCTA</strong> Manual del Usuario<br />
Español<br />
Comienzo Rápido<br />
Para operar la <strong>REF</strong>-<strong>METER</strong>-<strong>OCTA</strong> como una balanza básica siga los pasos siguientes:<br />
Preparación<br />
1. Desempaque la balanza como se describe en la sección “Desempacando la <strong>REF</strong>-<br />
<strong>METER</strong>-<strong>OCTA</strong>” mas abajo.<br />
2. Instale las baterías en la caja de controles según se describe en a sección “Instalación<br />
de la Baterías” mas abajo.<br />
3. Coloque la plataforma de pesado en una superficie firme y nivelada.<br />
4. Encienda la <strong>REF</strong>-<strong>METER</strong>-<strong>OCTA</strong> oprimiendo .<br />
5. Seleccione la unidad de medición deseada oprimiendo repetidamente . Las unidades<br />
de medida cambiaran según sigue:<br />
kilogramos libras libras y onzas onzas<br />
6. Seleccione la resolución deseada oprimiendo repetidamente según se describe en la<br />
sección RESOLUCION.<br />
Operación Básica de Pesado<br />
1. En caso de que se use un recipiente para contener los objetos a pesar, coloque el<br />
recipiente vació en el centro de la plataforma.<br />
2. Oprima para “llevar a cero” la balanza. La pantalla mostrara cero.<br />
3. Coloque el material a medir en el recipiente o en el centro de la plataforma.<br />
4. Tome la lectura en la pantalla.<br />
5. El símbolo de menos significa reducción de peso, es decir, que se ha<br />
derramado refrigerante de la botella durante el proceso de llenado. En cuanto se alcance<br />
en la pantalla la cantidad deseada, finalice el proceso de llenado.<br />
6. Apague la balanza <strong>REF</strong>-<strong>METER</strong>-<strong>OCTA</strong> pulsando el botón .<br />
7. Para conservar la vida de las baterías la <strong>REF</strong>-<strong>METER</strong>-<strong>OCTA</strong> se apagara después de 30<br />
minutos de inactividad a menos que este ejecutando un programa (vea la sección de<br />
Programación). La <strong>REF</strong>-<strong>METER</strong>-<strong>OCTA</strong> regresara al último estado cuando se encienda<br />
nuevamente.<br />
58
Español<br />
<strong>REF</strong>-<strong>METER</strong>-<strong>OCTA</strong> Manual del Usuario<br />
Desempaque de la <strong>REF</strong>-<strong>METER</strong>-<strong>OCTA</strong><br />
1. Retire la <strong>REF</strong>-<strong>METER</strong>-<strong>OCTA</strong> del bolso de bandolera<br />
2. Haga clic en el logotipo „push“ en la caja de controles, que se encuentra en la parte<br />
inferior de la balanza, es para sacar la caya de controles de la cavidad de<br />
almacenamiento.<br />
3. Sacar la caja controles, y asegúrese de que el cable no se encuentra en la plataforma.<br />
4. En caso de que sea necesario, despliegue el gancho para colgar.<br />
Reempaque del <strong>REF</strong>-<strong>METER</strong>-<strong>OCTA</strong><br />
1. Si el caballete se encuentra extendido, recójalo.<br />
2. Mantenga pulsado la caja de controles del y pulse el botón para el alimentador<br />
automático de cable.<br />
3. Oprima la firmemente caja de controles en la cavidad de almacenamiento hasta que<br />
encaje.<br />
4. Coloque la <strong>REF</strong>-<strong>METER</strong>-<strong>OCTA</strong> en la maleta.<br />
Instalación y Reemplazo de las Baterías<br />
1. Para quitar la cubierta de las baterías de la parte trasera de la caja de controles oprima<br />
la lengüeta que esta en la base de la cubierta.<br />
2. En caso de ser necesario retire las baterías viejas.<br />
3. Inserte 4 ‘AAA’. Para colocar la cubierta alinee las lengüetas y encaje la cubierta en su<br />
lugar.<br />
IMPORTANTE: PARA PREVENIR DAÑOS A LA <strong>REF</strong>-<strong>METER</strong>-<strong>OCTA</strong> OBSERVE<br />
CUIDADOSAMENTE LAS MARCAS DE POLARIDAD DENTRO DEL COMPARTIMIENTO<br />
DE LAS BATERÍAS. NO DEJE BATERÍAS GASTADAS DENTRO DE LA UNIDAD.<br />
RETIRE LAS BATERÍAS SI LA <strong>REF</strong>-<strong>METER</strong>-<strong>OCTA</strong> NO VA A SER UTILIZADA POR UN<br />
TIEMPO PROLONGADO.<br />
59
<strong>REF</strong>-<strong>METER</strong>-<strong>OCTA</strong> Manual del Usuario<br />
Español<br />
Resolución<br />
La resolución (incremento mínimo de peso o volumen) que puede ser mostrada por el <strong>REF</strong>-<br />
<strong>METER</strong>-<strong>OCTA</strong> se puede ajustar para facilitar la lectura. Cargas inestables o vientos fuertes<br />
pudieran provocar fluctuaciones en las lecturas. La <strong>REF</strong>-<strong>METER</strong>-<strong>OCTA</strong> se envía con la<br />
resolución en la posición mediana esta es conveniente para la mayoría de la aplicaciones.<br />
La resolución se puede cambiar a BAJA, MEDIANA o ALTA oprimiendo repetidamente<br />
en el teclado. La tabla 1 muestra la resolución para cada modo. Sin importar la resolución<br />
fijada la balanza siempre opera internamente en la más alta resolución, por tanto solo el<br />
valor en la pantalla es afectado.<br />
Unidad de medida<br />
Resolución Kilogramo libra<br />
ALTA<br />
(HIGH)<br />
MEDIANA<br />
(MED)<br />
BAJA<br />
(LOW)<br />
2 g<br />
5 g<br />
10 g<br />
0.005<br />
lb.<br />
0.010<br />
lb.<br />
0.020<br />
lb.<br />
TABLA 1. Ajustes de Resolución<br />
libras &<br />
onzas<br />
onzas<br />
0.1 oz. 0.1 oz.<br />
0.2 oz. 0.2 oz.<br />
0.5 oz. 0.5 oz.<br />
60
Español<br />
<strong>REF</strong>-<strong>METER</strong>-<strong>OCTA</strong> Manual del Usuario<br />
Indicación de Peso Excesivo<br />
Si el peso colocado en la plataforma de pesado excede la capacidad máxima de la <strong>REF</strong>-<br />
<strong>METER</strong>-<strong>OCTA</strong> (100 Kg.) aparecerá un “1” a la izquierda de la pantalla. Para evitar daños a<br />
la <strong>REF</strong>-<strong>METER</strong>-<strong>OCTA</strong> retire el peso inmediatamente de la plataforma.<br />
Modo Espera<br />
Una característica especial de la <strong>REF</strong>-<strong>METER</strong>-<strong>OCTA</strong> es que permite el reemplazo y<br />
vaciado de los contenedores si afectar las mediciones mostradas en la pantalla.<br />
El Modo Espera se puede usar según sigue:<br />
1. Permita que la carga se estabilice hasta que la lectura sea estable.<br />
2. Oprima . El peso actual quedara fijo en la pantalla.<br />
3. Quite, vacíe o reemplace objetos, o contenedores en la plataforma<br />
4. Espere 5 segundos a que la nueva carga se estabilice.<br />
5. Oprima . Las mediciones continuaran a partir de donde quedaron antes de iniciar el<br />
Modo Espera.<br />
Programación<br />
Con la <strong>REF</strong>-<strong>METER</strong>-<strong>OCTA</strong> se puede programar un peso umbral que hace sonar una<br />
alarma. La alarma sonará cuando el valor mostrado en la pantalla (positivo para peso<br />
incrementando o negativo para peso disminuyendo) sea igual al peso programado. Para<br />
programar la alarma siga los pasos siguientes:<br />
1. Ajuste la <strong>REF</strong>-<strong>METER</strong>-<strong>OCTA</strong> en las unidades y resolución deseadas según se describe<br />
en la sección Comienzo Rápido mas arriba.<br />
2. Si se va a medir un peso que disminuye coloque los objetos o contenedor con los<br />
objetos o material que serán removidos en la plataforma.<br />
3. Oprima para comenzar el Modo de Ajuste indicado por el anunciador SET en la<br />
pantalla.<br />
4. Oprima y mantenga oprimida la tecla ó para ajustar la alarma en la posición<br />
deseada. Para ajustar más rápido oprima<br />
. Esto activara el modo AJUSTE RAPIDO<br />
61
<strong>REF</strong>-<strong>METER</strong>-<strong>OCTA</strong> Manual del Usuario<br />
Español<br />
con lo cual se avanzara 10 veces mas rápido que el normal. Oprima<br />
para retornar a la velocidad normal de ajuste.<br />
una vez más<br />
5. Oprima . La pantalla mostrara un cero automáticamente y el indicador RUN se<br />
encenderá para enseñar que el programa esta corriendo.<br />
6. Cuando el peso aplicado (o quitado) exceda la cantidad programada la alarma sonara y<br />
el indicador DONE destellara en la pantalla.<br />
7. Oprima cualquier tecla para apagar la alarma.<br />
8. Para cancelar el Modo Corrida (RUN) en cualquier momento oprima la tecla .<br />
NOTA: El modo Corrida (RUN) solo podrá ser iniciado desde el modo Ajuste (SET) si usted<br />
cancela el modo Corrida oprimiendo , y desea retomarlo oprima (El punto ajuste<br />
previo se restaurara) seguido por una vez mas. La pantalla va a cero cuando el<br />
programa recomienza .Usted puede programar el modo Ajuste sin comenzar el modo<br />
Corrida oprimiendo luego de ajustar el programa. El nuevo valor se guardara hasta la<br />
próxima vez que el modo Ajuste se activado. La función se puede usar durante el modo<br />
Corrida según se describe en la sección Modo Espera. La <strong>REF</strong>-<strong>METER</strong>-<strong>OCTA</strong>-PLUS provee<br />
funcionalidad adicional durante el uso del modo Corrida. Refiérase al manual de<br />
instrucciones del <strong>REF</strong>-<strong>METER</strong>-<strong>OCTA</strong>-PLUS para más detalles.<br />
Modo Capacidad del Tanque<br />
Frecuentemente es conveniente saber la cantidad relativa de material (refrigerante por<br />
ejemplo) que queda en el contenedor (tanque). El modo Capacidad de Tanque de la <strong>REF</strong>-<br />
<strong>METER</strong>-<strong>OCTA</strong> permite la observar continuamente el porcentaje de material remanente en<br />
el tanque. Para poder calcular el porcentaje con precisión la <strong>REF</strong>-<strong>METER</strong>-<strong>OCTA</strong> debe ser<br />
entrenada para que sepa el peso de un tanque lleno así como uno vació. Para este<br />
propósito siga los pasos siguientes:<br />
62
Español<br />
<strong>REF</strong>-<strong>METER</strong>-<strong>OCTA</strong> Manual del Usuario<br />
Modo de Entrenamiento de la Capacidad del Tanque<br />
1. Mientras mantiene presionada la tecla , oprima . El Indicador del Modo<br />
Capacidad del Tanque (SET TANK) se encenderá, y la pantalla mostrara OFF. Esto<br />
indica que el Modo Capacidad del Tanque esta apagado.<br />
2. Encienda el Modo de Capacidad del Tanque oprimiendo . La pantalla mostrara ON,<br />
y la pantalla numérica alterna y el indicador de porciento también encenderán.<br />
3. Oprima para proceder al primer paso de entrenamiento. Destellara un 0% en la<br />
pantalla alterna indicando que se debe colocar un contenedor vació para registrar su<br />
peso.<br />
4. Coloque un contenedor vació (o una carga que represente su peso) en la plataforma.<br />
Espere 5 segundos a que se estabilice la carga y oprima . Destellara 100% en la<br />
pantalla alterna indicando que se debe colocar un contenedor lleno para registrar su<br />
peso.<br />
5. Coloque un contenedor lleno (o una carga que represente su peso) en la plataforma.<br />
Espere 5 segundos a que se estabilice la carga y oprima . Esto completa el proceso<br />
de entrenamiento y el indicador de Modo de Capacidad del Tanque (SET TANK) se<br />
apagara.<br />
6. A partir de este momento la pantalla alterna mostrara la cantidad de material que queda<br />
en el tanque en forma de porciento de 0% a 100%<br />
NOTA: El peso 100% tiene que ser mayor que el peso 0% por lo menos por 200g. De lo<br />
contrario la pantalla alterna mostrara “Err”. Para eliminar el error vuelva a entrenar como se<br />
explica arriba usando un peso 100% que sea por lo menos 200g mayor que el peso de 0%.<br />
Durante el entrenamiento, la tecla ZERO puede ser utilizada como asistencia para el ajuste<br />
de los valores 0% y 100%. Esto no tiene efecto en el entrenamiento ya que el Modo<br />
Capacidad del Tanque se basa en pesos absolutos y no relativos.<br />
Siga los pasos siguientes para apagar el Modo Capacidad del Tanque.<br />
63
<strong>REF</strong>-<strong>METER</strong>-<strong>OCTA</strong> Manual del Usuario<br />
Español<br />
Apagar el Modo Capacidad del Tanque<br />
1. Mientras mantiene presionada la tecla , oprima . El Indicador del Modo<br />
Capacidad del Tanque (SET TANK) se encenderá, la pantalla mostrara ON. Esto indica<br />
que el Modo Capacidad del Tanque esta encendido.<br />
2. Apague el Modo Capacidad del Tanque oprimiendo . La pantalla mostrara OFF y la<br />
pantalla numérica alterna se apagara.<br />
3. Oprima para regresar a la operación normal.<br />
El Modo Capacidad del Tanque se puede volver a encender sin necesidad de volver a<br />
entrenar. La <strong>REF</strong>-<strong>METER</strong>-<strong>OCTA</strong> recordara los valores previos de 0% y 100% hasta que la<br />
unidad se vuelva a entrenar como se explico mas arriba. Para encender el Modo Capacidad<br />
del Tanque sin volver a entrenar siga los siguientes pasos:<br />
Encendiendo el Modo Capacidad del Tanque sin volver a entrenar<br />
1. Mientras mantiene presionada la tecla , oprima . El Indicador del Modo<br />
Capacidad del Tanque (SET TANK) se encenderá, y la pantalla mostrara OFF. Esto<br />
indica que el Modo de Capacidad del Tanque esta apagado<br />
2. Encienda el Modo Capacidad del Tanque oprimiendo . La pantalla mostrara ON, y la<br />
pantalla numérica alterna y el indicador de porciento también encenderán.<br />
3. Oprima para regresar a la operación normal.<br />
Indicador del nivel de la batería<br />
El indicador de nivel de la batería muestra la potencia relativa de estas. Cuatro barras<br />
indican máxima potencia. Según se van agotando las baterías el número de barras<br />
disminuye hasta que no queden barras. En este momento es necesario reemplazar las<br />
baterías (refiérase al la sección Instalación de la Baterías mas arriba). Si la potencia de las<br />
baterías cae a un nivel donde <strong>REF</strong>-<strong>METER</strong>-<strong>OCTA</strong> no pueda funcionar ya con precisión la<br />
unidad se apagara automáticamente. Cuando se reemplacen las baterías y se vuelva a<br />
encender la unidad la <strong>REF</strong>-<strong>METER</strong>-<strong>OCTA</strong> continuara la operación con todos los ajustes<br />
previos intactos.<br />
64
Español<br />
<strong>REF</strong>-<strong>METER</strong>-<strong>OCTA</strong> Manual del Usuario<br />
Calibración<br />
La <strong>REF</strong>-<strong>METER</strong>-<strong>OCTA</strong> se calibra en la fábrica para proveer alta precisión. Una segunda<br />
calibración debe ser raramente, sino jamás, necesaria; sin embargo puede ser realizada<br />
fácilmente si necesidad de enviar el producto al fabricante. Un peso de calibración conocido (en<br />
kilogramos) es requerido para calibrar la balanza y puede ser cualquier valor entre 5 kg. y 100<br />
kg. Se recomienda un peso de 25 kg. La mejor precisión se obtiene usando el peso mas<br />
grande disponible (por ejemplo un peso de 50 Kg. provee mas precisión que uno de 5 kg.).<br />
Además es necesario conocer el peso con una precisión de +/- 2 gramos<br />
Para calibrar la <strong>REF</strong>-<strong>METER</strong>-<strong>OCTA</strong> siga los siguientes pasos:<br />
1. Coloque la plataforma de pesado en una superficie firme y nivelada.<br />
2. Apague la <strong>REF</strong>-<strong>METER</strong>-<strong>OCTA</strong>.<br />
3. Elimine todos los objetos de la plataforma.<br />
4. Mientras este oprimiendo , oprima y suelte . La <strong>REF</strong>-<strong>METER</strong>-<strong>OCTA</strong> se encenderá y<br />
luego de unos segundos la pantalla mostrara SET CAL y 25.000 kg.<br />
5. Utilizando ó ajuste el valor mostrado en la pantalla (con incrementos de 1 g)<br />
hasta que sea igual al peso de la pesa de referencia. Utilice la tecla para<br />
incrementos de 1kg. en el ajuste.<br />
6. Oprima . Aparecerá en la pantalla un número que representa la plataforma sin carga.<br />
Oprima para guardar el valor. La pantalla mostrara cero.<br />
7. Coloque el peso de calibración en la plataforma. Aparecerá en la pantalla un número que<br />
representa el peso de referencia colocado. Deje transcurrir por lo menos 10 segundos para<br />
que se estabilice el número.<br />
8. Oprima . La <strong>REF</strong>-<strong>METER</strong>-<strong>OCTA</strong> ya esta nuevamente calibrada con el peso de<br />
referencia.<br />
9. Refiérase a la sección Comienzo Rápido mas arriba para ajustar las unidades y resolución<br />
deseadas.<br />
65
<strong>REF</strong>-<strong>METER</strong>-<strong>OCTA</strong> Manual del Usuario<br />
Español<br />
Restaurando la Calibración del Fabricante<br />
Si cometiese un error durante la calibración de la <strong>REF</strong>-<strong>METER</strong>-<strong>OCTA</strong> siempre se puede<br />
retornar al la calibración (y preajustes) de fabrica.<br />
Para retornar a los ajustes de fábrica siga los pasos siguientes:<br />
1. Apague la <strong>REF</strong>-<strong>METER</strong>-<strong>OCTA</strong>.<br />
2. Retire cualquier objeto de la plataforma.<br />
3. Mientras este oprimiendo , oprima y suelte . La <strong>REF</strong>-<strong>METER</strong>-<strong>OCTA</strong> se<br />
encenderá y sonara 10 veces. Eso significa que los ajustes de fábrica ya están<br />
reinstaurados.<br />
4. Refiérase a la sección Comienzo Rápido mas arriba para ajustar las unidades y<br />
resolución deseadas.<br />
5. Calibración<br />
Sonido<br />
La <strong>REF</strong>-<strong>METER</strong>-<strong>OCTA</strong> sale de la fábrica con el sonido activado cuando enciende y cuando<br />
se oprimen las teclas, este sonido puede ser apagado de la siguiente manera:<br />
1. Asegúrese de que la <strong>REF</strong>-<strong>METER</strong>-<strong>OCTA</strong> encendida.<br />
2. Mientras este oprimiendo , oprima . El símbolo musical a la izquierda de la<br />
pantalla se apagara para indicar que el sonido ha sido apagado.<br />
Repita los pasos 1 y 2 para encender el sonido.<br />
NOTA: La función de apagar el sonido solo afecta el encendido de la unidad y al oprimir las<br />
teclas, no tiene ningún efecto en la alarma.<br />
66
Español<br />
<strong>REF</strong>-<strong>METER</strong>-<strong>OCTA</strong> Manual del Usuario<br />
Servicio de Calefacción Ventilación y Aire Acondicionado<br />
Gracias a su gran estabilidad y precisión la <strong>REF</strong>-<strong>METER</strong>-<strong>OCTA</strong> es ideal para la carga y<br />
recuperación de gases refrigerantes tanto en la industria automotriz como lugares<br />
comerciales y el hogar. Su alta resolución permite la recarga de sistemas pequeños que<br />
requieran carga critica tales como congeladores comerciales<br />
Para utilizar la <strong>REF</strong>-<strong>METER</strong>-<strong>OCTA</strong> en la carga de refrigerantes siga los pasos siguientes:<br />
1. Oprima para ajustar las unidades deseadas en la pantalla.<br />
2. Si lo desea, prepare el modo Capacidad del Tanque según se indica en la sección<br />
Modo Capacidad del Tanque. Esto permite saber en cualquier momento el porciento de<br />
refrigerante que queda en el cilindro.<br />
3. Coloque el cilindro del refrigerante cuidadosamente en la plataforma de pesado.<br />
4. Conecte el cilindro al múltiple de carga a través de una manguera. Abra la válvula para<br />
purgar el aire que esta en la manguera.<br />
5. Programe el peso de la cantidad de refrigerante que desea cargar según se describe en<br />
la sección Programación. Active el programa oprimiendo .<br />
6. Abra la(s) válvula(s) en el múltiple.<br />
7. La pantalla mostrara el peso cargado como negativo indicando que el refrigerante esta<br />
siendo sacado del cilindro.<br />
8. Si se vaciara el cilindro durante la carga:<br />
a. Cierre todas las válvulas.<br />
b. Oprima para “congelar” la pantalla<br />
c. Reemplace el tanque vació por uno lleno. Conecte y purgue las mangueras.<br />
d. Oprima para salir del Modo Espera.<br />
e. Abra la(s) válvula(s) del múltiple. La carga continuara donde se había quedado.<br />
9. Cuando la carga se haya completado sonara la alarma. Cierre todas las válvulas y<br />
oprima cualquier tecla para cancelar la alarma.<br />
67
<strong>REF</strong>CO <strong>Manufacturing</strong> <strong>Ltd</strong>.<br />
Industriestrasse 11<br />
6285 Hitzkirch - Switzerland<br />
Telefon +41 41 919 72 82<br />
Telefax +41 41 919 72 83<br />
info@refco.ch<br />
www.refco.ch