guttafusion - Vdw-dental.com
guttafusion - Vdw-dental.com
guttafusion - Vdw-dental.com

Create successful ePaper yourself
Turn your PDF publications into a flip-book with our unique Google optimized e-Paper software.
22<br />
en<br />
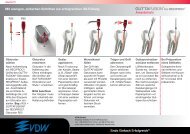
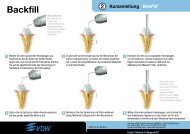
11. Removing excess gutta-percha<br />
Using a spoon excavator, explorer, etc., remove<br />
any excess gutta-percha that may block access<br />
to the chamber and other canals. Repeat all of<br />
the above steps on each canal of a multi-rooted<br />
tooth. If necessary, protect adjacent canal<br />
orifices from debris and gutta-percha with tiny<br />
cotton pellets or a paper point until time for<br />
obturation. Obturation is <strong>com</strong>plete once excess<br />
gutta-percha is removed.<br />
12. Removing GUTTAFUSION ®<br />
obturation materials<br />
Creating post space and retreatment are ac<strong>com</strong>plished<br />
using traditional methods for removing<br />
obturation material. For creating post space,<br />
remove the GUTTAFUSION ® Obturator by selecting<br />
either an appropriately sized post drill of the<br />
root post to be used, e.g. DT Universal drill, Gates<br />
Glidden or Peeso Reamer. When removing the<br />
obturation material for retreatment purposes, use<br />
either an Mtwo ® retreatment instrument R25/.05<br />
or RECIPROC ® instrument R25. Take a radiograph<br />
to confirm the removal of all obturation material.<br />
If retreating and encountering intricate anatomy<br />
in the apical 1/3 of the canal, use a hand file with<br />
solvent to soften the gutta-percha on the<br />
GUTTAFUSION ® Obturator.