INSTALLATIONSANLEITUNGEN - Kälte Bast GmbH
INSTALLATIONSANLEITUNGEN - Kälte Bast GmbH
INSTALLATIONSANLEITUNGEN - Kälte Bast GmbH

You also want an ePaper? Increase the reach of your titles
YUMPU automatically turns print PDFs into web optimized ePapers that Google loves.
EG<br />
I<br />
F<br />
D<br />
E<br />
P<br />
WALL / MURO / MUR / WAND<br />
PARED / PAREDE / TOICOS<br />
(1)<br />
WALL / MURO / MUR / WAND<br />
PARED / PAREDE / TOICOS<br />
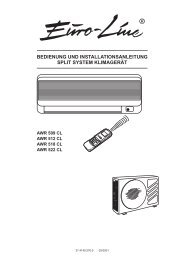
NON-FIXED POSITION (1)<br />
OI ANAGKAIES BIDES GIA TOUS DUO TROPOUS<br />
EGKATASTASHS PROMHQEUONTAI MAZI ME THN<br />
ESWTERIKH MONADA.<br />
• Momentarily place the remote control unit in the desired mounting position.<br />
• Verify that the remote control unit can operate from this position.<br />
• Hang the remote control unit from the mounting screw.<br />
WALL-MOUNTED FIXED POSITION (2)<br />
• See non-fixed position (1).<br />
• Remove the batteries from the remote control unit and tighten the screw into the wall, then hang the remote control unit.<br />
• Locate the pretrimmed hole in the battery compartment.<br />
• Through the pretrimmed hole fix the remote control unit at the wall using the supplied screw.<br />
• Insert the two batteries, check that the remote control unit operates correctly.<br />
POSIZIONE NON FISSA (1)<br />
• Momentaneamente sistemare il telecomando nella posizione desiderata.<br />
• Verificare che da questa posizione prescelta il telecomando dialoghi con il condizionatore.<br />
• Avvitare la vite a supporto nel muro e appendere il telecomando.<br />
POSIZIONE FISSA A PARETE (2)<br />
• Vedi posizione non fissa (1).<br />
• Rimuovere le batterie del telecomando quindi avvitare la vite a supporto nel muro e appendere il telecomando.<br />
• Individuare il foro pretranciato nel vano porta batterie.<br />
• Fissare attraverso il foro pretranciato il telecomando al muro con vite in dotazione.<br />
• Inserire le due batterie, verificare il corretto funzionamento del telecomando.<br />
POSITION MOBILE (1)<br />
• Placer la télécommande dans la position désirée.<br />
• Vérifier que la commande à distance peut être utilisée dans cette position.<br />
• Visser la vis dans le mur et accrocher la télécommande.<br />
POSITION FIXE (MONTAGE MURAL) (2)<br />
• Voir position mobile (1).<br />
• Enlever les piles de la télécommande ensuite visser la vis dans le mur et accrocher la télécommande.<br />
• Localiser le trou prédecoupé dans le compartiment des piles.<br />
• Fixer à travers le trou la télécommande au mur par la vis fournie.<br />
• Placer les deux piles, vérifier le bon fonctionnement de la télécommande.<br />
NICHT ORTSFESTE POSITION (1)<br />
• Die Fernbedienung momentan in die gewünschte Position anbringen.<br />
• Prüfen, ob die Fernbedienung von dieser Position aus funktionsfähig ist.<br />
• Die Schraube in die Wand einschrauben und die Fernbedienung anhängen.<br />
MONTAGE AN EINER WAND (2)<br />
• Sehen nicht ortfeste position (1).<br />
• Die Batterien von der Fernbedienung herausnehmen, die Schraube in die Wand einschrauben und die Fernbedienung anhängen.<br />
• Das im Batteriefach vorgebohrte Loch bestimmen.<br />
• Durch das vorgebohrte Loch die Fernbedienung an der Wand mit der gelieferten Schraube einschrauben.<br />
• Die beiden Batterien einsetzen und den korrekten Betrieb der Fernbedienung überprüfen.<br />
POSICION NO FIJA (1)<br />
• Elija un lugar para colocar el mando a distancia.<br />
• Controle que desde esta posición el mando transmita al acondicionador.<br />
• Atornille los tornillos adecuados en la pared y cuelgue el mando a distancia.<br />
POSICION FIJA EN LA PARED (2)<br />
• Ver posicion no fija (1).<br />
• Quite las pilas y fije el soporte con los tornillos adecuados en la pared. Cuelgue el mando a distancia.<br />
• Localice el agujero precortado en el compartimento para las pilas.<br />
• Fije el mando a distancia con el tornillo adecuado a través del agujero.<br />
• Coloque las dos pilas y controle que el mando funciona correctamente.<br />
POSIÇÃO NÃO FIXA (1)<br />
• Coloque a unidade de controle remoto da posição desiderada.<br />
• Verifique que haja diálogo entre a unidade de controle remoto e o aparelho de ar condicionado.<br />
• Aparafuse o suporte na parede e pendure a unidade de controle remoto.<br />
POSIÇÃO FIXA (NA PAREDE) (2)<br />
• Veja posição não fixa (1).<br />
• Remova as pilhas da unidade de controle remoto e aplique o parafuso de suporte na parede; em seguida pendure a unidade de controle remoto.<br />
• Localize o orifício existente na armação de suporte da unidade (parede) de controle remoto.<br />
• Aparafuse, através desse orifício, a unidade de controle remoto na parede utilizando os parafusos fornecidos.<br />
MH • Reponha STAQERH as QESH. pilhas (1) e verifique se a unidade funciona corretamente.<br />
GR • MTopoqethvste<br />
proswrinav to thleceiristhvrio sthn epiqumhthv qevsh.<br />
• Elevgxte an apov authv th qevsh to thleceiristhvrio epikoinwneiv me to klimatistikov.<br />
• Bidwvste me ti" bivde" th bavsh ston toivco kai topoqethvste to thleceiristhvrio.<br />
STAQERH QESH STON TOICO (2)<br />
Blepe mh staqerh qesh (1).<br />
• Bgavlte ti" mpatarive" tou thleceiristhrivou kai bidwvste th bavsh me ti" bivde" ston toivco kai topoqethvste to thleceiristhvrio.<br />
• Breivte thn hvdh upavrcousa truvpa sth qhvkh twn mpatariwvn.<br />
• Staqeropoihvste to thleceiristhvrio ston toivco mevsw th" eidikhv" bivda".<br />
• Bavlte ti" duvo mpatarive" kai elevgxte an to thleceiristhvrio leitourgeiv swstav.<br />
(2)<br />
21<br />
THE SCREWS NECESSARY FOR THE TWO DIFFERENT<br />
INSTALLATIONS ARE SUPPLIED WITH THE INDOOR UNIT.<br />
LE VITI NECESSARIE ALLE DUE TIPOLOGIE DI INSTALLAZIONE<br />
SONO FORNITE A CORREDO DELL’UNITÀ INTERNA.<br />
LES VIS NECESSAIRES POUR LES DEUX INSTALLATIONS SONT<br />
LIVREES AVEC L'UNITE INTERIEURE.<br />
DIE FÜR DIE ZWEI VERSCHIEDENEN MONTAGEN<br />
NOTWENDIGE SCHRAUBEN WERDEN MIT DER INNENEINHEIT<br />
MITGELIEFERT.<br />
CON LA UNIDAD INTERIOR SE SUMINISTRAN LOS TORNILLOS<br />
NECESARIOS PARA LOS DOS TIPOS DE INSTALACION.<br />
OS PARAFUSOS NECESSÁRIOS AOS DOIS TIPOS DE<br />
INSTALAÇÃO SAO FORNECIDOS COM A UNIDADE INTERIOR.