

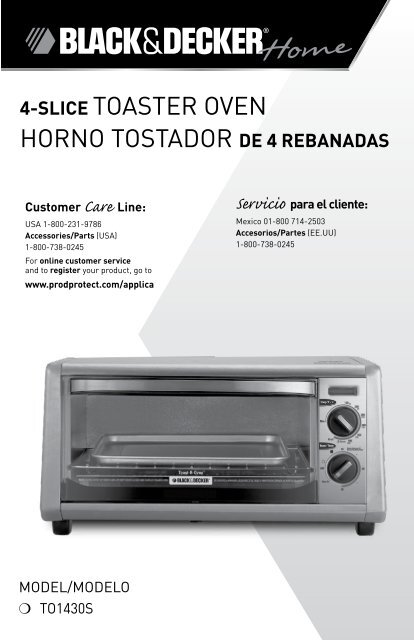
4-SLICE ToASTeR oVeN HoRNo ToSTAdoR dE 4 rEbanadaS
4-SLICE ToASTeR oVeN HoRNo ToSTAdoR dE 4 rEbanadaS
4-SLICE ToASTeR oVeN HoRNo ToSTAdoR dE 4 rEbanadaS

Create successful ePaper yourself
Turn your PDF publications into a flip-book with our unique Google optimized e-Paper software.
4-<strong>SLICE</strong> TOASTER OVEN<br />
Horno tostador de 4 rebanadas<br />
Customer Care Line:<br />
USA 1-800-231-9786<br />
Accessories/Parts (USA)<br />
1-800-738-0245<br />
For online customer service<br />
and to register your product, go to<br />
www.prodprotect.com/applica<br />
Servicio para el cliente:<br />
Mexico 01-800 714-2503<br />
Accesorios/Partes (EE.UU)<br />
1-800-738-0245<br />
Model/Modelo<br />
❍ TO1430S
Please Read and Save this Use and Care Book<br />
IMPORTANT SAFEGUARDS<br />
When using electrical appliances, basic safety precautions should always be<br />
followed, including the following:<br />
❍ Read all instructions before using.<br />
❍ Do not touch hot surfaces. Use handles or knobs.<br />
❍ To protect against electrical shock do not immerse cord, plugs or appliance<br />
in water or other liquid.<br />
❍ Close supervision is necessary when any appliance is used by or near<br />
children.<br />
❍ Unplug from outlet when not in use and before cleaning. Allow to cool<br />
before putting on or taking off parts and before cleaning.<br />
❍ Do not operate any appliance with a damaged cord or plug, or after the<br />
appliance malfunctions or has been damaged in any manner. Return<br />
appliance to the nearest authorized service facility for examination, repair<br />
or adjustment. Or, call the appropriate toll-free number on the cover of this<br />
manual.<br />
❍ The use of accessory attachments not recommended by the appliance<br />
manufacturer may cause injuries.<br />
❍ Do not use outdoors.<br />
❍ Do not let cord hang over edge of table or counter, or touch hot surfaces.<br />
❍ Do not place on or near a hot gas or electric burner, or in a heated oven.<br />
❍ Extreme caution must be used when moving an appliance containing hot oil<br />
or other hot liquids.<br />
❍ Always attach plug to appliance first, then plug cord into the wall outlet.<br />
To disconnect, turn any control to OFF, then remove plug from wall outlet.<br />
❍ Do not use appliance for other than intended use.<br />
❍ Use extreme caution when removing tray or disposing of hot grease.<br />
❍ Do not clean with metal scouring pads. Pieces can break off the pad and<br />
touch electrical parts, creating a risk of electric shock.<br />
❍ Oversized foods or metal utensils must not be inserted in a toaster oven, as<br />
they may create a fire or risk of electric shock.<br />
❍ A fire may occur if the toaster oven is covered or touching flammable<br />
material including curtains, draperies, walls and the like, when in operation.<br />
❍ Extreme caution should be exercised when using containers constructed of<br />
other than metal or glass.<br />
2
❍ Do not store any material, other than manufacturer's recommended<br />
accessories, in this oven when not in use.<br />
❍ Do not place any of the following materials in the oven: paper, cardboard,<br />
plastic, and the like.<br />
❍ Do not cover crumb tray or any part of this oven with metal foil. This will<br />
cause overheating of the oven.<br />
SAVE THESE INSTRUCTIONS.<br />
This product is for household use only.<br />
ENGLISH<br />
GROUNDED PLUG<br />
As a safety feature, this product is equipped with a grounded plug, which will only<br />
fit into a three-prong outlet. Do not attempt to defeat this safety feature. Improper<br />
connection of the grounding conductor may result in the risk of electric shock.<br />
Consult a qualified electrician if you are in doubt as to whether the outlet is properly<br />
grounded.<br />
TAMPER-RESISTANT SCREW<br />
Warning: This appliance is equipped with a tamper-resistant screw to prevent<br />
removal of the outer cover. To reduce the risk of fire or electric shock, do not<br />
attempt to remove the outer cover. There are no user-serviceable parts inside.<br />
Repair should be done only by authorized service personnel.<br />
ELECTRICAL CORD<br />
a) A short power-supply cord (or detachable power-supply cord) is to be<br />
provided to reduce the risk resulting from becoming entangled in or tripping<br />
over a longer cord.<br />
b) Longer detachable power-supply cords or extension cords are available and<br />
may be used if care is exercised in their use.<br />
c) If a long detachable power-supply cord or extension cord is used,<br />
1) The marked electrical rating of the detachable power-supply cord or<br />
extension cord should be at least as great as the electrical rating of the<br />
appliance,<br />
2) If the appliance is of the grounded type, the extension cord should be a<br />
grounding-type 3-wire cord, and<br />
3) The longer cord should be arranged so that it will not drape over<br />
the countertop or tabletop where it can be pulled on by children or<br />
tripped over.<br />
Note: If the power supply cord is damaged, it should be replaced by qualified<br />
personnel; in Latin America by an authorized service center.<br />
3
Product may vary slightly from what is illustrated.<br />
<br />
<br />
<br />
<br />
<br />
<br />
<br />
<br />
1. Power ON indicator light<br />
† 2. Temperature selector knob<br />
(part# TO1430S-01)<br />
† 3. Toast • Timer selector knob<br />
(part#TO1430S-02)<br />
† 4. Slide rack (part# TO1430S-03)<br />
† 5. Swing-down crumb tray<br />
6. Door handle<br />
† 7. Bake pan/drip tray<br />
(part# TO1430S-04)<br />
8. Rack slot<br />
Note: † indicates consumer replaceable/<br />
removable parts<br />
CONTROL PANEL<br />
<br />
1. Power on indicator light<br />
2. Temperature selector knob<br />
3. Toast • Timer selector knob with Stay On setting<br />
<br />
Important:<br />
When making toast or<br />
using the Timer function,<br />
always turn the dial past<br />
10 and then turn back or<br />
forward to desired setting.<br />
<br />
4
How to Use<br />
This product is for household use only.<br />
CAUTION<br />
ENGLISH<br />
THIS OVEN GETS HOT.<br />
WHEN IN USE, ALWAYS USE OVEN<br />
MITTS OR POT HOLDERS WHEN<br />
TOUCHING ANY OUTER OR INNER<br />
SURFACE OF THE OVEN.<br />
GETTING STARTED<br />
• Remove all packing material and any stickers.<br />
• Please go to www.prodprotect.com/applica to register your warranty.<br />
• Wash all removable parts as instructed in Care and Cleaning section of this<br />
manual.<br />
• Wipe outside of appliance with a damp cloth; dry thoroughly.<br />
• Select a location where this unit is to be used allowing enough space for back of the<br />
unit and the wall to allow heat to flow without damage to cabinets and walls.<br />
• Insert slide rack completely into the oven before closing the door.<br />
• Remove tie from cord and unwind.<br />
• Plug unit into electrical outlet. The power ON indicator light comes on and will<br />
remain lit during the entire cooking time.<br />
Important: This oven gets hot. When in use, always use<br />
oven mitts or potholders when touching any outer or inner<br />
surface of the oven (A).<br />
Note: During first few minutes of use you may notice smoke<br />
and a slight odor. This is normal and should cause no<br />
concern.<br />
A<br />
HELPFUL TIPS ABOUT YOUR OVEN<br />
• When the oven is turned on the power ON light will come on and remain lit until<br />
the oven is turned off manually or automatically if the timer has been used.<br />
• When selecting baking time for a particular product or<br />
recipe, include preheat time.<br />
• This oven has a 30-minute timer. If baking something<br />
that will take longer than 30 minutes, we suggest you<br />
use the Stay On feature (B).<br />
• Metal, ovenproof glass and ceramic bake ware without<br />
lids can be used in the oven. If foods require covering,<br />
use aluminum foil.<br />
• Be sure the top of the container or food being baked or<br />
B<br />
broiled is at least 1½ inches away from the upper heating<br />
elements.<br />
5
• Turn temperature selector knob to Min and the Toast • Timer selector knob to Off<br />
before inserting or removing plug from electrical outlet.<br />
• Do not put any container directly on the lower heating element.<br />
• To obtain the best performance from this toaster oven:<br />
o Do not overfill the oven.<br />
o To avoid heat loss do not open the door too frequently<br />
o When using foil to cover a food, tuck the edges of the foil against the sides of the<br />
baking dish or pan.<br />
OVERVIEW OF THE FUNCTIONS<br />
Important: This oven gets hot. When in use, always use oven mitts or potholders when<br />
touching any outer or inner surface of the oven.<br />
BAKING<br />
Note: For best results, preheat oven for 8 to 10 minutes at desired baking temperature<br />
before baking food.<br />
1. Open the oven door.<br />
2. Insert the slide rack.<br />
3. Turn temperature selector knob to desired temperature from 150ºF to 400ºF.<br />
4. Turn Toast • Timer selector knob past 10 and then turn back or forward to desired<br />
baking time, including preheat time.<br />
Note: Select Stay On to bake longer than 30 minutes or to control cooking time yourself.<br />
Be sure to use a kitchen timer.<br />
Important: You must set the timer or select Stay On for the oven to function.<br />
5. The blue ON indicator light comes on and will remain lit during the entire baking time.<br />
6. The heating elements will cycle on and off to maintain even heat distribution.<br />
7. Once oven has preheated, open oven door and insert food. Close oven door.<br />
Note: You can bake 3 ways:<br />
• Use the bake pan/drip tray placed on the oven rack (C).<br />
C<br />
• Place the bake pan/drip tray under the oven rack and place<br />
the food directly on the rack (D).<br />
Note: Be sure food does not extend past the outer limits of the<br />
bake pan/drip tray to prevent grease dripping onto the heating<br />
elements.<br />
D<br />
E<br />
• Use a metal, glass or ceramic baking dish placed on the<br />
rack. (Be sure food or baking dish does not come within<br />
1½ inches of the top heating elements.) (E)<br />
8. The first time you use the oven, bake following the<br />
manufacturers’ or recipe directions and check for doneness<br />
at minimum suggested cooking time.<br />
6
9. If using the oven timer, there will be an audible signal once the baking cycle is<br />
complete. The oven turns Off and the light goes out.<br />
10. If not using the oven timer, turn the Toast • Timer Off once cooking cycle is<br />
complete.<br />
11. Open the oven door. Using oven mitts or pot holders, slide the rack out to remove<br />
the cooked food.<br />
Important: This oven gets hot. When in use, always use oven mitts or potholders<br />
when touching any outer or inner surface of the oven.<br />
12. Unplug appliance when not in use.<br />
ENGLISH<br />
BAKING GUIDE<br />
FOOD AMOUNT TEMP./TIME PROCEDURE<br />
Boneless chicken<br />
breast<br />
Boneless chicken<br />
tenders<br />
Steak, pork or<br />
lamb chops and<br />
ham<br />
Fish fillets or<br />
steaks<br />
1 to 2 pieces to<br />
fit pan<br />
1 to 6 pieces to<br />
fit pan<br />
400ºF / 30 to 40<br />
minutes<br />
375ºF / 15 to 25<br />
minutes.<br />
1 to 2 to fit pan 350ºF to desired<br />
doneness.<br />
1 to 2 to fit pan 400ºF for about<br />
12 minutes.<br />
Cookies about 6 Follow recipe<br />
or package<br />
directions.<br />
Biscuits and<br />
dinner rolls<br />
White or sweet<br />
potatoes<br />
Frozen snack<br />
foods<br />
4 to 5 to fit pan Follow recipe<br />
or package<br />
directions.<br />
1 to 4 to fit pan 400ºF / 50 to<br />
60 minutes.<br />
Consider using<br />
a kitchen timer.<br />
Single layer in<br />
bake pan<br />
Follow package<br />
directions.<br />
Frozen pizza Up to 9-inch pizza Follow package<br />
directions.<br />
Chicken should<br />
register 180ºF on<br />
meat thermometer.<br />
Chicken should<br />
register 180ºF on<br />
meat thermometer.<br />
Arrange in single<br />
layer on rack over<br />
bake pan. Check with<br />
meat thermometer<br />
for doneness.<br />
Test for doneness;<br />
fish will flake easily.<br />
Bake on bake pan<br />
in single layer until<br />
fully baked and lightly<br />
browned.<br />
Bake on bake pan<br />
in single layer until<br />
fully baked and lightly<br />
browned.<br />
Pierce with fork and<br />
bake until tender.<br />
Turn halfway through<br />
baking period, check<br />
at minimum baking<br />
time<br />
Turn halfway through<br />
baking period, check<br />
at minimum baking<br />
time.<br />
7
BROILING<br />
1. Turn temperature selector to Broil.<br />
2. Turn time selector past 10 and then turn back or forward to desired broiling time<br />
including 5-minute preheat time. (Select Stay On to control cooking time yourself. Be<br />
sure to use a kitchen timer.)<br />
3. If you need to insert bake pan/drip tray, slide it under the oven rack and place the food<br />
directly on the rack.<br />
Important: Be sure food does not extend past the outer limits of the bake pan/drip tray<br />
to prevent grease dripping onto the heating elements.<br />
Also be sure the top of the food is at least 1½-inches from the top heating element.<br />
4. Broil food according to recipe or package directions and check for doneness at<br />
minimum suggested broiling time.<br />
5. If using the oven timer, there will be an audible signal once the broiling cycle is<br />
complete. The oven turns Off and the light goes out.<br />
6. If not using the oven timer, turn the Toast • Timer to Off once broiling cycle is<br />
complete.<br />
7. Open the oven door. Using oven mitts or pot holders, slide the rack out along with the<br />
bake/broil pan to remove the cooked food.<br />
Important: This oven gets hot. When in use, always use oven mitts or potholders when<br />
touching any outer or inner surface of the oven.<br />
8. Unplug appliance when not in use.<br />
BROILING TIPS<br />
• Preheat the broiler for 8 to 10 minutes for improved performance.<br />
• Placing food on slide rack allows the drippings to flow into the bake pan/drip tray and<br />
reduce the fat in the foods being broiled. It also helps to eliminate or prevent smoking<br />
from the broiler.<br />
• For best results, thaw frozen meat, poultry and fish before broiling.<br />
• Trim excess fat from meat and score edges to prevent curling.<br />
• If desired, brush foods to be broiled with sauce or oil and season as desired before<br />
broiling.<br />
• Fish fillets and steaks are delicate and should be broiled directly on bake pan/drip tray.<br />
• There is no need to turn fish fillets during broiling. Carefully turn thick fish steaks<br />
midway through broiling cycle.<br />
• If food being broiled needs to be turned, remove from oven about halfway through<br />
broiling, turn food over, season if desired, and return to oven to finish cooking.<br />
TOASTING<br />
Note: It is not necessary to preheat the oven for toasting.<br />
1. Turn temperature selector knob to Toast.<br />
2. Open oven door and place desired pieces of bread or bagel to be toasted directly on<br />
slide rack and close the door.<br />
3. Turn Toast • Timer selector knob past 10 and then turn back to desired toast shade.<br />
8
F<br />
Note: You must set the Toast • Timer selector knob as<br />
desired for the oven to begin toasting (F).<br />
4. For best results on first toasting cycle set the Toast •<br />
Timer selector knob to medium which will be midway<br />
between light and dark setting, then re-adjust for next<br />
cycle to lighter or darker to suit your preference.<br />
5. The power ON indicator light comes on and remains on<br />
until toasting cycle is complete.<br />
6. When toast cycle is complete, there will be an audible<br />
signal. The oven and the power ON indicator will go off.<br />
7. Open the oven door. Using oven mitts or pot holders, slide the rack out to remove<br />
the toast.<br />
Important: This oven gets hot. When in use, always use oven mitts or potholders<br />
when touching any outer or inner surface of the oven.<br />
8. Unplug appliance when not in use.<br />
TOAST TIPS<br />
• You must turn the Toast • Timer selector knob to Off to discontinue toasting.<br />
• When repeating the toast cycle immediately, it is suggested that the Toast • Timer<br />
selector knob be set to a slightly lighter setting.<br />
KEEP WARM<br />
1. Turn temperature selector knob to 150ºF to 200ºF.<br />
2. Turn Toast • Timer selector knob past 10 and then turn back or forward to desired<br />
warming time, including preheat time. (Select Stay On to control cooking time<br />
yourself. Be sure to use a kitchen timer.)<br />
Note: This feature is designed to keep already cooked foods warm after they have<br />
been cooked. This function should be used for short periods of time; to prevent food<br />
from drying out cover with foil.<br />
3. When cycle is complete, there will be an audible signal. The oven and the power ON<br />
indicator light will go off.<br />
4. If not using the oven timer, turn the Toast • Timer selector knob to Off once cycle is<br />
complete.<br />
5. Unplug appliance when not in use.<br />
ENGLISH<br />
9
Care and Cleaning<br />
This product contains no user serviceable parts. Refer service to qualified service<br />
personnel.<br />
CLEANING YOUR OVEN<br />
Important: Before cleaning any part, be sure the oven is off, unplugged, and cool.<br />
Always dry parts thoroughly before using oven after cleaning.<br />
1. Clean the glass door with a sponge, soft cloth or nylon pad and sudsy water. Do not<br />
use a spray glass cleaner.<br />
2. To remove the slide rack, open the door, pull the rack forward and out. Wash the slide<br />
rack in sudsy water or in a dishwasher. To remove stubborn spots, use a polyester or<br />
nylon pad.<br />
3. Wash the bake pan in sudsy water. To minimize scratching, use a polyester or nylon<br />
pad.<br />
CRUMB TRAY<br />
1. Tilt oven back, grasp the knob and pull down crumb tray.<br />
2. Dispose of crumbs and wipe tray with a dampened cloth, or wash in sudsy warm water.<br />
3. Be sure to dry thoroughly before pushing the tray back into the oven.<br />
EXTERIOR SURFACES<br />
Important: The oven gets hot. Be sure the oven has cooled completely before cleaning.<br />
Wipe the top and exterior walls with a damp cloth or sponge. dry thoroughly.<br />
ADDITIONAL TIPS FOR CLEANING THE INTERIOR OF YOUR OVEN<br />
• Heat oven to 200°F; turn oven off. Place shallow glass bowl containing ½ cup ammonia<br />
on rack. Close oven door and let stand overnight. Next day, open oven, remove bowl<br />
and wipe interior of oven with moist paper towels.<br />
• To refresh air inside oven, lay strips of orange or lemon peel on rack. Heat oven to<br />
350°F and bake for 30 minutes. Turn oven off and let stand until oven is completely<br />
cool. Remove peel.<br />
Note: We strongly recommend that the bake pan/drip tray be washed by hand with<br />
warm sudsy water, as opposed to washing in the dishwasher. Washing this piece in the<br />
dishwasher will cause it to discolor, but will not affect its functionality.<br />
10
TROUBLESHOOTING<br />
PROBLEM POSSIBLE CAUSE SOLUTION<br />
Oven is not heating<br />
or stops heating.<br />
Second toasting is<br />
too dark.<br />
Moisture forms on<br />
the inside of the door<br />
during toasting.<br />
Food is overcooked<br />
or undercooked.<br />
There is a burnt food<br />
odor or smoking<br />
when oven is in use.<br />
Heating elements do<br />
not seem to be on.<br />
Oven is not plugged in or<br />
outlet is not working.<br />
Toast setting selected is<br />
too dark.<br />
The amount of moisture<br />
in the product being<br />
toasted will vary from one<br />
manufacturer to another.<br />
Temperature and/or cook<br />
time may need to be<br />
adjusted.<br />
There are remnants of<br />
food on the walls of the<br />
oven or in the crumb tray.<br />
The heating elements in<br />
the toaster oven will cycle<br />
on and off during baking.<br />
Check that both knobs are<br />
set to the appropriate setting<br />
and the ON power light is on.<br />
Check that outlet is working.<br />
When doing repeated toast<br />
cycles remember to select a<br />
slightly lighter setting for the<br />
2nd and 3 rd toasting.<br />
The moisture that forms<br />
on the door is common and<br />
usually disappears before<br />
the end of the toasting cycle.<br />
Because the oven is a closed<br />
appliance the moisture<br />
cannot evaporate as it would<br />
in a toaster.<br />
Since the toaster oven<br />
is much smaller than a<br />
conventional oven it may<br />
cook faster. Try lowering<br />
the temperature setting 25<br />
degrees from the suggested<br />
setting in a recipe or label<br />
directions.<br />
Refer to the directions in<br />
Care and Cleaning in this<br />
manual. Make sure all parts<br />
of the oven are clean and free<br />
of debris.<br />
Check toaster oven to make<br />
sure proper function is<br />
selected. On broil, only the<br />
top heating elements will<br />
be on.<br />
ENGLISH<br />
11
RECIPES<br />
BASIL LEMON HALIBUT<br />
1½ cups halved cherry tomatoes<br />
3 tbsp. chopped Italian parsley<br />
1 tbsp. slivered fresh basil<br />
1 tbsp. snipped fresh chives<br />
1 tbsp. slivered lemon peel<br />
½ tsp. kosher salt<br />
2 tbsp. fresh lemon juice<br />
1 tbsp. olive oil<br />
2 halibut fillets (about 6 oz., ea.)<br />
¼ tsp. garlic pepper<br />
Preheat Black & Decker ® Toaster Oven to 400ºF. Meanwhile, in medium bowl, combine<br />
tomatoes, parsley, basil, chives, lemon peel, ¼ tsp. salt, lemon juice and olive oil; blend<br />
well.<br />
Spoon into 1-quart shallow baking dish. Place fish on top and season with remaining ¼<br />
tsp. salt and garlic pepper.<br />
Bake for 20 minutes or until fish flakes easily when tested with a fork. (Fish will have an<br />
internal temperature of 145ºF).<br />
Makes 2 servings.<br />
EASY CINNAMON RAISIN ROLLUPS<br />
1 tbsp. sugar<br />
¼ tsp. ground cinnamon<br />
Generous dash ground nutmeg<br />
1 pkg. (4 oz.) refrigerated crescent rolls<br />
1 tbsp. melted butter or margarine<br />
2 tbsp. chopped pecans<br />
2 tbsp. raisins<br />
Confectioners’ sugar<br />
Preheat Black & Decker ® Toaster Oven at 375ºF. In small bowl, combine sugar, cinnamon<br />
and nutmeg; blend well.<br />
Unroll dough and separate into 4 triangles. Brush top of each triangle with melted butter.<br />
Sprinkle evenly with sugar mixture. Top with nuts and raisins. Roll up crescents loosely.<br />
Arrange on bake pan of toaster oven.<br />
Bake for 10 minutes until golden on top and fully baked internally.<br />
Let cool on pan on wire rack for 10 minutes. Drizzle with confectioners’ sugar frosting<br />
before serving.<br />
Delicious for a lazy mid-morning treat or an after school surprise.<br />
Makes 8 servings.<br />
12
NEED HELP<br />
For service, repair or any questions regarding your appliance, call the appropriate<br />
800 number on cover of this book. Please DO NOT return the product to the place of<br />
purchase. Also, please DO NOT mail product back to manufacturer, nor bring it to a<br />
service center. You may also want to consult the website listed on the cover of this<br />
manual.<br />
Two-Year Limited Warranty<br />
(Applies only in the United States and Canada)<br />
What does it cover<br />
• Any defect in material or workmanship provided; however, Applica’s liability will not<br />
exceed the purchase price of product.<br />
For how long<br />
• Two years from the date of original purchase with proof of such purchase.<br />
What will we do to help you<br />
• Provide you with a reasonably similar replacement product that is either new or<br />
factory refurbished.<br />
How do you get service<br />
• Save your receipt as proof of date of sale.<br />
• Visit the online service website at www.prodprotect.com/applica, or call<br />
toll-free 1-800-231-9786, for general warranty service.<br />
• If you need parts or accessories, please call 1-800-738-0245.<br />
What does your warranty not cover<br />
• Damage from commercial use<br />
• Damage from misuse, abuse or neglect<br />
• Products that have been modified in any way<br />
• Products used or serviced outside the country of purchase<br />
• Glass parts and other accessory items that are packed with the unit<br />
• Shipping and handling costs associated with the replacement of the unit<br />
• Consequential or incidental damages (Please note, however, that some states do<br />
not allow the exclusion or limitation of consequential or incidental damages, so this<br />
limitation may not apply to you.)<br />
How does state law relate to this warranty<br />
• This warranty gives you specific legal rights. You may also have other rights that<br />
vary from state to state or province to province.<br />
ENGLISH<br />
is a trademark of The Black & Decker Corporation,<br />
Towson, Maryland, USA<br />
Made in People’s Republic of China<br />
Printed in People’s Republic of China<br />
13
Por favor lea este instructivo antes de usar el producto<br />
INSTRUCCIONES IMPORTANTES<br />
DE SEGURIDAD<br />
Cuando se usan aparatos electricos, siempre se deben respetar las<br />
siguientes medidas basicas de seguridad:<br />
❍ Lea todas las instrucciones antes de utilizar el producto.<br />
❍ No toque las superficies calientes. Use las asas o las perillas.<br />
❍ A fin de protegerse contra un choque eléctrico y lesiones a las personas,<br />
no sumerja el cable, los enchufes ni el aparato en agua ni en ningún<br />
otro líquido.<br />
❍ Todo aparato eléctrico usado en la presencia de los niños o por ellos<br />
mismos requiere la supervisión de un adulto.<br />
❍ Desconecte el aparato del tomacorriente cuando no esté en uso y antes<br />
de limpiarlo. Espere que el aparato se enfrie antes de instalarle o<br />
retirarle piezas y antes de limpiarlo.<br />
❍ No use ningún aparato eléctrico que tenga el cable o el enchufe<br />
averiado, que presente un problema de funcionamiento o que esté<br />
dañado. Acuda a un centro de servicio autorizado para que lo examinen,<br />
reparen o ajusten o llame gratis al número correspondiente en la<br />
cubierta de este manual.<br />
❍ El uso de accesorios no recomendados por el fabricante del aparato<br />
puede ocasionar incendio, choque eléctrico o lesiones a las personas.<br />
❍ No use este aparato a la intemperie.<br />
❍ No permita que el cable cuelgue del borde de la mesa o del mostrador<br />
ni que entre en contacto con superficies calientes.<br />
❍ No coloque el aparato sobre ni cerca de las hornillas de gas o eléctricas<br />
ni adentro de un horno caliente.<br />
❍ Tome mucha precaución al mover de un lugar a otro un aparato que<br />
contenga aceite u otros líquidos calientes.<br />
❍ Siempre conecte primero el cable al aparato y después, enchúfelo al<br />
tomacorriente. Para desconectar, ajuste todo control a la posición de<br />
apagado (OFF) y después, retire el enchufe del tomacorriente.<br />
❍ Este aparato se debe usar únicamente con el fin previsto.<br />
❍ Tenga muchisimo cuidado al retirar la bandeja o al desechar la grasa<br />
caliente.<br />
❍ No use almohadillas de fibras metálicas para limpiar el aparato. Las<br />
fibras metálicas podrian entrar en contacto con las piezas eléctricas del<br />
aparato, resultando en el riesgo de un choque eléctrico.<br />
14
❍ A fin de evitar el riesgo de incendio o choque eléctrico, jamás<br />
introduzca alimentos demasiado grandes ni utensilios de metal<br />
adentro del aparato.<br />
❍ Existe el riesgo de incendio si el aparato permanece cubierto<br />
mientras se encuentra en funcionamiento o si éste llegase a entrar<br />
en contacto con cualquier material inflamable, incluyendo las<br />
cortinas y las paredes.<br />
❍ Asegúrese de no colocar nada sobre el aparato mientras se<br />
encuentre en uso. Tenga mucho cuidado al utilizar recipientes que no<br />
sean de metal ni de vidrio.<br />
❍ Cuando este aparato no se encuentre en funcionamiento no se debe<br />
almacenar nada aparte de los accesorios recomendados por el<br />
fabricante.<br />
❍ No introduzca los siguientes materiales en el aparato: papel, cartón,<br />
envolturas plásticas ni materiales semejantes.<br />
❍ A fin de evitar que el aparato se sobrecaliente, no cubra la bandeja<br />
para los residuos como ninguna otra superficie del aparato con papel<br />
de aluminio.<br />
CONSERVE ESTAS INSTRUCCIONES.<br />
Este aparato eléctrico es para uso doméstico<br />
únicamente.<br />
ESPAÑOL<br />
15
ENCHUFE DE TIERRA<br />
Como medida de seguridad, este producto cuenta con un enchufe de tierra que<br />
tiene tres contactos. No trate de alterar esta medida de seguridad. La conexión<br />
inapropiada del conductor de tierra puede resultar en un riesgo de choque<br />
eléctrico. Si tiene alguna duda, consulte con un eléctricista calificado para<br />
asegurarse de que la toma de corriente sea una de tierra.<br />
TORNILLO DE SEGURIDAD<br />
Advertencia: Este aparato cuenta con un tornillo de seguridad para evitar<br />
la remoción de la cubierta exterior del mismo. A fin de reducir el riesgo de<br />
incendio o de choque eléctrico, por favor no trate de remover la cubierta<br />
exterior. Este producto no contiene piezas reparables por el consumidor.<br />
Toda reparación se debe llevar a cabo únicamente por personal de servicio<br />
autorizado.<br />
CABLE ELÉCTRICO<br />
a) El producto se debe de proporcionar con un cable eléctrico corto (o uno<br />
separable), a fin de reducir el riesgo de tropezar o de enredarse en un cable<br />
más largo.<br />
b) Existen cables eléctricos más largos y separables o cables de extensión que<br />
uno puede utilizar si toma el cuidado debido.<br />
c) Si se utiliza un cable separable o de extensión,<br />
1) El régimen nominal del cable separable o del cable de extensión debe ser,<br />
como mínimo, igual al del régimen nominal del aparato.<br />
2) Si el aparato es de conexión a tierra, el cable de extensión debe ser un<br />
cable de tres alambres de conexión a tierra.<br />
3) Uno debe de acomodar el cable más largo de manera que no cuelgue del<br />
mostrador o de la mesa, para evitar que un niño tire del mismo o que<br />
alguien se tropiece.<br />
Nota: Si el cordón de alimentación esta dañado, en América Latina debe<br />
sustituirse por personal calificado o por el centro de servicio autorizado.<br />
16
Este producto puede variar ligeramente del que aparece ilustrado.<br />
<br />
<br />
<br />
<br />
ESPAÑOL<br />
<br />
<br />
<br />
<br />
1. Luz indicadora de encendido<br />
† 2. Selector de temperatura<br />
(No. de piezaTO1430S-01)<br />
† 3. Selector de tostar/reloj automático<br />
(Toast • Timer)<br />
(No. de piezaTO1430S-02)<br />
† 4. Rejilla deslizante<br />
(No. de piezaTO1430S-03)<br />
5. Bandeja giratoria para migas<br />
6. Asa de la puerta<br />
† 7. Bandeja de hornear/bandeja de<br />
goteo (No. de pieza TO1430S-04)<br />
8. Ranura para rejilla<br />
Nota: † indica piezas desmontables/<br />
reemplazables por el consumidor<br />
PANEL DE CONTROL<br />
<br />
1. Luz indicadora de encendido<br />
2. Selector de temperatura (Toast • Timer)<br />
3. Selector de tostar/reloj automático de<br />
30 minutos con opción de funcionamiento<br />
continuo<br />
Importante:<br />
Al utilizar la función de tostar/<br />
reloj automático (Toast • Timer),<br />
gire siempre el selector pasando<br />
la posición 10, y luego gírelo a<br />
la izquierda o a la derecha hasta<br />
alcanzar el nivel deseado.<br />
<br />
<br />
17
Como usar<br />
Este producto es solamente para uso doméstico.<br />
PRECAUCIÓN<br />
ESTE HORNO SE CALIENTA<br />
CUANDO ESTÁ EN USO. SIEMPRE<br />
USE AGARRADERAS O GUANTES<br />
DE COCINA CUANDO TOQUE TODA<br />
SUPERFICIE INTERNA O EXTERNA<br />
DEL HORNO.<br />
PRIMEROS PASOS<br />
• Retire todo el material de embalaje y las etiquetas.<br />
• Por favor, visite www.prodprotect.com/applica para registrar su garantía.<br />
• Lave todas las piezas removibles siguiendo las instrucciones de la sección Cuidado y<br />
Limpieza.<br />
• Limpie el aparato por fuera con un pano humedo; séquelo bien.<br />
• Seleccione el lugar donde se utilizará este aparato dejando el espacio suficiente en la<br />
parte de atrás, entre el aparato y la pared, para permitir que el calor fluya sin dañar<br />
armarios y paredes.<br />
• Inserte la rejilla deslizante en la posición inferior de la rejilla. Cierre el horno y<br />
asegúrese de que la rejilla se desliza completamente en el horno.<br />
• Desate el cable y desenróllelo.<br />
• Enchufe el aparato a un tomacorriente. La luz indicatora de encendiido azul se<br />
enciende y se mantendrá encendida durante el tiempo de cocción.<br />
Importante: Este horno se calienta. Cuando lo utilice, lleve<br />
siempre utilice guantes de cocina o agarradores cuando<br />
toque cualquier superficie exterior o interior del horno (A).<br />
Nota: Durante los primeros minutos de utilización, puede<br />
notar un poco de humo o un ligero olor. esto es normal, no se<br />
preocupe.<br />
A<br />
CONSEJOS ÚTILES SOBRE SU HORNO<br />
• Cuando el horno esté en funcionamiento, se encenderá la luz indicadora de encendido<br />
azul y permanecerá iluminada hasta que el horno se apague manualmente, o<br />
automáticamente cuando se haya utilizado el reloj automático.<br />
• Cuando seleccione el tiempo de cocción para un determinado producto o receta,<br />
incluya el tiempo de precalentado.<br />
18
• Este horno tiene un reloj atuomático de 30 minutos.<br />
Si está cocinando algo que necesita más tiempo,<br />
le sugerimos que utilice la característica Stay On<br />
(funcionamiento continuo) (B).<br />
• Puede utilizar recipientes de metal, vidrio y cerámica<br />
aptos para horno sin tapa. Si necesita cubrir los<br />
alimentos, utilice papel de aluminio.<br />
• Asegúrese de que la parte superior del recipiente o la<br />
comida que se está cociendo o asando se encuentra<br />
B<br />
al menos a 4 cm (1½”) de distancia de los elementos<br />
calefactores superiores.<br />
• Gire el selector de temperatura a la posición de calor mínimo (Min) y el seclector<br />
de tostar/reloj automáico a loa posicion de apagado (Off) antes de insertar el<br />
enchufe en el tomacorriente y antes de retirarlo.<br />
• No ponga ningún recipiente directamente en el elemento calentador de la parte<br />
inferior.<br />
• Para obtener un óptimo rendimiento de este horno-asador:<br />
o No sobrecargue el horno.<br />
o Para evitar pérdidas de calor, no abra la puerta del horno con excesiva<br />
frecuencia.<br />
o Cuando utilice papel de aluminio para cubrir un alimento, meta los bordes del<br />
papel de aluminio por debajo de los lados del recipiente apto para hornos.<br />
RESUMEN DE LAS FUNCIONES<br />
Importante: Este horno se calienta. Cuando lo utilice, lleve siempre manoplas o use<br />
agarradores cuando toque cualquier superficie exterior o interior del horno.<br />
HORNEAR<br />
Nota: Para obtener los mejores resultados, precaliente el horno de 8 a10 minutos a la<br />
temperatura deseada antes de asar los alimentos.<br />
1. Abra la puerta del horno.<br />
2. Inserte la rejilla deslizante.<br />
3. Ponga el selector de temperatura a la temperatura deseada, entre 65 °C (150 °F)<br />
y 200 °C (400 °F).<br />
4. Gire el selector de toastar/reloj automatico (Toast • Timer) hasta que pase el<br />
10 y a continuación, muévalo hacia atrás o hacia adelante para establecer el<br />
tiempo de cocinar que desee, incluyendo el tiempo de precalentado.<br />
Nota: Seleccione la opción Stay On (funcionamiento continuo) si desea cocinar<br />
durante más de 30 minutos o si prefiere controlar el tiempo usted mismo. Asegúrese<br />
de utilizar un reloj automático de cocina.<br />
Importante: Es necesario que configure el reloj automático o que seleccione la<br />
función Stay On (funcionamiento continuo) para que el horno funcione.<br />
5. La luz indicatora de encendiido azul se enciende y se mantendrá encendida<br />
durante el tiempo de cocción.<br />
6. Los elementos calefectores se encenderan y apagaran para mantener la<br />
distrubición de calor uniforme.<br />
7. Una vez que el horno se ha precalentado, abra la puerta del horno y coloque el<br />
alimento. Cierre la puerta del horno.<br />
ESPAÑOL<br />
19
Nota: Puede cocinar de 3 formas:<br />
• Utilice la bandeja de hornear/bandeja de goteo colocada<br />
encima de la rejilla deslizante (C).<br />
C<br />
D<br />
E<br />
• Coloque la bandeja de hornear/bandeja de goteo debajo de<br />
la rejilla deslizante y ponga el alimento directamente en la<br />
rejilla deslizante (D).<br />
Nota: Asegúrese de que el alimento que vaya a cocinar no<br />
exceda las dimensiones de la bandeja de hornear/bandeja de<br />
goteo, para evitar que la grasa gotee en las resistencias.<br />
• Utilice un plato de metal, cristal o cerámica apto para<br />
horno. en la posición de la ranura superior o inferior.<br />
(Asegúrese de que el plato que utilice para cocinar el<br />
alimento se encuentra a 4 cm (1½”) de los elementos<br />
calefactores de la parte superior) (E).<br />
8. La primera vez que utilice el horno, cocine siguiendo las instrucciones de los<br />
fabricantes o de la receta, y compruebe si los alimentos están listos en el tiempo<br />
mínimo de cocción sugerido.<br />
9. Si utiliza el reloj automático del horno, habrá una señal audible cuando se haya<br />
completado el ciclo de cocinado. El horno se apaga y la luz también.<br />
10. Si no está utilizando el selector de tostar/reloj automático (Toast • Timer) del horno,<br />
apague el horno (Off) una vez que se haya completado el ciclo de cocinado.<br />
11. Abra la puerta del horno. Utilice guantes de cocina o agarradores, deslice la rejilla<br />
hacia el exterior para sacar la comida ya cocinada.<br />
Importante: Este horno se calienta. Cuando lo utiliceutilice guantes de cocina o<br />
agarradores cuando toque cualquier superficie exterior o interior del horno.<br />
12. Desenchufe el aparato cuando no lo esté utilizando.<br />
20
GuÍA De CoCCiÓn<br />
ALIMENTO CANTIDAD TEMP./TIEMPO INSTRUCCIONES<br />
Pechuga de<br />
pollo sin hueso<br />
De 1 a 2<br />
piezas (lo que<br />
quepa en la<br />
bandeja)<br />
Pollo en trozos De 1 a 6<br />
piezas (lo que<br />
quepa en la<br />
bandeja)<br />
Bistec, culetas<br />
de puerco o<br />
tenera y jamón<br />
Filetes de<br />
pescado o<br />
bistecs<br />
De 1 a 2<br />
piezas (lo que<br />
quepa en la<br />
bandeja)<br />
De 1 a 2<br />
piezas (lo que<br />
quepa en la<br />
bandeja)<br />
200 °C (400 °F) de<br />
30 a 40 minutos<br />
190 °C (375 °F) /<br />
de 15 a 25 minutos<br />
190 °C (350 °F) hasta<br />
que esté cocinado a<br />
su gusto<br />
200 °C (400°F)<br />
durante<br />
aproximadamente<br />
12 minutos<br />
Galleticas Hasta 6 Siga la receta o las<br />
instrucciones del<br />
paquete.<br />
Bollos y<br />
panecillos<br />
De 4 a 5<br />
(lo que quepa<br />
en la bandeja)<br />
Papas y boniatos De 1 a 4<br />
(lo que quepa<br />
en la bandeja)<br />
Siga la receta o las<br />
instrucciones del<br />
paquete.<br />
200 °C (400°F)<br />
durante<br />
aproximadamente<br />
50 a 60 minutos.<br />
Considere usar un<br />
reloj automático de<br />
cocina.<br />
El pollo debería tener<br />
una temperatura de<br />
80 °C (180 °F) en un<br />
termómetro para<br />
carnes<br />
El pollo debería tener<br />
una temperatura de<br />
80 °C (180 °F) en un<br />
termómetro para<br />
carnes<br />
Cocine en la bandeja<br />
de horno en una sola<br />
capa en la bandeja de<br />
hornear. Verifiqe que<br />
esté cocinado con<br />
un termómetro para<br />
carnes.<br />
Compruebe si está<br />
hecho; el pescado<br />
se deshace con<br />
facilidad.<br />
Cocine en la bandeja<br />
de horno en una<br />
sola capa hasta que<br />
estén completamente<br />
cocidos hayan<br />
adquirido un tono<br />
ligeramente tostado.<br />
Cocine en la bandeja<br />
de horno en una<br />
sola capa hasta que<br />
estén completamente<br />
cocidos hayan<br />
adquirido un tono<br />
ligeramente tostado.<br />
Pinche con un<br />
tenedor y cocine<br />
hasta que estén<br />
tiernos.<br />
ESPAÑOL<br />
21
ALIMENTO CANTIDAD TEMP./TIEMPO INSTRUCCIONES<br />
Comida rápida<br />
congelada<br />
Una sola capa<br />
en la bandeja<br />
de horno<br />
Siga las instrucciones<br />
del paquete<br />
Déle la vuelta a<br />
mitad del periodo de<br />
cocción; compruebe<br />
su estado en el<br />
tiempo mínimo de<br />
cocción especificado<br />
Pizza congelada<br />
Pizza de<br />
hasta 9<br />
pulgadas<br />
Siga las instrucciones<br />
del paquete<br />
Déle la vuelta a<br />
mitad del periodo de<br />
cocción; compruebe<br />
su estado en el<br />
tiempo mínimo de<br />
cocción especificado<br />
ASAR<br />
1. Coloque el selector de función de cocinado en asar (BroIl).<br />
2. Gire el selector de toastar/reloj automatico (Toast • Timer) hasta que pase el 10 y<br />
a continuación, muévalo hacia atrás o hacia adelante para establecer el tiempo de<br />
cocinar que desee, incluyendo el tiempo de precalentado. Seleccione la opción Stay On<br />
(funcionamiento continuo) si desea cocinar durante más de 30 minutos o si prefiere<br />
controlar el tiempo usted mismo. Asegúrese de utilizar un reloj automático de cocina.<br />
3. Coloque el alimento en la bandeja de hornor/bandeja de goteo o en la rejilla deslizante<br />
insertada en ella.<br />
Importante: Asegúrese de que el alimento que vaya a cocinar no exceda las<br />
dimensiones de la bandeja de hornor/bandeja de goteo, para evitar que la grasa gotee<br />
en las resistencias. Asegúrese de que la parte superior del alimento se encuentra<br />
al menos a 4 cm (1½”) de distancia de las resistencias de la parte superior. Meta<br />
la comida en el horno y cierre la puerta dejándola entreabierta a una distancia de<br />
aproximadamente 20 mm (¾”) de la posición completamente cerrada.<br />
4. Ase los alimentos siguiendo la receta o las instrucciones del paquete, y compruebe su<br />
estado en el tiempo de asar mínimo que se sugiere.<br />
5. Si utiliza el temporizador del horno, éste emitirá una señal audible cuando se haya<br />
completado el ciclo de asar. el horno se apaga y la luz también.<br />
6. Si no está utilizando el temporizador del horno, apague el horno (Off) una vez que se<br />
haya completado el ciclo de asar.<br />
7. Utilizando guantes de cocina o agarradores, baje la puerta del horno hasta que esté<br />
completamente abierta. deslice la rejilla hacia el exterior junto con la bandeja de<br />
horno para sacar la comida ya cocinada.<br />
Importante: Este horno se calienta. Cuando lo utilice, lleve siempre manoplas o use<br />
agarradores cuando toque cualquier superficie exterior o interior del horno.<br />
8. Desenchufe el aparato cuando no lo esté utilizando.<br />
CONSEJOS ÚTILES PARA ASAR<br />
• Precaliente el horno durante 8 a 10 minutos para obtener mejores resultados.<br />
• Si coloca los alimentos en la rejilla, los alimentos gotearán en la bandeja de hornear/<br />
bandeja de goteo, lo que ayuda a evitar el humo procedente del asador.<br />
• Para obtener los mejores resultados, descongele la carne, el pollo y el pescado<br />
congelados antes de cocinarlos en el asador.<br />
22
• Elimine el exceso de grasa de la carne y haga unos cortes en los bordes para evitar<br />
que se enrosque.<br />
• Rocíe con aceite y condimentos los alimentos que va a cocinar a su gusto antes de<br />
introducirlos en el horno.<br />
• Los filetes de pescado y los bistecs son delicados, y deberían cocinarse utilizando<br />
la función de asar en la bandeja de hornear/bandeja de goteo.<br />
• No hay necesidad de dar la vuelta a los filetes de pescado mientras los cocina al<br />
asador. Dé la vuelta con cuidado a filetes más gordos a mitad del ciclo de asar.<br />
• Lave la bandeja de hornor/bandeja de goteo y limpie el interior del horno después<br />
de cada utilización con un producto no abrasivo y con agua caliente con jabón. la<br />
acumulación de un exceso de grasa puede causar humo.<br />
TOSTAR<br />
Nota: No es necesario precalentar el horno para tostar.<br />
1. Gire el selector de temperatura a la posición de tostar (Toast).<br />
2. Abra la puerta del horno y coloque las piezas de pan o bagel que desee tostar<br />
directamente en la rejilla deslizante y cierre la puerta.<br />
3. Seleccione la opción de tostado (Toast) en el selector de temperatura.<br />
4. Lleve el selector de tostar / reloj automático (Toast • Timer) pasado la posición 10 y<br />
a continuación, colóquelo en el grado de tostado deseado.<br />
Nota: Es necesario que configure el selector de grado de<br />
tostado según sus preferencias para que el horno empiece<br />
a tostar (F).<br />
5. Se enciende la luz indicadora de encendido y permanece<br />
encendida hasta que el ciclo de tostado se completa.<br />
6. Cuando se completa el ciclo de tostado, el aparato<br />
emitirá un sonid. El horno y la luz indicadora se<br />
apagarán.<br />
7. Abra la puerta del horno. Utilizando guantes de cocina o<br />
F<br />
agarradores, saque la rejilla para sacar las tostadas.<br />
ESPAÑOL<br />
Importante: Este horno se calienta. Cuando lo utilice, siempre use guantes de cocina<br />
o agarradores cuando toque cualquier superficie exterior o interior del horno.<br />
8. Desenchufe el aparato cuando no lo esté utilizando.<br />
CONSEJOS DE TOSTADO<br />
• Si desea detener el proceso de tostado, debe poner el selector de tostado en<br />
posición de apagado (Off).<br />
• Para obtener los mejores resultados, si repite el ciclo de tostado inmediatamente<br />
después de terminar el primer ciclo, se recomienda seleccionar un nivel de tostado<br />
más claro.<br />
MANTENER CALIENTE<br />
1. Posicione el selector de temperatura entre 65 °C (150 °F) y 95 °C (200 °F).<br />
2. Gire el selector de toastar/reloj automatico (Toast • Timer) hasta que pase el 10 y<br />
a continuación, muévalo hacia atrás o hacia adelante para establecer el tiempo de<br />
calentar que desee, incluyendo el tiempo de precalentado. (Seleccione la opción<br />
Stay On (funcionamiento continuo) si desea controlar el tiempo usted mismo.<br />
Asegúrese de utilizar un reloj automático de cocina.)<br />
Nota: Esta característica está diseñada para mantener la temperatura de comidas ya<br />
cocinadas. Debería utilizar esta función durante periodos cortos de tiempo; para evitar<br />
que la comida se seque, cúbrela con papel de aluminio.<br />
23
3. Cuando se haya completado el ciclo, el aparato emitirá una señal audible. El horno y el<br />
indicador se encendido se apagarán.<br />
4. Si no está utilizando el temporizador del horno, apague el horno (Off) una vez que se<br />
haya completado.<br />
5. Desenchufe el aparato cuando no lo esté utilizando.<br />
Cuidado y limpieza<br />
Este producto contiene piezas que no pueden ser reemplazadas o mantenidas por el<br />
usuario.<br />
Póngase en contacto con personal cualificado del servicio cuando sea necesario.<br />
LIMPIEZA DEL HORNO<br />
Importante: Antes de proceder a la limpieza de cualquiera de los componentes<br />
asegúrese de que el horno está apagado, desenchufado y frío. Seque siempre<br />
completamente las distintas partes después de llevar a cabo la limpieza y antes de<br />
volver a poner en marcha el horno.<br />
1. Limpie la puerta de cristal con una esponja, con un paño suave o con un estropajo de<br />
nailon y agua con jabón. No utilice limpiadores de cristales en pulverizador.<br />
2. Para sacar la rejilla deslizante, abra la puerta y tire de la rejilla hacia adelante y hacia<br />
afuera. Lave la rejilla en agua con jabón. Para limpiar manchas persistentes, utilice un<br />
estropajo de poliéster o nailon.<br />
3. Lave la bandeja de horno con agua con jabón. Para minimizar la posibilidad de que se<br />
raye, utilice un estropajo de poliéster o nailon.<br />
BANDEJA PARA MIGAS<br />
1. Sujete la perilla de la bandeja y hálela hacia abajo.<br />
2. Tire las migas y limpie la bandeja con un paño húmedo, o lávela en agua con jabón.<br />
3. Asegúrese de secarla completamente antes de encajarla de nuevo en su lugar.<br />
SUPERFICIES EXTERIORES<br />
Importante: La superficie superior del horno se calienta. Asegúrese de que el horno se<br />
ha enfriado completamente antes de limpiarlo.<br />
Limpie la parte superior y los laterales con un paño húmedo o con una esponja. Séquelas<br />
completamente.<br />
CONSEJOS ADICIONALES PARA LIMPIAR EL INTERIOR DE SU HORNO<br />
• Caliente el horno a 95 °C (200 °F); desactive la función de tostador. Coloque un<br />
recipientel de cristal poco profundo con media taza de amoníaco en la rejilla. Cierre<br />
la puerta del horno y déjelo una noche. Al día siguiente, abra el horno, saque el bol y<br />
limpie el interior del horno con papel de cocina humedecido.<br />
• Para refrescar el aire dentro del horno, ponga tiras de cáscara de naranja o de limón<br />
en la rejilla. Caliente el tostador del horno a 175 °C (350 °F) y déjelo 30 minutos.<br />
Apague el horno y déjelo hasta que se enfríe por completo. Saque las cáscaras.<br />
Nota: Le recomendamos encarecidamente que lave la bandeja de hornor/bandeja de<br />
goteo a mano con agua templada con jabón, en lugar de lavarlas en la máquina de<br />
lavaplatos. Si utiliza la máquina de lavaplatos en la limpieza de estas piezas puede hacer<br />
que pierdan color, aunque esto no afectará su funcionalidad.<br />
24
DeteCCiÓn De FALLAS<br />
proBLeMA poSiBLe CAuSA SoLuCiÓn<br />
El aparato no calienta o<br />
deja de calentar.<br />
La segunda tanda de<br />
tostado resulta muy<br />
oscura.<br />
El tomacorriente no<br />
funciona o el horno<br />
está desconectado.<br />
El control del grado de<br />
tostado está a un nivel<br />
demasiado alto.<br />
Verifique que el tomacorriente<br />
esté funcionando. Tanto el<br />
control de temperatura como<br />
el cronómetro deben ser<br />
ajustados para que el horno<br />
funcione.<br />
Si repite varias tandas, escoja<br />
un grado de tostado más bajo<br />
que el anterior.<br />
ESPAÑOL<br />
Se forma humedad por<br />
dentro en la puerta de<br />
vidrio durante el ciclo de<br />
tostado.<br />
La cantidad de<br />
humedad varía entre<br />
un producto y otro<br />
según los productos;<br />
pan, bagels, pasteles<br />
etc.<br />
La humedad que se forma<br />
por dentro en la puerta del<br />
horno es bastante común y<br />
generalmente desaparece<br />
durante el ciclo de tostado.<br />
Como la puerta permanece<br />
cerrada, la humedad no se<br />
puede evaporar como en un<br />
tostador normal.<br />
Los alimentos se sobre<br />
cocinan o no se cocinan<br />
bien.<br />
La temperatura y el<br />
tiempo de cocción<br />
pueden requerir<br />
reajuste.<br />
Como un horno tostador es<br />
mucho más pequeño que un<br />
horno regular, puede que se<br />
caliente y cocine más rápido.<br />
Ensaye, reduciendo 25 grados<br />
de la temperature indicada en<br />
la receta o en el paquete.<br />
El aparato despide olor<br />
a comida quemada o<br />
humea cuando está en<br />
funcionamiento.<br />
Hay residuos de<br />
comida en la bandeja<br />
de recolección o en las<br />
paredes del horno.<br />
Consulte las instrucciones<br />
en la sección de Cuidado y<br />
Limpieza de este manual.<br />
Asegúrese de que todas las<br />
partes del horno, bandeja<br />
de hornear y parrilla estén<br />
limpias.<br />
Asegúrese que el aparato<br />
esté ajustado a la function<br />
correcta. Para el caso, cuando<br />
uno asa los alimentos,<br />
solamente se enciende el<br />
elemento calefactor superior.<br />
Los elementos<br />
calefactores parecen no<br />
estar encendidos.<br />
Los elementos<br />
calefactores funcionan<br />
intermitentemente<br />
durante el ciclo de<br />
cocción.<br />
25
RECETAS<br />
HALIBUT CON LIMÓN Y ALBAHACA<br />
1½ tazas tomates cereza, cortados por mitad<br />
3 cdas. perejil Italiano, picado<br />
1 cda. albahaca fresca, cortada en tiras<br />
1 cda. hojas de cebollinas, cortadas<br />
1 cda. cáscara de limón, cortada en tiras<br />
½ cdta. sal kosher<br />
2 cda. jugo fresco de limón<br />
1 cda. aceite de oliva<br />
2 filetes habibut (aprox. 6 oz. cada uno)<br />
¼ cdta. pimiento con ajo<br />
Precaliente el horno para mostrador a 200 °C (400 °F). Combine en un tazón mediano los<br />
tomates, perejil, albahaca, cebollinas, cáscara de limón, ¼ cdta. de la sal, jugo de limón y<br />
ace ite de oliva; mezcle bien.<br />
Vierta en un molde superficial de hornear. Ponga el pescado encima y sazone con el<br />
¼ cdta. de sal restante y la pimienta con ajo.<br />
Cocine por 20 minutos o hasta que el pescado se separe fácilmente al probarlo con un<br />
tenedor. (El pescado debe tener una temperatura interna de 63 °C (145 °F.)<br />
Rinde 2 porciones.<br />
SENCILLOS ROLLITOS DE PASAS Y CANELA<br />
1 cda. de azúcar<br />
¼ cda. de canela molida<br />
Una pizca generosa de nuez moscada molida<br />
1 paquete; (4 onzas) de masa refrigerada<br />
1 cda. de margarina o mantequilla fundida<br />
2 cda. de nueces troceadas<br />
2 cda. de pasas<br />
Azúcar glas<br />
En un bol pequeño, mezcle el azúcar, la canela y la nuez moscada hasta conseguir una<br />
mezcla uniforme.<br />
Desenrosque la masa y córtela en 4 triángulos. Unte la superficie de cada triángulo con<br />
mantequilla fundida. Espolvoree uniformemente con la mezcla de azúcar. Ponga encima<br />
las nueces y las pastas. Enrolle la masa sin apretarla. Colóquelos en una bandeja de<br />
horno/bandeja de goteo.<br />
Cocine (Bake) durante 10 minutos o hasta que los rollitos estén dorados en la parte<br />
superior y hechos en el interior.<br />
Dejar enfriar en la bandeja sobre la rejilla durante 10 minutos. espolvoree con azúcar<br />
glas.<br />
Delicioso como capricho a media mañana o como una sorpresa para los que vuelven<br />
del colegio.<br />
Rinde 8 porciones.<br />
26
¿NECESITA AYUDA<br />
Para servicio, reparaciones o preguntas relacionadas al producto, por favor llame<br />
al número del centro de servicio que se indica para el país donde usted compró su<br />
producto. NO devuélva el producto al fabricante. Llame o lleve el producto a un centro<br />
de servicio autorizado.<br />
DOS AÑOS DE GARANTÍA LIMITADA<br />
(No aplica en México, Estados Unidos o Canadá)<br />
¿Qué cubre la garantía<br />
• La garantía cubre cualquier defecto de materiales o de mano de obra que no haya<br />
sido generado por el uso incorrecto del producto.<br />
¿Por cuánto tiempo es válida la garantía<br />
• Por dos años a partir de la fecha original de compra mientras que tenga una prueba<br />
de la compra.<br />
¿Cómo se obtiene el servicio necesario<br />
• Conserve el recibo original como comprobante de la fecha de compra, comuníquese<br />
con el centro de servicio de su país y haga efectiva su garantía si cumple lo indicado<br />
en el manual de instrucciones.<br />
¿Cómo se puede obtener servicio<br />
• Conserve el recibo original de compra.<br />
• Por favor llame al número del centro de servicio autorizado.<br />
¿Qué aspectos no cubre esta garantía<br />
• Los productos que han sido utilizados en condiciones distintas a las normales.<br />
• Los daños ocasionados por el mal uso, el abuso o negligencia.<br />
• Los productos que han sido alterados de alguna manera.<br />
• Los daños ocasionados por el uso comercial del producto.<br />
• Los productos utilizados o reparados fuera del país original de compra.<br />
• Las piezas de vidrio y demás accesorios empacados con el aparato.<br />
• Los gastos de tramitación y embarque asociados al reemplazo del producto.<br />
• Los daños y perjuicios indirectos o incidentales.<br />
¿Qué relación tiene la ley estatal con esta garantía<br />
• Esta garantía le otorga derechos legales específicos y el consumidor podría tener<br />
otros derechos que varían de una región a otra.<br />
ESPAÑOL<br />
27
Póliza de Garantía<br />
(Válida sólo para México)<br />
Duración<br />
Applica Manufacturing, S. de R. L. de C.V. garantiza este producto por 2 años a partir de la<br />
fecha original de compra.<br />
¿Qué cubre esta garantía<br />
Esta Garantía cubre cualquier defecto que presenten las piezas, componentes y la mano<br />
de obra contenidas en este producto.<br />
Requisitos para hacer válida la garantía<br />
Para reclamar su Garantía deberá presentar al Centro de Servicio Autorizado la póliza<br />
sellada por el establecimiento en donde adquirió el producto. Si no la tiene, podrá<br />
presentar el comprobante de compra original.<br />
¿Donde hago válida la garantía<br />
Llame sin costo al teléfono 01 800 714 2503, para ubicar el Centro de Servicio Autorizado<br />
más cercano a su domicilio en donde usted podrá encontrar partes, componentes,<br />
consumibles y accesorios.<br />
Procedimiento para hacer válida la garantía<br />
Acuda al Centro de Servicio Autorizado con el producto con la póliza de Garantía sellada<br />
o el comprobante de compra original, ahí se reemplazará cualquier pieza o componente<br />
defectuoso sin cargo alguno para el usuario final. Esta Garantía incluye los gastos de<br />
transportación que se deriven de su cumplimiento.<br />
Excepciones<br />
Esta Garantía no será válida cuando el producto:<br />
A) Se hubiese utilizado en condiciones distintas a las normales.<br />
B) No hubiese sido operado de acuerdo con el instructivo de uso que le acompaña.<br />
C) Cuando el producto hubiese sido alterado o reparado por personas no autorizadas por<br />
Applica Manufacturing, S. de R. L. de C.V.<br />
Nota: Usted podra encontrar partes, componentes, consumibles y accesorios en los<br />
centros de servicios autorizados. Esta garantía incluyen los gastos de transportación que<br />
se deriven de sus cumplimiento dentro de sus red de servicio.<br />
28
Por favor llame al número correspondiente que aparece en la lista a continuación<br />
para solicitar que se haga efectiva la garantía y donde Ud. puede solicitar servicio,<br />
reparaciones o partes en el país donde el producto fué comprado. También puede<br />
consultarnos en el e-mail servicio@applicamail com.mx<br />
Argentina<br />
SERVICIO TECNICO CENTRAL<br />
ATTENDANCE<br />
Avda. Monroe N° 3351<br />
Buenos Aires – Argentina<br />
Fonos: 0810 – 999 - 8999<br />
011 - 4545 - 4700<br />
011 – 4545 – 5574<br />
supervision@attendance.com.ar<br />
Chile<br />
MASTER SERVICE SERVICENTER<br />
Nueva Los Leones N° 0252<br />
Providencia<br />
Santiago – Chile<br />
Fono Servicio: (562) – 232 77 22<br />
servicente@servicenter.cl<br />
Colombia<br />
PLINARES<br />
Avenida Quito # 88A-09<br />
Bogotá, Colombia<br />
Tel. sin costo 01 800<br />
7001870<br />
Costa Rica<br />
Aplicaciones Electromecanicas, S.A.<br />
Calle 26 Bis y Ave. 3<br />
San Jose, Costa Rica<br />
Tel.: (506) 257-5716 / 223-0136<br />
Ecuador<br />
Servicio Master de Ecuador<br />
Av. 6 de Diciembre 9276 y los Alamos<br />
Tel. (593) 2281-3882<br />
El Salvador<br />
Calle San Antonio Abad 2936<br />
San Salvador, El Salvador<br />
Tel. (503) 2284-8374<br />
Guatemala<br />
MacPartes SA<br />
3ª Calle 414 Zona 9<br />
Frente a Tecun<br />
Tel. (502) 2331-5020 / 2332-2101<br />
Honduras<br />
ServiTotal<br />
Contigua a Telecentro<br />
Tegucigalpa, Honduras,<br />
Tel. (504) 235-6271<br />
México<br />
Articulo 123 # 95 Local 109 y 112<br />
Col. Centro, Cuauhtemoc,<br />
México, D.F.<br />
Tel. 01 800 714 2503<br />
Nicaragua<br />
ServiTotal<br />
De semáforo de portezuelo<br />
500 metros al sur.<br />
Managua, Nicaragua,<br />
Tel. (505) 248-7001<br />
Panamá<br />
Servicios Técnicos CAPRI<br />
Tumbamuerto Boulevard<br />
El Dorado Panamá<br />
500 metros al sur.<br />
Tel. 3020-480-800 sin costo<br />
(507) 2360-236 / 159<br />
Perú<br />
Servicio Central Fast Service<br />
Av. Angamos Este 2431<br />
San Borja, Lima Perú<br />
Tel. (511) 2251 388<br />
Puerto Rico<br />
Buckeye Service<br />
Jesús P. Piñero #1013<br />
Puerto Nuevo, SJ PR 00920<br />
Tel.: (787) 782-6175<br />
Republica Dominicana<br />
Plaza Lama, S.A.<br />
Av, Duarte #94<br />
Santo Domingo,<br />
República Dominicana<br />
Tel.: (809) 687-9171<br />
Venezuela<br />
Inversiones BDR CA<br />
Av. Casanova C.C.<br />
City Market Nivel Plaza Local 153<br />
Diagonal Hotel Melia,<br />
Caracas.<br />
Tel. (582) 324-0969<br />
www.applicaservice.com<br />
servicio@applicamail.com<br />
ESPAÑOL<br />
29
Sello del Distribuidor:<br />
Fecha de compra:<br />
Modelo:<br />
Comercializado por:<br />
Applica Manufacturing, S. de R. L. de C.V.<br />
Presidente Mazarik No. 111, 1er Piso<br />
Col. Chapultepec Morales, Mexico D.F<br />
Deleg. Miguel Hidalgo<br />
CP 11570<br />
MEXICO<br />
Servicio y Reparación<br />
Art. 123 No. 95<br />
Col. Centro, C.P. 06050<br />
Deleg. Cuauhtemoc<br />
Servicio al Consumidor,<br />
Venta de Refacciones y Accesorios<br />
01 800 714 2503<br />
Código de fecha / Date Code<br />
1 000 W 120 V<br />
60 Hz<br />
CAT. NO. EHB500<br />
TYPE 1 160 W 120 V<br />
AC ONLY 60Hz<br />
30
ESPAÑOL<br />
es una marca registrada de The Black & Decker Corporation,<br />
Towson, Maryland, E.U.<br />
Fabricado en la República Popular de China<br />
Impreso en la República Popular de China<br />
Importado por / Imported by:<br />
Applica Americas, Inc.<br />
Av. Juan B Justo 637 Piso 10<br />
(C1425FSA) Ciudad Autonoma de Buenos Aires<br />
Argentina<br />
C.U.I.T No. 30-69729892-0<br />
Importado por / Imported by:<br />
APPLICA MANUFACTURING, S. DE R. L. DE C. V.<br />
Presidente Mazarik No. 111, 1er Piso<br />
Col. Chapultepec Morales, Mexico D.F<br />
Deleg. Miguel Hidalgo<br />
CP 11570<br />
MEXICO<br />
Teléfono: (55) 5263-9900<br />
Del interior marque sin costo<br />
01 (800) 714 2503<br />
31
© 2012 Applica Consumer Products, Inc.<br />
2010-8-22_116 E/S


