GETTING STARTED PRODUCT CARE & MAINTENANCE ... - Kangoo
GETTING STARTED PRODUCT CARE & MAINTENANCE ... - Kangoo
GETTING STARTED PRODUCT CARE & MAINTENANCE ... - Kangoo

Create successful ePaper yourself
Turn your PDF publications into a flip-book with our unique Google optimized e-Paper software.
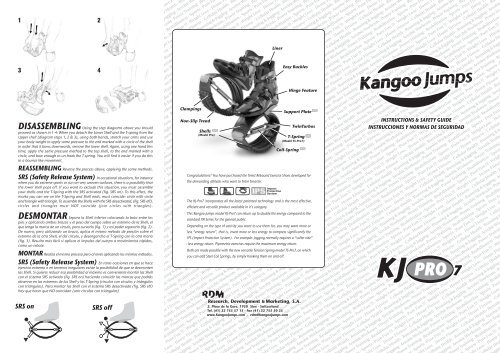
1 2<br />
Liner<br />
3<br />
4<br />
Easy Buckles<br />
Hinge Feature<br />
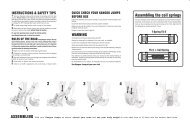
DISASSEMBLING Using the step diagrams above you should<br />
proceed as shown in 1-4: When you detach the Lower Shell and the T-spring from the<br />
Upper shell (diagram steps 1, 2 & 3), using both hands, stretch your arms and use<br />
your body weight to apply some pressure to the end marked with a circle of the shell<br />
in order that it bows downwards, remove the lower shell. Again, using one hand this<br />
time, apply the same pressure method to the top shell, to the end marked with a<br />
circle, and bow enough to un-hook the T-spring. You will find it easier if you do this<br />
in a bounce like movement.<br />
REASSEMBLING Reverse the process above, applying the same methods.<br />
SRS (Safety Release System) In occasional situations, for instance<br />
when you do extreme sports or run on very uneven surfaces, there is a possibility that<br />
the lower shell pops off. If you want to exclude this situation, you must assemble<br />
your shells and the T-Spring with the SRS activated (fig. SRS on). To this effect, the<br />
marks you can see on the T-Spring and Shell ends, must coincide: circle with circle<br />
and triangle with triangle. To assemble the Shells with the SRS desactivated, (fig. SRS off),<br />
circles and triangles must NOT coincide (join circles with triangles).<br />
DESMONTAR Separa la Shell inferior colocando la bota entre los<br />
pies y aplicando ambos brazos y el peso del cuerpo sobre un extremo de la Shell, el<br />
que tenga la marca de un círculo, para curvarlo (fig. 1) y así poder separarlo (fig. 2).<br />
De nuevo, pero utilizando un brazo, aplica el mismo método de presión sobre el<br />
extremo de la otra Shell, el del círculo, y desengancha el T-Spring con la otra mano<br />
(fig. 3). Resulta más fácil si aplicas el impulso del cuerpo a movimientos rápidos,<br />
como un rebote.<br />
MONTAR Realiza el mismo proceso pero al revés aplicando los mismos métodos.<br />
SRS (Safety Release System) En raras ocasiones en que se hace<br />
ejercicio extremo o en terrenos irregulares existe la posibilidad de que se desmonten<br />
las Shell. Si quieres reducir esa posibilidad al máximo es conveniente montar las Shell<br />
con el sistema SRS activado (fig. SRS on) haciendo coincidir las marcas que podrás<br />
observar en los extremos de las Shell y los T-Spring (círculos con círculos y triángulos<br />
con triángulos). Para montar las Shell con el sistema SRS desactivado (fig. SRS off)<br />
hay que hacer que NO coincidan (unir círculos con triángulos)<br />
Clampings<br />
Non-Slip Tread<br />
Shells<br />
(Model Pro)<br />
Support Plate<br />
T-Spring<br />
(Model TS-Pro7)<br />
Coil-Spring<br />
TwinTurbos<br />
Congratulations! You have purchased the finest Rebound Exercise Shoes developed for<br />
the demanding athletes who want to Train Smarter.<br />
The KJ-Pro7 incorporates all the latest patented technology and is the most effective,<br />
efficient and versatile product available in it’s category.<br />
This <strong>Kangoo</strong> Jumps model KJ-Pro7 can return up to double the energy compared to the<br />
standard XR Series for the general public.<br />
Depending on the type of activity you want to use them for, you may want more or<br />
less “energy return”, that is, invest more or less energy to compress significantly the<br />
IPS (Impact Protection System). For example: jogging normally requires a “softer ride”<br />
- less energy return. Plyometric exercises require the maximum energy return.<br />
Both are made possible with the new versatile Tension Spring model TS-Pro7, on which<br />
you can add Steel Coil Springs, by simply hooking them on and off.<br />
INSTRUCTIONS & SAFETY GUIDE<br />
INSTRUCCIONES Y NORMAS DE SEGURIDAD<br />
SRS on<br />
SRS off