

Dichiarazione di Conformità
Dichiarazione di Conformità
Dichiarazione di Conformità

Create successful ePaper yourself
Turn your PDF publications into a flip-book with our unique Google optimized e-Paper software.
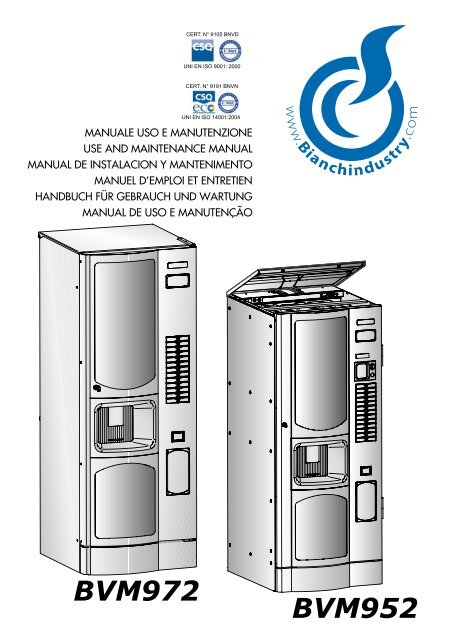
MANUALE USO E MANUTENZIONE<br />
USE AND MAINTENANCE MANUAL<br />
MANUAL DE INSTALACION Y MANTENIMENTO<br />
MANUEL D’EMPLOI ET ENTRETIEN<br />
HANDBUCH FÜR GEBRAUCH UND WARTUNG<br />
MANUAL DE USO E MANUTENÇÃO<br />
BVM972<br />
CERT. N° 9105 BNVD<br />
UNI EN ISO 9001: 2000<br />
CERT. N° 9191 BNVN<br />
UNI EN ISO 14001:2004<br />
BVM952
Il manuale uso e manutenzione più dettagliato lo si potrà scaricare dal portale della Bianchi<br />
Ven<strong>di</strong>ng con USER bianchiven<strong>di</strong>ngmanuals e PASSWORD manuals all’in<strong>di</strong>rizzo<br />
www.bianchindustry.com nell’area riservata sotto portale tecnico.<br />
I moduli PRIMA INSTALLAZIONE E RICAMBI IN GARANZIA invece si possono trovare al SITO<br />
http://www.bianchindustry.com/ sotto la voce PRODOTTI / GARANZIA.<br />
ENGLISH<br />
A more detailed Use and Maintenance Manual can be downloaded from the official Bianchi<br />
Ven<strong>di</strong>ng website’s Technical Portal. To do so, access www.bianchindustry.com, select TECH-<br />
NICAL PORTAL in the drop-down menu under the horizontal bar’s RESERVED selection tab.<br />
Enter bianchiven<strong>di</strong>ngmanuals in the USER tab and manuals under the PASSWORD tab.<br />
The FIRST INSTALLATION FORM – WARRANTY ACTIVATION is instead available for <strong>di</strong>rect<br />
download in the official http://www.bianchindustry.com/ website. To do so, select WAR-<br />
RANTY in the drop-down menu under the horizontal bar’s PRODUCTS selection tab.<br />
ESPAÑOL<br />
El manual de uso y mantenimiento más detallado se puede descargar del portal de Bianchi Ven<strong>di</strong>ng<br />
utilizando el NOMBRE DE USUARIO bianchiven<strong>di</strong>ngmanuals y la CONTRASEÑA manuals en<br />
la <strong>di</strong>rección www.bianchindustry.com en el área reservada dentro del portal técnico.<br />
Los formularios PRIMERA INSTALACIÓN y REPUESTOS EN GARANTIA se encuentran en<br />
cambio en la web http://www.bianchindustry.com/ en la página PRODUCTOS /<br />
GARANTÍA.<br />
FRANÇAIS<br />
Pour télécharger le manuel d’utilisation et d’entretien détaillé, accéder au portail de Bianchi<br />
Ven<strong>di</strong>ng, à l’adresse www.bianchindustry.com, aire réservée du portail technique, avec<br />
le NOM D’UTILISATEUR bianchiven<strong>di</strong>ngmanuals et le MOT DE PASSE manuals.<br />
Les formulaires PREMIÈRE INSTALLATION ET PIÈCES DÉTACHÉES EN GARANTIE se trouvent<br />
en revanche sur le site http://www.bianchindustry.com/ à la rubrique PRODUITS /<br />
GARANTIE.<br />
DEUTSCH<br />
Die detaillierte Gebrauchs- und Wartungsanweisung kann vom Portal der Fa. Bianchi Ven<strong>di</strong>ng<br />
über USER bianchiven<strong>di</strong>ngmanuals und PASSWORD manuals unter der Adresse<br />
www.bianchindustry.com im reservierten Bereich, unter technisches Portal, heruntergeladen<br />
werden.<br />
Die Vordrucke ERSTE INSTALLATION und ERSATZTEILE IN GARANTIE finden Sie dagegen in der<br />
WEB-SITE http://www.bianchindustry.com/ im Bereich PRODUKTE/GEWÄHRLEISTUNG.<br />
PORTUGUÊS<br />
O manual de uso e manutenção mais detalhado poderá ser descarregado no portal na Bianchi<br />
Ven<strong>di</strong>ng com USER bianchiven<strong>di</strong>ngmanuals e PASSWORD manuals no endereço<br />
www.bianchindustry.com na área reservada do portal técnico.<br />
Por outro lado os formulários PRIMEIRA INSTALAÇÃO E PEÇAS DE REPOSIÇÃO EM GARAN-<br />
TIA poderão ser encontrados no SÍTIO http://www.bianchindustry.com/ no ponto<br />
PRODUTOS/GARANTIA.
DICHIARAZIONE DI CONFORMITA’<br />
La BIANCHI VENDING GROUP S.p.A.<br />
Corso Africa, 9 - 24040 Zingonia <strong>di</strong> VERDELLINO (BG) Italia<br />
Dichiara sotto la propria responsabilità che la famiglia dei <strong>di</strong>stributori automatici modello:<br />
Marca: BIANCHI VENDING<br />
Fabbricante: BIANCHI VENDING GROUP S.p.A.<br />
Tipo/Modello: BVM 952 – BVM 972<br />
E’ conforme ai Requisiti Essenziali delle Direttive:<br />
1) Bassa Tensione 2006/95/CE (concernente il ravvicinamento delle legislazioni degli Stati membri relative al materiale elettrico destinato ad essere<br />
adoperato entro taluni limiti <strong>di</strong> tensione) -BT-<br />
2) Compatibilità Elettromagnetica 2004/108/CE (E concernente il ravvicinamento delle legislazioni degli Stati membri relative alla compatibilità<br />
elettromagnetica) -EMC-<br />
3) REG. (CE) 1935/2004 riguardante i materiali e gli oggetti destinati a venire a contatto con i prodotti alimentari<br />
REG. (CE) 1895/2005 relativo alla restrizione dell’uso <strong>di</strong> alcuni derivati epossi<strong>di</strong>ci in materiali e oggetti destinati a entrare in contatto<br />
con prodotti alimentari<br />
DIR. 2002/72 CE relativa ai materiali e agli oggetti <strong>di</strong> materia plastica destinati a venire a contatto con i prodotti alimentari.<br />
Le prove / verifiche sono state eseguite in accordo alle vigenti Norme Armonizzate / Europee:<br />
1) BASSA TENSIONE (Sicurezza Elettrica BT):<br />
EN 60335-1:2002 +A1:2004 +A11:2004 +A2:2006 +A12:2006 +A13:2008 (Sicurezza degli apparecchi elettrici d’uso domestico e similare - Norma generale)<br />
EN 60335-2-75:2004+ A1:2005 +A11:2006 + A2:2008 +A12:2010. (Norme particolari per <strong>di</strong>stributori commerciali e apparecchi automatici per la ven<strong>di</strong>ta)<br />
EN ISO 11201:2009 +EN ISO 3744:2009 Misurazione del rumore acustico. Livello Pressione Sonora : LpA < 70 dB(A)<br />
2) COMPATIBILITA’ ELETTROMAGNETICA (EMC):<br />
EN 55014-1:2006 (Limiti e meto<strong>di</strong> <strong>di</strong> misura delle caratteristiche <strong>di</strong> ra<strong>di</strong>o<strong>di</strong>sturbo degli apparecchi elettrodomestici, e similari a motore o termici, degli<br />
utensili e degli apparecchi elettrici similari)<br />
EN 55014-2:1997 +A1:2001 +A2:2008 (Requisiti <strong>di</strong> immunità per apparecchi elettrodomestici, utensili e degli apparecchi elettrici similari)<br />
EN 61000-3-2: 2006 (Limiti per le emissioni <strong>di</strong> corrente armonica)<br />
EN 61000-3-3:1995+ A1:2001 +A2:2005 (Limitazione delle fluttuazioni <strong>di</strong> tensione e dei flicker in sistemi <strong>di</strong> alimentazione in bassa tensione per apparecchiature<br />
con corrente nominale ≤ 16 A)<br />
EN 62233:2008 Meto<strong>di</strong> <strong>di</strong> misurazione dei campi elettromagnetici <strong>di</strong> elettrodomestici e apparecchi simili per quanto riguarda l’esposizione umana.<br />
3) IDONEITA’ DEI MATERIALI IMPIEGATI, AL CONTATTO CON SOSTANZE ALIMENTARI<br />
Prove <strong>di</strong> “Idoneità al contatto con sostanze alimentari” come previsto dalla legislazione italiana D.M. 21-03-1973 e successivi emendamenti ⇒ Decreto 4<br />
Maggio 2006 nr. 227, e dai recepimenti delle Direttive Europee:82/711/CEE, 85/572/CEE, 93/8/CEE, 97/48/CE, 2002/72/CE, 2004/13/CE, 2004/19/CE,<br />
2005/79/CE, Reg. CE n. 1935/04 e Reg. CE n. 1895/2005.<br />
Zingonia <strong>di</strong> Verdellino (BG), GENNAIO 2010<br />
INFORMAZIONE AGLI UTENTI<br />
Ai sensi del Decreto Legislativo 25 settembre 2007, n. 185 e dell’ art. 13 del Decreto Legislativo 25 luglio 2005, n. 151” Attuazione delle Direttive 2002/95/<br />
CE, 2002/96/CE e 2003/108/CE, relative alla riduzione dell’uso <strong>di</strong> sostanze pericolose nelle apparecchiature elettriche ed elettroniche, nonché allo smaltimento<br />
dei rifiuti”.<br />
<strong>Dichiarazione</strong> <strong>di</strong> <strong>Conformità</strong><br />
Il simbolo del cassonetto barrato riportato sull’apparecchiatura in<strong>di</strong>ca che il prodotto alla fine della propria vita utile deve essere raccolto separatamente<br />
dagli altri rifiuti.<br />
L’utente dovrà, pertanto, conferire l’apparecchiatura giunta a fine vita, agli idonei centri <strong>di</strong> raccolta <strong>di</strong>fferenziata dei rifiuti elettronici ed elettrotecnici,<br />
oppure riconsegnarla al riven<strong>di</strong>tore al momento dell’acquisto Direttiva <strong>di</strong> una 2002/95/CE nuova apparecchiatura del Parlamento <strong>di</strong> tipo equivalente. Europeo L’adeguata e raccolta <strong>di</strong>fferenziata per l’avvio<br />
successivo dell’apparecchiatura <strong>di</strong>messa al riciclaggio, al trattamento e allo smaltimento ambientalmente compatibile, contribuisce ad evitare possibili<br />
effetti negativi sull’ambiente e sulla salute e favorisce il riciclo del dei Consiglio materiali <strong>di</strong> del cui è 27 composta Gennaio l’apparecchiatura. 2003 Lo smaltimento abusivo del prodotto da<br />
parte dell’utente, comporta l’applicazione delle sanzioni amministrative <strong>di</strong> cui al D.Lgs. n. 22/1997 (articolo 50 e seguenti del D.Lgs. n. 22/1997).<br />
<strong>Dichiarazione</strong> <strong>di</strong> <strong>Conformità</strong><br />
• Cadmio (Cd)<br />
Direttiva RoHS<br />
Direttiva 2002/95/CE del Parlamento Europeo e<br />
<strong>Dichiarazione</strong> • Cromo esavalente (Cr(VI))<br />
del Consiglio del 27 <strong>di</strong> Gennaio <strong>Conformità</strong><br />
2003<br />
• Bifenile sulla polibromurati restrizione dell’uso (PBB) <strong>di</strong> determinate sostanze pericolose<br />
• Eteri <strong>di</strong> <strong>di</strong>fenili nelle polibromurati:<br />
apparecchiature elettriche ed elettroniche<br />
o PentaBromoDifenilEtere Bianchi Ven<strong>di</strong>ng Group (PBDE) S.p.A. <strong>di</strong>chiara che:<br />
o OttaBromoDifenilEtere Direttiva (OttaBDE) RoHS<br />
dal 1° luglio 2006 qualsiasi prodotto <strong>di</strong> Bianchi Ven<strong>di</strong>ng Group S.p.A. immesso sul mercato in Europa è conforme alla Direttiva RoHS, e quin<strong>di</strong> non<br />
contiene concentrazioni che superino i limiti o DecaBromoDifenilEtere consentiti per le seguenti (DecaBDE)<br />
sostanze:<br />
• Piombo (Pb)<br />
• Pefluorooctano sulfonato (PFSO)<br />
• Mercurio (Hg) Direttiva • PoliCloroNaftalene 2002/95/CE (PCN) del Parlamento Europeo e<br />
• Cadmio (Cd)<br />
• Pefluorooctano sulfonato (PFSO)<br />
• Bis(tribromophenoxy)etano PoliCloroBifenile (PCB)<br />
• Cromo esavalente (Cr(VI)) del Consiglio del • 27 PoliCloroNaftalene Gennaio (PCN) 2003<br />
• Bifenile polibromurati (PBB) • Benzene<br />
• Bis(tribromophenoxy)etano PoliCloroBifenile (PCB)<br />
• Eteri <strong>di</strong> <strong>di</strong>fenili polibromurati:<br />
• Benzene<br />
sulla restrizione dell’uso <strong>di</strong> determinate sostanze pericolose<br />
o PentaBromoDifenilEtere (PBDE)<br />
o OttaBromoDifenilEtere (OttaBDE) nelle apparecchiature elettriche L’Amministratore ed elettroniche<br />
Delegato<br />
o DecaBromoDifenilEtere (DecaBDE)<br />
Zingonia <strong>di</strong> Verdellino (BG), 12 Gennaio 2009<br />
Direttiva RoHS<br />
sulla restrizione dell’uso <strong>di</strong> determinate sostanze pericolose<br />
nelle apparecchiature elettriche ed elettroniche<br />
Bianchi Ven<strong>di</strong>ng Group S.p.A. <strong>di</strong>chiara che:<br />
dal 1° luglio 2006 qualsiasi prodotto <strong>di</strong> Bianchi Ven<strong>di</strong>ng Group S.p.A. immesso sul<br />
mercato in Europa è conforme alla Direttiva RoHS, e quin<strong>di</strong> non contiene<br />
concentrazioni che superino i limiti consentiti per le seguenti sostanze:<br />
• Piombo (Pb)<br />
• Mercurio (Hg)<br />
Bianchi Ven<strong>di</strong>ng Group S.p.A. <strong>di</strong>chiara che:<br />
______________________<br />
dal 1° luglio 2006 Zingonia qualsiasi <strong>di</strong> Verdellino prodotto (BG), 12 <strong>di</strong> Gennaio Bianchi 2009 Ven<strong>di</strong>ng Group S.p.A. immesso sul<br />
mercato in Europa è conforme alla Direttiva RoHS, e quin<strong>di</strong> non contiene
ITALIANO<br />
PRIMA DI UTILIZZARE LA MACCHINA, LEGGERE ATTENTAMENTE QUESTO MANUALE PER UN IMPIEGO CORRETTO IN CONFORMITA’ AI REQUISITI ESSENZIALI DI SICUREZZA.<br />
SIMBOLOGIA DI SICUREZZA<br />
PITTOGRAMMI<br />
ATTENZIONE: Importanti in<strong>di</strong>cazioni<br />
per la sicurezza!<br />
LEGGERE attentamente il manuale<br />
<strong>di</strong> istruzioni prima della messa<br />
in servizio<br />
AVVERTENZE IMPORTANTI<br />
MANUTENTORE<br />
Viene definito manutentore la persona addetta alla ricarica dei contenitori <strong>di</strong> prodotto solubile, zucchero, caffè, palette e bicchieri.<br />
Il manutentore inoltre deve provvedere alla pulizia del <strong>di</strong>stributore (vedere le operazioni in<strong>di</strong>cate al capitolo 6.0). Nel caso <strong>di</strong> guasto, il manutentore<br />
è tenuto a chiamare il tecnico installatore.<br />
TECNICO INSTALLATORE<br />
Viene definito tecnico installatore, la persona addetta all’installazione del <strong>di</strong>stributore automatico, alla messa in funzione ed alla programmazione<br />
delle funzioni. Ogni operazione <strong>di</strong> taratura, è <strong>di</strong> esclusiva competenza dell’installatore che è inoltre depositario della password <strong>di</strong> accesso alla<br />
programmazione.<br />
Chiavi a <strong>di</strong>sposizione del<br />
MANUTENTORE e del<br />
TECNICO INSTALLATORE<br />
N° 1 Chiave<br />
CHIAVI A TUBO<br />
n° 5,5 - n° 7 - n° 8 - n° 10 - n° 20 - n° 22<br />
CHIAVI FISSE (a forchetta)<br />
n° 7 - n° 8 - n° 10 - n° 12 - n° 14<br />
INDICE CAPITOLI<br />
Per ogni intervento <strong>di</strong> manutenzione,<br />
togliere l’alimentazione<br />
elettrica<br />
ATTENZIONE: macchina in tensione<br />
PREMESSA<br />
1.0 CARATTERISTICHE TECNICHE<br />
2.0 DESCRIZIONE DEL FUNZIONAMENTO<br />
3.0 MOVIMENTAZIONE DEL DISTRIBUTORE AUTOMATICO<br />
4.0 INSTALLAZIONE<br />
5.0 ISTRUZIONI SOFTWARE<br />
6.0 MANUTENZIONE E INATTIVITÀ<br />
7.0 SMANTELLAMENTO<br />
8.0 ALLARMI<br />
PREMESSA<br />
Nonostante la piena osservanza del costruttore delle normative <strong>di</strong> sicurezza,<br />
coloro che operano sul <strong>di</strong>stributore automatico devono essere perfettamente<br />
I - Avvertenze per l’operatore<br />
Questo <strong>di</strong>stributore automatico è stato progettato e costruito nel pieno rispetto<br />
delle normative vigenti concernenti la sicurezza e risulta essere sicuro<br />
per le persone che seguano le istruzioni <strong>di</strong> caricamento e pulizia or<strong>di</strong>naria<br />
riportate in questo manuale.<br />
coscienti dei rischi potenziali che tuttavia sussistono intervenendo sulla<br />
macchina.<br />
– Questo manuale è parte integrante del <strong>di</strong>stributore automatico e come<br />
tale deve sempre rimanere all’interno della stessa, per consentire ulteriori<br />
consultazioni da parte dei vari operatori, sino allo smantellamento e/o<br />
rottamazione del <strong>di</strong>stributore automatico.<br />
L’utente non deve per alcun motivo rimuovere le protezioni che richie- – In caso <strong>di</strong> smarrimento o danneggiamento del presente manuale, è possibile<br />
dano un utensile per essere asportate.<br />
riceverne una nuova copia facendone richiesta al costruttore, previo segna-<br />
Alcune operazioni <strong>di</strong> manutenzione (da effettuarsi ad opera solamente <strong>di</strong> lazione dei dati riportati sulla matricola del <strong>di</strong>stributore automatico stesso.<br />
tecnici specializzati ed in<strong>di</strong>cate in questo manuale da un pittogramma appo- – Solo me<strong>di</strong>ante l’utilizzo <strong>di</strong> ricambi originali è garantita l’affidabilità funsito)<br />
richiedono un deliberato aggiramento <strong>di</strong> alcune protezioni <strong>di</strong> sicurezza zionale e l’ottimizzazione delle prestazioni del <strong>di</strong>stributore automatico.<br />
del <strong>di</strong>stributore.<br />
– Mo<strong>di</strong>fiche alla macchina non precedentemente concordate con il la <strong>di</strong>tta<br />
Nel rispetto delle normative <strong>di</strong> sicurezza, alcune operazioni sono <strong>di</strong> esclu- costruttrice ed eseguite dal tecnico installatore e/o gestore, devono consiva<br />
competenza del tecnico installatore e solo su specifica autorizzazione siderarsi a totale responsabilità dello stesso.<br />
anche l’operatore addetto alla manutenzione or<strong>di</strong>naria può avere accesso Sono a carico del tecnico / gestore tutte le operazioni necessarie per<br />
ad operazioni specifiche.<br />
mantenere in efficienza la macchina prima e durante il suo uso.<br />
La conoscenza ed il rispetto assoluto, dal punto <strong>di</strong> vista tecnico delle av- – Qualsiasi manomissione o mo<strong>di</strong>fica della macchina non preventivamente<br />
vertenze <strong>di</strong> sicurezza e degli avvisi <strong>di</strong> pericolo contenuti in questo manuale, autorizzate dal costruttore sollevano, quest’ultimo da danni derivati o<br />
costituiscono il presupposto per l’esecuzione, in con<strong>di</strong>zione <strong>di</strong> minimo rischio, riferibili agli atti suddetti e fanno decadere automaticamente le respon-<br />
dell’installazione, la messa in esercizio, la conduzione e la manutenzione sabilità <strong>di</strong> garanzia della macchina stessa.<br />
della macchina.<br />
– Il presente manuale rispecchia lo stato dell’arte, al momento della immis-<br />
II - Avvertenze generali<br />
sione sul mercato, del <strong>di</strong>stributore automatico; eventuali mo<strong>di</strong>fiche, miglioramenti,<br />
adeguamenti che venissero apportate alle macchine commercia-<br />
Prima <strong>di</strong> utilizzare il <strong>di</strong>stributore automatico, leggere attentalizzate successivamente, non obbligano Bianchi Ven<strong>di</strong>ng Group S.p.A.<br />
mente in tutte le sue parti, il presente manuale.<br />
ne ad intervenire sul <strong>di</strong>stributore automatico fornito precedentemente, né<br />
La conoscenza delle informazioni e delle prescrizioni contenute nel presente<br />
ad aggiornare la relativa documentazione tecnica fornita a corredo.<br />
manuale è essenziale per un corretto uso del <strong>di</strong>stributore automatico, da – E’ comunque facoltà della Bianchi Ven<strong>di</strong>ng Group S.p.A., quando lo<br />
parte dell’utente.<br />
ritenesse opportuno e per qualificati motivi, aggiornare i manuali già<br />
Il tecnico installatore deve essere precedentemente addestrato ed istruito presenti sul mercato, inviando ai propri clienti i fogli <strong>di</strong> aggiornamento<br />
sugli interventi da eseguire sul <strong>di</strong>stributore automatico e limitarli a quanto che devono essere conservanti nel manuale.<br />
<strong>di</strong> sua competenza.<br />
Gli eventuali problemi tecnici che si possono verificare sono facilmente risol-<br />
Il tecnico installatore deve essere a conoscenza dei meccanismi <strong>di</strong> funzionavibili consultando il presente manuale; per ulteriori informazioni, contattare<br />
mento del <strong>di</strong>stributore automatico.<br />
il concessionario presso il quale il <strong>di</strong>stributore automatico è stato acquistato,<br />
– E’ responsabilità dell’acquirente, accertarsi che i tecnici installatori siano oppure contattare il Servizio Tecnico ai seguenti numeri:<br />
addestrati ed a conoscenza <strong>di</strong> tutte le informazioni e prescrizioni in<strong>di</strong>cate<br />
nella documentazione tecnica fornita.<br />
� +039. 035.45.02.111 - fax +039. 035.883.304<br />
4<br />
PE<br />
CACCIAVITI<br />
Taglio piccolo<br />
Taglio me<strong>di</strong>o<br />
Taglio grande<br />
Croce normale<br />
Croce piccolo<br />
Croce me<strong>di</strong>o<br />
Croce grande<br />
In Teflon a taglio piccolo per tarare Trimmer<br />
ATTENZIONE: parti calde a contatto!<br />
ATTENZIONE! Organi in movimento<br />
In<strong>di</strong>cazione <strong>di</strong> messa a terra<br />
Utensili necessari per poter fare interventi nel <strong>di</strong>stributore automatico.<br />
CHIAVE CRICK n° 14<br />
TESTER<br />
FORBICI ELETTRICISTA<br />
KIT DI PROGRAMMAZIONE
In caso <strong>di</strong> chiamata è bene sapere in<strong>di</strong>care:<br />
� i dati riportati sulla matricola (Fig.1)<br />
� versione del programma contenuto nel microprocessore (targhetta adesiva<br />
sul componente montato sulla scheda).<br />
Bianchi Ven<strong>di</strong>ng Group S.p.A. declina ogni responsabilità per danni causati<br />
a persone o cose in conseguenza a:<br />
� installazione non corretta<br />
� alimentazione elettrica e/o idrica non appropriata<br />
� pulizia e manutenzione non adeguate<br />
� mo<strong>di</strong>fiche non autorizzate<br />
� uso improprio del <strong>di</strong>stributore<br />
� ricambi non originali<br />
– In nessun caso Bianchi Ven<strong>di</strong>ng Group S.p.A. è tenuta a risarcire eventuali<br />
danni dovuti ad interruzioni forzate delle erogazioni del <strong>di</strong>stributore<br />
a causa <strong>di</strong> guasti.<br />
– Le operazioni d’installazione e manutenzione, devono essere eseguite esclusivamente<br />
da personale tecnico qualificato e precedentemente addestrato<br />
allo svolgimento <strong>di</strong> queste mansioni.<br />
– Per la ricarica, utilizzare esclusivamente prodotti alimentari specifici per<br />
l’uso in <strong>di</strong>stributori automatici.<br />
– Il <strong>di</strong>stributore automatico non è idoneo per essere installato all’esterno,<br />
deve essere allocato in locali asciutti, con temperature che non scendano<br />
mai sotto 1°C, non può essere installato in locali dove vengano utilizzati<br />
getti <strong>di</strong> acqua per la pulizia (es. gran<strong>di</strong> cucine ....). Non utilizzare il getto<br />
d’acqua <strong>di</strong>rettamente sul <strong>di</strong>stributore.<br />
III - Norme per la sicurezza<br />
Prima <strong>di</strong> utilizzare il <strong>di</strong>stributore automatico, leggere attentamente<br />
in tutte le sue parti, il presente manuale.<br />
– Le operazioni <strong>di</strong> installazione e manutenzione, devono essere eseguite<br />
esclusivamente da personale tecnico qualificato.<br />
– L’utente non deve in alcun modo poter accedere a quelle parti del <strong>di</strong>stributore<br />
automatico le cui protezioni sono bloccate da mezzi che richiedano<br />
un utensile per essere liberati.<br />
– La conoscenza ed il rispetto assoluto, delle avvertenze <strong>di</strong> sicurezza e degli<br />
avvisi <strong>di</strong> pericolo contenuti in questo manuale, costituiscono il presupposto<br />
per l’esecuzione, in con<strong>di</strong>zione <strong>di</strong> minimo rischio, dell’installazione, della<br />
messa in esercizio e della manutenzione della macchina.<br />
Staccare sempre il CAVO DI ALIMENTAZIONE prima <strong>di</strong> interventi<br />
<strong>di</strong> manutenzione o <strong>di</strong> pulizia.<br />
NON INTERVENIRE ASSOLUTAMENTE SULLA MACCHINA E NON<br />
RIMUOVERE ALCUNA PROTEZIONE PRIMA DELL’AVVENUTO RAFFRED-<br />
DAMENTO DELLE PARTI CALDE!<br />
– Solo me<strong>di</strong>ante l’utilizzo <strong>di</strong> ricambi originali è garantita l’affidabilità funzionale<br />
e l’ottimizzazione delle prestazioni del <strong>di</strong>stributore automatico.<br />
– Per garantire il normale esercizio, l’apparecchio deve essere installato in<br />
luoghi in cui la temperatura ambiente sia compresa tra una temperatura<br />
minima <strong>di</strong> +1°C ed una temperatura massima <strong>di</strong> +50°C e l’umi<strong>di</strong>tà relativa<br />
assoluta non superi l’ 85%.<br />
– Per garantire un funzionamento regolare, mantenere sempre il <strong>di</strong>stributore<br />
automatico in perfette con<strong>di</strong>zioni <strong>di</strong> pulizia.<br />
– Nel caso in cui all’atto dell’installazione venissero riscontrate con<strong>di</strong>zioni<br />
d’uso <strong>di</strong>verse da quelle riportate nel presente manuale, o le stesse dovessero<br />
subire variazioni nel tempo, dovrà essere imme<strong>di</strong>atamente contattato<br />
il costruttore prima dell’uso del <strong>di</strong>stributore automatico.<br />
- Verificare inoltre che vengano recepite ed applicate ulteriori ed eventuali<br />
norme stabilite da legislazioni nazionali o locali.<br />
Questo apparecchio non è inteso per uso da parte <strong>di</strong> persone (inclusi bambini)<br />
con ridotte capacità fisiche, sensoriali o mentali, o senza esperienze<br />
e conoscenza, a meno che abbiano ricevuto istruzioni relativamente all’uso<br />
dell’apparecchio e siano controllati da una persona responsabile per la loro<br />
sicurezza. I bambini devono essere controllati in modo <strong>di</strong> assicurare che<br />
non giochino con l’apparecchio.<br />
L’accesso all’area <strong>di</strong> service è permessa solo a personale<br />
dotato <strong>di</strong> specifica conoscenza ed esperienza pratica dell’apparecchi.<br />
1.0 CARATTERISTICHE TECNICHE<br />
BVM972 BVM952<br />
Altezza (A) 1830 mm 1620 mm<br />
Larghezza (B) 666 mm 666 mm<br />
Profon<strong>di</strong>tà (C) 776 mm 776 mm<br />
Peso 140 kg÷190 kg (3) 155 kg<br />
Tensione <strong>di</strong> alimentazione V230 V230<br />
Frequenza <strong>di</strong> alimentazione Hz 50 Hz 50<br />
Potenza installata (1) 1,8 kW ÷ 3,2 kW 1,8 kW ÷ 3,2 kW<br />
Corrente nominale (Max) 8 A - 15 A 8 A - 15 A<br />
Alimentazione rete idrica 0,5 ÷ 6,5 bar 0,5 ÷ 6,5 bar<br />
IDLE STATE MODE<br />
secondo EVA-EMP<br />
CONSUMI MEDI<br />
110-220 Wh/h 110-220 Wh/h<br />
ENERGY CONSUMPTION<br />
PER LITRE secondo EVA-EMP<br />
150-230 Wh/L 150-230 Wh/L<br />
5<br />
ITALIANO<br />
Connessione rete idrica 3/8” gas 3/8” gas<br />
Connessione rete elettrica Spina Schuko Spina Schuko<br />
DISTRIBUTORE BICCHIERI<br />
Diametro bicchieri 70÷74mm 70÷74mm<br />
RESISTENZA CALDAIA<br />
Di tipo corazzato-Caldaia caffè: 1500W 1500W<br />
Di tipo corazzato-Caldaia solubili: 2000W 2000W<br />
CAPACITA’ CONTENITORI<br />
Caffè in grani Kg 3,5 Kg 3,5<br />
Caffè solubile Kg 1,4 Kg 1,2<br />
Latte granulare Kg 2,2 Kg 1,7<br />
Creamer Kg 4,0 Kg 3,2<br />
Cioccolata Kg 4,8 Kg 3,6<br />
Tè al limone Kg 5,2 Kg 3,3<br />
Tè naturale Kg 2,4 Kg 1,7<br />
Brodo Kg 3,8 Kg 3,6<br />
Zucchero Kg 4,0 Kg 4,0<br />
Bicchieri N° 700 500<br />
Palette N° 540 400<br />
Tipo lampada LED LED<br />
Livello <strong>di</strong> pressione sonora ponderato A 58,2 dB ± 2,5 dB<br />
Livello <strong>di</strong> potenza sonora ponderato A 71,0 dB ± 3,0 dB<br />
(1) Verificare la potenza nominale riportata sulla targa dati apposta sul<br />
<strong>di</strong>stributore.<br />
(2) Secondo la versione richiesta e le normative in vigore nel luogo <strong>di</strong> utilizzo.<br />
(3) Secondo la versione.<br />
CONOSCERE IL DISTRIBUTORE<br />
BVM972 (Fig.1.2)<br />
1 Gruppo caffè e macina caffè<br />
2 Gruppo <strong>di</strong>stributori bevande<br />
3 Gruppo erogazione zucchero<br />
4 Sistemi <strong>di</strong> pagamento<br />
5 Colonna bicchieri<br />
6 Scheda CPU<br />
7 Scheda potenza<br />
8 Colonna palette<br />
9 Filtro decalcificatore<br />
10 Secchio fon<strong>di</strong> liqui<strong>di</strong><br />
11 Vano erogazione<br />
12 Tasto servizio<br />
13 Tasto lavaggio<br />
14 Gruppo refrigerante (optional)<br />
1.1 USO PREVISTO<br />
BVM952 (Fig.1.3)<br />
1 Gruppo caffè e macina caffè<br />
2 Gruppo <strong>di</strong>stributori bevande<br />
3 Gruppo erogazione zucchero<br />
4 Sistemi <strong>di</strong> pagamento<br />
5 Colonna bicchieri<br />
6 Scheda CPU<br />
7 Scheda potenza<br />
8 Colonna palette<br />
9 Filtro decalcificatore (optional)<br />
10 Secchio fon<strong>di</strong> liqui<strong>di</strong><br />
11 Vano erogazione<br />
12 Tasto servizio<br />
13 Tasto lavaggio<br />
14 Carter superiore<br />
15 Gruppo refrigerante (optional)<br />
I <strong>di</strong>stributori automatici sono da a<strong>di</strong>birsi esclusivamente all’erogazione <strong>di</strong><br />
bevande, preparate miscelando prodotti alimentari con acqua (per infusione<br />
per quanto concerne caffè espresso).<br />
Per lo scopo utilizzare prodotti alimentari <strong>di</strong>chiarati dal fabbricante idonei alla<br />
<strong>di</strong>stribuzione automatica in contenitori aperti. Le bevande sono erogate in<br />
appositi bicchieri <strong>di</strong> plastica <strong>di</strong>stribuiti automaticamente dalla macchina.<br />
Dove previsto, viene erogata anche la paletta per la miscelazione dello zucchero.<br />
Le erogazioni devono essere consumate imme<strong>di</strong>atamente ed in nessun<br />
caso vanno conservate per un successivo consumo.<br />
CAFFE’ ESPRESSO<br />
Questo processo avviene solo per i modelli dotati <strong>di</strong> gruppo caffè espresso,<br />
dopo che sono già avvenuti i processi <strong>di</strong> erogazione bicchiere e zucchero.<br />
– Il macinino viene attivato fino a raggiungere la dose <strong>di</strong> caffè macinato<br />
fissato dal dosatore (Fig.2.3) .<br />
– Viene attivato l’elettromagnete del dosatore, provocandone l’apertura del<br />
portello e conseguente caduta del caffè nel bicchiere <strong>di</strong> infusione.<br />
– Si attiva il motoriduttore rotazione gruppo per portarlo in posizione <strong>di</strong><br />
erogazione e contemporaneamente comprimere la pastiglia (Fig.2.4 -<br />
Fig.2.5).<br />
– Si attiva la pompa che eroga la quantità <strong>di</strong> acqua programmata, e controllata<br />
da apposito <strong>di</strong>spositivo elettronico (contatore volumetrico), pescando<br />
dalla caldaia caffè (Fig.2.6).<br />
– Viene attivato nuovamente il motoriduttore gruppo caffè per riportarlo in<br />
posizione <strong>di</strong> riposo; durante questo movimento viene anche espulsa la<br />
pastiglia <strong>di</strong> caffè usata.<br />
La sequenza <strong>di</strong> queste operazioni (macinatura e sgancio caffè) può avvenire<br />
in or<strong>di</strong>ne inverso a seconda del tipo <strong>di</strong> programmazione<br />
EROGAZIONE PALETTA<br />
Questo processo viene attivato solo sulle versioni dove è previsto il <strong>di</strong>stributore<br />
palette; è possibile opzionare la paletta su qualsiasi bevanda a seconda<br />
delle esigenze.<br />
– viene attivato il motoriduttore che aziona il <strong>di</strong>spositivo <strong>di</strong> sgancio paletta,<br />
facendola scivolare nel bicchiere (Fig.2.7).
ITALIANO<br />
BEVANDE SOLUBILI<br />
Questo processo viene avviato quando i processi <strong>di</strong> erogazione bicchiere e<br />
zucchero sono già stati completati.<br />
A seconda del tipo <strong>di</strong> bevanda richiesta e del modello <strong>di</strong> <strong>di</strong>stributore, per la<br />
preparazione della bevanda possono attivarsi più processi sottodescritti.<br />
- Viene attivato, se presente, il motofrullatore (Fig.2.8).<br />
- L’elettrovalvola fissata sulla caldaia solubili (Fig.2.9) o sulla caldaia caffè<br />
(2.10) viene attivata per immettere nel frullatore la quantità <strong>di</strong> acqua<br />
programmata.<br />
La caldaia Solubili viene montata sulla versione solubili e sulla versione<br />
Espresso Doppia caldaia.<br />
- Il motoriduttore del prodotto solubile attiva la coclea per riversare la<br />
quantità <strong>di</strong> prodotto programmato nel frullatore (in alcune versioni più<br />
prodotti possono finire nello stesso miscelatore ve<strong>di</strong> il caso <strong>di</strong> latte e<br />
cioccolata) (Fig.2.11).<br />
- Erogata la quantità <strong>di</strong> acqua e <strong>di</strong> polvere preafissata, viene <strong>di</strong>sattivato il<br />
frullatore dopo un tempo T impostato in programmazione.<br />
3.0 MOVIMENTAZIONE DEL DISTRIBUTORE<br />
AUTOMATICO<br />
3.1 Movimentazione e Trasporto (Fig.3.1)<br />
Il trasporto del <strong>di</strong>stributore deve essere effettuato da personale competente.<br />
Il <strong>di</strong>stributore è fornito su pallet; per lo spostamento utilizzare un carrello<br />
elevatore adatto a sostenerne il peso e movimentarlo a velocità ridotta al<br />
fine d’evitare ribaltamenti o pericolosi ondeggiamenti .<br />
Evitare:<br />
– <strong>di</strong> sollevare il <strong>di</strong>stributore con funi o presse<br />
– <strong>di</strong> trascinare il <strong>di</strong>stributore<br />
– <strong>di</strong> rovesciare o coricare il <strong>di</strong>stributore per il trasporto<br />
– <strong>di</strong> dare scossoni al <strong>di</strong>stributore<br />
Evitare che il <strong>di</strong>stributore:<br />
– subisca urti<br />
– sia sovraccaricato da altri colli<br />
– sia esposto alla pioggia, al gelo o fonti <strong>di</strong> calore<br />
– sia giacente in luoghi umi<strong>di</strong><br />
La <strong>di</strong>tta costruttrice non è responsabile per eventuali danni causati dall’inosservanza<br />
parziale o totale delle avvertenze sopra riportate.<br />
3.2 Stoccaggio<br />
Per eventuale stoccaggio, evitare <strong>di</strong> sovrapporre più macchine, mantenerle<br />
in posizione verticale, in ambienti asciutti con temperature non inferiori a<br />
1°C (Fig.3.2).<br />
3.3 Imballaggio<br />
Il <strong>di</strong>stributore è protetto da angolari in polistirolo o cartone e da una pellicola<br />
trasparente in polipropilene (Fig.3.2).<br />
Il <strong>di</strong>stributore automatico verrà consegnato imballato, assicurando allo stesso<br />
tempo una protezione meccanica ed una protezione contro l’aggressione<br />
dell’ambiente esterno.<br />
Sull’imballo sono applicate delle etichette in<strong>di</strong>canti:<br />
� manovrare con cura<br />
� non capovolgere<br />
� proteggere dalla pioggia<br />
� non sovrapporre<br />
� proteggere da fonti <strong>di</strong> calore<br />
� non resistente agli urti<br />
� tipo <strong>di</strong> <strong>di</strong>stributore e numero <strong>di</strong> matricola<br />
3.4 Ricevimento<br />
All’atto del ricevimento del <strong>di</strong>stributore automatico occorre controllare che<br />
lo stesso non abbia subito danni durante il trasporto.<br />
Se si dovessero notare danni <strong>di</strong> qualsiasi natura si faccia imme<strong>di</strong>atamente<br />
reclamo al trasportatore.<br />
Alla fine del trasporto l’imballo deve risultare integro, vale a <strong>di</strong>re non<br />
deve:<br />
– Presentare ammaccature, segni <strong>di</strong> urti, deformazioni o rotture dell’involucro<br />
contenitore.<br />
– Presentare zone bagnate o segni che possano condurre a supporre che<br />
l’involucro sia stato esposto alla pioggia, al gelo o al calore.<br />
– Presentare segni <strong>di</strong> manomissione<br />
3.5 Disimballaggio<br />
– Liberare il <strong>di</strong>stributore dal suo imballo, tagliando il film protettivo in cui<br />
è avvolto, lungo uno degli angolari <strong>di</strong> protezione (Fig.3.3).<br />
– Sganciare il <strong>di</strong>stributore dal pallet per il trasporto, svitando le viti (A) che<br />
bloccano le staffe <strong>di</strong> fissaggio al pallet stesso (Fig.3.4).<br />
– Liberare il pallet ed inserire i 4 pie<strong>di</strong>ni nei fori filettati (Fig. 3.5) lasciati<br />
liberi dalle viti<br />
– Togliere la chiave dal vano erogazione (Fig.3.6).<br />
Aprire la porta del <strong>di</strong>stributore e togliere il nastro adesivo dai componenti<br />
<strong>di</strong> seguito elencati:<br />
� Colonna bicchieri (esempio in Fig.3.7).<br />
� Cassa monete.<br />
� Contenitore dello zucchero.<br />
� Pesetto della colonna palette .<br />
� Copertura vano gettoniere/scheda Master<br />
� Contenitori prodotti.<br />
� Galleggiante pieno fon<strong>di</strong> liqui<strong>di</strong>.<br />
� Fascia battiscopa.<br />
� Secchio fon<strong>di</strong> liqui<strong>di</strong>.<br />
� Togliere i polistiroli che bloccano i contenitori prodotti (Fig.3.8).<br />
I materiali <strong>di</strong> imballaggio non devono essere lasciati alla portata <strong>di</strong> persone<br />
estranee, perchè potenziali fonti <strong>di</strong> inquinamento per l’ambiente.<br />
Per lo smaltimento affidarsi ad aziende autorizzate.<br />
6<br />
4.0 INSTALLAZIONE<br />
4.1 Posizionamento<br />
– Se posizionato vicino ad una parete, lo schienale deve avere una <strong>di</strong>stanza<br />
minima <strong>di</strong> 5 cm dalla stessa (Fig.4.1), per permettere la regolare ventilazione.<br />
In nessun caso coprire il <strong>di</strong>stributore con panni o similari.<br />
– Posizionare il <strong>di</strong>stributore, curandone il livellamento me<strong>di</strong>ante i pie<strong>di</strong>ni<br />
regolabili precedentemente montati sul mobile (Fig.4.2). Assicurarsi che<br />
il <strong>di</strong>stributore non abbia un’inclinazione superiore ai 2°.<br />
ATTENZIONE! Non posizionare l’apparecchio vicino ad oggetti infiammabili,<br />
rispettando una <strong>di</strong>stanza minima <strong>di</strong> sicurezza <strong>di</strong> 30 cm.<br />
La Bianchi Ven<strong>di</strong>ng Group S.p.A. declina ogni responsabilità per inconvenienti<br />
dovuti all’inosservanza delle norme <strong>di</strong> posizionamento.<br />
Se l’installazione avviene in corridoi <strong>di</strong> evacuazione <strong>di</strong> sicurezza assicurarsi<br />
che con il <strong>di</strong>stributore a porta aperta rimanga comunque spazio sufficiente<br />
al passaggio (Fig.4.1).<br />
Per evitare che il pavimento si sporchi, causa cadute accidentali <strong>di</strong> prodotti,<br />
utilizzare, se necessario, sotto il <strong>di</strong>stributore, una protezione sufficientemente<br />
larga a coprire il raggio d’azione del <strong>di</strong>stributore automatico.<br />
4.2 Allacciamento rete idrica<br />
Prima <strong>di</strong> procedere all’allacciamento del <strong>di</strong>stributore alla rete <strong>di</strong> acqua, verificare<br />
che questa sia:<br />
- Potabile (eventualmente attraverso una certificazione <strong>di</strong> un laboratorio <strong>di</strong><br />
analisi).<br />
- Abbia una pressione compresa tra 0,5 e 6.5 bar (in caso contrario utilizzare<br />
una pompa o un riduttore <strong>di</strong> pressione, a seconda del caso).<br />
– Installare, se non fosse presente, un rubinetto in posizione accessibile<br />
per isolare l’apparecchio dalla rete idrica qualora se ne riscontrasse la<br />
necessità (Fig.4.3).<br />
– Prima <strong>di</strong> effettuare il collegamento idrico, far fuoriuscire dell’acqua dal<br />
rubinetto per eliminare eventuali tracce <strong>di</strong> impurità e tracce <strong>di</strong> sporco<br />
(Fig.4.4).<br />
– Collegare il rubinetto al <strong>di</strong>stributore, utilizzando per lo scopo del tubo in<br />
nylon idoneo per alimenti ed adatto a sopportare la pressione <strong>di</strong> rete. Nel<br />
caso si utilizzi del tubo flessibile è necessario montare al suo interno la<br />
bussola <strong>di</strong> rinforzo data in corredo (Fig.4.5).<br />
– L’attacco previsto è un 3/8” gas (Fig.4.6).<br />
4.3 Collegamento rete elettrica<br />
Il <strong>di</strong>stributore è pre<strong>di</strong>sposto per funzionare con tensione monofase 230Volt<br />
ed è protetto con fusibili da 12,5A e 20A. (10A e 20A il modello monocaldaia<br />
e la versione solubile, 15A e 20A la versione solubile freddo).<br />
Si consiglia <strong>di</strong> controllare che:<br />
– La tensione <strong>di</strong> rete <strong>di</strong> 230 V non abbia uno scostamento maggiore del ± 6%.<br />
– La linea <strong>di</strong> alimentazione sia adatta a sopportare il carico del <strong>di</strong>stributore<br />
automatico.<br />
– Utilizzare un sistema <strong>di</strong> protezione <strong>di</strong>fferenziale.<br />
– Posizionare l’apparecchio in modo tale che la spina rimanga accessibile.<br />
L’apparecchio deve essere collegato ad una presa <strong>di</strong> terra in ottemperanza<br />
alle vigenti norme.<br />
Verificare in tal senso il collegamento del filo <strong>di</strong> terra dell’impianto affinchè<br />
sia efficiente e risponda alle normative nazionali ed europee <strong>di</strong> sicurezza<br />
elettrica.<br />
Se necessario richiedere l’intervento <strong>di</strong> personale professionalmente qualificato<br />
per la verifica dell’impianto.<br />
– Il <strong>di</strong>stributore è dotato <strong>di</strong> cavo <strong>di</strong> alimentazione H05VV-F 3x1,5mm², con<br />
spina SCHUKO (Fig.4.7).<br />
– Le prese non compatibili con la spina dell’apparecchio devono essere<br />
sostituite (Fig.4.8).<br />
– E’ vietato l’uso <strong>di</strong> prolunghe, adattatori e/o prese multiple.<br />
– In alcuni modelli sono montate spine specifiche per il luogo <strong>di</strong> destinazione.<br />
La Bianchi Ven<strong>di</strong>ng Group S.p.A. declina ogni responsabilità per danni<br />
causati dall’inosservanza parziale o totale delle suddette avvertenze.<br />
Se il cavo <strong>di</strong> alimentazione dovesse risultare danneggiato, scollegare imme<strong>di</strong>atamente<br />
dall’alimentazione elettrica<br />
La sostituzione dei cavi <strong>di</strong> alimentazione deve essere effettuata<br />
da personale qualificato<br />
4.4 Messa in servizio<br />
Il <strong>di</strong>stributore è dotato <strong>di</strong> interruttore <strong>di</strong> sicurezza (Fig.4.9) che toglie<br />
tensione a tutti gli utilizzatori, ogni qualvolta viene aperta la porta (ve<strong>di</strong><br />
schema elettrico). In caso <strong>di</strong> necessità, quin<strong>di</strong>, aprire la porta o scollegare<br />
la spina dalla presa dell’impianto.<br />
Restano sotto tensione, la morsettiera del cavo <strong>di</strong> alimentazione<br />
(Fig.4.10-pos.1) e la presa <strong>di</strong> servizio all’interno del <strong>di</strong>stributore<br />
automatico (Fig.4.11-pos.2).<br />
– Per alcune operazioni è però necessario operare con porta aperta, ma<br />
<strong>di</strong>stributore attivo.<br />
E’ possibile, per il tecnico installatore, operare in questo modo, azionando<br />
l’interruttore posto all’interno del <strong>di</strong>stributore come in<strong>di</strong>cato in figura<br />
4.12.<br />
L’apertura e l’eventuale attivazione a porta aperta del <strong>di</strong>stributore, devono<br />
essere affidate esclusivamente a personale autorizzato all’esecuzione<br />
<strong>di</strong> queste operazioni. Non lasciare incusto<strong>di</strong>to il <strong>di</strong>stributore aperto.<br />
Ad ogni accensione del <strong>di</strong>stributore avviene un ciclo <strong>di</strong> <strong>di</strong>agnosi per verificare<br />
lo stato delle periferiche del DA ed effettuare il ripristino delle parti in<br />
movimento.
4.5 Installazione<br />
4.5.1 Lavaggio resine decalcificatore dove installato come accessorio<br />
Prima <strong>di</strong> riempire il circuito idraulico del <strong>di</strong>stributore, è consigliabile effettuare<br />
il lavaggio delle resine del decalcificatore (nei modelli che ne sono provvisti)<br />
operando come segue:<br />
– Inserire il tubo del rubinetto inferiore in un recipiente adatto all’uso.<br />
– Aprire il rubinetto (Fig.4.13).<br />
– Disattivare la tensione premendo l’interruttore all’interno del <strong>di</strong>stributore<br />
(Fig.4.12).<br />
– Lasciare fuoriuscire dell’acqua fino a che questa non si presenti limpida<br />
(Fig.4.14).<br />
– Ripristinare la tensione premendo l’interruttore (Fig.4.12) e chiudere il<br />
rubinetto.<br />
I modelli BVM972 e BVM952 montano <strong>di</strong> serie il depuratore/filtro a cartuccia<br />
e non prevedono l’applicazione della procedura <strong>di</strong> cui sopra. In questo caso<br />
basta collegare il DA alla rete e procedere con il riempimento del circuito<br />
idraulico.<br />
4.5.2 Riempimento circuito idraulico<br />
PROCEDURA DI INSTALLAZIONE<br />
La procedura <strong>di</strong> installazione è valida nei <strong>di</strong>stributori mono e doppia caldaia.<br />
In particolare Caldaia espresso e Caldaia in polisulfone con sonde <strong>di</strong> livello.<br />
MONO CALDAIA ESPRESSO<br />
In uscita dalle linee il <strong>di</strong>stributore verrà messo in con<strong>di</strong>zione <strong>di</strong> PRIMA IN-<br />
STALLAZIONE.<br />
Giunto in locazione l’operatore collegherà solo l’acqua (sia nel caso <strong>di</strong> allacciamento<br />
a rete che serbatoio autonomo) e la rete elettrica.<br />
Il <strong>di</strong>stributore richiamerà automaticamente l’acqua finchè il micro vuoto acqua<br />
non sia N.C. almeno per 15 secon<strong>di</strong>. In questa con<strong>di</strong>zione il D.A. accende la<br />
pompa e, in con<strong>di</strong>zione <strong>di</strong> resistenza OFF, erogherà 200 cc <strong>di</strong> acqua (misurati<br />
attraverso il ventolino).<br />
Dopo questa procedura viene memorizzata la data <strong>di</strong> installazione del <strong>di</strong>stributore.<br />
Confermata la data, il D.A. attende 10 secon<strong>di</strong> e subito dopo inizierà<br />
a riscaldare l’acqua in caldaia.<br />
CALDAIA POLISULFONE con SONDE DI LIVELLO<br />
In uscita dalle linee il <strong>di</strong>stributore verrà messo in con<strong>di</strong>zione <strong>di</strong> PRIMA IN-<br />
STALLAZIONE. Giunto in locazione l’operatore collegherà solo l’acqua (sia nel<br />
caso <strong>di</strong> allacciamento a rete che serbatoio autonomo) e la rete elettrica.<br />
Il <strong>di</strong>stributore richiamerà automaticamente l’acqua finchè le sonde <strong>di</strong> livello<br />
massimo rileveranno la presenza acqua.<br />
Dopo questa procedura viene memorizzata la data <strong>di</strong> installazione del <strong>di</strong>stributore.<br />
Confermata la data, il D.A. attende 10 secon<strong>di</strong> e subito dopo inizierà<br />
a riscaldare l’acqua in caldaia.<br />
MONO CALDAIA INOX PER SOLUBILI<br />
In uscita dalle linee il <strong>di</strong>stributore verrà messo in con<strong>di</strong>zione <strong>di</strong> PRIMA INSTAL-<br />
LAZIONE. Giunto in locazione l’operatore collegherà solo l’acqua (sia nel caso<br />
<strong>di</strong> allacciamento a rete che serbatoio autonomo) e la rete elettrica.<br />
Il <strong>di</strong>stributore, in con<strong>di</strong>zione <strong>di</strong> resistenza OFF, richiamerà automaticamente l’acqua<br />
e aprirà l’elettrovalvola 2 per sfiatare l’aria presente nella caldaia stessa.<br />
Questa con<strong>di</strong>zione durerà 200 secon<strong>di</strong>. Terminato questo timeout il <strong>di</strong>stributore<br />
chiuderà l’elettrovalvola 2 e l’ev ingresso acqua per 20 sec. Dopo<br />
questo tempo continuerà il carico acqua finchè il micro vuoto acqua non<br />
sia N.C. per un tempo superiore a 5sec (operazione legata ad un secondo<br />
timeout <strong>di</strong> 200 secon<strong>di</strong>). In questa con<strong>di</strong>zione il D.A. accende l’elettrovalvola<br />
2 erogherà 20s <strong>di</strong> acqua.<br />
Terminata l’erogazione, si attende che il micro vuoto acqua torni N.C.. Dopo<br />
questa procedura viene memorizzata la data <strong>di</strong> installazione del <strong>di</strong>stributore.<br />
Confermata la data si faranno trascorrere 10 secon<strong>di</strong> al termine dei quali il<br />
D.A. inizierà a riscaldare l’acqua in caldaia.<br />
DOPPIA CALDAIA<br />
In uscita dalle linee BV il <strong>di</strong>stributore verrà messo in con<strong>di</strong>zione <strong>di</strong> PRIMA<br />
INSTALLAZIONE.<br />
Giunto in locazione l’operatore collegherà solo l’acqua (sia nel caso <strong>di</strong> allacciamento<br />
a rete che serbatoio autonomo) e la rete elettrica.<br />
Il <strong>di</strong>stributore, in con<strong>di</strong>zione <strong>di</strong> resistenze OFF, richiamerà automaticamente<br />
l’acqua e aprirà l’elettrovalvola 2 per sfiatare l’aria presente nella caldaia inox.<br />
Questa con<strong>di</strong>zione durerà 200 secon<strong>di</strong>. Terminato questo timeout il <strong>di</strong>stributore<br />
chiuderà l’elettrovalvola 2 e l’ev ingresso acqua per 20 sec.<br />
Dopo questo tempo continuerà il carico acqua finchè il micro vuoto acqua non<br />
sia N.C. per un tempo superiore a 5sec (operazione legata ad un secondo<br />
timeout <strong>di</strong> 200 secon<strong>di</strong>). In questa con<strong>di</strong>zione il D.A. accende l’elettrovalvola<br />
2 erogherà 20s <strong>di</strong> acqua.<br />
Terminata l’erogazione, si attende che il micro vuoto acqua torni N.C.. Attesi<br />
10 secon<strong>di</strong> il D.A. accende la pompa espresso e, in con<strong>di</strong>zione <strong>di</strong> resistenza<br />
OFF, erogherà 200 cc <strong>di</strong> acqua attraverso l’ev caffè (misurati attraverso il<br />
ventolino). Dopo questa procedura viene memorizzata la data <strong>di</strong> installazione<br />
del <strong>di</strong>stributore.<br />
Confermata la data, il D.A. attende 10 secon<strong>di</strong> e subito dopo inizierà a riscaldare<br />
l’acqua nelle 2 caldaie.<br />
A riempimento finito effettuare dei lavaggi del gruppo mixer per riempire tutti<br />
i circuiti e rimuovere eventuali residui dalla caldaia (Fig.4.16).<br />
Prima <strong>di</strong> dare tensione, accertarsi <strong>di</strong> avere collegato il <strong>di</strong>stributore alla rete<br />
idrica e <strong>di</strong> avere provveduto ad aprire il rubinetto dell’acqua.<br />
4.5.3 Lavaggio parti a contatto con alimenti<br />
A <strong>di</strong>stributore acceso effettuare dei lavaggi dei miscelatori premendo i pulsanti<br />
secondo quanto riportato alle funzioni <strong>di</strong> servizio al fine <strong>di</strong> eliminare ogni<br />
possibile residuo <strong>di</strong> sporco dalla caldaia caffè e caldaia solubili.<br />
– Lavarsi accuratamente le mani<br />
– Preparare una soluzione <strong>di</strong>sinfettante antibatterica a base <strong>di</strong> cloro (prodotti<br />
reperibili presso negozi farmaceutici) seguendo scrupolosamente le<br />
in<strong>di</strong>cazioni riportate sul prodotto stesso.<br />
7<br />
4.6 Caricamento prodotti (a macchina spenta)<br />
4.6.1 Caricamento contenitori<br />
ITALIANO<br />
– Rimuovere tutti i contenitori prodotti dal <strong>di</strong>stributore (Fig.4.17).<br />
– Rimuovere dagli stessi i coperchi e gli scivoli prodotti (Fig.4.18). Immergere<br />
tutto nella soluzione precedentemente preparata.<br />
– Rimuovere tutti i convogliatori polveri, imbuti acqua, camere e ventole<br />
<strong>di</strong> frullatura, tubi al silicone ed immergere anche questi particolari nella<br />
soluzione preparata (Fig.4.19).<br />
– Con un panno imbevuto della soluzione pulire anche le basi dei frullatori<br />
(Fig.4.20).<br />
– I particolari vanno lasciati immersi nella soluzione secondo il tempo riportato<br />
sulla confezione stessa.<br />
– recuperare tutti i particolari, risciacquarli abbondantemente, asciugarli<br />
perfettamente e procedere al rimontaggio nel <strong>di</strong>stributore.<br />
Per maggiore sicurezza è consigliabile effettuare dopo il rimontaggio dei particolari<br />
smontati, dei lavaggi automatici per eliminare eventuali residui.<br />
4.5.4 Installazione sistemi <strong>di</strong> pagamento<br />
Il <strong>di</strong>stributore viene fornito privo del sistema <strong>di</strong> pagamento:<br />
L’installazione del sistema <strong>di</strong> pagamento è a cura e responsabilità del<br />
tecnico installatore.<br />
La Bianchi Ven<strong>di</strong>ng Group spa non si ritiene corresponsabile per eventuali<br />
danni alla macchina stessa e/o a cose e/o persone dovuti ad una errata<br />
installazione.<br />
– Aprire il portello protezione scheda e gettoniera (Fig.4.21).<br />
– Montare il sistema <strong>di</strong> pagamento (Fig.4.22) e collegarlo alla scheda Master.<br />
I selettori vanno connessi <strong>di</strong>rettamente sulla scheda Master, i sistemi seriali<br />
executive attraverso il cavo interfaccia dato in dotazione.<br />
Accedere poi alla programmazione per le giuste tarature.<br />
Consultare il capitolo “5.0 ISTRUZIONI SOFTWARE” per verificare l’impostazione<br />
dei parametri, coerenti con il sistema usato.<br />
Verificare le connessioni del sistema <strong>di</strong> pagamento, consultando lo schema<br />
della scheda riportato.<br />
– Agganciare la gettoniera (Fig.4.23) come in<strong>di</strong>cato in figura.<br />
– Per effettuare il caricamento è necessario sfilare ciascun contenitore.<br />
Per caricare il caffè in grani, è necessario chiudere la piastra <strong>di</strong> chiusura<br />
prima <strong>di</strong> sfilare il contenitore (Fig.4.26).<br />
– Sollevare i coperchi <strong>di</strong> ciascun contenitore ed inserirvi il prodotto secondo<br />
quanto riportato dalla targhetta stessa (Fig.4.27).<br />
– Fare attenzione che non vi siano grumi, evitare <strong>di</strong> comprimere il prodotto<br />
e <strong>di</strong> utilizzarne una quantità eccessiva per evitarne l’invecchiamento.<br />
Mod. BVM952<br />
Il <strong>di</strong>stributore modello BVM952 è provvisto <strong>di</strong> un carter superiore apribile.<br />
Attraverso questa apertura è possibile accedere ai contenitori per effettuare<br />
le operazioni <strong>di</strong> caricamento del prodotto.<br />
In figura 4.24 e 4.25 sono in<strong>di</strong>cate le corrette operazioni per l’apertura e la<br />
chiusura del carter .<br />
Attenzione! Stringere la molla in<strong>di</strong>cata in figura 4.25 prima <strong>di</strong> chiudere<br />
il carter. Controllare le capacità <strong>di</strong> ciascun contenitore al paragrafo 1.0<br />
CARATTERISTICHE TECNICHE.<br />
4.6.2 Caricamento bicchieri<br />
Utilizzare solo bicchieri idonei alla <strong>di</strong>stribuzione automatica, (verificarne le<br />
caratteristiche consultando il capitolo 1.0 “Caratteristiche Tecniche”), evitare<br />
<strong>di</strong> comprimerli tra loro durante il caricamento. Non cercare <strong>di</strong> ruotare<br />
manualmente la colonna.<br />
Primo caricamento<br />
In fase <strong>di</strong> installazione o con <strong>di</strong>stributore bicchieri completamente vuoto,<br />
operare come segue:<br />
- Verificare che la colonna bicchieri non sia allineata con il foro <strong>di</strong> <strong>di</strong>stribuzione.<br />
quin<strong>di</strong> caricare tutte le colonne procedendo in senso antiorario,<br />
viceversa (quando la colonna è posizionata in corrispondenza del foro <strong>di</strong><br />
<strong>di</strong>stribuzione), chiudere la portiera ed alimentare la macchina in modo tale<br />
che la colonna bicchieri ruoti e si porti automaticamente in una posizione<br />
non allineata con il foro e quin<strong>di</strong> procedere al caricamento (Fig.4.28).<br />
- Rimettere il coperchio della colonna bicchieri ed agganciare la staffa<br />
superiore (Fig.4.29).<br />
Normale caricamento<br />
Il normale caricamento delle colonne bicchieri deve avvenire a macchina spenta,<br />
si effettua semplicemente aprendo la porta anteriore, sollevando la staffa<br />
fermo colonna, sollevando il coperchio ed inserendo i bicchieri mancanti.<br />
4.6.3 Caricamento palette<br />
Attenzione! Utilizzare solo palette adatte ad essere impiegate in <strong>di</strong>stributori<br />
automatici.<br />
– Togliere il pesetto in metallo dall’incolonnatore (Fig.4.30)<br />
– Inserire le palette con la loro fascetta <strong>di</strong> imballo nella colonna e posizionarle<br />
sul fondo e quin<strong>di</strong> tagliare e sfilare la fascetta (Fig.4.31).<br />
– Fare attenzione che le palette siano esenti da bave, non siano incurvate<br />
e che siano <strong>di</strong>sposte tutte orizzontalmente.<br />
– Completato il caricamento reinserire il pesetto (Fig.4.32).<br />
4.6.4 Inserimento sacco fon<strong>di</strong> e secchio liqui<strong>di</strong><br />
– Applicare la molla blocca-sacchetto sullo scivolo<br />
– Inserire il sacchetto in plastica avolgendolo sullo scivolo e bloccandolo<br />
con la molla (fig. 4.33)<br />
Utilizzare sacchetti sufficientemente lunghi affinchè tocchino il pavimento<br />
del <strong>di</strong>stributore.<br />
Accertarsi che il secchio <strong>di</strong> raccolta liqui<strong>di</strong> sia in posizione (Fig. 4.33) e<br />
perio<strong>di</strong>camente provvedere allo svuotamento.
ITALIANO<br />
4.8 Modalita’ prima auto-installazione<br />
Al primo avviamento della macchina verrà effettuata una auto-installazione.<br />
Lo scopo <strong>di</strong> tale procedura è <strong>di</strong> evitare i collegamenti manuali <strong>di</strong> fili sulle<br />
schede in seguito al riempimento del circuito idraulico.<br />
Per Mono caldaia Espresso:<br />
All’accensione del <strong>di</strong>stributore l’acqua riempie l’airbreack.<br />
Quando il galleggiante sarà in posizione alta la macchina inizierà un carico<br />
automatico <strong>di</strong> acqua che continuerà finchè il ventolino non avrà contato il<br />
passaggio <strong>di</strong> 200cc <strong>di</strong> acqua (verrà quin<strong>di</strong> erogata acqua tramite un mixer<br />
per tutta la durata della procedura).<br />
La procedura verrà eseguita con la resistenza spenta.<br />
Al termine il <strong>di</strong>splay mostrerà una data.<br />
Per Doppia caldaia Espresso:<br />
All’accensione del <strong>di</strong>stributore l’acqua riempie l’airbreack.<br />
Quando il galleggiante sarà in posizione alta la macchina inizierà il processo<br />
<strong>di</strong> installazione automatica e conseguente caricamento <strong>di</strong> entrambe le caldaie<br />
(verrà quin<strong>di</strong> erogata acqua tramite un mixer e dalla EV 3 vie Caffè durante<br />
la procedura).<br />
La procedura verrà eseguita con la resistenza spenta.<br />
Al termine il <strong>di</strong>splay mostrerà una data.<br />
Per Caldaia Solubile :<br />
All’accensione del <strong>di</strong>stributore l’acqua riempie l’airbreack.<br />
Quando il galleggiante sarà in posizione alta per almeno 5 secon<strong>di</strong> consecutivi<br />
la macchina aprirà una elettrovalvola solubile ed inizierà un ciclo <strong>di</strong> carico<br />
acqua in caldaia (verrà quin<strong>di</strong> erogata acqua tramite un mixer per tutta la<br />
durata della procedura).<br />
La procedura verrà eseguita con la<br />
resistenza spenta.<br />
Al termine il <strong>di</strong>splay mostrerà una<br />
data.<br />
Ora dobbiamo inserire la data dell’installazione utilizzando la pulsantiera<br />
come in<strong>di</strong>cato sotto:<br />
Per Versione Alfanumerica<br />
TASTO 1 INCREMENTA VALORE<br />
TASTO 3 MUOVI CURSORE<br />
TASTO 5 ENTER CONFERMA DATA<br />
TASTO 7 DECREMENTA VALORE<br />
TASTO 9 SPOSTA CURSORE TRA<br />
Giorno/Mese/Anno<br />
Per Versione Pulsantiera<br />
Premendo il pulsante EN-<br />
TER, la macchina attenderà<br />
10 secon<strong>di</strong>, poi alimenterà<br />
la resistenza caldaia.<br />
La data verrà memorizzata<br />
in un posto sicuro della<br />
scheda.<br />
Per ripristinare la modalità<br />
<strong>di</strong> prima installazione, entrare<br />
in Programmazione<br />
con la Password 22933.<br />
INCREMENTA<br />
VALORE<br />
DECREMENTA<br />
VALORE<br />
MUOVI<br />
CURSORE<br />
5.0 ISTRUZIONI SOFTWARE<br />
SPOSTA<br />
CURSORE TRA<br />
giorno/mese/anno<br />
ENTER<br />
CONFERMA DATA<br />
5.1 PASSWORD<br />
L’attuale logica <strong>di</strong> programmazione prevede, all’accesso tramite il pulsante<br />
PROG, l’inserimento <strong>di</strong> una password che permette <strong>di</strong> accedere ad un unico<br />
menu <strong>di</strong> programmazione.<br />
Per poter facilitare e velocizzare alcune operazioni sul campo, la gestione<br />
delle password verrà scomposta come segue:<br />
PWD 1 - Menu <strong>di</strong> programmazione ridotto<br />
PWD 2 - Menu <strong>di</strong> programmazione completo<br />
PWD 3 - Menu Ven<strong>di</strong>te;<br />
PWD 4 - Divisa in 2 PWD Imposte: 88000 per collaudare tutti gli slave<br />
BVM600;<br />
Collaudo (gestita solo da Bianchi Ven<strong>di</strong>ng Group) per accedere al collaudo<br />
eseguito in linea <strong>di</strong> montaggio.<br />
Note: Se la password del menù ridotto coincide con quella del menù completo<br />
sarà prioritaria quella del Menù completo<br />
8<br />
5.2 MENU IN MACCHINA<br />
La PWD 1 permette <strong>di</strong> accedere al menu completo del <strong>di</strong>stributore automatico.<br />
La procedura <strong>di</strong> accesso al menu prevede <strong>di</strong>: Premere il pulsante PROG sulla<br />
scheda master, inserire la password e premere il tasto ENTER. Di seguito<br />
sono elencati i menu <strong>di</strong> programmazione del D.A.<br />
5.2.1 MENU IN MACCHINA<br />
Tastiera selezione <strong>di</strong>retta<br />
In programmazione i tasti assumono i seguenti significati:<br />
1: Incrementa<br />
2: Visualizza nome<br />
3: Sposta il cursore<br />
4: Prova polvere<br />
5: Torna al menù precedente (esc)<br />
6: Prova solo acqua<br />
7: Decrementa<br />
8: Prova completa (Menù dosi)<br />
Prova EV o Sol (Menù dosi bevanda)<br />
9: Enter<br />
0: Prova completa (Menù dosi bevanda)<br />
5.3 MANUTENZIONE<br />
Si entra in manutenzione premendo il tasto ‘Servizio’. Il <strong>di</strong>splay visualizza in<br />
riga 1 ‘Manutenzione xxx’ , in cui xxx visualizza la temperatura della caldaia,<br />
ed in riga 2 gli eventuali allarmi rilevati.<br />
Premendo due volte il tasto Servizio, verrà bypassata la fase <strong>di</strong> attesa del<br />
riscaldamento permettendovi <strong>di</strong> effettuare selezioni <strong>di</strong> prova anche a temperatura<br />
non a regime. Premendo un tasto si visualizza la temperatura delle<br />
caldaie slave in scroll.<br />
Il pannello manutenzione prevede le seguenti funzioni:<br />
In manutenzione i tasti assumono i seguenti significati:<br />
Tasto1: Scorre allarmi, (se premuto per 5 secon<strong>di</strong> vengono visualizzati a<br />
<strong>di</strong>splay gli ultimi 15 allarmi)<br />
Tasto 5: Reset allarmi<br />
Co<strong>di</strong>ce 01: Rotazione gruppo<br />
Co<strong>di</strong>ce 02: Riempimento tubi MDB<br />
Co<strong>di</strong>ce 03: Svuota tubi MDB<br />
Co<strong>di</strong>ce 04: Test Ingressi e svuota tubi MDB<br />
Co<strong>di</strong>ce 05: Reset allarmi ( oppure solo 5 )<br />
Co<strong>di</strong>ce 06: Prova completa<br />
Co<strong>di</strong>ce 07: Prova solo acqua<br />
Co<strong>di</strong>ce 08: Movimento traslatore<br />
Co<strong>di</strong>ce 09: Rotazione colonna bicchieri<br />
Co<strong>di</strong>ce 12: Visualizza le battute totali<br />
Co<strong>di</strong>ce 13: Sgancio Bicchiere<br />
Co<strong>di</strong>ce 14: Prova mixer<br />
Co<strong>di</strong>ce 15: Ricarica Decontatori<br />
Co<strong>di</strong>ce 16: Prova Senza zucchero<br />
Co<strong>di</strong>ce 17: Erogazione Paletta<br />
Co<strong>di</strong>ce 18: Test macinadosatore<br />
Co<strong>di</strong>ce 0A: Visualizz.Temperatura ultime 48 ore Vega A<br />
Co<strong>di</strong>ce 0B: Visualizz.Temperatura ultime 48 ore Vega B<br />
Tasto+zucchero: Reset allarmi<br />
Tasto–Zucchero: Scorri allarmi (se premuto per 5 secon<strong>di</strong> vengono visualizzati<br />
a <strong>di</strong>splay gli ultimi 15 allarmi )<br />
In manutenzione sarà necessario <strong>di</strong>gitare in sequenza, sulla tastiera alfanumerica,<br />
i numeri in<strong>di</strong>cati per ottenere la funzione desiderata.
6.0 MANUTENZIONE E INATTIVITÀ<br />
6.1 Pulizia e caricamento<br />
Per garantire il corretto funzionamento del <strong>di</strong>stributore nel tempo, è<br />
necessario eseguire con perio<strong>di</strong>cità delle operazioni, alcune delle quali<br />
in<strong>di</strong>spensabili per ottemperare alle norme sanitarie vigenti.<br />
Queste operazioni, salvo <strong>di</strong>verse in<strong>di</strong>cazioni, vanno eseguite a <strong>di</strong>stributore<br />
aperto e spento; le operazioni <strong>di</strong> pulizia devono essere eseguite<br />
prima del caricamento dei prodotti<br />
Per garantire il normale esercizio, l’apparecchio deve essere installato in<br />
luoghi in cui la temperatura ambiente sia compresa tra una temperatura<br />
minima <strong>di</strong> +1°C ed una temperatura massima <strong>di</strong> +32°C e l’umi<strong>di</strong>tà non<br />
superi il 70%.<br />
Il <strong>di</strong>stributore non può essere installato in locali dove vengano utilizzati getti<br />
d’acqua per la pulizia (es. gran<strong>di</strong> cucine ...).<br />
Non utilizzare il getto d’acqua <strong>di</strong>rettamente sul <strong>di</strong>stributore.<br />
Riferirsi alle <strong>di</strong>sposizioni in<strong>di</strong>cate al capitolo III NORME PER LA SICU-<br />
REZZA e al capitolo 4.0 INSTALLAZIONE del presente libretto.<br />
6.1.1 Manutenzione consigliata<br />
La Bianchi Ven<strong>di</strong>ng Group S.p.A. garantisce il buon funzionamento<br />
nel tempo del proprio <strong>di</strong>stributore solo a fronte <strong>di</strong><br />
una manutenzione preventiva eseguita rispettando le modalità<br />
riportate nella tabella sottostante:<br />
TIPOLOGIA DI INTERVENTO<br />
Rigenerazione depuratore<br />
(* resine)<br />
Sostituzione pistone completo <strong>di</strong><br />
filtri e guarnizione<br />
Sostituzione gruppo caffè completo<br />
Decalcificazione caldaia espresso<br />
ed elettrovalvole<br />
6.1.2 Pulizia perio<strong>di</strong>ca a cura del manutentore<br />
Prima operazione.Smaltimento dei rifiuti presenti nei bidoni dell’immon<strong>di</strong>zia<br />
(bicchieri sporchi, palette, carta, fazzoletti, ecc.). Dopo lo smaltimento dei<br />
rifiuti possono iniziare le pulizie dell’ambiente.<br />
- eliminazione dello sporco più grossolano<br />
- sanitizzazione dei pavimenti e delle pareti dell’ambiente circostante nel<br />
raggio <strong>di</strong> 1 metro intorno al <strong>di</strong>stributore automatico<br />
- al termine si accede all’apertura del <strong>di</strong>stributore<br />
6.1.3 Pulizia quoti<strong>di</strong>ana consigliata<br />
Lo scopo è quello <strong>di</strong> prevenire la formazione <strong>di</strong> batteri nelle zone a contatto<br />
con alimenti.<br />
Per tutte le operazioni <strong>di</strong> pulizia attenersi alle <strong>di</strong>sposizioni riportate al<br />
capitolo 6.3.1<br />
Operare come segue:<br />
– pulire tutte le parti in vista della zona <strong>di</strong> erogazione (Fig.6.1 e Fig.6.2)<br />
asportare e lavare accuratamente:<br />
– convogliatori e scivoli polveri (Fig.6.3-pos.1)<br />
– convogliatore acqua (2), camera miscelazione (3), ventola <strong>di</strong> frullatura<br />
(4) e ghiera (5)<br />
– tubi <strong>di</strong> erogazione al silicone<br />
– vano erogazione (Fig.6.4)<br />
– scivolo e imbuto caffè (Fig.6.5)<br />
Prima <strong>di</strong> effettuare le operazioni <strong>di</strong> rimontaggio asciugare accuratamente<br />
tutti i particolari<br />
– Pulire dai residui <strong>di</strong> polvere <strong>di</strong> caffè il gruppo; per facilitare il compito si<br />
può estrarre il gruppo dalla sede (Fig.6.6).<br />
6.2 Manutenzione or<strong>di</strong>naria e straor<strong>di</strong>naria<br />
N° <strong>di</strong> Battute<br />
5.000 10.000 20.000 30/40.000 70/80.000<br />
�<br />
Sostituzione macine �<br />
Decalcificazione caldaia solubile<br />
ed elettrovalvole<br />
�<br />
* se non sussistono in<strong>di</strong>cazioni contrarie da parte del fornitore del depuratore.<br />
6.1.4 Caricamento prodotti<br />
Quando necessario provvedere al caricamento dei prodotti e/o materiali <strong>di</strong><br />
consumo del <strong>di</strong>stributore automatico.<br />
Per queste operazioni fare riferimento alle operazioni <strong>di</strong> prima installazione<br />
capitolo 4.6.<br />
Le operazioni descritte in questa sezione sono puramente in<strong>di</strong>cative perchè<br />
legate a <strong>di</strong>verse variabili quali: durezza dell’acqua, umi<strong>di</strong>tà, prodotti usati,<br />
con<strong>di</strong>zioni e mole <strong>di</strong> lavoro, etc.<br />
Per tutte le operazioni che richiedono lo smontaggio <strong>di</strong> componenti<br />
del <strong>di</strong>stributore, assicurarsi che lo stesso sia spento.<br />
Affidare le operazioni sottodescritte a personale competente.<br />
Se le operazioni richiedono il <strong>di</strong>stributore acceso affidarle a personale addestrato.<br />
Per interventi più complessi, come ad esempio la <strong>di</strong>sincrostazione delle caldaie,<br />
necessita la buona conoscenza dell’apparecchiatura.<br />
�<br />
�<br />
�<br />
9<br />
ITALIANO<br />
Mensilmente eseguire la <strong>di</strong>sinfezione <strong>di</strong> tutte le parti a contatto con alimenti<br />
utilizzando prodotti a base <strong>di</strong> cloro seguendo quanto gia descritto nel capitolo<br />
4.5.3.<br />
PROCEDURA DI CONTROLLO DELLA FASATURA DEL GRUPPO CAFFè<br />
Assicurarsi che, nella fase <strong>di</strong> riposo, l’in<strong>di</strong>ce rotante sia allineato all’in<strong>di</strong>ce <strong>di</strong><br />
fase (ve<strong>di</strong> Fig. 6.7).<br />
Assicurarsi che in fase <strong>di</strong> erogazione l’in<strong>di</strong>ce rotante sia in anticipo <strong>di</strong> non più<br />
<strong>di</strong> 1,5 mm dal punto <strong>di</strong> riferimento <strong>di</strong> erogazione (l’in<strong>di</strong>ce rotante deve essere<br />
in posizione <strong>di</strong> erogazione tra 0 e 1,5 mm dal punto <strong>di</strong> erogazione).<br />
6.3 Procedure <strong>di</strong> manutenzione<br />
Equipaggiamento ideale:<br />
Per gli addetti al caricamento e alla manutenzione l’equipaggiamento ideale<br />
dovrebbe essere così composto:<br />
- Valigetta porta strumenti<br />
- Divisa pulita<br />
- Guanti usa e getta<br />
- Morsetto per chiudere le cannucce<br />
- Rotolo <strong>di</strong> carta alimentare<br />
- Bastoncino in legno o plastica<br />
- Confezione <strong>di</strong> detergente<br />
- Confezione <strong>di</strong> <strong>di</strong>sinfettante<br />
- Cartello “Distributore fuori servizio”<br />
- Tavolino <strong>di</strong> appoggio (facoltativo)<br />
Non utilizzare mai:<br />
- Spugne, spugnette, stracci <strong>di</strong> stoffa<br />
- Pennelli<br />
- Cacciaviti od oggetti metallici<br />
6.3.1 Sanitizzazione<br />
ALCUNI IMPORTANTI AVVERTIMENTI<br />
- Operatori e tecnici del ven<strong>di</strong>ng che abitualmente entrano in contatto con<br />
i prodotti alimentari devono prestare particolare attenzione alla pulizia<br />
personale e dei propri indumenti.<br />
In particolare prima <strong>di</strong> iniziare ogni operazione sul <strong>di</strong>stributore assicurarsi <strong>di</strong>:<br />
- indossare scarpe antinfortunistiche o almeno adatte all’uso<br />
- lavarsi le mani con cura<br />
- mantenere le unghie corte, pulite e prive <strong>di</strong> tinta<br />
- portare capelli corti e puliti<br />
- evitare <strong>di</strong> graffiarsi durante le operazioni <strong>di</strong> manutenzione<br />
- non fumare e non mangiare durante il lavoro<br />
- evitare <strong>di</strong> toccare capelli, bocca, naso durante il lavoro<br />
- evitare <strong>di</strong> indossare anelli, bracciali, orologi<br />
- coprire eventuali ferite<br />
- evitare profumazioni personali forti<br />
La maggior contaminazione dei cibi passa attraverso le mani, vi ricor<strong>di</strong>amo<br />
pertanto <strong>di</strong> lavarvi le mani ogni qualvolta:<br />
- si inizia a lavorare sul <strong>di</strong>stributore<br />
- dopo essere stati alla toilette<br />
- dopo esservi toccati i capelli, soffiato il naso, mangiato<br />
- dopo aver maneggiato prodotti chimici per la pulizia<br />
- dopo aver stretto le mani ad altre persone<br />
Se vengono usati guanti protettivi bisogna avere l’accortezza <strong>di</strong> cambiarli ogni<br />
volta che entrano in contatto con oggetti inquinanti.<br />
Come ottenere l’igiene:<br />
- Si ottiene con l’impiego <strong>di</strong> <strong>di</strong>sinfettanti<br />
I <strong>di</strong>sinfettanti hanno il compito <strong>di</strong> <strong>di</strong>struggere i microrganismi presenti sulle<br />
superfici.<br />
Come ottenere la pulizia:<br />
- Si ottiene con l’impiego <strong>di</strong> detergenti e/o detersivi<br />
I detergenti hanno il compito <strong>di</strong> eliminare lo sporco grossolano.<br />
Esistono in commercio prodotti che sono contemporaneamente detergenti/<br />
<strong>di</strong>sinfettanti, normalmente reperibili in farmacia (a base <strong>di</strong> cloro).<br />
Per quanto non menzionato in questo capitolo fare riferimento alla normativa<br />
HACCP ed in particolare prestare attenzione a:<br />
- Pulizia dei locali<br />
- Trasporto prodotti<br />
- Manutenzione macchinari<br />
- Smaltimento rifiuti<br />
- Approvvigionamento acqua potabile<br />
- Igiene personale<br />
- Caratteristiche prodotti alimentari<br />
- Direttiva 93/43/CEE<br />
Alcune importanti avvertenze (rif. Direttiva 93/43/CEE)<br />
� I locali in cui vengono installati i <strong>di</strong>stributori automatici, devono essere tali<br />
da impe<strong>di</strong>re l’accumulo <strong>di</strong> sporcizia, il contatto con materiali tossici e la<br />
formazione <strong>di</strong> condensa o muffa sulle superfici della macchina stessa.<br />
� Inoltre è importante che i locali in cui viene installato il <strong>di</strong>stributore, possa<br />
garantire una corretta prassi igienica impedendo anche la contaminazione<br />
crociata, durante le operazioni, fra prodotti alimentari, apparecchiatura,<br />
materiali, acqua, ricambio d’aria o interventi del personale ed escludendo
ITALIANO<br />
agenti sterni <strong>di</strong> contaminazione quali insetti o altri animali nocivi.<br />
� Verificare che l’allacciamento idrico sia adeguato e conforme alla <strong>di</strong>rettiva<br />
CEE 80/778 concernente la qualità delle acque destinate al consumo<br />
umano.<br />
� Assicurare una corretta aerazione meccanica o naturale, evitando il flusso<br />
meccanico <strong>di</strong> aria da una zona contaminata verso una zona pulita.<br />
Le operazioni <strong>di</strong> pulizia possono avvenire sul posto in cui è installato il <strong>di</strong>stributore<br />
automatico<br />
Esempio <strong>di</strong> procedura <strong>di</strong> pulizia ideale <strong>di</strong> un <strong>di</strong>stributore automatico<br />
<strong>di</strong> bevande calde:<br />
L’addetto all’igiene dell’impianto, prima <strong>di</strong> aprire il <strong>di</strong>stributore, deve accertarsi<br />
dello stato <strong>di</strong> pulizia dell’ambiente circostante e porre un cartello, che in<strong>di</strong>chi<br />
ai potenziali consumatori che:<br />
- “l’apparecchiatura è fuori servizio per manutenzione”<br />
- è importante che, durante le operazioni <strong>di</strong> pulizia e sanitizzazione, l’addetto<br />
non debba mai sospendere il suo lavoro per far funzionare il <strong>di</strong>stributore.<br />
- Per la pulizia interna usare strofinacci puliti, meglio ancora panni monouso.<br />
- In<strong>di</strong>spensabile l’accorgimento <strong>di</strong> non far entrare mai in contatto prodotti<br />
usati per la pulizia generica per <strong>di</strong>stributore da quelli usati per la pulizia<br />
delle parti a contatto con alimenti.<br />
- Prestare attenzione durante le operazioni <strong>di</strong> pulizia a non trasferire germi<br />
da zone sporche ad altre già pulite.<br />
A) usare guanti puliti<br />
B) usare acqua calda non prelevata da gabinetti<br />
C) prestare maggiori attenzioni nella pulizia delle parti a contatto con le<br />
sostanze alimentari<br />
- Rimuovere accuratamente tutti i residui <strong>di</strong> sporcizia prima <strong>di</strong> procedere<br />
all’utilizzo <strong>di</strong> <strong>di</strong>sinfettanti.<br />
- Evitare accuratamente ogni contato <strong>di</strong> alimenti con superfici sporche.<br />
- Durante le operazioni <strong>di</strong> pulizia attenersi scrupolosamente alle in<strong>di</strong>cazioni<br />
riportate nelle confezioni dei detergenti chimici. Evitare assolutamente<br />
che le confezioni degli alimenti vengano a contatto dei detergenti.<br />
- Accertarsi che il vostro equipaggiamento <strong>di</strong> pulizia sia in perfette con<strong>di</strong>zioni<br />
<strong>di</strong> efficienza.<br />
D) terminate le operazioni <strong>di</strong> pulizia depositare i sacchi raccolta rifiuti in<br />
apposite aree lontane da quelle dove andranno i <strong>di</strong>stributori automatici.<br />
Riassumiamo nella tabella che segue il comportamento che suggeriamo al<br />
fine <strong>di</strong> ridurre al minimo il rischio <strong>di</strong> proliferazione e contaminazione da batteri<br />
all’interno del <strong>di</strong>stributore.<br />
TIPOLOGIA DI<br />
INTERVENTO<br />
Asportare e lavare tutte le parti in<br />
vista nella zona <strong>di</strong> erogazione con<br />
liquido sanitizzante<br />
Vuotare i secchi fon<strong>di</strong> liqui<strong>di</strong> e pulirli<br />
con sanitizzante<br />
Vuotare il contenitore fon<strong>di</strong> caffè e<br />
lavarlo con sanitizzante<br />
Sfilare tutti i contenitori e pulire<br />
con un panno umido tutte le parti <strong>di</strong><br />
appoggio dei contenitori, nonché il<br />
fondo del <strong>di</strong>stributore e l’esterno del<br />
<strong>di</strong>stributore, in particolare la zona <strong>di</strong><br />
erogazione, procedere poi con la sanitizzazione<br />
* Kit <strong>di</strong> sanitizzazione composti da<br />
parti plastiche destinate al passaggio<br />
del prodotto in polvere o liquido<br />
(coppette, tubi, flangia <strong>di</strong> erogazione,<br />
ugelli,...). Per maggiori informazioni<br />
Vi preghiamo <strong>di</strong> contattare<br />
<strong>di</strong>rettamente la Bianchi Ven<strong>di</strong>ng<br />
Group<br />
OGNI<br />
GIORNO<br />
�<br />
�<br />
�<br />
TEMPO / N° DI BATTUTE<br />
OGNI<br />
SETTIMANA<br />
�<br />
20.000<br />
BATTUTE O<br />
MAX OGNI<br />
MESE<br />
*La Bianchi ha pre<strong>di</strong>sposto dei kit specifici appositamente stu<strong>di</strong>ati per<br />
ogni modello <strong>di</strong> <strong>di</strong>stributore.<br />
6.4 Regolazioni<br />
6.4.1 Regolazione dose e macinatura<br />
Il <strong>di</strong>stributore viene consegnato tarato su dei valori standard cioè:<br />
– Temperatura caffè nel bicchiere tra 70°C e 80°C.<br />
– Temperatura prodotti solubili nel bicchiere tra 70°C e 80°C.<br />
– Grammatura polvere <strong>di</strong> caffè tra 6 e 8 grammi.<br />
�<br />
10<br />
– Grammatura polveri solubili secondo quanto riportato nelle apposite<br />
tabelle.<br />
Per ottenere i migliori risultati con i prodotto utilizzato si consiglia <strong>di</strong> controllare:<br />
– Grammatura del caffè macinato. Variare la quantità agendo sul pomolo<br />
posto sul dosatore (Fig.6.8).<br />
Ogni scatto del pomolo <strong>di</strong> regolazione corrisponde ad un valore <strong>di</strong> 0,05<br />
grammi.<br />
Ruotando in senso orario la dose <strong>di</strong>minuisce.<br />
Ruotando in senso antiorario la dose aumenta.<br />
La variazione <strong>di</strong> prodotto è controllabile me<strong>di</strong>ante delle tacche <strong>di</strong> riferimento<br />
poste sul corpo dosatore (ve<strong>di</strong> figura 6.8).<br />
La pastiglia <strong>di</strong> caffè, normalmente, deve presentarsi compatta e leggermente<br />
umida.<br />
– Regolazione del grado <strong>di</strong> macinatura manuale. Ruotare la vite<br />
(Fig.6.9) per ottenere i risultati desiderati.<br />
Ruotando in senso orario si ottiene una macinatura fine, ruotando in senso<br />
antiorario si ottiene una macinatura grossa.<br />
Dopo la regolazione devono esere effettuate 3 regolazioni <strong>di</strong> prodotto<br />
per verificare la bontà della regolazione, più la granulometria risulta fine,<br />
maggiore sarà il tempo impiegato<strong>di</strong> erogazione del prodotto.<br />
- Regolazione automatica macinatura (Fig.6.10)<br />
- Permette nelle versioni espresso <strong>di</strong> mantenere costante la macinatura,<br />
in<strong>di</strong>pendentemente dalla percentuale <strong>di</strong> umi<strong>di</strong>tà, dalla temperatura e<br />
dall’usura delle macine.<br />
- La prima taratura si esegue a <strong>di</strong>spositivo scollegato<br />
- Eseguire manualmente la regolazione della dose (6-7g)<br />
- Eseguire manualmente la regolazione della macinatura<br />
- Calcolare il tempo <strong>di</strong> erogazione in secon<strong>di</strong> (std 18s)<br />
- Ricollegare il <strong>di</strong>spositivo<br />
- Impostare il tempo <strong>di</strong> erogazione misurato, in programmazione<br />
- Ogni 5 caffè espressi, verrà eseguito in automatico il controllo <strong>di</strong> tale<br />
parametro.Le letture valide corrispondono con il terzo / quarto caffè.: Le<br />
prime due saranno ignorate poiché risultato dell precedenti regolazioni,<br />
la quinta sarà <strong>di</strong> regolazione.<br />
6.4.2 Regolazione portata acqua elettrovalvole solubili<br />
Nei prodotti solubili potete regolare la quantità <strong>di</strong> acqua e la dose della polvere<br />
elettronicamente variando i parametri standard, la procedura è illustrata al<br />
capitolo “5.0 ISTRUZIONI SOFTWARE”<br />
ATTENZIONE: Starare la portata acqua agendo sulla vite <strong>di</strong> regolazione<br />
delle valvole solubili, significa compromettere e variare le quantità d’acqua<br />
erogata in tazza e quin<strong>di</strong> la dose della stessa<br />
Per accedere alla elettrovalvola, posizionata nella caldaia solubili, è necessario<br />
togliere il pannello (1) allentando le due viti (2) in<strong>di</strong>cate in figura 6.12<br />
– Per ottenere un buon risciacquo delle coppette agire eventualmente sulla<br />
vite <strong>di</strong> portata controllando poi l’atten<strong>di</strong>bilità delle dosi (Fig.6.11).<br />
6.4.3 Accesso alle parti interne<br />
Per accedere alle parti interne del <strong>di</strong>stributore automatico (pompe, caldaia<br />
caffè espresso, elettrovalvole, connessioni elettriche, etc.):<br />
Versione Espresso:<br />
- Ruotare verso l’esterno il gruppo <strong>di</strong> erogazione zucchero (fig.6.13).<br />
- Agire quin<strong>di</strong> sulle due impugnature in<strong>di</strong>cate in fig. 6.14 e 6.16, estrarre<br />
il pannello e sostenerlo fino all’escursione completa (fig.6.15 e 6.17).<br />
Dopo aver effettuato le eventuali operazioni <strong>di</strong> manutenzione sollevare il<br />
pannello completo fino alla corretta posizione verticale e riportare quin<strong>di</strong> il<br />
gruppo erogazione zucchero in posizione <strong>di</strong> lavoro ruotandolo verso destra.<br />
Versione Solubile:<br />
- Smontare i gruppi mixer e allentare le tre viti in<strong>di</strong>cate in figura 6.18 e<br />
6.19, far scorrere a sinistra il pannello frontale fino allo sgancio delle<br />
asole, quin<strong>di</strong> togliere il pannello per accedere all’interno.<br />
6.5 Inattività<br />
Per una prolungata inattività del <strong>di</strong>stributore è necessario effettuare delle<br />
operazioni preventive:<br />
– Scollegare elettricamente ed idraulicamente il <strong>di</strong>stributore.<br />
– Vuotare completamente la caldaia solubili e la vaschetta galleggianti,<br />
togliendo il tappo posto sul tubo lungo lo scivolo scarico. Rimontare il<br />
tappo a svuotamento avvenuto (Fig.6.20).<br />
– Scaricare tutti i prodotti dai contenitori.<br />
– Provvedere al lavaggio <strong>di</strong> tutte le parti a contatto con alimenti secondo<br />
quanto già descritto.<br />
– Svuotare il secchio fon<strong>di</strong> e pulirlo accuratamente.<br />
– Eliminare il sacco raccogli fon<strong>di</strong>.<br />
– Pulire con un panno tutte le superfici interne ed esterne del <strong>di</strong>stributore<br />
automatico<br />
– Proteggere l’esterno con un film o sacco in cellophan (Fig.6.21)<br />
– Immagazzinare in locali asciutti, riparati e con temperature non inferiori<br />
a 1°C
DECLARATION OF CONFORMITY<br />
La BIANCHI VENDING GROUP S.p.A.<br />
Corso Africa, 9 - 24040 Zingonia <strong>di</strong> VERDELLINO (BG) Italia<br />
declares under its own responsibility that the family of ven<strong>di</strong>ng machines:<br />
Brand: BIANCHI VENDING<br />
Manufacturer: BIANCHI VENDING GROUP S.p.A.<br />
Type/Model: BVM 952 – BVM 972<br />
11<br />
dal 1° luglio 2006 Zingonia qualsiasi <strong>di</strong> Verdellino prodotto (BG), 12 Gennaio <strong>di</strong> Bianchi 2009 Ven<strong>di</strong>ng Group S.p.A. immesso sul<br />
ENGLISH<br />
is in compliance with the Basic Requirements included in the following Directives:<br />
1) Low Voltage – 2006/95/CE (on the harmonisation of the laws of Member States relating to electrical equipment designed for use within certain<br />
voltage limits) -LV-<br />
2) Electromagnetic Compatibility – 2004/108/CE (on the approximation of the laws of the Member States relating to electromagnetic compatibility) -EMC-<br />
3) REG. (CE) 1935/2004 (on materials and articles intended to come into contact with food)<br />
REG. (CE) 1895/2005 (on the restriction of use of certain epoxy derivatives in materials and articles intended to come into contact with food)<br />
DIR. 2002/72 CE (relating to plastic materials and articles intended to come into contact with foodstuffs)<br />
The tests/checks were performed in accordance with the current European Harmonised Standards:<br />
1)LOW VOLTAGE (Electrical Safety LV):<br />
EN 60335-1:2002 +A1:2004 +A11:2004 +A2:2006 +A12:2006 +A13:2008 (Safety of household and similar electrical appliances – General requirements)<br />
EN 60335-2-75:2004+ A1:2005 +A11:2006 + A2:2008 +A12:2010. (Particular requirements for commercial <strong>di</strong>spensing appliances and ven<strong>di</strong>ng machines)<br />
EN ISO 11201:2009 + EN ISO 3744:2009 – Measurement of acoustic noise. Sound Pressure level: LpA < 70 dB(A)<br />
2) ELECTROMAGNETIC COMPATIBILITY (EMC):<br />
EN 55014-1:2006(Limits and methods of measurement of ra<strong>di</strong>o <strong>di</strong>sturbance characteristics of household appliances, similar engine or heating appliances,<br />
of tools and similar electrical apparatus)<br />
EN 55014-2:1997 +A1:2001 +A2:2008 (Immunity requirements for household appliances, tools and similar electrical apparatus)<br />
EN 61000-3-2: 2006 (Limits for harmonic current emissions)<br />
EN 61000-3-3:1995+ A1:2001 +A2:2005 (Limitation of voltage fluctuations and flicker in lowvoltage<br />
supply systems for equipment with rated current ≤ 16 A)<br />
EN 62233:2008 (Measurement methods for electromagnetic fields of household appliances and similar apparatus with regard to human exposure)<br />
3) SUITABILITY OF MATERIALS FOR CONTACT WITH FOODSTUFFS<br />
Selected tests for the “Suitability for contact with foodstuffs” as required by Italian law: Min. Dec. 21-03-1973 and following amendments ⇒ Decree 4th<br />
May 2006 no. 227, and by transposition of European Directives: 82/711/CEE, 85/572/CEE, 93/8/CEE, 97/48/CE, 2002/72/CE, 2004/13/CE, 2004/19/<br />
CE, 2005/79/CE, Reg. CE no. 1935/04 and Reg. CE no. 1895/2005.<br />
MANAGING DIRECTOR<br />
Zingonia <strong>di</strong> Verdellino (BG), January 2010<br />
INFORMATION TO THE USERS<br />
Under Legislative Decree 25 September 2007, no.185 and art. 13, Legislative Decree 25 July 2005, no.151 “Implementation of Directives 2002/95/<br />
EC, 2002/96/EC and 2003/108/EC, regar<strong>di</strong>ng the reduction of use of hazardous substances in electrical and electronic equipment as well as<br />
waste <strong>di</strong>sposal”.<br />
Declaration of Conformity<br />
RoHS Directive<br />
DIRECTIVE 2002/95/EC OF THE<br />
EUROPEAN PARLIAMENT AND OF THE COUNCIL of 27 January 2003<br />
on the restriction of the use of certain hazardous<br />
substances in electrical and electronic equipment<br />
o PentaBromoDifenilEtere Bianchi Ven<strong>di</strong>ng (PBDE) Group S.p.A. declares:<br />
Starting from July 1st 2006 any product o manufactured OttaBromoDifenilEtere by “Bianchi Ven<strong>di</strong>ng (OttaBDE) Group Spa” on the European market is Rohs Directive compliant and<br />
do not contain concentrations excee<strong>di</strong>ng olimits DecaBromoDifenilEtere allowed for the following (DecaBDE) substances:<br />
• Lead (Pb)<br />
• Pefluorooctano sulfonato (PFSO)<br />
• Mercury (Hg)<br />
• Cadmium (Cd) Direttiva • PoliCloroNaftalene 2002/95/CE • (PCN) Perfluorooctane del sulfonate Parlamento (PFOS) Europeo e<br />
• Hexavalent Chromium (Cr(VI)) • Bis(tribromophenoxy)etano • PolyChloro PoliCloroBifenile Naphthalenes (PCB) (PCN)<br />
• Polybrominated Biphenyls (PBB) • Benzene del Consiglio • Bis(tribromophenoxy)ethane del 27 Gennaio Polychlorinated 2003 biphenyl (PCB)<br />
• Polybrominated Diphenyl ethers:<br />
• Benzene<br />
o Polybrominated sulla <strong>di</strong>phenyl restrizione ethers (PBDE) dell’uso <strong>di</strong> determinate sostanze pericolose<br />
o Octabromo<strong>di</strong>phenyl ether (OctaBDE)<br />
o Decabromo<strong>di</strong>phenyl ether (DecaBDE)<br />
MANAGING DIRECTOR<br />
Zingonia <strong>di</strong> Verdellino (BG), 12 January 2009<br />
<strong>Dichiarazione</strong> <strong>di</strong> <strong>Conformità</strong><br />
The barred waste container symbol on the equipment means that the product, at the end of its service life, must be <strong>di</strong>sposed of separately from the<br />
other types of waste.<br />
Direttiva RoHS<br />
The user must therefore convey the equipment, at the end of its service life, to the appropriate separate collection centres for electronic/electrotechnical<br />
waste products or return it to the dealer when purchasing a new equivalent equipment.<br />
The appropriate separate collection and the following sen<strong>di</strong>ng of the used equipment to recycling, treatment and eco-friendly <strong>di</strong>sposal will help avoid negative<br />
effects on the environment as well as on health along with an easier recycling of the materials forming the equipment.<br />
Any unauthorized <strong>di</strong>sposal of the product by the user will imply the enforcement of the administrative sanctions as set out in Legislative Decree no. 22/1997<br />
(article 50 and following articles, Legislative Decree no. 22/1997).<br />
Direttiva 2002/95/CE del Parlamento Europeo e<br />
del Consiglio del 27 Gennaio 2003<br />
sulla restrizione dell’uso <strong>di</strong> determinate sostanze pericolose<br />
nelle apparecchiature elettriche ed elettroniche<br />
Bianchi Ven<strong>di</strong>ng Group S.p.A. <strong>di</strong>chiara che:<br />
dal 1° luglio 2006 qualsiasi prodotto <strong>di</strong> Bianchi Ven<strong>di</strong>ng Group S.p.A. immesso sul<br />
mercato in Europa è conforme alla Direttiva RoHS, e quin<strong>di</strong> non contiene<br />
concentrazioni che superino i limiti consentiti per le seguenti sostanze:<br />
• Piombo (Pb)<br />
• Mercurio (Hg)<br />
• Cadmio (Cd)<br />
<strong>Dichiarazione</strong> <strong>di</strong> <strong>Conformità</strong><br />
• Cromo esavalente (Cr(VI))<br />
• Bifenile polibromurati (PBB)<br />
• Eteri <strong>di</strong> <strong>di</strong>fenili polibromurati:<br />
Direttiva RoHS<br />
nelle apparecchiature elettriche L’Amministratore ed elettroniche<br />
Delegato<br />
Bianchi Ven<strong>di</strong>ng Group S.p.A. <strong>di</strong>chiara che:<br />
______________________<br />
mercato in Europa è conforme alla Direttiva RoHS, e quin<strong>di</strong> non contiene
ENGLISH<br />
BEFORE USING THE MACHINE, READ THIS MANUAL CAREFULLY FOR ITS CORRECT USE IN ACCORDANCE WITH THE CURRENT SAFETY STANDARDS.<br />
ATTENTION: Important safety<br />
in<strong>di</strong>cations<br />
READ the instruction manual<br />
machine carefully before using<br />
the machine<br />
IMPORTANT NOTICES<br />
MAINTENANCE TECHNICIAN<br />
The maintenance technician is defined as being the person responsible for filling up the containers with soluble products, sugar, coffee, stirrers<br />
and cups. The maintenance technician is also responsible for cleaning the <strong>di</strong>stributor (see operations in<strong>di</strong>cated in chapter 6.0). In the event of a<br />
fault the maintenance technician must call the installation technician.<br />
INSTALLATION TECHNICIAN<br />
The installation technician is defined as the person responsible for the installation of the automatic <strong>di</strong>stributor, the starting up operations and the<br />
function settings. Each regulation operation is the exclusive responsibility of the installation technician who also holds the programming access<br />
password.<br />
Keys at the <strong>di</strong>sposal of<br />
the MAINTENANCE and<br />
INSTALLATION technicians<br />
N° 1 Key<br />
PREMISE<br />
I - Important notices for operator<br />
This automatic <strong>di</strong>stributor has been designed and constructed in full accordance<br />
with current safety regulations and is therefore safe for those who follow<br />
the or<strong>di</strong>nary filling and cleaning instructions as in<strong>di</strong>cated in this manual.<br />
The user must not under any circumstances remove the guards that<br />
require a tool for removal.<br />
Some maintenance operations (to be done solely by specialized technicians<br />
and in<strong>di</strong>cated in this manual with a special symbol) require that specific safety<br />
protections of the machine must be switched off .<br />
In accordance with the current safety regulations, certain operations are<br />
the exclusive responsibility of the installation technician, and the or<strong>di</strong>nary<br />
maintenance technician may have access to specific operations on with<br />
specific authorization.<br />
The acquaintance and absolute respect, from a technical point of view, of<br />
the safety instructions and of the danger notices contained in this manual,<br />
are fundamental for the execution, in con<strong>di</strong>tions of minimum risk, for the<br />
installation, use and maintenance of this machine.<br />
II - General Instructions<br />
SOCKET SPANNERS<br />
n° 5,5 - n° 7 - n° 8 - n° 10 - n° 20 - n° 22<br />
SPANNERS (fork type)<br />
n° 7 - n° 8 - n° 10 - n° 12 - n° 14<br />
INDEX<br />
Knowledge of the information and instructions contained in the<br />
present manual is essential for a correct use of the automatic<br />
ven<strong>di</strong>ng machine on the part of the user .<br />
– Interventions by the user on the automatic ven<strong>di</strong>ng machine are allowed<br />
only if they are of his competence and if he has been duly trained.<br />
The installation technician must be fully acquainted with all the mechanisms<br />
necessary for the correct operation of the machine.<br />
– It is the buyer’s responsibility to ascertain that the users have been trained<br />
and are informed and regulations in<strong>di</strong>cated in the technical documentation<br />
supplied.<br />
Despite the full observance of the safety regulations by the constructor,<br />
those who operate on the automatic <strong>di</strong>spensers must be fully aware of<br />
the potential risks involved in operations on the machine.<br />
For any service or maintenance<br />
switch off the machine<br />
ATTENTION:<br />
machine switched on<br />
PREMISE<br />
1.0 DESCRIPTION OF THE MACHINE’S TECHNICAL CHARACTERISTICS<br />
2.0 TECHNICAL DESCRIPTION OF THE OPERATION<br />
3.0 TRANSPORTING THE AUTOMATIC VENDING MACHINE<br />
4.0 INSTALLATION<br />
5.0 SOFTWARE INSTRUCTIONS<br />
6.0 MAINTENANCE AND INACTIVITY<br />
7.0 DISMANTLEMENT<br />
8.0 ALARMS<br />
12<br />
PE<br />
ATTENTION: hot parts in contact!<br />
CAUTION! Parts in motion<br />
Earthing in<strong>di</strong>cation<br />
Tools necessary for undertaking interventions on the automatic <strong>di</strong>spenser.<br />
SCREWDRIVERS<br />
Small size<br />
Me<strong>di</strong>um size<br />
Large size<br />
Normal cross<br />
Small cross<br />
Me<strong>di</strong>um cross<br />
Large cross<br />
Of Teflon, small size for Trimmer regulation<br />
RATCHET SPANNER no.14<br />
TESTER<br />
ELECTRICIAN’S SCISSORS<br />
PROGRAMMING KIT<br />
– This manual is an integral part of the equipment and as such must always<br />
remain inside of the same, so as to allow further consultations on the<br />
part of the various operators, until the <strong>di</strong>smantlement and/or scrapping<br />
of the machine.<br />
– In case of loss or damage of the present manual it is possible receive a<br />
new copy making application to the manufacturer, with prior in<strong>di</strong>cation<br />
of the data registered on machines’ serial number.<br />
– The functional reliability and optimization of machine’s services are<br />
guaranteed only if original parts are used.<br />
– Mo<strong>di</strong>fications to the machine not previously agreed on with the construction<br />
company and undertaken by the installation technician and/or manager,<br />
are considered to be under his entire responsibility.<br />
All the operations necessary to maintain the machine’s efficiency, before<br />
and during it’s use are at the users charge.<br />
– Any manipulations or mo<strong>di</strong>fications made to the machine that are not<br />
previously authorized by the manufacturer, relieve the latter from any<br />
responsibility for damages deriving from, and will automatically result<br />
in the cancellation of the machine guarantee terms.<br />
– This manual reflects the status at the moment of the emission of the<br />
automatic ven<strong>di</strong>ng machine on the market; possible mo<strong>di</strong>fications, upgra<strong>di</strong>ng,<br />
adaptments that are done the machine and that are subsequently<br />
commercialized do not oblige BIANCHI VENDING GROUP Spa neither<br />
to intervene on the machine previously supplied, nor, neither to update the<br />
relative technical documentation supplied together with the machine.<br />
– It is however BIANCHI VENDING‘s Group faculty, when deemed opportune<br />
and for valid motives, to adjourn the manuals already present<br />
on the market, sen<strong>di</strong>ng to their customers adjournment sheets that must<br />
be kept in the original manual.<br />
Possible technical problems that could occur are easily resolvable consulting<br />
this manual ; For further information, contact the <strong>di</strong>stributor from whom<br />
the machine has been purchased, or contact Bianchi Ven<strong>di</strong>ng’s Technical<br />
Service at the following numbers:<br />
� +039. 035.45.02.111 - fax +039. 035.883.304
When calling it is advisable to be able to give the following information:<br />
The data registered on the serial number label (Fig.1)<br />
version of program contained in the microprocessor (Adhesive label on<br />
the component installed on board).<br />
BIANCHI VENDING GROUP Spa declines any responsibility for damages<br />
caused to people or belongings in consequence to:<br />
Incorrect installation<br />
Inappropriate electrical and/or water connection.<br />
Inadequate cleaning and maintenance<br />
Not authorized mo<strong>di</strong>fications<br />
Improper use of the <strong>di</strong>stributor<br />
Not original spare parts<br />
– Under no circumstances is Bianchi Ven<strong>di</strong>ng Group Spa obliged to<br />
compensate for eventual damage resulting from the forced suspension<br />
of drink deliveries as the result of faults.<br />
– Installation and maintenance operations , must be done exclusively by<br />
qualified technical personnel with prior training for carrying out these<br />
duties.<br />
– For refilling use only food products that are specific for automatic ven<strong>di</strong>ng<br />
machines.<br />
– The automatic <strong>di</strong>stributor is not suitable for external installation. The<br />
machine must be installed in dry places, with temperatures that never<br />
go below 1°C it must not be installed in places where cleaning is done<br />
with water hoses (ex. big kitchens.).<br />
Do not use water jets to clean the machine.<br />
III - SAFETY NORMS<br />
Before using the automatic <strong>di</strong>stributor, read this manual carefully.<br />
– The installation and maintenance operations must be performed exclusively<br />
by qualified technical personnel.<br />
– The user must not in any circumstance be able accede to those parts of<br />
the automatic <strong>di</strong>stributor that are protected and require a tool in order<br />
to be accessible.<br />
– The knowledge and the absolute respect, from a technical point of view of<br />
the safety instructions and of the danger notices contained in this manual,<br />
constitute the basis for the operation , in con<strong>di</strong>tions of minimum risk, of<br />
the installation, starting and maintenance of the machine.<br />
Always <strong>di</strong>sconnect the POWER CABLE before maintenance or<br />
cleaning interventions.<br />
ABSOLUTELY DO NOT INTERVENE ON THE MACHINE AND DO NOT<br />
REMOVE ANY PROTECTION BEFORE THE COOLING OF THE HOT<br />
PARTS!<br />
– The functional reliability and optimization of machine’s services are<br />
guaranteed only if original parts are used.<br />
– In order to guarantee normal operation, the machine must be installed<br />
in areas that the environmental temperature is between a minimum of<br />
+1°C and a maximum of +50°C end humi<strong>di</strong>ty of not over 85%.<br />
– In order to guarantee a regular operation, always maintain the automatic<br />
<strong>di</strong>stributor in perfect cleaning con<strong>di</strong>tions<br />
– If at the moment of the installation, if con<strong>di</strong>tions <strong>di</strong>ffering from those<br />
in<strong>di</strong>cated in the present manual, or should the same undergo changes<br />
in time, the manufacturer must be imme<strong>di</strong>ately contacted before use of<br />
the machine.<br />
– Also check that any other eventual norms or regulations as laid down by<br />
national or local legislation are taken into account and applied.<br />
This device is not intended for use by in<strong>di</strong>viduals (inclu<strong>di</strong>ng children) with<br />
reduced physical, sensorial or mental capacities, or by in<strong>di</strong>viduals without<br />
the required knowledge and experience, unless said in<strong>di</strong>viduals have been<br />
instructed on the use of the device and are duly supervised by a person<br />
responsible for their safety.<br />
Children must be monitored to ensure that they do not play with the device,<br />
or use it as though it were a toy.<br />
Access to the service area is allowed only by personnel that have<br />
been specifically trained accor<strong>di</strong>ngly and that have acquired<br />
practical experience on the devices.<br />
1.0 TECHNICAL CHARACTERISTICS<br />
BVM972 BVM952<br />
Height (A) mm 1830 mm 1620 mm<br />
Width (B) mm 666 mm 666 mm<br />
Depth (C) mm 776 mm 776 mm<br />
Weight 140 kg÷190 kg (3)<br />
155 kg<br />
Power Supply V230 V230<br />
Installed power (1) 1,8 kW ÷ 3,2 kW 1,8 kW ÷ 3,2 kW<br />
Nominal current (Max) 8 A - 15 A 8 A - 15 A<br />
Water supply 0,5 ÷ 6,5 bar 0,5 ÷ 6,5 bar<br />
AVERAGE CONSUMPTIONS:<br />
IDLE STATE MODE<br />
accor<strong>di</strong>ng to EVA-EMP<br />
110-220 Wh/h 110-220 Wh/h<br />
ENERGY CONSUMPTION<br />
PER LITRE accor<strong>di</strong>ng to EVA-EMP<br />
150-230 Wh/L 150-230 Wh/L<br />
13<br />
ENGLISH<br />
Water supply connection 3/8” gas 3/8” gas<br />
Electrical supply connec. Schuko plug<br />
CUP DISPENSER<br />
Schuko plug<br />
Diameter cups mm 70÷74 70÷74<br />
BOILER RESISTANCE<br />
of armoured type:coffee boiler: 1500W 1500W<br />
of armoured type:instant boiler: 2000W 2000W<br />
Coffee in beans<br />
PRODUCT CONTAINER CAPACITY<br />
Kg 3,5 Kg 3,5<br />
Instant coffee Kg 1,4 Kg 1,2<br />
Powder milk Kg 2,2 Kg 1,7<br />
Creamer Kg 4,0 Kg 3,2<br />
Chocolate Kg 4,8 Kg 3,6<br />
Tea Kg 5,2 Kg 3,3<br />
Frozen-dry tea Kg 2,4 Kg 1,7<br />
Broth Kg 3,8 Kg 3,6<br />
Sugar Kg 4,0 Kg 4,0<br />
Caps N° 700 500<br />
Spoons N° 540 400<br />
Type of light LED LED<br />
A-weighted sound pressure level 58,2 dB ± 2,5 dB<br />
A-weighted sound power level 71,0 dB ± 3,0 dB<br />
(1) Check the rated output in<strong>di</strong>cated on the data plate applied by the<br />
<strong>di</strong>stributor.<br />
(2) Accor<strong>di</strong>ng to the requested version and the applicable standards in the<br />
place of use.<br />
(3) Accor<strong>di</strong>ng to the version.<br />
KNOWING THE DISTRIBUTOR<br />
Mod. BVM972 (Fig.1.2)<br />
1 Coffee group and grinder<br />
2 Drink <strong>di</strong>spensing group<br />
3 Sugar <strong>di</strong>spenser group<br />
4 Payment system<br />
5 Cup column<br />
6 Electronics board CPU<br />
7 Power card<br />
8 Spoons column<br />
9 Water softener filter<br />
10 Water bin<br />
11 Dispensing chamber<br />
12 Service button<br />
13 Washing button<br />
14 Cooling unit (optional)<br />
Mod. BVM952 (Fig.1.3)<br />
1 Coffee group and grinder<br />
2 Drink <strong>di</strong>spensing group<br />
3 Sugar <strong>di</strong>spenser group<br />
4 Payment system<br />
5 Cup column<br />
6 Electronics board CPU<br />
7 Power card<br />
8 Spoons column<br />
9 Water softener filter (optional)<br />
10 Water bin<br />
11 Dispensing chamber<br />
12 Service button<br />
13 Washing button<br />
14 Upper case<br />
15 Cooling unit (optional)<br />
1.1 Foreseen use<br />
The automatic <strong>di</strong>stributor is exclusively for the <strong>di</strong>spensing of drinks, prepared<br />
mixing food substances with water (by infusion as far as concerns<br />
espresso coffee).<br />
For this purpose use products declared as suitable by the manufacturer for<br />
automatic <strong>di</strong>stribution in open containers. The drinks are made in specific<br />
plastic cups automatically <strong>di</strong>spensed by the machine. Where foreseen, also<br />
the spoon for mixing the sugar is <strong>di</strong>spensed.<br />
The drinks must be consumed imme<strong>di</strong>ately and in no case are to be kept for<br />
subsequent consumption.<br />
ESPRESSO COFFEE<br />
This process functions only the models equipped with the coffee espresso<br />
group (brass or plastic), after the cup and sugar <strong>di</strong>spensing processes have<br />
been effected.<br />
– the grinder is activated until it reaches the dose of ground coffee set by<br />
the doser (Fig.2.3)<br />
– the doser electromagnet is activated , causing the opening of the door<br />
and consequent fall of the coffee into the brew chamber<br />
– the rotation group geared motor brings it into the <strong>di</strong>spensing position and<br />
simultaneously compresses the ground coffee (Fig.2.4 - Fig.2.5).<br />
– the pump that <strong>di</strong>spenses the quantity of programmed water and that is<br />
controlled by a specific electronic device, (volume meter), extracting the<br />
water from the coffee boiler(Fig.2.6).<br />
– the coffee group geared motor is activated again so as to bring again<br />
into standby position ; during this movement the used coffee grounds<br />
are expelled<br />
The sequence of these operations (grin<strong>di</strong>ng and coffee <strong>di</strong>spensing) could<br />
occur in inverse order accor<strong>di</strong>ng to the type of programme used.<br />
SPOON DISPENSING<br />
This process is activated only in the versions where the spoon <strong>di</strong>spenser is<br />
foreseen; In these versions it is possible to select the spoon in the selections<br />
without sugar and/ or in the instant selections.<br />
- the geared motor that operates the spoon release device is activated<br />
making the spoon fall into the cup. (Fig.2.7).
ENGLISH<br />
INSTANT DRINKS<br />
This process is activated when the cup and spoon <strong>di</strong>spensing processes have<br />
been completed.<br />
Accor<strong>di</strong>ng to the type drink requested and to the <strong>di</strong>stributor model, several<br />
of the various processes described here below can be activated.<br />
– If present, the whipper motor is activated (Fig.2.8)<br />
- The electro valve fixed on the soup boiler (Fig.2.9) or on the coffee boiler<br />
(Fig.2.10). it is activated to introduce into the mixer the programmed<br />
water quantity.<br />
- The Instant boiler is installed on the instant version and on the Double<br />
Boiler Espresso version.<br />
- The instant product geared motor activates the helicoidal screw conveyor<br />
so as to <strong>di</strong>spense the quantity of product programmed into the mixer (in<br />
some versions several products can be processed in the same mixer such<br />
as milk and chocolate) (Fig.2.11)<br />
- Once the preset water and powder quantity has been preset has been<br />
supplied, the mixer is <strong>di</strong>sabled after a time (T) set during the programming.<br />
3.0 MOVING AN AUTOMATIC VENDING MACHINE<br />
3.1 Moving and transport (Fig.3.1)<br />
The transport of the <strong>di</strong>stributor must be effected by competent personnel.<br />
The <strong>di</strong>stributor is delivered on a pallet; for the shifting use a trolley and move<br />
it slowly in order to avoid capsizing or dangerous movements.<br />
Avoid :<br />
– lifting the <strong>di</strong>stributor with ropes or presses<br />
– dragging the <strong>di</strong>stributor<br />
– upset or lay down the <strong>di</strong>stributor during transport<br />
– give jolts to the <strong>di</strong>stributor<br />
Avoid as the <strong>di</strong>stributor:<br />
– bumping it<br />
– overloa<strong>di</strong>ng it with other packages<br />
– exposing it to rain, to cold or sources of heat<br />
– keeping it in damp places<br />
The construction company is not liable for any damage which may be caused<br />
for the partial or complete non-observance of the warning notices in<strong>di</strong>cated<br />
above.<br />
3.2 Stocking<br />
For eventual stocking, avoid laying several machines over each other, maintain<br />
it in vertical position, in dry places with temperatures not inferior to<br />
1°C (Fig.3.2).<br />
3.3 Packing<br />
The <strong>di</strong>stributor is protected with polystyrene angles and by a transparent<br />
film in polypropylene (Fig.3.2).<br />
The automatic <strong>di</strong>stributor will be delivered packed, assuring both a mechanical<br />
protection and protection against damages from the external environment.<br />
On the package labels are applied in<strong>di</strong>cating:<br />
� maneouver with care<br />
� don’t turn upside-down<br />
� protect from the rain<br />
� don’t superimpose<br />
� protect from sources of heat<br />
� not resistant against bumps<br />
� type of <strong>di</strong>stributor and serial number.<br />
3.4 Reception<br />
Upon reception of the automatic <strong>di</strong>stributor you need to check that the same<br />
has not suffered damages during the transport.<br />
If damages of any nature are noticed place a claim with the forwarder imme<strong>di</strong>ately.<br />
At the end of the transport the packing must result without damages<br />
which means it must not :<br />
– present dents, signs of bumps, deformations or damages of the external<br />
packaging<br />
– present wet zones or signs that could lead to suppose that the packing<br />
has been exposed to rain, cold or heat.<br />
– present signs of tampering<br />
3.5 Unpacking<br />
- Free the <strong>di</strong>stributor from the packaging , cutting the protective film in<br />
which it is wrapped, along one of the protection angles (Fig.3.3).<br />
- Remove the <strong>di</strong>stributor from transport pallet, unscrewing the screws (A)<br />
that block the fixing cross staff heads to the pallet (Fig.3.4).<br />
– Release the pallet and insert the 4 feet into the threaded slots (fig. 3.5)<br />
freed of the screws (A)<br />
– remove the key from the drink <strong>di</strong>spensing chamber (Fig.3.6)<br />
Open the door of the <strong>di</strong>stributor and remove the adhesive tape from the<br />
components listed here below:<br />
� cup turret (example in Fig.3.7)<br />
� coin box<br />
� sugar container<br />
� weight on the spoon <strong>di</strong>spenser column<br />
� coin mechanism cover / Master board<br />
� product containers<br />
� water bin float mechanism<br />
� bottom skirting-board<br />
� water bin<br />
� remove the polystyrene that that blocks the product containers<br />
(Fig.3.8)<br />
The packing material must not be left accessible to others, as it is a<br />
potential environmental pollution sources. For the <strong>di</strong>sposal contact<br />
qualified companies authorized.<br />
14<br />
4.0 INSTALLATION<br />
4.1 Positioning<br />
– If positioned near to a wall, there must be a minimum <strong>di</strong>stance from the<br />
wall of at least 5 cm. (Fig.4.1) so as to allow a regular ventilation. In no<br />
case cover the <strong>di</strong>stributor with cloths or similar.<br />
– Position the <strong>di</strong>stributor, checking the leveling by means of the adjustable<br />
feet already assembled on the machines (Fig.4.2). make sure that the<br />
<strong>di</strong>stributor doesn’t have an inclination of more than 2 degrees.<br />
WARNING! Do not position the device near inflammable objects, keep<br />
a minimum safety <strong>di</strong>stance of 30 cm.<br />
Bianchi Ven<strong>di</strong>ng Group spa declines all responsibility for inconveniences<br />
due to the non observance of the above mentioned installation norms.<br />
If the installation is made in safety evacuation corridors make sure that<br />
with the <strong>di</strong>stributor door open there is anyhow sufficient space to pass by<br />
(Fig.4.1).<br />
So as to avoid that the floor gets <strong>di</strong>rty, due to accidental spilling of the products,<br />
use, if necessary, under the <strong>di</strong>stributor, a protection sufficiently wide<br />
to cover the <strong>di</strong>stributors’ operating space.<br />
4.2 Connection to the main water supply<br />
Before procee<strong>di</strong>ng with the connection of the <strong>di</strong>stributor to the water main<br />
supply verify the following water characteristics:<br />
– that it is drinkable (eventually through an laboratory’s analysis certification)<br />
– it has a pressure comprised between 0.5 and 6.5 (bar) ( if this should<br />
not be the case, use a pump or a water pressure, reducer accor<strong>di</strong>ng to<br />
the case).<br />
– install, if not present, a tap in an accessible position to isolate the machine<br />
from the water mains should it be found to be necessary (Fig.4.3).<br />
– before making water connections, make some water flow out of the tap<br />
so as to eliminate possible traces of impurities and <strong>di</strong>rt (Fig.4.4)<br />
– connect the cock to the <strong>di</strong>stributor, using a pipe in nylon material suitable<br />
for food products and suitable for the mains pressure. In the event of the<br />
use of a flexible pipe it is necessary to fit the reinforcement bush supplied<br />
inside (Fig. 4.5).<br />
– the foreseen connection is a 3/ 8 gas (Fig.4.6).<br />
4.3 Main Power supply connection<br />
The <strong>di</strong>stributor is pre<strong>di</strong>sposed to function with mono-phase 230 Volt tension<br />
and is protected with 12,5A and 20A fuses. (10A and 20A for the single boiler<br />
and instant versions and 15A and 20A for the instant hot/cold version).<br />
We suggest to check that:<br />
– the tension of net of 230 V doesn’t have a <strong>di</strong>fference of more than ± 6%<br />
– The power supply output is able to bear the power load of the machine.<br />
– use a system of <strong>di</strong>versified protection<br />
– position the machine in such a way as to ensure that the plug remains<br />
accessible<br />
The machine must be connected to earth in observance with the current<br />
safety norms.<br />
For this reason, verify the plant’s earth wire connection to ascertain that it<br />
is efficient and it answers national and European safety electric standards.<br />
If necessary require the intervention qualified personnel for the verification<br />
of the plant.<br />
– The <strong>di</strong>stributor is equipped with a power supply cable of H05VV-F<br />
3x1,5mm², with SCHUKO plug (Fig.4.7).<br />
– The sockets that are not compatible with that of the machine must be<br />
replaced. (Fig.4.8).<br />
– The use of extension, adapters and/ or multiple plugs is forbidden.<br />
– In some models, specific plugs are assembled for the destination place.<br />
Bianchi Ven<strong>di</strong>ng Group spa declines all responsibility for damages deriving<br />
for the complete or partial failure to observe these warnings.<br />
Should the power cable be found to be damaged, imme<strong>di</strong>ately <strong>di</strong>sconnect<br />
from the power socket.<br />
The power supply cables are to be replaced by skilled personnel.<br />
4.4 Starting up of the unit<br />
The <strong>di</strong>stributor is equipped with a safety switch (Fig.4.9) that <strong>di</strong>sconnects<br />
the machine whenever the door is opened ( see electric<br />
schema).<br />
In case of necessity, therefore, open the door or <strong>di</strong>sconnect unplugging of<br />
the machine from the power supply.<br />
The clamp of the power cable junction box remain under tension<br />
(Fig.4.10-pos.1) as well as the service switch inside the<br />
<strong>di</strong>stributor. (Fig.4.11-pos.2).<br />
– For some operations is however necessary operate with the door open<br />
but with the <strong>di</strong>stributor connected.<br />
It is possible for installation technician, to operate in this way, by inserting<br />
the special plastic key, supplied with the <strong>di</strong>stributor, into the door switch<br />
and rotating it 90° (Fig.4.12).<br />
The opening and the possible connection with the <strong>di</strong>stributor’s door<br />
open must be performed only by authorized in carrying out these<br />
operations.<br />
Don’t leave the <strong>di</strong>stributor open and unguarded.<br />
Give the key only to qualified personnel.<br />
Any time the <strong>di</strong>stributor is switched on there is a <strong>di</strong>agnosis cycle to check the<br />
state of DA peripherals and perform the restoration of moving parts.
4.5 Installation<br />
4.5.1 Decalcificator resin washing where it is installed as accessory<br />
First of all fill the <strong>di</strong>stributor’s water circuit, it is advisable effect the water<br />
softener resin regeneration (if installed)<br />
operating in the following manner:<br />
– insert the pipe of the bottom faucet in a container suitable for this use<br />
– open the faucet (Fig.4.13)<br />
– insert the key in the door switch (Fig.4.12)<br />
– Let the water flow until it is clear (Fig. 4.14).<br />
– Take out the key and close the faucet.<br />
BVM972 and BVM952 assembles as standard the filter cartridge and does not<br />
provide for the above mentioned procedure application. In this case, just link<br />
DA to the mains and proceed with the hydraulic circuit filling.<br />
4.5.2 Filling of water circuit<br />
INSTALLATION PROCEDURE<br />
The installation procedure is valid only for the single boiler <strong>di</strong>stributors. In<br />
particular, expresso boiler and polisulphone boiler fitted with level probes.<br />
EXPRESSO SINGLE BOILER<br />
At the line output, the <strong>di</strong>stributor will be put in con<strong>di</strong>tion of FIRST INSTALLA-<br />
TION. As soon as it reaches the location, the operator will link only water (both<br />
in case of water supply connection and autonomous tank) and the mains.<br />
The <strong>di</strong>stributor will automatically require water until micro lack of water<br />
reaches N.C. for at least 15 seconds. In this con<strong>di</strong>tion D.A. switches on the<br />
pump and, with resistance OFF, will supply 200 cc of water (measured through<br />
the fan). Following this procedure the <strong>di</strong>stributor installation date is stored.<br />
Once the date has been confirmed, D.A. waits 10 seconds and soon after it<br />
will start to heat water in the boiler.<br />
POLISULPHONE BOILER with LEVEL PROBES<br />
At the output of BV lines the <strong>di</strong>stributor will be put in con<strong>di</strong>tion of FIRST<br />
INSTALLATION. As soon it reaches the location the operator will link only<br />
water (both in case of water supply connection and autonomous tank) and<br />
the mains.<br />
The <strong>di</strong>stributor will automatically require water until the maximum level<br />
probes detect the presence of water. After this procedure the <strong>di</strong>stributor<br />
installation date is stored. Once the date has been confirmed, D.A. waits 10<br />
sec and soon after it will start to heat up water in the boiler.<br />
SINGLE STAINLESS STEEL BOILER FOR SOUPS<br />
At the output of BV lines, the <strong>di</strong>stributor will be put in con<strong>di</strong>tion of FIRST<br />
INSTALLATION.<br />
As soon it reaches the location the operator will link only water (both in case<br />
of water supply connection and autonomous tank) and the mains.<br />
The <strong>di</strong>stributor , in con<strong>di</strong>tion of OFF resistance, will automatically require<br />
water and will open the electrovalve 2 to vent air which is in the boiler.<br />
This con<strong>di</strong>tion will last 200 seconds. At the end of this timeout, the <strong>di</strong>stributor<br />
will close the electrovalve 2 and the input water ev for 20 sec. After<br />
this period, the water loa<strong>di</strong>ng will last until the micro lack of water is N.C.<br />
for a time excee<strong>di</strong>ng 5 sec (this operation is linked to a second timeout of<br />
200 seconds). In this con<strong>di</strong>tion D.A. automatically activates the electrovalve<br />
2 which will supply 20 s of water.<br />
At the end of the supply, the micro lack of water returns become N.C. After<br />
this procedure the <strong>di</strong>stributor installation date is stored. When the date<br />
is confirmed, D.A. waits 10 seconds and soon after it will start to heat up<br />
water in boilers.<br />
DOUBLE BOILER<br />
At the output of the lines, the <strong>di</strong>stributor will be put in con<strong>di</strong>tion of FIRST<br />
INSTALLATION. As it reaches the location the operator will link only water<br />
(both in the case of linking to the mains and autonomous tanker) and the<br />
mains.<br />
The <strong>di</strong>stributor, in con<strong>di</strong>tion of resistances OFF, will automatically require<br />
water and will open the electrovalve 2 to vent the air which is in the stainless<br />
boiler.<br />
This con<strong>di</strong>tion will last 200 seconds. At the end of this timeout, the <strong>di</strong>stributor<br />
will close the electrovalve 2 and the water input ev for 20 sec.<br />
After this time water loa<strong>di</strong>ng will continue until the micro lack of water is<br />
N.C. for a time excee<strong>di</strong>ng 5 sec (this operation is linked to a second timeout<br />
of 200 seconds). In this con<strong>di</strong>tion the D.A. activates the electrovalve 2 and<br />
will supply 20 sec of water.<br />
At the end of the supply, the micro lack shall return to N.C. After 10 sec D.A.<br />
activates the expresso pump, and, on con<strong>di</strong>tion of resistance OFF, it will supply<br />
20 cc of water through the coffee ev (measured through the fan).<br />
After this procedure, the <strong>di</strong>stributor installation date is stored. When the<br />
date is confirmed, D.A. waits 10 seconds and soon after it will start to heat<br />
up water in the 2 boilers.<br />
At the end of the water filling, effect a cleaning cycle of the mixer group<br />
so as to fill all the circuits and remove eventual residues from the boiler<br />
(Fig.4.16).<br />
Before connecting the power supply, ensure that the <strong>di</strong>stributor has been<br />
connected to the water mains and that the water tap has been turned on.<br />
4.5.3 Cleaning of the parts in contact with food substances<br />
ENGLISH<br />
on the product instruction labels.<br />
– remove all the product containers from the <strong>di</strong>stributor (Fig.4.17)<br />
– remove the lids from the product containers covers and product chutes<br />
(Fig.4.18). Dip all in the solution previously prepared<br />
– remove all the powder chutes, water funnels, mixing bowls and whippers<br />
and silicone tubes and <strong>di</strong>p these parts also in the prepared solution<br />
(Fig.4.18)<br />
– with a cloth soaked with the solution clean the whipper assembly base<br />
(Fig.4.20)<br />
– the parts must soak in the solution for the time in<strong>di</strong>cated on the solutions’<br />
instruction label.<br />
– Recover all the parts, rinse them abundantly, dry them perfectly and<br />
proceed with the re-assembly in the <strong>di</strong>stributor.<br />
For further safety after the assembly of the parts, effect some automatic<br />
cleaning cycles so as to eliminate any eventual residues.<br />
4.5.4 Payment system installation<br />
The <strong>di</strong>stributor is supplied without any payment system:<br />
The installation of the payment system is the responsibility of the installation<br />
technician.<br />
Bianchi Ven<strong>di</strong>ng Group spa will not take responsibility for any eventual<br />
damage to the machine itself and/or to things and/or persons due to incorrect<br />
installation.<br />
– open the board and coin mechanism protection door (Fig. 4.21)<br />
– Connect the payment system (Fig.4.22) to the Master board.<br />
The selectors must be <strong>di</strong>rectly connected to the Master board the and the serial<br />
executive systems through the interface cable supplied with the machine.<br />
Then go into programming for the correct settings.<br />
Consult chapter” 5.0 SOFTWARE INSTRUCTIONS” so as to verify setting of<br />
the parameters, that must be coherent with the system used.<br />
Check the payment system connections, by consulting the <strong>di</strong>agram of the<br />
sheet shown.<br />
– Hook the coin mechanism (Fig. 4.23).<br />
4.6 Product container loa<strong>di</strong>ng (with machine off)<br />
4.6.1 Loa<strong>di</strong>ng containers<br />
– so as to effect the loa<strong>di</strong>ng is necessary remove each container.<br />
Particularly, for the coffee bean container, it is necessary close the chute<br />
door before removing the container (Fig.4.26).<br />
– remove the covers of each container and load the product accor<strong>di</strong>ng to<br />
the product in<strong>di</strong>cated on the label (Fig.4.27)<br />
– pay attention that they there are no clots, avoid pressing the product<br />
and using an excessive quantity, so as to avoid its aging in relation to the<br />
consumption forseen in the time period between two loa<strong>di</strong>ngs.<br />
Bvm952<br />
The BVM952 ven<strong>di</strong>ng machine is equipped with an openable upper case.<br />
This opening gives access to the containers to load the product.<br />
Figures 4.24 and 4.25 show the correct operations to open/close the case.<br />
Caution! Tighten the spring shown in figure 4.25 before closing the<br />
case.<br />
Check the container product capacity in the section TECHNICAL CHARACTE-<br />
RISTICS.<br />
4.6.2 Cup loa<strong>di</strong>ng<br />
Use only cups suitable for automatic ven<strong>di</strong>ng machines, (check the relevant<br />
features by consulting the chapter 1.0 “Technical Specifications.”), avoid<br />
compressing the cups between themselves during the loa<strong>di</strong>ng. Don’t try to<br />
rotate the turret manually.<br />
First filling<br />
In installation phase with the cup <strong>di</strong>spenser completely empty, operate as<br />
follows:<br />
– Check that the cup column is not aligned with the <strong>di</strong>stribution outlet,<br />
then fill all the columns procee<strong>di</strong>ng in an anti-clockwise sense, opposite<br />
sense (when the column is aligned with the <strong>di</strong>stribution outlet), close<br />
the door and switch on the machine so that the cup column rotates and<br />
automatically places itself in a position in which it is not aligned with the<br />
inlet and then proceed to fill (Fig.4.28)<br />
– Put the cup turret’s lid back on and snap in the spring band (Fig. 4.29).<br />
Normal filling<br />
The cup column should normally filled with the machine off, simply by opening<br />
the front door, lifting the lid and inserting the missing cups.<br />
4.6.3 Spoon loa<strong>di</strong>ng<br />
Attention! Only use appropriate stirers to be used in automatic ven<strong>di</strong>ng<br />
machines.<br />
– Remove the metal weight from the spoon <strong>di</strong>spensing column (Fig. 4.30)<br />
– insert the spoons with their pack wrapping in the column and when they<br />
are positioned on the bottom cut and remove the wrapping (Fig. 4.31)<br />
– once the loa<strong>di</strong>ng is completed put the weight back in the spoon <strong>di</strong>spensing<br />
column.<br />
– Check that the spoon are cut burr-free, that they are not bent and that<br />
they are all placed horizontally (Fig.4.32).<br />
4.6.4 Insertion of waste grounds bag<br />
With <strong>di</strong>stributor switched on effect a cleaning of the mixers pressing the<br />
– insert the plastic bag wrapping it on the support itself (Fig. 4.33)<br />
buttons accor<strong>di</strong>ng to what is described in the service functions so as to eliminate<br />
any <strong>di</strong>rt from the coffee boiler and the instant boiler.<br />
– Use plastic bags that are sufficiently long so that they touch the bottom<br />
of the <strong>di</strong>stributor.<br />
– wash your hands carefully<br />
- Make sure that the liquid collection tank is in the correct position (Fig.<br />
– prepare an anti-bacterial cleaning solution with a chlorine base (products 4.33) and perio<strong>di</strong>cally empty it.<br />
that can be purchased in pharmacies) carefully following the in<strong>di</strong>cations<br />
15
ENGLISH<br />
4.8 FIRST SELF INSTALLATION MODE<br />
At the first machine start up will be performed a self installtion .The aim<br />
of this procedure is to avoid the manual connections of wires on the boards<br />
after the filling of the Hydraulic cyrcuit.<br />
For Espresso single boiler:<br />
When the <strong>di</strong>stributor is started up the airbreak is filled with water.<br />
When the floater is in the upper position the machine will start loa<strong>di</strong>ng water<br />
automatically and this will go on until 200cc of water are counted by the fan<br />
(then water will be supplied via a mixer throughout the procedure).<br />
The procedure will be carried out with resistance off.<br />
At the end a date will be shown on the <strong>di</strong>splay.<br />
For Espresso Double boiler<br />
When the <strong>di</strong>stributor is started up the airbreak is filled with water.<br />
When the floater is in the upper position the machine will start the automatic<br />
installation process and following loa<strong>di</strong>ng of both boilers (then water will be<br />
supplied via a mixer and by the 3-way Coffee EV throughout the procedure).<br />
The procedure will be carried out with resistance off.<br />
At the end a date will be shown on the <strong>di</strong>splay.<br />
For Instant boiler :<br />
When the <strong>di</strong>stributor is started up the airbreak is filled with water.<br />
When the floater is in the upper position at least for 5 consecutive seconds<br />
the machine will open an instant electrovalve and start a water loa<strong>di</strong>ng<br />
cycle in the boiler (then water will be supplied via a mixer throughout the<br />
procedure)<br />
The procedure will be carried out<br />
with resistance off.<br />
At the end a date will be shown on<br />
the <strong>di</strong>splay.<br />
Now we must enter the installation date using the push button panel as<br />
shown below:<br />
For Alphanumeric version<br />
KEY 1 INCREASE VALUE<br />
KEY 3 MOVE CURSOR<br />
KEY 5 ENTER DATE<br />
KEY 7 DECREASE VALUE<br />
KEY 9 MOVE BETWEEN Day/Month/Year<br />
For Push Button Panel version<br />
Pushing the ENTER BUT-<br />
TON , the machine will<br />
wait for 10 seconds then<br />
will start to warm up the<br />
boiler.<br />
The date will be stored<br />
in a safe place of the<br />
board.<br />
To restore the first installation<br />
mode, go to<br />
Programming using Password<br />
22933.<br />
INCREASE<br />
VALUE<br />
DECREASE<br />
VALUE<br />
MOVE<br />
CURSOR<br />
MOVE<br />
BETWEEN<br />
Day/Month/Year<br />
5.0 SOFTWARE INSTRUCTIONS<br />
ENTER DATE<br />
5.1 PASSWORD<br />
The current programming logic requires, when entering by pressing the<br />
PROG key, the insertion of a password allowing to access one programming<br />
menu.<br />
To facilitate and speed up some operations on the field, the password management<br />
is sub<strong>di</strong>vided as follows:<br />
PWD 1 - Reduced programming menu<br />
PWD 2 – Complete programming menu<br />
PWD 3 – Sales Menu;<br />
PWD 4 – Sub<strong>di</strong>vided into 2 PWD set: 88000 to test all BVM600 slaves;<br />
Test (managed by Bianchi Ven<strong>di</strong>ng Group only) to access the test carried<br />
out in the assembly line.<br />
Note: If the password of the reduced menu coincides with the password of<br />
the complete menu, the latter will prevail.<br />
16<br />
5.2 MACHINE MENUS<br />
PWD 1 allows the access the complete menu of the ven<strong>di</strong>ng machine. The<br />
menu access procedure is as follows: press PROG key on the master board,<br />
enter the password and press ENTER key. Below is a list of programming<br />
menus of the ven<strong>di</strong>ng machine.<br />
5.2.1 SOFTWARE MENUS MACHINE<br />
Direct selection keyboard<br />
In the programming mode the keys have the following meaning:<br />
1 Increase<br />
2 Show name<br />
3 Move cursor<br />
4 Powder test<br />
5 Go back to previous menu (esc)<br />
6 Only water test<br />
7 Decrease<br />
8 Complete test (Dose menu)<br />
EV or Inst. Test (Drink dose menu)<br />
9 Enter<br />
0 Complete test (Drink dose menu)<br />
5.3 MAINTENANCE<br />
Maintenance is performed by pressing the key ‘Service’.<br />
In line 1 ”Maintenance xxx” will be <strong>di</strong>splayed , where xxx <strong>di</strong>splays the boiler<br />
temperature, and in line 2 the possible detected alarms.<br />
Pressing twice the key Service, the stand by heating phase will be bypassed,<br />
allowing you to perform test selections even on non regimen temperatures.<br />
Pressing a key the slave boiler temperature will be <strong>di</strong>splayed in scroll.<br />
The maintenance panel has the following functions:<br />
In the maintenance mode the keys have the following meaning:<br />
Key 1: Scroll ALARMS (if pressed for 5 seconds appear to <strong>di</strong>splay the last<br />
15 alarms)<br />
Key 5: Reset alarms<br />
Code 01: Group rotation<br />
Code 02: MDB tube filling<br />
Code 03: MDB tube depletion<br />
Code 04: Input test and empty pipes for MDB<br />
Code 05: Reset alarms (or only 5)<br />
Code 06: Complete test<br />
Code 07: Only water test<br />
Code 08: Nozzle movement<br />
Code 09: Column rotation<br />
Code 12: Total entries <strong>di</strong>splay<br />
Code 13: Cup release<br />
Code 14: Mixer test<br />
Code 15: Refill<br />
Code 16: Test without sugar<br />
Code 17: Spoon<br />
Code 18: grinder-doser test<br />
Code 0A: Display Temperature last 48 hours Vega A<br />
Code 0B: Display Temperature last 48 hours Vega B<br />
Key+Sugar: Reset alarms<br />
Key–Sugar: Scroll ALARMS (if pressed for 5 seconds appear to <strong>di</strong>splay the<br />
last 15 alarms)<br />
In maintenance mode it is necessary to enter in sequence,via the alphanumeric<br />
keyboard, the numbers shown to obtain the desired function.
6.0 MAINTENANCE AND INACTIVITY<br />
6.1 Cleaning and Loa<strong>di</strong>ng<br />
So as to guarantee the correct functioning of the <strong>di</strong>stributor during<br />
time it is necessary to effect some operations perio<strong>di</strong>cally, some of<br />
which are in<strong>di</strong>spensable for the observance of the health standard<br />
norms. These operations must be done with the <strong>di</strong>stributor open and<br />
switched off. The cleaning operations must be effected before the loa<strong>di</strong>ng<br />
of the products. In order to guarantee normal operation, the machine<br />
must be installed in areas that the environmental temperature is between a<br />
minimum of -1°C and a maximum of +32°C end humi<strong>di</strong>ty of not over 70%.<br />
Must not be installed in places where cleaning is done with water hoses(ex.<br />
big kitchens.).<br />
Do not use water jets to clean the machine.<br />
Please refer to the provisions of section III SAFETY REGULATIONS<br />
and section 4.0 INSTALLATION of this manual.<br />
6.1.1 Recommended maintenance<br />
Bianchi Ven<strong>di</strong>ng Group spa guarantees the proper operation<br />
of its <strong>di</strong>stributor over time only with a preventive maintenance<br />
carried out in compliance with the provisions listed below:<br />
TYPE OF INTERVENTION<br />
Softener regeneration<br />
(*Resins)<br />
Replacement of piston equipped<br />
with filters and gask<br />
Replacement of entire coffee<br />
group<br />
Decalcification of espresso boiler<br />
and solenoid valves<br />
6.2 Or<strong>di</strong>nary and Extraor<strong>di</strong>nary Maintenance<br />
No. of COUN<br />
5.000 10.000 20.000 30/40.000 70/80.000<br />
Replacement of grinders �<br />
Decalcification of instant drink<br />
boiler and solenoid valve<br />
* if not otherwise recommended by the softener supplier.<br />
6.1.2 Perio<strong>di</strong>c cleaning by the maintenance technician<br />
6.1.3 Daily cleaning recommended<br />
The operations described in this section are purely in<strong>di</strong>cative as they are<br />
tied to variable factors such as the water hardness, humi<strong>di</strong>ty, products<br />
used and workload, etc.<br />
For all operations that require the <strong>di</strong>sassembly of the <strong>di</strong>stributors’<br />
components, make sure that the latter is switched off.<br />
Entrust the operations mentioned here below to qualified personnel.<br />
If the operations require that the <strong>di</strong>stributor be switched on, entrust them<br />
to specially trained personnel.<br />
For more complicated interventions, such as removing the lime build-up<br />
in the boilers a good knowledge of the equipment is necessary.<br />
�<br />
First step: <strong>di</strong>sposal of the waste inside the waste bins (used cups, stirrers,<br />
paper, tissues etc).Once the waste has been <strong>di</strong>sposed of it is possible to<br />
clean the surroun<strong>di</strong>ng area.<br />
- elimination of the coarse <strong>di</strong>rt<br />
- <strong>di</strong>sinfecting of the flooring and walls of the area surroun<strong>di</strong>ng the machine<br />
up to a ra<strong>di</strong>us of 1 metre around the <strong>di</strong>stributor<br />
- once this is complete proceed with opening the <strong>di</strong>stributor.<br />
The objective is that to avoid the creation of bacteria in the food zone<br />
areas.<br />
For all cleaning operations follow the instructions in<strong>di</strong>cated in paragraph<br />
6.3.1.<br />
Operate as follows:<br />
- clean all the visible parts in the <strong>di</strong>spensing area. (Fig. 6.1 e Fig. 6.2)<br />
remove and clean carefully:<br />
– funnels and powder chutes (Fig. 6.3-pos.1)<br />
– canal água (2), camara miscelação (3), ventainha de misturagem (4) e<br />
anel (5).<br />
– silicone water <strong>di</strong>spensing tubes.<br />
– <strong>di</strong>spensing chamber (Fig. 6.4)<br />
– coffee funnel and chute (Fig. 6.5)<br />
Before effecting the re-assembly operations clean all the elements carefully.<br />
– remove all coffee powder residue; the unit can be removed from its housing<br />
to make the task easier (Fig. 6.6)<br />
6.1.4 Product loa<strong>di</strong>ng<br />
When necessary provide for the loa<strong>di</strong>ng of the products and/or consumption<br />
materials of the automatic ven<strong>di</strong>ng machine. For these operations please<br />
refer to the operations described under chapter 4.6.<br />
�<br />
�<br />
�<br />
�<br />
ENGLISH<br />
Monthly effect the debacterisation of all the parts in contact with food substances<br />
using chlorine based solutions following the operations already<br />
described under chapter 4.5.3.<br />
COFFEE MACHINE TIMING CHECK PROCEDURE<br />
Ensure that during the idle state, the rotating index is aligned with the stage<br />
index (see fig. 6.7)<br />
Ensure that during the delivery stage that the rotating index is not more than<br />
1.5 mm in advance of the delivery reference point (the rotating index must be<br />
at a delivery position of between 0 and 1.5 mm from the delivery point).<br />
6.3 MAINTENANCE PROCEDURES<br />
Recommended equipment:<br />
For those responsible for filling up and maintenance of the machine the<br />
recommended equipment is as follows:<br />
- Tool carrier case<br />
- Clean uniform<br />
- Disposable gloves<br />
- Clamp for closing the<br />
- Roll of kitchen paper<br />
- Wood or plastic stick<br />
- Bottle of detergent<br />
- Bottle of <strong>di</strong>sinfectant<br />
- “Distributor out of action” sign<br />
- Small table for resting items (optional)<br />
Never use:<br />
- Sponges, scourers, cloths<br />
- Brushes<br />
- Screwdrivers or metallic objects.<br />
6.3.1 Sanitization<br />
IMPORTANT ADVICE<br />
- Ven<strong>di</strong>ng operators and technicians who usually get in contact with food<br />
shall pay particular attention to their personal cleaning and the cleaning<br />
of their clothes.<br />
In particular before starting any operation on the <strong>di</strong>stributor, make sure<br />
to:<br />
- wear protection shoes or at least suitable shoes<br />
- carefully wash your hands<br />
- keep your hand nails short, clean and with no varnish<br />
- keep your hair short and clean<br />
- avoid scratching yourselves during maintenance operations<br />
- avoid smoking and eating during work<br />
- avoid touching hair, mouth, nose during work<br />
- avoid wearing rings, bracelets, watches<br />
- cover wounds (if any)<br />
- avoid any personal strong perfume<br />
The major food contamination passes through hands; remember to wash<br />
your hands when:<br />
- you start working on the <strong>di</strong>stributor<br />
- after being to the toilet<br />
- after touching your hair, blowing your nose, eating<br />
- after touching chemical cleaning products<br />
- after shaking hands with other people<br />
If you use protection glove, remember to change them whenever they get<br />
in contact with polluting objects.<br />
To ensure hygiene:<br />
- Use <strong>di</strong>sinfectants<br />
The purpose of the <strong>di</strong>sinfectants is to destroy any surface bacteria which<br />
may be present.<br />
For cleaning:<br />
- Use detergents and/or detersive products<br />
The detergents act to eliminate the <strong>di</strong>rt.<br />
Products exist on the market which are both detergents/<strong>di</strong>sinfectants and<br />
are usually sold at the chemist’s (chlorine-based).<br />
For anything not mentioned in this section, refer to the HACCP regulation<br />
and in particular pay attention to the following:<br />
- Cleaning of the premises<br />
- Product transportation<br />
- Machinery maintenance<br />
- Waste <strong>di</strong>sposal<br />
- Drinking water procurement<br />
- Personnel hygiene<br />
- Food product characteristics<br />
- Personnel training<br />
- (Directive 93/43 CEE)<br />
Important advice (ref. Directive 93/43)<br />
- The premises where the automatic <strong>di</strong>stributors are installed must be such<br />
as to prevent any accumulation of <strong>di</strong>rt, any contact with toxic materials, and<br />
the formation of condensate or mould on the surfaces of the machine.<br />
17
ENGLISH<br />
- It is also important that the premises where the <strong>di</strong>stributor is installed<br />
can guarantee a correct hygienic procedure, also preventing any cross<br />
contamination, during the operations, between food, equipment, materials,<br />
water, air recirculation or personnel interventions and exclu<strong>di</strong>ng any<br />
external contamination agent such as insects or other harmful animals.<br />
- Make sure that the water system complies with EEC Directive 80/778<br />
regar<strong>di</strong>ng the quality of water for human consumption.<br />
- Ensure a correct mechanical or natural aeration, avoi<strong>di</strong>ng any mechanical<br />
air flow from a contaminated area to a cleaned area.<br />
The cleaning operations may be undertaken at the site of installation of the<br />
automatic <strong>di</strong>stributor<br />
Example of a recommended cleaning procedure of a hot drink automatic<br />
<strong>di</strong>stributor:<br />
The person responsible for machine hygiene, before opening the <strong>di</strong>stributor<br />
must check the cleanliness of the surroun<strong>di</strong>ng environment and put up a<br />
sign to tell any potential consumers that:<br />
- the machine is “out of use as maintenance is in progress”<br />
- it is important that the person responsible for cleaning never has to interrupt<br />
his work in order to operate the machine.<br />
- For internal cleaning use clean cloths, better if <strong>di</strong>sposable.<br />
- It is in<strong>di</strong>spensable to avoid any contact between the products used for the<br />
generic cleaning of the <strong>di</strong>stributor and the products to clean the parts in<br />
contact with food.<br />
- During cleaning operations, pay attention not to transfer germs from <strong>di</strong>rty<br />
areas to already cleaned areas.<br />
A) Use clean gloves.<br />
B) Use hot water not taken from toilets.<br />
C) Pay special care to clean the parts in contact with food<br />
- Carefully remove any residual <strong>di</strong>rt before procee<strong>di</strong>ng to use <strong>di</strong>sinfectants.<br />
- Carefully avoid any contact of food with <strong>di</strong>rty surfaces.<br />
- During the cleaning operations carefully follow the instructions on the<br />
packages of chemical detergents. Absolutely avoid any contact of food<br />
with detergents.<br />
- Make sure that your cleaning equipment is perfectly efficient.<br />
D) At the end of the cleaning operations, place the water collecting bags in<br />
appropriate areas far from the automatic <strong>di</strong>stributor areas.<br />
The following table summarizes the recommended behaviour to reduce the<br />
risk of bacteria proliferation and contamination inside the <strong>di</strong>stributor to the<br />
minimum.<br />
TYPE OF INTERVENTION<br />
Remove and wash all visible parts in<br />
the delivery area with sanitizing liquid.<br />
Empty the liquid ground collecting<br />
buckets and clean them with sanitizing<br />
liquid.<br />
Empty the coffee ground collecting<br />
tank and wash it with sanitizing liquid<br />
Remove all containers and clean with<br />
a wet cloth all container supporting<br />
parts, as well as the bottom and the<br />
outside of the <strong>di</strong>stributor, in particular<br />
the delivery area; then proceed<br />
to sanitization.<br />
* Sanitization kits inclu<strong>di</strong>ng plastic<br />
parts for the passage of pulverized<br />
or liquid product (cups, pipes, delivery<br />
flange, nozzles,…). For any<br />
further information, please contact<br />
<strong>di</strong>rectly our offices.<br />
EVERY<br />
DAY<br />
�<br />
�<br />
�<br />
TIME / No.of COUN<br />
EVERY<br />
WEEK<br />
�<br />
20000 COUN<br />
OR MAX<br />
EVERY<br />
MONTH<br />
* Bianchi Ven<strong>di</strong>ng Group has prepared specific kits expressly designed for<br />
every <strong>di</strong>stributor mode<br />
6.4 Regulations<br />
6.4.1 Dosage and grin<strong>di</strong>ng regulations<br />
– Coffee temperature in the cup between 70° and 80°<br />
– Temperature of soup products in the cup between 70°C and 80 °C.<br />
– Grammage of coffee powder between 6 and 8 grams.<br />
�<br />
18<br />
– grams of instant powder products accor<strong>di</strong>ng to what is in<strong>di</strong>cated on the<br />
specific tables.<br />
In order to obtain the best results with the product used we advise to check:<br />
- Ground coffee gram weighting: vary the quantity using the knob<br />
positioned on the measuring device (Fig.6.8).<br />
Each notch of the regulation knob corresponds to a value of 0.05<br />
grams.<br />
By turning in a clockwise sense the amount decreases.<br />
By turning in an anti-clockwise sense the amount increases.<br />
The variation in the product can be controlled by means of the reference<br />
notches on the body of the measuring unit (see figure 6.8)<br />
Coffee pellets must be have a compact consistency and be slightly<br />
damp.<br />
- Adjustment of the grade of manual grin<strong>di</strong>ng.<br />
Turn the screw (fig.6.9) to obtain the desired results.<br />
Turn clockwise for fine grin<strong>di</strong>ng, turn anti-clockwise for coarser grin<strong>di</strong>ng.<br />
After regulation, three product regulations must be carried out in order to<br />
assess the efficiency of the regulation, the finer the granules the greater<br />
the time required for product delivery.<br />
- Automatic adjustment of grin<strong>di</strong>ng (Fig.6.10)<br />
- It allows in the expresso versions to keep grin<strong>di</strong>ng steady, irrespective of<br />
the percentage of moisture, temperature and wear of blades.<br />
- The first adjustment is performed with the device <strong>di</strong>sconnected<br />
- Performing the dose adjustment manually (6-7g)<br />
- Performing the grin<strong>di</strong>ng adjustment manually<br />
- Reckoning the supply time in seconds (std 18s)<br />
- Reconnecting the device<br />
- Setting the measured supply time, in programming<br />
- Out of 5 expresso coffee, this parameter test will be automatically performed<br />
.The valid rea<strong>di</strong>ngs correspond with the third / fourth coffee:<br />
The first two will be ignored since they are the results of the previous<br />
adjustments, the fifth will be adjusting tests<br />
6.4.2 Regulation of the instant solenoid water delivery valves<br />
In the case of soluble products you can regulate the quantity of water and the<br />
powder dosage electronically by varying the standard parameter, accor<strong>di</strong>ng<br />
to the procedure in<strong>di</strong>cated in chapter 5.0 SOFTWARE INSTRUCTIONS.<br />
ATTENTION: Re-adjust water rate by acting on the soup valve adjusting<br />
screws means to compromise and alter the quantity of water supplied in<br />
cup and therefore its dose.<br />
To access the electrovalve placed in the instant boiler, remove panel (1) by<br />
loosening the two screws (2) shown in figure 6.12<br />
– To obtain a good rinsing of cups possibly act on the rate screw and then<br />
check that doses are reliable (Fig. 6.11).<br />
6.4.3 Access to internal parts<br />
To access the internal parts of the automatic <strong>di</strong>stributor (pumps, espresso<br />
coffee boiler, electrovalves, electrical connections,etc.):<br />
Espresso version:<br />
- Rotate the sugar <strong>di</strong>spensing group towards outside (fig.6.13).<br />
- Then act on the two handles shown in fig. 6.14 - 6.16, remove the panel<br />
and support it until completely taken out (fig.6.15-6.17).<br />
After carrying out maintenance operations, if required, lift the complete panel<br />
until it is correctly installed in vertical position, then put again the sugar<br />
<strong>di</strong>spensing group in work position by rotating it rightwards.<br />
Instant version:<br />
- Disassemble the mixer groups and loosen the three screws shown in figure<br />
6.18 - 6.19, slide the frontal panel leftwards until the slots are released,<br />
then remove the panel to access inside.<br />
6.5 Inactivity<br />
If the automatic ven<strong>di</strong>ng machine remains inactive for a long time it is necessary<br />
to perform some prevention operations:<br />
– <strong>di</strong>sconnect the machine electrically and hydraulically.<br />
– empty completely the instant boiler and the floater reservoir removing<br />
the plug located on the hose along the drain chute (Fig. 6.20).<br />
– Put the plug back in once the draining has been done.<br />
– unload all the product from the containers<br />
– perform a thorough cleaning of all the parts in contact with food substances<br />
accor<strong>di</strong>ng to what has already been described.<br />
– empty the liquid waste bin carefully<br />
– eliminate the spent grounds bag<br />
– clean with a cloth all the internal and external surfaces of the machine.<br />
– protect the outisde of the machine with a plastic film wrapping or bag<br />
(fig. 6.21)<br />
– stock in a dry and protected place where the temperature is not less than<br />
1° C.
DECLARACIÓN DE CONFORMIDAD<br />
La BIANCHI VENDING GROUP S.p.A.<br />
Corso Africa, 9 - 24040 Zingonia <strong>di</strong> VERDELLINO (BG) Italia<br />
Declara bajo su responsabilidad que la familia de los <strong>di</strong>stribuidores automáticos modelo:<br />
Marca: BIANCHI VENDING<br />
Fabricante: BIANCHI VENDING GROUP S.p.A.<br />
Tipo/Modelo: BVM 952 – BVM 972<br />
Declaración de Conformidad<br />
Directiva RoHS<br />
Directiva 2002/95/CE del Parlamento Europeo y<br />
• Cromo esavalente (Cr(VI))<br />
del Consejo de 27 de Enero de 2003<br />
• Bifenile sobre polibromurati restricciones (PBB) a la utilización de sustancias peligrosas<br />
• Eteri <strong>di</strong> <strong>di</strong>fenili polibromurati:<br />
en aparatos eléctricos y electrónicos<br />
o PentaBromoDifenilEtere Bianchi Ven<strong>di</strong>ng Group (PBDE) S.p.A. declara que:<br />
desde el 1° de julio de 2006, cualquier producto o OttaBromoDifenilEtere de Bianchi Direttiva Ven<strong>di</strong>ng Group (OttaBDE) S.p.A. RoHS<br />
que se introduce en el mercado en Europa se ajusta a la Directiva<br />
RoHS, y por lo tanto no contiene concentraciones o DecaBromoDifenilEtere que rebasen los límites (DecaBDE) permitidos con relación a las siguientes sustancias<br />
• Pefluorooctano sulfonato (PFSO)<br />
Direttiva • PoliCloroNaftalene 2002/95/CE (PCN)<br />
• Plomo (Pb)<br />
• del Sulfonato Parlamento de perfluorooctano (PFSO) Europeo e<br />
• Mercurio (Hg)<br />
• Bis(tribromophenoxy)etano PoliCloroBifenile • PoliCloroNaftaleno (PCB) (PCN)<br />
• Cadmio (Cd)<br />
• Benzene del Consiglio • del Bis(tribromophenoxy)etano 27 Gennaio 2003 PoliCloroBifenil (PCB)<br />
• Cromo hexavalente (Cr(VI))<br />
• Benceno<br />
• Bifenil polibrominados sulla (PBB) restrizione dell’uso <strong>di</strong> determinate sostanze pericolose<br />
• Éteres de <strong>di</strong>feniles polibrominados:<br />
o PentaBromoDifenilEter (PBDE) nelle apparecchiature elettriche EL L’Amministratore ADMINISTRADOR ed elettroniche<br />
Delegato DELEGADO<br />
o OctaBromoDifenilEter (OctaBDE)<br />
o DecaBromoDifenilEter (DecaBDE)<br />
Zingonia <strong>di</strong> Verdellino (BG), a 12 de enero de 2009<br />
19<br />
Zingonia <strong>di</strong> Verdellino (BG), 12 Gennaio 2009<br />
ESPAÑOL<br />
Satisface los Requisitos Esenciales de Seguridad de las Directivas:<br />
1) Baja tensión 2006/95/CE (relativa a la aproximación de las legislaciones de los Estados miembros sobre el material eléctrico destinado a utilizarse<br />
con determinados límites de tensión) -BT-<br />
2) Compatibilidad electromagnética 2004/108/CE (relativa a la aproximación de las legislaciones de los Estados miembros en materia de compatibilidad<br />
electromagnética) -EMC-<br />
3) REG. (CE) 1935/2004 sobre los materiales y objetos destinados a entrar en contacto con alimentos<br />
REG. (CE) 1895/2005 relativo a la restricción en el uso de determinados derivados epoxí<strong>di</strong>cos enmateriales y objetos destinados a entrar en contacto<br />
con productos alimenticios<br />
DIR. 2002/72 CE relativa a los materiales y objetos plásticos destinados a entrar en contacto con productos alimenticios.<br />
Las pruebas / comprobaciones han sido realizadas con arreglo a las vigentes Normas armonizadas / europeas:<br />
1)BAJA TENSIÓN (Seguridad eléctrica BT):<br />
EN 60335-1:2002 +A1:2004 +A11:2004 +A2:2006 +A12:2006 +A13:2008 (Seguridad de los aparatos electrodomésticos y análogos - Norma general)<br />
EN 60335-2-75:2004+ A1:2005 +A11:2006 + A2:2008 +A12:2010. (Requisitos particulares para <strong>di</strong>spensadores comerciales y máquinas de venta)<br />
EN ISO 11201:2009 +EN ISO 3744:2009 Determinación de los niveles de potencia acústica: LpA < 70 dB(A)<br />
2) COMPATIBILIDAD ELECTROMAGNÉTICA (EMC):<br />
EN 55014-1:2006 (Límites y métodos de me<strong>di</strong>da de las características relativas a la perturbación ra<strong>di</strong>oeléctrica de los aparatos electrodomésticos o<br />
análogos accionados por motor o con <strong>di</strong>spositivos térmicos, de las herramientas y equipos eléctricos análogos)<br />
EN 55014-2:1997 +A1:2001 +A2:2008 (Requisitos de inmunidad para aparatos electrodomésticos, herramientas eléctricas y aparatos análogos)<br />
EN 61000-3-2: 2006 (Límites de las emisiones para corriente armónica)<br />
EN 61000-3-3:1995+ A1:2001 +A2:2005 (Limitación de las fluctuaciones de tensión y flicker en las redes de suministro de baja tensión para equipos<br />
con corriente asignada ≤ 16 A)<br />
EN 62233:2008 Métodos de me<strong>di</strong>da de los campos electromagnéticos de los aparatos electrodomésticos y análogos en relación con la exposición humana.<br />
3) APTITUD DE LOS MATERIALES EMPLEADOS AL CONTACTO CON PRODUCTOS ALIMENTICIOS<br />
Pruebas de “Aptitud al contacto con productos alimenticios” según previsto por la normativa italiana D.M. 21-03-1973 y mo<strong>di</strong>ficaciones sucesivas ⇒<br />
Decreto de 4 de mayo de 2006 n° 227, y por las normas de transposición de las Directivas Europeas: 82/711/CEE, 85/572/CEE, 93/8/CEE, 97/48/CE,<br />
2002/72/CE, 2004/13/CE, 2004/19/CE, 2005/79/CE, Reg. CE n. 1935/04 y Reg. CE n. 1895/2005.<br />
EL ADMINISTRADOR DELEGADO<br />
Zingonia <strong>di</strong> Verdellino (BG), Enero 2010<br />
INFORMACIÓN PARA LOS USUARIOS<br />
Con arreglo del Decreto Legislativo 25 Septiembre 2007, Nº 185 y al Art. 13 del Decreto Legislativo 25 Julio 2005, Nº 151 “Actuación de las Directivas<br />
2002/95/CE, 2002/96/CE y 2003/108/CE, relativas a las restricciones a la utilización de sustancias peligrosas en los aparatos eléctricos y electrónicos,<br />
como asimismo a la eliminación de los residuos”.<br />
<strong>Dichiarazione</strong> <strong>di</strong> <strong>Conformità</strong><br />
El símbolo del cajón tachado aplicado en el aparato in<strong>di</strong>ca que el producto, al final de su vida útil, debe ser recogido por separado de los demás<br />
desechos.<br />
Direttiva RoHS<br />
Por lo tanto, el usuario deberá entregar el aparato, una vez que ha alcanzado el final de su vida, a los idóneos centros de recolección <strong>di</strong>ferenciada de los<br />
desechos electrónicos y electrotécnicos, o devolverlo al revendedor en el momento de la compra de un nuevo aparato de tipo equivalente.<br />
La adecuada recolección <strong>di</strong>ferenciada para el envío Direttiva sucesivo del 2002/95/CE aparato al reciclaje, del para Parlamento el tratamiento Europeo y para la eliminación e ambientalmente compatible,<br />
contribuye a evitar posibles efectos negativos sobre el ambiente del Consiglio y sobre la salud, del y 27 favorece Gennaio el reciclaje 2003 de los materiales que componen el aparato.<br />
La eliminación abusiva del producto por parte del usuario, implica la aplicación de las sanciones administrativas con arreglo al Dec. Leg. Nº 22/1997<br />
(artículo 50 y siguientes del Dec. Leg. Nº 22/1997). sulla restrizione dell’uso <strong>di</strong> determinate sostanze pericolose<br />
nelle apparecchiature elettriche ed elettroniche<br />
Bianchi Ven<strong>di</strong>ng Group S.p.A. <strong>di</strong>chiara che:<br />
dal 1° luglio 2006 qualsiasi prodotto <strong>di</strong> Bianchi Ven<strong>di</strong>ng Group S.p.A. immesso sul<br />
mercato in Europa è conforme alla Direttiva RoHS, e quin<strong>di</strong> non contiene<br />
concentrazioni che superino i limiti consentiti per le seguenti sostanze:<br />
• Piombo (Pb)<br />
• Mercurio (Hg)<br />
• Cadmio (Cd)<br />
<strong>Dichiarazione</strong> <strong>di</strong> <strong>Conformità</strong><br />
Bianchi Ven<strong>di</strong>ng Group S.p.A. <strong>di</strong>chiara che:<br />
______________________<br />
dal 1° luglio 2006 qualsiasi prodotto <strong>di</strong> Bianchi Ven<strong>di</strong>ng Group S.p.A. immesso sul<br />
mercato in Europa è conforme alla Direttiva RoHS, e quin<strong>di</strong> non contiene
ESPAÑOL<br />
ANTES DE UTILIZAR LA MAQUINA, LEER ATENTAMENTE ESTE MANUAL PARA UN CORRECTO EMPLEO SEGUN LOS REQUISITOS ESCENCIALES DE SEGURIDAD.<br />
¡ATENCION! In<strong>di</strong>caciones importantes<br />
para la seguridad!<br />
LEER atentamente el manual de<br />
instrucciones antes de la puesta<br />
en servicio.<br />
ADVERTENCIAS<br />
ENCARGADO DE LA MANUTENCIÓN<br />
Se define como encargado de la manutención a la persona que se ocupa de cargar los recipientes para el producto soluble, el azúcar, el café, las<br />
paletinas y los vasos.El encargado de la manutención debe además ocuparse de la limpieza del <strong>di</strong>stribuidor (véanse las operaciones in<strong>di</strong>cadas en<br />
el capítulo 6.0). En el caso de averías, el encargado de la manutención debe llamar al técnico instalador.<br />
TÉCNICO INSTALADOR<br />
Se define como técnico instalador a la persona encargada de la instalación del <strong>di</strong>stribuidor automático, de la puesta en funcionamiento y de la<br />
programación de las funciones.Todas las operaciones de calibrado son de exclusiva competencia del instalador, quien es además depositario de<br />
la password de acceso a la programación.<br />
Llaves a <strong>di</strong>sposición del<br />
ENCARGADO DE LA<br />
MANUTENCIÓN y del<br />
técnico INSTALADOR<br />
N° 1 Llave<br />
PREMISA<br />
I Advertencia para el usuario<br />
Este <strong>di</strong>stribuidor automático ha sido <strong>di</strong>señado y construido en el pleno respeto<br />
de las normativas vigentes que conciernen a la seguridad y resulta ser seguro<br />
para las personas que sigan las instrucciones de carga y limpieza or<strong>di</strong>naria presentadas<br />
en este manual.<br />
El usuario no debe por ningún motivo, extraer las protecciones que<br />
requieran de una herramienta para ser extraídas.<br />
Para algunas operaciones de mantenimiento,(que han de efectuarse solo<br />
por técnicos cualificados e in<strong>di</strong>cadas en este manual por el correspon<strong>di</strong>ente<br />
pictograma), se precisa desmontar algunas protecciones de seguridad.<br />
En el respeto de las normativas de seguridad, algunas operaciones son de<br />
exclusiva competencia del técnico instalador y, solamente bajo autorización<br />
específica, también el operador encargado de la manutención or<strong>di</strong>naria puede<br />
tener acceso a operaciones determinadas.<br />
El conocimiento y el respeto desde el punto de vista técnico de las advertencias<br />
de seguridad y de los peligros contenidos en este manual, permiten la<br />
instalación, puesta en marcha y mantenimiento con un riesgo mínimo.<br />
II Advertencias generales<br />
LLAVES DE CAJA<br />
n° 5,5 - n° 7 - n° 8 - n° 10 - n° 20 - n° 22<br />
LLAVES DE CUBO (llave-tenedor)<br />
n° 7 - n° 8 - n° 10 - n° 12 - n° 14<br />
Antes de utilizar el <strong>di</strong>stribuidor automático, leer atentamente<br />
en todos sus apartados, el presente manual.<br />
El conocimiento de la información y del contenido del presente manual, es<br />
esencial para una correcta utilización del <strong>di</strong>stribuidor automático.<br />
– La intervención en el <strong>di</strong>stribuidor automático solo se puede realizar por personal<br />
competente y que haya recibido formación previa sobre el mismo.<br />
El técnico instalador debe conocer todas los mecanismos de funcionamiento<br />
de la máquina.<br />
– Es responsabilidad del comprador procurar que el personal que interviene<br />
en la máquina esté preparado para tal fin y que tenga conoscimiento<br />
de toda la información y prescripciones in<strong>di</strong>cadas en la documentación<br />
técnica.<br />
A pesar de la plena observación del constructor de las normativas de<br />
seguridad, quienes trabajan sobre el <strong>di</strong>stribuidor automático deben ser<br />
Antes de cualquier intervención<br />
de mantenimiento, cortar la<br />
alimentación eléctrica.<br />
¡ATENCIÓN! : máquina conectada<br />
a la tensión eléctrica<br />
INDICE<br />
PREMISA<br />
1.0 CARACTERISTICAS TÉCNICAS<br />
2.0 DESCRIPCIÓN TÉCNICA DEL FUNCIONAMIENTO<br />
3.0 TRANSPORTE DEL DISTRIBUIDOR AUTOMÁTICO<br />
4.0 INSTALACIÓN<br />
5.0 INSTRUCCIONES SOFTWARE<br />
6.0 MANTENIMIENTO E INACTIVIDAD<br />
7.0 DESMANTELAMIENTO<br />
8.0 ALARMES<br />
20<br />
PE<br />
¡ATENCIÓN! superficie de contacto<br />
MUY CALIENTE.<br />
¡ATENCIÓN! Piezas en movimiento<br />
In<strong>di</strong>cación de toma en tierra<br />
Herramientas necesarias para poder efectuar intervenciones en el <strong>di</strong>stribuidor automático.<br />
DESTORNILLADORES<br />
Corte pequeño<br />
Corte me<strong>di</strong>ano<br />
Corte grande<br />
Cruz normal<br />
Cruz pequeña<br />
Cruz me<strong>di</strong>ana<br />
Cruz grande<br />
En Teflon de corte pequeño para calibrar Trimmer<br />
LLAVE CRICK n° 14<br />
TESTER<br />
TIJERAS ELECTRICISTA<br />
KIT PROGRAMACIÓN<br />
perfectamente conscientes de los riesgos potenciales que subsisten al<br />
intervenir sobre la máquina .<br />
– Este manual forma parte integrante de la máquina y como tal tiene que<br />
permanacer siempre en el interior de la misma, con el fin de permitir ulteriores<br />
consultas y hasta el desmantelamiento o desguace del<strong>di</strong>stribuidor<br />
automático.<br />
– En caso de pér<strong>di</strong>da o rotura del manual, se puede solicitar una nueva<br />
copia al fabricante, sólo hace falta in<strong>di</strong>car los datos que aparecen en la<br />
matrícula del <strong>di</strong>stribuidor.<br />
– Sólo me<strong>di</strong>ante la utilización de recambios originales se garantiza la<br />
fiabilidad funcional y la optimización de las prestaciones del <strong>di</strong>stribuidor<br />
automático<br />
– Las mo<strong>di</strong>ficaciones a la máquina no concordadas anteriormente con la<br />
empresa fabricante y con el técnico instalador y/o administrador, son<br />
siempre bajo su responsabilidad.<br />
Todas las operacionas necesarias para mantener la eficacia de la máquina<br />
antes y a lo largo de su vida útil son cargo del técnico / administrador.<br />
– Todas las mo<strong>di</strong>ficaciones y usos indebidos de la máquina que no estén<br />
autorizadas previamente por el constructor, liberan a éste último de<br />
cualquier responsabilidad por los daños derivados o refidos a tales actos<br />
y hacen decaer automáticamente las responsabilidades de garantía de la<br />
máquina misma.<br />
– Este manual, contiene la información actualizada para el momento de<br />
comercialización de la máquina; eventuales mo<strong>di</strong>ficaciones, mejoras o<br />
adaptaciones que se realicen sobre los nuevos <strong>di</strong>stribuidores, no obligan a<br />
Bianchi Ven<strong>di</strong>ng Group a incorporarlas en los <strong>di</strong>stribuidores automáticos<br />
ya comercializados, ni a actualizar la relativa documentación técnica<br />
suministrada en dotación.<br />
– Es facultad de Bianchi Ven<strong>di</strong>ng Group, actualizar el manual e<strong>di</strong>tado,<br />
enviando al cliente la hoja correspon<strong>di</strong>ente a la actualización. Esta hoja<br />
de actualización, debe guardarse con el manual.<br />
Los problemas técnicos que puedan aparecer, son fácilmente solucionables<br />
consultando el presente manual; para más información, contactar con el<br />
concesionario donde ha sido adquirido el <strong>di</strong>stribuidor automático; también<br />
puede contactar con el servicio técnico de:<br />
� +039. 035.45.02.111 - fax +039. 035.883.304
En caso de llamar para consultas técnicas debe in<strong>di</strong>car:<br />
� los datos que aparecen en la placa de características (Fig.1)<br />
� versión del programa contenido en el microprocesador (etiqueta adhesiva<br />
que hay colocada sobre un componente de la placa).<br />
Bianchi Ven<strong>di</strong>ng Group S.p.a., declina toda responsabilidad por daños<br />
ocasionados a personas o cosas, por consecuencia de:<br />
� instalación incorrecta<br />
� instalación eléctrica o hidráulica no adecuada<br />
� limpieza y mantenimiento inadecuados<br />
� mo<strong>di</strong>ficaciones no autorizadas<br />
� utilización incorrecta del <strong>di</strong>stribuidor<br />
� recambios no originales<br />
– Bianchi Ven<strong>di</strong>ng Group S.p.A. no está obligada en ningún caso a resarcir<br />
eventuales daños debidos a interrupciones forzadas de las erogaciones<br />
del <strong>di</strong>stribuidor debido a fallas.<br />
– Las operaciones de instalación y mantenimiento, deben realizarse exclusivamente<br />
por personal técnico cualificado y anteriormente capacitado<br />
para el desarrollo de estas tareas.<br />
– Para la recarga, utilizar únicamente preparados alimentarios específicos<br />
para el uso en <strong>di</strong>stribuidores automáticos.<br />
– El <strong>di</strong>stribuidor automático no es apto para ser instalado en el exterior, está<br />
preparado para trabajar en locales donde la temperatura no descienda por<br />
debajo de 1º C ampoco se puede instalar en aquellos locales en donde la<br />
limpieza se realice con mangueras de agua (eje. Grandes cocinas, etc).<br />
No utilizar chorros de agua para la limpieza de la máquina.<br />
– Si durante la instalación se observan con<strong>di</strong>ciones de uso <strong>di</strong>ferentes de las<br />
presentadas en el presente manual o que pueden experimentar variaciones<br />
con el tiempo, se deberá consultar inme<strong>di</strong>atamente al fabricante antes<br />
de la utilización del <strong>di</strong>stribuidor.<br />
– Verificar además que sean acogidas y aplicadas ulteriores y eventuales<br />
normas establecidas por legislaciones nacionales o locales.<br />
III - NORMAS DE SEGURIDAD<br />
Antes de utilizar el <strong>di</strong>stribuidor automático, leer atentamente<br />
todos los capítulos del presente manual.<br />
– Las operaciones de instalación y mantenimento deben ser realizadas por<br />
personal técnico cualificado.<br />
– El usuario no debe en modo alguno poder tener acceso a todas aquellas<br />
zonas protegidas que necesitan alguna herramienta para acceder a ellas.<br />
– El conocimiento y el respeto absoluto de las advertencias de seguridad<br />
y de los avisos de peligro contenidos en el presente manual, constituye<br />
el antecedente para la ejecución, en con<strong>di</strong>ciones de mÍnimo riesgo, de<br />
la instalación, puesta en marcha y mantenimento de la máquina.<br />
Desconectar siempre EL CABLE DE ALIMENTACION antes de<br />
cualquier intervención técnica de mantenimento o de limpieza.<br />
EN NINGUN CASO SE PUEDE ACCEDER AL INTERIOR DE LA MAQUINA<br />
NI RETIRAR NIGUNA PROTECCION INTERIOR ANTES DE QUE TODOS<br />
LOS ELEMENTOS CALIENTES SE HAYAN ENFRIADO<br />
– Sólo me<strong>di</strong>ante la utilización de recambios originales se garantiza la<br />
fiabilidad funcional y la optimización de las prestaciones del <strong>di</strong>stribuidor<br />
automático.<br />
– Para garantizar el ejercicio normal, el aparato tiene que ser instalado en<br />
lugares en donde la temperatura ambiente esté compren<strong>di</strong>da entre una<br />
temperatura mínima de +1°C y una máxima de +50°C y la humedad<br />
no supere el 85%.<br />
– Para garantizar un funcionamento regular, manter siempre el <strong>di</strong>stribuidor<br />
automático en perfectas con<strong>di</strong>ciones de limpieza.<br />
– Si durante la instalación se observan con<strong>di</strong>ciones de uso <strong>di</strong>ferentes de las<br />
presentadas en el presente manual o que pueden experimentar variaciones<br />
con el tiempo, se deberá consultar inme<strong>di</strong>atamente al fabricante<br />
antes de la utilización del <strong>di</strong>stribuidor.<br />
– Verificar además que sean acogidas y aplicadas ulteriores y eventuales<br />
normas establecidas por legislaciones nacionales o locales.<br />
Este aparato no está previsto para ser usado por personas (incluidos niños)<br />
con reducidas capacidades físicas, sensoriales o mentales, o sin experiencia y<br />
conocimiento, a menos que hayan recibido instrucciones sobre el uso del aparato<br />
y sean controladas por una persona responsable por su seguraidad. Los niños<br />
deben ser controlados para asegurarse de que no jueguen con el aparato.<br />
El acceso al área de servicio está permitida sólo a personal dotado<br />
de específicos conocimientos y experiencia práctica de los aparatos.<br />
1.0 CARACTERISTICAS TÉCNICAS<br />
BVM972 BVM952<br />
Alto (A) mm 1830 mm 1620 mm<br />
Ancho (B) mm 666 mm 666 mm<br />
Fondo (C) mm 776 mm 776 mm<br />
Peso 140 kg÷190 kg (3) 155 kg<br />
Tensión de alimentación V230 V230<br />
Potencia (1) kW 1,8 kW ÷ 3,2 kW 1,8 kW ÷ 3,2 kW<br />
Corriente nominal (Max) 8 A - 15 A 8 A - 15 A<br />
Alimentación red hídrica 0,5 ÷ 6,5 bar 0,5 ÷ 6,5 bar<br />
IDLE STATE MODE<br />
según EVA-EMP<br />
CONSUMO MEDIO:<br />
110-220 Wh/h 110-220 Wh/h<br />
ENERGY CONSUMPTION<br />
PER LITRE según EVA-EMP<br />
150-230 Wh/L 150-230 Wh/L<br />
21<br />
ESPAÑOL<br />
Conexión red hídrica 3/8” gas 3/8” gas<br />
Conexión red eléctrica prise SCHUKO prise SCHUKO<br />
DISTRIBUIDOR DE VASOS<br />
Diámetro vasos mm 70÷74 70÷74<br />
RESISTENCIA DE CALDERA<br />
De tipo acorazado caldera de café 1500W 1500W<br />
De tipo acorazado caldera de soluble 2000W 2000W<br />
CAPACIDAD DE LOS CONTENEDORES<br />
Café en grano Kg 3,5 Kg 3,5<br />
Café soluble Kg 1,4 Kg 1,2<br />
Leche granulada Kg 2,2 Kg 1,7<br />
Creamer Kg 4,0 Kg 3,2<br />
Chocolate Kg 4,8 Kg 3,6<br />
Tè Kg 5,2 Kg 3,3<br />
Té natural Kg 2,4 Kg 1,7<br />
Caldo Kg 3,8 Kg 3,6<br />
Azúcar Kg 4,0 Kg 4,0<br />
Vasos N° 700 500<br />
Paletinas N° 540 400<br />
Tipo lampada LED LED<br />
Nivel de presión sonora ponderado A 58,2 dB ± 2,5 dB<br />
Nivel de potencia sonora ponderado A 71,0 dB ± 3,0 dB<br />
(1) Hay que verificar la potencia nominal presentada en la placa con los datos<br />
aplicada sobre el <strong>di</strong>stribuidor.<br />
(2) Según la versión requerida y las normativas en vigor en el lugar de utilización.<br />
(3) Según la versión.<br />
CONOCER EL DISTRIBUIDOR<br />
Mod.BVM972(Fig.1.2)<br />
1. Grupo café y muela de café<br />
2. Grupo <strong>di</strong>stribuidores bebidas<br />
3. Grupo de <strong>di</strong>stribución de azúcar<br />
4 Grupo monedero<br />
5 Columna de vasos<br />
6 Ficha CPU<br />
7 Ficha de potencia<br />
8 Columna Paletinas<br />
9 Filtro descalcificador<br />
10 Embudo de líquidos<br />
11 Zona de recepción<br />
12 Tecla servicio<br />
13 Tecla lavado<br />
14 Grupo de frìo (optional)<br />
Mod. BVM952 (Fig.1.3)<br />
1. Grupo café y muela de café<br />
2. Grupo <strong>di</strong>stribuidores bebidas<br />
3. Grupo de <strong>di</strong>stribución de azúcar<br />
4 Grupo monedero<br />
5 Columna de vasos<br />
6 Ficha CPU<br />
7 Ficha de potencia<br />
8 Columna Paletinas<br />
9 Filtro descalcificador (optional)<br />
10 Embudo de líquidos<br />
11 Zona de recepción<br />
12 Tecla servicio<br />
13 Tecla lavado<br />
14 Cárter superior<br />
15 Grupo de frìo (optional)<br />
1.1 Modo de empleo<br />
Los <strong>di</strong>stribuidores automático se han de utilizar exclusivamente para <strong>di</strong>spensar<br />
bebidas producidas de agua con un producto alimentario, (infusiones en el<br />
caso del café expreso y té en hojas).<br />
El producto alimentarios ha de ser especial para ser utilizado dentro de los<br />
contenedores de <strong>di</strong>stribuidores automáticos.<br />
También está prevista la <strong>di</strong>spensación de la paletina para la mezcla del azúcar.<br />
La consumición <strong>di</strong>spensada, se ha de tomar inme<strong>di</strong>atamente y en ningún<br />
caso conservarla para posteriores servicios.<br />
CAFÉ EXPRESO<br />
Este proceso sólo se realiza en los modelos con grupo de café, tras haber<br />
<strong>di</strong>spensado el vaso y el azúcar<br />
– Se activa el molinillo hasta moler la dosis de café ajustada en el dosificador<br />
(Fig.2.3)<br />
– Se activa la bobina del dosificador, provocando la apertura de la trampilla<br />
y por consiguiente la caída del café en el bloque de erogación<br />
– Se activa el motorreductor del grupo de café hasta llegar a la posición de<br />
erogación, lo que provoca el prensado de la pastilla (Fig.2.4 - Fig.2.5).<br />
– Se activa la bomba hasta inyectar la cantidad de agua programada. Para<br />
controlar la dosis, se utiliza un <strong>di</strong>spositivo electrónico, (contador volumétrico),<br />
situado a la entrada de la bomba (Fig.2.6)<br />
– De nuevo se activa el motorreactor del grupo de café hasta llegar a la<br />
posición de reposo,(durante este movimiento se expulsa la pastilla de<br />
café utilizada).<br />
La secuencia de esta operación, (molida y erogación), puede darse en orden<br />
inverso,según el tipo de programación.<br />
DISPENSACIÓN DE LA PALETINA<br />
Este proceso sólo está activado en las versiones dotadas de <strong>di</strong>stribuidor<br />
de paletinas;opcionalmente, se puede <strong>di</strong>spensar paletina con la opción de<br />
amargo.<br />
Para las versiones de soluble no está prevista la <strong>di</strong>spensación de paletinas.<br />
– Se activa el motorreductor que acciona el <strong>di</strong>spositivo encargado de empujar<br />
y hacer caer la paletina en el vaso (Fig.2.7).
ESPAÑOL<br />
BEBIDA SOLUBLE<br />
Este proceso se inicia cuando se ha completado la <strong>di</strong>spensación del vaso y<br />
el azúcar.<br />
Según el tipo de bebida seleccionada y el modelo del <strong>di</strong>stribuidor, para la<br />
preparación de la bebida se activan los siguientes procesos.<br />
– Primero se activa el motor de la batidora (Fig.2.8).<br />
– La electroválvula fijada sobre la caldera solubles (Fig.2.9) o sobre la<br />
caldera café (Fig.2.10). se activa para cargar en la batidora la cantidad<br />
de agua programada.<br />
La caldera Solubles está montada en la versión solubles y en la versión<br />
Expreso Doble caldera.<br />
– Se activa el motorreductor de producto soluble haciendo girar la espiral<br />
del contenedor de producto y <strong>di</strong>spensando sobre la batidora la dosis<br />
programada, (en algunas versiones más productos pueden cargarse en<br />
la misma mezcladora, vean el caso de leche y chocolate) (Fig.2.11).<br />
- Una vez elaborada la cantidad de agua y polvo preestablecida, se desactiva<br />
la batidora tras el tiempo T configurado durante la programación.<br />
3.0 TRANSPORTE DEL DISTRIBUIDOR AUTOMÁTICO<br />
3.1 Transporte y traslado (Fig. 3.1)<br />
El transporte debe ser realizado por personal cualificado.<br />
El <strong>di</strong>stribuidor está montado sobre un palé; lo que permite utilizar un traspalé.<br />
Moverlo a velocidad lenta a fin de evitar dañar el <strong>di</strong>stribuidor.<br />
Evitar de:<br />
– volcar el <strong>di</strong>stribuidor sobre la parte trasera o el lateral<br />
– arrastrar el <strong>di</strong>stribuidor<br />
– volcar o acostar el <strong>di</strong>stribuidor durante el transporte<br />
– dar sacu<strong>di</strong>das al <strong>di</strong>stribuidor<br />
Evitar que o <strong>di</strong>stribuidor:<br />
– tome choques<br />
– seja sobrecarregado com outros volumes<br />
– fique esposto à chuva, ao gelo ou à fontes de calor<br />
– seja posicionado em lugares húmidos<br />
La empresa fabricante no es responsable por eventuales daños provocados por<br />
la no observación parcial o total de las advertencias in<strong>di</strong>cadas más arriba.<br />
3.2 Almacenamiento<br />
En caso de almacenamiento, evitar remontar las máquinas, mantenerlas<br />
en posición vertical, en ambiente seco y con temperatura<br />
no inferior a 1º C.(Fig.3.2).<br />
3.3 Embalaje<br />
El <strong>di</strong>stribuidor está protegido por porespan y una pelicula transparente de<br />
polipropileno (Fig.3.2).<br />
El <strong>di</strong>stribuidor automático se suministra embalado, asegurando al mismo<br />
tiempo la protección de la parte mecánica y la protección contra las agresiones<br />
del ambiente externo.<br />
Sobre el embalaje se enganchan las siguientes etiquetas in<strong>di</strong>cativas:<br />
mover con cuidado<br />
no volcar<br />
proteger de la lluvia<br />
no remontar<br />
proteger de fuentes de calor<br />
no resistente a los golpes<br />
tipo de <strong>di</strong>stribuidor y numero de serie<br />
3.4 Recepción<br />
Al recibir el <strong>di</strong>stribuidor automático firmar el albarán con la in<strong>di</strong>cación “conforme<br />
salvo examen”, y comprobar que no ha habido ningún daño durante<br />
el transporte.<br />
Si se observa alguna anomalía, notificarlo inme<strong>di</strong>atamente a la agencia<br />
de transporte.<br />
El embalaje de la máquina debe estar integro, no debe:<br />
– presentar señales de golpes o roturas en el embalaje<br />
– presentar zonas mojadas o señales que puedan hacer suponer que ha<br />
estado expuesta a la lluvia, hielo o calor<br />
– presentar signos de uso indebido.<br />
3.5 Desembalaje<br />
– Liberar al <strong>di</strong>stribuidor de su embalaje, cortar el film exterior y extraer las<br />
cantoneras (Fig.3.3).<br />
– Desmontar las abrazaderas que sujetan el <strong>di</strong>stribuidor al palé (Tornillos<br />
A). Bajar el <strong>di</strong>stribuidor del palé (Fig.3.4).<br />
– Liberar el pallet e introducir los 4 pies en los agujeros fileteados (Fig. 3.5)<br />
dejados libres por los tornillos (A)<br />
– Coger las llaves que están en la zona de recepción del vaso (Fig.3.6).<br />
Quitar la cinta adhesiva de:<br />
columna de vasos (Fig.3.7)<br />
hucha<br />
contenedor de azúcar<br />
peso de la columna de paletinas<br />
protector de monedero y placa Master<br />
contenedores de producto<br />
boya del cubo de desper<strong>di</strong>cios<br />
cubos de residuos<br />
embudo de líquidos<br />
quitar el porespán que bloquea los contenedores de producto (Fig.3.8)<br />
El material de embalaje no se debe abandonar en cualquier lugar, ya<br />
que es una fuentes de contaminación para el ambiente.<br />
22<br />
4.0 INSTALACIÓN<br />
4.1 Posicionamiento<br />
– Instalar cerca de la pared, con una <strong>di</strong>stancia mínima de 5 cm (Fig.4.1),<br />
para permitir la ventilación. En ningún caso cubrir el <strong>di</strong>stribuidor con un<br />
trapo o similar.<br />
– Nivelar el <strong>di</strong>stribuidor, colocando un nivel sobre el mueble. Asegurarse que<br />
el desnivel no es superior a 2º (Fig.4.2).<br />
¡ATENCIÓN! No colocar el aparato cerca de objetos inflamables, respetando<br />
una <strong>di</strong>stancia mínima de seguridad de 30 cm.<br />
Bianchi Ven<strong>di</strong>ng Group S.p.A. declina toda responsabilidad sobre daños<br />
ocasionados por el incumplimiento de las normas de instalación.<br />
En caso de instalar la máquina cerca de una salida de emergencia, asegurarse<br />
de que con el <strong>di</strong>stribuidor abierto haya espacio suficiente para el paso<br />
(Fig.4.1).<br />
Para evitar que el suelo se ensucie, por una caída accidental de producto,<br />
utilizar, si es necesario, bajo el <strong>di</strong>stribuidor, una protección suficientemente<br />
grande como para cubrir el ra<strong>di</strong>o de acción del <strong>di</strong>stribuidor automático.<br />
4.2 Conexión a la red hidráulica<br />
Antes de proceder a la conexión de la máquina a la red hidráulica, asegurarse<br />
que esta sea:<br />
– potable (si es necesario pe<strong>di</strong>r una certificación a un laboratorio de análisis).<br />
– que tenga una presión compren<strong>di</strong>da entre 0,5 y 6,5 bar (en caso contrario<br />
utilizar una bomba o un reductor de presión, según el caso).<br />
– instalar, si no lo hay, un grifo de fácil acceso, aislar el aparato de la red<br />
hídrica en el caso que fuese necesario (Fig.4.3).<br />
– antes de efectuar la conexión hídrica dejar correr el agua del grifo para<br />
eliminar impurezas y suciedad (Fig.4.4).<br />
– conecten el grifo al <strong>di</strong>stribuidor, utilizando para ello un tubo en nylon<br />
apto para alimentos y que pueda soportar la presión de red. Si se utiliza<br />
un tubo flexible hay que montar en su interior el casquillo de refuerzo<br />
entregado con el equipo (Fig. 4.5).<br />
– la conexión prevista es de 3/8 macho (Fig.4.6).<br />
4.3 Conexión a la red eléctrica<br />
El <strong>di</strong>stribuidor está preparado para funcionar con tensión monofásica de 230<br />
voltios y está protegido por unos fusibles de 12´5 A. y 20 A. (10 A y 20 A<br />
el modelo monocaldera y la versión para solubles, 15 A y 20 A la versión<br />
para solubles fríos)<br />
Antes de conectar se debe verificar que:<br />
– en la tensión de red, 230 V, no haya variaciones superiores al +/- 6%<br />
– la línea de alimentación sea adecuada a las necesidades de consumo del<br />
<strong>di</strong>stribuidor<br />
– utilizar un <strong>di</strong>spositivo de protección <strong>di</strong>ferencial<br />
– Colocar el aparato de manera tal que el enchufe quede accesible<br />
La conexión debe estar provista de puesta a tierra, tal y como se in<strong>di</strong>ca en<br />
las normas vigentes.<br />
Verificar, si fuese necesario, que el cable de tierra sea correcto y responda a<br />
las normativas nacionales y europeas de seguridad eléctrica.<br />
Si es necesario, solicitar la intervención de personal cualificado para la inspección<br />
de la instalación.<br />
– El <strong>di</strong>stribuidor está dotado de un cable de alimentación H05VV-F 3x1,5<br />
mm2 , con clavija SCHUKO (Fig.4.7).<br />
– Los tomas que no sean compatibles con la clavija, se han de sustituir<br />
(Fig.4.8).<br />
– Está prohibido el uso de prolongaciones, adaptadores y/o tomas multiples<br />
- En algunos modelos se han montado enchufes específicos para el lugar<br />
de destino.<br />
Bianchi Ven<strong>di</strong>ng Group S.p.A. declina toda responsabilidad por la no<br />
observación parcial o total de <strong>di</strong>chas advertencias.<br />
Se o cabo de alimentação for estragado, desligar ime<strong>di</strong>atamente a alimentação<br />
eletrica.<br />
La substitución de los cables de alimentación debe ser efectuada<br />
por personal cualificado<br />
4.4 Puesta en marcha<br />
El <strong>di</strong>stribuidor está dotado de un interruptor (Fig.4.9) que desconecta la<br />
tensión de toda la máquina al abrir la puerta,(ver esquema eléctrico).<br />
En caso de urgencia, abrir la puerta o desconectar la clavija de la máquina.<br />
Con la puerta abierta, quedan bajo tensión la regleta del cable<br />
de alimentación(Fig.4.10-pos.1) y la toma de servicio interna del<br />
<strong>di</strong>stribuidor automático(Fig.4.11-pos.2).<br />
– Para los casos en que es necesario trabajar con la puerta abierta y la<br />
máquina conectada, es posible, para el técnico instalador, trabajar de<br />
esta forma, introduciendo y girando 90º la llave especial de plástico en<br />
el interruptor de puerta del <strong>di</strong>stribuidor automático (Fig.4.12).<br />
El funcionamiento del <strong>di</strong>stribuidor con la puerta abierta, debe ser realizado<br />
exclusivamente por personal técnico autorizado para ejecutar<br />
estas operaciones.<br />
Nunca dejar conectado el <strong>di</strong>stribuidor con la puerta abierta.<br />
Facilitar la llave sólo a personal cualificado.<br />
Durante cada encen<strong>di</strong>do del <strong>di</strong>stribuidor se efectúa un ciclo de <strong>di</strong>agnóstico<br />
para verificar la con<strong>di</strong>ción de las periféricas del DA y efectuar la restauración<br />
de las partes en movimiento
4.5 Instalación<br />
4.5.1 Lavado resinas descalcificador donde instalado cual accesorio<br />
Antes de abrir el circuito hidráulico del <strong>di</strong>stribuidor , es necesario lavar las<br />
resinas del filtro descalcificador (Si está previsto):<br />
– introducir el tubo del filtro inferior en un cubo adaptado para tal uso<br />
– abrir el grifo (Fig.4.13)<br />
– introducir la llave en el interruptor de puerta (Fig.4.12)<br />
– dejar circular el agua hasta que salga limpia (Fig.4.14)<br />
– sacar la llave del interruptor de puerta y cerrar el grifo.<br />
La BVM972 y BVM952 montan de serie el filtro de cartucho y no preve la<br />
aplicación del proce<strong>di</strong>miento arriba in<strong>di</strong>cado. En este caso es suficiente conectar<br />
el DA con la red y llenar el circuito hidráulico.<br />
4.5.2 Carga de agua<br />
PROCEDIMIENTO DE INSTALACIÓN<br />
El proce<strong>di</strong>miento de instalación es válido sólo para los <strong>di</strong>stribuidores monocaldera.<br />
En particular Caldera expreso y Caldera de polifusión con sondas<br />
de nivel.<br />
MONOCALDERA EXPRESO<br />
A la salida de las líneas, el <strong>di</strong>stribuidor se pone en con<strong>di</strong>ción de PRIMERA<br />
INSTALACIÓN. Una vez llegado en localización el operador conecte sólo el<br />
agua (tanto en caso de conexión a la red como en caso de tanque autónomo)<br />
y la red eléctrica.<br />
El <strong>di</strong>stribuidor recupera automáticamente el agua hasta cuando el micro vacío<br />
agua no esté N.C. durante por lo menos 15 segundos. En <strong>di</strong>cha con<strong>di</strong>ción<br />
el D.A. enciende la bomba y, en con<strong>di</strong>ciones de resistencia OFF, elabora<br />
200 cc de agua (me<strong>di</strong>dos a través el ventilador). Tras este proce<strong>di</strong>miento<br />
se memoriza la fecha de instalación del <strong>di</strong>stribuidor. Una vez confirmada la<br />
fecha, el D.A. espera 10 segundos y, enseguida después, empieza a calentar<br />
el agua en la caldera.<br />
CALDERA POLIFUSIÓN con SONDAS DE NIVEL<br />
A la salida de las líneas BV el <strong>di</strong>stribuidor se pone en con<strong>di</strong>ción de PRIMERA<br />
INSTALACIÓN. Una vez llegado en localización el operador conecte sólo el<br />
agua (tanto en caso de conexión a la red como en caso de tanque autónomo)<br />
y la red eléctrica.<br />
El <strong>di</strong>stribuidor recupera automáticamente el agua hasta cuando las sondas<br />
de nivel máximo detecten la presencia de agua.<br />
Después de <strong>di</strong>cho proce<strong>di</strong>miento se memoriza la fecha de instalación del<br />
<strong>di</strong>stribuidor. Una vez confirmada la fecha, el D.A. espera 10 segundos y<br />
enseguida después empieza a calentar el agua en la caldera.<br />
MONOCALDERA INOX PARA SOLUBLES<br />
A la salida de las líneas el <strong>di</strong>stribuidor se pone en con<strong>di</strong>ción de PRIMERA<br />
INSTALACIÓN. Una vez llegado en localización el operador conecte sólo el<br />
agua (tanto en caso de conexión a la red como en caso de tanque autónomo)<br />
y la red eléctrica.<br />
El <strong>di</strong>stribuidor, en con<strong>di</strong>ción de resistencia OFF, recupera automáticamente<br />
el agua y abre la electroválvula 2 para purgar el aire presente en la misma<br />
caldera. Dicha con<strong>di</strong>ción dura 200 segundos. Una vez acabado <strong>di</strong>cho timeout<br />
el <strong>di</strong>stribuidor cierra la electroválvula 2 y la ev entrada agua por 20 seg. Tras<br />
<strong>di</strong>cho tiempo sigue cargando agua hasta que el micro vacío agua no esté<br />
N.C. por un tiempo superior a 5seg (operación depen<strong>di</strong>ente de otro timeout<br />
de 200 segundos).<br />
En esta con<strong>di</strong>ción el D.A. enciende la electroválvula 2 y elabora 20s de agua.<br />
Una vez terminada la elaboración, hay que esperar que el micro vacío agua<br />
vuelva a N.C.. Después de <strong>di</strong>cho proce<strong>di</strong>miento se memoriza la fecha de<br />
instalación del <strong>di</strong>stribuidor. Una vez confirmada la fecha se hacen transcurrir<br />
10 segundos, a final de los cuales el D.A. empieza a calentar el agua en la<br />
caldera.<br />
DOBLE CALDERA<br />
A la salida de las líneas el <strong>di</strong>stribuidor se pone en con<strong>di</strong>ción de PRIMERA<br />
INSTALACIÓN. Una vez llegado en localización el operador conecte sólo el<br />
agua (tanto en caso de conexión a la red como en caso de tanque autónomo)<br />
y la red eléctrica. El <strong>di</strong>stribuidor, en con<strong>di</strong>ción de resistencias OFF, recupera<br />
automáticamente el agua y abre la electroválvula 2 para purgar el aire presente<br />
en la caldera inox.<br />
Esta con<strong>di</strong>ción dura 200 segundos. Una vez terminado <strong>di</strong>cho timeout el <strong>di</strong>stribuidor<br />
cierra la electroválvula 2 y la ev entrada agua por 20 seg.<br />
Después de <strong>di</strong>cho tiempo sigue cargando agua hasta que el micro vacío agua<br />
no esté N.C. por un tiempo superior a 5seg (operación depen<strong>di</strong>ente de otro<br />
timeout de 200 segundos.<br />
En esta con<strong>di</strong>ción el D.A. enciende la electroválvula 2 y elabora 20s de<br />
agua. Una vez terminada la elaboración, hay que esperar que el micro vacío<br />
agua vuelva N.C.. Tras 10 segundos el D.A. enciende la bomba expreso y,<br />
en con<strong>di</strong>ción de resistencia OFF, elabora 200 cc de agua a través la ev café<br />
(me<strong>di</strong>dos a través el ventilador).<br />
Después de este proce<strong>di</strong>miento se memoriza la fecha de instalación del<br />
<strong>di</strong>stribuidor.<br />
Una vez confirmada la fecha, el D.A. espera 10 segundos y enseguida después<br />
empieza a calentar el agua en las 2 calderas.<br />
Al completar la carga de agua, realizar un lavado de todas las batidoras para<br />
limpiar todos los conductos y eliminar eventuales residuos en la caldera<br />
(Fig.4.16).<br />
Antes de dar tensión, asegúrense de haber conectado el <strong>di</strong>stribuidor a la red<br />
hídrica y de haber abierto el grifo del agua.<br />
4.5.3 Lavado de las partes en contacto con los alimentos<br />
Efectuar, por me<strong>di</strong>o de los pulsadores de servicio, lavados de las batidoras,<br />
de esta forma eliminaremos cualquier posible residuo de la caldera del café<br />
y caldera de soluble.<br />
– lavarse cuidadosamente las manos:<br />
– preparar una solución desinfectante antibacteriana a base de cloro, (producto<br />
de venta en farmacias), siguiendo escrupulosamente las in<strong>di</strong>caciones<br />
23<br />
ESPAÑOL<br />
del producto<br />
– desmontar todos los contenedores de producto del <strong>di</strong>stribuidor<br />
(Fig.4.17)<br />
– desmontar las tapas y rampas de producto (Fig.4.18). Sumergir todo en<br />
la solución anteriormente preparada<br />
– sumergir también en la solución, los embudos de agua, la cámara de<br />
mezcla, las aspas de las batidoras y los tubos de silicona (Fig.4.19)<br />
– con un trapo humedecido,( en la solución ), limpiar la base de las batidoras<br />
(Fig.4.20)<br />
– dejar todos los componentes inmersos en la solución el tiempo que in<strong>di</strong>que<br />
en las especificaciones del producto.<br />
– extraer todas las piezas; aclarar abundantemente, secar perfectamente<br />
y montar de nuevo en el <strong>di</strong>stribuidor.<br />
Para mayor seguridad, después de montarlo, efectuar lavados automáticos<br />
para eliminar eventuales residuos.<br />
4.5.4 Instalación del monedero<br />
El <strong>di</strong>stribuidor es suministrado sin el sistema de pago:<br />
La instalación del sistema de pago está a cargo y es responsabilidad del<br />
técnico instalador.<br />
La firma Bianchi Ven<strong>di</strong>ng Group S.p.A. no se considera responsable por<br />
eventuales daños a la máquina misma y/o a cosas y/o a personas debidos<br />
a una instalación equivocada.<br />
– Abrir la puerta de protección de la placa y el monedero (Fig.4.21)<br />
– Monter el monedero (Fig. 4.22) conectarlo con la placa Master<br />
El monedero se conecta <strong>di</strong>rectamente a la placa Master por me<strong>di</strong>o de un<br />
cable interface suministrado con la máquina.<br />
Acceder a la programación para verificar le giuste tarature.<br />
Consultar el cap. “5.0 INSTRUCCIONES SOFTWARE” para verificar que la<br />
programación del tipo de monedero sea correcta.<br />
Verifiquen las conexiones del sistema de pago, consultando el esquema de<br />
la ficha in<strong>di</strong>cado.<br />
– colocar el monedero (Fig. 4.23).<br />
4.6 Carga de producto (con la máquina apagada)<br />
4.6.1 Carga de los contenedores<br />
– para cargar de producto con mayor facilidad, se pueden<br />
extraer los contenedores.<br />
En particular para el café en grano, es necesario cerrar la trampilla antes<br />
de extraer el contenedor (Fig.4.26).<br />
– Quitar la tapa de todos los contenedores y colocar el producto adecuado<br />
según muestra el rótulo (Fig. 4.27)<br />
– prestar atención en que el producto no tenga grumos, evitar comprimirlo<br />
y utilizar la cantidad necesaria según el tiempo de recarga para así evitar<br />
el envejecimiento del producto.<br />
BVM952<br />
El <strong>di</strong>stribuidor modelo BVM952 cuenta con un cárter superior abrible.<br />
A través de esta apertura, se puede acceder a los contenedores para efectuar<br />
las operaciones de carga del producto.<br />
En las figuras 4.24 y 4.25 están in<strong>di</strong>cadas las operaciones correctas para la<br />
apertura y el cierre del cárter.<br />
¡Atención! Apriete el muelle in<strong>di</strong>cado en la figura 4.25 antes de cerrar<br />
el cárter.<br />
Revisar la capacidad de los contenedores en el apartado de CARACTERISTI-<br />
CAS TÉCNICAS.<br />
4.6.2 Carga de vasos<br />
Utilizar sólo vasos aptos para la <strong>di</strong>stribución automática (verifiquen las características<br />
consultando el capítulo 1.0 “Características Técnicas”). Evitar<br />
comprimir la columna durante la carga. No girar manualmente la columna.<br />
Primera carga<br />
En el proceso de instalación y con la columna de vasos completamente vacía,<br />
seguir los siguientes pasos:<br />
– Verificar que la columna de vasos no esté alineada con el agujero de<br />
<strong>di</strong>stribución. Cargar entonces todas las columnas proce<strong>di</strong>endo hacia la<br />
izquierda; viceversa (cuando la columna está colocada en correspondencia<br />
del agujero de <strong>di</strong>stribución), hay que cerrar la puerta y alimentar la<br />
máquina de modo tal que la columna de vasos gire y se conduzca automáticamente<br />
hasta una posición no alineada con el agujero y proceder<br />
entonces al cargamento (Fig.4.28).<br />
– colocar la tapa de la columna de vasos y enganchar la abrazadera superior<br />
(Fig.4.29).<br />
Cargamento normal<br />
El cargamento normal de las columnas de vasos debe efectuarse con la<br />
máquina apagada; se realiza simplemente abriendo la puerta delantera,<br />
levantando la tapa e introduciendo los vasos que faltan.<br />
4.6.3 Carga de las paletinas<br />
¡Cuidado! Utilicen sólo paletinas idóneas para el empleo en los <strong>di</strong>stribuidores<br />
automáticos.<br />
– Quitar el peso metálico de la guía. (Fig.4.30)<br />
– colocar las paletinas con el papel de embalaje; cuando están en posición<br />
quitar el papel que las sujeta (Fig.4.31)<br />
– las paletinas han de estar planas, no cargar paletinas dobladas y vigilar<br />
que todas queden en posición horizontal.<br />
– al completar la carga, colocar de nuevo el peso metálico (Fig.4.32).<br />
4.6.4 Bolsa de desper<strong>di</strong>cios<br />
- aplicar el resorte bloquea-bolsa en la rampa.<br />
- introducir la bolsa de plástico envolviéndola en la rampa y bloquearla con<br />
el resorte (fig. 4.33).<br />
Utilizar bolsas suficientemente largas para que toquen el piso del <strong>di</strong>stribuidor.<br />
Asegurarse de que el balde de recolección de líquidos esté en posición (Fig.<br />
4.33) y vaciarlo perió<strong>di</strong>camente.
ESPAÑOL<br />
4.8 MODALIDAD PRIMERA AUTO-INSTALACIÓN<br />
Con la primera puesta en marcha de la máquina se llevará a cabo una auto-instalación.<br />
El objetivo de <strong>di</strong>cho proce<strong>di</strong>miento es evitar las conexiones manuales<br />
de cables en las tarjetas luego del llenado del circuito hidráulico.<br />
Para Mono caldera Expreso:<br />
Cuando se enciende el <strong>di</strong>stribuidor, el agua llena el airbreack.<br />
Cuando el flotador estará en posición alta, la máquina comenzará una carga<br />
automática de agua que continuará hasta que el ventilador habrá contado<br />
el pasaje de 200cc de agua (se suministrará entonces agua me<strong>di</strong>ante un<br />
mezclador por toda la duración del proce<strong>di</strong>miento).<br />
El proce<strong>di</strong>miento se llevará a cabo con la resistencia apagada.<br />
Al finalizar, el <strong>di</strong>splay mostrará una fecha.<br />
Para Doble caldera Expreso:<br />
Cuando se enciende el <strong>di</strong>stribuidor, el agua llena el airbreack.<br />
Cuando el flotador estará en posición alta, la máquina comenzará el proceso<br />
de instalación automática y la consecuente carga de ambas calderas (se<br />
suministrará entonces agua me<strong>di</strong>ante un mezclador y Café desde la EV 3<br />
vías durante el proce<strong>di</strong>miento).<br />
El proce<strong>di</strong>miento se llevará a cabo con la resistencia apagada.<br />
Al finalizar, el <strong>di</strong>splay mostrará una fecha.<br />
Para Caldera Soluble:<br />
Cuando se enciende el <strong>di</strong>stribuidor, el agua llena el airbreack.<br />
Cuando el flotador estará en posición alta durante por lo menos 5 segundos<br />
consecutivos, la máquina abrirá una electroválvula soluble y comenzará un<br />
ciclo de carga de agua en la caldera (se suministrará entonces agua me<strong>di</strong>ante<br />
un mezclador durante toda la duración del proce<strong>di</strong>miento).<br />
El proce<strong>di</strong>miento se llevará a cabo<br />
con la resistencia apagada.<br />
Al finalizar, el <strong>di</strong>splay mostrará<br />
una fecha.<br />
Ahora tenemos que introducir la fecha de la instalación utilizando<br />
la botonera como se in<strong>di</strong>ca más abajo:<br />
Para Versión Alfanumérica<br />
TECLA 1 Aumentar valor<br />
TECLA 3 Mover cursor<br />
TECLA 5 Enter confirma fecha<br />
TECLA 7 Disminuir valor<br />
TECLA 9 Mover entre Día/Mes/Año<br />
Para Versión Botonera<br />
Pulsando la TECLA EN-<br />
TER, la máquina aguardará<br />
10 segundos y<br />
entonces comenzará el<br />
calentamiento de la caldera.<br />
La fecha se memorizará<br />
en un lugar seguro de la<br />
tarjeta.<br />
Para restablecer la modalidad<br />
de primera instalación,<br />
hay que entrar<br />
a Programación con el<br />
Password 22933.<br />
Aumentar<br />
valor<br />
Disminuir<br />
valor<br />
Mover<br />
cursor<br />
Mover entre<br />
Día/Mes/Año<br />
5.0 INSTRUCCIONES SOFTWARE<br />
Introducir<br />
fecha<br />
5.1 PASSWORD<br />
La lógica actual de programación prevé, con el acceso me<strong>di</strong>ante el pulsador<br />
PROG, la introducción de una contraseña que permite acceder a un único<br />
menú de programación.<br />
Para poder facilitar y acelerar algunas operaciones in situ, la gestión de las<br />
contraseñas se descompondrá de la siguiente manera:<br />
PWD 1 - Menú de programación reducido<br />
PWD 2 - Menú de programación completo<br />
PWD 3 - Menú Ventas;<br />
PWD 4 – Divi<strong>di</strong>da en 2 PWD Impuestas: 88000 para probar todos los slave<br />
BVM600;<br />
Prueba (gestionada sólo por Bianchi Ven<strong>di</strong>ng Group) para acceder a la prueba<br />
efectuada en la línea de montaje.<br />
Notas: Si la contraseña del menú reducido coincide con aquella del menú<br />
completo, será prioritaria la del Menú completo<br />
24<br />
5.2 MENÚ EN LA MÁQUINA<br />
La PWD 1 permite acceder al menú completo del <strong>di</strong>stribuidor automático. El<br />
proce<strong>di</strong>miento de acceso al menú prevé: Presionar el pulsador PROG en la<br />
tarjeta master, introducir la contraseña y pulsar la tecla ENTER. A continuación<br />
se enumera el menú de programación del D.A.<br />
5.2.1 MENÚ SOFTWARE<br />
Teclado selección <strong>di</strong>recta<br />
En programación, las teclas asumen los siguientes significados:<br />
Tecla 1 Incrementa<br />
Tecla 2 Visualiza nombre<br />
Tecla 3 Desplaza cursor<br />
Tecla 4 Prueba polvo<br />
Tecla 5 Vuelve al menú precedente (esc)<br />
Tecla 6 Prueba agua<br />
Tecla 7 Disminuye<br />
Tecla 8 Prueba completa (Menú dosis)<br />
Prueba EV o Sol (Menú dosis bebida)<br />
Tecla 9 Enter<br />
Tecla 0 Prueba completa (Menú dosis bebida)<br />
5.3 MANTENIMIENTO<br />
Se entra a la modalidad mantenimiento pulsando la tecla ‘Service’. El <strong>di</strong>splay<br />
visualiza en la línea 1 ‘Mantenimiento xxx’, en que xxx visualiza la temperatura<br />
de la caldera, y en la línea 2 las eventuales alarmas detectadas.<br />
Pulsando dos veces la tecla Service, se by-pasará la fase de espera de la calefacción<br />
permitiendo efectuar selecciones de prueba también a temperatura<br />
no en régimen. Pulsando una tecla se visualiza la temperatura de las calderas<br />
slave en scroll. El panel mantenimiento prevé las siguientes funciones:<br />
En mantenimiento, las teclas asumen los siguientes significados:<br />
Tecla 1: Deslizamiento Alarmas, (si se pulsa durante 5 segundos parecen<br />
mostrar los últimos 15 alarmas)<br />
Tecla 5: Reset alarmes<br />
Có<strong>di</strong>go 01: Rotación Grupo<br />
Co<strong>di</strong>ce 02: Llenado tubos MDB<br />
Có<strong>di</strong>go 03: Vaciado tubos MDB<br />
Có<strong>di</strong>go 04: Test entradas y vacía tubos para MDB<br />
Có<strong>di</strong>go 05: Reset alarmes (o sólo 5)<br />
Có<strong>di</strong>go 06: Prueba completa<br />
Có<strong>di</strong>go 07: Prueba Sólo Agua<br />
Có<strong>di</strong>go 08: Movimiento del brazo<br />
Có<strong>di</strong>go 09: Rotación columna<br />
Có<strong>di</strong>go 12: Visualiza ventas totales<br />
Có<strong>di</strong>go 13: Desenganche vaso<br />
Có<strong>di</strong>go 14: Prueba Mezclador<br />
Có<strong>di</strong>go 15: Recarga<br />
Có<strong>di</strong>go 16: Prueba Sin Azúca<br />
Có<strong>di</strong>go 17: Paletina<br />
Có<strong>di</strong>go 18: Prueba muele-dosador<br />
Có<strong>di</strong>go 0A: Visualiza Temperatura últimas 48 horas Vega A<br />
Có<strong>di</strong>go 0B: Visualiza Temperatura últimas 48 horas Vega B<br />
Tecla+Azúca: Reset alarmes<br />
Tecla–Azúca: Deslizamiento Alarmas (si se pulsa durante 5 segundos parecen<br />
mostrar los últimos 15 alarmas)<br />
En mantenimiento, será necesario escribir en secuencia en el teclado alfanumérico<br />
los números in<strong>di</strong>cados para obtener la función deseada.
6.0 MANTENIMIENTO E INACTIVIDAD<br />
6.1 Limpieza y carga<br />
Para garantizar durante mucho tiempo el correcto funcionamiento del<br />
<strong>di</strong>stribuidor, es necesario una limpieza perió<strong>di</strong>ca en algunas de sus<br />
partes. La limpieza de algunos elementos es in<strong>di</strong>spensable para cumplir<br />
las normas sanitarias vigentes. Estas operaciones se realizan con<br />
el <strong>di</strong>stribuidor abierto y apagado; las operaciones de limpieza, han de<br />
realizarse antes de la carga del producto. Para garantizar el ejercicio normal, el<br />
aparato tiene que ser instalado en lugares en donde la temperatura ambiente<br />
esté compren<strong>di</strong>da entre una temperatura mínima de +1°C y una máxima de<br />
+32°C y la humedad no supere el 70%. Tampoco se puede instalar en aquellos<br />
locales en donde la limpieza se realice con mangueras de agua (eje. Grandes<br />
cocinas, etc). No utilizar chorros de agua para la limpieza de la máquina.<br />
Consultar las <strong>di</strong>sposiciones in<strong>di</strong>cadas en el capítulo III NORMAS DE<br />
SEGURIDAD y el capitulo 4.0 INSTALACIÓN del presente manual.<br />
6.1.1 Mantenimiento aconsejado<br />
Bianchi Ven<strong>di</strong>ng Group S.p.A. garantiza el buen funcionamiento<br />
del <strong>di</strong>stribuidor en el trascurso del tiempo solo cuando se ha realizado<br />
el mantenimiento preventivo respetando las modalidades<br />
descritas en la tabla siguiente:<br />
TIPOLOGÍA DE INTERVEN-<br />
CIÓN<br />
Regeneración depurador<br />
(*Resinas)<br />
Sustitución émbolo completo de<br />
filtros y guarnición<br />
Sustitución grupo café completo<br />
Descalcificación caldera expreso<br />
y electroválvulas<br />
N° VENTAS<br />
5.000 10.000 20.000 30/40.000 70/80.000<br />
Sustitución de las molederas �<br />
Decalcificación caldera soluble y<br />
electroválvulas<br />
�<br />
* si no se in<strong>di</strong>ca lo contrario por parte del proveedor del depurador.<br />
6.1.2 Limpieza perió<strong>di</strong>ca a cargo del responsable de la manutención<br />
Primera operación. Eliminación de los deshechos presentes en los bidones<br />
de la basura (vasos sucios, paletinas, papel, pañuelos, etc.). Después de la eliminación<br />
de los deshechos, pueden comenzar las limpiezas del ambiente.<br />
- eliminación de la suciedad más grosera<br />
- sanificación de los pisos y de las paredes del ambiente en el ra<strong>di</strong>o de 1<br />
metro alrededor del <strong>di</strong>stribuidor automático<br />
- al finalizar, se accede a la abertura del <strong>di</strong>stribuidor<br />
6.1.3 Limpieza coti<strong>di</strong>ana aconsejada<br />
La finalidad de esta, es prevenir la formación de bacterias en las zonas de<br />
contacto con los alimentos.<br />
Para todas las operaciones de limpieza, hay que atenerse a las <strong>di</strong>sposiciones<br />
presentadas en el párrafo 6.3.1<br />
Realizar las siguientes operaciones:<br />
– limpiar todas las partes visibles de la zona de recepción de vasos (Fig.6.1<br />
e Fig.6.2)<br />
Desmontar y lavar cuidadosamente:<br />
– embudos y cierre magnético de contenedores de producto<br />
(Fig.6.3-pos.1)<br />
– salida de agua, (2), batidoras (3), aspas de las batidoras (4) y tuerca (5).<br />
– tubos de silicona de <strong>di</strong>spensación del producto<br />
– ventana y soporte de <strong>di</strong>spensación del producto (Fig.6.4)<br />
– rampa y embudo de café (Fig.6.5)<br />
Antes de montar de nuevo, secar cuidadosamente todos los elementos.<br />
– Pimpiar los residuos de café del grupo. Este se puede extraer para facilitar<br />
la tarea (Fig.6.6)<br />
6.1.4 Carga de producto<br />
�<br />
Cuando sea necesario proceder a la carga de producto y los materiales de<br />
consumo del <strong>di</strong>stribuidor automático. Tomar como referencia la sec. 4.6<br />
correspon<strong>di</strong>ente a la primera instalación.<br />
6.2 Mantenimiento or<strong>di</strong>nario y extraor<strong>di</strong>nario<br />
Las operaciones descritas en esta sección son puramente orientativas, ya<br />
que pueden variar según: dureza del agua, humedad, producto utilizado,<br />
con<strong>di</strong>ciones y modo de trabajo, etc.<br />
�<br />
�<br />
Para todas las operaciones que precisen desmontar algún componente<br />
del <strong>di</strong>stribuidor, asegurarse de que está desconectado;<br />
confiar estas operaciones a personal cualificado.<br />
Confiar las operaciones descritas a continuación a personal competente.<br />
Si las operaciones requieren el acceso al <strong>di</strong>stribuidor coniarlo a personal<br />
preparado.<br />
�<br />
25<br />
6.3.1 Sanitarización<br />
ALGUNAS ADVERTENCIAS IMPORTANTES<br />
ESPAÑOL<br />
Para intervenciones más complejas, como la descalcificación de la caldera,<br />
es necesario un perfecto conocimiento de la máquina.<br />
Mensualmente realizar la desinfección de todas las partes en contacto con<br />
los alimentos, utilizando productos a base de cloro y siguiendo lo descrito<br />
en la sección, 4.5.3.<br />
PROCEDIMIENTO DE CONTROL DE LA PUESTA EN FASE DEL GRUPO<br />
CAFÉ<br />
Asegurarse de que, en la fase de reposo, el ín<strong>di</strong>ce giratorio esté alineado al<br />
ín<strong>di</strong>ce de fase (véase Fig. 6.7).<br />
Asegurarse de que durante la fase de erogación el ín<strong>di</strong>ce giratorio esté<br />
anticipado de no más de 1,5 mm del punto de referencia de erogación (el<br />
ín<strong>di</strong>ce giratorio debe estar en posición de erogación entre 0 y 1,5 mm del<br />
punto de erogación).<br />
6.3 Proce<strong>di</strong>mientos para la limpieza del <strong>di</strong>stribuidor<br />
Equipo ideal:<br />
Para los encargados de la carga y de la manutención, el equipo ideal debería<br />
estar compuesto por:<br />
- Valija porta instrumentos<br />
- Uniforme limpio<br />
- Guantes descartables<br />
- Borne para cerrar las pajillas<br />
- Rollo de papel alimentario<br />
- Bastón en madera o plástico<br />
- Confección de detergente<br />
- Confección de desinfectante<br />
- Cartel “Distribuidor fuera de servicio ”<br />
- Mesita de apoyo (facultativa)<br />
No utilizar nunca:<br />
- Esponjas, esponjitas, trapos de tela<br />
- Pinceles<br />
- Destornilladores u objetos metálicos<br />
- Los operadores y técnicos del ven<strong>di</strong>ng que habitualmente estén en contacto<br />
con los productos alimenticios deben prestar particular atención al<br />
aseo personal y a la indumentaria.<br />
En particular, antes de iniciar cada operación en el <strong>di</strong>stribuidor debe asegurarse<br />
de:<br />
- calzar zapatos que prevengan los accidentes o al menos que sean adecuados<br />
al uso<br />
- lavarse las manos perfectamente<br />
- mantener las uñas cortas, limpias y sin tinta<br />
- llevar el cabello corto y limpio<br />
- evitar rascarse durante las operaciones de mantenimiento<br />
- no fumar y no comer durante el trabajo<br />
- evitar tocarse el cabello, boca, nariz durante el trabajo<br />
- evitar llevar anillos, pulseras, relojes<br />
- cubrir las posibles heridas<br />
- evitar perfumes personales fuertes<br />
La mayor contaminación de los alimentos pasa a través de las manos, os<br />
recordamos por tanto que os lavéis las manos de vez en cuando:<br />
- se inicia a trabajar en el <strong>di</strong>stribuidor<br />
- después de haber ido al lavabo<br />
- después de haberse tocado el cabello, sonado la nariz, comido<br />
- después de haber tocado productos químicos de limpieza<br />
- después de haberle dado la mano a otra persona<br />
Si se usan guantes protectores es necesario acordarse de cambiarlos cada<br />
vez que tocan objetos contaminantes.<br />
Cómo obtener la higiene:<br />
- Se obtiene con el empleo de desinfectantes<br />
Los desinfectantes tienen por objeto destruir los microorganismos presentes<br />
en las superficies.<br />
Cómo obtener la limpieza:<br />
- Se obtiene con el empleo de detergentes y/o detersivos<br />
Los detergentes tienen por objeto eliminar la suciedad más grosera.<br />
Existen en comercio productos que son al mismo tiempo detergentes/desinfectantes.<br />
Normalmente se consiguen en la farmacia (a base de cloro).<br />
Con respecto a lo que no se ha mencionado en este capítulo, consulta la<br />
HACCP y en particular prestar atención a:<br />
- La limpieza de los locales<br />
- El transporte de los productos<br />
- La manutención de las maquinarias<br />
- La eliminación de los deshechos<br />
- Aprovisionamiento del agua potable<br />
- La higiene personal<br />
- Las características de los productos alimenticios<br />
- (<strong>di</strong>rectiva 93/43/CEE)<br />
Algunas advertencias importantes (ref. Directiva 93/43)<br />
- Los locales en donde se instalan los <strong>di</strong>stribuidores automáticos, deben<br />
impe<strong>di</strong>r la acumulación de suciedad, el contacto con materiales tóxicos y<br />
la formación de moho sobre las superficies de la máquina.
ESPAÑOL<br />
- Además, es importante que los locales en donde se instala el <strong>di</strong>stributor,<br />
puedan garantizar una correcta práctica higiénica impi<strong>di</strong>endo la contaminación<br />
cruzada, durante las operaciones, entre productos alimenticios,<br />
aparatos, materiales, agua, recambio de aire o intervenciones del personal<br />
y excluyendo agentes externos de contaminación como insectos u otros<br />
animales nocivos.<br />
- Comprobar que la conexión hídrica sea adecuada y conforme a la <strong>di</strong>rectiva<br />
CEE 80/778 concerniente a la cualidad de las aguas destinadas al consumo<br />
humano.<br />
- Asegurar una correcta aireación mecánica o natural, evitando el flujo<br />
mecánico de aire de una zona contaminada hacia una zona limpia.<br />
Las operaciones de limpieza pueden ser efectuadas en el lugar en el que está<br />
instalado el <strong>di</strong>stribuidor automático.<br />
Ejemplo de proce<strong>di</strong>miento de limpieza ideal de un <strong>di</strong>stribuidor automático<br />
de bebidas calientes:<br />
El encargado de la higiene de la instalación, antes de abrir el <strong>di</strong>stribuidor,<br />
debe asegurarse del estado de limpieza del ambiente circunstante y poner<br />
un cartel que in<strong>di</strong>que a los potenciales consumidores que:<br />
- “el aparato está fuera de servicio por manutención”<br />
- es importante que, durante las operaciones de limpieza y sanificación, el<br />
encargado no tenga que suspender nunca su trabajo para hacer funcionar<br />
el <strong>di</strong>stribuidor.<br />
- Para la limpieza interna usar estropajos limpios, mucho mejor paños de<br />
un solo uso.<br />
- In<strong>di</strong>spensable acordarse de no poner nunca en contacto los productos<br />
usados para la limpieza genérica del <strong>di</strong>stribuidor con los usados para la<br />
limpieza de las piezas en contacto con los alimentos.<br />
- Prestar atención durante las operaciones de limpieza de no transferir<br />
gérmenes de zonas sucias a otras ya limpias.<br />
A) usar guantes limpios<br />
B) usar agua caliente que no esté sacada de los lavabos<br />
C) prestar una atención especial en la limpieza de las piezas en contacto con<br />
las sustancias alimenticias.<br />
- Quitar totalmente todos los residuos de suciedad antes de utilizar desinfectantes.<br />
- Evitar completamente todo contacto de alimentos con superficies sucias.<br />
- Durante las operaciones de limpieza abstenerse minuciosamente a las<br />
in<strong>di</strong>caciones descritas en las confecciones de los detergentes químicos.<br />
Evitar absolutamente que las confecciones de los alimentos tengan contacto<br />
con los detergentes.<br />
- Asegurarse de que vuestro equipo de limpieza esté en perfectas con<strong>di</strong>ciones<br />
de eficiencia.<br />
D) terminadas las operaciones de limpieza depositar las bolsas de basura<br />
en las áreas adecuadas alejadas de donde se colocaran los <strong>di</strong>stribuidores<br />
automáticos.<br />
Resumimos en la tabla siguiente el comportamiento que sugerimos con el fin<br />
de reducir al mínimo el riesgo de proliferación y contaminación de bacterias<br />
en el interior del <strong>di</strong>stribuidor<br />
TIPOLOGÍA DE INTERVENCIÓN<br />
Trasportar y lavar todas las piezas a<br />
la vista en la zona de erogación con<br />
liquido higienizante.<br />
Vaciar los posos líquidos secos y<br />
limpiarlos con higienizante.<br />
Vaciar el contenedor de posos de café<br />
y lavarlo con higienizante<br />
Sacar todos los contenedores y limpiar<br />
con un paño húmedo todas las<br />
piezas de apoyo de los contenedores,<br />
además del fondo del <strong>di</strong>stribuidor y<br />
el exterior del mismo, en particular la<br />
zona de erogación, después proceder<br />
con la higienización.<br />
* Los Kit de higienización están compuestos<br />
por piezas de plástico destinadas<br />
al paso del producto en polvo<br />
o líquido (ventosas, tubos, brida de<br />
erogación, boquillas, ...). Para una<br />
mayor información os rogamos que<br />
os pongáis en contacto <strong>di</strong>rectamente<br />
con Bianchi<br />
6.4 Dosificación<br />
CADA DIA<br />
TIEMPO / n° VENTAS<br />
CADA<br />
SEMANA<br />
6.4.1 Regulación de la dosis y el molido<br />
El <strong>di</strong>stribuidor está regulado de fábrica para los siguientes valores:<br />
– Temperatura café en el vaso entre 70°C y 80 °C.<br />
– Temperatura productos solubles en el vaso entre 70°C y 80°C.<br />
– Peso en gramos polvo de café entre 6 y 8 gramos.<br />
�<br />
�<br />
�<br />
�<br />
20000 VENTAS<br />
O MAX CADA<br />
MES.<br />
*Bianchi ha pre<strong>di</strong>spuesto kit específicos expresamente estu<strong>di</strong>ados para<br />
cada modelo de <strong>di</strong>stribuidor.<br />
�<br />
– dosificación del producto tal y como se in<strong>di</strong>ca en la siguientes tablas.<br />
Para personalizar y mejorar el resultado según el producto utilizado, se recomienda<br />
revisar:<br />
– Gramaje del café molido.<br />
Variar la cantidad actuando sobre el botón puesto en el dosificador<br />
(Fig.6.8).<br />
Cada salto del botón de regulación corresponde a un valor de 0,05 gramos.<br />
Girando a la derecha la dosis <strong>di</strong>sminuye.<br />
Girando a la izquierda la dosis aumenta.<br />
La variación de producto se puede controlar me<strong>di</strong>ante las muescas de<br />
referencia colocadas en el cuerpo dosificador (véase la figura 6.8).<br />
La tableta de café, normalmente, debe presentarse compacta y levemente<br />
húmeda.<br />
- Regulación del grado de molido manual. Girar el tornillo (Fig.6.9) para<br />
obtener los resultados deseados. Girando a la derecha se obtiene un<br />
molido fino; girando a la izquierda se obtiene un molido grueso.<br />
Después de la regulación hay que efectuar 3 erogaciones de producto<br />
para verificar que la regulación sea justa, cuanto más fino es el gramaje,<br />
mayor será el tiempo empleado en la erogación del producto.<br />
- Regulación automática molido (Fig.6.10)<br />
- Permite, para las versiones expreso, guardar constante el molido, indepen<strong>di</strong>entemente<br />
del porcentaje de humedad, de la temperatura y del<br />
desgaste de los molinillos.<br />
- El primer calibrado se efectúa con <strong>di</strong>spositivo desconectado<br />
- Regulen manualmente la dosis (6-7g)<br />
- Regulen manualmente el molido<br />
- Calculen el tiempo de elaboración en segundos (std 18s)<br />
- Vuelvan a conectar el <strong>di</strong>spositivo<br />
- Digiteen el tiempo de elaboración me<strong>di</strong>do, en programación<br />
- Cada 5 cafés,expresos se efectúa en automático el control de <strong>di</strong>cho<br />
parámetro. Las lecturas válidas corresponden al tercer / cuarto café.: Las<br />
primeras dos se ignorarán ya que resultado de las regulaciones anteriores,<br />
la quinta será de regulación<br />
6.4.2 Regulación del caudal de agua en las electroválvulas de soluble<br />
Ben los productos solubles pueden regular electrónicamente la cantidad de<br />
agua y la dosis del polvo variando los parámetros estándar; el proce<strong>di</strong>miento<br />
está ilustrado en el capítulo 5.0 INSTRUCCIONES SOFTWARE.<br />
CUIDADO: Desajustar la capacidad volumétrica de agua, actuando en el<br />
tornillo de regulación de las válvulas solubles, significa perju<strong>di</strong>car y variar<br />
las cantidades de agua elaborada en taza y, por consiguiente, la dosis de<br />
la misma.<br />
- Para acceder a la electroválvula posicionada en la caldera solubles, es<br />
necesario quitar el panel (1) aflojando los dos tornillos (2) in<strong>di</strong>cados en<br />
la figura 6.12<br />
– Para obtener un buen enjuague de las copitas, actúen eventualmente en<br />
el tornillo de capacidad volumétrica, controlando luego la aten<strong>di</strong>bilidad<br />
de las dosis.<br />
6.4.3 Acceso a las partes internas<br />
Para acceder a las partes internas del <strong>di</strong>stribuidor automático (bombas,<br />
caldera café expreso, electroválvulas, conexiones eléctricas, etc.):<br />
Versión Expreso:<br />
- Girar hacia el exterior el grupo de suministro de azúcar (Fig. 6.13).<br />
- Actuar entonces sobre las dos empuñaduras in<strong>di</strong>cadas en la Fig. 6.14<br />
- 6.16, extraer el panel y sujetarlo hasta el recorrido completo (Fig. 6.15<br />
- 6.17).<br />
Luego de haber efectuado las eventuales operaciones de mantenimiento,<br />
elevar el panel completo hasta la correcta posición vertical y colocar entonces<br />
nuevamente el grupo de suministro de azúcar en posición de trabajo,<br />
girándolo hacia la derecha.<br />
Versión Soluble:<br />
- Desmontar los grupos mezclador y afl ojar los tres tornillos in-<strong>di</strong>cados en<br />
la fi gura 6.18 - 6.19, hacer desplazar a la izquierda el panel frontal hasta<br />
el desenganche de las ranuras y entonces quitar el panel para acceder al<br />
interior.<br />
6.5 Inactividad<br />
Para una prolongada inactividad del <strong>di</strong>stribuidor, es necesario efectuar las<br />
siguientes operaciones preventivas:<br />
– Desconectar eléctricamente e hidráulicamente el <strong>di</strong>stribuidor<br />
– Vaciar por completo la caldera de solubles y la cubeta de entrada de<br />
agua, para ello, quitar el tapón situado en el tubo largo de la salida de<br />
líquidos.<br />
– Colocar de nuevo el tapón (Fig.6.20).<br />
– Vaciar todo el producto de los contenedores<br />
– Proceder al lavado de todas las partes en contacto con alimentos tal y<br />
como se ha descrito en apartados anteriores<br />
– Vaciar el cubo de residuos y limpiarlo cuidadosamente<br />
– Sacar la bolsa de posos de café<br />
– Limpiar con un paño limpio, todas las superficies internas y externas del<br />
<strong>di</strong>stribuidor automático<br />
– Proteger el exterior con un film o bolsa de celofán (Fig.6.21)<br />
– Almacenar en un local seco, resguardado y a una temperatura no inferior<br />
a 1º C.<br />
26
DÉCLARATION DE CONFORMITÉ<br />
La BIANCHI VENDING GROUP S.p.A.<br />
Corso Africa, 9 - 24040 Zingonia <strong>di</strong> VERDELLINO (BG) Italia<br />
déclare sous sa responsabilité que la famille de <strong>di</strong>stributeurs automatiques modèle:<br />
Marque: BIANCHI VENDING<br />
Fabricant : BIANCHI VENDING GROUP S.p.A.<br />
Type/Modèle: BVM 952 – BVM 972<br />
est conforme aux Caractéristiques de Base concernant la Sécurité selon les Directives:<br />
• Piombo (Pb)<br />
• Mercurio (Hg) Déclaration de Conformité<br />
• Cadmio (Cd)<br />
Directive RoHS<br />
<strong>Dichiarazione</strong> • Cromo esavalente Directive 2002/95/CE (Cr(VI)) du Parlement <strong>di</strong> <strong>Conformità</strong><br />
Européen et<br />
• Bifenile polibromurati du Conseil (PBB) du 27 janvier 2003<br />
relative à la limitation de l’utilisation de certaines substances dangereuses<br />
• Eteri <strong>di</strong> <strong>di</strong>fenili dans les polibromurati:<br />
équipements électriques et électroniques<br />
o PentaBromoDifenilEtere (PBDE)<br />
Bianchi Ven<strong>di</strong>ng Group S.p.A. déclare que:<br />
o OttaBromoDifenilEtere Direttiva (OttaBDE) RoHS<br />
depuis le 1er juillet, tout produit de Bianchi o Ven<strong>di</strong>ng<br />
DecaBromoDifenilEtere<br />
Group S.p.A. mis<br />
(DecaBDE)<br />
sur le marché en Europe est conforme à la Directive RoHS et ne contient<br />
donc pas de concentrations au-delà des limites autorisées des substances suivantes :<br />
• Pefluorooctano sulfonato (PFSO)<br />
• Plomb (Pb) Direttiva • PoliCloroNaftalene 2002/95/CE • Sulfonate<br />
(PCN) del de perfluorooctane Parlamento (PFSO) Europeo e<br />
• Polychloronaphtalène (PCN)<br />
• Mercure (Hg)<br />
• Bis(tribromophenoxy)etano • Bis(tribromo PoliCloroBifenile phenoxy)éthane (PCB) Polychlorobiphényl (PCB)<br />
• Cadmium (Cd)<br />
del Consiglio del 27 Gennaio 2003<br />
• Benzene<br />
• Benzène<br />
• Chrome hexavalent (Cr(VI)) sulla restrizione dell’uso <strong>di</strong> determinate sostanze pericolose<br />
• Diphényle de polybromide (PBB)<br />
• Éthers de <strong>di</strong>phényle de polybromide nelle : apparecchiature elettriche L’Amministratore L’ADMINISTRATEUR ed elettroniche<br />
Delegato DELEGUE<br />
o Pentabromo <strong>di</strong>phényl éther (PBDE)<br />
o Octabromo <strong>di</strong>phényl éther (OctaBDE)<br />
o Décabromo <strong>di</strong>phényl éther (DécaBDE) Bianchi Ven<strong>di</strong>ng Group S.p.A. ______________________<br />
<strong>di</strong>chiara che:<br />
Zingonia <strong>di</strong> Verdellino (BG), le 12 janvier 2009<br />
FRANÇAIS<br />
1) Basse tension 2006/95/CE (concernant le rapprochement des législations des États membres relatives au matériel électrique destiné à être employé<br />
dans certaines limites de tension ) -BT-<br />
2) Compatibilité électromagnétique 2004/108/CE (relative au rapprochement des législations des États membres concernant la compatibilité<br />
électromagnétique) -EMC-<br />
3) REG. (CE) 1935/2004 concernant les matériaux et objets destinés à entrer en contact avec des denrées alimentaires<br />
REG. (CE) 1895/2005 concernant l’utilisation de certains dérivés époxy<strong>di</strong>ques dans les matériaux et objets destinés à entrer en contact<br />
avec des denrées alimentaires<br />
DIR. 2002/72 CE concernant les matériaux et objets en matière plastique destinés à entrer en contact avec des denrées alimentaires.<br />
Les essais/vérifications ont été menés conformément aux normes harmonisées/européennes en vigueur :<br />
1) BASSE TENSION (sécurité électrique BT) :<br />
EN 60335-1:2002 +A1:2004 +A11:2004 +A2:2006 +A12:2006 +A13:2008 (Sécurité des appareils électrodomestiques et analogues - Norme générale)<br />
EN 60335-2-75:2004+ A1:2005 +A11:2006 + A2:2008 +A12:2010. (Règles particulières pour les <strong>di</strong>stributeurs commerciaux et les appareils automatiques<br />
pour la vente)<br />
EN ISO 11201:2009 +EN ISO 3744:2009 Détermination de la puissance acoustique. Niveau de pression sonore : LpA < 70 dB(A)<br />
2) COMPATIBILITÉ ÉLECTROMAGNÉTIQUE (EMC) :<br />
EN 55014-1:2006 (Exigences et méthodes de mesure des caractéristiques de perturbation ra<strong>di</strong>o des appareils électrodomestiques et analogues à moteur<br />
ou thermiques, des outillages électriques et appareils analogues)<br />
EN 55014-2:1997 +A1:2001 +A2:2008 (Exigences d’immunité pour les appareils électrodomestiques, outillages électriques et appareils analogues)<br />
EN 61000-3-2: 2006 (Limites pour les émissions de courant harmonique)<br />
EN 61000-3-3:1995+ A1:2001 +A2:2005 (Limitation des variations de tension, des fluctuations de tension et du papillotement dans les réseaux d’alimentation<br />
basse tension pour les matériels ayant un courant assigné ≤ 16 A)<br />
EN 62233:2008 Méthodes des mesures des champs électromagnétiques des appareils électrodomestiques et similaires similaires en relations avec l’exposition<br />
humaine.<br />
3) APTITUDE DES MATÉRIAUX EMPLOYÉS AU CONTACT AVEC LES SUBSTANCES ALIMENTAIRES<br />
Essais d’ « Aptitude au contact avec les substances alimentaires » comme prévu par la législation italienne D.M. 21-03-1973 et amendements successifs<br />
⇒ Décret n°227 du 4 mai 2006, et par les <strong>di</strong>spositions portant transposition des Directives Européennes : 82/711/CEE, 85/572/CEE, 93/8/CEE, 97/48/CE,<br />
2002/72/CE, 2004/13/CE, 2004/19/CE, 2005/79/CE, Reg. CE n° 1935/04 et Reg. CE n° 1895/2005.<br />
L’ADMINISTRATEUR DELEGUE<br />
Zingonia <strong>di</strong> Verdellino (BG), January 2010<br />
INFORMATION AUX UTILISATEURS<br />
Aux termes du Décret-Loi 25 Septembre 2007, n°185 et de l’art. 13 du Décret-Loi 25 Juillet 2005, n°151 “Application des Directives 2002/95/CE,<br />
2002/96/CE et 2003/108/CE, concernant la réduction de l’utilisation de substances dangereuses dans les appareils électriques et électroniques,<br />
<strong>Dichiarazione</strong> <strong>di</strong> <strong>Conformità</strong><br />
aussi bien que l’écoulement des déchets”.<br />
Le symbole barré du récipient pour les déchets in<strong>di</strong>qué sur l’appareil signifie que le produit, à la fin de sa vie utile, doit être collecté séparément des<br />
autres déchets.<br />
Par conséquent l’utilisateur devra déposer l’appareil à la fin de sa Direttiva vie utile auprès RoHS<br />
des déchetteries autorisées pour déchets électroniques et électrotechniques<br />
ou bien rendre l’appareil au revendeur au moment de l’achat d’un nouvel appareil de type équivalent.<br />
Un adéquat collectage sélectif pour l’envoi successif Direttiva de l’appareil 2002/95/CE non plus utilisé del au Parlamento recyclage, au traitement Europeo et à e l’écoulement respecteux de l’environnement<br />
contribue à éviter tout éventuel effect négatif sur l’environnement aussi bien que sur la santé en facilitant aussi le recyclage des composants de<br />
l’appareil même. Tout écoulement non autorisé du produit de del la Consiglio part de l’utilisateur del 27 comporte Gennaio l’application 2003 des sanctions administratives aux termes du<br />
Décret-Loi n° 22/1997 (article 50 et suivants du Décret-Loi n° 22/1997).<br />
sulla restrizione dell’uso <strong>di</strong> determinate sostanze pericolose<br />
nelle apparecchiature elettriche ed elettroniche<br />
Bianchi Ven<strong>di</strong>ng Group S.p.A. <strong>di</strong>chiara che:<br />
dal 1° luglio 2006 qualsiasi prodotto <strong>di</strong> Bianchi Ven<strong>di</strong>ng Group S.p.A. immesso sul<br />
mercato in Europa è conforme alla Direttiva RoHS, e quin<strong>di</strong> non contiene<br />
concentrazioni che superino i limiti consentiti per le seguenti sostanze:<br />
27<br />
dal 1° luglio 2006 Zingonia qualsiasi <strong>di</strong> Verdellino prodotto (BG), 12 <strong>di</strong> Gennaio Bianchi 2009 Ven<strong>di</strong>ng Group S.p.A. immesso sul<br />
mercato in Europa è conforme alla Direttiva RoHS, e quin<strong>di</strong> non contiene
FRANÇAIS<br />
AVANT D’UTILISER LA MACHINE, LIRE ATTENTIVEMENT CETTE NOTICE PERMETTANT UN EMPLOI CORRECT ET PLEINEMENT CONFORME AUX PRESCRIPTIONS DE SECURITE.<br />
ATTENTION! Prescriptions de<br />
sécurité importantes!<br />
LIRE attentivement la notice d’instruction<br />
et d’emploi avant la mise<br />
en marche!<br />
AVERTISSEMENT IMPORTANT<br />
TECHNICIEN D’ENTRETIEN<br />
Est défini comme technicien d’entretien, la personne chargée de la recharge des conteneurs du produit soluble, du sucre, du café, des spatules<br />
et des verres. Le technicien chargé de l’entretien doit également pourvoir au nettoyage du <strong>di</strong>stributeur (voir les opérations in<strong>di</strong>quées au chapitre<br />
6.0). En cas de panne, le technicien d’entretien est tenu d’appeler le technicien installateur.<br />
TECHNICIEN INSTALLATEUR<br />
Est défini comme technicien installateur, la personne chargée de l’installation du <strong>di</strong>stributeur automatique, de la mise en route et de la programmation<br />
des fonctions. Toute opération de tarage est de la compétence exclusive de l’installateur qui, de plus, est dépositaire du mot de passe<br />
d’accès à la programmation.<br />
Clés à <strong>di</strong>sposition du TECH-<br />
NICIEN D’ENTRETIEN et du<br />
TECHNICIEN INSTALLATEUR<br />
N° 1 Clé<br />
AVERTISSEMENT<br />
I - Avertissement pour l’operateur<br />
Ce <strong>di</strong>stributeur automatique a été conçu et réalisé dans le respect total des<br />
normes de sécurité en vigueur et s’avère sûr si les personnes suivent les<br />
instructions de chargement et de nettoyage reportées dans ce manuel.<br />
L’utilisateur ne doit, sous aucun prétexte, retirer les protections exigées<br />
par un outil.<br />
Diverses opérations de manutention (à effectuer uniquement par des techniciens<br />
spécialisés et in<strong>di</strong>quées, dans ce manuel, par un pictogramme<br />
spécifique) demandent un enlèvement délibéré des tôles de protection du<br />
<strong>di</strong>stributeur.<br />
Dans le respect des normes de sécurité, certaines opérations sont de compétence<br />
exclusive du technicien installateur et l’opérateur chargé de l’entretien<br />
courant peut également, uniquement sur autorisation spéciale, avoir accès<br />
à des opérations spécifiques.<br />
La connaissance et le respect absolu d’un point de vue technique des avertissements<br />
de sécurité et de danger contenus dans ce manuel, constituent<br />
la présomption d’exécution, dans des con<strong>di</strong>tions de risques minimums, de<br />
l’installation, mise en service et con<strong>di</strong>tions de manutention du <strong>di</strong>stributeur.<br />
II - Avertissements generaux<br />
CLES A TUBE<br />
n° 5,5 - n° 7 - n° 8 - n° 10 - n° 20 - n° 22<br />
CLES A OUVERTURE FIXE (à fourche)<br />
n° 7 - n° 8 - n° 10 - n° 12 - n° 14<br />
Avant d’utiliser le <strong>di</strong>stributeur automatique, lire attentivement<br />
toutes les parties d’installation du présent manuel.<br />
La connaissance des informations et des prescriptions contenues dans celui-ci<br />
est essentielle pour un usage correct du <strong>di</strong>stributeur.<br />
Les utilisations de personnes non compétentes seront consenties uniquement<br />
après formation de celles-ci.<br />
Ces personnes devront avoir eu connaissance des mécanismes de fonctionnement<br />
du <strong>di</strong>stributeur et ceci en fonction de leurs capacités.<br />
– Il est sous la responsabilité de l’acheteur de s’assurer que ces personnes<br />
soient formées ou aient pris connaissance de toutes les informations et<br />
précisions présentes dans ce manuel et les prescriptions in<strong>di</strong>quées dans<br />
la documentation technique<br />
Malgré l’observation scrupuleuse des normes de sécurité de la part du<br />
Avant toute opération d’entretien<br />
couper l’alimentation<br />
électrique<br />
ATTENTION: machine sous<br />
tension!<br />
INDEX<br />
AVERTISSEMENT<br />
1.0 CARACTERISTIQUES TECHNIQUES<br />
2.0 DESCRIPTION TECHNIQUE DU FONCTIONNEMENT<br />
3.0 DEPLACEMENT DU DISTRIBUTEUR AUTOMATIQUE<br />
4.0 INSTALLATION<br />
5.0 INSTRUCTIONS LOGICIEL<br />
6.0 NETTOYAGE ET ARRET DU DISTRIBUTEUR<br />
7.0 FERRAILLAGE<br />
8.0 ALARMES<br />
28<br />
PE<br />
TOURNEVIS<br />
Plat petit<br />
Plat moyen<br />
Plat grand<br />
Cruciforme normal<br />
Cruciforme petit<br />
Cruciforme moyen<br />
Cruciforme grand<br />
En Téflon, plat, petit, pour tarer le Trimmer<br />
ATTENTION:<br />
Parties en contact chaudes!<br />
ATTENTION!<br />
Parties en mouvement<br />
Outils nécessaires aux interventions sur le <strong>di</strong>stributeur automatique.<br />
In<strong>di</strong>cation de mise à la terre<br />
CLES CRICK n° 14<br />
TESTEUR<br />
CISEAUX D’ELECTRICIEN<br />
KIT DE PROGRAMMATION<br />
constructeur, ceux qui opèrent sur le <strong>di</strong>stributeur automatique doivent<br />
être parfaitement conscients des risques potentiels qui subsistent toutefois<br />
lors des interventions sur la machine.<br />
– Ce manuel est partie intégrante du <strong>di</strong>stributeur et doit être toujours à<br />
l’intérieur de celui-ci pour d’éventuelles consultations de la part de <strong>di</strong>fférents<br />
techniciens jusqu’à la destruction du <strong>di</strong>stributeur.<br />
– En cas de perte ou détérioration du présent manuel, il est possible de<br />
recevoir une copie de celui-ci en la demandant auprès du fabricant en<br />
signalant les données reportées sur la plaque matricule du <strong>di</strong>stributeur.<br />
– En employant uniquement des pièces détachées d’origine , nous garantissons<br />
la fiabilité et l’optimisation des prestations du <strong>di</strong>stributeur.<br />
– Les mo<strong>di</strong>fications à la machine non convenues au préalable avec le constructeur<br />
et effectuées par le technicien installateur et/ou l’exploitant,<br />
doivent être considérées sous la totale responsabilité de l’exécutant.<br />
– Le technicien / exploitant décline toute responsabilité pour des mo<strong>di</strong>fications<br />
non autorisées par lui même.<br />
– Le technicien / exploitant décline toute responsabilité pour des mo<strong>di</strong>fications<br />
non autorisées par lui même.<br />
– Ce présent manuel respecte toutes les normes de sécurité au moment<br />
de la mise sur le marché du <strong>di</strong>stributeur, les éventuelles mo<strong>di</strong>fications,<br />
améliorations qui seraient apportées au <strong>di</strong>stributeur par la suite n’obligeraient<br />
en aucun cas Bianchi Ven<strong>di</strong>ng Group Spa à intervenir sur les<br />
<strong>di</strong>stributeurs précédemment fournis, ni à mettre à jour la documentation<br />
technique fournie correspondante.<br />
– Bianchi Ven<strong>di</strong>ng Group Spa se réserve le droit de mo<strong>di</strong>fier à tout<br />
moment et de faire une mise à jour des manuels présents sur le marché<br />
en envoyant à ses clients des feuilles de mise à jour qui doivent être<br />
conservées dans le présent catalogue.<br />
Les éventuels problèmes techniques qui pourraient intervenir seront facilement<br />
résolus en consultant le présent manuel; pour d’autre information,<br />
contacter le concessionnaire auprès duquel vous en avez fait l’achat.<br />
� +039. 035.45.02.111 - fax +039. 035.883.304
Dans le cas d’un appel téléphonique, il est conseillé de se munir des éléments<br />
suivants :<br />
Données reportées sur l’étiquette de propriété (Fig.1)<br />
Version du programme contenu dans le microprocesseur (étiquette adhésive<br />
sur le particulier montée sur la fiche).<br />
Bianchi Ven<strong>di</strong>ng Group déclinent toute responsabilité pour des dommages<br />
corporels ou matériels consécutifs à:<br />
� Installation non correcte<br />
� Alimentation électrique et eau non conformes<br />
� Nettoyages et manutentions non adéquats<br />
� Mo<strong>di</strong>fications non autorisées<br />
� Usage non approprié du <strong>di</strong>stributeur<br />
� Pièces détachées non d’origine<br />
– En aucun cas, Bianchi Ven<strong>di</strong>ng Group S.p.A. n’est tenue à dédommager<br />
d’éventuels dégâts dus à des interruptions forcées des débits du <strong>di</strong>stributeur<br />
à cause de pannes.<br />
– Les opérations d’installation et de manutention devront être exécutées<br />
exclusivement par du personnel techniquement qualifié et préalablement<br />
formé à l’accomplissement de ces fonctions<br />
– Pour la recharge, utilisez exclusivement des produits alimentaires pour<br />
<strong>di</strong>stributeurs automatiques.<br />
– Le <strong>di</strong>stributeur automatique n’est pas approprié à une installation à l’extérieur,<br />
il doit être placé dans des locaux secs avec une température ne<br />
descendant pas en dessous de 1° C et ne peut être installé dans des endroits<br />
où seraient utilisés des jets d’eau pour nettoyage (exemple : grandes<br />
cuisines). Ne pas utiliser de jets d’eau pour nettoyer le <strong>di</strong>stributeur.<br />
III - NORMES DE SECURITE<br />
Avant l’utilisation du <strong>di</strong>stributeur automatique, lire attentivement<br />
le manuel.<br />
– Les opérations d’installation et de manutention devront être effectuées<br />
impérativement par des personnes techniquement qualifiées.<br />
– L’utilisateur ne doit, en aucun cas, pouvoir accéder dans les parties du <strong>di</strong>stributeur<br />
qui sont fixées par des vis qui demandent un outillage approprié.<br />
– La connaissance et le respect absolu des instructions de sécurité et des<br />
avis de danger contenus dans le présent manuel constituent une présomption<br />
pour l’exécution pour un minimum de risques à l’installation,<br />
mise en service et manutention du <strong>di</strong>stributeur.<br />
Debrancher imperativement le cable d’alimentation avant toute<br />
intervention de manutention ou de nettoyage du <strong>di</strong>stributeur.<br />
Ne pas intervenir sur le <strong>di</strong>stributeur et ne pas oter les protections<br />
avant le refroi<strong>di</strong>ssement complet des parties chaudes.<br />
– En utilisant uniquement des pièces détachées d’origine, nous garantissons<br />
la fiabilité et l’optimisation des prestations du <strong>di</strong>stributeur.<br />
– Pour autoriser une fonction normale, l’appareil doit être installé dans un<br />
local dans lesquels la température ambiante comprise entre un minimum<br />
de +1°C. et un maximum de +50°C et l’humi<strong>di</strong>té non supérieure à 85%.<br />
– Pour garantir un fonctionnement correct du <strong>di</strong>stributeur, le maintenir dans<br />
un état parfait de propreté.<br />
– Dans le cas où lors de l’installation, on viendrait à rencontrer <strong>di</strong>fférentes<br />
de celles reportées dans le présent manuel, ou si celles-ci subissaient des<br />
variations dans le temps, le constructeur devra en être informé avant de<br />
se servir du <strong>di</strong>stributeur.<br />
– Vérifier de plus que les normes éventuelles et ultérieures, établies par les<br />
législations nationales et locales sont connues et appliquées.<br />
Cet appareil n’a pas été conçu pour être utilisé par des personnes (y compris enfants)<br />
ayant des capacités physiques, sensorielles ou mentales réduites ou sans<br />
expérience ni connaissance, à moins qu’elles n’aient reçu des instructions sur<br />
l’utilisation de l’appareil et qu’elles soient sous la surveillance d’une personne.<br />
L’accès à l’aire de service est réservé au personnel possédant une<br />
connaissance spécifique et une expérience pratique de l’appareil.<br />
1.0 CARACTERISTIQUES TECHNIQUES<br />
BVM972 BVM952<br />
Hauteur (A) mm 1830 mm 1620 mm<br />
Largeur (B) mm 666 mm 666 mm<br />
Profondeur (C) mm 776 mm 776 mm<br />
Poids 140 kg÷190 kg (3) 155 kg<br />
Tension d’alimentation V230 V230<br />
Puissance installée (1) 1,8 kW ÷ 3,2 kW 1,8 kW ÷ 3,2 kW<br />
Courant nominal (Max) 8 A - 15 A 8 A - 15 A<br />
Alimentation réseau hydrique 0,5 ÷ 6,5 bar 0,5 ÷ 6,5 bar<br />
IDLE STATE MODE<br />
selon EVA-EMP<br />
CONSOMMATION MOYENNE:<br />
110-220 Wh/h 110-220 Wh/h<br />
ENERGY CONSUMPTION<br />
PER LITRE selon EVA-EMP<br />
150-230 Wh/L 150-230 Wh/L<br />
29<br />
FRANÇAIS<br />
Branchement réseau hydrique 3/8” gas 3/8” gas<br />
Branchement réseau électrique prise Schuko prise Schuko<br />
DISTRIBUTEUR GOBELETS<br />
Diamètre gobelets mm 70÷74 70÷74<br />
RESISTANCE CHAUDIERE<br />
De type armé Chau<strong>di</strong>ère café: 1500W 1500W<br />
De type armé Chau<strong>di</strong>ère soluble: 2000W 2000W<br />
CONTENANCE BACS PRODUITS<br />
Café grain Kg 3,5 Kg 3,5<br />
Café soluble Kg 1,4 Kg 1,2<br />
Lait Kg 2,2 Kg 1,7<br />
Creamer Kg 4,0 Kg 3,2<br />
Chocolat Kg 4,8 Kg 3,6<br />
Thé citron Kg 5,2 Kg 3,3<br />
Thé naturel Kg 2,4 Kg 1,7<br />
Potage Kg 3,8 Kg 3,6<br />
Sucre Kg 4,0 Kg 4,0<br />
Gobelets n° 700 500<br />
Palettes n° 540 400<br />
Type de lampe LED LED<br />
Niveau de pression sonore pondéré A 58,2 dB ± 2,5 dB<br />
Niveau de puissance sonore pondéré A 71,0 dB ± 3,0 dB<br />
(1) Vérifier la puissance nominale reportée sur la plaque des caractéristiques<br />
apposée sur le <strong>di</strong>stributeur.<br />
(2) Selon la version demandée et les normes en vigueur dans le lieu d’utilisation.<br />
(3) Selon la version.<br />
CONNAITRE LE DISTRIBUTEUR<br />
Mod. BVM972 (Fig.1.2)<br />
1 Groupe cafè et moulin à cafè<br />
2 Groupe <strong>di</strong>stributeurs de boissons<br />
3 Groupe <strong>di</strong>stribution de sucre<br />
4 Groupe monnayeur<br />
5 Tourelle gobelets<br />
6 Fiche electronique<br />
7 Groupe carte puissance<br />
8 Colonne Palettes<br />
9 Filtre décalcifiant<br />
10 Enjoliveur bas de caisse<br />
11 Zone de réceptacle<br />
12 Touche service<br />
13 Touche lavage<br />
14 Groupe froid (optional)<br />
Mod. BVM952 (Fig.1.3)<br />
1 Groupe cafè et moulin à cafè<br />
2 Groupe <strong>di</strong>stributeurs de boissons<br />
3 Groupe <strong>di</strong>stribution de sucre<br />
4 Groupe monnayeur<br />
5 Tourelle gobelets<br />
6 Fiche electronique<br />
7 Groupe carte puissance<br />
8 Colonne Palettes<br />
9 Filtre décalcifiant (optional)<br />
10 Enjoliveur bas de caisse<br />
11 Zone de réceptacle<br />
12 Touche service<br />
13 Touche lavage<br />
14 Carter supérieur<br />
15 Groupe froid (optional)<br />
1.1 Usage prevu<br />
Le <strong>di</strong>stributeur automatique est prévu exclusivement pour délivrer des boissons<br />
préparées en mélangeant des produits alimentaires avec de l’eau. (par<br />
infusion, en ce qui concerne le café expresso).<br />
De ce fait, utilisez des produits déclarés par le fabricant, propres à la <strong>di</strong>stribution<br />
automatique en bac ouvert. Les boissons sont délivrées par des gobelets<br />
en plastique <strong>di</strong>stribuées <strong>di</strong>rectement par le <strong>di</strong>stributeur.<br />
En outre, il est prévu de délivrer une palette pour le mélange du sucre pour<br />
les boissons à base de café grains.<br />
Les consommations devront être consommées immé<strong>di</strong>atement et en aucun<br />
cas conservées pour une consommation ultérieure.<br />
CAFE EXPRESSO (GRAINS)<br />
Ce processus se fait uniquement sur les modèles dotés d’un groupe café<br />
expresso, après que l’on ait déjà délivré le gobelet et le sucre.<br />
– Le moulin à café s’active jusqu’à délivrer la dose de café moulu fixée par<br />
le doseur (figure 2.3).<br />
– L’électro-aimant du doseur s’alimente provocant l’ouverture du portillon<br />
et par conséquent la descente du café dans la chambre d’infusion.<br />
– Le moteur de rotation du groupe s’alimente pour le mettre en position<br />
d’infusion et comprimer la pastille en même temps (figure 2.4- Fig. 2.5).<br />
- La pompe délivre la quantité d’eau programmée qui est contrôlée par le<br />
doseur volumétrique en la prenant de la chau<strong>di</strong>ère café (figure 2.6).<br />
- Le moteur du groupe café est réalimenté pour repositionner l’infuseur<br />
dans sa position repos ; durant cette opération, la pastille de café usagé<br />
est expulsée.<br />
La séquence de ces opérations (mouture et délivrance du café) peut se faire<br />
en ordre inverse suivant le type de programmation utilisé.<br />
DISTRIBUTION PALETTE<br />
Ce processus est activé uniquement sur les versions où il est prévu un <strong>di</strong>stributeur<br />
de palettes.<br />
Il est possible, en option, d’avoir la palette sur les sélections sans sucre ou<br />
soluble.<br />
– On active le moteur qui actionne le <strong>di</strong>spositif de <strong>di</strong>stribution de la palette<br />
en faisant glisser celle-ci dans le gobelet (fig. 2.7).
FRANÇAIS<br />
BOISSONS SOLUBLES<br />
Ce processus est activé lorsque on aura délivré le gobelet et le sucre.<br />
Suivant le type de boissons demandées et le modèle du <strong>di</strong>stributeur, pour la<br />
préparation de la boisson, peuvent être activés les processus suivants :<br />
– Le moteur de mixer vient être activé si il est présent (fig. 2.8).<br />
– L’électrovanne fixée sur la chau<strong>di</strong>ère solubles (Fig.2.9) ou sur la chau<strong>di</strong>ère<br />
café (Fig.2.10) est activée pour introduire dans le mixer la quantité d’eau<br />
programmée.<br />
– La chau<strong>di</strong>ère Solubles est installée sur la version solubles et sur la version<br />
Expresso Double chau<strong>di</strong>ère.<br />
- Le moteur du produit soluble fait tourner la vis sans fin pour délivrer la<br />
quantité de poudre programmée dans le mixer (dans quelques versions<br />
produits <strong>di</strong>vers peuvent finir dans le même mélangeur- par exemple lait<br />
et chocolat) (Fig. 2.11).<br />
- Après avoir <strong>di</strong>stribué la quantité d’eau et de poudre préfixée, le mixer est<br />
désactivé après un temps T établi en programmation.<br />
3.0 DEPLACEMENT DU DISTRIBUTEUR AUTOMATIQUE<br />
3.1 Deplacement et transport (Fig.3.1)<br />
Le transport du <strong>di</strong>stributeur doit être effectué par des personnes compétentes.<br />
Le <strong>di</strong>stributeur est livré sur une palette ; pour le déplacer, utiliser un chariot<br />
en le manipulant avec précautions.<br />
Eviter de:<br />
– Soulever le <strong>di</strong>stributeur avec des cordes ou des presses<br />
– Traîner le <strong>di</strong>stributeur<br />
– Renverser le <strong>di</strong>stributeur pour le transport<br />
– Faire subir des secousses au <strong>di</strong>stributeur<br />
Eviter que le <strong>di</strong>stributeur:<br />
– Heurter le <strong>di</strong>stributeur<br />
– Poser du poids sur le haut du <strong>di</strong>stributeur<br />
– L’exposer à la pluie, au froid ou chaleur intensive<br />
– Le placer dans un endroit humide<br />
Le constructeur n’est pas responsable des éventuels dommages causés par<br />
la non-observation partielle ou totale des instructions reportées ci-dessus.<br />
3.2 Stockage<br />
Pour un éventuel stockage, éviter de superposer des <strong>di</strong>stributeurs, les maintenir<br />
dans une position verticale, dans des endroits secs, avec une température<br />
non inférieure à 1°C (figure 3.2).<br />
3.3 Embalage<br />
Le <strong>di</strong>stributeur est protégé par des angles en polystyrène et une pellicule<br />
transparent en polypropylène (figure 3.2).<br />
Le <strong>di</strong>stributeur est livré emballé assurant ainsi une protection mécanique et<br />
une protection contre les intempéries.<br />
Sur l’emballage, sont appliquées des étiquettes in<strong>di</strong>quant:<br />
Manutentionner avec soin<br />
Ne pas renverser<br />
Protéger de la pluie<br />
Ne pas superposer<br />
Protéger de la chaleur<br />
Non résistant aux heurts<br />
Type du <strong>di</strong>stributeur et numéro de matricule.<br />
3.4 Reception<br />
A la réception du <strong>di</strong>stributeur, s’assurer qu’il n’ait pas subi de dommages<br />
pendant le transport.<br />
Si l’on constate des dégâts éventuels, les signaler immé<strong>di</strong>atement au transporteur.<br />
A la réception, l’emballage doit être intact et ne doit pas :<br />
– présenter des chocs, déformation ou déchirure du film plastique<br />
– présenter des zones humides qui pourraient in<strong>di</strong>quer que celui-ci a été<br />
exposé à la pluie, au gel ou à la chaleur.<br />
– Présenter des signes de mauvaise manutention.<br />
3.5 Deballage<br />
- Libérer le <strong>di</strong>stributeur de son film plastique en coupant celui-ci avec un<br />
outil approprié le long des angles de protection (fig. 3.3).<br />
- Desserrer les vis (A) des pattes de fixation sur la palette (fig. 3.4).<br />
- Libérer la palette et insérer 4 pieds dans les trous filetés (Fig. 3.5) libérés<br />
par les vis (A).<br />
- Prendre la clef dans le réceptacle gobelets (figure 3.6).<br />
Ouvrir la porte du <strong>di</strong>stributeur et enlever le ruban adhésif des parties cidessous<br />
:<br />
Colonne gobelet (exemple : figure 3.7).<br />
Caisse à monnaie<br />
Bac à sucre<br />
Contrepoids palettes<br />
Porte-cache monnayeur<br />
Bac produits<br />
Flotteur du seau<br />
Enjoliveur bas de caisse<br />
Seau<br />
– Enlever les polystyrènes qui bloquent les bacs produits. (figure 3.8).<br />
Les materieux d’emballage ne doivent pas etre laisses a la portee de<br />
personnes etrangeres car ils peuvent presenter des dangereux sources<br />
de pollution de l’environnement. Nous vous recommandons de vous<br />
debarasser de ces emballages en les apportant dans des dechetteries.<br />
30<br />
4.0 INSTALLATION<br />
4.1 Positionnement<br />
– Le <strong>di</strong>stributeur ne doit pas être plaqué contre le mur, il doit être placé à<br />
une <strong>di</strong>stance minimum de 5 cm du mur (figure 4.1). pour permettre une<br />
ventilation correcte. En aucun cas, ne couvrir le <strong>di</strong>stributeur de chiffons<br />
ou autre.<br />
– Mettre le <strong>di</strong>stributeur de niveau en se servant des pieds réglables (figure 4.2).<br />
S’assurer que le <strong>di</strong>stributeur n’est pas une inclinaison supérieure à 2°.<br />
ATTENTION! Ne jamais placer le <strong>di</strong>stributeur à proximité d’objets inflammables,<br />
en respectant une <strong>di</strong>stance minimum de sécurité de 30 cm.<br />
Bianchi Ven<strong>di</strong>ng Group S.p.A. déclinent toute responsabilité pour des dégâts<br />
dûs à l’inobservance des normes de positionnement.<br />
Si l’installation doit être faite dans des couloirs d’évacuation de sécurité,<br />
s’assurer que le <strong>di</strong>stributeur à porte ouverte, laisse un passage suffisant<br />
(figure 4.1).<br />
Pour éviter que le sol ne se salisse, pour cause de chutes accidentelles de<br />
produits, utiliser si nécessaire sous le <strong>di</strong>stributeur, une protection suffisamment<br />
large pour couvrir son rayon d’action.<br />
4.2 Branchement reseau d’eau<br />
Avant de procéder au branchement du <strong>di</strong>stributeur au réseau d’eau, vérifier<br />
que celui-ci soit :<br />
– Potable (éventuellement avoir une certification par un laboratoire<br />
d’analyse).<br />
– Pression comprise entre 0.5 et 6.5 bar (dans le cas contraire, utiliser une<br />
pompe ou un réducteur de pression suivant le cas).<br />
– Installer s’il n’est pas présent, un robinet en position accessible isoler<br />
l’appareil du réseau d’eau si nécessaire (figure 4.3).<br />
– avant d’effectuer le branchement hydraulique, purger la canalisation pour<br />
éliminer d’éventuelles traces d’impureté et ceci à l’aide du seau (minimum<br />
10 litres)(figure 4.4).<br />
– Brancher le robinet au <strong>di</strong>stributeur en utilisant, à cet effet, un tube en<br />
nylon de type alimentaire et supportant la pression du réseau. Dans le<br />
cas où l’on utilise un tube flexible, il faut placer, à l’intérieur, la douille de<br />
renforcement fournie (Fig.4.5).<br />
– Le raccord prévu est de 3/8 gas (figure 4.6).<br />
4.3 Raccordement electrique<br />
Le <strong>di</strong>stributeur est pré<strong>di</strong>sposé pour fonctionner avec une tension monophasée<br />
230 V et il est protégé avec des fusibles de 12.5 A et 20A. (10A et 20A pour<br />
le modèle à une seule chau<strong>di</strong>ère et la version soluble, 15A et 20A pour la<br />
version soluble froid)<br />
Nous conseillons de contrôler que:<br />
- Le courant 230 V n’est pas une tension de ± 6 %.<br />
– Que la ligne d’alimentation soit adaptée à supporter la consommation du<br />
<strong>di</strong>stributeur.<br />
– Utilisez un système de protection <strong>di</strong>fférentiel.<br />
– Placer le <strong>di</strong>stributeur de manière à ce que la fiche soit facilement accessible<br />
Le <strong>di</strong>stributeur doit être relié impérativement à une prise avec terre.<br />
Vérifiez que le raccordement du fil de terre soit effectif et corresponde aux<br />
normes nationales et européennes de sécurité électrique.<br />
Si nécessaire, faire intervenir du personne qualifié pour vérification.<br />
– Le <strong>di</strong>stributeur est fourni avec un câble d’alimentation H 05 VV - F 3 x<br />
1.5 mm2 avec prise SCHUKO (figure 4.7).<br />
– Les prises non compatibles avec la prise du <strong>di</strong>stributeur doivent être<br />
remplacées (figure 4.8).<br />
– Il est inter<strong>di</strong>t l’usage de rallonge, adaptateur ou prise multiple.<br />
– Quelques modèles sont pourvus de fiches spécifiques pour le lieu de<br />
destination.<br />
Bianchi Ven<strong>di</strong>ng Group S.p.A. déclinent toute responsabilité par la non-observation<br />
partielle ou totale des instructions in<strong>di</strong>quées ci-dessus.<br />
Si le câble d’alimentation est endommagé, couper immé<strong>di</strong>atement le courant<br />
électrique.<br />
Le remplacement des câbles d’alimentation doit être effectué<br />
par un personnel qualifié.<br />
4.4 Mise en service<br />
Le <strong>di</strong>stributeur possède un interrupteur de sécurité (figure 4.9).qui ôte la<br />
tension porte ouverte.(voir schéma électrique).<br />
En cas de nécessité, ouvrir la porte et débrancher la prise du <strong>di</strong>stributeur.<br />
Reste sous tension, le connecteur du câble d’alimentation (figure<br />
4.10 pos.1) et la prise de service à l’intérieur du <strong>di</strong>stributeur<br />
(figure 4.11 pos.2).<br />
– Pour certaines opérations, il est nécessaire d’opérer avec la porte ouverte,<br />
mais <strong>di</strong>stributeur sous tension. Il est possible pour le personnel technique<br />
et compétent d’insérer la clef spéciale en plastique fournie dans l’interrupteur<br />
de porte en la faisant tourner de 90° (figure 4.12).<br />
L’ouverture et l’eventuelle activation porte ouverte du <strong>di</strong>stributeur<br />
doivent etre executees exclusivement par du personnel autorise et<br />
techniquement qualifie pour l’exécution de ces opérations.<br />
Ne laisser en aucun cas le <strong>di</strong>stributeur ouvert.<br />
Ne donner la clef qu’au personnel compétent.<br />
Chaque fois que le <strong>di</strong>stributeur est mis en marche, un cycle de <strong>di</strong>agnostic<br />
a lieu pour vérifier l’état des périphériques du DA et effectuer le reset des<br />
parties en mouvement.
4.5 Installation<br />
4.5.1 Rinçage résines <strong>di</strong>spositif de décalcification si installé comme<br />
accessoire<br />
Avant de remplir le circuit d’eau du <strong>di</strong>stributeur, il est conseillé d’effectuer<br />
un rinçage des résines de l’adoucisseur (si oprévu) en opérant de la façon<br />
suivante:<br />
– Mettre le tube du robinet inférieur dans un récipient adapté à cet usage.<br />
– Ouvrir le robinet (fig. 4.13).<br />
– Insérer la clef de sécurité dans l’interrupteur de porte (fig. 4.12).<br />
– Laisser couler l’eau jusqu’à ce qu’elle soit limpide (fig. 4.14).<br />
– Oter la clef de sécurité et fermer le robinet.<br />
La BVM972 et BVM952 monte comme standard le filtre à cartouche et ne<br />
prévoit pas l’application de la procédure in<strong>di</strong>quée ci-dessus. Dans ce cas il<br />
suffit de brancher le DA au réseau et procéder au remplissage du circuit<br />
hydraulique<br />
4.5.2 Remplissage circuit d’eau<br />
PROCEDURE D’INSTALLATION<br />
La procédure d’installation est valable uniquement pour les <strong>di</strong>stributeurs mono<br />
chau<strong>di</strong>ère. En particulier Chau<strong>di</strong>ère expresso et Chau<strong>di</strong>ère en polysulfone<br />
avec sondes de niveau.<br />
MONO CHAUDIERE EXPRESSO<br />
En sortie des lignes le <strong>di</strong>stributeur sera mis en con<strong>di</strong>tion de PREMIERE IN-<br />
STALLATION. Une fois en location, l’opérateur branchera uniquement l’eau<br />
(avec connexion au réseau aussi bien qu’en cas de réservoir autonome) et<br />
le réseau électrique.<br />
Le <strong>di</strong>stributeur va rappeler automatiquement l’eau jusqu’à ce que le micro<br />
vide eau n’est N.C. au moins pour 15 secondes. Dans cette con<strong>di</strong>tion le D.A.<br />
va activer la pompe et, en con<strong>di</strong>tion de résistance OFF, il va <strong>di</strong>stribuer 200<br />
cc d’eau (mesurés à travers l’hélice). A la fin de cette procédure la date<br />
d’installation du <strong>di</strong>stributeur sera mémorisée.<br />
Une fois confirmée la date, le D.A. va attendre 10 secondes et immé<strong>di</strong>atement<br />
après il va chauffer l’eau dans la chau<strong>di</strong>ère.<br />
CHAUDIERE POLYSULFONE AVEC SONDES DE NIVEAU<br />
En sortie des lignes BV le <strong>di</strong>stributeur sera mis en con<strong>di</strong>tion de PREMIERE<br />
INSTALLATION. Une fois en location, l’opérateur branchera uniquement l’eau<br />
(avec connexion au réseau aussi bien qu’en cas de réservoir autonome) et<br />
le réseau électrique.<br />
Le <strong>di</strong>stributeur va rappeler automatiquement l’eau jusqu’à ce que les sondes<br />
de niveau maxi vont relever la présence eau. A la fin de cette procédure<br />
la date d’installation du <strong>di</strong>stributeur sera mémorisée. Une fois confirmée la<br />
date, le D.A. va attendre 10 secondes et immé<strong>di</strong>atement après il va chauffer<br />
l’eau dans la chau<strong>di</strong>ère.<br />
MONO CHAUDIERE INOX POUR SOLUBLES<br />
En sortie des lignes le <strong>di</strong>stributeur sera mis en con<strong>di</strong>tion de PREMIERE IN-<br />
STALLATION. Une fois en location, l’opérateur branchera uniquement l’eau<br />
(avec connexion au réseau aussi bien qu’en cas de réservoir autonome) et<br />
le réseau électrique.<br />
Le <strong>di</strong>stributeur, en con<strong>di</strong>tion de résistance OFF, va rappeler automatiquement<br />
l’eau et ouvrir l’électrovanne 2 pour décharger l’air présent dans la chau<strong>di</strong>ère.<br />
Cette con<strong>di</strong>tion durera 200 secondes. A la fin de ce timeout le <strong>di</strong>stributeur<br />
va fermer l’électrovanne 2 et l’év. entrée eau pour 20 sec. Après ce temps<br />
le chargement de l’eau va continuer jusqu’à ce que le micro vide eau n’est<br />
N.C. pour un temps supérieur à 5sec (opération liée à un deuxième timeout<br />
de 200 secondes). Dans cette con<strong>di</strong>tion le D.A. va activer l’électrovanne 2<br />
qui va <strong>di</strong>stribuer 20s d’eau. A la fin de la <strong>di</strong>stribution, il faut attendre que le<br />
micro vide eau revient N.C. A la fin de cette procédure la date d’installation du<br />
<strong>di</strong>stributeur sera mémorisée. Une fois confirmée la date, le D.A. va attendre 10<br />
secondes et immé<strong>di</strong>atement après il va chauffer l’eau dans la chau<strong>di</strong>ère.<br />
DOUBLE CHAUDIERE<br />
En sortie des lignes le <strong>di</strong>stributeur sera mis en con<strong>di</strong>tion de PREMIERE IN-<br />
STALLATION. Une fois en location, l’opérateur branchera uniquement l’eau<br />
(avec connexion au réseau aussi bien qu’en cas de réservoir autonome) et le<br />
réseau électrique. Le <strong>di</strong>stributeur, en con<strong>di</strong>tion de résistances OFF, va rappeler<br />
automatiquement l’eau et ouvrir l’électrovanne 2 pour décharger l’air présent<br />
dans la chau<strong>di</strong>ère inox. Cette con<strong>di</strong>tion durera 200 secondes. A la fin de ce<br />
timeout le <strong>di</strong>stributeur va fermer l’électrovanne 2 et l’év. entrée eau pour<br />
20 sec. Après ce temps le chargement de l’eau va continuer jusqu’à ce que<br />
le micro vide eau n’est N.C. pour un temps supérieur à 5sec (opération liée<br />
à un deuxième timeout de 200 secondes).<br />
Dans cette con<strong>di</strong>tion le D.A. va activer l’électrovanne 2 qui va <strong>di</strong>stribuer<br />
20s d’eau. A la fin de la <strong>di</strong>stribution, il faut attendre que le micro vide eau<br />
revient N.C. Après 10 secondes le D.A. va activer la pompe expresso et, en<br />
con<strong>di</strong>tion de résistance OFF, il va <strong>di</strong>stribuer 200 cc d’eau à travers l’év. café<br />
(mesurés à travers l’hélice). A la fin de cette procédure la date d’installation<br />
du <strong>di</strong>stributeur sera mémorisée. Une fois confirmée la date, le D.A. va<br />
attendre 10 secondes et immé<strong>di</strong>atement après il va chauffer l’eau dans les<br />
2 chau<strong>di</strong>ères.<br />
Lorsque le remplissage sera fini, effectuer des rinçages du groupe des<br />
mixers pour remplir tous les circuits et éliminer d’éventuels résidus dans la<br />
chau<strong>di</strong>ère (figure 4.16 ).<br />
Avant de mettre sous tension, s’assurer d’avoir bien branché le <strong>di</strong>stributeur<br />
au réseau d’eau et d’avoir ouvert le robinet d’eau.<br />
4.5.3 Rincage des parties en contact avec les produits<br />
Le <strong>di</strong>stributeur étant sous tension, effectuer le rinçage des mixers par les<br />
fonctions “ RINCAGE ” en entrant par le bouton SERVICE.<br />
– Prendre soin de bien se laver les mains.<br />
– Préparer une solution anti-bactérienne à base de chlore (produit que l’on<br />
trouve dans des magasins pharmaceutiques) en suivant scrupuleusement<br />
les in<strong>di</strong>cations reportées sur le produit même.<br />
– Enlever tous les bacs produits du <strong>di</strong>stributeur (figure 4.17).<br />
– Enlever les couvercles des bacs et les buses de sortie (figure 4.18) im-<br />
31<br />
FRANÇAIS<br />
merger le tout dans la solution précédemment préparée.<br />
– Enlever les descentes produits, bols mixers, corps mixers, hélices tubes<br />
silicones et les immerger dans la solution préparée (figure 4.19).<br />
– Avec un chiffon imbibé de la solution débactérisante, nettoyer les embases<br />
des mixers (figure 4.20 ).<br />
– Toutes ces parties doivent être laissées immergées suivant le temps de<br />
pause inscrit sur la solution.<br />
– Rincer abondamment ces élements, les essuyer avec soin et procéder au<br />
remontage sur le <strong>di</strong>stributeur.<br />
Pour une meilleure securite, effectuer apres le remontage des rincages<br />
automatiques pour eliminer des residus eventuels.<br />
4.5.4 Installation systeme de paiement<br />
Le <strong>di</strong>stributeur est fourni sans système de paiement :<br />
L’installation du système de paiement est à la charge et de la responsabilité<br />
du technicien installateur.<br />
Bianchi Ven<strong>di</strong>ng Group S.p.A. ne se tient pas coresponsable d’éventuels<br />
dommages portés à la machine et/ou aux biens et/ou aux personnes et dus<br />
à une installation incorrecte.<br />
– Ouvrir le portillon cache-monnayeur (figure 4.21).<br />
– Reliez le systeme de paiement (figure 4.22) à la plaquette Master.<br />
Les accepteurs seront connectés <strong>di</strong>rectement à la plaquette Master, les systèmes<br />
exécutives au câble interface de la Master.<br />
Accédez ensuite à la programmation pour les réglages, consultez le chapitre<br />
“ 5.0 INSTRUCTIONS LOGICIEL” pour vérifier les paramètres cohérents avec<br />
le système employé.<br />
Vérifier les connexions du système de paiement selon le schéma de la carte<br />
in<strong>di</strong>qué.<br />
– Accrochez le monnayeur (figure 4.23).<br />
4.6 Chargement produits (machine à l’arrêt)<br />
4.6.1 Remplissage des bacs<br />
– Pour le remplissage des bacs, il est nécessaire de les enlever. En particulier<br />
pour le café en grains, il faut fermer la trappe avant d’enlever le bac<br />
(figure 4.25).<br />
– Enlever les couvercles de chaque bac et remplissez ce dernier suivant<br />
l’étiquette reportée sur le bac lui même (figure 4.27).<br />
– Faire attention que les produits ne contiennent pas de grumeaux, évitez<br />
de les comprimer et d’utiliser une quantité excessive pour éviter un vieillissement<br />
prématuré entre les deux recharges.<br />
BVM 952<br />
Le <strong>di</strong>stributeur modèle BVM952 est pourvu d’un carter supérieur ouvrable.<br />
A travers cette ouverture on a accés aux récipients pour effectuer les opérations<br />
de chargement du produit.<br />
Les figures 4.24 et 4.25 montrent les opérations nécessaires pour ouvrir et<br />
fermer le carter.<br />
Attention! Serrer le ressort in<strong>di</strong>qué dans la figure 4.25 avant de fermer<br />
le carter.<br />
Contrôlez la capacité de chaque bac au paragraphe 1.0 caractéristique<br />
technique.<br />
4.6.2 Remplissage tourelle gobelets<br />
Utilisez uniquement des gobelets adaptés à la <strong>di</strong>stribution automatique (vérifier<br />
les caractéristiques dans le chapitre 1.0 “Caractéristiques Techniques”),<br />
évitez de comprimer entre eux les gobelets pendant le chargement.<br />
NE JAMAIS ESSAYER DE FAIRE TOURNER MANUELLEMENT LA TOURELLE A<br />
GOBELETS.<br />
Premier chargement<br />
En phase d’installation d’un <strong>di</strong>stributeur complètement vide, opérez de la<br />
façon suivante :<br />
– Vérifier que la colonne de verres n’est pas alignée avec le trou de <strong>di</strong>stribution.<br />
Charger ensuite toutes les colonnes en procédant dans le sens inverse<br />
des aiguilles d’une montre.<br />
Dans le cas contraire (lorsque la colonne est positionnée en correspondance<br />
du trou de <strong>di</strong>stribution), fermer la porte et alimenter la machine<br />
de manière à ce que la colonne de verres puisse tourner et se placer automatiquement<br />
dans une position non alignée avec le trou, puis procéder<br />
au chargement (fig.4.28).<br />
– Remettre le couvercle de la tourelle (fig. 4.29).<br />
Chargement normal<br />
Le chargement normal des colonnes de verres doit être effectué machine à<br />
l’arrêt, simplement en ouvrant la porte avant, en soulevant le couvercle et<br />
en insérant les verres manquants.<br />
4.6.3 Remplissage palettes<br />
Attention! Only use appropriate stirers to be used in automatic ven<strong>di</strong>ng<br />
machines.<br />
– Enlevez le contrepoids en métal de la colonne (figure 4.30).<br />
– Insérez les palettes avec leur bandes d’emballage dans la colonne et<br />
uniquement après qu’elles soient positionnées, ôtez la bande d’emballage<br />
(figure 4.31).<br />
– Faire attention que les palettes soient exemptes de bavure, ne soient pas<br />
incurvées et qu’elles soient <strong>di</strong>sposées toutes horizontalement.<br />
– A la fin du remplissage, remettre le contrepoids (figure 4.32).<br />
4.6.4 Pose du sac de marc<br />
- Appliquer le ressort bloquant le sac sur le toboggan.<br />
- Placer le sac en plastique sur le toboggan et le bloquer avec le ressort<br />
(Fig. 4.33).<br />
Utiliser des sacs suffisamment longs de façon à ce qu’ils touchent le socle<br />
du dustributeur.<br />
Vérifier que le récipient de récolte liquides est en position (Fig. 4.33) et<br />
effectuer le vidage pério<strong>di</strong>que de ce dernier.
FRANÇAIS<br />
4.8 MODALITE PREMIERE AUTO-INSTALLATION<br />
A la première mise en marche de la machine une auto-installation sera effectuée.<br />
Le but de cette procédure est celui d’éviter les branchements manuels de câbles<br />
sur les cartes suite au remplissage du circuit hydraulique.<br />
Pour Chau<strong>di</strong>ère in<strong>di</strong>viduelle Expresso:<br />
A la mise en marche du <strong>di</strong>stributeur l’eau va remplir l’airbreak.<br />
Lorsque le flotteur est en position haute la machine commencera un chargement<br />
automatique de l’eau qui va continuer jusqu’à ce que le <strong>di</strong>spositif n’a<br />
compté le passage de 200 cc d’eau (l’eau sera ensuite <strong>di</strong>stribuée au moyen<br />
d’un mixer pour toute la durée de la procédure).<br />
La procédure sera effectuée avec résistance éteinte.<br />
A la fin l’afficheur montrera une date.<br />
Pour Double Chau<strong>di</strong>ère Expresso:<br />
A la mise en marche du <strong>di</strong>stributeur l’eau va remplir l’airbreak.<br />
Lorsque le flotteur est en position haute la machine commencera la procédure<br />
d’installation automatique et ensuite de chargement des deux chau<strong>di</strong>ères<br />
(l’eau sera ensuite <strong>di</strong>stribuée au moyen d’un mixer et par la EV à 3 voies<br />
Café au cours de la procédure).<br />
La procédure sera effectuée avec résistance éteinte.<br />
A la fin l’afficheur montrera une date.<br />
Pour Chau<strong>di</strong>ère Soluble :<br />
A la mise en marche du <strong>di</strong>stributeur l’eau va remplir l’airbreak.<br />
Lorsque le flotteur est en position haute au moins pour 5 secondes consécutives<br />
la machine ouvrira une électrovanne soluble et commencera un cycle<br />
de chargement de l’eau dans la chau<strong>di</strong>ère (l’eau sera ensuite <strong>di</strong>stribuée au<br />
moyen d’un mixer pour toute la durée de la procédure).<br />
La procédure sera effectuée avec<br />
résistance éteinte.<br />
A la fin l’afficheur montrera une<br />
date.<br />
A ce point il faut insérer la date d’installation au moyen du tableau<br />
de commande comme in<strong>di</strong>qué ci-dessous:<br />
Pour Version Alphanumérique<br />
TOUCHE 1 AUGMENTER VALEUR<br />
TOUCHE 3 DEPLACER CURSEUR<br />
TOUCHE 5 INTRODUIRE DATE<br />
TOUCHE 7 REDUIRE VALEUR<br />
TOUCHE 9 DEPLACER ENTRE Jour/<br />
Mois/An<br />
Pour Version avec Tableau de commande<br />
En appuyant sur la TOU-<br />
CHE ENTER, la machine<br />
reste en attente 10<br />
secondes; ensuite le<br />
réchauffement de la<br />
chau<strong>di</strong>ère va commencer.<br />
La date sera mémorisée<br />
dans un endroit sûr de<br />
la carte.<br />
Pour restaurer la modalité<br />
de première installation,<br />
entrer en<br />
Programmation avec le<br />
Mot de Passe 22933.<br />
AUGMENTER<br />
VALEUR<br />
REDUIRE<br />
VALEUR<br />
DEPLACER<br />
CURSEUR<br />
DEPLACER<br />
ENTRE<br />
Jour/Mois/An<br />
5.0 INSTRUCTIONS LOGICIEL<br />
INTRODUIRE<br />
DATE<br />
5.1 MOT DE PASSE<br />
L’actuelle logique de programmation prévoit, lors de l’accès en appuyant sur<br />
la touche PROG, l’introduction d’un mot de passe qui permet d’accéder à un<br />
unique menu de programmation.<br />
Pour pouvoir faciliter et accélérer certaines opérations sur le champ, la gestion<br />
des mots de passe sera décomposée comme suit :<br />
PWD 1 - Menu de programmation réduit<br />
PWD 2 - Menu de programmation complet<br />
PWD 3 - Menu Ventes;<br />
PWD 4 – Divise en 2 PWD Etablie: 88000 pour tester toutes les slave<br />
BVM600;<br />
Essai (géré uniquement par Bianchi Ven<strong>di</strong>ng Group) pour accéder à l’essai<br />
exécuté en ligne de montage.<br />
32<br />
Notes: Si le mot de passe du menu réduit coïncide avec celui du menu complet<br />
celui du Menu complet sera prioritaire<br />
5.2 MENU EN MACHINE<br />
La PWD 1 permet d’accéder au menu complet du <strong>di</strong>stributeur automatique.<br />
La procédure d’accès au menu prévoit de: Appuyer sur la touche PROG sur<br />
la carte master, rentrer le mot de passe et appuyer sur la touche ENTER.<br />
Ci-après sont reportés les menus de programmation du D.A.<br />
5.2.1 MENU SOFTWARE MACHINE<br />
Clavier sélection <strong>di</strong>recte<br />
En programmation les touches ont le sens suivant:<br />
1: Augmente<br />
2: Visualiser nom<br />
3: Déplace curseur<br />
4: Essai poudre<br />
5: Retour au menu précédent (esc)<br />
6: Essai seulement eau<br />
7: Diminue<br />
8: Essai complete (Menu doses)<br />
Essai EV ou Sol (Menu doses boisson)<br />
9: Enter<br />
0: Essai complete (Menu doses boisson)<br />
5.3 ENTRETIEN<br />
Quand on entre en entretien en appuyant sur la touche‘Service’.<br />
L’écran visualise en ligne 1 ‘Entretien xxx’ , où xxx visualise la température<br />
de la chau<strong>di</strong>ère, et en ligne 2 les éventuelles alarmes relevées<br />
En appuyant deux fois sur la touche Service, on va éviter la phase d’attente<br />
du chauffage et on pourra effectuer des sélections d’essai même à la température<br />
non à régime.<br />
En appuyant sur une touche on visualise la température des chau<strong>di</strong>ères<br />
slave en scroll.<br />
Le panne entretien prévoit les fonctions suivantes:<br />
En entretien les touches ont le sens suivant:<br />
Touche 1 : Défiler alarmes (presser 5 secondes, les 15 dernières<br />
alarmes s’affichent)<br />
Touche 5: Reset alarmes<br />
Code 01: Rotation Groupe<br />
Code 02: Rempli.Tubes MDB<br />
Code 03: Vid.tubes MDB<br />
Code 04: Essai entrées et vidage tubes pour MDB<br />
Code 05: Reset alarmes (ou 5 seulement)<br />
Code 06: Essai complet<br />
Code 07: Essai eau<br />
Code 08: Deplacement gobelet<br />
Code 09: Rotat.colonne gobelet<br />
Code 12: Visualise frappes totales<br />
Code 13: Déclenchement gobelet<br />
Code 14: Essai Mixer<br />
Code 15: Recharge des décompteurs<br />
Code 16: Essai sans sucre<br />
Code 17: Palettes<br />
Code 18: Essai moulin-doseur<br />
Code 0A: Affich. température 48 dernières heures Vega A<br />
Code 0B: Affich. température 48 dernières heures Vega B<br />
Touche+sucre: Reset alarmes<br />
Touche+sucre: Défiler alarmes (presser 5 secondes, les 15 dernières<br />
alarmes s’affichent)<br />
En entretien il sera nécessaire d’introduire en séquence, sur le clavier alphanumérique,<br />
les nombres in<strong>di</strong>qués pour obtenir la fonction désirée.
6.0 MANUTENTION ET ARRET<br />
6.1 Nettoyage et remplissage<br />
Pour garantir le fonctionnement correct du <strong>di</strong>stributeur dans le temps,<br />
il est necessaire, d’executer perio<strong>di</strong>quement des operations, dont<br />
quelques unes in<strong>di</strong>spensables pour rester dans les normes sanitaires<br />
en vigueur.Ces operations seront executees <strong>di</strong>stributeur ouvert et<br />
hors tension ; les operations de nettoyage devront etre faites avant<br />
tout rechargement de produit. Pour autoriser une fonction normale,<br />
l’appareil doit être installé dans un local dans lesquels la température ambiante<br />
comprise entre un minimum de +1°C. et un maximum de +32°C et<br />
l’humi<strong>di</strong>té non supérieure à 70%.<br />
Ne pas utiliser de jets d’eau pour nettoyer le <strong>di</strong>stributeur.<br />
Se référer aux <strong>di</strong>spositions in<strong>di</strong>quées au chapitre III NORMES<br />
POUR LA SECURITE et au chapitre 4.0 INSTALLATION du présent<br />
manuel.<br />
6.1.1 Entretien conseillé<br />
La Société Bianchi Ven<strong>di</strong>ng Group garantit le bon fonctionnement<br />
dans le temps de son <strong>di</strong>stributeur uniquement avec un entretien<br />
préventif effectué dans le respect des modalités in<strong>di</strong>quées<br />
ci-dessous:<br />
TYPOLOGIE<br />
D’INTERVENTION<br />
Régénération épurateur<br />
(* Résines)<br />
Remplacement piston complet de<br />
filtres et garniture<br />
Remplacement groupe café complet<br />
Décalcification chau<strong>di</strong>ère express<br />
et électrovannes<br />
N° SELECTIONS<br />
5.000 10.000 20.000 30/40.000 70/80.000<br />
Remplacement meules �<br />
Décalcification chau<strong>di</strong>ère soluble<br />
et électrovannes<br />
�<br />
*S’il n’y a aucune in<strong>di</strong>cation contraire de la part du fournisseur de l’épurateur.<br />
6.1.2 Nettoyage pério<strong>di</strong>que à charge du technicien d’entretien<br />
Première opération. Elimination des déchets présents dans les bidons poubelle<br />
(verres, saletés, spatules, papier, mouchoirs, etc.). Après l’élimination des<br />
déchets, le nettoyage de l’environnement peut démarrer.<br />
- élimination du plus gros de la saleté,<br />
- assainissement des sols et des parois de l’environnement dans un rayon<br />
de 1 mètre autour du <strong>di</strong>stributeur automatique,<br />
- ces opérations étant effectuées, on procède à l’ouverture du <strong>di</strong>stributeur.<br />
6.1.3 Nettoyage quoti<strong>di</strong>en conseillé<br />
Le but est de prévenir la formation des bactéries dans les zones en contact<br />
avec les produits.<br />
Pour toutes les opérations de nettoyage, s’en tenir aux <strong>di</strong>spositions<br />
reportées au paragraphe 6.3.1.<br />
Opérez comme suit :<br />
– Nettoyez toutes les parties en vue des zones de <strong>di</strong>stribution (figure 6.1<br />
et figure 6.2).<br />
Démontez et lavez correctement :<br />
– Réceptacle à gobelets et descente de poudre (fig.6.3 - pos.1)<br />
– Bol mixer (2) corps de mixer (3), hélice de mixage (4) et bague (5).<br />
– Tube de <strong>di</strong>stribution, réceptacle à gobelets (figure 6.4)<br />
– Descente et infuseur café (figure 6.5)<br />
Avant d’effectuer les opérations de remontage, essuyez correctement toutes<br />
ces parties.<br />
– Nettoyez les résidus de poudre de café sur le groupe; pour faciliter cette<br />
opération on peut retirer le groupe de son logement (Figure 6.6).<br />
6.1.4 Chargement produits<br />
Lorsqu’il est nécessaire de remplir les bacs produits ou gobelets, pour ces<br />
opérations reportez vous au chapitre 4.6 (première installation).<br />
6.2 Nettoyage normal et particulier<br />
Les opérations décrites dans cette section sont purement in<strong>di</strong>catives, car<br />
elles sont liées aux variations suivantes: dureté de l’eau, humi<strong>di</strong>té, produit<br />
usagé, con<strong>di</strong>tion et mode de fonctionnement, etc...<br />
Pour toutes les operations qui demandent le demontage des<br />
composants du <strong>di</strong>stributeur, s’assurer que celui-ci soit hors<br />
tension.<br />
Confiez les opérations sous-décrites à du personnel compétent. Si pour ces<br />
opérations, le <strong>di</strong>stributeur doit rester sous tension, les confier à du personnel<br />
techniquement compétent.<br />
�<br />
�<br />
�<br />
�<br />
33<br />
PROCEDURE DE CONTROLE DU CALAGE DU GROUPE CAFE<br />
FRANÇAIS<br />
Pour des interventions plus complexes, par exemple: détartrage des chau<strong>di</strong>ères,<br />
il faut avoir une bonne connaissance du <strong>di</strong>stributeur.<br />
Mensuellement, faire la débactérisation de toutes les parties en contact avec<br />
les produits en utilisant des produits désinfectants comme nous l’avons déjà<br />
décrit à la section 4.5.3.<br />
S’assurer que, dans la phase de repos, l’index tournant est aligné avec l’index<br />
de phase (voir Fig. 6.7).<br />
S’assurer qu’en phase de d istribution, l’index tournant est en avance de<br />
1,5 mm tout au plus du point de référence de <strong>di</strong>stribution (l’index tournant<br />
doit être en position de <strong>di</strong>stribution entre 0 et 1,5 mm à partir du point de<br />
<strong>di</strong>stribution).<br />
6.3 PROCEDURES D’ENTRETIEN<br />
Equipement idéal :<br />
Pour le personnel responsable du chargement et de l’entretien, l’équipement<br />
idéal est composé de la manière suivante :<br />
- Boîte à outils,<br />
- Tenue de nettoyage,<br />
- Gants jetables,<br />
- Serre-tuyauteries,<br />
- Rouleau de papier essuie-tout alimentaire,<br />
- Bâtonnet en bois ou en plastique,<br />
- Confection de détergent,<br />
- Confection de désinfectant,<br />
- Panneau “Distributeurs hors service”,<br />
- Table d’appui (facultative).<br />
Ne jamais utiliser :<br />
- Eponges, chiffons en tissu,<br />
- Pinceaux,<br />
- Tournevis ou objets métalliques.<br />
6.3.1 Désinfection<br />
QUELQUES AVIS IMPORTANTS:<br />
- Opérateurs et techniciens du ven<strong>di</strong>ng qui normalement entrent en contact<br />
avec les produits alimentaires doivent faire particulièrement attention au<br />
nettoyage personnel et de leur vêtements.<br />
En particulier avant de commencer chaque opération sur le <strong>di</strong>stributeur<br />
s’assurer de:<br />
- porter des chaussures de protection ou au moins aptes à l’emploi<br />
- se laver soigneusement les mains<br />
- maintenir les ongles courts, propres et sans vernis<br />
- porter les cheveux courts et propres<br />
- éviter de se griffer pendant les opérations d’entretien<br />
- ne pas fumer et ne pas manger pendant le travail<br />
- éviter de toucher cheveux, bouche, nez pendant le travail<br />
- éviter de porter bagues, bracelets, montres<br />
- couvrir toute blessure éventuelle<br />
- éviter tout parfum fort<br />
La contamination la plus grande des aliments passe à travers les mains; nous<br />
vous rappelons donc de laver vos mains chaque fois :<br />
- que l’on commence à travailler sur le <strong>di</strong>stributeur<br />
- après avoir été à la toilette<br />
- après avoir touché les cheveux, le nez, ou avoir mangé<br />
- après avoir touché des produits chimiques pour le nettoyage<br />
- après des poignées de main avec d’autres personnes<br />
Si l’on utilise des gants de protection, il faut les changer chaque fois qu’ils<br />
entrent en contact avec des objets polluants.<br />
Comment garantir l’hygiène :<br />
- employer un désinfectant.<br />
Les désinfectants ont pour objet de détruire les micro-organismes présents<br />
en surface.<br />
Comment garantir la propreté :<br />
- employer des détergents et/ou détersifs.<br />
Les détergents ont pour objet d’éliminer le plus gros de la saleté.<br />
Il existe, dans le commerce et généralement dans les pharmacies, des produits<br />
à la fois détergent et désinfectant (à base de chlore).<br />
Pour tout ce qui n’a pas été mentionné dans ce chapitre, se référer à la réglementation<br />
HACCP et en particulier faire attention à ce qui suit:<br />
- Le nettoyage des locaux,<br />
- Le transport des produits,<br />
- L’entretien des appareillages,<br />
- L’élimination des déchets,<br />
- L’approvisionnement en eau potable,<br />
- L’hygiène personnel,<br />
- Les caractéristiques des produits alimentaires,<br />
- (<strong>di</strong>rective 93/43/CEE)<br />
Quelques importants avis (réf. Directive 93/43)<br />
- Les locaux où les <strong>di</strong>stributeurs automatiques sont installés doivent être tels<br />
à empêcher l’accumulation de saleté, le contact avec matériaux toxiques<br />
et la formation d’eau de condensation ou moisissure sur les surfaces de<br />
la machine même.
FRANÇAIS<br />
- En outre il est important que les locaux où le <strong>di</strong>stributeur est installé<br />
puissent garantir une correcte procédure hygiénique en empêchant aussi<br />
la contamination croisée, pendant les opérations, entre produits alimentaires,<br />
équipements, matériaux, eau , recirculation d’air ou interventions<br />
du personnel et en excluant tout agent extérieur de contamination tel<br />
qu’insectes ou d’autres animaux nuisibles.<br />
- Vérifier que le branchement hydrique soit adéquat et conforme à la<br />
<strong>di</strong>rective CEE 80/778 concernant la qualité des eaux destinées à la consommation<br />
de l’homme.<br />
- Assurer une correcte aération mécanique ou naturelle, en évitant le flux<br />
mécanique d’air provenant d’une zone contaminée vers une zone propre.<br />
Les opérations de nettoyage peuvent s’effectuer sur le lieu ou le <strong>di</strong>stributeur<br />
automatique est installé,<br />
Exemple de procédure idéale de nettoyage d’un <strong>di</strong>stributeur automatique<br />
de boissons chaudes :<br />
L’employé à l’hygiène de l’installation doit, avant d’ouvrir le <strong>di</strong>stributeur,<br />
s’assurer de l’état de propreté de l’environnement et apposer un panneau<br />
in<strong>di</strong>quant aux consommateurs potentiels que:<br />
- “l’appareil est hors service pour entretien”,<br />
- il est important, lors des opérations de nettoyage et d’assainissement,<br />
que l’employé ne suspende jamais son travail pour faire fonctionner le<br />
<strong>di</strong>stributeur.<br />
- Pour le nettoyage intérieur utiliser des torchons propres, mieux encore si<br />
jetables.<br />
- Il est in<strong>di</strong>spensable de ne jamais faire entrer en contact produits employés<br />
pour le nettoyage générique du <strong>di</strong>stributeur avec les produits employés<br />
pour le nettoyage des parties en contact avec les aliments.<br />
- Faire attention pendant les opérations de nettoyage de ne pas transférer<br />
de germes des zones sales à d’autres zones déjà nettoyées.<br />
A) Employer des gants propres<br />
B) Employer de l’eau chaude non des toilettes<br />
C) Faire plus d’attention pour le nettoyage des parties en contact avec les<br />
substances alimentaires<br />
- Enlever soigneusement tous les résidus de saleté avant de procéder à<br />
l’emploi de désinfectants.<br />
- Eviter soigneusement tout contact d’aliments avec des surfaces sales.<br />
- Pendant les opérations de nettoyage respecter scrupuleusement les in<strong>di</strong>cations<br />
sur les récipients des détergents chimiques. Eviter absolument<br />
que les paquets des aliments entrent en contact avec les détergents.<br />
- Vérifier que votre équipement de nettoyage soit en parfaites con<strong>di</strong>tions<br />
d’emploi.<br />
D) A la fin des opérations de nettoyage mettre les sacs de récolte des ordures<br />
dans des aires appropriées loin des zones où les <strong>di</strong>stributeurs automatiques<br />
seront installés.<br />
Le tableau suivant résume le comportement recommandé afin de réduire au<br />
minimum le risque de prolifération et contamination de bactéries à l’intérieur<br />
du <strong>di</strong>stributeur.<br />
TYPOLOGIE D’INTERVENTION<br />
Enlever et laver toutes les parties<br />
visibles dans la zone de <strong>di</strong>stribution<br />
avec liquide désinfectant.<br />
Vider les seaux fonds liquides et les<br />
nettoyer avec liquide désinfectant.<br />
CHAQUE<br />
JOUR<br />
�<br />
�<br />
TEMPS / n° SELECTIONS<br />
CHAQUE<br />
SEMAINE<br />
20000<br />
BATTUES<br />
OU MAXI<br />
CHAQUE<br />
MOIS<br />
Vider le récipient marc de café et le<br />
�<br />
laver avec liquide désinfectant.<br />
Enlever tous les récipients et nettoyer<br />
avec un torchon humide toutes<br />
les parties d’appui de ceux-ci, aussi<br />
bien que le fond du <strong>di</strong>stributeur et<br />
�<br />
l’extérieur du <strong>di</strong>stributeur, en particulier<br />
la zone de <strong>di</strong>stribution, ensuite<br />
procéder à la désinfection.<br />
* Kit de désinfection des parties<br />
plastiques destinées au passage<br />
du produit en poudre ou liquide<br />
(coupes,tubes, brides de <strong>di</strong>stribution,<br />
�<br />
gicleurs…). Pour des informations<br />
plus détaillées, veuillez contacter <strong>di</strong>rectement<br />
la Société Bianchi.<br />
* La Société Bianchi a pré<strong>di</strong>sposé des kits spécifiques projetés exprès<br />
pour chaque modèle de <strong>di</strong>stributeur.<br />
6.4 Reglages<br />
6.4.1 Reglages doses et mouture<br />
Le <strong>di</strong>stributeur est livré réglé sur des valeurs standards :<br />
– Température café dans le gobelet entre 70°C et 80 °C.<br />
– Température produits solubles dans le gobelet entre 70°C et 80°C.<br />
– Grammage poudre de café entre 6 et 8 grammes.<br />
34<br />
– Quantité de poudre soluble voir tableau.<br />
Pour obtenir les meilleurs résultats avec les produits utilisés, nous conseillons<br />
de contrôler :<br />
– Grammage du café moulu. Varier la quantité en agissant sur la poignée<br />
placée sur le doseur (Fig.6.8).<br />
Chaque cran de la poignée de réglage correspond à une valeur de 0,05<br />
grammes.<br />
En tournant dans le sens des aiguilles d’une montre, la dose <strong>di</strong>minue.<br />
En tournant dans le sens contraire des aiguilles d’une montre, la dose<br />
augmente.<br />
La variation de produit est contrôlable par l’intermé<strong>di</strong>aire des crans de<br />
référence placés sur le corps du doseur (voir figure 6.8).<br />
La pastille de café doit, normalement, se présenter compacte et légèrement<br />
humide.<br />
– Réglage du degré de mouture manuelle. Tourner la vis (Fig.6.9) afin<br />
d’obtenir les résultats souhaités.<br />
En tournant dans le sens des aiguilles d’une montre, on obtient une mouture<br />
fine, en tournant dans le sens inverse des aiguilles d’une montre, on<br />
obtient une mouture grosse.<br />
Après le réglage, il doit être effectué 3 tarages du produit, afin de vérifier<br />
la justesse du réglage. Plus la granulométrie est fine, plus le temps de<br />
coulée du produit sera important.<br />
– Réglage automatique de la mouture (Fig.6.10)<br />
- Permet dans les versions expresso de maintenir constante la mouture,<br />
indépendamment du pourcentage, de la température et de l’usure des<br />
meules.<br />
- Le premier réglage a lieu avec <strong>di</strong>spositif débranché<br />
- Effectuer le réglage de la dose à la main (6-7g)<br />
- Effectuer le réglage de la mouture à la main<br />
- Calculer le temps de <strong>di</strong>stribution en secondes (std 18s)<br />
- Brancher le <strong>di</strong>spositif de nouveau<br />
- Afficher le temps de <strong>di</strong>stribution mesuré, en programmation<br />
- Tous les 5 cafés expresso, le contrôle de ce paramètre sera effectué<br />
automatiquement.. Les lectures valides correspondent avec les troisième/quatrième<br />
café. Les deux premières lectures seront ignorées étant<br />
le résultat des réglages précédents, la cinquième sera de réglage.<br />
6.4.2 Reglage des electrovannes solubles<br />
Dans les produits solubles, on peut régler électroniquement la quantité d’eau<br />
et la dose de poudre, en variant les paramètres standards, la procédure est<br />
illustrée au chapitre 5.0 INSTRUCTIONS LOGICIEL.<br />
ATTENTION: Dérégler le débit de l’eau en agissant sur la vis de réglage des<br />
vannes solubles signifie compromettre et varier la quantité d’eau <strong>di</strong>stribuée<br />
dans la tasse et donc la dose de celle-ci.<br />
Pour avoir accès à l’électrovanne, installée dans la chau<strong>di</strong>ère solubles, il<br />
faut enlever le panneau (1) en desserrant les deux vis (2) in<strong>di</strong>quées en<br />
figure 6.12<br />
– Pour obtenir un bon rinçage des coupelles agir éventuellement sur la vis<br />
de débit et ensuite vérifier la régularité des doses (Fig.6.11).<br />
6.4.3 Accès aux parties intérieures<br />
Pour avoir accès aux parties intérieures du <strong>di</strong>stributeur automatique (pompes,<br />
chau<strong>di</strong>ère café expresso, électrovannes, branchements électriques, etc.):<br />
Version Expresso:<br />
- Tourner vers l’extérieur le groupe de <strong>di</strong>stribution sucre (fig.6.13).<br />
- Ensuite agir sur les deux poignées in<strong>di</strong>quées en fig. 6.14 - 6.16, enlever le<br />
panneau et soutenir celui-ci jusqu’à ce qu’il est entièrement sorti (fig.6.15<br />
- 6.17).<br />
Après avoir effectué toute éventuelle opération d’entretien soulever le panneau<br />
complet jusqu’à la correcte position verticale et remettre le groupe de<br />
<strong>di</strong>stribution sucre en position de travail en le tournant vers droite.<br />
Version Soluble:<br />
- Démonter les groupes mixer et desserrer les trois vis in<strong>di</strong>quées en figure<br />
6.18-6.19; faire glisser à gauche le panneau frontal jusqu’au déclenchement<br />
des boutonnières, ensuite enlever le panneau pour accéder à<br />
l’intérieur.<br />
6.5 Arret<br />
Pour un arrêt prolongé du <strong>di</strong>stributeur, il est nécessaire d’effectuer des<br />
opérations préventives :<br />
– Débranchez électriquement et hydrauliquement le <strong>di</strong>stributeur<br />
– Videz complètement la chau<strong>di</strong>ère soluble et le bac tampon, en enlevant<br />
le bouchon sur le tube de vidange<br />
– Remettre le bouchon lorsque la vidange a été effectuée (figure 6.20)<br />
– Enlevez tous les produits des bacs<br />
– Procédez au lavage de toutes les parties en contact avec les poudres<br />
suivant chapitre déjà décrit<br />
– Videz le seau d’égouttures et le nettoyer correctement<br />
– Enlevez le sac à marc<br />
– Nettoyez avec un chiffon humide toutes les surfaces internes et externes<br />
du <strong>di</strong>stributeur<br />
– Protégez le <strong>di</strong>stributeur avec un film plastique (figure 6.21)<br />
– Le stocker dans des locaux secs, à l’abri et avec une température non<br />
inférieure à 1°C.
35<br />
Zingonia <strong>di</strong> Verdellino (BG), 12 Gennaio 2009<br />
DEUTSCH<br />
BEDIENERINFORMATIONEN<br />
Gemäß der italienischen Rechtsverordnung vom 25. September 2007, Nr. 185 und Art. 13 der italienischen Rechtsverordnung vom 25. Juli 2005, Nr. 151<br />
“Durchsetzung der Richtlinien 2002/95/EG, 2002/96/EG und 2003/108/EG zur Beschränkung der Verwendung bestimmter gefährlicher Stoffe in<br />
<strong>Dichiarazione</strong> <strong>di</strong> <strong>Conformità</strong><br />
Elektro- und Elektronikgeräten, sowie deren Entsorgung”.<br />
Das Symbol der durchgestrichenen Abfalltonne auf dem Gerät bedeutet, dass das Produkt am Ende seiner Lebenszeit gesondert von anderen Abfällen<br />
entsorgt werden muss.<br />
Der Be<strong>di</strong>ener muss daher das Gerät nach Beendung seiner praktischen Direttiva Lebensdauer RoHS<br />
den entsprechenden Zentren für getrennte Abfallentsorgung übergeben,<br />
oder dem Wiederverkäufer zum Zeitpunkt des Kaufs eines neuen Geräts der gleichen Art zurückliefern.<br />
Die geeignete Abfallsammlung für <strong>di</strong>e nachfolgende Direttiva Rezyklierung, 2002/95/CE Behandlung und del umweltverträgliche Parlamento Europeo Entsorgung e trägt dazu bei, mögliche negative Auswirkungen<br />
auf <strong>di</strong>e Umwelt und <strong>di</strong>e Gesundheit zu vermeiden und fördert <strong>di</strong>e Wiederverwertung der Materialien, aus denen das Gerät besteht.<br />
Die widerrechtliche Entsorgung des Produkts durch den Benützer hat Verwaltungssanktionen gemäß Rechtsverordnung Nr. 22/1997 (Artikel 50 und folgende)<br />
zur Folge.<br />
Konformitätserklärung<br />
Richtlinie RoHS<br />
• Cromo esavalente (Cr(VI))<br />
Richtlinie 2002/95/EG des Europäischen Parlaments und<br />
<strong>Dichiarazione</strong> • Bifenile polibromurati Ds (PBB) Rats vom 27. Januar <strong>di</strong> 2003 <strong>Conformità</strong><br />
• Eteri zur <strong>di</strong> Beschränkung <strong>di</strong>fenili polibromurati:<br />
der Verwendung bestimmter gefährlicher Stoffe<br />
o PentaBromoDifenilEtere in Elektro- und (PBDE) Elektronikgeräten<br />
o OttaBromoDifenilEtere Bianchi Ven<strong>di</strong>ng (OttaBDE)<br />
Group S.p.A. erklärt dass:<br />
Ab den 1. Juli 2006 jedes von Bianchi Ven<strong>di</strong>ng o Direttiva RoHS<br />
DecaBromoDifenilEtere Group S.p.A auf den (DecaBDE)<br />
europäischen Markt eingeführte Produkt der Richtlinie RoHS entspricht und<br />
demnach keine Konzentrationen •enthält, Pefluorooctano <strong>di</strong>e für folgende sulfonato Substanze (PFSO) <strong>di</strong>e zugelassenen Grenzen überschreiten:<br />
• PoliCloroNaftalene (PCN)<br />
• Blei (Pb) Direttiva 2002/95/CE • Pefluoroktan-Sulfonat del Parlamento (PFSO) Europeo e<br />
• Quecksilber (Hg)<br />
• Bis(tribromophenoxy)etano • PoliCloroNaftalene PoliCloroBifenile (PCN) (PCB)<br />
• Cadmium (Cd)<br />
• Benzene<br />
• Bis(tribromophenoxy)etan Polytbromierungs-Biphenyle (PCB)<br />
del Consiglio del 27 Gennaio 2003<br />
• hexavalentes Chrom (Cr(VI))<br />
• Benzen<br />
• Polytbromierungs-Biphenyle sulla restrizione (PBB) dell’uso <strong>di</strong> determinate sostanze pericolose<br />
• Polytbromierungs-Diphenyläther:<br />
o der PentaBromo-Diphenyläther (PBDE)<br />
L’Amministratore DER GESCHÄFTSFÜHRER Delegato<br />
nelle apparecchiature elettriche ed elettroniche<br />
o der OktaBromo-Diphenyläther (OttaBDE)<br />
o der DekaBromo- Diphenyläther (DecaBDE)<br />
Zingonia <strong>di</strong> Verdellino (BG), 12. Januar 2009<br />
KONFORMITÄTSERKLÄRUNG<br />
La BIANCHI VENDING GROUP S.p.A.<br />
Corso Africa, 9 - 24040 Zingonia <strong>di</strong> VERDELLINO (BG) Italia<br />
erklärt in eigener Verantwortung, dass <strong>di</strong>e Familie der Maschinen Modell:<br />
del Consiglio del 27 Gennaio 2003<br />
sulla restrizione dell’uso <strong>di</strong> determinate sostanze pericolose<br />
nelle apparecchiature elettriche ed elettroniche<br />
Bianchi Ven<strong>di</strong>ng Group S.p.A. <strong>di</strong>chiara che:<br />
dal 1° luglio 2006 qualsiasi prodotto <strong>di</strong> Bianchi Ven<strong>di</strong>ng Group S.p.A. immesso sul<br />
mercato in Europa è conforme alla Direttiva RoHS, e quin<strong>di</strong> non contiene<br />
concentrazioni che superino i limiti consentiti per le seguenti sostanze:<br />
• Piombo (Pb)<br />
• Mercurio (Hg)<br />
• Cadmio (Cd)<br />
Marke : BIANCHI VENDING<br />
Hersteller: BIANCHI VENDING GROUP S.p.A.<br />
Typ/Modell: BVM 952 – BVM 972<br />
den grundlegenden Sicherheitsanforderungen der Richtlinien:<br />
1) Tiefspannung 2006/95/EG (hinsichtlich der Annäherung der Gesetzgebung der Mitgliedsstaaten bezüglich dem elektrischen Material, das innerhalb<br />
von bestimmten Spannungsgrenzen eingesetzt wird) - BT -<br />
2) Elektromagnetische Kompatibilität 2004/108/EG ((hinsichtlich der Annäherung der Gesetzgebung der Mitgliedsstaaten bezüglich der elektromagnetischen<br />
Kompatibilität) -EMC-<br />
3) REG. (EG) 1935/2004 hinsichtlich Materialien und Gegenständen, <strong>di</strong>e mit Lebensmitteln in Berührung kommen.<br />
REG. (EG) 1895/2005 bezüglich der Benutzungseinschränkung von einigen Epoxyd-Derivaten, <strong>di</strong>e in mit Lebensmitteln in Berührung<br />
kommenden Materialien oder Gegenständen enthalten sind.<br />
Richtlinie. 2002/72 EG hinsichtlich Materialien und Gegenständen, <strong>di</strong>e mit Lebensmitteln in Berührung kommen.<br />
Die Proben / Prüfungen wurden gemäß der gültigen Harmonisierten / Europäischen Vorschriften durchgeführt.<br />
1) TIEFSPANNUNG (Elektrische Sicherheit BT):<br />
EN 60335-1:2002 +A1:2004 +A11:2004 +A2:2006 +A12:2006 +A13:2008 (Sicherheit der elektrischen Geräte für den Haushalt oder für einen ähnlichen<br />
Gebrauch . Allgemeine Vorschriften) EN 60335-2-75:2004+ A1:2005 +A11:2006 + A2:2008 +A12:2010. (Besondere Vorschriften für Handels-Automaten<br />
und automatische Geräte, <strong>di</strong>e für den Verkauf bestimmt sind.<br />
EN ISO 11201:2009 +EN ISO 3744:2009 Rauschmessung. Schalldruck: LpA < 70 dB(A)<br />
2) ELEKTROMAGNETISCHE KOMPATIBILITÄT (EMC):<br />
EN 55014-1:2006 (Grenzen und Messungsmethoden der Ra<strong>di</strong>ofunkstörungen bei motorgesteuerten oder thermischen Haushaltsgeräten, Werkzeugen und<br />
ähnlichen Elektrogeräten)<br />
EN 55014-2:1997 +A1:2001 +A2:2008 (Immunitätsanforderungen für Haushaltsgeräte, Werkzeuge und ähnliche Elektrogeräte).<br />
EN 61000-3-2: 2006 (Grenzen für <strong>di</strong>e Emission von harmonisiertem Strom)<br />
EN 61000-3-3:1995+ A1:2001 +A2:2005 (Spannungsschwankungs- und Flicker-Begrenzung für Geräte mit Nennstrom ≤ 16 A)<br />
EN 62233:2008 Messungsmethoden der elektromagnetischen Felder bei Haushaltsgeräten und ähnlichen Geräten, hinsichtlich der menschlichen Aussetzung.<br />
3) TAUGLICHKEIT DER MATERIALIEN, DIE MIT LEBENSMITTELN IN BERÜHRUNG KOMMEN<br />
Probe der “Kontakttauglichkeit mit Lebensmitteln“ entsprechend der italienischen Gesetzgebung D.M. 21-03-1973 und folgenden Änderungen ⇒ Dekret<br />
4. Mai 2006 Nr. 227 und der Umsetzung folgender Europäischen Richtlinien: 82/711/EWG, 85/572/EWG, 93/8/EWG, 97/48/EG, 2002/72/EG, 2004/13/EG,<br />
2004/19/EG, 2005/79/EG, Reg. EG n. 1935/04 und Reg. EG Nr. 1895/2005.<br />
DER GESCHÄFTSFÜHRER<br />
Zingonia <strong>di</strong> Verdellino (BG), Januar 2010<br />
______________________<br />
Bianchi Ven<strong>di</strong>ng Group S.p.A. <strong>di</strong>chiara che:<br />
dal 1° luglio 2006 qualsiasi prodotto <strong>di</strong> Bianchi Ven<strong>di</strong>ng Group S.p.A. immesso sul
DEUTSCH<br />
VOR INBETRIEBNAHME DES AUTOMATEN MUSS DIESES HANDBUCH AUFMERKSAM GELESEN WERDEN. ES ENTHÄLT WICHTIGE ANGABEN ÜBER DIE VORAUSSETZUNGEN FÜR DEN<br />
BETRIEB IN ÜBEREINSTIMMUNG MIT DEN GELTENDEN SICHERHEITSVORSCHRIFTEN.<br />
ACHTUNG: Wichtige Sicherheitshinweise!<br />
Die Be<strong>di</strong>enungsanleitung vor Inbetriebnahme<br />
aufmerksam LESEN.<br />
HINWEISE<br />
WARTUNGSBEAUFTRAGTER<br />
Als Wartungsbeauftragter wird <strong>di</strong>e zur Nachfüllung der Behältnisse mit löslichen Produkten, Zucker, Kaffee, Stäbchen und Bechern bezeichnet.<br />
Der Wartungsbeauftragte muß außerdem für <strong>di</strong>e Reinigung des Dosierungautomates sorgen (siehe <strong>di</strong>e im Kapitel 6.0 angegebenen Arbeitsgänge).<br />
Im Falle eines Schadens muß der Wartungsbeauftragte den Installateurtechniker informieren.<br />
INSTALLATEURTECHNIKER<br />
Als Installateurtechniker wird <strong>di</strong>e mit der Installation, der Inbetriebnahme und der Programmierung der Funktionen des Dosierungautomates<br />
beauftragte Person bezeichnet. Alle Arbeitsgänge zur Einstellung unterliegen ausschließlich dem Installateur, der außerdem das Zugangspaßwort<br />
für <strong>di</strong>e Programmierung besitzt.<br />
Schlüssel beim WARTUNG-<br />
SBEAUFTRAGTEN und dem<br />
Installateurtechniker.<br />
N° 1 Schlüssel<br />
VORWORT<br />
I - Hinweise für den Be<strong>di</strong>ener<br />
Dieser Getränkeautomat wurde unter völliger Einhaltung der gültigen Vorschriften<br />
bezüglich der Sicherheit entworfen und gebaut und gilt als sicher<br />
für <strong>di</strong>e Personen, <strong>di</strong>e <strong>di</strong>e in <strong>di</strong>esem Handbuch enthaltenen Anweisungen zur<br />
Auffüllung und Reinigung einhalten.<br />
Der Anwender darf aus keinem Grunde <strong>di</strong>e Schutzvorrichtungen entfernen,<br />
<strong>di</strong>e zu ihrer Entfernung eines Werkzeuges bedürfen.<br />
Einige Instandhaltungsvorgänge (<strong>di</strong>e nur durch spezialisierte Techniker durchgeführt<br />
werden dürfen und in <strong>di</strong>esem Handbuch durch ein entsprechendes<br />
Piktrogramm gekennzeichnet) machen eine bewußte Umgehung einiger<br />
Sicherheitseinrichtungen des Getränkeautomaten erforderlich.<br />
Unter Einhaltung der Sicherheitsvorschriften dürfen einige der Arbeitsgänge<br />
ausschließlich durch den Installationstechniker durchgeführt werden und nur<br />
nach spezifischer Genehmigung darf auch der mit der ordentlichen Wartung<br />
beauftragte Be<strong>di</strong>ener Zugang zu spezifischen Arbeitsgängen haben.<br />
Die Kenntnis und <strong>di</strong>e (vom technischen Standpunkt gesehene) vollstän<strong>di</strong>ge<br />
Einhaltung der in <strong>di</strong>eser Anleitung enthaltenen Sicherheits- und Gefahrenhinweise<br />
stellen <strong>di</strong>e Grundlage dar, auf der bei kleinstmöglichem<br />
Gefahrenrisiko, <strong>di</strong>e Installation, <strong>di</strong>e Inbetriebnahme, der Betrieb und <strong>di</strong>e<br />
Instandhaltung des Automaten erfolgen können.<br />
II - Allgemeine Hinweise<br />
ROHRSCHLÜSSEL<br />
n° 5,5 - n° 7 - n° 8 - n° 10 - n° 20 - n° 22<br />
MAULSCHLÜSSEL (mit Gabel)<br />
n° 7 - n° 8 - n° 10 - n° 12 - n° 14<br />
INHALTSVERZEICHNIS<br />
VORWORT<br />
1.0 TECHNISCHE DATEN<br />
2.0 TECHNISCHE BETRIEBSBESCHREIBUNG<br />
3.0 HANDLING DES GETRÄNKEAUTOMATEN<br />
4.0 INSTALLATION<br />
5.0 SOFTWARE ANLEITUNGEN<br />
6.0 NSTANDHALTUNG UND STILLEGUNG<br />
7.0 STILLEGUNG<br />
8.0 ALARME<br />
Vor Benutzung des Getränkeautomaten müssen alle Teile des<br />
vorliegenden Handbuchs aufmerksam gelesen werden.<br />
Die Kenntnis der darin enthaltenen Informationen und Vorschriften ist<br />
wesentlich für <strong>di</strong>e korrekte Betätigung des Getränkeautomaten durch den<br />
Be<strong>di</strong>ener.<br />
– Eingriffe des Benutzers am Getränkeautomaten sind nur innerhalb seines<br />
Zustän<strong>di</strong>gkeitsbereichs zugelassen, und nur wenn er am Gerät ausgebildet<br />
wurde.<br />
Der Installationstechniker , im Rahmen seiner Zustän<strong>di</strong>gkeit, von den<br />
Funktionsmechanismen des Getränkeautomaten Kenntnis haben.<br />
– Es liegt in der Verantwortung des Käufers, sicherzustellen, daß alle Benutzer<br />
am Gerät ausgebildet sind und daß sie Kenntnis von allen in der<br />
mitgelieferten Dokumentation enthaltenen Informationen und Angaben<br />
haben und Vorschriften, <strong>di</strong>e in der mitgelieferten technischen Dokumentation<br />
angegeben sind.<br />
Trotz der vollstän<strong>di</strong>gen Einhaltung der Sicherheitsvorschriften durch den<br />
Vor jeglicher Instandhaltungstätigkeit<br />
am Gerät muß das<br />
Gerät vom Netz getrennt<br />
werden<br />
ACHTUNG: Gerät unter Spannung<br />
36<br />
PE<br />
SCHRAUBENDREHER<br />
Kleine Größe<br />
Mittlere Größe<br />
Große Größe<br />
Normales Kreuz<br />
Kleines Kreuz<br />
Mittleres Kreuz<br />
Großes Kreuz<br />
In Teflon in kleiner Größe zur Einstellung<br />
der Trimmer<br />
ACHTUNG: Heiße Oberflächen<br />
ACHTUNG! Teile in Bewegung<br />
Erdungshinweis<br />
Notwen<strong>di</strong>ge Werkzeuge, um Arbeitsgänge am Getränkeautomat vorzunehmen.<br />
CRICK-SCHLÜSSEL Nr. 14<br />
TESTER<br />
ELEKTRIKERSCHERE<br />
PROGRAMMIERKIT<br />
Hersteller, müssen <strong>di</strong>ejenigen, <strong>di</strong>e am Getränkeautomat tätig sind, vollstän<strong>di</strong>g<br />
über <strong>di</strong>e potentiellen Risiken informiert sein, <strong>di</strong>e bei Betätigung<br />
der Maschine noch immer vorliegen.<br />
– Dieses Handbuch ist ein wichtiger Bestandteil des Automaten, und als<br />
solches muß es immer, bis zur Stillegung und/oder Verschrottung des<br />
Getränkeautomaten, in seinem Innern verbleiben, um weiteres Nachschlagen<br />
der späterer Be<strong>di</strong>ener zu gestatten.<br />
– Im Falle von Verlust oder Beschä<strong>di</strong>gung des vorliegenden Handbuchs kann<br />
eine weitere Kopie desselben vom Hersteller angefordert werden. Eine<br />
<strong>di</strong>esbezügliche Anfrage muß <strong>di</strong>e auf dem Typenschild des Getränkeautomaten<br />
angebrachten Daten enthalten.<br />
– Nur bei Vervendung von Originalersatzteilen ist <strong>di</strong>e funktionelle Zuverläßigkeit<br />
und <strong>di</strong>e optimale Leistung des Automaten gewährleistet.<br />
– Veränderungen an der Maschine, <strong>di</strong>e nicht zuvor mit dem Hersteller vereinbart<br />
wurden und durch den Installationstechniker und / oder Besitzer<br />
vorgenommen werden, erfolgen auf dessen eigene Verantwortung. Alle<br />
Vorgänge, <strong>di</strong>e der Erhaltung der Funktionsfähigkeit des Automaten vor<br />
und während des Betriebs <strong>di</strong>enen, gehen zu Lasten des Betreibers.<br />
– Eingriffe und Veränderungen am Gerät, <strong>di</strong>e nicht vorher durch den Hersteller<br />
genehmigt wurden, befreien <strong>di</strong>esen von der Verantwortung für<br />
eventuelle darauf zurückzuführende Schäden und lassen automatisch <strong>di</strong>e<br />
Gewährleistungshaftung für <strong>di</strong>e Maschine verfallen.<br />
– Im Moment der Einführung auf den Markt <strong>di</strong>eses Getränkeautomaten ist<br />
das vorliegende Handbuch auf dem neuesten Stand der Technik; eventuelle<br />
an den danach vertriebenen Geräten vorgenommene Veränderungen,<br />
Verbesserungen oder Anpassungen verpflichten Fa. Bianchi Ven<strong>di</strong>ng Group<br />
S.p.a. weder, <strong>di</strong>e vor <strong>di</strong>esem Moment gelieferten Getränkeautomaten auf<br />
den neuesten Stand zu bringen, noch <strong>di</strong>e entsprechende mitgelieferte<br />
technische Dokumentation zu überarbeiten.<br />
– Es steht Fa. Bianchi Ven<strong>di</strong>ng Group S.p.a. dennoch frei, <strong>di</strong>e auf dem Markt<br />
befindlichen Handbücher auf den neuesten Stand zu bringen, wenn sie<br />
<strong>di</strong>es aus gewichtigen Gründen für angemessen halten sollte. In <strong>di</strong>esem<br />
Fall werden Einlegeblätter nachgeliefert, <strong>di</strong>e mit dem Handbuch zusammen<br />
aufbewahrt werden müssen.<br />
Eventuell vorkommende technische Probleme können ohne weiteres unter<br />
Hinzuziehung des vorliegenden Handbuchs gelöst werden; bei weitergehenden<br />
Problemen kann der Händler weiterhelfen, bei dem der Getränkeautomat<br />
erworben wurde, oder gegebenenfalls der technische Dienst unter den folgenden<br />
Nummern:<br />
� +039. 035.45.02.111 - fax +039. 035.883.304
In <strong>di</strong>esem Falle sollten folgende Daten bereitgehalten werden:<br />
<strong>di</strong>e Angaben des Typenschilds (Abb. 1)<br />
im Mikroprozessor enthaltene Programmversion (Klebeschildchen auf dem<br />
Teil, das auf den Steuerung)<br />
Fa. Bianchi Ven<strong>di</strong>ng Group S.p.a. übernimmt keine Verantwortung für<br />
Schäden an Dingen oder Personen, <strong>di</strong>e verursacht wurden durch:<br />
� unvorschriftsgemäße Installation<br />
� ungeeignete Wasser- und/oder Stromzufuhr<br />
� unangemessene Reinigung und Instandhaltung<br />
� ungenehmigte Änderungen<br />
� unpassende Verwendung des Getränkeautomaten<br />
� Verwendung nicht-originaler Ersatzteile<br />
– Keinesfalls ist <strong>di</strong>e Bianchi Ven<strong>di</strong>ng Group S.p.a. gezwungen, eventuelle<br />
Schäden auf Grund von durch Erogationen des Getränkeautomaten durch<br />
Störungen erzeugte Unterbrechungen zu ersetzen.<br />
– Die Installation und <strong>di</strong>e Instandhaltung dürfen nur durch qualifiziertes<br />
technisches Personal durchgeführt werden und zuvor zur Durchführung<br />
<strong>di</strong>eser Arbeitsgänge eingewiesenem Personal.<br />
– Zum Nachfüllen, es dürfen nur Lebensmittelprodukte verwendet werden,<br />
<strong>di</strong>e ausdrücklich für den Einsatz in Getränkeautomaten vorgesehen sind.<br />
– Der Getränkeautomat ist nicht für <strong>di</strong>e Aufstellung im Freien geeignet, er<br />
muß in trockenen Räumen stehen, in denen <strong>di</strong>e Temperatur nie unter 1°C<br />
sinkt, und er darf auf keinen Fall in Räumen aufgestellt werden, in denen<br />
Wasser zu Reinigungszwecken verspritzt wird (z.B. Großküchen...).<br />
Es ist verboten Gerät mit Wasser abzuspritzen.<br />
III - SICHERHEITSVORSCHRIFTEN<br />
Vor Benutzung des Automaten muß <strong>di</strong>eses Handbuch aufmerksam<br />
und vollstän<strong>di</strong>g gelesen werden.<br />
– Die Installation und <strong>di</strong>e Instandhaltung dürfen nur durch qualifiziertes<br />
technisches Personal vorgenommen werden.<br />
– Ein Be<strong>di</strong>ener darf sich unter keinen Umständen Zugriff auf <strong>di</strong>e Teile des Getränkeautomaten<br />
verschaffen, deren Schutz so ausgelegt ist, daß zu ihrem<br />
Freilegen ein Werkzeug erforderlich ist.<br />
– Die Kenntnis und <strong>di</strong>e genaue Beachtung der technischen Aspekte der in<br />
<strong>di</strong>esem Handbuch enthaltenen Sicherheits- und Gefahrenhinweise sind <strong>di</strong>e<br />
unab<strong>di</strong>ngbare Voraussetzung für eine Installation, eine Inbetriebnahme<br />
und <strong>di</strong>e Instandhaltung des Automaten bei kleinstmöglichem Risiko.<br />
Vor Instandhaltungs- oder Reinigungstätigkeiten muß immer<br />
der Netzstecker gezogen werden.<br />
AUF KEINEN FALL DÜRFEN SCHUTZABDECKUNGEN ENTFERNT<br />
ODER EINGRIFFE VORGENOMMEN WERDEN, BEVOR DIE HEISSEN<br />
GERÄTETEILE NICHT VOLLSTÄNDIG ABGEKÜHLT SIND.<br />
– Nur bei Verwendung von Originalersatzteilen ist <strong>di</strong>e funktionelle Zuverlässigkeit<br />
und <strong>di</strong>e optimale Leistung des Automaten gewährleistet.<br />
– Zur Gewährleistung eines normalen Betriebs, muss der Automat in Räumlichkeiten<br />
aufgestellt werden, deren Temperaturbereich mindestens<br />
+1°C und höchstens +50°C umfasst und <strong>di</strong>e Feuchtigkeit nicht 85%<br />
überschreitet.<br />
– Um immer eine korrekte Funktionsweise des Automaten zu gewährleisten,<br />
sollte <strong>di</strong>eser regelmäßig nach Vorschrift gereinigt werden.<br />
– Sollten bei der Installation Betriebsbe<strong>di</strong>ngungen angetroffen werden, <strong>di</strong>e<br />
von den hier beschriebenen abweichen, oder sollten <strong>di</strong>ese sich im Lauf der<br />
Zeit ändern, muß vor Inbetriebnahme des Getränkeautomaten unbe<strong>di</strong>ngt<br />
der Hersteller angesprochen werden.<br />
- Außerdem ist zu überprüfen, ob zusätzliche und eventuell durch <strong>di</strong>e nationalen<br />
oder lokalen Gesetzgebungen aufgestellte Vorschriften angewendet<br />
und berücksichtigt werden.<br />
Dieses Gerät ist nicht für <strong>di</strong>e Benutzung durch Personen (Kinder inbegriffen)<br />
mit beschränkten physischen, sinnlichen und geistlichen Kapazitäten,<br />
oder ohne Erfahrung oder Kenntnis, bestimmt, es sei denn, sie haben <strong>di</strong>e<br />
Anweisungen für den Gebrauch des Gerätes erhalten und werden von einer<br />
Person, <strong>di</strong>e für ihre Sicherheit verantwortlich ist, kontrolliert. Kinder müssen<br />
beaufsichtigt werden, dass sie nicht mit dem Gerät spielen.<br />
Der Zutritt zum Service-Bereich ist nur dem Personal gestattet, das über<br />
eine spezifische Kenntnis und praktische Erfahrung des Gerätes verfügt.<br />
1.1 TECHNISCHE DATEN<br />
BVM972 BVM952<br />
Höhe (A) mm 1830 mm 1620 mm<br />
Breite (B) mm 666 mm 666 mm<br />
Tiefe (C) mm 776 mm 776 mm<br />
Gewicht 140 kg÷190 kg (3) 155 kg<br />
Betriebsspannung V230 V230<br />
Leistung (1) 1,8 kW ÷ 3,2 kW 1,8 kW ÷ 3,2 kW<br />
Nennstrom (Max) 8 A - 15 A 8 A - 15 A<br />
Wassernetzversorgung 0,5 ÷ 6,5 bar 0,5 ÷ 6,5 bar<br />
IDLE STATE MODE<br />
gemäß EVA-EMP<br />
Durchschnittlicher Verbrauch:<br />
110-220 Wh/h 110-220 Wh/h<br />
ENERGY CONSUMPTION<br />
PER LITRE gemäß EVA-EMP<br />
150-230 Wh/L 150-230 Wh/L<br />
37<br />
DEUTSCH<br />
Wassernetzanschluss 3/8” gas 3/8” gas<br />
Stromnetzanschluss Schuko Schuko<br />
BECHERMAGAZIN<br />
Gläserdurchmesser mm 70÷74 70÷74<br />
BOILERWIDERSTÄNDE<br />
anzerausführung Brühkesse 1500W 1500W<br />
anzerausführung Instantboiler 2000W 2000W<br />
BEHÄLTERVOLUMEN<br />
Kaffeebohnen Gefriergetrockneter Kg 3,5 Kg 3,5<br />
Pulverkaffee Kg 1,4 Kg 1,4<br />
Milchpulver Kg 2,2 Kg 2,2<br />
Creamer Kg 4,0 Kg 4,0<br />
Schokolade Kg 4,8 Kg 4,8<br />
Tee Kg 5,2 Kg 5,2<br />
Tee natur Kg 2,4 Kg 2,4<br />
Brühe Kg 3,8 Kg 3,8<br />
Zucker Kg 4,0 Kg 4,0<br />
Becher N° 700 700<br />
Stäbe N° 540 540<br />
Lampentyp LED LED<br />
Schalldruckpegel erwägt A 58,2 dB ± 2,5 dB<br />
Schalleistungspegel erwägt A 71,0 dB ± 3,0 dB<br />
(1) Mit Nennleistung auf Kennschild an Getränkeautomat prüfen.<br />
(2) Entsprechend der geforderten Version und den am Ort der Benutzung<br />
gültigen Vorschriften.<br />
(3) nach der Ausführung.<br />
DEN AUTOMATEN KENNEN<br />
BVM972 (Abb.1.2)<br />
1 Kaffeegruppe und -Kaffeemühlen<br />
2 Getränkeverteilergruppe<br />
3 Zuckerausgabeeinheit<br />
4 Zahlungssystem<br />
5 Becherstapler<br />
6 Steuerung CPU<br />
7 Leistungskarte<br />
8 Stäbchensäule<br />
9 Entkalkfilter<br />
10 Vom Eimer für flüssige Abfälle<br />
11 Entnahmefach entnehmen<br />
12 Servicetaste<br />
13 Taste Reinigung<br />
14 Kühleinheit (optional)<br />
BVM952 (Abb.1.3)<br />
1 Kaffeegruppe und -Kaffeemühlen<br />
2 Getränkeverteilergruppe<br />
3 Zuckerausgabeeinheit<br />
4 Zahlungssystem<br />
5 Becherstapler<br />
6 Steuerung CPU<br />
7 Leistungskarte<br />
8 Stäbchensäule<br />
9 Entkalkfilter (optional)<br />
10 Vom Eimer für flüssige Abfälle<br />
11 Entnahmefach entnehmen<br />
12 Servicetaste<br />
13 Taste Reinigung<br />
14 Ober Gehäuse<br />
15 Kühleinheit (optional)<br />
1.1 Vorgesehene Verwendung<br />
Der Getränkeautomat darf nur für <strong>di</strong>e Ausgabe von Getränken eingesetzt<br />
werden, <strong>di</strong>e durch Mischung von Lebensmittelprodukten mit Wasser vorbereitet<br />
oder (bei Kaffee espresso) aufgebrüht werden.<br />
Für <strong>di</strong>esen Zweck dürfen nur solche Produkte verwendet werden, <strong>di</strong>e von<br />
ihrem Hersteller ausdrücklich als geeignet für <strong>di</strong>e automatische Ausgabe in<br />
offenen Behältern erklärt werden.<br />
Die Getränke werden in entsprechenden Plastikbechern ausgegeben, <strong>di</strong>e das<br />
Gerät automatisch bereitstellt. Wo <strong>di</strong>es vorgesehen ist, wird auch ein Stab<br />
zum Umrühren des Zuckers ausgegeben.<br />
Die ausgegebenen Getränke müssen sofort konsumiert werden, auf keinen<br />
Fall dürfen sie für einen späteren Verbrauch aufbewahrt werden.<br />
EXPRESSO<br />
Dieser Vorgang ist nur bei den Modellen mit Expressogruppe (aus Messing<br />
oder Kunststoff) möglich, er beginnt nach erfolgter Ausgabe des Bechers<br />
und des Zuckers<br />
- <strong>di</strong>e Kaffeemühle wird solange eingeschaltet, bis <strong>di</strong>e von der Dosiervorrichtung<br />
vorgegebene Kaffeemenge gemahlen ist (Abb. 2.3)<br />
- der Elektromagnet der Dosiervorrichtung wird eingeschaltet, <strong>di</strong>es bewirkt<br />
<strong>di</strong>e Öffnung der Verschlußklappe und das Herausfallen des Kaffeepulvers<br />
in den Brühbehälter.<br />
- der Antriebsmotor für <strong>di</strong>e Rotation der Gruppe schaltet sich ein und bewegt<br />
<strong>di</strong>ese in <strong>di</strong>e Ausgabestellung, gleichzeitig ver<strong>di</strong>chtet er das Kaffeepulver<br />
(Abb. 2.4 - abb.2.5).<br />
- <strong>di</strong>e Wasserpumpe schaltet sich ein und gibt <strong>di</strong>e programmierte und durch<br />
eine entsprechende elektronische Vorrichtung (Volumenzähler) kontrollierte<br />
Wassermenge aus dem Kaffeeboiler aus (Abb. 2.6)<br />
- der Antriebsmotor für <strong>di</strong>e Rotation der Kaffeegruppe schaltet sich erneut<br />
ein und bewegt <strong>di</strong>ese in <strong>di</strong>e Ausgangsstellung zurück; während <strong>di</strong>eses<br />
Vorgangs wird auch der Kaffeesatz ausgeworfen.<br />
Die Reihenfolge <strong>di</strong>eser Operationen (Mahlen und Ausgabe des Kaffeepulvers)<br />
kann, je nach gewähltem Programm, auch in umgekehrter Reihenfolge<br />
erfolgen.<br />
STABAUSGABE<br />
Dieser Vorgang wird nur bei den Modellen aktiviert, in denen ein Stabgeber vorgesehen<br />
ist; <strong>di</strong>e Stabausgabe kann gegebenenfalls auch für <strong>di</strong>e Wahlmöglichkeit<br />
„ohne Zucker“ und/oder <strong>di</strong>e Instantgetränke wählbar gemacht werden.<br />
– Ein Auswurfmotor trennt den Stab vom Stapel im Stapelbehälter und läßt<br />
ihn in den Becher rutschen (Abb.2.7).
DEUTSCH<br />
INSTANTGETRÄNKE<br />
Dieser Vorgang wird begonnen, wenn <strong>di</strong>e Vorgänge der Becher- und Zuckerausgabe<br />
schon erfolgt sind.<br />
Je nach Art des Getränks und des Getränkeautomaten können für <strong>di</strong>e Zubereitung<br />
der Instantgetränke verschiedene Zubereitungsprozesse erfolgen:<br />
- wenn vorhanden, schaltet sich der Mixermotor ein (Abb. 2.8).<br />
- Das Elektroventil am Instantprodukten (Abb. 2.9) oder am Kaffeeboiler<br />
(Abb. 2.10) wird in Betrieb gesetzt, um <strong>di</strong>e vorbestimmte Wassermenge<br />
in den Mixer zu giessen.<br />
Der Heizkessel Instantprodukt wird auf <strong>di</strong>e Version Instant und auf <strong>di</strong>e Version<br />
Espresso Doppelheizkessel montiert.<br />
– der Produktmotor betätigt <strong>di</strong>e Ausgabeschnecke, um <strong>di</strong>e programmierte<br />
Menge des jeweiligen Instantprodukts in den Mixer zu geben (bei einigen<br />
Ausführungen können mehrere Produkte in den gleichen Mixer eingeschüttet<br />
werden, wie z. B. Milch und Kakao) (Abb.2.11)<br />
- Wenn <strong>di</strong>e vorbestimmte Wasser- und Pulvermenge abgegeben wird, wird<br />
der Mixer nach einer bei der Programmierung eingestellten Zeit T abgeschaltet.<br />
3.0 HANDLING DES GETRÄNKEAUTOMATEN<br />
3.1 Handling und Transport (ABB. 3.1)<br />
Der Transport des Getränkeautomaten muß von Fachpersonal durchgeführt<br />
werden. Der Automat wird auf einer Palette angeliefert; für seine Bewegung<br />
muß ein Hubwagen verwendet werden, der nur langsam bewegt werden<br />
darf, um ein Umkippen oder ein gefährliches Schwanken des Automaten zu<br />
vermeiden.<br />
Zu vermeiden sind:<br />
– das Anheben des Getränkeautomaten mit Seilen oder Pressen<br />
– das Ziehen des Getränkeautomaten<br />
– das Kippen oder Legen des Getränkeautomaten für den Transport<br />
– Stöße<br />
– <strong>di</strong>e Belastung mit anderen Gegenständen<br />
– Regen, Frost und Hitzequellen<br />
– <strong>di</strong>e Lagerung an einem feuchtem Ort<br />
3.2 Lagerung<br />
Im Falle einer eventuellen Lagerung muß absolut vermieden werden, mehrere<br />
Geräte übereinander zu stellen. Die Lagerung muß in vertikaler Stellung<br />
erfolgen, in trockenen Räumen mit Temperaturen über 1°C (Abb. 3.2)<br />
3.3 Verpackung<br />
Der AUTOMAT ist mit Styropor-Eckenschützern versehen und mit einer Klarsichtfolie<br />
umhüllt (Abb. 3.2).<br />
Er wird verpackt ausgeliefert, dadurch ist er sowohl gegen mechanische<br />
Einwirkungen als auch gegen Umwelteinflüsse geschützt.<br />
Auf der Verpackung sind folgende Aufkleber angebracht:<br />
� Vorsichtig bewegen<br />
� Nicht kippen<br />
� Vor Regen schützen<br />
� Nicht stapeln<br />
� Nicht stoßen<br />
� Typ-Version und Seriennummer<br />
3.4 Empfang<br />
Im Moment der Anlieferung des Automaten muß überprüft werden, daß<br />
<strong>di</strong>eser während des Transports keine Beschä<strong>di</strong>gungen erlitten hat. Sollten<br />
irgendwelche Beschä<strong>di</strong>gungen festgestellt werden, muß <strong>di</strong>es sofort dem<br />
Spe<strong>di</strong>teur mitgeteilt werden.<br />
Im Moment der Anlieferung darf <strong>di</strong>e Verpackung nicht beschä<strong>di</strong>gt sein,<br />
d. h. sie darf auf keinen Fall aufweisen:<br />
– Vertiefungen, Spuren von Stößen, Verformungen oder Bruch der Schutzverpackung<br />
– feuchte Stellen oder andere Zeichen, <strong>di</strong>e darauf hinweisen, daß das Gerät<br />
Regen, Frost oder Hitze ausgesetzt worden ist<br />
– Zeichen, daß <strong>di</strong>e Verpackung geöffnet worden ist<br />
3.5 Auspacken<br />
– Die Schutzhülle entlang einer der 4 Kantenabdeckungen aufschneiden<br />
und entfernen (Abb. 3.3)<br />
– Das Gerät durch Entfernen der Schrauben (A) der Transportsicherung von<br />
der Palette lösen (Abb. 3.4)<br />
– Die Palette entleeren und <strong>di</strong>e 4 Stützfüße in <strong>di</strong>e Gewindeöffnungen (Abb.<br />
3.5) einsetzen, <strong>di</strong>e durch <strong>di</strong>e Schrauben (A) frei geworden sind.<br />
– den Schlüssel aus dem Entnahmefach entnehmen (Abb. 3.6)<br />
<strong>di</strong>e Tür des Automaten öffnen und das Klebeband von folgenden Teilen<br />
entfernen:<br />
� vom Bechermagazin (Beispiel in Abb.3.7)<br />
� vom der Münzkassa<br />
� vom Zuckerbehälter<br />
� vom Gewichtsstück des Stäbeladers<br />
� von der Abdeckung der Münzkassa/der Master-Steuerung<br />
� von den Produktbehältern<br />
� vom Schwimmer des Abwassereimers<br />
� von der Scheuerleiste<br />
� vom Eimer für flüssige Abfälle<br />
� den Styropor-Schutz von den Produktbehältern abnehmen (Abb. 3.8)<br />
Da <strong>di</strong>e Verpackungsmaterialien eine mögliche Gefahrenquelle darstellen,<br />
dürfen sie nicht an einem zugänglichen Ort aufbewahrt werden. Die<br />
Entsorgung muß vorschriftsgemäß erfolgen.<br />
38<br />
4.0 INSTALLATION<br />
4.1 Aufstellung<br />
– Der Automat muß mindestens 5 cm von einer Wand rückwärts positioniert<br />
werden, um <strong>di</strong>e notwen<strong>di</strong>ge Lüftung zu gewährleisten (Abb.4.1). Der Automat<br />
darf keinefalls abgedeckt werdwn.<br />
– den Automaten aufstellen und über <strong>di</strong>e beiden am Gerät befindlichen verstellbaren<br />
Füße nivellieren (Abb. 4.2). Die vertikale Achse des Automaten<br />
darf nicht mehr als 2° von der Senkrechten abweichen.<br />
ACHTUNG! Automat nicht in <strong>di</strong>e Nähe von entzündbaren Gegenständen<br />
und in einem Sicherheitsabstand von mindestens 30 cm aufstellen.<br />
Fa. Bianchi Ven<strong>di</strong>ng Group S.p.A. übernimmt keine Verantwortung für<br />
Probleme, <strong>di</strong>e durch <strong>di</strong>e fehlende Einhaltung der Sicherheitsvorschriften<br />
verursacht werden.<br />
Wenn <strong>di</strong>e Aufstellung in Korridoren erfolgt, <strong>di</strong>e Teil eines Fluchtweges sind,<br />
muß sichergestellt werden, daß der Fluchtweg auch bei geöffneter Tür des<br />
Automaten ausreichend breit ist (Abb. 4.1).<br />
Um zu verhindern, daß der Bodenbelag durch heruntergefallene Produkte<br />
verschmutzt wird, ist es eventuell angebracht, unter den Automaten eine<br />
Schutzmatte zu legen, <strong>di</strong>e breit genug ist, um den Tätigkeitsra<strong>di</strong>us des Automaten<br />
abzudecken.<br />
4.2 Anschluß ans Wassernetz<br />
Vor dem Anschluß des Automaten an das Wassernetz kontrollieren Sie bitte<br />
folgendes:<br />
– <strong>di</strong>e Trinkbarkeit des Wassers (gegebenenfalls durch ein Labor bestätigen<br />
lassen).<br />
– stellen Sie sicher, daß der Leitungsdruck zwischen 0,5 und 6,5 bar liegt<br />
(wenn nicht, muß der Druck je nach Fall mit Hilfe einer Pumpe oder eines<br />
Druckuntersetzers angeglichen werden).<br />
– falls nicht schon vorhanden, installieren Sie an zugänglicher Stelle einen<br />
Hahn, um gegebenenfalls das Gerät von der Leitung trennen zu können<br />
(Abb. 4.3).<br />
– vor der Ausführung des Wasseranschlusses, lassen Sie etwas Wasser aus<br />
dem Hahn laufen, um eventuell in der Leitung vorhandene Schmutzpartikel<br />
zu entfernen (Abb. 4.4)<br />
– Hahn mit einem für Nahrungsmittel und Leitungsdruck geeigneten<br />
Nylonrohr an Getränkeautomat schliessen; sollte ein Schlauch verwendet<br />
werden, muss <strong>di</strong>e beiliegende Verstärkungshülse in den Schlauch gesetzt<br />
werden (Bild 4.5).<br />
– Der vorgeshene Anschluß hat ist vom Typ 3/8” Gas (Abb. 4.6).<br />
4.3 Anschluß ans Stromnetz<br />
Der Automat ist für eine Netzspannung von 230 Volt ausgelegt, er ist durch Sicherungen<br />
von 12,5 A und 20A geschützt. (10A und 20A für das Modell mit einzelnem<br />
Boiler und <strong>di</strong>e Instantversion, 15A und 20A für <strong>di</strong>e Kaltinstantversion).<br />
Bitte überprüfen Sie folgendes:<br />
– ob <strong>di</strong>e Schwankungen der Netzspannung im Rahmen von ± 6% liegen<br />
– ob <strong>di</strong>e Netzleitung eine ausreichend hohe Kapazität hat, um <strong>di</strong>e Leistungsaufnahme<br />
des Automaten bereitzustellen<br />
– Automat so aufstellen, dass Zugriff zum Stecker möglich ist<br />
Außerdem sollte ein <strong>di</strong>fferenziertes Schutzsystem verwendet werden.<br />
Das Gerät muß entsprechend den geltenden Vorschriften an eine Steckdose<br />
mit Erdung angeschlossen werden.<br />
In <strong>di</strong>esem Sinne muß überprüft werden, ob <strong>di</strong>e Erdung des Stromnetzes<br />
wirksam ist und ob sie den nationalen und europäischen Vorschriften für <strong>di</strong>e<br />
elektrische Sicherheit entspricht.<br />
Wenn erforderlich, muß qualifiziertes Fachpersonal für <strong>di</strong>e Kontrolle der<br />
Anlage hinzugezogen werden.<br />
– Der Automat ist mit einem Netzkabel des Typs H05VV-F 3x1,5 mm² mit<br />
Schukostecker ausgerüstet (Abb. 4.7).<br />
– Für <strong>di</strong>esen Stecker nicht geeignete Steckdosen müssen ausgetauscht<br />
werden (Abb. 4.8).<br />
– Die Verwendung von Mehrfachsteckdosen, Adaptern und/oder Verlängerungskabeln<br />
ist nicht zulässig.<br />
– Bei einigen Modellen sind <strong>di</strong>e für den Bestimmungsort spezifischen Stecker<br />
eingebaut<br />
Fa. Bianchi Ven<strong>di</strong>ng Group S.p.A. übernimmt keine Verantwortung für<br />
Schäden, <strong>di</strong>e durch <strong>di</strong>e teilweise oder vollstän<strong>di</strong>ge Nichteinhaltung der vorstehenden<br />
Hinweise.<br />
Sollte das Speisekabel beschä<strong>di</strong>gt sein, muss <strong>di</strong>e Stromleitung unverzüglich<br />
getrennt werden.<br />
Der Austausch der Stromversorgungskabel muß durch Fachpersonal<br />
vorgenommen werden.<br />
4.4 Inbetriebnahme<br />
Der Automat ist mit einem Sicherheitsschalter (Abb. 4.9) ausgerüstet,<br />
der bei jedem Öffnen der Tür den Stromkreis aller elektrischen Bauteile<br />
unterbricht (Siehe Verkabelungsschema).<br />
Sollte eine Unterbrechung des Stromkreises erwünscht werden, ist <strong>di</strong>es daher<br />
durch Öffnen der Tür oder durch Ziehen des Netzsteckers möglich.<br />
Unter Spannung bleiben der Stecker des Netzkabels (Abb. 4.10-<br />
1) sowie <strong>di</strong>e Hilfssteckdose im Innern des Automaten (Abb.<br />
4.11-2).<br />
– Für einige Vorgänge ist es erforderlich, bei geöffneter Tür zu arbeiten,<br />
ohne daß der Stromkreis unterbrochen wird. In <strong>di</strong>esem Fall kann das<br />
kompetente Fachpersonal durch Einführen und Drehen um 90° des mit<br />
dem Automaten mitgelieferten Kunststoffschlüssels im Türschalter <strong>di</strong>e<br />
Auslösung desselben sperren (Abb. 4.12)<br />
Die Öffnung und das eventuelle Einschalten des Automaten bei geöffneter<br />
Tür darf nur technisch versiertem und autorisiertem Personal<br />
anvertraut werden.<br />
Der Automat darf bei geöffneter Tür nicht unbeaufsichtigt gelassen werden.<br />
Der Geräteschlüssel darf nur an autorisierte Personen weitergegeben werden.<br />
Bei jedem Start des Automats erfolgt ein Diagnosezyklus, um den Zustand<br />
der Automat-Peripherien zu prüfen und <strong>di</strong>e Wiederherstellung der Bewegungsteile<br />
durchzuführen.
4.5 Installation<br />
4.5.1 Spülung der Harze vom Entkalkgerät, wenn als Zubehör<br />
vorhanden<br />
Vor dem Füllen des Wasserkreislaufs ist es ratsam, <strong>di</strong>e Harze des Entkalkungsfilters<br />
(falls eingebaut) wie folgt zu spülen:<br />
– Führen Sie den Schlauch des unteren Hahns in einen für den Zweck<br />
geeigneten Behälter ein<br />
– Öffnen Sie den Hahn (Abb. 4.13)<br />
– Führen Sie den Kunststoffschlüssel in den Türschalter ein (Abb. 4.12)<br />
– Lassen Sie solange Wasser aus dem Behälter laufen, bis <strong>di</strong>eses klar ist<br />
(Abb. 4.14)<br />
– Ziehen Sie den Schlüssel ab und schließen Sie den Hahn.<br />
BVM972 und BVM952 hat als Serienausrüstung den Filter mit Patrone nd<br />
sieht <strong>di</strong>e Anwendung des obengenannten Verfahren nicht vor. In <strong>di</strong>esem<br />
Fall reicht es aus, den Automaten zur Stromnetz anschliessen und den<br />
Wasserkreis füllen.<br />
4.5.2 Füllen des Wasserkreislaufs<br />
EINBAUVERFAHREN<br />
Das Einbauverfahren gilt nur für Einzelboilerautomaten und besonders für<br />
Espresso-Boiler und Polysuhlfon-Boiler mit Standfühler.<br />
ESPRESSO EINZELBOILER<br />
AAm Ausgang aus der Produktion befindet sich der Automat für den ERSTEN<br />
EINBAU fertig. Wenn er am Einbaustelle ankommt, wird der Be<strong>di</strong>ener nur<br />
Wasser (sowohl bei Netzanschluss als auch beim Anschluss mit unabhängigem<br />
Tank) und Strom anschließen.<br />
Der Automat wird das Wasser automatisch füllen, bis das Mikro Wassermangel<br />
für mindestens 15 Sek. ausgeschlossen bleibt. In <strong>di</strong>esem Zustand schaltet<br />
der Automat <strong>di</strong>e Pumpe ein und bei Widerstand OFF wird er 200 Cc Wasser<br />
abgeben (<strong>di</strong>e durch <strong>di</strong>e Gebläse gemessen werden). Nach <strong>di</strong>esem Verfahren<br />
wird das Einbaudatum vom Automat gespeichert. Nach Bestätigung vom<br />
Datum wartet der Automat 10 Sek. ab und sofort danach fängt er an, das<br />
Wasser im Boiler zu heizen.<br />
POLYSULFON-BOILER mit STANDFÜHLERN<br />
Am Ausgang aus der BV Produktion befindet sich der Automat für den<br />
ERSTEN EINBAU fertig. Wenn er am Einbaustelle ankommt, wird der Be<strong>di</strong>ener<br />
nur Wasser (sowohl bei Netzanschluss als auch beim Anschluss mit<br />
unabhängigem Tank) und Strom anschließen.<br />
Der Automat wird das Wasser automatisch füllen, bis <strong>di</strong>e Höchststandfühler<br />
den Wasserstand aufnehmen. Nach <strong>di</strong>esem Verfahren wird das Einbaudatum<br />
vom Automat gespeichert. Nach Bestätigung vom Datum wartet der Automat<br />
10 Sek. ab und sofort danach fängt er an, das Wasser im Boiler zu heizen.<br />
INOX EINZELBOILER FÜR INSTANTGETRÄNKE<br />
Am Ausgang aus der Produktion befindet sich der Automat für den ERSTEN<br />
EINBAU fertig. Wenn er am Einbaustelle ankommt, wird der Be<strong>di</strong>ener nur<br />
Wasser (sowohl bei Netzanschluss als auch beim Anschluss mit unabhängigem<br />
Tank) und Strom anschließen.<br />
Der Automat wird bei Widerstand OFF das Wasser automatisch füllen und<br />
das Elektroventil 2 öffnen, um den Boiler zu entlüften. Das dauert 200 Sek.<br />
Danach wird der Automat das Ventil 2 und <strong>di</strong>e Wasserbeaufschlagung für 20<br />
Sek. schließen. Nach <strong>di</strong>eser Zeit wird das Wasser weiter gefüllt bis das Mikro<br />
Wassermangel für mehr als 5 Sek. ausgeschlossen bleibt (<strong>di</strong>ese Operation<br />
ist mit einem zweiten Timeout von 200 Sek. verbunden). In <strong>di</strong>esem Zustand<br />
schaltet der Automat das Elektroventil 2 ein und wird 20s Wasser abgeben.<br />
Am Ende der Abgabe wartet man ab, dass das Mikro Wassermangel wieder<br />
ausgeschlossen ist.. Nach <strong>di</strong>esem Verfahren wird das Einbaudatum vom<br />
Automat gespeichert. Nach Bestätigung vom Datum wartet der Automat 10<br />
Sek. ab und sofort danach fängt er an, das Wasser im Boiler zu heizen.<br />
DOPPELBOILER<br />
Am Ausgang aus der Produktion befindet sich der Automat für den ERSTEN<br />
EINBAU fertig. Wenn er am Einbaustelle ankommt, wird der Be<strong>di</strong>ener nur<br />
Wasser (sowohl bei Netzanschluss als auch beim Anschluss mit unabhängigem<br />
Tank) und Strom anschließen.<br />
Der Automat wird bei Widerstand OFF das Wasser automatisch füllen und das<br />
Elektroventil 2 öffnen, um den Inox Boiler zu entlüften. Das dauert 200 Sek.<br />
Danach wird der Automat das Ventil 2 und <strong>di</strong>e Wasserbeaufschlagung für 20<br />
Sek. schließen. Nach <strong>di</strong>eser Zeit wird das Wasser weiter gefüllt bis das Mikro<br />
Wassermangel für mehr als 5 Sek. ausgeschlossen bleibt (<strong>di</strong>ese Operation<br />
ist mit einem zweiten Timeout von 200 Sek. verbunden). In <strong>di</strong>esem Zustand<br />
schaltet der Automat das Elektroventil 2 ein und wird 20s Wasser abgeben.<br />
Am Ende der Abgabe wartet man ab, dass das Mikro Wassermangel wieder<br />
ausgeschlossen ist. Nach 10 Sek. schaltet der Automat <strong>di</strong>e Espresso-Pumpe<br />
ein und bei Widerstand OFF wird 200 Cc Wasser durch den ev Kaffee abgeben<br />
(<strong>di</strong>e durch <strong>di</strong>e Gebläse gemessen werden).<br />
Nach <strong>di</strong>esem Verfahren wird das Einbaudatum vom Automat gespeichert.<br />
Nach Bestätigung vom Datum wartet der Automat 10 Sek. ab und sofort<br />
danach fängt er an, das Wasser in beiden Boilern zu heizen.<br />
– Nach Been<strong>di</strong>gung des Füllvorgangs muß <strong>di</strong>e Mixergruppe mehrmals gespült<br />
werden, um alle Leitungen zu füllen und um eventuelle Verschmutzungen<br />
aus dem Boiler zu entfernen (Abb. 4.16)<br />
Vor dem Zuschalten der Spannung überprüfen, daß der Getränkeautomat an<br />
das Wassernetz angeschlossen und der Wasserhahn geöffnet wurde.<br />
4.5.3 Reinigen der Komponenten in Kontakt mit Lebensmitteln<br />
Spülen Sie <strong>di</strong>e Mixer bei eingeschaltetem Automaten durch Betätigen der im<br />
Absatz “Dienstfunktionen” beschriebenen Tasten, um alle eventuell vorhandenen<br />
Schmutzreste aus dem Kaffee- und dem Instantboiler zu entfernen.<br />
– Waschen Sie sich gründlich <strong>di</strong>e Hände<br />
– Bereiten Sie eine desinfizierende, bakterizide Lösung auf Chlorbasis vor<br />
(in Apotheken erhältlich), in der auf der Packung angegebenen Konzentration.<br />
39<br />
DEUTSCH<br />
– Entfernen Sie alle Produktbehälter aus dem Automaten (Abb. 4.17)<br />
– Nehmen Sie <strong>di</strong>e Deckel und <strong>di</strong>e Produktrutschen (Abb. 4.18) ab und<br />
tauchen Sie sie in <strong>di</strong>e vorbereitete Reinigungslösung.<br />
– Entfernen Sie alle Förderschnecken, Wassertrichter, Mixerkammern und<br />
-rührer sowie <strong>di</strong>e Silikonrohre und tauchen Sie sie ebenfalls in <strong>di</strong>e Reinigungslösung<br />
(Abb. 4.19).<br />
– Reinigen Sie mit einem befeuchteten Tuch <strong>di</strong>e Sockel der Mixer (Abb. 4.20)<br />
– Lassen Sie alle Teile für <strong>di</strong>e auf der Packung des Reinigungsmittel angegebenen<br />
Dauer in der Lösung<br />
– Spülen sie nun alle Teile gründlich ab, trocknen Sie sie und bauen Sie sie<br />
wieder in den Automaten ein.<br />
Um sicherzugehen, daß sich keine Spülmittelreste mehr im Gerät befinden,<br />
sollten nach dem Wiedereinbau einige automatische Spülzyklen<br />
durchgeführt werden.<br />
4.5.4 Anbringen der Zahlungssysteme<br />
Der Getränkeautomat wird ohne das Zahlungssystem geliefert:<br />
Die Installation des Zahlungssystems erfolgt durch den Verantwortlichen des<br />
Installationstechnikers.<br />
Die Firma Bianchi Ven<strong>di</strong>ng Group S.p.A. haftet nicht für eventuelle Schäden<br />
an der Maschine und / oder an Sachen und / oder Personen auf Grund einer<br />
falschen Installation.<br />
– Schutzabdeckung der Master-Steuerung und des Münzzählers öffnen<br />
(Abb. 4.21)<br />
– Zahlungssysteme (Abb. 4.22) mit Master-Steuerung verbinden<br />
Die Wählschalter müssen <strong>di</strong>rekt mit der Master-Steuerung verbunden<br />
werden, serielle “Executive”-Systeme dagegen über das mitgelieferte Schnittstellenkabel.<br />
Anschließend müssen <strong>di</strong>e korrekten Parameter programmiert werden.<br />
In Kapitel “5.0 SOFTWARE ANLEITUNGEN” ist beschrieben, wie <strong>di</strong>e Parameter<br />
des installierten Zahlungssystems eingegeben werden.<br />
Die Verbindungen vom Zahlungssystem durch Nachschlagen vom obengenanten<br />
Kartenschema prüfen.<br />
– Münzschaltgerät (Abb. 4.23) am Halter einhaken.<br />
4.6 Einfüllen der Produkte (bei ausgeschalteter Maschine)<br />
4.6.1 Füllen der Behälter<br />
- Zum Füllen müssen <strong>di</strong>e Behälter aus dem Gerät entnommen werden<br />
(Abb.4.26). Besonders im Fall des Kaffeebohnenbehälters ist es erforderlich,<br />
<strong>di</strong>e Verschlußplatte vor dem Herausnehmen des Behälters zu<br />
schließen.<br />
- Nach Abnehmen der Deckel kann das auf dem Schild angegebene Produkt<br />
eingefüllt werden (Abb. 4.27).<br />
- Es dürfen keine Klumpen eingefüllt werden und das Pulver darf nicht<br />
komprimiert werden. Um eine Überschreitung der Haltbarkeitsdauer zu<br />
vermeiden, darf nicht mehr Produkt eingeführt werden, als im Zeitraum<br />
zwischen zwei Füllvorgängen verbraucht wird.<br />
Bvm952<br />
Der Automat Modell BVM952 ist mit einem oberen zu öffnenden Gehäuse<br />
ausgestattet.<br />
Über <strong>di</strong>eser Öffnung hat man Zugriff zu den Behältern zur Auffüllung derselben<br />
mit den Produkten.<br />
In den Abbildungen 4.24 und 4.25 wird der korrekte Öffnungs- und Schließungsvorgang<br />
des Gehäuses dargestellt.<br />
Achtung! Vor dem Verschließen des Gehäuses muss <strong>di</strong>e in der Abbildung<br />
angegebene Feder gut angezogen werden (Abb.4.25).<br />
Die Füllkapazität der einzelnen Behälter kann dem Absatz TECHNISCHE<br />
DATEN entnommen werden.<br />
4.6.2 Auffüllen des Bechermagazins<br />
Nur Becher verwenden, <strong>di</strong>e für Getränkeautomaten vorgesehen sind (Eigenschaften<br />
im Kap. 1.0 “Technische Merkmale” nachprüfen). Die Becherstangen<br />
dürfen beim Beschicken nicht zusammengedrückt werden. Das Magazin darf<br />
nicht von Hand gedreht werden.<br />
Erste Auffüllung<br />
In der Beschickungsphase muß, bei vollstän<strong>di</strong>g leerem Magazin, folgendermaßen<br />
vorgegangen werden:<br />
– Überprüfen, ob <strong>di</strong>e Bechersäule zur Ausgabeöffnung ausgerichtet ist. Ist<br />
<strong>di</strong>es nicht der Fall, alle Säulen entgegen dem Uhrzeigersinn auffüllen.<br />
Anderenfalls (Wenn sich <strong>di</strong>e Säule über der Ausgabeöffnung befindet), <strong>di</strong>e<br />
Klappe schließen und <strong>di</strong>e Maschine an <strong>di</strong>e Stromversorgung anschließen,<br />
so daß sich <strong>di</strong>e Bechersäule dreht und automatisch in einer Position anhält,<br />
in der sie nicht zur Ausgabeöffnung ausgerichtet ist. Dann <strong>di</strong>e Becher<br />
auffüllen (Abb. 4.28).<br />
– Den Bechermagazin mit dem Deckel schließen und mit der oberen Halterung<br />
befestigen (Abb. 4.29).<br />
Normale Auffüllen<br />
Das normale Auffüllen der Bechersäule muß bei ausgeschalteter Maschine<br />
erfolgen. Dazu werden einfach <strong>di</strong>e vordere Klappe geöffnet, der Deckel angehoben<br />
und <strong>di</strong>e fehlenden Becher aufgefüllt.<br />
4.6.3 Auffüllen des Stäbestaplers<br />
Zu Beachten! Nur für Automaten geeignete Stäbchen anwenden.<br />
- Das Gewichtsstück aus dem Stapelhalter entnehmen (Abb. 4.30)<br />
- Die Stäbchen mit ihrem Verpackungsband in den Stapler einführen, wenn<br />
<strong>di</strong>es geschehen ist, das Band aufschneiden und herausziehen (Abb. 4.31)<br />
- Nach Been<strong>di</strong>gung des Füllvorgangs das Gewichtsstück wieder einführen<br />
- Es muß darauf geachtet werden, daß <strong>di</strong>e Stäbchen keine Grate haben, daß<br />
sie nicht gebogen sind und daß sie alle horizontal liegen (Abb. 4.32)<br />
4.6.4 Anbringen des Beutels für Kaffeesatz<br />
- Beutel-Haltefeder auf Rutsche befestigen.<br />
- Plastikbeutel einfügen; <strong>di</strong>es erfolgt, indem <strong>di</strong>eser um Rutsche gewickelt<br />
und mit Feder blockiert wird (Abb. 4.33).<br />
Die verwendeten Beutel müssen lang genug sein, daß sie den Geräteboden<br />
berühren.<br />
Überprüfen, dass der Flüssigkeitssammeleimer richtig positioniert ist (Abb.<br />
4.33) und regelmäßig entleert wird.
DEUTSCH<br />
4.8 ERSTE AUTO-INSTALLATION<br />
Beim ersten Anlassen der Maschine wird eine Auto-Installation durchgeführt.<br />
Ziel <strong>di</strong>eses Vorgangs ist das Vermeiden der manuellen Verbindungen der Drähte<br />
auf den Karten in der Folge auf das Füllen des Hydraulikkreises.<br />
Für Einzelkessel Espresso:<br />
Beim Einschalten des Automaten wird der Airbreack mit Wasser gefüllt.<br />
Wenn sich der Schwimmer auf hoher Position befindet beginnt <strong>di</strong>e Maschine<br />
<strong>di</strong>e automatische Füllung mit Wasser, <strong>di</strong>e solange andauert, bis der<br />
Durchflussmesser den Durchlauf von 200 cm³ Wasser abgemessen hat (es<br />
wird also während der gesamten Ablaufdauer Wasser durch einen Mixer<br />
ausgegeben).<br />
Dieser Vorgang wird mit ausgeschaltetem Widerstand durchgeführt.<br />
Bei Beendung des Vorgangs erscheint auf der Anzeige ein Datum.<br />
Für Doppelkessel Espresso:<br />
Beim Einschalten des Automaten wird der Airbreack mit Wasser gefüllt.<br />
Wenn sich der Schwimmer in hoher Position befindet beginnt <strong>di</strong>e Maschine<br />
den Vorgang der automatischen Installation und der entsprechenden Füllung<br />
beider Heizkessel (es wird also während des Verlaufs Wasser über einen<br />
Mixer und Kaffee vom 3-Wege-Ventil ausgegeben). Dieser Vorgang wird mit<br />
ausgeschaltetem Widerstand durchgeführt.<br />
Bei Been<strong>di</strong>gung des Vorgangs erscheint auf der Anzeige ein Datum.<br />
Für Heizkessel Instantprodukt :<br />
Beim Einschalten des Automaten wird der Airbreack mit Wasser gefüllt. Wenn<br />
sich der Schwimmer während mindestens 5 aufeinander folgenden Sekunden<br />
in hoher Position befindet öffnet <strong>di</strong>e Maschine ein Magnetventil Instant und<br />
beginnt einen Wassereinfüllzyklus in den Heizkessel (es wird also während<br />
der gesamten Ablaufdauer Wasser durch einen Mixer ausgegeben).<br />
Dieser Vorgang wird mit ausgeschaltetem<br />
Widerstand durchgeführt.Bei<br />
Beendung <strong>di</strong>eser Vorgangs<br />
erscheint auf der Anzeige<br />
ein Datum.<br />
Jetzt muss das Installationsdatum eingegeben werden, indem <strong>di</strong>e<br />
Druckknopftafel wie unten beschrieben verwendet wird:<br />
Für alphanumerische Version<br />
Taste 1 WERT ERHÖHEN<br />
Taste 3 CURSOR BEWEGEN<br />
Taste 5 DATUM EINGEBEN<br />
Taste 7 WERT VERMINDERN<br />
Taste 9 BEWEGEN ZWISCHEN<br />
Tag/Monat/Jahr<br />
Für Version Druckknopftafel<br />
Bei Betätigen der TASTE<br />
ENTER beginnt <strong>di</strong>e Maschine,<br />
nach einer Wartezeit<br />
von 10 Sekunden,<br />
den Heizkessel aufzuwärmen.<br />
Das Datum wird an einer<br />
sicheren Stelle auf der<br />
Karte gespeichert.<br />
Für <strong>di</strong>e Rückstellung auf den<br />
Status der Erstinstallation<br />
erfolgt mit dem Passwort<br />
22933 der Zugang zur Programmierung<br />
.<br />
WERT<br />
ERHÖHEN<br />
WERT<br />
VERMINDERN<br />
CURSOR<br />
BEWEGEN<br />
BEWEGEN<br />
ZWISCHEN<br />
Tag/Monat/Jahr<br />
5.0 SOFTWARE ANLEITUNGEN<br />
DATUM<br />
EINGEBEN<br />
5.1 PASSWORT<br />
Die Programmierlogik sieht für den Zugang über <strong>di</strong>e Taste PROG <strong>di</strong>e Eingabe<br />
eines Passworts vor, das es ermöglicht, in ein einheitliches Programmations-<br />
Menu zu gelangen.<br />
Zur Vereinfachung und Beschleunigung einiger Vorgänge vor Ort wird das<br />
Passwortmanagement wie folgt unterteilt:<br />
PWD 1 – eingeschränktes Programmationsmenü<br />
PWD 2 – komplettes Programmationsmenü<br />
PWD 3 - Menu Verkäufe;<br />
PWD 4 – In 2 PWD aufgeteilt: 88000 für <strong>di</strong>e Prüfung aller Slave BVM600;<br />
Test (wird nur von Bianchi Ven<strong>di</strong>ng Group verwendet) für den Zugang zur<br />
Prüfung am Ende der Montagelinie.<br />
Bemerkung: Wenn das Passwort des eingeschränkten Menus mit demjenigen<br />
des kompletten Menus übereinstimmt, hat das Passwort des kompletten<br />
Menus Vorrang<br />
40<br />
5.2 MENU IN MASCHINE<br />
PWD 1 ermöglicht den Zugang zum kompletten Menu des Verkaufsautomaten.<br />
Der folgende Ablauf beschreibt den Zugang zum Menu:<br />
Taste PROG auf der Master Karte drücken, Passwort eingeben und<br />
Taste ENTER drücken. Es folgt eine Aufstellung der Menus der Programmierung<br />
des V.A.<br />
5.2.1 MENU SOFTWARE MASCHINE<br />
Tastatur Direktauswahl<br />
In der Programmierung nehmen <strong>di</strong>e Tasten <strong>di</strong>e folgenden Funktionen<br />
an:<br />
1: Erhöhen<br />
2: Name anzeigen<br />
3: Cursor bewegen<br />
4: Pulverprobe<br />
5: Zurück zum vorherigen Menu (esc)<br />
6: Test nur Wasser<br />
7: Vermindern<br />
8: Test komplett (Menù Dosierung)<br />
Test MV oder Sol (Menu Getränkedosierungen)<br />
9: Enter<br />
0: Test komplett (Menu Getränkedosierungen)<br />
5.4 WARTUNG<br />
Durch Drücken der Aussentaste ‘Service’ tritt man den Menü Wartung ein.<br />
Der Bildschirm visualisiert in der Zeile 1 ‘Wartung xxx’, wo xxx <strong>di</strong>e Boilertemperatur<br />
zeigt, und in der Zeile 2 <strong>di</strong>e ggf. festgestellten Warnungen. Durch<br />
zweimal Drücken der Taste Service wird <strong>di</strong>e Wartezeit für das Warmlaufen<br />
übersprungen und kann man Testauswahlen durchführen, auch wenn <strong>di</strong>e<br />
Betriebstemperatur noch nicht erreicht ist. Durch Drücken einer Taste wird<br />
<strong>di</strong>e Temperatur der Boiler slave in scroll visualisiert.<br />
Die Wartungstafel sieht folgende Funktionen vor:<br />
In der Wartung nehmen <strong>di</strong>e Tasten <strong>di</strong>e folgenden Funktionen an:<br />
Taste 1: Abrollen der Alarme, (wird <strong>di</strong>ese Taste für 5 Sekunden angedrückt,<br />
werden auf dem Display <strong>di</strong>e letzten 15 Alarme visualisiert).<br />
Taste 5: Reset Störungen<br />
Kode 01: Drehung Einheit<br />
Kode 02: MDB Röhren füllen<br />
Kode 03: MDB Röhren leeren<br />
Kode 04: Test Eingänge und Röhrenentleerung für MDB<br />
Kode 05: Reset Störungen ( oder nur 5 )<br />
Kode 06: Test Komplett<br />
Kode 07: Test nur Wasser<br />
Kode 08: Bewegung ausgabedüsen<br />
Kode 09: Säule drehen<br />
Kode 12: Anzeige summe der anschläge<br />
Kode 13: Becher aushängen<br />
Kode 14: Test Mixer<br />
Kode 15: Rückstellung der Rückzähler<br />
Kode 16: Test ohne Zucker<br />
Kode 17: Stäbchenauslösung aushängen<br />
Kode 18: Mahldosierer test.<br />
Kode 0A: Temperaturangabe der letzten 48 Stunden Vega A<br />
Kode 0B: Temperaturangabe der letzten 48 Stunden Vega B<br />
Taste+ Zucker: Reset Störungen<br />
Taste– Zucker: Abrollen der Alarme, (wird <strong>di</strong>ese Taste für 5 Sekunden angedrückt,<br />
werden auf dem Display <strong>di</strong>e letzten 15 Alarme visualisiert).<br />
Bei der Wartung müssen <strong>di</strong>e angegebenen Nummern nacheinander auf der<br />
alphanumerischen Tastatur eingegeben werden, um <strong>di</strong>e gewünschte Funktion<br />
zu erhalten.
6.0 INSTANDHALTUNG UND STILLEGUNG<br />
6.1 Reinigen und Füllen<br />
Um eine störungsfreien Betrieb des Automaten über einen langen Zeitraum<br />
hinweg sicherzustellen, ist es erforderlich, regelmäßig bestimmte<br />
Tätigkeiten durchzuführen, von denen einige zur Einhaltung der geltenden<br />
Hygienevorschriften unerläßlich sind. Diese Tätigkeiten müssen bei<br />
geöffnetem und ausgeschaltetem Automaten durchgeführt werden ; das<br />
Reinigen muß vor dem Einfüllen der Produkte erfolgen. Zur Gewährleistung<br />
eines normalen Betriebs, muss der Automat in Räumlichkeiten aufgestellt werden,<br />
deren Temperaturbereich mindestens +1°C und höchstens +32°C umfasst<br />
und <strong>di</strong>e Feuchtigkeit nicht 70% überschreitet und er darf auf keinen Fall in<br />
Räumen aufgestellt werden, in denen Wasser zu Reinigungszwecken verspritzt<br />
wird (z.B. Großküchen...). Es ist verboten Gerät mit Wasser abzuspritzen.<br />
Dispositionen im Kapitel III SICHERHEITSNORMEN und Kapitel 4.0<br />
INSTALLIERUNG <strong>di</strong>eses Handbuchs beachten.<br />
6.1.1 Wartungsempfehlungen<br />
La Bianchi Ven<strong>di</strong>ng Group garantiert dauerhafte Funktionstüchtigkeit<br />
ihrer Automaten nur bei gewissenhaft ausgeführter<br />
vorbeugender Wartung wie nachfolgend aufgeführt:<br />
TYPOLOGIE DES EINGRIFFS<br />
Regenerierung Reinigungsanlage<br />
(* Harze)<br />
RAustausch des Kolbens einschließlich<br />
der Filter und Dichtung<br />
ANZAHL DER EINGABEN<br />
5.000 10.000 20.000 30/40.000 70/80.000<br />
Kompletter Austausch Kaffegruppe<br />
�<br />
Entkalkung des Espresso-Heisswassertanks<br />
und der Elektroventile<br />
�<br />
Austausch Mahlanlage �<br />
Entkalkung des Instantgetränke-<br />
Heisswassertanks und der Elek-<br />
�<br />
troventile<br />
* falls vom Hersteller der Reinigungsanlage nicht anderweitig angegeben.<br />
�<br />
6.1.2 Regelmäßige Renigung durch den<br />
Wartungsbeauftragten<br />
Vor der Entsorgung der Abfällen in den Mülleimern (schmutzige Becher,<br />
Stäbchen, Papier, Taschentücher, usw.). Nach der Entsorgung der Abfälle<br />
kann mit der Reinigung des Raumes begonnen werden.<br />
- Entfernung des groberen Schmutzes<br />
- Desinfizierung der Fußböden und Wände des Raumes im Umkreis von 1<br />
Meter um den Getränkeautomaten<br />
- Danach kann der Getränkeautomat geöffnet werden<br />
6.1.3 Tägliche empfohlene Reinigung<br />
Der Zweck des Reinigens ist <strong>di</strong>e Vorbeugung von Bakterienansammlungen<br />
in den Bereichen, <strong>di</strong>e mit Lebensmitteln in Kontakt kommen.<br />
Reinigungsarbeiten müssen unter Einhaltung der Vorschriften aus Punkt<br />
6.3.1 vorgenommen werden.<br />
Vorgehen wie folgt :<br />
- Tuch befeuchten und alle sichtbaren Teile der Ausgabekammer reinigen<br />
(Abb. 6.1 und 6.2)<br />
Abnehmen und gründlich reinigen :<br />
- Zuführschnecken und Produktrutsche (Abb. 6.3 - 1)<br />
- Wassertrichter (2), Mixerkammer (3), Mixerschraube (4) und Nutmutter (5).<br />
- Wasserschläuche aus Silikon<br />
- Ausgabekammer (Abb. 6.4)<br />
- Produktrutsche und Trichter (Abb. 6.5)<br />
Vor dem Wiederzusammenbau müssen alle Teile gründlich abgetrocknet<br />
werden.<br />
- Kaffeepulverreste mit Hilfe des Pinsels von der Kaffeegruppe entfernen;<br />
dazu kann <strong>di</strong>e Gruppe von deren Aufnahme herausgezogen werden, um<br />
das Putzen zu vereinfachen (Abb.6.6).<br />
6.1.4 Nachfüllen der Produkte<br />
Wenn <strong>di</strong>es erforderlich ist, <strong>di</strong>e Produkte und/oder Verbrauchsmaterialien des<br />
Automaten nachfüllen.<br />
Diese Tätigkeiten sind gleich wie <strong>di</strong>e unter Kapitel 4.6 beschriebenen Vorgehensweisen<br />
bei der Inbetriebnahme.<br />
6.2 Gewöhnliche und außergewöhnliche Instandhaltung<br />
Die in <strong>di</strong>esem Teil beschriebenen Tätigkeiten sind nicht allgemeingültig, sie<br />
hängen von Faktoren wie dem Härtegrad des Wassers, der Feuchtigkeit, den<br />
verwendeten Produkten, Arbeitsbe<strong>di</strong>ngungen und -umfang etc. ab.<br />
Bei allen Tätigkeiten, <strong>di</strong>e den Ausbau von Komponenten des<br />
Automaten vorsehen, muß sichergestellt werden, daß <strong>di</strong>eser<br />
ausgeschaltet ist.<br />
Die nachfolgenden Tätigkeiten müssen von Fachpersonal durchgeführt werden.<br />
Sollten Tätigkeiten am eingeschalteten Automaten durchzuführen sein,<br />
müssen sie ausgebildetem Fachpersonal anvertraut werden.<br />
Umfangreichere Eingriffe wie <strong>di</strong>e Entkalkung der Boiler bedürfen der guten<br />
Kenntnis des Automaten.<br />
�<br />
41<br />
6.3.1 Hygienisierung<br />
EINIGE WICHTIGE HINWEISE<br />
DEUTSCH<br />
Jeden Monat müssen alle Teile, <strong>di</strong>e in Kontakt mit Lebensmitteln kommen,<br />
mit einem Reinigungsmittel auf Chlorbasis desinfiziert werden, wie <strong>di</strong>es in<br />
Kapitel 4.5.3 beschrieben ist.<br />
VERFAHRENSWEISE ZUR KONTROLLE DER PHASENEINRICHTUNG<br />
DER KAFFEEBAUGRUPPE<br />
Sicherstellen, daß in der Stillstandsphase der Rotationsanzeiger mit dem<br />
Phasenanzeiger ausgerichtet ist (siehe Abb. 6.7).<br />
Sicherstellen, daß in der Phase der Ausgabe von Kaffee der Rotationsanzeiger<br />
nicht mehr als 1,5 mm vor dem Bezugspunkt für <strong>di</strong>e Ausgabe steht (der<br />
Rotationsanzeiger muß sich in der Ausgabeposition zwischen 0 und 1,5 mm<br />
vom Ausgabepunkt befinden).<br />
6.3 WARTUNGSPROZEDUREN<br />
Ideale Ausstattung:<br />
Für <strong>di</strong>e mit dem Nachfüllen und der Wartung beauftragten Personen sollte<br />
<strong>di</strong>e ideale Ausrüstung wie folge zusammengesetzt sein:<br />
- Instrumentenkoffer<br />
- Saubere Kleidung<br />
- Einweghandschuhe<br />
- Klemme zum Schließen der Röhren<br />
- Rolle mit Haushaltpapier<br />
- Holz- oder Plastikstäbchen<br />
- Reinigungsmittel<br />
- Desinfizierungsmittel<br />
- Schild “Getränkeautomat außer Betrieb”<br />
- Ablagetisch (fakultativ)<br />
Niemals verwenden:<br />
- Schwämme, Lappen<br />
- Pinsel<br />
- Schraubenzieher oder metallische Gegenstände<br />
- Operatoren und Ven<strong>di</strong>ng-Techniker, <strong>di</strong>e für gewöhnlich mit den Lebensmitteln<br />
in Berührung kommen, müssen auf Körperhygiene und saubere<br />
Bekleidung achten.<br />
Vor jedem Zugang zum Automaten muss folgendes beachtet werden:<br />
- Sicherheitsschuhe oder zumindest geeignetes Schuwerk tragen<br />
- Vorher gründlich Hände waschen<br />
- Saubere kurze Fingernägel, kein Nagellack<br />
- Saubere kurze Haare tragen<br />
- Verletzungen wie Kratzer während der Wartung vermeiden<br />
- Während der Arbeit darf weder gegessen noch geraucht werden<br />
- Während der Arbeit weder Haare, Mund und Nase berühren<br />
- Keine Ringe, Armbänder oder Uhren tragen<br />
- Eventuelle Verletzungen abdecken<br />
- Starke Parfümierung vermeiden<br />
Am häufigsten werden Lebensmittel durch Berühren verunreinigt, deshalb<br />
vergessen Sie nicht, sich jedes mal <strong>di</strong>e Hände zu waschen:<br />
- bevor Sie mit der Arbeit am Automaten beginnen<br />
- nachdem Sie auf der Toilette waren<br />
- nachdem sie Haare berührt, sich geschneuzt oder gegessen haben<br />
- nachdem Sie chemische Produkte zur Reinigung benutzt haben<br />
- nachdem Sie anderen Leuten <strong>di</strong>e Hand geschüttelt haben<br />
Handschuhe müssen jedesmal gewechselt werden, wenn Sie mit verunreinigenden<br />
Gegenständen in Berührung kommen.<br />
Wie kann <strong>di</strong>e Hygiene erzielt werden:<br />
- Durch den Einsatz von Desinfizierungsmitteln<br />
Die Desinfizierungsmittel haben <strong>di</strong>e Aufgabe <strong>di</strong>e auf den Oberflächen vorhandenen<br />
Mikroorganisamen zu vernichten.<br />
Wie kann <strong>di</strong>e Sauberkeit erzielt werden:<br />
- Durch Einsatz von Reinigungsmitteln<br />
Die Reinigungsmittel haben <strong>di</strong>e Aufgabe den groben Schmutz zu entfernen.<br />
Im Handel sind Produkte erhältlich, <strong>di</strong>e gleichzeitig eine renigende/desinfizierende<br />
Wirkung haben. Normalerweise sind <strong>di</strong>ese in der Apotheke erhältlich<br />
(mit Chlor).<br />
Für alle nicht aufgeführten Fälle gilt das HACCP; vor allem ist zu beachten:<br />
- Reinigung der Räume<br />
- Transport der Produkte<br />
- Wartung der Geräte<br />
- Entsorgung der Abfälle<br />
- Zuführung von Trinkwasser<br />
- Hygiene Personals<br />
- Eigenschaften der Lebensmittel<br />
- Richtlinie 93/43/EWG<br />
Einige wichtige Hinweise (siehe Richtlinie 93/43)<br />
- Die Umgebung von Lebensmittelautomaten muss frei von giftigem Material<br />
und so beschaffen sein, dass sich kein Schmutz ansammeln oder<br />
Schimmel auf dem Automaten bilden kann.<br />
- Außerdem muss der Raum, in dem sich der Automat befindet, eine korrekte<br />
Reinigung ermöglichen und somit eine überkreuzte Kontamination<br />
von Lebensmitteln, Gerät, Material, Wasser durch Belüftung oder Eingriffe<br />
des Personals verhindert werden und externe Agenten wie Insekten oder<br />
andere Schädlinge ausgeschlossen sein.<br />
- Prüfen Sie, ob der Wasseranschluss den EU-Richtlinien 80/778 entsprechen,<br />
<strong>di</strong>e <strong>di</strong>e Wasserqualität für Trinkwasser betreffen.
DEUTSCH<br />
- Sorgen Sie für eine korrekte natürliche oder mechanische Belüftung und<br />
vermeiden Sie dabei mechanische Luftströme von einem verschmutzten<br />
Bereich in einen sauberen .<br />
Die Reinigungsvorgänge können erfolgen an der Stelle, an der der Getränkeautomat<br />
aufgestellt ist<br />
Beispiel für einen idealen Reinigungsvorgang eines Automaten für<br />
Heißgetränke:<br />
Die mit der Reinigung der Anlage beauftragte Person muß vor dem Öffnen des<br />
Getränkeautomaten den sauberen Zustand des Raumes überprüfen und ein<br />
Schild anbringen, daß <strong>di</strong>e potentiellen Verbraucher darauf hinweist, daß:<br />
- “<strong>di</strong>eses Gerät auf Grund von Wartungsarbeiten außer Betrieb ist”<br />
- es wichtig ist, daß während der Reinigungs- und Desinfizierungsarbeiten<br />
der Beschäftigte nie seine Arbeitt unterbrechen muß, um den Getränkeautomaten<br />
einzuschalten.<br />
- Benutzen Sie saubere Lappen bei der inneren Reinigung des Automaten,<br />
am besten Einwegprodukte.<br />
- Vermeiden Sie immer den Kontakt von Reinigungsmitteln für das Gehäuse<br />
mit Reinigungsmitteln für <strong>di</strong>ejenigen Teile, <strong>di</strong>e mit den Lebensmitteln in<br />
Berührung kommen.<br />
- Achten Sie darauf, dass bei der Reinigung keine Krankheitserreger von<br />
verschmutzten Teilen auf bereits gereinigte Teile übertragen werden.<br />
A) Benutzen Sie saubere Handschuhe<br />
B) Entnehmen Sie nie warmes Wasser aus Toilettenräumen<br />
C) Reinigen Sie <strong>di</strong>e mit Lebensmittel in Berührung kommenden Teile immer<br />
besonders gründlich<br />
- Entfernen Sie gründlich alle Restspuren von Schmutz, bevor sie mit der<br />
Desinfektion beginnen.<br />
- Vermeiden Sie tunlichst jeglichen Kontakt von Lebensmitteln mit verschmutzten<br />
Oberflächen.<br />
- Halten Sie sich bei der Reinigungsprozedur strikt an <strong>di</strong>e Herstelleranweisungen<br />
auf der Verpackung der chemischen Produkte. Bringen Sie auf<br />
keinen Fall <strong>di</strong>e Verpackung der Lebensmittel in Berührung mit den Reinigungsmitteln.<br />
- Achten sie immer auf den guten Zustand Ihrer Reinigungsmittel.<br />
D) Nach Been<strong>di</strong>gung der Reinigungsarbeiten müssen <strong>di</strong>e Müllsäcke in <strong>di</strong>e<br />
dafür vorgesehenen Bereiche weitab vom Automaten gebracht werden.<br />
In der folgenden Tabelle fassen wir <strong>di</strong>e Hinweise für korrektes Verhalten<br />
zusammen, um das Risiko der Ansiedlung von Bakterien im Inneren des<br />
Automaten zu vermeide<br />
TYPOLOGIE DES EINGRIFFS<br />
6.4 Einstellungen<br />
ZEIT / ANZAHL DER EINGABEN<br />
TÄGLICH<br />
WÖCHEN-<br />
TLICH<br />
20000<br />
EINGABEN<br />
ODER<br />
MONATSMA-<br />
XIMUM<br />
Entfernen und reinigen Sie alle sichtbaren<br />
Teile im Auswurfbereich mit<br />
hygienisierenden Flüssigreinigern<br />
Leeren Sie <strong>di</strong>e Sammelwanne für<br />
�<br />
flüssige Überreste und reinigen Sie<br />
sie mit hygienisierenden Reinigern<br />
Leeren Sie den Kaffeesatzbehälter<br />
�<br />
und reinigen Sie ihn mit hygienisierenden<br />
Reinigern<br />
Entnehmen Sie alle Container und<br />
reinigen Sie mit einem feuchten<br />
�<br />
Tuch alle Containerhalterungen,<br />
sowie den Boden und das Gehäuse<br />
des Automaten, vor allem den Auswurfbereich;<br />
nehmen Sie daraufhin<br />
<strong>di</strong>e Hygienisierung vor<br />
* Hygienebausatz bestehend aus<br />
Plastikteilen für den Durchlauf des<br />
Produkts in flüssiger pder Pulverform<br />
�<br />
(Schalen, Rohre, Auswurfsflansch,<br />
�<br />
Düsen, ...). Für weitere Informationen<br />
wenden Sie sich bitte <strong>di</strong>rekt an <strong>di</strong>e Firma<br />
La Bianchi Ven<strong>di</strong>ng Group spa<br />
*La Bianchi hat für jedes Automatenmodell passende Bausätze ausgearbeitet.<br />
6.4.1 Dosage and grin<strong>di</strong>ng regulations<br />
Der Automat wird mit folgenden voreingestellten Standardwerten geliefert :<br />
– Kaffeetemperatur im Becher zwischen 70°C und 80 °C.<br />
– Temperatur der Instantprodukte im Becher zwischen 70°C und 80 °C.<br />
– Grammatur Kaffeepulver zwischen 6 und 8 Gramme.<br />
– Instantpulvermenge wie Tabelle<br />
42<br />
Um für <strong>di</strong>e verwendeten Produkte <strong>di</strong>e besten Ergebnisse zu erzielen, ist es<br />
ratsam, folgende Parameter zu kontrollieren :<br />
– Abwiegen des gemahlenen Kaffees. Die Menge durch Betätigung des<br />
Drehgriffs auf der Dosiervorrichtung einstellen (Abb.6.8).<br />
Jede Stufe des Drehgriffes entspricht einem Wert von 0,05 g.<br />
Durch Drehen im Uhrzeigersinn wird <strong>di</strong>e Menge verringert.<br />
Durch Drehen entgegen dem Uhrzeigersinn wird <strong>di</strong>e Menge erhöht.<br />
Die Veränderung der Produktmenge kann über <strong>di</strong>e Bezugskennzeichnungen<br />
auf der Dosiervorrichtung überprüft werden (Siehe Abb. 6.8).<br />
Die Kaffeescheibe muß normalerweise kompakt und leicht feucht sein.<br />
- Einstellung der manuellen Mahlung.<br />
Die Schraube (Abb. 6.9) drehen, um <strong>di</strong>e gewünschten Ergebnisse zu<br />
erzielen.<br />
Durch Drehen im Uhrzeigersinn erhält man eine feine Mahlung, entgegen<br />
dem Uhrzeigersinn eine grobe Mahlung.<br />
Nach der Einstelllung müssen 3 Einstellungen am Produkt vorgenommen<br />
werden, um <strong>di</strong>e Richtigkeit der Einstellung zu überprüfen, je feiner <strong>di</strong>e<br />
Körnung ist, desto länger ist <strong>di</strong>e Zeit bis zur Ausgabe des Produktes.<br />
- Automatische Einstellung der Mahlung (Abb.6.10)<br />
- Es ermöglicht, bei den Espresso-Ausführungen <strong>di</strong>e Mahlung gleichmässig<br />
zu behalten, unabhängig von Feuchtigkeit, Temperatur und Mühlenverschleiss.<br />
- Die erste Eichung wird bei ausgeschlossenem Gerät durchgeführt<br />
- Dosis manuell einstellen (6-7g)<br />
- Mahlung manuell einstellen<br />
- Abgabezeit in Sek. rechnen (std 18s)<br />
- Gerät anschliessen<br />
- gemessene Abgabezeit einstellen, bei der Programmierung<br />
- je 5 Espresso, wird <strong>di</strong>esen Parameter automatisch geprüft. Die gültigen<br />
Ablesungen entsprechen den dritten bzw. vierten Kaffee. Die ersten zwei<br />
werden nicht beachtet, weil sie sich aus den vorigen Einstellungen ergeben,<br />
<strong>di</strong>e fünfte wird als Einstellung gelten.<br />
6.4.2 Einstellung Wasserförderung für Instantgetränke<br />
Bei den löslichen Produkten kann <strong>di</strong>e Wassermenge und <strong>di</strong>e Pulverdosierung<br />
elektronische durch Veränderung der Standardparameter eingestellt<br />
werden.<br />
Der Vorgang wird im Kapitel 5.0 SOFTWARE ANLEITUNGEN beschrieben.<br />
BEACHTEN: Wenn man <strong>di</strong>e Wassermenge durch <strong>di</strong>e Einstellschraube der<br />
Instantproduktenventile enteicht, wird <strong>di</strong>e abgegebene Wassermenge in den<br />
Becher beeinträchtigt und <strong>di</strong>e Dosis geändert.<br />
Für den Zugang zum Magnetventil im Heizkessel Instantprodukte muss das<br />
Paneel (1) entfernt werden, indem <strong>di</strong>e beiden auf Abbildung 6.12 gezeigten<br />
Schrauben (2) entfernt werden.<br />
– Um eine korrekte Spülung der Becher zu erreichen, kann man auf <strong>di</strong>e Wassermengenschraube<br />
wirken und <strong>di</strong>e Dosierung danach prüfen (Fig. 6.11).<br />
6.4.3 Zugang zu den Innenteilen<br />
Für den Zugang zu den inneren Teilen des Verkaufsautomaten (Pumpen,<br />
Heizkessel Espresso, Magnetventile, elektrische Anschlüsse, usw.):<br />
Version Espresso:<br />
- Zuckerausgabeeinheit gegen außen drehen (Abb.6.13).<br />
- das Paneel an den beiden auf Abb. 6.14 - 6.16 gezeigten Griffe ausziehen<br />
und bis zum vollen Ausschlag stützen (Abb.6.15 - 6.17).<br />
Nach Ausführung der eventuellen Wartungsarbeiten das ganze Paneel<br />
hochheben, bis es <strong>di</strong>e korrekte vertikale Position erreicht hat und danach<br />
<strong>di</strong>e Zuckerausgabeeinheit durch Drehen nach rechts in ihre Arbeitsposition<br />
zurückführen.<br />
Version Instantprodukt:<br />
- Mixereinheiten ausbauen und <strong>di</strong>e drei auf Abb. 6.18 und Abb. 6.19<br />
gezeigten Schrauben lösen, Frontpaneel nach links schieben, bis zum<br />
Aushängen der Langlöcher, danach das Paneel entfernen, um den Zugang<br />
zum Geräteinnern freizugeben.<br />
6.5 Stillstand<br />
Bei längerem Stillstand des Automaten müssen <strong>di</strong>e folgenden vorbeugenden<br />
Tätigkeiten durchgeführt werden :<br />
– Automat vom Strom- und Wassernetz trennen<br />
– Instantboiler und Schwimmerwanne durch Entfernen des Stopfens am<br />
Schlauch auf der der Auslaßrutsche vollstän<strong>di</strong>g leeren.<br />
– Nach der vollstän<strong>di</strong>gen Entleerung Stopfen wieder anbringen (Abb. 6.20)<br />
– Alle Produktbehälter leeren<br />
– Alle Teile, <strong>di</strong>e mit Lebensmitteln in Kontakt kommen, gründlich wie beschrieben<br />
reinigen<br />
– Eimer für Flüssigabfälle leeren und gründlich reinigen<br />
– Kaffeesatzbeutel entfernen<br />
– Mit einem Tuch alle Flächen im Innern und auf der Außenseite des Automaten<br />
reinigen<br />
– Den Automat mit Plastikfolie oder -sack abdecken (Abb. 6.21)<br />
– In trockenen, geschützten Räumen lagern, in denen <strong>di</strong>e Temeperatur nicht<br />
unter 1°C sinkt
DECLARAÇÃO DE CONFORMIDADE<br />
La BIANCHI VENDING GROUP S.p.A.<br />
Corso Africa, 9 - 24040 Zingonia <strong>di</strong> VERDELLINO (BG) Italia<br />
Declara sob sua responsabilidade que a família dos <strong>di</strong>stribuidores automáticos modelo:<br />
43<br />
Zingonia <strong>di</strong> Verdellino (BG), 12 Gennaio 2009<br />
PORTUGUÊS<br />
INFORMAÇÕES AOS USUÁRIOS<br />
Seguindo do Decreto Legislativo de 25 de septiembre de 2007, n.185 e o art. 13 do Decreto Legislativo de 25 de julho de 2005, n.151 “Atuação das Diretrizes<br />
2002/95/CE, 2002/96/CE e 2003/108/CE, relativas à redução do uso de substâncias perigosas nos aparelhos elétricos e eletrônicos , e à<br />
<strong>Dichiarazione</strong> <strong>di</strong> <strong>Conformità</strong><br />
eliminação dos resíduos”.<br />
O símbolo da caixa com um “X” (cancelado) significa que o produto no final de sua vida útil deve ser recolhido separado dos outros resíduos.<br />
O usuário deverá, portanto, conferir o aparelho que chegou ao final de sua vida, nos centros de coleta <strong>di</strong>ferenciada dos resíduos eletrônicos e eletrotécnicos,<br />
ou devolvê-lo ao revendedor no momento da compra de uma nova aparelhagem equivalente.<br />
A coleta <strong>di</strong>ferenciada adequada para o início do encaminhamento adequado da aparelhagem à reciclagem, ao tratamento e à eliminação ambientalmente<br />
Direttiva 2002/95/CE del Parlamento Europeo e<br />
compatível contribui para evitar possíveis efeitos negativos ao ambiente e à saúde e favorece a reciclagem dos materiais dos quais é composta a aparelhagem.<br />
del Consiglio del 27 Gennaio 2003<br />
A eliminação abusiva do produto por parte do usuário comporta a aplicação das sanções administrativas como o D.L. n. 22/1997 (artigo 50 e seguintes<br />
dos D.L. n. 22/1997).<br />
Declaração de Conformidade<br />
Diretiva RoHS<br />
• Cromo esavalente (Cr(VI))<br />
Diretiva 2002/95/CE do Parlamento Europeu e<br />
<strong>Dichiarazione</strong> • Bifenile polibromurati do Conselho (PBB) <strong>di</strong> <strong>Conformità</strong><br />
de 27 de Janeiro de 2003<br />
• Eteri a respeito <strong>di</strong> <strong>di</strong>fenili da restrição polibromurati: do uso de determinadas substâncias perigosas<br />
o PentaBromoDifenilEtere nas aparelhagens (PBDE) elétricas e eletrônicas<br />
o OttaBromoDifenilEtere A Bianchi Ven<strong>di</strong>ng (OttaBDE) Group S.p.A. declara que:<br />
Direttiva RoHS<br />
o DecaBromoDifenilEtere (DecaBDE)<br />
desde 1° de Julho de 2006 todo produto da Bianchi Ven<strong>di</strong>ng Group S.p.A. colocado no mercado na Europa encontra-se em conformidade com a<br />
Diretiva RoHS e, portanto, não contém • Pefluorooctano concentrações sulfonato que ultrapassem (PFSO) os limites permitidos para as seguintes substâncias:<br />
• PoliCloroNaftalene (PCN)<br />
• Chumbo (Pb) Direttiva 2002/95/CE del • Parlamento Sulfonato perfluoroctano Europeo (PFOS) e<br />
• Bis(tribromophenoxy)etano PoliCloroBifenile • Policloronaftaleno (PCB) (PCN)<br />
• Mercúrio (Hg)<br />
• Benzene<br />
• Cadmio (Cd)<br />
del Consiglio del 27 • Bis(tribromo Gennaio fenoxi)etano 2003 Policlorobifenil (PCB)<br />
• Benzeno<br />
• Cromo hexavalente (Cr(VI))<br />
• Bifenil polibromados sulla (PBB) restrizione dell’uso <strong>di</strong> determinate sostanze pericolose<br />
• Éteres de bifenil polibromados:<br />
O L’Amministratore ADMINISTRADOR Delegato DELEGADO<br />
ou Penta Bromo Bifenil Éter nelle (PBDE) apparecchiature elettriche ed elettroniche<br />
ou Octa Bromo Bifenil Éter (OttaBDE)<br />
ou Deca Bromo Bifenil Éter (DecaBDE)<br />
Zingonia <strong>di</strong> Verdellino (BG), 12 de Janeiro de 2009<br />
Direttiva RoHS<br />
sulla restrizione dell’uso <strong>di</strong> determinate sostanze pericolose<br />
nelle apparecchiature elettriche ed elettroniche<br />
Bianchi Ven<strong>di</strong>ng Group S.p.A. <strong>di</strong>chiara che:<br />
dal 1° luglio 2006 qualsiasi prodotto <strong>di</strong> Bianchi Ven<strong>di</strong>ng Group S.p.A. immesso sul<br />
mercato in Europa è conforme alla Direttiva RoHS, e quin<strong>di</strong> non contiene<br />
concentrazioni che superino i limiti consentiti per le seguenti sostanze:<br />
• Piombo (Pb)<br />
• Mercurio (Hg)<br />
• Cadmio (Cd)<br />
Marca: BIANCHI VENDING<br />
Fabricante: BIANCHI VENDING GROUP S.p.A.<br />
Tipo/Modelo: BVM 952 – BVM 972<br />
É conforme aos Requisitos Essenciais de Segurança das Diretrizes:<br />
1) Baixa Tensão 2006/95/CE (concernente a adaptação das legislações dos Estados membros relativas ao material eléctrico destinado a ser utilizado<br />
dentro de alguns limites de tensão) -BT-<br />
2) Compatibilidade Electromagnética 2004/108/CE (concernente a adaptação das legislações dos Estados membros relativas à compatibilidade<br />
electromagnética) -EMC-<br />
3) REG. (CE) 1935/2004 relativa aos materiais e aos objectos destinados a entrar em contacto com produtos alimentares<br />
REG. (CE) 1895/2005 relativo à restrição do uso de alguns derivados epoxí<strong>di</strong>cos em materiais e objectos destinados a entrar em contacto<br />
com produtos alimentares<br />
DIR. 2002/72 CE relativa aos materiais e objectos de matéria plástica destinados a entrar em contacto com produtos alimentares.<br />
Os testes/verificações foram executados em conformidade com as Normas Harmonizadas/Europeias vigentes:<br />
1) BAIXA TENSÃO (Segurança Eléctrica BT):<br />
EN 60335-1:2002 +A1:2004 +A11:2004 +A2:2006 +A12:2006 +A13:2008<br />
(Segurança dos aparelhos eléctricos de uso doméstico e similar - Norma geral)<br />
EN 60335-2-75:2004+ A1:2005 +A11:2006 + A2:2008 +A12:2010.<br />
(Normas especiais para <strong>di</strong>stribuidores comerciais e aparelhos automáticos para a venda)<br />
EN ISO 11201:2009 +EN ISO 3744:2009 Me<strong>di</strong>ção do ruído acústico. Nível de Pressão Sonora: LpA < 70 dB(A)<br />
2) COMPATIBILIDADE ELECTROMAGNÉTICA (EMC):<br />
EN 55014-1:2006 (Limites e métodos de me<strong>di</strong>ção das características de rá<strong>di</strong>o <strong>di</strong>stúrbio dos aparelhos electrodomésticos, e similares com motor ou térmicos,<br />
dos utensílios e dos aparelhos eléctricos similares)<br />
EN 55014-2:1997 +A1:2001 +A2:2008 (Requisitos de imunidade para aparelhos electrodomésticos, utensílios e aparelhos eléctricos similares)<br />
EN 61000-3-2: 2006 (Limites para as emissões de corrente harmónica)<br />
EN 61000-3-3:1995+ A1:2001 +A2:2005 (Limitação das flutuações de tensão e dos flicker em sistemas de alimentação em baixa tensão para aparelhagens<br />
com corrente nominal ≤ 16 A)<br />
EN 62233:2008 Métodos de me<strong>di</strong>ção dos campos electromagnéticos de electrodomésticos e aparelhos similares no que <strong>di</strong>z respeito à exposição humana.<br />
3) IDONEIDADE DOS MATERIAIS EMPREGADOS EM CONTACTO COM SUBSTÂNCIAS ALIMENTARES<br />
Testes de “Idoneidade ao contacto com substâncias alimentares” como previsto pela legislação italiana D.M. 21-03-1973 e sucessivas actualizações ⇒<br />
Decreto 4 de Maio 2006 n° 227, e das adaptações das Directivas Europeias: 82/711/CEE, 85/572/CEE, 93/8/CEE, 97/48/CE, 2002/72/CE, 2004/13/CE,<br />
2004/19/CE, 2005/79/CE, Reg. CE n° 1935/04 e Reg. CE n° 1895/2005.<br />
O ADMINISTRADOR DELEGADO<br />
Zingonia <strong>di</strong> Verdellino (BG), Janeiro 2010<br />
______________________<br />
Bianchi Ven<strong>di</strong>ng Group S.p.A. <strong>di</strong>chiara che:<br />
dal 1° luglio 2006 qualsiasi prodotto <strong>di</strong> Bianchi Ven<strong>di</strong>ng Group S.p.A. immesso sul
PORTUGUÊS<br />
ANTES DE UTILIZAR A MAQUINA, LER ATENTAMENTE ESTE MANUAL PARA UM USO CORRETO EM CONFORMIDADE AS NORMAS FUNDAMEN-<br />
TAIS DE SEGURANÇA.<br />
ATENÇÃO: Importantes <strong>di</strong>cas<br />
para a segurança!<br />
LER atentamente o manual de instruções<br />
antes de por em função.<br />
ADVERTENCIAS<br />
OPERADOR DA MANUTENÇÃO<br />
E’ a pessoa responsavel pela recarga dos recipientes de produto solúvel, açucar, café culherzinhas e copos.<br />
Ele deve também efetuar a limpeza do <strong>di</strong>stribuidor (ver as operações in<strong>di</strong>cadas no capítulo 6.0). Em caso de avarias, deve chamar o tecnico instalador.<br />
TECNICO INSTALADOR<br />
O instalador é a pessoa encargada pela instalação do <strong>di</strong>stribuidor automático, pelo funcionamento e programação das funções.<br />
Todas as operações de regulagem, são de exclusiva competência do instalador que conhece a password de entrada na programação.<br />
Chaves utilizaveis pelo OPERA-<br />
DOR DA MANUTENÇÃO e pelo<br />
TECNICO INSTALADOR<br />
N° 1 Chave<br />
PREMISSA<br />
I - Advertencias para o operador<br />
Este <strong>di</strong>stribuidor automático foi projetado e fabricado no rispeito das normas<br />
existentes pelo que se refere a segurança e é garantido para as pessoas que<br />
executam corretamente as instruções de carga e limpeza or<strong>di</strong>naria in<strong>di</strong>cadas<br />
neste manual.<br />
O utilizador não deve por nenhuma razão tirar as proteções que necessitam<br />
de um apetrecho para serem removidas.<br />
Algumas operações de manutenção (que podem ser executadas somente<br />
por tecnicos especializadosspecializzati e são in<strong>di</strong>cadas neste manual com<br />
um pitograma apósito) devem ser efetuadas rodeando as proteções de segurança<br />
do <strong>di</strong>stribuidor.<br />
Para o respeito das normas de segurança, algumas operações são de exclusiva<br />
competência do tecnico instalador e somente com uma especial autorização<br />
também do operador da manutenção or<strong>di</strong>nária pode efetuar as operações<br />
particulares.<br />
Conhecer e respeitar os avisos de perigo é uma con<strong>di</strong>ção necessária para<br />
operar com boa segurança seja pelo que se refere a instalação, funcionamento<br />
e manutenção da máquina.<br />
II - Advertencias gerais<br />
CHAVES TUBULARES<br />
n° 5,5 - n° 7 - n° 8 - n° 10 - n° 20 - n° 22<br />
CHAVES DE BOCA (com pinos)<br />
n° 7 - n° 8 - n° 10 - n° 12 - n° 14<br />
Antes de utilizar o <strong>di</strong>stribuidor automático, ler atentamente<br />
este manual.<br />
O operador deve conhecer perfeitamente as informações deste manual para<br />
um correto uso do <strong>di</strong>stribuidor automático.<br />
As intervenções sobre o <strong>di</strong>stribuidor automático devem ser efetuadas por<br />
pessoal tecnico treinado.<br />
O usuário deve conhecer os mecanismos de funcionamento do <strong>di</strong>stribuidor<br />
automático.<br />
– E’ responsabilidade do comprador verificar que os usuários sejam treinados<br />
e conheçam todas as informações contidas na documentação e<br />
in<strong>di</strong>cações da documentação tecnica fornecida.<br />
Apesar de que o fabricante tenha respeitado as normas de segurança,<br />
Para qualquer manutenção, desligar<br />
a alimentação elétrica<br />
ATENÇÃO: maquina em tensão<br />
INDICE<br />
PREMISSA<br />
1.0 CARATERISTICAS TECNICAS<br />
2.0 DESCRIÇÃO TÉCNICA DO FUNCIONAMENTO<br />
3.0 MOVIMENTAÇÃO DO DISTRIBUIDOR AUTOMÁTICO<br />
4.0 INSTALAÇÃON<br />
5.0 INSTRUÇÕES SOFTWARE<br />
6.0 MANUTENÇÃO E INATIVIDADE<br />
7.0 DESMANTELAMENTO<br />
8.0 ALARMES<br />
44<br />
PE<br />
CHAVES DE PARAFUSOS<br />
Corte pequeno<br />
Corte me<strong>di</strong>o<br />
Corte grande<br />
Cruz normal<br />
Cruz pequeno<br />
Cruz me<strong>di</strong>o<br />
Cruz grande<br />
Em Teflon de corte pequeno para regular<br />
Trimmer<br />
ATENÇÃO: partes quentes em contato!<br />
ATENÇÃO Partes em movimento<br />
In<strong>di</strong>cação do fio terra<br />
Apetrechos necessários para intervenções no <strong>di</strong>stribuidor automático<br />
CHAVE CRICK n° 14<br />
TESTER<br />
TESOURA ELETRICISTA<br />
KIT DE PROGRAMAÇÃO<br />
as pessoas que intervem sobre o <strong>di</strong>stribuidor automático devem estar<br />
perfeitamente conscientes dos eventuais perigos existentes operando<br />
sobre a máquina.<br />
– Este manual é parte integrante da <strong>di</strong>stribuidor automático e deve sempre<br />
ficar no interno da mesma, para permitir o utilizo por parte dos varios<br />
operadores, até o desmantelamento e/ou destruição do <strong>di</strong>stribuidor automático.<br />
– Em caso de perda ou dano deste manual, é possível pe<strong>di</strong>r outra copia ao<br />
fabricante in<strong>di</strong>cando os dados sobre a matrícula do <strong>di</strong>stribuidor automático<br />
mesmo.<br />
– Só utilizando peças originais é garantido um bom funcionamento e uma<br />
otima prestação do <strong>di</strong>stribuidor automático.<br />
– Mo<strong>di</strong>ficações à maquina máquina não concordadas anteriormente com a<br />
casa construtora e executadas pelo tecnico instalador e/ou gestor devem<br />
ser consideradas de sua plena responsabilidade.<br />
– O tecnico / gestor deve executar todas as operações necessárias para<br />
manter a eficiencia da máquina antes e durante o uso.<br />
– Qualquer manomissão ou mo<strong>di</strong>ficação da máquina não autorizada pelo<br />
fabricante fica de responsabilidade de quem fez as mo<strong>di</strong>ficações e anulam<br />
automaticamente as responsabilidades de garantia da máquina mesma.<br />
– Este manual ilustra as prestações da máquina, na hora da imissão no<br />
mercado, do <strong>di</strong>stribuidor automático;eventuais mo<strong>di</strong>ficações, amelhoramentos,<br />
efetuadas sobre as máquinas comercializadas sucessivamente,<br />
não obrigam a BIANCHI VENDING GROUP nem a intervir sobre o <strong>di</strong>stribuidor<br />
automático fornecido anteriormente, nem a atualizar a relativa<br />
documentação tecnica fornecida em dotação.<br />
– A BIANCHI VENDING GROUP, em qualquer momento pode mo<strong>di</strong>ficar<br />
os manuais já existentes, enviando à seus clientes uma copia que deve<br />
ser conservada com o manual.<br />
Eventuais problemas tecnicos que podem verificar-se sao facilmente resolvidos<br />
consultando este manual; para maiores informações, contatar o<br />
vendedor onde foi comprado o <strong>di</strong>stribuidor automático ou o Serviço Tecnico<br />
aos numeros:<br />
� +039. 035.45.02.111 - fax +039. 035.883.304
Em caso de chamada saber in<strong>di</strong>car:<br />
os dados in<strong>di</strong>cados sobre a matricula (Fig.1)<br />
versão do programa contido no micro-processor (plaqueta adesiva no<br />
componente montado na placa).<br />
A Bianchi Ven<strong>di</strong>ng Group S.p.A. declina qualquer responsabilidade por<br />
danos causados a pessoas ou coisas por :<br />
� instalação não correta<br />
� alimentação elétrica e/ou hidrica não apropriada<br />
� limpeza e manutenção não adequadas<br />
� mo<strong>di</strong>ficações não autorizadas<br />
� uso improprio do <strong>di</strong>stribuidor<br />
� peças não originais<br />
– Em caso nenhum a Bianchi Ven<strong>di</strong>ng Group S.p.A. torna-se responsável a<br />
pagar eventuais danos devidos à interrupções forçadas das <strong>di</strong>stribuições<br />
do <strong>di</strong>stribuidor por causa de avarias.<br />
– As operações de instalação e manutenção, devem ser executadas somente<br />
por pessoal tecnico qualificado e anteriormente treinado.<br />
– Para a recarga utilizar somente produtos alimentares especificos para o<br />
uso em <strong>di</strong>stribuidores automáticos.<br />
– O <strong>di</strong>stribuidor automático não é idoneo para ser instalado ao externo,<br />
lugares secos, com temperaturas acima de 1°C e não pode ser montado<br />
em lugares onde sejam utilizados jatos de água para a limpeza (ex.<br />
grandes cozinhas ....).<br />
Não utilizar jatos de água para a limpeza da máquina<br />
III - NORMAS PARA A SEGURANÇA<br />
Antes de utilizar o <strong>di</strong>stribuidor automático, ler atentamente este manual.<br />
– As operações de instalação e manutenção, devem ser executadas exclusivamente<br />
por pessoal tecnico qualificado.<br />
– O utilizador não deve de forma nenhuma por as mãos nas partes do<br />
<strong>di</strong>stribuidor automático protegidas com <strong>di</strong>spositivos que necessitam de<br />
um apetrecho para serem desbloqueadas<br />
– Conhecer e respeitar os avisos de perigo é uma con<strong>di</strong>ção necessária para<br />
operar com boa segurança seja pelo que se refere a instalação, funcionamento<br />
e manutenção da máquina.<br />
Desligar sempre o CABO DE ALIMENTAÇÃO antes das operações<br />
de manutenção ou limpeza.<br />
NÃO OPERAR ABSOLUTAMENTE SOBRE A MAQUINA E NÃO TIRAR<br />
PROTEÇÃO ALGUMA ANTES DO COMPLETO RESFRIAMENTO DAS<br />
PARTES QUENTES!<br />
– Só com o uso de peças originais é garantido um bom funcionamento e<br />
uma otima prestação do <strong>di</strong>stribuidor automático.<br />
– Para garantir um normal funcionamento, o aparelho deve ser instalado<br />
em lugares com temperatura ambiente entre mínimo + 1° C e máximo<br />
+ 50° C e a humidade não esteja além do 85%.<br />
– Para garantir um funcionamento regular, manter sempre o <strong>di</strong>stribuidor<br />
automático em perfeitas con<strong>di</strong>ções de limpeza.<br />
– No caso em que na hora da instalação se verificarem con<strong>di</strong>ções de uso<br />
<strong>di</strong>ferentes das in<strong>di</strong>cadas neste manual, será necessário contatar ime<strong>di</strong>atamente<br />
o fabricante antes do uso do <strong>di</strong>stribuidor automático.<br />
– Controlar também que sejam compren<strong>di</strong>das e aplicadas novas e eventuais<br />
normas estabelecidas pelas autoridades nacionais ou provinciais.<br />
Este aparelho não foi projetado para o uso por parte de pessoas (inclusive<br />
crianças) com capacidades físicas, sensoriais ou mentais reduzidas, ou<br />
sem experiência e conhecimento a menos que tenham recebido instruções<br />
relativamente ao uso do aparelho e sejam supervisionadas por uma pessoa<br />
responsável pela segurança das mesmas.<br />
As crianças devem ser controladas de modo a assegurar que não brinquem<br />
com o aparelho.<br />
O acesso à área de serviço somente é permitido a pessoal dotado<br />
de conhecimento e experiência prática do aparelho.<br />
1.0 CARATERISTICAS TECNICAS<br />
BVM972 BVM952<br />
Altura (A) 1830 mm 1620 mm<br />
Largura (B) 666 mm 666 mm<br />
Profun<strong>di</strong>dade (C) 776 mm 776 mm<br />
Peso 140 kg÷190 kg (3) 155 kg<br />
Tensão de alimentação V230 V230<br />
Potencia instalada (1) 1,8 kW ÷ 3,2 kW 1,8 kW ÷ 3,2 kW<br />
Corrente nomina (Max) 8 A - 15 A 8 A - 15 A<br />
Alimentaçao rede hídrica 0,5 ÷ 6,5 bar 0,5 ÷ 6,5 bar<br />
IDLE STATE MODE<br />
segundo EVA-EMP<br />
CONSUMOS MEDIOS:<br />
110-220 Wh/h 110-220 Wh/h<br />
ENERGY CONSUMPTION<br />
PER LITRE segundo EVA-EMP<br />
150-230 Wh/L 150-230 Wh/L<br />
45<br />
PORTUGUÊS<br />
Conexão rede hídrica 3/8” gas 3/8” gas<br />
Conexão rede eléctrica tomada SCHUKO tomada SCHUKO<br />
DISTRIBUIDOR COPINHOS<br />
Diâmetro copos mm 70÷74<br />
RESISTENÇIAS TANQUE<br />
70÷74<br />
Do tipo blindado caldeira do café: 1500W 1500W<br />
Do tipo blindado caldeira solúveis: 2000W 2000W<br />
Café em grãos<br />
CAPACIDADE RECIPIENTES<br />
Kg 3,5 Kg 3,5<br />
Café soluvel Kg 1,4 Kg 1,2<br />
Leite granular Kg 2,2 Kg 1,7<br />
Creamer Kg 4,0 Kg 3,2<br />
Chocolate Kg 4,8 Kg 3,6<br />
Chá Kg 5,2 Kg 3,3<br />
Chá natural Kg 2,4 Kg 1,7<br />
Caldo Kg 3,8 Kg 3,6<br />
Açucar Kg 4,0 Kg 4,0<br />
Copinhos n° 700 500<br />
Culherzinhas n° 540 400<br />
Tipo lâmpada LED LED<br />
Nível de pressão sonora ponderada A 58,2 dB ± 2,5 dB<br />
Nível de potência sonora ponderada A 71,0 dB ± 3,0 dB<br />
(1) Controlar a potencia nominal in<strong>di</strong>cada sobre a etiqueta dados do <strong>di</strong>stribuidor.<br />
(2) Segundo a versão pe<strong>di</strong>da e às normas em vigor no lugar de utilizo.<br />
(3) Segundo a versão.<br />
CONHECER O DISTRIBUIDOR<br />
Mod. BVM972 (Fig.1.2)<br />
1 Grupo café, moedor<br />
2 Grupo <strong>di</strong>stribuição bebidas<br />
3 Grupo <strong>di</strong>stribuição açucar<br />
4 Sistemas de pagamento<br />
5 Coluna copinhos<br />
6 Ficha CPU<br />
7 Placa de potência<br />
8 Coluna paletinas<br />
9 Filtro descalcificado<br />
10 Recipiente fundos liquidos<br />
11 Zona <strong>di</strong>stribuição<br />
12 Tecla de serviço<br />
13 Tecla de lavagem<br />
14 Grupo refrigerador (optional)<br />
Mod. BVM952 (Fig.1.3)<br />
1 Grupo café, moedor<br />
2 Grupo <strong>di</strong>stribuição bebidas<br />
3 Grupo <strong>di</strong>stribuição açucar<br />
4 Sistemas de pagamento<br />
5 Coluna copinhos<br />
6 Ficha CPU<br />
7 Placa de potência<br />
8 Coluna paletinas<br />
9 Filtro descalcificado (optional)<br />
10 Recipiente fundos liquidos<br />
11 Zona <strong>di</strong>stribuição<br />
12 Tecla de serviço<br />
13 Tecla de lavagem<br />
14 Carter superior<br />
15 Grupo refrigerador (optional)<br />
1.1 Uso contemplado<br />
O <strong>di</strong>stribuidor automático deve ser usado exclusivamente para bebidas,<br />
preparadas misturando produtos alimentares com água (por infusão pelo<br />
que se refere o café espresso).<br />
Utilizar produtos alimentares adequados à <strong>di</strong>stribuição automática em recipientes<br />
abertos. As bebidas vem <strong>di</strong>stribuidas em apositos copinhos de plástica<br />
<strong>di</strong>stribuidos automáticamente pela máquina.<br />
Onde for contemplado, vem <strong>di</strong>stribuida tambem a culherzinha para misturar<br />
o açucar. As bebidas devem ser utilizadas ime<strong>di</strong>atamente e em nenhum caso<br />
conservadas para um successivo consumo.<br />
CAFE’ ESPRESSO<br />
Este processo verifica-se só nos modelos dotados de grupo café espresso,<br />
depois dos processos de <strong>di</strong>stribuição copinho e açucar.<br />
– o moedor ativa-se até alcançar a dose de café moido selecionada pelo<br />
dosador (figure 2.3).<br />
– ativa-se o eletromagnete do dosador, que provoca a abertura da janelinha<br />
e a caída do café no copinho<br />
– ativa-se o motoredutor rotação grupo para levá-lo em posição de <strong>di</strong>stribuição<br />
e contemporaneamente comprimir a pastilha (Fig.2.4-Fig.2.5).<br />
– ativa-se a bomba que <strong>di</strong>stribue a quantidade de água selecionada, e<br />
controlada pelo apósito <strong>di</strong>spositivo eletronico (contador volumetrico),<br />
puxando pelo tanque café (Fig.2.6)<br />
– ativa-se novamente o motoredutor grupo café para levá-lo em posição<br />
de descanço; durante este movimento vem também expelida a pastilha<br />
de café usada.<br />
A sequencia destas operações (moagem e <strong>di</strong>stribuição café) pode verificar-se<br />
no sentido inverso em relação ao tipo de seleção utilizada.<br />
DISTRIBUIÇÃO CULHERZINHA<br />
Este processo vem ativado somente sobre as versões onde foi contemplado<br />
o <strong>di</strong>stribuidor culherzinhas; è possível selecionar a culherzinha sobre amargo<br />
e/ou solúvel.<br />
– ativa-se o motoredutor que aciona o <strong>di</strong>spositivo de desganchamento<br />
culherzinha no copinho (Fig.2.7).
PORTUGUÊS<br />
BEBIDAS SOLUVEIS<br />
Este processo ativa-se quando a <strong>di</strong>stribuição dos copinhos e do açucar está<br />
completada.<br />
Segundo o tipo de bebida desejada e o modelo do <strong>di</strong>stribuidor, para a preparação<br />
da bebida podem ativar-se os processos embaixo descritos.<br />
– ativa-se, se presente, o motomisturador (Fig.2.8)<br />
– A electroválvula fixada na caldeira dos solúveis (Fig.2.9) ou na caldeira<br />
do café (Fig.2.10) é activada para emitir no batedor a quantidade de<br />
água programada.<br />
A caldeira Solúveis é montada na versão solúveis e na versão Expresso<br />
Dupla caldeira.<br />
- O motoredutor do produto soluvel ativa o caracol para vazar a quantidade<br />
de produto selecionado no misturador (em algumas versões <strong>di</strong>versos<br />
produtos podem ir para o mesmo mixer, ver o caso do leite e chocolate)<br />
(Fig.2.11).<br />
- Distribuída a quantidade de água e de pó pré fixada, o batedor será<br />
desactivado depois de um tempo T programado.<br />
3.0 MOVIMENTAÇÃO DO DISTRIBUIDOR AUTOMÁTICO<br />
3.1 Movimentação e Transporte (Fig.3.1)<br />
O transporte do <strong>di</strong>stribuidor deve ser efettuado por pessoal competente.<br />
O <strong>di</strong>stribuidor vem fornecido sobre pallet; para a deslocação utilizar um<br />
carrinho e movimentá-lo lentamente para não capotá-lo.<br />
Não :<br />
– levantar o <strong>di</strong>stribuidor com correias ou prensas<br />
– arrastar o <strong>di</strong>stribuidor<br />
– virar ou deitar o <strong>di</strong>stribuidor para o transporte<br />
– dar pancadas no <strong>di</strong>stribuidor<br />
Evitar que o <strong>di</strong>stribuidor:<br />
– tome choques<br />
– seja sobrecarregado com outros volumes<br />
– fique esposto à chuva, ao gelo ou à fontes de calor<br />
– seja posicionado em lugares húmidos<br />
A casa construtora não é responsável por eventuais danos causados por<br />
inobservância parcial ou total das advertências acima in<strong>di</strong>cadas.<br />
3.2 Estocagem<br />
Para a estocagem, evitar de por mais máquinas encima, mante-las em<br />
posição vertical, em lugares secos com temperaturas não inferiores a 1°C<br />
(Fig.3.2).<br />
3.3 Embalagem<br />
O <strong>di</strong>stribuidor é protegido por cantos em polistirolo e por uma pelicula transparente<br />
em polipropilene (Fig.3.2).<br />
O <strong>di</strong>stribuidor automático vem entregado embalado, garantindo também uma<br />
proteção mecânica e contra as agressões do ambiente externo .<br />
Sobre a embalagem vem aplicadas etiquetas que in<strong>di</strong>cam:<br />
manobrar com cura<br />
não capotar<br />
proteger da chuva<br />
não sobrepor<br />
proteger das fontes de calor<br />
não resistente aos choques<br />
3.4 Recebimento<br />
Na hora de recebimento precisa verificar que o <strong>di</strong>stribuidor automático não<br />
tenha recebido choques no transporte. Em caso contrario reclamar ime<strong>di</strong>atamente<br />
com o transportador.<br />
Na fim do transporte a embalagem deve ser integra, quer <strong>di</strong>zer não<br />
deve:<br />
– apresentar achatamento, marcas de choque, deformações ou<br />
rupturas da embalagem<br />
– apresentar marcas de partes molhadas que possam in<strong>di</strong>car que a embalagem<br />
ficou na chuva, gelo ou calor<br />
– apresentar marcas de manomissão.<br />
3.5 Desembalagem<br />
– Tirar a embalagem do <strong>di</strong>stribuidor, cortando o filme protetivo que o enrola,<br />
ao longo de um dos cantos de proteção (Fig.3.3).<br />
– Desganchar o <strong>di</strong>stribuidor do pallet para o transporte, desparafusando os<br />
parafusos (A) que o bloqueiam ao pallet mesmo (Fig.3.4).<br />
– Soltar o palet e introduzir os 4 pezinhos nos furos roscados (Fig. 3.5)<br />
deixados soltos dos parafusos (A)<br />
– tirar a chave da zona <strong>di</strong>stribuição (Fig.3.6)<br />
Abrir a janelinha do <strong>di</strong>stribuidor e tirar a fita adesiva dos componentes aquí<br />
elencados:<br />
coluna copinhos (exemplo Fig.3.7)<br />
caixa<br />
Recipiente do açucar<br />
peso da coluna culherzinhas<br />
cobertura caixa fichas Master<br />
recipientes produtos<br />
flutuante cheio fundos liquidos<br />
faixa terminal<br />
recipiente fundos liquidos<br />
– tirar o polistirolo que bloqueia os recipientes produtos (Fig.3.8)<br />
As embalagens devem ser deixadas à pessoas competentes porque<br />
fontes de poluição para o ambiente Para a destruição consultar firmas<br />
autorizadas.<br />
46<br />
4.0 INSTALAÇÃO<br />
4.1 Posicionamento<br />
– Se posicionado perto de uma parede, a parte traseira deve ficar a uma<br />
<strong>di</strong>stancia mínima de 5 cm da mesma (Fig.6.1), para permitir uma ventilação<br />
regular. Em caso nenhum cobrir o <strong>di</strong>stribuidor com panos ou coisas<br />
parecidas.<br />
– Posicionar o <strong>di</strong>stribuidor, prestando atenção ao nivelamento regulando os<br />
pezinhos já montados sobre o móvel (Fig.6.2). Verificar que o <strong>di</strong>stribuidor<br />
não tenha uma inclinação superior aos 2°.<br />
ATENÇÃO! Não posicionar o aparelho perto de objetos inflamáveis,<br />
respeitando uma <strong>di</strong>stância mínima de segurança de 30 cm.<br />
A Bianchi Ven<strong>di</strong>ng Group S.p.A. declina qualquer responsabilidade por inconvenientes<br />
causados pela inobservancia das normas de posicionamento.<br />
Se a instalação vem efetuada em corridores de evacuação de segurança verificar<br />
que com o <strong>di</strong>stribuidor com a porta aberta fique um espaço suficiente<br />
à passagem (Fig.6.1).<br />
Para não sujar o chão, causa caídas acidentais de produtos, utilizar, se necessário,<br />
debaixo do <strong>di</strong>stribuidor, uma proteção suficientemente larga para<br />
cubrir o raio de ação do <strong>di</strong>stribuidor automático.<br />
4.2 Conexão à rede hídrica<br />
Antes de coneter o <strong>di</strong>stribuidor à rede da água, verificar que esta seja:<br />
– potável (eventualmente com um exame de laboratório)<br />
– tenha uma pressão entre 0,5 e 6.5 Bar (caso contrario utilizar uma bomba<br />
ou um redutor de pressão, a segunda dos casos).<br />
– instalar, se não for presente, uma torneira em posição accessível para<br />
isolar o aparelho da rede hídrica se for necessário (Fig.4.3).<br />
– antes de efetuar a conexão hídrica, deixar sair um pouco de água da<br />
torneira para eliminar eventuais residuos de impuridade e de sujeira<br />
(Fig.4.4).<br />
– Coneter a torneira ao <strong>di</strong>stribuidor, utilizando um tubo de nylon para alimentos<br />
e que possa suportar a pressão da rede. No caso se utilize tubo<br />
flexível é necessário montar no seu interno a bússola de renforço em<br />
dotação (Fig.4.5).<br />
– A Ligação contemplada é um 3/8 gas (Fig.4.6).<br />
4.3 Conexão à rede elétrica<br />
O <strong>di</strong>stribuidor funciona com tensão monofase 230 Volt e é protegido com<br />
fusíveis de 12,5A e 20A. (10A e 20A o modelo monotanque e a versão solúvel,<br />
15A e 20A a versão solúvel frio).<br />
Aconselhamos verificar que:<br />
- a tensão de rede de 230 V não tenha um descarte maior do ± 6 %.<br />
– a linha de alimentação seja adequada à carga do <strong>di</strong>stribuidor automático<br />
– utilizar um sistema de proteção <strong>di</strong>ferenciado<br />
– posicionar o aparelho de forma que a tomada fique facilmente alcançável.<br />
Le <strong>di</strong>stributeur doit être relié impérativement à une prise avec terre.<br />
O aparelho deve ser conetado a uma tomada de terra segundo às normas<br />
vigentes.<br />
Verificar que a conexão do fio de terra da aparelhagem seja eficiente e conforme<br />
às normas nacionais e europeas de segurança elétrica.<br />
Se necessário pe<strong>di</strong>r a intervenção do pessoal profissionalmente qualificado<br />
para o controle da aparelhagem.<br />
– O <strong>di</strong>stribuidor é equipado de cabo de alimentação H05VV-F 3x1,5mm²,<br />
com tomada SCHUKO (Fig.4.7).<br />
– As tomadas não compativeis com a do aparelho devem ser substituidas<br />
(Fig.4.8).<br />
– E’ proibido o uso de prolomgamento, adaptadores e/ou tomadas multiplas.<br />
– Em alguns modelos estão montadas fichas específicas para o local de<br />
destinação.<br />
A Bianchi Ven<strong>di</strong>ng Group S.p.A. declina qualquer responsabilidade por<br />
inobservância parcial ou total das advertencias acima.<br />
Se o cabo de alimentação for estragado, desligar ime<strong>di</strong>atamente a alimentação<br />
eletrica.<br />
A substituição dos cabos de alimentação deve ser efetuada por<br />
pessoal especializado<br />
4.4 Por em função<br />
O <strong>di</strong>stribuidor está equipado de um interruptor de segurança (Fig.4.9)<br />
que tira tensão a todos os utilizadores, cada vez que a porta vem aberta<br />
(ver esquema elétrico).<br />
Em caso de necessidade, portanto, abrir a porta ou desconeter a tomada<br />
da aparelhagem.<br />
Ficam sob tensão, a morseta do cabo de alimentação (Fig.4.10pos.1)<br />
e a tomada de serviço no interno do <strong>di</strong>stribuidor automático<br />
(Fig.4.11-pos.2).<br />
– Para algumas operações é porem necessário operar com a porta aberta,<br />
mas <strong>di</strong>stribuidor ativo.<br />
E’ possível, para o pessoal tecnico instalador, operar assim, introduzindo<br />
a especial chavinha em plástica, em dotação ao <strong>di</strong>stribuidor automático,<br />
no interuptor porta, virando-a de 90° (Fig.4.12).<br />
A abertura e a eventual ativação com porta aberta do <strong>di</strong>stribuidor,<br />
devem ser efetuadas exclusivamente por pessoal autorizado e tecnicamente<br />
preparado.<br />
Não deixar sem guarda o <strong>di</strong>stribuidor aberto.<br />
Deixar a chavinha só a pessoal competente.<br />
A cada acionamento do <strong>di</strong>stribuidor segue-se um ciclo de <strong>di</strong>agnóstico para<br />
verificar o estado das periféricas do D.A. e efetua-se a reactivacção das<br />
partes em movimento.
4.5 Instalação<br />
4.5.1 Lavagem resinas descalcificador quando instalado como acessório.<br />
Antes de encher o circuito hidráulico do <strong>di</strong>stribuidor, aconselhamos efetuar a<br />
lavagem das resinas resinas do decalcificador operando assim:<br />
– por o tubo da torneira inferior num recipiente adequado<br />
– abrir a torneira (Fig.4.13)<br />
– introduzir a chavinha no interruptor porta (Fig.4.12)<br />
– deixar sair a água até que não saia límpida (Fig.4.14)<br />
– tirar a chavinha e fechar a torneira<br />
A BVM972 e BVM952 monta na fábrica o filtro com cartucho e não prevê<br />
a aplicação do proce<strong>di</strong>mento acima. Neste caso basta ligar o DA à rede e<br />
proceder com o carregamento do circuito hidráulico<br />
4.5.2 Enchimento circúito hidráulico<br />
PROCEDIMENTO DE INSTALAÇÃO<br />
O proce<strong>di</strong>mento de instalação é válido só nos <strong>di</strong>stribuidores com mono<br />
caldeira. Em particular a caldeira do espresso e a Caldeira com polisulfone<br />
com sondas de nível.<br />
MONO CALDEIRA ESPRESSO<br />
Na saída das linhas o <strong>di</strong>stribuidor será colocado em con<strong>di</strong>ção de PRIMEIRA<br />
INSTALAÇÃO. Uma vez instalado o operador ligará somente a água (seja no<br />
caso de ligação à rede que a reservatório autónomo) e a rede eléctrica.<br />
O <strong>di</strong>stribuidor puxará automáticamente a água para que o micro vácuo da<br />
água não seja N.C. ao menos por 15 segundos. Nesta con<strong>di</strong>ção o D.A. acende<br />
a bomba e, em con<strong>di</strong>ção de resistência OFF, <strong>di</strong>stribuirá 200 cc de água<br />
(me<strong>di</strong>dos através da ventuinha). Depois deste proce<strong>di</strong>mento é memorizada<br />
a data de instalação do <strong>di</strong>stribuidor. Confirmada a data, o D.A. espera 10<br />
segundos e logo após iniciará a aquecer a água na caldeira.<br />
CALDEIRA POLISULFONE com SONDAS DE NÍVEL<br />
Na saída das linhas BV o <strong>di</strong>stribuidor será colocado em de PRIMEIRA INSTA-<br />
LAÇÃO. Uma vez instalado o operador ligará somente a água (seja no caso<br />
de ligação à rede que a reservatório autónomo) e a rede eléctrica.<br />
O <strong>di</strong>stribuidor puxará automáticamente a água para que as sondas de nível<br />
máximo detectem a presença da água. Depois deste proce<strong>di</strong>mento é memorizada<br />
a data de instalação do <strong>di</strong>stribuidor. Confirmada a data, o D.A. espera<br />
10 segundos e logo após iniciará a aquecer a água na caldeira<br />
MONO CALDEIRA INIXIDÁVEL PARA SOLÚVEIS<br />
Na saída das linhas o <strong>di</strong>stribuidor será colocado em con<strong>di</strong>ção de PRIMEIRA<br />
INSTALAÇÃO. Uma vez instalado o operador ligará somente a água (seja no<br />
caso de ligação à rede que a reservatório autónomo) e a rede eléctrica.<br />
O <strong>di</strong>stribuidor, em con<strong>di</strong>ção de resistência OFF, puxará automáticamente a<br />
água e abrirá a electroválvula 2 para eliminar o ar presente na própria caldeira.<br />
Esta con<strong>di</strong>ção durará 200 segundos. Terminado este timeout o <strong>di</strong>stribuidor<br />
fechará a electroválvula 2 e a entrada da água por 20 seg. Depois deste<br />
tempo continuará o carga da água até que o micro vácua da água não seja<br />
N.C. por um tempo superior a 5 seg. (operação ligada a um segundo timeout<br />
de 200 segundos). Nesta con<strong>di</strong>ção o D.A. liga a electroválvula 2 <strong>di</strong>stribuindo<br />
água por 20s. Terminada a preparação, epera-se que o micro vácuo da água<br />
volte N.C.. Depois deste proce<strong>di</strong>mento é memorizada a data de instalação<br />
do <strong>di</strong>stribuidor. Confirmada a data serão decorridos 10 segundos ao final dos<br />
quais o D.A. iniciará a aquecer a água na caldeira.<br />
DUPLA CALDEIRA<br />
Na saída das linhas o <strong>di</strong>stribuidor será colocado em con<strong>di</strong>ção de PRIMEIRA<br />
INSTALAÇÃO. Uma vez instalado o operador ligará somente a água (seja no<br />
caso de ligação à rede que a reservatório autónomo) e a rede eléctrica.<br />
O <strong>di</strong>stribuidor, em con<strong>di</strong>ção de resistência OFF, puxará automáticamente<br />
a água e abrirá a electroválvula 2 para eliminar o ar presente na própria<br />
caldeira. Esta con<strong>di</strong>ção durará 200 segundos. Terminado este timeout o<br />
<strong>di</strong>stribuidor fechará a electroválvula 2 e a entrada da água por 20 seg. Depois<br />
deste tempo continuará o carga da água até que o micro vácua da água não<br />
seja N.C. por um tempo superior a 5 seg. (operação ligada a um segundo<br />
timeout de 200 segundos).<br />
Nesta con<strong>di</strong>ção o D.A. liga a electroválvula 2 <strong>di</strong>stribuindo água por 20s.<br />
Terminada a preparação, espera-se que o micro vácuo da água volte N.C..<br />
Esperados 10 segundos o D.A. acende a bomba e, em con<strong>di</strong>ções de resitência<br />
OFF, <strong>di</strong>stribuirá 200 cc de água através da ev do café (me<strong>di</strong>dos através da<br />
ventuinha). Depois deste proce<strong>di</strong>mento é memorizada a data de instalação<br />
do <strong>di</strong>stribuidor. Confirmada a data, o D.A. espera 10 segundos e logo após<br />
iniciará o aquecimento da água nas 2 caldeiras. Uma vez acabado o enchimento<br />
efetuar algumas lavagens do grupo mixer para encher todos os circuitos<br />
e eliminar eventuais residuos da caldeira (Fig.4.16).<br />
Antes de dar tensão, verificar a conexão do <strong>di</strong>stribuidor à rede hídrica e a<br />
abertura da torneira da água.<br />
4.5.3 Lavagem partes em contato com alimentos<br />
Com o <strong>di</strong>stribuidor ligado efetuar algumas lavagens dos misceladores premendo<br />
os botões segundo quanto in<strong>di</strong>cado nas funções de serviço para eliminar<br />
qualquer possível residuo de sujeira do tanque café ou tanque soluveis.<br />
– lavar bem as mãos<br />
– preparar uma solução <strong>di</strong>sinfetante antibaterica de base cloro (produtos<br />
que se acham nas farmácias) em relação às concentrações do produto<br />
mesmo<br />
– tirar todos os recipientes produzidos pelo <strong>di</strong>stribuidor (Fig.4.17)<br />
– tirar as tampas e as guias produtos (Fig.4.18). Por tudo na solução antecedentemente<br />
preparada<br />
– tirar todas as guias pó, funis água, camaras e pás de misturagem, tubos de silicone<br />
e por também todos estes particulares na solução preparada (Fig.4.19)<br />
47<br />
PORTUGUÊS<br />
– com um pano molhado na solução limpar também as bases dos misturadores<br />
(Fig.4.20)<br />
– as partes devem ser deixadas na solução pelo tempo in<strong>di</strong>cado na embalagem.<br />
– em seguida tirar todas as partes, enxaguá-las bem, secá-las perfeitamente<br />
e re-montá-las no <strong>di</strong>stribuidor .<br />
Para maior segurança depois da re-montagem, efetuar algumas lavagens<br />
automáticas para eliminar eventuais residuos.<br />
4.5.4 Instalação sistemas de pagamento<br />
O <strong>di</strong>stribuidor vem fornecido sem o sistema de pagamento:<br />
A instalação do sistema de pagamento vem efetuada pelo tecnico instalador.<br />
A Bianchi Ven<strong>di</strong>ng Group S.p.A. não considera-se corresponsável por eventuais<br />
danos à máquina mesma e/ou coisas e/ou pessoas devidos a uma não<br />
correta instalação.<br />
– abrir a porta de proteção fichas (Fig.4.21).<br />
– coneter o sistemas de pagamento (Fig.4.22) para as fichas à ficha Master<br />
Os seletores devem ser ligados <strong>di</strong>retamente sobre a ficha Master, os sistemas<br />
seriais executive com o cabo interface em dotação.<br />
Entrar na programação para a taragem.<br />
Consultar o capítulo “5.0 INSTRUÇÕES SOFTWARE” para verificar a seleção<br />
dos parametros, adequados ao sistema usado.<br />
Verificar as conexões do sistema de pagamento, consultando o esquema<br />
da trazido.<br />
– enganchar o <strong>di</strong>spositivo (Fig.4.23).<br />
4.6 Carga produtos (com a máquina desligada)<br />
4.6.1 Carga recipientes<br />
– Para efetuar a carga é necessário extrair cada recipiente.<br />
Particularmente para o café em grãos è necessário fechar a chapa de<br />
fecho antes de desfiar o recipiente (Fig.4.26).<br />
– levantar a tampa de cada recipiente e por o produto como in<strong>di</strong>cado na<br />
etiqueta (Fig.4.27)<br />
– verificar que não hajam grumulos, não comprimir o produto e não utilizar<br />
uma quantidade ecesiva, para o consumo previsto no tempo duas<br />
cargas.<br />
BVM952<br />
O <strong>di</strong>stribuidor modelo BVM952 é fornecido de um carter superior que pode<br />
ser aberto.<br />
Através desta abertura é é possível acessar os recipientes para efetuar as<br />
operações de carregamento do produto.<br />
Nas figuras 4.24 e 4.25 são in<strong>di</strong>cadas as operações corretas para a abertura<br />
e fechamento do carter.<br />
Atenção! Apertar a mola in<strong>di</strong>cada na figura 4.25 antes de fechar o<br />
carter.<br />
Controlar a capacidade de cada recipiente na seção CARATERISTICAS TEC-<br />
NICAS.<br />
4.6.2 Carga copinhos<br />
Utilizar só copinhos idoneos para a <strong>di</strong>stribuição automática, (verificar as suas<br />
características ,consultando o capítulo 1.0 “Características Técnicas”) prestar<br />
atenção a não comprimí-los durante a carga.<br />
Não tentar de virar manualmente a coluna.<br />
Primeira carga<br />
Em fase de instalação com <strong>di</strong>stribuidor copinhos completamente vazio,<br />
operar assim:<br />
– Controlar que a coluna copinhos não esteja alinhada com o furo de <strong>di</strong>stribuição.<br />
Em seguida cargar todas as colunas operando no sentido antehorario,<br />
viceversa (quando a coluna está posicionada em correspondencia<br />
do furo de <strong>di</strong>stribuição), fechar a porta e alimentar a máquina de forma<br />
que a coluna copinhos vire e desloque-se automaticamente numa posição<br />
não alinhada com o furo e seguir com a carga (Fig.4.28).<br />
– por a tampa da coluna copinhos e enganchar a suporte superior (Fig.<br />
4.29).<br />
Normal carga<br />
A normal carga das colunas copinhos deve ser efetuada com a máquina<br />
desligada, e efetua-se simplismente abrindo a porta anterior, levantando a<br />
tampa e introduzindo os copinhos que faltam.<br />
4.6.3 Carga culherzinhas<br />
Atenção! Utilizar só paletinas próprias para serem usadas em <strong>di</strong>stribuidores<br />
automáticos.<br />
- Tirar o peso de metal do incolonador (Fig. 4.30)<br />
- Introduzir as culherzinhas com a fita de embalagem na coluna e quando<br />
forem posicionadas sobre o fundo cortar e desfiar a fita (Fig. 4.31)<br />
- Prestar atenção que as culherzinhas não presentem babaduras, não<br />
estejem encurvadas e que estejem todas posicionadas horizontalmente<br />
- Uma vez acabada a carga re-introduzir o peso (Fig. 4.32).<br />
4.6.4 Introdução saco fundos<br />
– tirar o anel de suporte do saco do seu alojamento (Fig. 4.33)<br />
– introduzir o saco em plástico dobrando-o sobre o suporte<br />
Utilizar sacos bastante compridos que toquem a base do <strong>di</strong>stribuidor.<br />
Verificar se o recipiente de coleta de líquidos está na posição (Fig. 4.33) e<br />
realizar perio<strong>di</strong>camente o esvaziamento.
PORTUGUÊS<br />
4.8 MODALIDADES ANTES DA AUTO-INSTALAÇÃO<br />
Na primeira inicialização da máquina será efetuada uma auto-instalação.<br />
O objetivo deste proce<strong>di</strong>mento é evitar as ligações manuais de fios nas fichas,<br />
após o enchimento do circuito hidráulico.<br />
Para Mono caldeira Expresso:<br />
No acen<strong>di</strong>mento do <strong>di</strong>stribuidor a água enche o airbreack.<br />
Quando o flutuante estiver na posição alta, a máquina iniciará uma carga<br />
automática de água que continuará até que a ventoinha não terá contado a<br />
passagem de 200 colheres de água (será então <strong>di</strong>stribuída água através de<br />
um mixer durante todo o proce<strong>di</strong>mento).<br />
O proce<strong>di</strong>mento será executado com a resistência apagada.<br />
No final o <strong>di</strong>splay mostrará uma data.<br />
Para Dupla caldeira Expresso:<br />
No acen<strong>di</strong>mento do <strong>di</strong>stribuidor a água enche o airbreack.<br />
Quando o flutuante estiver na posição alta, a máquina iniciará o processo de<br />
instalação automática e consequente carregamento de ambas as caldeiras<br />
(será então <strong>di</strong>stribuída a água através de um mixer e pela EV 3 vias Café<br />
durante o proce<strong>di</strong>mento). O proce<strong>di</strong>mento será executado com a resistência<br />
apagada. No final o <strong>di</strong>splay mostrará uma data.<br />
Para Caldeira Solúvel:<br />
No acen<strong>di</strong>mento do <strong>di</strong>stribuidor a água enche o airbreack.<br />
Quando o flutuador estiver na posição alta por pelo menos 5 segundos<br />
consecutivos a máquina abrirá uma válvula solúvel e iniciará um ciclo de<br />
carga de água na caldeira (será então <strong>di</strong>stribuída água através de um mixer<br />
durante todo o proce<strong>di</strong>mento).<br />
O proce<strong>di</strong>mento será executado<br />
com a resistência apagada.<br />
No final o <strong>di</strong>splay mostrará uma<br />
data.<br />
Agora é necessário ajustar a data de instalação da máquina através do teclado,<br />
como in<strong>di</strong>cado a seguir:<br />
Para Versão Alfanumérica<br />
TECLA 1 AUMENTA VALOR<br />
TECLA 3 MOVE CURSOR<br />
TECLA 5 INSERE DATA<br />
TECLA 7 DIMINUI VALOR<br />
TECLA 9 MOVIE ENTRE Dia/Mês/<br />
Ano<br />
Pressionando a TECLA<br />
ENTER, a máquina irá<br />
aguardar 10 segundos,<br />
e então irá iniciar o<br />
aquecimento da caldeira.<br />
A data será memorizada<br />
em um local seguro da<br />
ficha.<br />
Para retomar a modalidade<br />
de antes da instalação,<br />
entrar na Programação<br />
com a Senha<br />
22933.<br />
AUMENTA<br />
VALOR<br />
DIMINUI<br />
VALOR<br />
MOVE<br />
CURSOR<br />
MOVIE<br />
ENTRE<br />
Dia/Mês/Ano<br />
5.0 INSTRUÇÕES SOFTWARE<br />
Para Versão Teclado<br />
INSERE<br />
DATA<br />
5.1 PASSWORD<br />
A lógica atual de programação prevê, ao acesso através do botão PROG,<br />
a inserção de uma password que permite acessar a um único menu de<br />
programação.<br />
Para poder facilitar a acelerar algumas das operações em campo, a gestão<br />
das password será decomposta como a seguir:<br />
PWD 1 - Menu de programação reduzido<br />
PWD 2 - Menu de programação completo<br />
PWD 3 - Menu Vendas;<br />
PWD 4 - Divi<strong>di</strong>da em 2 PWD Impostos: 88000 para testar todos os slaves<br />
BVM600;<br />
Teste (administrada somente pela Bianchi Ven<strong>di</strong>ng Group) para acessar ao<br />
teste executado na linha de montagem.<br />
48<br />
Nota: Se a password do menu reduzido coinci<strong>di</strong>r com a do menu completo<br />
será prioritária a do menu completo<br />
5.2 MENU EM MÁQUINA<br />
A PWD 1 permite acessar ao menu completo do <strong>di</strong>stribuidor automático. O<br />
proce<strong>di</strong>mento de acesso ao menu prevê: pressionar o botão PROG na ficha<br />
máster, inserir a password e pressionar a tecla ENTER. A seguir são listados<br />
o menu de programação do D.A.<br />
5.2.1 MENU SOFTWARE EM MÁQUINA<br />
Teclado seleção <strong>di</strong>reta<br />
Na programação as teclas assumem os seguintes significados:<br />
1: Incrementa<br />
2: Visualiza nome<br />
3: Desloca cursor<br />
4: Prova pó<br />
5: Volta ao menu anterior (esc)<br />
6: Prova Somente Água<br />
7: Decrementa<br />
8: Prova completa (Menù doses)<br />
Prova EV ou Sol (Menù doses bebida)<br />
9: Enter<br />
0: Prova completa (Menù doses bebida)<br />
5.4 MANUTEÇÃO<br />
Entra-se em manutanção premendo a tecla ‘Service’.<br />
O visualizador visualiza na linha 1 ‘Manutenção xx’ , onde xxx visualiza a<br />
temperatura da caldeira, e na linha 2 os eventuais alarmes detectados.<br />
Premindo duas a tecla Service, será evitada a fase de espera do aquecimento,<br />
vos permitindo efectutar selecções de prova também com a temperatura<br />
não regular.<br />
Premindo uma tecla visualiza-se a temperatura das caldeiras slave em<br />
scroll.<br />
O painel manutenção prevê as seguintes funções:<br />
Na manutenção as teclas assumem os seguintes significados:<br />
Tecla 1: Corre alarmes, (se pressionado por 5 segundos<br />
visualizam-se os últimos 15 alarmes no <strong>di</strong>splay)<br />
Tecla 5: Reset alarmes<br />
Có<strong>di</strong>go 01: Rotação do Grupo<br />
Có<strong>di</strong>go 02: Carga tubos MDB<br />
Có<strong>di</strong>go 03: Descarrega tubos MDB<br />
Có<strong>di</strong>go 04: Teste entradas e esvazia tubos para MDB<br />
Có<strong>di</strong>go 05: Reset alarmes (ou somente 5)<br />
Có<strong>di</strong>go 06: Prova completa<br />
Có<strong>di</strong>go 07: Prova só Água<br />
Có<strong>di</strong>go 08: Movimiento del brazo<br />
Có<strong>di</strong>go 09: Gira coluna copos<br />
Có<strong>di</strong>go 12: Visualiza ventas totales<br />
Có<strong>di</strong>go 13: Desenganche copo<br />
Có<strong>di</strong>go 14: Prova mixer<br />
Có<strong>di</strong>go 15: Recarga Decontadores<br />
Có<strong>di</strong>go 16: Prova Amargo<br />
Có<strong>di</strong>go 17: Paletinas<br />
Có<strong>di</strong>go 18: Prova dosador do moedor<br />
Có<strong>di</strong>go 0A: Visualização Temperatura das últimas 48 horas Vega A<br />
Có<strong>di</strong>go 0B: Visualização Temperatura das últimas 48 horas Vega B<br />
Tecla+ açucar: Reset alarmes<br />
Tecla+ açucar: Corre alarmes, (se pressionado por 5 segundos<br />
visualizam-se os últimos 15 alarmes no <strong>di</strong>splay)<br />
Em manutenção será necessário <strong>di</strong>gitar em sequência, no teclado alfanumérico,<br />
os números in<strong>di</strong>cados para obter a função desejada.
6.0 MANUTENÇÃO E INATIVIDADE<br />
6.1 Limpeza e carga<br />
Para garantir um bom funcionamento do <strong>di</strong>stribuidor no tempo, é<br />
necessário efetuar com perio<strong>di</strong>cidade algumas operações, algumas<br />
in<strong>di</strong>spensaveis para respeitar as normas sanitarias existentes. Estas<br />
operações devem ser executadas com o <strong>di</strong>stribuidor aberto e desligado;<br />
as operações de limpeza devem ser efetuadas antes da carga<br />
dos produtos.<br />
Para garantir um normal funcionamento, o aparelho deve ser instalado em<br />
lugares com temperatura ambiente entre mínimo + 1° C e máximo + 32° C e<br />
a humidade não esteja além do 70%. Não pode ser instalado em lugares onde<br />
vem utilizados jatos de água para a limpeza (ex. grandes cozinhas ....).<br />
Não utilizar jatos de água para a limpeza da máquina.<br />
6.1.1 Manutenção aconselhada<br />
A Bianchi Ven<strong>di</strong>ng Group garante o bom funcionamento no<br />
tempo do próprio <strong>di</strong>stribuidor, só <strong>di</strong>ante de uma manutenção<br />
preventiva, executada respeitando as modalidades trazidas na<br />
tabela abaixo:<br />
TIPO DE INTERVENÇÃO<br />
Regeneração do depurador (*<br />
Resinas)<br />
Substituição do pistão com os<br />
filtros e guarnição<br />
Substituição do grupo completo<br />
do café<br />
Descalcificação da caldeira do expresso<br />
e válvulas elétricas<br />
6.1.2 Limpeza perió<strong>di</strong>ca efetuada pelo operador da manutenção<br />
Primeira operação. Eliminação dos restos presentes nos recipientes do lixo<br />
(copinhos sujos, culherzinhas, papel, lenços, etc.). Depois da eliminação<br />
dos restos pode iniciar a limpeza.<br />
- eliminação da sujeira mais grossa<br />
- sanificação do chão e das paredes do ambiente por um raio de 1 metro<br />
na volta do <strong>di</strong>stribuidor automático<br />
- uma vez acabada a limpeza abrir o <strong>di</strong>stribuidor<br />
6.1.3 Limpeza <strong>di</strong>ária aconselhada<br />
Deve ser efetuada para impe<strong>di</strong>r a formação de bactérias nas partes em<br />
contato com alimentos.<br />
Para todas as operações de limpeza seguir as <strong>di</strong>cas do parágrafo<br />
6.3.1<br />
Operar assim:<br />
– limpar todas as partes à vista da zona de <strong>di</strong>stribuição (Fig.6.1 e<br />
Fig.6.2)<br />
Tirar e lavar bem:<br />
– canais e tubos de escorregamento pós (Fig.6.3-pos.1)<br />
– canal água (2), camara miscelação (3), ventainha de misturagem (4) e<br />
anel (5).<br />
- tubos de <strong>di</strong>stribuição de silicone<br />
- zona <strong>di</strong>stribuição (Fig.6.4)<br />
- tubo de escorregamento e conduto café (Fig.6.5)<br />
Antes de efetuar as operações de remontagem secar bem todas as partes<br />
- limpar os residuos de pó de café do grupo, è possível extrair o grupo café<br />
para facilitar o trabalho (Fig. 6.6)<br />
6.1.4 Carga produtos<br />
N° DE BATIDAS<br />
5.000 10.000 20.000 30/40.000 70/80.000<br />
Substituição do moedor �<br />
Descalcificação da caldeira do<br />
solúvel e válvulas elétricas<br />
�<br />
*: se não há in<strong>di</strong>cações contrárias por parte do fornecedor do depurador.<br />
Quando for necessário cargar os produtos e/ou materiais de consumo do<br />
<strong>di</strong>stribuidor automático.<br />
Para estas operações referir-se às operações de primeira instalação<br />
capítulo 4.6.<br />
6.2 Manutenção or<strong>di</strong>nária e extraor<strong>di</strong>nária<br />
As operações aquí descritas sao somente in<strong>di</strong>cativas porque vinculadas à<br />
variaveis <strong>di</strong>ferentes como: dureza da água, humidade, produtos usados,<br />
con<strong>di</strong>ções e quantidade de trabalhol, etc.<br />
Para todas as operações que necessitam da desmontagem dos<br />
componentes do <strong>di</strong>stribuidor, verificar que o mesmo esteja<br />
desligado.<br />
Deixar as operações em seguida descritas a pessoal competente.<br />
Se as operações necessitam do <strong>di</strong>stribuidor ligado deixá-las a pessoal treinado.<br />
�<br />
�<br />
�<br />
�<br />
49<br />
PORTUGUÊS<br />
Para operações mais complexas, como por exemplo desencrostar as caldeiras,<br />
é necessário um bom conhecimento da aparelhagem.<br />
Mensilmente desinfectar todas as partes em contato com alimentos utilizando<br />
produtos em base de cloro seguindo quanto já descrito na seção 4.5.3.<br />
PROCESSO DE CONTROLE DA FASATURA DO GRUPO CAFè<br />
Verificar que, na fase de descanço, o in<strong>di</strong>ce rotante esteja alinhado com o<br />
ín<strong>di</strong>ce de fase (ver Fig. 6.7).<br />
Verificar que na fase de <strong>di</strong>stribuição o in<strong>di</strong>ce rotante esteja a<strong>di</strong>antado de<br />
não mais de 1,5 mm do ponto de referencia de <strong>di</strong>stribuição (o in<strong>di</strong>ce rotante<br />
deve estar em posição de <strong>di</strong>stribuição entre 0 e 1,5 mm do ponto de<br />
<strong>di</strong>stribuição).<br />
6.3 PROCEDIMENTO DE MANUTENÇÃO<br />
Equipamento ideal:<br />
Para o pessoal responsável da carga e da manutenção o equipamento ideal<br />
deveria ser:<br />
- Mala porta apetrechos<br />
- Uniforme limpa<br />
- Luvas usa e joga fora<br />
- Grampo para fechar os canu<strong>di</strong>nhos<br />
- Papel alimentar<br />
- Pauzinho de madeira ou plástica<br />
- Detergente<br />
- Disinfetante<br />
- Aviso “Distribuidor fora serviço”<br />
- Mesinha de apoio (facultativa)<br />
Nunca utilizar:<br />
- Esponjas, panos de tecido<br />
- Pinceis<br />
- Chaves de parafusos ou objetos metálicos<br />
6.3.1 Sanitização<br />
ALGUMAS ADVERTÊNCIAS IMPORTANTES<br />
Operadores e técnicos do ven<strong>di</strong>ng que normalmente entram em contato com<br />
os produtos alimentares devem prestar particular atenção na higiene pessoal<br />
e das próprias roupas.<br />
Em particular antes de iniciar cada operação no <strong>di</strong>stribuidor, certificar-se de:<br />
- Calçar sapatos para prevenção de acidentes ou ao menos próprios para<br />
o uso.<br />
- Lavar bem as mãos<br />
- Manter as unhas curtas, limpas e sem tinta<br />
- Manter o cabelo curto e limpo<br />
- Evitar de arranhar-se durante as operações de manutenção<br />
- Não fumar e não comer durante o trabalho<br />
- Evitar de tocar cabelo, boca, nariz durante o trabalho<br />
- Evitar de usar anéis, pulseiras, relógios<br />
- Cobrir eventuais feridas<br />
- Evitar usar perfumes pessoais fortes<br />
A maior contaminação dos alimentos passa através das mãos, recordamos<br />
portanto de lavar as mãos cada vez:<br />
- Que se inicia a trabalhar no <strong>di</strong>stribuidor<br />
- Depois de ter usado a toilette<br />
- Depois de ter tocado o cabelo, assoado o nariz, comido<br />
- depois de ter manejado produtos químicos de limpeza<br />
- depois ter apertado as mãos de outras pessoas<br />
Se são usadas luvas de proteção, é necessário ter a prudência de trocá-las<br />
cada vez que entram em contato com produtos poluentes.<br />
Para a higiene:<br />
- Utilizar <strong>di</strong>sinfetantes<br />
Os <strong>di</strong>sinfetantes <strong>di</strong>struem os microrganismos presentes sobre as superficies.<br />
Para a limpeza:<br />
- Utilizar detergentes e/ou detersivos<br />
Os detergentes eliminam a sujeira grossa.<br />
Existem no comércio produtos que são contemporaneamente detergentes/<br />
<strong>di</strong>sinfetantes, encontram-se geralmente nas farmácias (a base de cloro).<br />
Por quanto não mencionado neste capítulo, tomar como referência o normativo<br />
HACCP e em particular prestar atenção a:<br />
- Limpeza dos ambientes<br />
- Transporte produtos<br />
- Manutenção máquinarias<br />
- Eliminação restos<br />
- Abastecimento água sanitária<br />
- Higiene pessoal<br />
- Caraterísticas produtos alimentares<br />
- Diretriz 93/43/CEE<br />
Algumas advertências importantes (ref. Diretriz 93/43)<br />
- Os locais onde serão instalados os <strong>di</strong>stribuidores automáticos devem<br />
ser aqueles que possam impe<strong>di</strong>r o acúmulo de sujeira , o contato com<br />
materiais tóxicos e a formação de condensa ou mofo sobre as superfícies<br />
da própria máquina.
PORTUGUÊS<br />
- É também importante que o local onde é instalado o <strong>di</strong>stribuidor possa<br />
garantir uma prática higiênica correta, impe<strong>di</strong>ndo também a contaminação<br />
cruzada, durante as operações, entre os produtos alimentares,<br />
ferramentas, materiais, água, troca de ar ou intervenções do pessoal e<br />
excluir agentes externos de contaminação, tais como insetos ou outros<br />
animais nocivos.<br />
- Verificar se a ligação hidráulica é adequada e conforme a <strong>di</strong>retriz CEE<br />
80/778, no que <strong>di</strong>z respeito à qualidade das águas destinadas ao consumo<br />
humano.<br />
- Garantir uma correta ventilação mecânica ou natural, evitando o fluxo<br />
mecânico do ar de uma zona contaminada para uma zona limpa.<br />
As operações de limpeza podem ser efetuadas no lugar onde foi instalado o<br />
<strong>di</strong>stribuidor automático<br />
Exemplo do processo de limpeza ideal de um <strong>di</strong>stribuidor automático<br />
de bebidas quentes:<br />
O operador responsável pela higíene da instalação, antes de abrir o <strong>di</strong>stribuidor,<br />
deve controlar o estado de limpeza do ambiente e pôr um aviso, para<br />
in<strong>di</strong>car aos consumidores que:<br />
- “o aparelho está fora serviço por manutenção”<br />
- é importante que, durante as operações de limpeza e sanificação, o operador<br />
nunca deixe seu trabalho para fazer funcionar o <strong>di</strong>stribuidor.<br />
Por quanto não mencionado neste capítulo, tomar como referência o normativo<br />
HACCP e em particular prestar atenção a:<br />
- Para a limpeza interna usar panos limpos, melhor ainda se panos descartáveis<br />
- É in<strong>di</strong>spensável precaução para nunca fazer entrar em contato os produtos<br />
usados para a limpeza geral do <strong>di</strong>stribuidor com aqueles usados para a<br />
limpeza das partes em contato com os alimentos.<br />
- Prestar atenção durante as operações de limpeza para não transferir<br />
germes das partes sujas para outras já limpas<br />
A) Usar luvas limpas<br />
B) Usar água quente não proveniente de banheiros<br />
C) Prestar maior atenção na limpeza das partes em contato com as substâncias<br />
alimentares<br />
- Remuover muito bem todos os resíduos de sujeira antes de proceder ao<br />
uso de desinfetantes<br />
- Evitar com cuidado todo contato dos alimentos com superfícies sujas.<br />
- Durante as operações de limpeza seguir expressamente as in<strong>di</strong>cações<br />
trazidas nas confecções dos detergentes químicos. Evitar absolutamente<br />
que as confecções dos alimentos entrem em contato com os detergentes.<br />
- Verificar se o seu equipamento de limpeza está em perfeitas con<strong>di</strong>ções<br />
de eficiência.<br />
D) Terminadas as operações de limpeza, depositar os sacos de lixo em áreas<br />
apropriadas, longe daquelas onde estarão os <strong>di</strong>stribuidores automáticos.<br />
Resumimos na tabela a seguir o comportamento que sugerimos, com a<br />
finalidade de reduzir ao mínimo o risco de proliferação e contaminação por<br />
bactérias no interior do <strong>di</strong>stribuidor<br />
TIPO DE INTERVENÇÃO<br />
CADA<br />
DIA<br />
TEMPO / n° BATIDAS<br />
CADA<br />
SEMANA<br />
20000<br />
BATIDAS<br />
OU MAX<br />
CADA MÊS<br />
Retirar e lavar todas as partes em vista<br />
na zona de <strong>di</strong>stribuição com produto �<br />
de limpeza<br />
Esvaziar os baldes com restos de<br />
líquidos e limpá-los com produto de �<br />
limpeza<br />
Esvaziar o recipiente dos fundos de<br />
café e lavá-lo com produto de lim- �<br />
peza<br />
Tirar todos os recipientes e limpar<br />
com um pano úmido todas as partes<br />
de apoio dos recipientes, além do que<br />
o fundo do <strong>di</strong>stribuidor e o externo do<br />
�<br />
<strong>di</strong>stribuidor, em particular a zona de<br />
<strong>di</strong>stribuição, proceder depois com a<br />
sanitização<br />
* Kits de sanitização compostos por<br />
partes plásticas destinadas à passagem<br />
do produto em pó ou líquido(ventosas,<br />
�<br />
tubos, bordo de <strong>di</strong>stribuição, condutores,…)<br />
Para maiores informações, contate<br />
<strong>di</strong>retamente a Bianchi.<br />
*A Bianchi pre<strong>di</strong>spôs kits especificamente estudados para cada modelo<br />
de <strong>di</strong>stribuidor<br />
50<br />
6.4 Regulagens<br />
6.4.1 Regolagem dose e moagem<br />
O <strong>di</strong>stribuidor vem entregado tarado sobre valores estandard quer <strong>di</strong>zer:<br />
– Temperatura café no copo entre 70°C e 80 °C.<br />
– Temperatura produtos solúveis nos compartimentos entre 70°C e 80<br />
°C.<br />
– Me<strong>di</strong>das das gramas do pó de café entre 6 e 8 gramas.<br />
- gramatura pós soluveis segundo quanto in<strong>di</strong>cado nas tabelas.<br />
Para obter os melhores resultados com o produto utilizado aconselhamos<br />
controlar:<br />
- Gramatura do café moido. Variar a quantidade acionando a manopola<br />
sobre o dosador (Fig.6.8).<br />
A cada <strong>di</strong>sparo da manopola de regulagem corresponde um valor de 0,05<br />
gramas.<br />
Virando no sentido horário a dose <strong>di</strong>minue.<br />
Virando no sentido anti-horário a dose aumenta.<br />
A variação de produto é controlável por meio das marcas de referência<br />
que estão sobre o dosador (ver figura 6.8).<br />
A pastilha de café, normalmente, deve apresentar-se compacta e um<br />
pouco úmida.<br />
- Regulagem do grau de moagem manual. Virar o parafuso (Fig.6.9)<br />
para obter os resultados desejados.<br />
Virando no sentido horário obtem-se uma moedura fina, virando no sentido<br />
anti-horário obtem-se uma moedura grossa.<br />
Depois da regulagem devem ser efetuadas 3 regulagens de produto para<br />
controlar a qualidade da regulagem, quanto mais a granulometria é fina,<br />
quanto maior será o tempo necessário para a <strong>di</strong>stribuição do produto.<br />
- Regulagem automática da moagem (Fig.6.10)<br />
- Permite nas versões espresso manter constante a moagem, independente<br />
da taxa de humidade, da temperatura e do desgaste do moinho.<br />
- A primiera regulagem deve ser efectuada com o <strong>di</strong>spositivo desconectado<br />
- Executar a manualmente a regulagem da dose (6-7g)<br />
- Executar manualmente a regulagem da moagem<br />
- Calcular o tempo de preparação em segundos (std 18s)<br />
- Conectar novamente o <strong>di</strong>spositivo<br />
- Programar o tempo de preparação me<strong>di</strong>do, na programação<br />
- Cada 5 cafés espressos, será executa un controlo automático de tal<br />
parâmetro. As leituras válidas correspondem com o terceiro/quarto café.<br />
As primeiras duas serão ignoradas porque são resultados das regulagens<br />
anteriores, a quinta será de regulagem.<br />
6.4.2 Regulagem capacidade água eletroválvulas soluveis<br />
Para os produtos solúveis é possível regular a quantidade de água e a dose<br />
da pó eletronicamente variando os parametros estandard, este processo vem<br />
ilustrado no capítulo 5.0 INSTRUÇÕES SOFTWARE.<br />
ATENÇÃO: Retirar a condução da água utilizando os parafusos de regulagem<br />
das válvulas dos solúveis, significa comprometer e variar as quantidades de<br />
água <strong>di</strong>srtribuídas na chávena e então a dose da mesma.<br />
Para acessar à válvula, posicionada na caldeira solúveis, é necessário retirar<br />
o painel (1) afrouxando os dois parafusos (2) in<strong>di</strong>cados na figura 6.12<br />
– Para obter um bom enxague dos vasos de vidro utilizar eventualmente os<br />
pararafusos de condução controllando depois a aceitabilidade das doses<br />
(Fig.6.11).<br />
6.4.3 Acesso às partes internas<br />
Para acessar às partes internas do <strong>di</strong>stribuidor automático (bombas, caldeira<br />
de café expresso, eletroválvulas, conexões elétricas, etc.):<br />
Versão Expresso:<br />
- Rodar para o externo o grupo de <strong>di</strong>stribuição de açúcar (fig.6.13).<br />
- Agir então nas duas manivelas in<strong>di</strong>cadas na fig. 6.14 - 6.16, extrair o<br />
painel e sustentá-lo até a retirada completa (fig.6.15 - 6.17).<br />
Depois de ter efetuado as eventuais operações de manutenção, levantar o<br />
painel completo até a correta posição vertical e recolocar então o grupo de<br />
<strong>di</strong>stribuição de açúcar na posição de trabalho girando-o para a <strong>di</strong>reita.<br />
Versão Solúvel:<br />
- Desmontar os grupos mixer e afrouxar os três parafusos in<strong>di</strong>cados na<br />
figura 6.18 - 6.19, deslizar o painel frontal até o desengancho das bordas,<br />
e retirar o painel para acessar o interior.<br />
6.5 Inatividade<br />
Para uma prolongada inatividade do <strong>di</strong>stribuidor é necessário efetuar algumas<br />
operações preventivas:<br />
– desconeter eletricamente e hidraulicamente o <strong>di</strong>stribuidor<br />
– esvaziar completamente a caldeira soluveis e o tanque flutuantes, tirando<br />
a tampa situada sobre o tubo ao longo do conduto descarga. Remontar<br />
a tampa depois do esvaziamento. (Fig.6.20).<br />
– descargar todos os produtos dos recipientes<br />
– lavar todas as partes em contato com alimentos conforme quanto já<br />
descrito<br />
– esvaziar o recipiente fundos e limpá-lo muito bem<br />
– eliminar o saco fundos<br />
– limpar com um pano todas as superficies internas e externas do <strong>di</strong>stribuidor<br />
automático<br />
– proteger o externo com um filme ou saco de celofane (Fig.6.21)<br />
– armazenar em lugares secos e com temperaturas não inferiores a 1°C
51<br />
9<br />
5<br />
8<br />
6<br />
4<br />
10<br />
2<br />
7<br />
11<br />
13<br />
12<br />
14<br />
1 1.1<br />
1.2<br />
BVM972 Solubile<br />
BVM972 Espresso<br />
3<br />
9<br />
5<br />
8<br />
6<br />
4<br />
10<br />
2<br />
7 1<br />
3<br />
13<br />
12<br />
11<br />
14<br />
7<br />
5<br />
8<br />
6<br />
4<br />
11<br />
9<br />
10<br />
2<br />
13<br />
12<br />
14<br />
15<br />
1.3<br />
BVM952 Solubile<br />
BVM952 Espresso<br />
7<br />
5<br />
8<br />
6<br />
4<br />
11<br />
3<br />
9<br />
10<br />
1<br />
3<br />
2<br />
13<br />
12<br />
14<br />
15
2.1<br />
190 kg<br />
2.2<br />
2.3 2.4 2.5 2.6<br />
2.7 2.8 2.9<br />
3.1 3.2 3.3 3.4<br />
52<br />
2.10<br />
2.11
3.5 3.6 3.7 3.8<br />
4.1 4.2 4.3 4.4<br />
4.5 4.6 4.8<br />
4.10 4.13 4.14 4.15 4.16<br />
4.11 4.12 4.17 4.18<br />
53<br />
4.7<br />
4.9
4.19 4.20 4.21 4.22<br />
4.23<br />
4.24 4.25<br />
4.26 4.27 4.28 4.29<br />
4.30 4.31 4.32 4.33<br />
6.1 6.2 6.3 6.4<br />
54
6.5 6.6 6.7<br />
Mod. 972 Espresso Mod. 972 Espresso<br />
6.14 6.15<br />
Mod. 952 Espresso<br />
6.17<br />
6.20<br />
6.21<br />
6.8 6.9 6.10<br />
6.11 6.12 6.13<br />
Mod. 972 Instant<br />
6.18<br />
55<br />
Mod. 952 Espresso<br />
6.16<br />
Mod. 952 Instant<br />
6.19<br />
STAGE INDEX<br />
DELIVERY<br />
INDEX
4.7 LAYOUT DISTRIBUTORE AUTOMATICO - AUTOMATIC DISTRIBUTOR LAYOUT - LAYOUT DISTRIBUIDOR AUTOMÁTICO<br />
- PLAN DU DISTRIBUTEUR AUTOMATIQUE - LAYOUT VERKAUFSAUTOMAT - LAYOUT DISTRIBUIDOR AUTOMÁTICO<br />
LAYOUT BVM972 ESPRESSO Mono caldaia - LAYOUT BVM972 ESPRESSO Doppia caldaia - LAYOUT BVM972 SOLUBILE -<br />
LAYOUT BVM972 Doppia caldaia 5 scatole - LAYOUT BVM972 Doppio macinino<br />
LAYOUT BVM952 ESPRESSO Mono caldaia - LAYOUT BVM952 SOLUBILE - LAYOUT BVM952 Doppio macinino<br />
Il menu DOSI permette <strong>di</strong> creare su ogni tasto <strong>di</strong> selezione la sequenza preferita <strong>di</strong> erogazione.<br />
Si potrà quin<strong>di</strong> combinare ogni selezione, creando una sequenza <strong>di</strong> massimo 3 elettrovalvole; ogni elettrovalvola potrà essere abbinata a 2 prodotti. Questi<br />
abbinamenti sono stati effettuati in fabbrica, quin<strong>di</strong> , per un corretto utilizzo del <strong>di</strong>stributore suggeriamo <strong>di</strong> attenervi strettamente alle seguenti In<strong>di</strong>cazioni:<br />
LAYOUT BVM972 ESPRESSO Single boiler - LAYOUT BVM972 ESPRESSO double boiler - LAYOUT BVM972 Instant -<br />
LAYOUT BVM972 double boiler 5 Canisters - LAYOUT BVM972 Double grinder<br />
LAYOUT BVM952 ESPRESSO Single boiler - LAYOUT BVM952 SOLUBILE - LAYOUT BVM952 Double grinder<br />
With the new dose menu we have the possibility to create selections with the required sequences. Therefore any selection can be combined, creating a maximum<br />
sequence of 3 electrovalves; each electrovalve can be coupled to 2 products at most. These couplings are factory made, therefore, for a correct use of the<br />
<strong>di</strong>stributor we should keep strictly to the following in<strong>di</strong>cations.<br />
LAYOUT BVM972 ESPRESSO Monocaldera - LAYOUT BVM972 ESPRESSO doble caldera - LAYOUT BVM972 SOLUBLE -<br />
LAYOUT BVM972 doble caldera 5 Cajas - LAYOUT BVM972 Doble Molino<br />
LAYOUT BVM952 ESPRESSO Monocaldera - LAYOUT BVM952 SOLUBILE - LAYOUT BVM952 Doble Molino<br />
Gracias al nuevo menú Dosis tenemos la posibilidad de crear selecciones con las secuencias preferidas. Por consiguiente, será posible combinar cada selección,<br />
creando una secuencia de máximo 3 electroválvulas, cada electroválvula podrá combinarse con un máximo de 2 productos. Dichas combinaciones se<br />
han hecho en fábrica, por lo tanto, para el correcto uso del <strong>di</strong>stribuidor tendremos que cumplir cuidadosamente con las siguientes in<strong>di</strong>caciones:<br />
LAYOUT BVM972 ESPRESSO Mono chau<strong>di</strong>ère - LAYOUT BVM972 ESPRESSO Double chau<strong>di</strong>ère - LAYOUT BVM972 SOLUBLE -<br />
LAYOUT BVM972 Double Chau<strong>di</strong>ère 5 Boîte - LAYOUT BVM972 Double moulin<br />
LAYOUT BVM952 ESPRESSO Mono chau<strong>di</strong>ère - LAYOUT BVM952 SOLUBILE - LAYOUT BVM952 Double moulin<br />
Avec le nouveau menu Doses on a la possibilité de créer des sélections avec les séquences préférées. On pourra donc combiner chaque sélection, créant<br />
une sequence de 3 électrovannes maxi; chaque électrovanne pourra être couplée à 3 produits maxi. Ces combinaisons ont été effectuées en usine et par<br />
conséquent pour une utilisation correcte du <strong>di</strong>stributeur il faudra suivre scrupuleusement les in<strong>di</strong>cations suivantes:<br />
LAYOUT BVM972 ESPRESSO Einzelkessel - LAYOUT BVM972 ESPRESSO Doppelkessel - LAYOUT BVM972 Instantprodukt -<br />
LAYOUT BVM972 Doppelkessel 5 Schachtel - LAYOUT BVM972 Doppelmühle<br />
LAYOUT BVM952 ESPRESSO Einzelkessel - LAYOUT BVM952 SOLUBILE - LAYOUT BVM952 Doppelmühle<br />
Das Menü DOSIERUNG ermöglicht <strong>di</strong>e Einstellung der gewünschten Sequenz für jede Anwahltaste.<br />
Jede Anwahl kann mit einer Sequenz von maximal 3 Elektroventilen kombiniert werden. Jedes Elektroventil kann mit einer Sequenz von maximal 3 Produkten<br />
kombiniert werden.<br />
Folgende Sequenz ist werksseitig gewählt worden, um <strong>di</strong>e korrekte Funktionsfähigkeit der Maschine zu gewährleisten bitten wir Sie sich an <strong>di</strong>eser zu<br />
orientieren.:<br />
LAYOUT BVM972 ESPRESSO Mono caldeira - LAYOUT BVM972 ESPRESSO Dupla caldeira - LAYOUT BVM972 Solúvel -<br />
LAYOUT BVM972 Dupla caldeira 5 caixas - LAYOUT BVM972 Duplo Moedor<br />
LAYOUT BVM952 ESPRESSO Mono caldeira - LAYOUT BVM952 SOLUBILE - LAYOUT BVM952 Duplo Moedor<br />
Com o novo menu das Doses temos a possibilidade de criar selecções comas sequências preferidas.<br />
Será possível combinar cada selecção, criando uma sequência de um máximo de 3 electroválvulas; cada electroválvula poderá ser associado a um máximo<br />
3 produtoso.<br />
Estas combinações foram feitas na fábrica, então para um uso correcto do <strong>di</strong>stribuidor devemos seguir atentamente as seguintes in<strong>di</strong>caçõe:<br />
EV1 Caffè - Coffee - Café<br />
- Cafe - Kaffee - Café<br />
PRIMO<br />
SOLUBILE<br />
LAYOUT BVM972 ESPRESSO Mono caldaia<br />
Single boiler - Monocaldera - Mono chau<strong>di</strong>ère - Einzelkessel - Mono caldeira<br />
SECONDO<br />
SOLUBILE<br />
FIRST<br />
SOUP<br />
SECOND<br />
SOUP<br />
PRIMERO<br />
SOLUBILE<br />
SEGUNDO<br />
SOLUBILE<br />
56<br />
PREMIER<br />
SOLUBLE<br />
DEUXIÈME<br />
SOLUBLE<br />
ERSTE<br />
INSTANT<br />
ZWEITE<br />
INSTANT<br />
PRIMEIRO<br />
SOLÚVEL<br />
0 0 0 0 0 0 0 0 0 0 0 0<br />
EV2 Orzo 0 Barley 0 Cebada 0 Orge 0 Getreidekaffee 0 Cevada 0<br />
EV3 Decaffeinato 0 Deka 0 Descafeinado 0 Decafeine 0 Koffeinfrei 0 Descafeinado 0<br />
EV4 Cioccolata Latte Chocolate Milk Chocolate Leche Choc Lait Schokolade Milch Chocolate Leite<br />
EV5 The 0 Tea 0 Té 0 The 0 Tee 0 Chá 0<br />
EV6 Acqua - Water - Agua<br />
- Eau -Wasser - Água<br />
0 0 0 0 0 0 0 0 0 0 0 0<br />
EV1 Caffè - Coffee - Café<br />
- Cafe - Kaffee - Café<br />
PRIMO<br />
SOLUBILE<br />
LAYOUT BVM972 ESPRESSO Doppia caldaia<br />
Double boiler - Doble caldera - Double chau<strong>di</strong>ère - Doppelkessel - Dupla caldeira<br />
SECONDO<br />
SOLUBILE<br />
FIRST<br />
SOUP<br />
SECOND<br />
SOUP<br />
PRIMERO<br />
SOLUBILE<br />
SEGUNDO<br />
SOLUBILE<br />
PREMIER<br />
SOLUBLE<br />
DEUXIÈME<br />
SOLUBLE<br />
ERSTE<br />
INSTANT<br />
ZWEITE<br />
INSTANT<br />
PRIMEIRO<br />
SOLÚVEL<br />
0 0 0 0 0 0 0 0 0 0 0 0<br />
EV2 Orzo 0 Barley 0 Cebada 0 Orge 0 Getreidekaffee 0 Cevada 0<br />
EV3 Decaffeinato 0 Deka 0 Descafeinado 0 Decafeine 0 Koffeinfrei 0 Descafeinado 0<br />
EV4 The 0 Tea 0 Té 0 The 0 Tee 0 Chá 0<br />
EV5 Cioccolata Latte Chocolate Milk Chocolate Leche Choc Lait Schokolade Milch Chocolate Leite<br />
EV6 Acqua - Water - Agua<br />
- Eau -Wasser - Água<br />
0 0 0 0 0 0 0 0 0 0 0 0<br />
SEGUNDO<br />
SOLÚVEL<br />
SEGUNDO<br />
SOLÚVEL
PRIMO<br />
SOLUBILE<br />
SECONDO<br />
SOLUBILE<br />
FIRST<br />
SOUP<br />
SECOND<br />
SOUP<br />
PRIMERO<br />
SOLUBILE<br />
LAYOUT BVM972 Doppia caldaia 5 scatole<br />
Double boiler 5 Canisters - Doble caldera 5 Cajas - Double Chau<strong>di</strong>ère 5 Boîte - Doppelkessel 5 Schachtel - Dupla caldeira 5 caixas<br />
57<br />
SEGUNDO<br />
SOLUBILE<br />
PREMIER<br />
SOLUBLE<br />
DEUXIÈME<br />
SOLUBLE<br />
ERSTE<br />
INSTANT<br />
ZWEITE<br />
INSTANT<br />
PRIMEIRO<br />
SOLÚVEL<br />
EV1 Brodo 0 Broth 0 Caldo 0 Bouillage 0 Brühe 0 Caldo 0<br />
EV2 The 0 Tea 0 Té 0 The 0 Tee 0 Chá 0<br />
EV3 Caffè Zucchero<br />
LAYOUT BVM972 SOLUBILE<br />
Instant - Soluble - Soluble - Instantprodukt - Solúvel<br />
EV4 Decaffeinato 0 Deka 0 Descafeinado 0 Decafeine 0 Koffeinfrei 0 Descafeinado 0<br />
EV5 Cioccolata Latte Chocolate Milk Chocolate Leche Choc Lait Schokolade Milch Chocolate Leite<br />
EV6<br />
Solubile 8 o<br />
The naturale<br />
0 0 0 0 0 0<br />
EV1 Caffè - Coffee - Café<br />
- Cafe - Kaffee - Café<br />
PRIMO<br />
SOLUBILE<br />
SECONDO<br />
SOLUBILE<br />
FIRST<br />
SOUP<br />
SECOND<br />
SOUP<br />
PRIMERO<br />
SOLUBILE<br />
SEGUNDO<br />
SOLUBILE<br />
PREMIER<br />
SOLUBLE<br />
DEUXIÈME<br />
SOLUBLE<br />
ERSTE<br />
INSTANT<br />
ZWEITE<br />
INSTANT<br />
PRIMEIRO<br />
SOLÚVEL<br />
0 0 0 0 0 0 0 0 0 0 0 0<br />
EV2 Orzo 0 Barley 0 Cebada 0 Orge 0 Getreidekaffee 0 Cevada 0<br />
EV3 Decaffeinato 0 Deka 0 Descafeinado 0 Decafeine 0 Koffeinfrei 0 Descafeinado 0<br />
EV4 Cioccolata Latte Chocolate Milk Chocolate Leche Choc Lait Schokolade Milch Chocolate Leite<br />
EV5 The 0 Tea 0 Té 0 The 0 Tee 0 Chá 0<br />
EV6 Acqua - Water - Agua<br />
- Eau -Wasser - Água<br />
0 0 0 0 0 0 0 0 0 0 0 0<br />
EV1 Caffè - Coffee - Café<br />
- Cafe - Kaffee - Café<br />
PRIMO<br />
SOLUBILE<br />
LAYOUT BVM972 Doppio macinino<br />
Double grinder-Doble Molino-Double moulin-Doppelmühle-Duplo Moedor<br />
SECONDO<br />
SOLUBILE<br />
FIRST<br />
SOUP<br />
SECOND<br />
SOUP<br />
PRIMERO<br />
SOLUBILE<br />
SEGUNDO<br />
SOLUBILE<br />
PREMIER<br />
SOLUBLE<br />
DEUXIÈME<br />
SOLUBLE<br />
ERSTE<br />
INSTANT<br />
ZWEITE<br />
INSTANT<br />
PRIMEIRO<br />
SOLÚVEL<br />
0 0 0 0 0 0 0 0 0 0 0 0<br />
EV2 Decaffeinato 0 Deka 0 Descafeinado 0 Decafeine 0 Koffeinfrei 0 Descafeinado 0<br />
EV3 Orzo 0 Barley 0 Cebada 0 Orge 0 Getreidekaffee 0 Cevada 0<br />
EV4 Acqua - Water - Agua<br />
- Eau -Wasser - Água<br />
0 0 0 0 0 0 0 0 0 0 0 0<br />
EV5 The 0 Tea 0 Té 0 The 0 Tee 0 Chá 0<br />
EV6 Cioccolata Latte Chocolate Milk Chocolate Leche Choc Lait Schokolade Milch Chocolate Leite<br />
EV1 Caffè - Coffee - Café<br />
- Cafe - Kaffee - Café<br />
PRIMO<br />
SOLUBILE<br />
SECONDO<br />
SOLUBILE<br />
FIRST<br />
SOUP<br />
SECOND<br />
SOUP<br />
PRIMERO<br />
SOLUBILE<br />
SEGUNDO<br />
SOLUBILE<br />
PREMIER<br />
SOLUBLE<br />
DEUXIÈME<br />
SOLUBLE<br />
ERSTE<br />
INSTANT<br />
ZWEITE<br />
INSTANT<br />
PRIMEIRO<br />
SOLÚVEL<br />
0 0 0 0 0 0 0 0 0 0 0 0<br />
EV2 Decaffeinato 0 Deka 0 Descafeinado 0 Decafeine 0 Koffeinfrei 0 Descafeinado 0<br />
EV3 The 0 Tea 0 Té 0 The 0 Tee 0 Chá 0<br />
EV4 Cioccolata Latte Chocolate Milk Chocolate Leche Choc Lait Schokolade Milch Chocolate Leite<br />
EV5 Acqua - Water - Agua<br />
- Eau -Wasser - Água<br />
0 0 0 0 0 0 0 0 0 0 0 0<br />
PRIMO<br />
SOLUBILE<br />
LAYOUT BVM952 ESPRESSO Mono caldaia<br />
Single boiler - Monocaldera - Mono chau<strong>di</strong>ère - Einzelkessel - Mono caldeira<br />
SECONDO<br />
SOLUBILE<br />
LAYOUT BVM952 SOLUBILE<br />
Instant - Soluble - Soluble - Instantprodukt - Solúvel<br />
FIRST<br />
SOUP<br />
SECOND<br />
SOUP<br />
PRIMERO<br />
SOLUBILE<br />
SEGUNDO<br />
SOLUBILE<br />
PREMIER<br />
SOLUBLE<br />
DEUXIÈME<br />
SOLUBLE<br />
ERSTE<br />
INSTANT<br />
ZWEITE<br />
INSTANT<br />
PRIMEIRO<br />
SOLÚVEL<br />
EV1 Brodo 0 Broth 0 Caldo 0 Bouillage 0 Brühe 0 Caldo 0<br />
EV2 The 0 Tea 0 Té 0 The 0 Tee 0 Chá 0<br />
EV3 Caffè Zucchero<br />
EV4 Decaffeinato 0 Deka 0 Descafeinado 0 Decafeine 0 Koffeinfrei 0 Descafeinado 0<br />
EV5 Cioccolata Latte Chocolate Milk Chocolate Leche Choc Lait Schokolade Milch Chocolate Leite<br />
EV1 Caffè - Coffee - Café<br />
- Cafe - Kaffee - Café<br />
PRIMO<br />
SOLUBILE<br />
LAYOUT BVM952 Doppio macinino<br />
Double grinder-Doble Molino-Double moulin-Doppelmühle-Duplo Moedor<br />
SECONDO<br />
SOLUBILE<br />
FIRST<br />
SOUP<br />
SECOND<br />
SOUP<br />
PRIMERO<br />
SOLUBILE<br />
SEGUNDO<br />
SOLUBILE<br />
PREMIER<br />
SOLUBLE<br />
DEUXIÈME<br />
SOLUBLE<br />
ERSTE<br />
INSTANT<br />
ZWEITE<br />
INSTANT<br />
PRIMEIRO<br />
SOLÚVEL<br />
0 0 0 0 0 0 0 0 0 0 0 0<br />
EV2 Decaffeinato 0 Deka 0 Descafeinado 0 Decafeine 0 Koffeinfrei 0 Descafeinado 0<br />
EV3 The 0 Tea 0 Té 0 The 0 Tee 0 Chá 0<br />
EV4 Cioccolata Latte Chocolate Milk Chocolate Leche Choc Lait Schokolade Milch Chocolate Leite<br />
EV5 Acqua - Water - Agua<br />
- Eau -Wasser - Água<br />
0 0 0 0 0 0 0 0 0 0 0 0<br />
SEGUNDO<br />
SOLÚVEL<br />
SEGUNDO<br />
SOLÚVEL<br />
SEGUNDO<br />
SOLÚVEL<br />
SEGUNDO<br />
SOLÚVEL<br />
SEGUNDO<br />
SOLÚVEL<br />
SEGUNDO<br />
SOLÚVEL
Sol. 1 - E.V. 2<br />
Sol. 1 - E.V. 1<br />
E.V. 3<br />
Tè<br />
Brodo<br />
Sol. 1 - E.V. 4<br />
Sol. 2 - E.V. 3<br />
Sol. 1 - E.V. 3<br />
E.V. 2<br />
E.V. 1<br />
LAYOUT BVM972 ESPRESSO Mono caldaia<br />
LAYOUT BVM972 SOLUBILE<br />
LAYOUT BVM972 Doppio Macinino<br />
LAYOUT BVM952 SOLUBILE<br />
Caffè<br />
Zucchero<br />
Decaffeinato<br />
Cioccolata<br />
Latte<br />
Sol. 2 - E.V. 5<br />
Sol. 1 - E.V. 5<br />
E.V. 5<br />
E.V. 4<br />
58<br />
Decaffeinato<br />
Zucchero<br />
Sol. 1 - E.V. 3<br />
Sol. 1 - E.V. 2<br />
LAYOUT BVM972 ESPRESSO Doppia caldaia<br />
LAYOUT BVM972 Doppia caldaia 5 scatole<br />
LAYOUT BVM952 ESPRESSO<br />
Tè<br />
E.V. 2 E.V. 3<br />
Caffè in Grani<br />
E.V. 1<br />
LAYOUT BVM952 Doppio Macinino<br />
Cioccolata<br />
Latte<br />
Sol. 2 - E.V. 4<br />
Sol. 1 - E.V. 4<br />
E.V. 4<br />
E.V. 5<br />
5<br />
5<br />
4<br />
5<br />
4
Qui <strong>di</strong> seguito sono riportate le configurazioni STANDARD delle targhette <strong>di</strong> selezione da inserire nella pulsantiera del modello in<strong>di</strong>cato.<br />
Here below are the STANDARD configurations of the selection labels to insert into the keyboard of the in<strong>di</strong>cated machine.<br />
Abajo son las configuraciones STANDARD de las placas que se inserta en el botón push-selección del modelo in<strong>di</strong>cado.<br />
Listes ci dessous les configurations STANDARD des labels à être insérés dans le clavier de choix du modèle in<strong>di</strong>qué.<br />
Im Folgenden finden Sie <strong>di</strong>e STANDARD Konfiguration des keyboard<br />
Abaixo mostra as STANDARD configurações das placas de ser inserido na selecção do teclado para o funcionamento dos <strong>di</strong>stribuidores.<br />
Single boiler and double boiler<br />
Monocaldera y doble caldera<br />
Mono chau<strong>di</strong>ère et Double chau<strong>di</strong>ère<br />
Einzelkessel und Doppelkessel<br />
Mono caldeira e Dupla caldeira<br />
mod. BVM972 Espresso Mono caldaia - Doppia caldaia<br />
P1-P2 +/- ZUCCHERO<br />
P3 EXTRA LATTE<br />
P4 SENZA BICCHIERE<br />
P5 CAFFÈ CORTO<br />
P6 CAFFÈ LUNGO<br />
P7 CAFFÈ MACCHIATO<br />
P8 CAPPUCCINO<br />
P9 MOCACCINO<br />
P10 CAPPCIOCC<br />
P11 CAFFÈ CORTO DECAFF.<br />
P12 CAFFÈ LUNGO DECAFF.<br />
P13 CAFFÈ MACCHIATO DECAFF.<br />
P14 CAPPUCCINO DECAFF.<br />
P15 MOCACCINO DECAFF.<br />
P16 CAPPCIOCC DECAFF.<br />
P17 ORZO CORTO<br />
P18 ORZO LUNGO<br />
P19 ORZO MACCHIATO<br />
P20 CAPPUCCINO MACCH. ORZO<br />
P21 LATTE<br />
P22 LATTE MACCHIATO<br />
P23 LATTE E CACAO<br />
P24 LATTE MACCHIATO DECAFF.<br />
P25 CIOCCOLATA AL LATTE<br />
P26 CIOCCOLATA<br />
P27 THE<br />
P28 CIOCCOLATA FORTE<br />
P29 ACQUA CALDA<br />
P30 BICCHIERE<br />
P1-P2 +/- SUCRE<br />
P3 EXTRA LAIT<br />
P4 SANS GOBELET<br />
P5 CAFE COURT<br />
P6 CAFE LONG<br />
P7 CAFE CREME<br />
P8 CAPPUCCINO<br />
P9 MOCACCINO<br />
P10 CAPPCIOCC<br />
P11 CAFE COURT DECAF.<br />
P12 CAFE LONG DECAF.<br />
P13 CAFE CREME DECAF.<br />
P14 CAPPUCCINO DECAF.<br />
P15 MOCACCINO DECAF.<br />
P16 CAPPCIOCC DECAF.<br />
P17 ORGE COURT<br />
P18 ORGE LONG<br />
P19 ORGE LAIT<br />
P20 CAPPUCCINO ORGE<br />
P21 LAIT<br />
P22 LAIT CAFE<br />
P23 LAIT CHOCOLAT<br />
P24 LAIT CAFE DECAF.<br />
P25 CHOCOLAT LAIT<br />
P26 CHOCOLAT<br />
P27 THE<br />
P28 CHOCOLAT FORT<br />
P29 EAU CHAUDE<br />
P30 GOBELET<br />
59<br />
P1-P2 +/- SUGAR<br />
P3 EXTRA MILK<br />
P4 WITHOUT CUP<br />
P5 SHORT COFFEE<br />
P6 LONG COFFEE<br />
P7 WHITE COFFEE<br />
P8 CAPPUCCINO<br />
P9 MOCACCINO<br />
P10 CAPPCHOCC<br />
P11 SHORT COFFEE DEKA<br />
P12 LONG COFFEE DEKA<br />
P13 WHITE COFFEE DEKA<br />
P14 CAPPUCCINO DEKA<br />
P15 MOCACCINO DEKA<br />
P16 CAPPCHOCC DEKA<br />
P17 SHORT BARLEY<br />
P18 LONG BARLEY<br />
P19 WHITE BARLEY<br />
P20 CAPPUCCINO & BARLEY<br />
P21 MILK<br />
P22 MILK AND COFFEE<br />
P23 MILK & CHOCOLATE<br />
P24 MILK AND COFFEE DEKA<br />
P25 CHOCOMILK<br />
P26 CHOCOLATE<br />
P27 TEA<br />
P28 CHOCOLATE STRONG<br />
P29 HOT WATER<br />
P30 ONLY CUP<br />
P1-P2 +/- ZUCKER<br />
P3 EXTRA MILCH<br />
P4 KEIN BECHER<br />
P5 KAFFEE KURZ<br />
P6 KAFFEE LANG<br />
P7 KAFFEE MACCHIATO<br />
P8 CAPPUCCINO<br />
P9 MOCACCINO<br />
P10 CAPPSCHOK.<br />
P11 KAFFEE KURZ KOFFEINFREI<br />
P12 KAFFEE LANG KOFFEINFREI<br />
P13 KAFFEE MACCHIATO KOFFEINFR.<br />
P14 CAPPUCCINO KOFFEINFREI<br />
P15 MOCACCINO KOFFEINFREI<br />
P16 CAPPSCHOK. KOFFEINFREI<br />
P17 GETREIDEKAFFEE<br />
P18 GETREIDEKAFFEE LANG<br />
P19 GETREIDEKAFFEE MACCHIATO<br />
P20 CAPPUCCINO GETREIDE<br />
P21 MILCH<br />
P22 MILCH MACCHIATO<br />
P23 MILCH SCHOKOLADE<br />
P24 MILCH MACCHIATO KOFFEIN.<br />
P25 SCHOKOLADE MIT MILCH<br />
P26 SCHOKOLADE<br />
P27 TEE<br />
P28 SCHOKOLADE FORT<br />
P29 HEIßWASSER<br />
P30 BECHER<br />
mod. BVM972 Solubile - Instant - Soluble - Soluble - Instantprodukt - Solúvel<br />
P1-P2 +/- ZUCCHERO<br />
P3 EXTRA LATTE<br />
P4 SENZA BICCHIERE<br />
P5 CAFFÈ CORTO<br />
P6 CAFFÈ LUNGO<br />
P7 CAFFÈ MACCHIATO<br />
P8 CAPPUCCINO<br />
P9 MOCACCINO<br />
P10 CAPPCIOCC<br />
P11 ATTUALMENTE VUOTO<br />
P12 ATTUALMENTE VUOTO<br />
P13 LATTE<br />
P14 LATTE MACCHIATO<br />
P15 LATTE E CACAO<br />
P16 CIOCCOLATA<br />
P17 CIOCCOLATA AL LATTE<br />
P18 CIOCCOLATA FORTE<br />
P19 ATTUALMENTE VUOTO<br />
P20 ATTUALMENTE VUOTO<br />
P21 SOLUBILE 1<br />
P22 SOLUBILE 2<br />
P23 ATTUALMENTE VUOTO<br />
P24 ATTUALMENTE VUOTO<br />
P25 ATTUALMENTE VUOTO<br />
P26 ATTUALMENTE VUOTO<br />
P27 THE AL LIMONE<br />
P28 ATTUALMENTE VUOTO<br />
P29 ACQUA CALDA<br />
P30 BICCHIERE<br />
P1-P2 +/- ZUCKER<br />
P3 EXTRA MILCH<br />
P4 KEIN BECHER<br />
P5 KAFFEE KURZ<br />
P6 KAFFEE LANG<br />
P7 KAFFEE MACCHIATO<br />
P8 CAPPUCCINO<br />
P9 MOCACCINO<br />
P10 CAPPSCHOK<br />
P11 ZUR ZEIT LEER<br />
P12 ZUR ZEIT LEER<br />
P13 MILCH<br />
P14 MILCH MACCHIATO<br />
P15 MILCH SCHOKOLADE<br />
P16 SCHOKOLADE<br />
P1-P2 +/- SUGAR<br />
P3 EXTRA MILK<br />
P4 WITHOUT CUP<br />
P5 SHORT COFFEE<br />
P6 LONG COFFEE<br />
P7 WHITE COFFEE<br />
P8 CAPPUCCINO<br />
P9 MOCACCINO<br />
P10 CAPPCHOCC<br />
P11 CURRENTLY EMPTY<br />
P12 CURRENTLY EMPTY<br />
P13 MILK<br />
P14 MILK AND COFFEE<br />
P15 MILK & CHOCOLATE<br />
P16 CHOCOLATE<br />
P17 CHOCOMILK<br />
P18 CHOCOLATE STRONG<br />
P19 CURRENTLY EMPTY<br />
P20 CURRENTLY EMPTY<br />
P21 INSTANT 1<br />
P22 INSTANT 2<br />
P23 CURRENTLY EMPTY<br />
P24 CURRENTLY EMPTY<br />
P25 CURRENTLY EMPTY<br />
P26 CURRENTLY EMPTY<br />
P27 TEA<br />
P28 CURRENTLY EMPTY<br />
P29 HOT WATER<br />
P30 ONLY CUP<br />
P17 SCHOKOLADE MIT MILCH<br />
P18 SCHOKOLADE FORT<br />
P19 ZUR ZEIT LEER<br />
P20 ZUR ZEIT LEER<br />
P21 INSTANTPRODUKT 1<br />
P22 INSTANTPRODUKT 2<br />
P23 ZUR ZEIT LEER<br />
P24 ZUR ZEIT LEER<br />
P25 ZUR ZEIT LEER<br />
P26 ZUR ZEIT LEER<br />
P27 TEE<br />
P28 ZUR ZEIT LEER<br />
P29 HEIßWASSER<br />
P30 BECHER<br />
P1-P2 +/-AZÚCAR<br />
P3 EXTRA LECHE<br />
P4 SIN VASO<br />
P5 CAFÉ CORTO<br />
P6 CAFÉ LARGO<br />
P7 CAFÉ CORTADO<br />
P8 CAPUCHINO<br />
P9 MOCACHINO<br />
P10 CAPCHOCO<br />
P11 ACTUALMENTE VACÍO<br />
P12 ACTUALMENTE VACÍO<br />
P13 LECHE<br />
P14 LECHE MANCHADA<br />
P15 LECHE AL CACAO<br />
P16 CIOCCOLATA<br />
P17 CHOCOLECHE<br />
P18 CHOCOLATE FUERTE<br />
P19 ACTUALMENTE VACÍO<br />
P20 ACTUALMENTE VACÍO<br />
P21 SOLUBLE 1<br />
P22 SOLUBLE 2<br />
P23 ACTUALMENTE VACÍO<br />
P24 ACTUALMENTE VACÍO<br />
P25 ACTUALMENTE VACÍO<br />
P26 ACTUALMENTE VACÍO<br />
P27 TE<br />
P28 ACTUALMENTE VACÍO<br />
P29 AGUA CALIENTE<br />
P30 SOLO VASO<br />
P1-P2 +/- AÇÚCAR<br />
P3 EXTRA LEITE<br />
P4 NO COPO<br />
P5 CAFE’ NORMAL<br />
P6 CAFE’ LONGO<br />
P7 CAFE’ PINGADO<br />
P8 CAPPUCCINO<br />
P9 MOCACCINO<br />
P10 CAPPCHOCC<br />
P11 ACTUALMENTE VAZIO<br />
P12 ACTUALMENTE VAZIO<br />
P13 LEITE<br />
P14 LEITE PINGADO<br />
P15 LEITE CHOCOLATE<br />
P16 CHOCOLATE<br />
P1-P2 +/-AZÚCAR<br />
P3 EXTRA LECHE<br />
P4 SIN VASO<br />
P5 CAFÉ CORTO<br />
P6 CAFÉ LARGO<br />
P7 CAFÉ CORTADO<br />
P8 CAPUCHINO<br />
P9 MOCACHINO<br />
P10 CAPCHOCO<br />
P11 CAFÉ CORTO DESCAF.<br />
P12 CAFÉ LARGO DESCAF.<br />
P13 CAFÉ CORTADO DESCAF.<br />
P14 CAPUCHINO DESCAF.<br />
P15 MOCACHINO DESCAF.<br />
P16 CAPCHOCO DESCAF.<br />
P17 CEBADA CORTO<br />
P18 CEBADA LARGO<br />
P19 CEBADA CORTADO<br />
P20 CAPUCHINO CORTADO CEBADA<br />
P21 LECHE<br />
P22 LECHE MANCHADA<br />
P23 LECHE AL CACAO<br />
P24 LECHE MANCHADA DESCAF.<br />
P25 CHOCOLECHE<br />
P26 CHOCOLATE<br />
P27 TE<br />
P28 CHOCOLATE FUERTE<br />
P29 AGUA CALIENTE<br />
P30 SOLO VASO<br />
P1-P2 +/- AÇÚCAR<br />
P3 EXTRA LEITE<br />
P4 NO COPO<br />
P5 CAFE’ NORMAL<br />
P6 CAFE’ LONGO<br />
P7 CAFE’ PINGADO<br />
P8 CAPPUCCINO<br />
P9 MOCACCINO<br />
P10 CAPPCHOCC<br />
P11 CAFE’ DESCAFEINADO<br />
P12 CAFE’ LONGO DESCAFEINADO<br />
P13 CAFE’ PINGADO DESCAFEIN.<br />
P14 CAPPUCCINO DESCAF.<br />
P15 MOCACCINO DESCAF.<br />
P16 CAPPCHOCC DESCAF.<br />
P17 CEVADA<br />
P18 CEVADA LONGO<br />
P19 CEVADA PINGADO<br />
P20 CAPPUCCINO CEVADA<br />
P21 LEITE<br />
P22 LEITE PINGADO<br />
P23 LEITE COM CHOCOLATE<br />
P24 LEITE PINGADO DESCAF.<br />
P25 CHOCOLATE LEITE<br />
P26 CHOCOLATE<br />
P27 CHA’<br />
P28 CHOCOLATE FORTE<br />
P29 AGUA QUENTE<br />
P30 COPO<br />
P1-P2 +/- SUCRE<br />
P3 EXTRA LAIT<br />
P4 SANS GOBELET<br />
P5 CAFE COURT<br />
P6 CAFE LONG<br />
P7 CAFE CREME<br />
P8 CAPPUCCINO<br />
P9 MOCACCINO<br />
P10 CAPPCIOCC<br />
P11 ACTUELLEMENT VIDE<br />
P12 ACTUELLEMENT VIDE<br />
P13 LAIT<br />
P14 LAIT CAFE<br />
P15 LAIT CHOCOLAT<br />
P16 CHOCOLAT<br />
P17 CHOCOLAT LAIT<br />
P18 CHOCOLAT FORT<br />
P19 ACTUELLEMENT VIDE<br />
P20 ACTUELLEMENT VIDE<br />
P21 SOLUBLE 1<br />
P22 SOLUBLE 2<br />
P23 ACTUELLEMENT VIDE<br />
P24 ACTUELLEMENT VIDE<br />
P25 ACTUELLEMENT VIDE<br />
P26 ACTUELLEMENT VIDE<br />
P27 THE<br />
P28 ACTUELLEMENT VIDE<br />
P29 EAU CHAUDE<br />
P30 GOBELET<br />
P17 CHOCOLATE LEITE<br />
P18 CHOCOLATE FORTE<br />
P19 ACTUALMENTE VAZIO<br />
P20 ACTUALMENTE VAZIO<br />
P21 SOLÚVEL 1<br />
P22 SOLÚVEL 2<br />
P23 ACTUALMENTE VAZIO<br />
P24 ACTUALMENTE VAZIO<br />
P25 ACTUALMENTE VAZIO<br />
P26 ACTUALMENTE VAZIO<br />
P27 CHA’<br />
P28 ACTUALMENTE VAZIO<br />
P29 AGUA QUENTE<br />
P30 COPO
mod. BVM972 Doppio macinino Pulsantiera Diretta<br />
Double grinder-Doble Molino<br />
Double moulin-Doppelmühle-Duplo Moedor<br />
P1-P2 +/- ZUCCHERO<br />
P3 EXTRA LATTE<br />
P4 SENZA BICHIERE<br />
P5-P7-P6-P8 CAFFÈ CORTO Espr.<br />
P9-P10 CAFFÈ MACCHIATO Espr.<br />
P11-P12 CAPPUCCINO Espresso<br />
P13-P14 CAFFÈ LUNGO Espresso<br />
P15-P16 MOCACCINO Espresso<br />
P17-P18 CAPPCIOCC Espresso<br />
P19 CAFFÈ CORTO Deca<br />
P20 CAFFÈ LUNGO Deca<br />
P21 CAFFÈ MACCHIATO Deca<br />
P22 CAPPUCCINO Deca<br />
P23 CAFFÈ D’ORZO<br />
P24 CAFFÈ LUNGO D’ORZO<br />
P25 CAFFÈ D’ORZO MACCHIATO<br />
P26 CAPPUCCINO D’ORZO<br />
P27 LATTE<br />
P28 CIOCCOLATA FORTE<br />
P29 THE AL LIMONE<br />
P30 CIOCCOLATA AL LATTE<br />
P1-P2 +/- SUCRE<br />
P3 EXTRA LAIT<br />
P4 SANS GOBELET<br />
P5-P7-P6-P8 CAFE COURT Espr.<br />
P9-P10 CAFE CREME Espr.<br />
P11-P12 CAPPUCCINO Espr.<br />
P13-P14 CAFE LONG Espr.<br />
P15-P16 MOCACCINO Espr.<br />
P17-P18 CAPPCIOCC Espr.<br />
P19 CAFE COURT Deca<br />
P20 CAFE LONG Deca<br />
P21 CAFE CREME Deca<br />
P22 CAPPUCCINO Deca<br />
P23 ORGE COURT<br />
P24 ORGE LONG<br />
P25 ORGE LAIT<br />
P26 CAPPUCCINO ORGE<br />
P27 LAIT<br />
P28 CHOCOLAT FORT<br />
P29 THE<br />
P30 CHOCOLAT LAIT<br />
P1-P2 +/- SUGAR<br />
P3 EXTRA MILK<br />
P4 WITHOUT CUP<br />
P5-P7-P6-P8 SHORT COFFEE Espr.<br />
P9-P10 WHITE COFFEE Espr.<br />
P11-P12 CAPPUCCINO Espr.<br />
P13-P14 LONG COFFEE Espr.<br />
P15-P16 MOCACCINO Espr.<br />
P17-P18 CAPPCHOCC Espr.<br />
P19 SHORT COFFEE Deka<br />
P20 LONG COFFEE Deka<br />
P21 WHITE COFFEE Deka<br />
P22 CAPPUCCINO Deka<br />
P23 BARLEY<br />
P24 LONG BARLEY<br />
P25 WHITE BARLEY<br />
P26 CAPPUCCINO & BARLEY<br />
P27 MILK<br />
P28 CHOCOLATE STRONG<br />
P29 TEA<br />
P30 CHOCOMILK<br />
P1-P2 +/- ZUCKER<br />
P3 EXTRA MILCH<br />
P4 KEIN BECHER<br />
P5-P7-P6-P8 KAFFEE KURZ Espr.<br />
P9-P10 KAFFEE MACCHIATO Espr.<br />
P11-P12 CAPPUCCINO Espresso<br />
P13-P14 KAFFEE LANG Espresso<br />
P15-P16 MOCACCINO Espresso<br />
P17-P18 CAPPSCHOK. Espresso<br />
P19 KAFFEE KURZ KOFFEINFREI<br />
P20 KAFFEE LANG KOFFEINFREI<br />
P21 KAFFEE MACCHIATO KOFFEINFR.<br />
P22 CAPPUCCINO KOFFEINFREI<br />
P23 GETREIDEKAFFEE<br />
P24 GETREIDEKAFFEE LANG<br />
P25 GETREIDEKAFFEE MACCHIATO<br />
P26 CAPPUCCINO GETREIDE<br />
P27 MILCH<br />
P28 SCHOKOLADE FORT<br />
P29 TEE<br />
P30 SCHOKOLADE MIT MILCH<br />
TASTI: 05/07-09-11-13-15-17-19-21 → Espresso da campana caffè 1 - TASTI: 06/08-10-12-14-16-18-20-22 → Espresso da campana caffè 2<br />
KEYS: 05/07-09-11-13-15-17-19-21 → Espresso coffee from coffee-hopper 1 - KEYS: 06/08-10-12-14-16-18-20-22 → Espresso coffee from coffee-hopper 2<br />
TECLAS: 05/07-09-11-13-15-17-19-21 → Espresso desde molino de café 1 - TECLAS: 06/08-10-12-14-16-18-20-22 → Espresso desde molino de café 2<br />
TOUCHES: 05/07-09-11-13-15-17-19-21 → Expresso depuis moulin à café 1 - TOUCHES: 06/08-10-12-14-16-18-20-22 → Expresso depuis moulin à café 2<br />
TASTEN: 05/07-09-11-13-15-17-19-21 → Espresso Von Kaffeemühle 1 - TASTEN: 06/08-10-12-14-16-18-20-22 → Espresso Von Kaffeemühle 2<br />
TECLAS: 05/07-09-11-13-15-17-19-21 → Expresso da campana café 1 - TECLAS: 06/08-10-12-14-16-18-20-22 → Expresso da campana café 2<br />
60<br />
P1-P2 +/-AZÚCAR<br />
P3 EXTRA LECHE<br />
P4 SIN VASO<br />
P5-P7-P6-P8 CAFÉ CORTO Espr.<br />
P9-P10 CAFÉ CORTADO Espr.<br />
P11-P12 CAPUCHINO Espr.<br />
P13-P14 CAFÉ LARGO Espr.<br />
P15-P16 MOCACHINO Espr.<br />
P17-P18 CAPCHOCO Espr.<br />
P19 CAFÉ CORTO Descaf.<br />
P20 CAFÉ LARGO Descaf.<br />
P21 CAFÉ CORTADO Descaf.<br />
P22 CAPUCHINO Descaf.<br />
P23 CEBADA<br />
P24 CEBADA LARGO<br />
P25 CEBADA CORTADO<br />
P26 CAPUCHINO CORTADO CEBADA<br />
P27 LECHE<br />
P28 CHOCOLATE FUERTE<br />
P29 TE<br />
P30 CHOCOLECHE<br />
P1-P2 +/- AÇÚCAR<br />
P3 EXTRA LEITE<br />
P4 NO COPO<br />
P5-P7-P6-P8 CAFE’ NORMAL Espr.<br />
P9-P10 CAFE’ PINGADO Espr.<br />
P11-P12 CAPPUCCINO Espresso<br />
P13-P14 CAFE’ LONGO Espresso<br />
P15-P16 MOCACCINO Espresso<br />
P17-P18 CAPPCHOCC Espresso<br />
P19 CAFE’ DESCAFEINADO<br />
P20 CAFE’ LONGO DESCAFEINADO<br />
P21 CAFE’ PINGADO DESCAFEIN.<br />
P22 CAPPUCCINO DESCAF.<br />
P23 CEVADA<br />
P24 CEVADA LONGO<br />
P25 CEVADA PINGADO<br />
P26 CAPPUCCINO CEVADA<br />
P27 LEITE<br />
P28 CHOCOLATE FORTE<br />
P29 CHA’<br />
P30 CHOCOLATE LEITE<br />
Le coppie <strong>di</strong> selezioni associate ad un tasto doppio andranno programmate in modo identico. In questo modo premendo la parte superiore od inferiore del tasto il risultato sarà analogo.<br />
Paired-off selection options associated to a double key will both have to be programmed in exactly the same way, so that if only the top or bottom part of a key is pressed in, the result will be the<br />
same.<br />
Las parejas de selecciones asociadas a una tecla doble se programarán de manera idéntica. De esta forma, se obtendrá un resultado análogo al pulsar la parte superior de la tecla o la inferior.<br />
Les paires de sélections associées à une touche double doivent être programmées de manière identique. On obtiendra ainsi un résultat analogue en pressant la partie supérieure ou inférieure de la<br />
touche.<br />
Die Wahlpaare, <strong>di</strong>e einer Doppeltaste zugeordnet sind, müssen auf gleicher Weise programmiert werden. Auf <strong>di</strong>ese Art, wenn man den oberen, bzw. unteren Teil der Taste drückt, ist das Resultat<br />
gleich.<br />
Os pares de selecções associados a uma tecla dupla serão programados de maneira idêntica. Assim, carregando na parte superior ou inferior da tecla, o resultado será análogo.
Double grinder-Doble Molino<br />
Double moulin-Doppelmühle-<br />
Duplo Moedor<br />
mod. BVM952 Doppio macinino Pulsantiera Diretta<br />
P1-P2 +/- ZUCCHERO<br />
P3 EXTRA LATTE<br />
P4 SENZA BICHIERE<br />
P5-P7-P6-P8 CAFFÈ CORTO Espr.<br />
P9-P10 CAFFÈ MACCHIATO Espr.<br />
P11-P12 CAPPUCCINO Espresso<br />
P13-P14 CAFFÈ LUNGO Espresso<br />
P15-P16 MOCACCINO Espresso<br />
P17-P18 CAPPCIOCC Espresso<br />
P19 CAFFÈ CORTO Deca<br />
P20 CAFFÈ LUNGO Deca<br />
P21 CAFFÈ MACCHIATO Deca<br />
P22 CAPPUCCINO Deca<br />
P23 LATTE<br />
P24 CIOCCOLATA FORTE<br />
P25 THE AL LIMONE<br />
P26 CIOCCOLATA AL LATTE<br />
P1-P2 +/- SUCRE<br />
P3 EXTRA LAIT<br />
P4 SANS GOBELET<br />
P5-P7-P6-P8 CAFE COURT Espr.<br />
P9-P10 CAFE CREME Espr.<br />
P11-P12 CAPPUCCINO Espr.<br />
P13-P14 CAFE LONG Espr.<br />
P15-P16 MOCACCINO Espr.<br />
P17-P18 CAPPCIOCC Espr.<br />
P19 CAFE COURT Deca<br />
P20 CAFE LONG Deca<br />
P21 CAFE CREME Deca<br />
P22 CAPPUCCINO Deca<br />
P23 LAIT<br />
P24 CHOCOLAT FORT<br />
P25 THE<br />
P26 CHOCOLAT LAIT<br />
P1-P2 +/- ZUCCHERO<br />
P3-P4 CAFFÈ CORTO Espr.<br />
P5-P6 CAFFÈ MACCHIATO Espr.<br />
P7-P8 CAPPUCCINO Espresso<br />
P9-P10 CAFFÈ LUNGO Espresso<br />
P11-P12 MOCACCINO Espresso<br />
P13-P14 CAPPCIOCC Espresso<br />
P15 CAFFÈ CORTO Deca<br />
P16 CAFFÈ LUNGO Deca<br />
P17 CAFFÈ MACCHIATO Deca<br />
P18 CAPPUCCINO Deca<br />
P19 CAFFÈ D’ORZO<br />
P20 CAFFÈ LUNGO D’ORZO<br />
P21 CAFFÈ D’ORZO MACCHIATO<br />
P22 CAPPUCCINO D’ORZO<br />
P23 LATTE<br />
P24 CIOCCOLATA FORTE<br />
P25 THE AL LIMONE<br />
P26 CIOCCOLATA AL LATTE<br />
61<br />
P1-P2 +/- SUGAR<br />
P3 EXTRA MILK<br />
P4 WITHOUT CUP<br />
P5-P7-P6-P8 SHORT COFFEE Espr.<br />
P9-P10 WHITE COFFEE Espr.<br />
P11-P12 CAPPUCCINO Espr.<br />
P13-P14 LONG COFFEE Espr.<br />
P15-P16 MOCACCINO Espr.<br />
P17-P18 CAPPCHOCC Espr.<br />
P19 SHORT COFFEE Deca<br />
P20 LONG COFFEE Deca<br />
P21 WHITE COFFEE Deca<br />
P22 CAPPUCCINO Deca<br />
P23 MILK<br />
P24 CHOCOLATE STRONG<br />
P25 TEA<br />
P26 CHOCOMILK<br />
P1-P2 +/- ZUCKER<br />
P3 EXTRA MILCH<br />
P4 KEIN BECHER<br />
P5-P7-P6-P8 KAFFEE KURZ Espr.<br />
P9-P10 KAFFEE MACCHIATO Espr.<br />
P11-P12 CAPPUCCINO Espresso<br />
P13-P14 KAFFEE LANG Espresso<br />
P15-P16 MOCACCINO Espresso<br />
P17-P18 CAPPCIOCC Espresso<br />
P19 KAFFEE KURZ KOFFEINFREI<br />
P20 KAFFEE LANG KOFFEINFREI<br />
P21 KAFFEE MACCHIATO KOFFEINFR.<br />
P22 CAPPUCCINO KOFFEINFREI<br />
P23 MILCH<br />
P24 SCHOKOLADE FORT<br />
P25 TEE<br />
P26 SCHOKOLADE MIT MILCH<br />
TASTI: 05/07-09-11-13-15-17-19-21 → Espresso da campana caffè 1 - TASTI: 06/08-10-12-14-16-18-20-22 → Espresso da campana caffè 2<br />
KEYS: 05/07-09-11-13-15-17-19-21 → Espresso coffee from coffee-hopper 1 - KEYS: 06/08-10-12-14-16-18-20-22 → Espresso coffee from coffee-hopper 2<br />
TECLAS: 05/07-09-11-13-15-17-19-21 → Espresso desde molino de café 1 - TECLAS: 06/08-10-12-14-16-18-20-22 → Espresso desde molino de café 2<br />
TOUCHES: 05/07-09-11-13-15-17-19-21 → Expresso depuis moulin à café 1 - TOUCHES: 06/08-10-12-14-16-18-20-22 → Expresso depuis moulin à café 2<br />
TASTEN: 05/07-09-11-13-15-17-19-21 → Espresso Von Kaffeemühle 1 - TASTEN: 06/08-10-12-14-16-18-20-22 → Espresso Von Kaffeemühle 2<br />
TECLAS: 05/07-09-11-13-15-17-19-21 → Expresso da campana café 1 - TECLAS: 06/08-10-12-14-16-18-20-22 → Expresso da campana café 2<br />
mod. BVM952 Espresso 5S Doppia campana caffè<br />
P1-P2 +/- SUCRE<br />
P3-P4 CAFE COURT Espr.<br />
P5-P6 CAFE CREME Espr.<br />
P7-P8 CAPPUCCINO Espr.<br />
P9-P10 CAFE LONG Espr.<br />
P11-P12 MOCACCINO Espr.<br />
P13-P14 CAPPCIOCC Espr.<br />
P15 CAFE COURT Deca<br />
P16 CAFE LONG Deca<br />
P17 CAFE CREME Deca<br />
P18 CAPPUCCINO Deca<br />
P19 ORGE COURT<br />
P20 ORGE LONG<br />
P21 ORGE LAIT<br />
P22 CAPPUCCINO ORGE<br />
P23 LAIT<br />
P24 CHOCOLAT FORT<br />
P25 THE<br />
P26 CHOCOLAT LAIT<br />
P1-P2 +/- SUGAR<br />
P3-P4 SHORT COFFEE Espr.<br />
P5-P6 WHITE COFFEE Espr.<br />
P7-P8 CAPPUCCINO Espr.<br />
P9-P10 LONG COFFEE Espr.<br />
P11-P12 MOCACCINO Espr.<br />
P13-P14 CAPPCHOCC Espr.<br />
P15 SHORT COFFEE Deca<br />
P16 LONG COFFEE Deca<br />
P17 WHITE COFFEE Deca<br />
P18 CAPPUCCINO Deca<br />
P19 BARLEY<br />
P20 LONG BARLEY<br />
P21 WHITE BARLEY<br />
P22 CAPPUCCINO & BARLEY<br />
P23 MILK<br />
P24 CHOCOLATE STRONG<br />
P25 TEA<br />
P26 CHOCOMILK<br />
P1-P2 +/- ZUCKER<br />
P3-P4 KAFFEE KURZ Espr.<br />
P5-P6 KAFFEE MACCHIATO Espr.<br />
P7-P8 CAPPUCCINO Espresso<br />
P9-P10 KAFFEE LANG Espresso<br />
P11-P12 MOCACCINO Espresso<br />
P13-P14 CAPPSCHOK. Espresso<br />
P15 KAFFEE KURZ KOFFEINFREI<br />
P16 KAFFEE LANG KOFFEINFREI<br />
P17 KAFFEE MACCHIATO KOFFEINFR.<br />
P18 CAPPUCCINO KOFFEINFREI<br />
P19 GETREIDEKAFFEE<br />
P20 GETREIDEKAFFEE LANG<br />
P21 GETREIDEKAFFEE MACCHIATO<br />
P22 CAPPUCCINO GETREIDE<br />
P23 MILCH<br />
P24 SCHOKOLADE FORT<br />
P25 TEE<br />
P26 SCHOKOLADE MIT MILCH<br />
P1-P2 +/- AZÚCAR<br />
P3 EXTRA LECHE<br />
P4 SIN VASO<br />
P5-P7-P6-P8 CAFÉ CORTO Espr.<br />
P9-P10 CAFÉ CORTADO Espr.<br />
P11-P12 CAPUCHINO Espr.<br />
P13-P14 CAFÉ LARGO Espr.<br />
P15-P16 MOCACHINO Espr.<br />
P17-P18 CAPCHOCO Espr.<br />
P19 CAFÉ CORTO Descaf.<br />
P20 CAFÉ LARGO Descaf.<br />
P21 CAFÉ CORTADO Descaf.<br />
P22 CAPUCHINO Descaf.<br />
P23 LECHE<br />
P24 CHOCOLATE FUERTE<br />
P25 TE<br />
P26 CHOCOLECHE<br />
P1-P2 +/- AÇÚCAR<br />
P3 EXTRA LEITE<br />
P4 NO COPO<br />
P5-P7-P6-P8 CAFE’ NORMAL Espr.<br />
P9-P10 CAFE’ PINGADO Espr.<br />
P11-P12 CAPPUCCINO Espresso<br />
P13-P14 CAFE’ LONGO Espresso<br />
P15-P16 MOCACCINO Espresso<br />
P17-P18 CAPPCHOCC Espresso<br />
P19 CAFE’ DESCAFEINADO<br />
P20 CAFE’ LONGO DESCAFEINADO<br />
P21 CAFE’ PINGADO DESCAFEIN.<br />
P22 CAPPUCCINO DESCAF.<br />
P23 LEITE<br />
P24 CHOCOLATE FORTE<br />
P25 CHA’<br />
P26 CHOCOLATE LEITE<br />
Le coppie <strong>di</strong> selezioni associate ad un tasto doppio andranno programmate in modo identico. In questo modo premendo la parte superiore od inferiore del tasto il risultato sarà analogo.<br />
Paired-off selection options associated to a double key will both have to be programmed in exactly the same way, so that if only the top or bottom part of a key is pressed in, the result will be the same.<br />
Las parejas de selecciones asociadas a una tecla doble se programarán de manera idéntica. De esta forma, se obtendrá un resultado análogo al pulsar la parte superior de la tecla o la inferior.<br />
Les paires de sélections associées à une touche double doivent être programmées de manière identique. On obtiendra ainsi un résultat analogue en pressant la partie supérieure ou inférieure de la touche.<br />
Die Wahlpaare, <strong>di</strong>e einer Doppeltaste zugeordnet sind, müssen auf gleicher Weise programmiert werden. Auf <strong>di</strong>ese Art, wenn man den oberen, bzw. unteren Teil der Taste drückt, ist das Resultat gleich.<br />
Os pares de selecções associados a uma tecla dupla serão programados de maneira idêntica. Assim, carregando na parte superior ou inferior da tecla, o resultado será análogo.<br />
Double boiler 5 Canisters<br />
Doble caldera 5 Cajas<br />
Double Chau<strong>di</strong>ère 5 Boîte<br />
Doppelkessel 5 Schachtel<br />
Dupla caldeira 5 caixas<br />
P1-P2 +/- AZÚCAR<br />
P3-P4 CAFÉ CORTO Espr.<br />
P5-P6 CAFÉ CORTADO Espr.<br />
P7-P8 CAPUCHINO Espr.<br />
P9-P10 CAFÉ LARGO Espr.<br />
P11-P12 MOCACHINO Espr.<br />
P13-P14 CAPCHOCO Espr.<br />
P15 CAFÉ CORTO Descaf.<br />
P16 CAFÉ LARGO Descaf.<br />
P17 CAFÉ CORTADO Descaf.<br />
P18 CAPUCHINO Descaf.<br />
P19 CEBADA<br />
P20 CEBADA LARGO<br />
P21 CEBADA CORTADO<br />
P22 CAPUCHINO CEBADA<br />
P23 LECHE<br />
P24 CHOCOLATE FUERTE<br />
P25 TE<br />
P26 CHOCOLECHE<br />
P1-P2 +/- AÇÚCAR<br />
P3-P4 CAFE’ NORMAL Espr.<br />
P5-P6 CAFE’ PINGADO Espr.<br />
P7-P8 CAPPUCCINO Espresso<br />
P9-P10 CAFE’ LONGO Espresso<br />
P11-P12 MOCACCINO Espresso<br />
P13-P14 CAPPCHOCC Espresso<br />
P15 CAFE’ DESCAFEINADO<br />
P16 CAFE’ LONGO DESCAFEINADO<br />
P17 CAFE’ PINGADO DESCAFEIN.<br />
P18 CAPPUCCINO DESCAF.<br />
P19 CEVADA<br />
P20 CEVADA LONGO<br />
P21 CEVADA PINGADO<br />
P22 CAPPUCCINO CEVADA<br />
P23 LEITE<br />
P24 CHOCOLATE FORTE<br />
P25 CHA’<br />
P26 CHOCOLATE LEITE
Single boiler and double boiler<br />
Monocaldera y doble caldera<br />
Mono chau<strong>di</strong>ère et Double chau<strong>di</strong>ère<br />
Einzelkessel und Doppelkessel<br />
Mono caldeira e Dupla caldeira<br />
P1-P2 +/- ZUCCHERO<br />
P3 EXTRA LATTE<br />
P4 SENZA BICHIERE<br />
P5 CAFFÈ CORTO solubile<br />
P6 CAFFÈ LUNGO solubile<br />
P7 CAFFÈ MACCHIATO solubile<br />
P8 CAFFÈ AL LATTE solubile<br />
P9 CAPPUCCINO solubile<br />
P10 MOCACCINO solubile<br />
P11 CAFFÈ CORTO DECA<br />
P12 CAFFÈ LUNGO DECA<br />
P13 CAFFÈ MACCHIATO DECA<br />
P14 CAFFÈ AL LATTE DECA<br />
P15 CAPPUCCINO DECA<br />
P16 MOCACCINO DECA<br />
P17 LATTE E CIOCCOLATA<br />
P18 CIOCCOLATA E LATTE<br />
P19 CIOCCOLATA<br />
P20 CIOCCOLATA FORTE<br />
P21 LATTE CON ZUCCHERO<br />
P22 LATTE ALLA NOCCIOLA<br />
P23 THE AL LIMONE<br />
P24 ZUPPA<br />
P25 BICCHIERE<br />
P26 ACQUA CALDA +BICCHIERE<br />
P1-P2 +/- ZUCKER<br />
P3 EXTRA MILCH<br />
P4 KEIN BECHER<br />
P5 KAFFEE KURZ solubile<br />
P6 KAFFEE LANG solubile<br />
P7 KAFFEE MACCHIATO solubile<br />
P8 KAFFEE MILCH solubile<br />
P9 CAPPUCCINO solubile<br />
P10 MOCACCINO solubile<br />
P11 KAFFEE KURZ KOFFEINFREI<br />
P12 KAFFEE LANG KOFFEINFREI<br />
P13 KAFFEE MACCHIATO KOFFEIN.<br />
P14 KAFFEE MILCH KOFFEIN.<br />
mod. BVM952 Espresso Mono caldaia - Doppia caldaia<br />
P1-P2 +/- ZUCCHERO<br />
P3 EXTRA LATTE<br />
P4 SENZA BICHIERE<br />
P5 CAFFÈ CORTO<br />
P6 CAFFÈ LUNGO<br />
P7 CAFFÈ MACCHIATO<br />
P8 CAPPUCCINO<br />
P9 MOCACCINO<br />
P10 CAPPCIOCC<br />
P11 CAFFÈ CORTO DECAFF.<br />
P12 CAFFÈ LUNGO DECAFF.<br />
P13 CAFFÈ MACCHIATO DECA<br />
P14 CAPPUCCINO DECAFF.<br />
P15 MOCACCINO DECAFF.<br />
P16 CAPPCIOCC DECAFF.<br />
P17 LATTE<br />
P18 LATTE MACCHIATO<br />
P19 LATTE E CACAO<br />
P20 LATTE MACCHIATO DECA<br />
P21 CIOCCOLATA AL LATTE<br />
P22 CIOCCOLATA<br />
P23 THE AL LIMONE<br />
P24 CIOCCOLATA FORTE<br />
P25 ACQUA CALDA<br />
P26 BICCHIERE<br />
P1-P2 +/- SUCRE<br />
P3 EXTRA LAIT<br />
P4 SANS GOBELET<br />
P5 CAFE COURT<br />
P6 CAFE LONG<br />
P7 CAFE CREME<br />
P8 CAPPUCCINO<br />
P9 MOCACCINO<br />
P10 CAPPCIOCC<br />
P11 CAFE COURT DECAF.<br />
P12 CAFE LONG DECAF.<br />
P13 CAFE CREME DECAF.<br />
P14 CAPPUCCINO DECAF.<br />
P15 MOCACCINO DECAF.<br />
P16 CAPPCIOCC DECAF.<br />
P17 LAIT<br />
P18 LAIT CAFE<br />
P19 LAIT CHOCOLAT<br />
P20 LAIT CAFE DECAF.<br />
P21 CHOCOLAT LAIT<br />
P22 CHOCOLAT<br />
P23 THE<br />
P24 CHOCOLAT FORT<br />
P25 EAU CHAUDE<br />
P26 GOBELET<br />
P1-P2 +/- SUGAR<br />
P3 EXTRA MILK<br />
P4 WITHOUT CUP<br />
P5 SHORT COFFEE instant<br />
P6 LONG COFFEE instant<br />
P7 WHITE COFFEE instant<br />
P8 MILK instant<br />
P9 CAPPUCCINO instant<br />
P10 MOCACCINO instant<br />
P11 SHORT COFFEE DEKA<br />
P12 LONG COFFEE DEKA<br />
P13 WHITE COFFEE DEKA<br />
P14 MILK DEKA<br />
P15 CAPPUCCINO DEKA<br />
P16 MOCACCINO DEKA<br />
P17 MILK & CHOCOLATE<br />
P18 CHOCOMILK<br />
P19 CHOCOLATE<br />
P20 CHOCOLATE STRONG<br />
P21 MILK + SUGAR<br />
P22 NUT-FLAVOURED MILK<br />
P23 TEA<br />
P24 SOUP<br />
P25 ONLY CUP<br />
P26 HOT WATER+CUP<br />
62<br />
P1-P2 +/- SUGAR<br />
P3 EXTRA MILK<br />
P4 WITHOUT CUP<br />
P5 SHORT COFFEE<br />
P6 LONG COFFEE<br />
P7 WHITE COFFEE<br />
P8 CAPPUCCINO<br />
P9 MOCACCINO<br />
P10 CAPPCHOCC<br />
P11 SHORT COFFEE DEKA<br />
P12 LONG COFFEE DEKA<br />
P13 WHITE COFFEE DECA<br />
P14 CAPPUCCINO DEKA<br />
P15 MOCACCINO DEKA<br />
P16 CAPPCHOCC DEKA<br />
P17 MILK<br />
P18 MILK AND COFFEE<br />
P19 MILK & CHOCOLATE<br />
P20 MILK AND COFFEE DEKA<br />
P21 CHOCOMILK<br />
P22 CHOCOLATE<br />
P23 TEA<br />
P24 CHOCOLATE STRONG<br />
P25 HOT WATER<br />
P26 ONLY CUP<br />
P1-P2 +/- ZUCKER<br />
P3 EXTRA MILCH<br />
P4 KEIN BECHER<br />
P5 KAFFEE KURZ<br />
P6 KAFFEE LANG<br />
P7 KAFFEE MACCHIATO<br />
P8 CAPPUCCINO<br />
P9 MOCACCINO<br />
P10 CAPPSCHOK.<br />
P11 KAFFEE KURZ KOFFEINFREI<br />
P12 KAFFEE LANG KOFFEINFREI<br />
P13 KAFFEE MACCHIATO KOFFEIN.<br />
P14 CAPPUCCINO KOFFEINFREI<br />
P15 MOCACCINO KOFFEINFREI<br />
P16 CAPPSCHOK.KOFFEINFREI<br />
P17 MILCH<br />
P18 MILCH MACCHIATO<br />
P19 MILCH SCHOKOLADE<br />
P20 MILCH MACCHIATO KOFFEIN.<br />
P21 SCHOKOLADE MIT MILCH<br />
P22 SCHOKOLADE<br />
P23 TEE<br />
P24 SCHOKOLADE FORT<br />
P25 HEIßWASSER<br />
P26 BECHER<br />
mod. BVM952 Solubile - Instant - Soluble - Soluble - Instantprodukt - Solúvel<br />
P15 CAPPUCCINO KOFFEINFREI<br />
P16 MOCACCINO KOFFEINFREI<br />
P17 MILCH SCHOKOLADE<br />
P18 SCHOKOLADE MIT MILCH<br />
P19 SCHOKOLADE<br />
P20 SCHOKOLADE FORT<br />
P21 MILCH + ZUCKER<br />
P22 HASELNUSS-MILCH<br />
P23 TEE<br />
P24 BRÜHE<br />
P25 BECHER<br />
P26 HEIßWASSER +BECHER<br />
P1-P2 +/- AZÚCAR<br />
P3 EXTRA LECHE<br />
P4 SIN VASO<br />
P5 CAFÉ CORTO soluble<br />
P6 CAFÉ LARGO soluble<br />
P7 CAFÉ CORTADO soluble<br />
P8 CAFÉ con LECHE soluble<br />
P9 CAPUCHINO soluble<br />
P10 MOCACHINO soluble<br />
P11 CAFÉ CORTO DESCAF.<br />
P12 CAFÉ LARGO DESCAF.<br />
P13 CAFÉ CORTADO DESCAF.<br />
P14 CAFÉ con LECHE DESCAF.<br />
P15 CAPUCHINO DDESCAF.<br />
P16 MOCACHINO DESCAF.<br />
P17 LATTE E CIOCCOLATA<br />
P18 CHOCOLECHE<br />
P19 CHOCOLATE<br />
P20 CHOCOLATE FUERTE<br />
P21 LECHE + AZÚCAR<br />
P22 LECHE CON AVELLANAS<br />
P23 TE<br />
P24 CALDO<br />
P25 SOLO VASO<br />
P26 AGUA CALIENTE+VASO<br />
P1-P2 +/- AÇÚCAR<br />
P3 EXTRA LEITE<br />
P4 NO COPO<br />
P5 CAFE’ NORMAL solubile<br />
P6 CAFE’ LONGO solubile<br />
P7 CAFE’ PINGADO solubile<br />
P8 CAFE’ LEITE solubile<br />
P9 CAPPUCCINO solubile<br />
P10 MOCACCINO solubile<br />
P11 CAFE’ DESCAFEINADO<br />
P12 CAFE’ LONGO DESCAFEINADO<br />
P13 CAFE’ PINGADO DESCAFEIN.<br />
P14 CAFE’ LEITE DESCAFEIN.<br />
P1-P2 +/-AZÚCAR<br />
P3 EXTRA LECHE<br />
P4 SIN VASO<br />
P5 CAFÉ CORTO<br />
P6 CAFÉ LARGO<br />
P7 CAFÉ CORTADO<br />
P8 CAPUCHINO<br />
P9 MOCACHINO<br />
P10 CAPCHOCO<br />
P11 CAFÉ CORTO DESCAF.<br />
P12 CAFÉ LARGO DESCAF.<br />
P13 CAFÉ CORTADO DESCAF.<br />
P14 CAPUCHINO DESCAF.<br />
P15 MOCACHINO DESCAF.<br />
P16 CAPCHOCO DESCAF.<br />
P17 LECHE<br />
P18 LECHE MANCHADA<br />
P19 LECHE AL CACAO<br />
P20 LECHE MANCHADA DESCAF.<br />
P21 CHOCOLECHE<br />
P22 CHOCOLATE<br />
P23 TE<br />
P24 CHOCOLATE FUERTE<br />
P25 AGUA CALIENTE<br />
P26 SOLO VASO<br />
P1-P2 +/- AÇÚCAR<br />
P3 EXTRA LEITE<br />
P4 NO COPO<br />
P5 CAFE’ NORMAL<br />
P6 CAFE’ LONGO<br />
P7 CAFE’ PINGADO<br />
P8 CAPPUCCINO<br />
P9 MOCACCINO<br />
P10 CAPPCHOCC<br />
P11 CAFE’ DESCAFEINADO<br />
P12 CAFE’ LONGO DESCAFEINADO<br />
P13 CAFE’ PINGADO DESCAFEIN.<br />
P14 CAPPUCCINO DESCAF.<br />
P15 MOCACCINO DESCAF.<br />
P16 CAPPCHOCC DESCAF.<br />
P17 LEITE<br />
P18 LEITE PINGADO<br />
P19 LEITE COM CHOCOLATE<br />
P20 LEITE PINGADO DESCAF.<br />
P21 CHOCOLATE LEITE<br />
P22 CHOCOLATE<br />
P23 CHA’<br />
P24 CHOCOLATE FORTE<br />
P25 AGUA QUENTE<br />
P26 COPO<br />
P1-P2 +/- SUCRE<br />
P3 EXTRA LAIT<br />
P4 SANS GOBELET<br />
P5 CAFE COURT soluble<br />
P6 CAFE LONG soluble<br />
P7 CAFE CREME soluble<br />
P8 CAFE LAIT soluble<br />
P9 CAPPUCCINO soluble<br />
P10 MOCACCINO soluble<br />
P11 CAFE COURT DECA<br />
P12 CAFE LONG DECA<br />
P13 CAFE CREME DECA<br />
P14 CAFE LAIT DECA<br />
P15 CAPPUCCINO DECA<br />
P16 MOCACCINO DECA<br />
P17 LAIT CHOCOLAT<br />
P18 CHOCOLAT LAIT<br />
P19 CHOCOLAT<br />
P20 CHOCOLAT FORT<br />
P21 LAIT + SUCRE<br />
P22 LAIT AUX NOISETTES<br />
P23 THE<br />
P24 POTAGE<br />
P25 GOBELET<br />
P26 EAU CHAUDE +GOBELET<br />
P15 CAPPUCCINO DESCAF.<br />
P16 MOCACCINO DESCAF.<br />
P17 LEITE COM CHOCOLATE<br />
P18 CHOCOLATE LEITE<br />
P19 CHOCOLATE<br />
P20 CHOCOLATE FORTE<br />
P21 LEITE + AÇÚCAR<br />
P22 LEITO COM AVELÃ<br />
P23 CHA’<br />
P24 CALDO<br />
P25 COPO<br />
P26 AGUA QUENTE + COPO
Double grinder-Alphanumeric<br />
Doble Molino teclado Alfanumérica<br />
Double moulin - Clavier Alphanumérique<br />
Doppelmühle - Tastatur alphanumerische<br />
Duplo Moedor - Teclado Alfanumérica<br />
Double boiler<br />
Doble caldera<br />
Double Chau<strong>di</strong>ère<br />
Doppelkessel<br />
Dupla caldeira<br />
Pulsantiera selezioni BVM972 Doppio macinino Pulsantiera alfanumerica<br />
P1-P2 +/- ZUCCHERO<br />
11-21 CAFFÈ CORTO Espresso<br />
12-22 CAFFÈ LUNGO Espresso<br />
13-23 CAFFÈ MACCHIATO Esp.<br />
14-24 CAPPUCCINO Espresso<br />
15-25 MOCACCINO Espresso<br />
31 CAFFÈ CORTO Deca<br />
32 CAFFÈ LUNGO Deca<br />
33 CAFFÈ MACCHIATO Deca<br />
34 CAPPUCCINO Deca<br />
35 MOCACCINO Deca<br />
41 CAFFÈ D’ORZO<br />
42 CAFFÈ LUNGO D’ORZO<br />
43 CAFFÈ D’ORZO MACCHIATO<br />
44 CAPPUCCINO D’ORZO<br />
45 MOCACCINO D’ORZO<br />
51 LATTE<br />
53 CIOCCOLATA<br />
54 CIOCCOLATA FORTE<br />
55 CIOCCOLATA E LATTE<br />
56 THE AL LIMONE<br />
91 ACQUA CALDA<br />
92 SOLO BICCHIERE<br />
P1-P2 +/- SUCRE<br />
11-21 CAFE COURT Espr.<br />
12-22 CAFE LONG Espr.<br />
13-23 CAFE CREME Esp.<br />
14-24 CAPPUCCINO Espr.<br />
15-25 MOCACCINO Espr.<br />
31 CAFE COURT Deca<br />
32 CAFE LONG Deca<br />
33 CAFE CREME Deca<br />
34 CAPPUCCINO Deca<br />
35 MOCACCINO Deca<br />
41 ORGE COURT<br />
42 ORGE LONG<br />
43 ORGE LAIT<br />
44 CAPPUCCINO ORGE<br />
45 MOCACCINO ORGE<br />
51 LAIT<br />
53 CHOCOLAT<br />
54 CHOCOLAT FORT<br />
55 CHOCOLAT LAIT<br />
56 THE<br />
91 AEAU CHAUDE<br />
92 GOBELET<br />
Pulsantiera selezioni BVM972 Doppia caldaia Pulsantiera alfanumerica<br />
P1-P2 +/- ZUCCHERO<br />
11 CAFFÈ CORTO Espresso<br />
12 CAFFÈ LUNGO Espresso<br />
13 CAFFÈ MACCHIATO Esp.<br />
14 CAPPUCCINO Espresso<br />
15 MOCACCINO Espresso<br />
16 CAPPCIOCC Espresso<br />
21 CAFFÈ CORTO Deca<br />
22 CAFFÈ LUNGO Deca<br />
23 CAFFÈ MACCHIATO Deca<br />
24 CAPPUCCINO Deca<br />
25 MOCCACCINO Deca<br />
26 CAPPCIOCC Deca<br />
31 CAFFÈ D’ORZO<br />
32 CAFFÈ LUNGO D’ORZO<br />
33 CAFFÈ D’ORZO MACCHIATO<br />
34 CAPPUCCINO D’ORZO<br />
35 MOCACCINO D’ORZO<br />
36 CAPPCIOCC D’ORZO<br />
41 LATTE<br />
42 LATTE E CACAO<br />
43 CIOCCOLATA<br />
44 CIOCCOLATA FORTE<br />
45 CIOCCOLATA AL LATTE<br />
46 THE AL LIMONE<br />
91 ACQUA CALDA<br />
92 SOLO BICCHIERE<br />
P1-P2 +/- SUCRE<br />
11 CAFE COURT Espr.<br />
12 CAFE LONG Espr.<br />
13 CAFE CREME Esp.<br />
14 CAPPUCCINO Espr.<br />
15 MOCACCINO Espr.<br />
16 CAPPCIOCC Espr.<br />
21 CAFE COURT Deca<br />
22 CAFE LONG Deca<br />
23 CAFE CREME Deca<br />
24 CAPPUCCINO Deca<br />
25 MOCCACCINO Deca<br />
26 CAPPCIOCC Deca<br />
31 ORGE COURT<br />
32 ORGE LONG<br />
33 ORGE LAIT<br />
34 CAPPUCCINO ORGE<br />
35 MOCACCINO ORGE<br />
36 CAPPCIOCC ORGE<br />
41 LAIT<br />
42 LAIT CHOCOLAT<br />
43 CHOCOLAT<br />
44 CHOCOLAT FORT<br />
45 CHOCOLAT LAIT<br />
46 THE<br />
91 AEAU CHAUDE<br />
92 GOBELET<br />
63<br />
P1-P2 +/- SUGAR<br />
11-21 SHORT COFFEE Espr.<br />
12-22 LONG COFFEE Espr.<br />
13-23 WHITE COFFEE Espr.<br />
14-24 CAPPUCCINO Espr.<br />
15-25 MOCACCINO Espr.<br />
31 SHORT COFFEE Deca<br />
32 LONG COFFEE Deca<br />
33 WHITE COFFEE Deka<br />
34 CAPPUCCINO Deka<br />
35 MOCACCINO Deka<br />
41 BARLEY<br />
42 LONG BARLEY<br />
43 WHITE BARLEY<br />
44 CAPPUCCINO & BARLEY<br />
45 MOCACCINO & BARLEY<br />
51 MILK<br />
53 CHOCOLATE<br />
54 CHOCOLATE STRONG<br />
55 CHOCOMILK<br />
56 TEA<br />
91 HOT WATER<br />
92 ONLY CUP<br />
P1-P2 +/- ZUCKER<br />
11-21 KAFFEE KURZ Espr.<br />
12-22 KAFFEE LANG Espresso<br />
13-23 KAFFEE MACCHIATO Espr.<br />
14-24 CAPPUCCINO Espresso<br />
15-25 MOCACCINO Espresso<br />
31 KAFFEE KURZ KOFFEINFREI<br />
32 KAFFEE LANG KOFFEINFREI<br />
33 KAFFEE MACCHIATO KOFFEINFR.<br />
34 CAPPUCCINO KOFFEINFREI<br />
35 MOCACCINO KOFFEINFREI<br />
41 GETREIDEKAFFEE<br />
42 GETREIDEKAFFEE LANG<br />
43 GETREIDEKAFFEE MACCHIATO<br />
44 CAPPUCCINO GETREIDE<br />
45 MOCACCINO GETREIDE<br />
51 MILCH<br />
53 SCHOKOLADE<br />
54 SCHOKOLADE FORT<br />
55 SCHOKOLADE MIT MILCH<br />
56 TEE<br />
91 HEIßWASSER<br />
92 BECHER<br />
P1-P2 +/- SUGAR<br />
11 SHORT COFFEE Espr.<br />
12 LONG COFFEE Espr.<br />
13 WHITE COFFEE Esp.<br />
14 CAPPUCCINO Espr.<br />
15 MOCACCINO Espr.<br />
16 CAPPCHOCC Espr.<br />
21 SHORT COFFEE Deka<br />
22 LONG COFFEE Deka<br />
23 WHITE COFFEE Deka<br />
24 CAPPUCCINO Deka<br />
25 MOCCACCINO Deka<br />
26 CAPPCHOCC Deka<br />
31 BARLEY<br />
32 LONG BARLEY<br />
33 WHITE BARLEY<br />
34 CAPPUCCINO & BARLEY<br />
35 MOCACCINO & BARLEY<br />
36 CAPPCHOCC & BARLEY<br />
41 MILK<br />
42 MILK & CHOCOLATE<br />
43 CHOCOLATE<br />
44 CHOCOLATE STRONG<br />
45 CHOCOMILK<br />
46 TEA<br />
91 HOT WATER<br />
92 ONLY CUP<br />
P1-P2 +/- ZUCKER<br />
11 KAFFEE KURZ Espr.<br />
12 KAFFEE LANG Espresso<br />
13 KAFFEE MACCHIATO Espr.<br />
14 CAPPUCCINO Espresso<br />
15 MOCACCINO Espresso<br />
16 CAPPSCHOK. Espresso<br />
21 KAFFEE KURZ KOFFEINFREI<br />
22 KAFFEE LANG KOFFEINFREI<br />
23 KAFFEE MACCHIATO KOFFEINFR.<br />
24 CAPPUCCINO KOFFEINFREI<br />
25 MOCCACCINO KOFFEINFREI<br />
26 CAPPSCHOK. KOFFEINFREI<br />
31 GETREIDEKAFFEE<br />
32 GETREIDEKAFFEE LANG<br />
33 GETREIDEKAFFEE MACCHIATO<br />
34 CAPPUCCINO GETREIDE<br />
35 MOCACCINO GETREIDE<br />
36 CAPPCIOCC GETREIDE<br />
41 MILCH<br />
42 MILCH SCHOKOLADE<br />
43 SCHOKOLADE<br />
44 SCHOKOLADE FORT<br />
45 SCHOKOLADE MIT MILCH<br />
46 TEE<br />
91 HEIßWASSER<br />
92 BECHER<br />
P1-P2 +/- AZÚCAR<br />
11-21 CAFÉ CORTO Espr.<br />
12-22 CAFÉ LARGO Espr.<br />
13-23 CAFÉ CORTADO Espr.<br />
14-24 CAPUCHINO Espr.<br />
15-25 MOCACHINO Espr.<br />
31 CAFÉ CORTO Descaf.<br />
32 CAFÉ LARGO Descaf.<br />
33 CAFÉ CORTADO Descaf.<br />
34 CAPUCHINO Descaf.<br />
35 MOCACHINO Descaf.<br />
41 CEBADA<br />
42 CEBADA LARGO<br />
43 CEBADA CORTADO<br />
44 CAPUCHINO CEBADA<br />
45 MOCACHINO CEBADA<br />
51 LECHE<br />
53 CHOCOLATE<br />
54 CHOCOLATE FUERTE<br />
55 CHOCOLECHE<br />
56 TE<br />
91 AGUA CALIENTE<br />
92 SOLO VASO<br />
P1-P2 +/- AÇÚCAR<br />
11-21 CAFE’ NORMAL Espr.<br />
12-22 CAFE’ LONGO Espresso<br />
13-23 CAFE’ PINGADO Espr.<br />
14-24 CAPPUCCINO Espresso<br />
15-25 MOCACCINO Espresso<br />
31 CAFE’ DESCAFEINADO<br />
32 CAFE’ LONGO DESCAFEINADO<br />
33 CAFE’ PINGADO DESCAFEIN.<br />
34 CAPPUCCINO DESCAF.<br />
35 MOCACCINO DESCAF.<br />
41 CEVADA<br />
42 CEVADA LONGO<br />
43 CEVADA PINGADO<br />
44 CAPPUCCINO CEVADA<br />
45 MOCACCINO CEVADA<br />
51 LEITE<br />
53 CHOCOLATE<br />
54 CHOCOLATE FORTE<br />
55 CHOCOLATE LEITE<br />
56 CHA’<br />
91 AGUA QUENTE<br />
92 COPO<br />
P1-P2 +/- AZÚCAR<br />
11 CAFÉ CORTO Espr.<br />
12 CAFÉ LARGO Espr.<br />
13 CAFÉ CORTADO Espr.<br />
14 CAPUCHINO Espr.<br />
15 MOCACHINO Espr.<br />
16 CAPCHOCO Espr.<br />
21 CAFÉ CORTO Descaf.<br />
22 CAFÉ LARGO Descaf.<br />
23 CAFÉ CORTADO Descaf.<br />
24 CAPUCHINO Descaf.<br />
25 MOCACHINO Descaf.<br />
26 CAPCHOCO Descaf.<br />
31 CEBADA<br />
32 CEBADA LARGO<br />
33 CEBADA CORTADO<br />
34 CAPUCHINO CEBADA<br />
35 MOCACHINO CEBADA<br />
36 CAPCHOCO CEBADA<br />
41 LECHE<br />
42 LECHE Y CACAO<br />
43 CHOCOLATE<br />
44 CHOCOLATE FUERTE<br />
45 CHOCOLECHE<br />
46 TE<br />
91 AGUA CALIENTE<br />
92 SOLO VASO<br />
P1-P2 +/- AÇÚCAR<br />
11 CAFE’ NORMAL Espr.<br />
12 CAFE’ LONGO Espresso<br />
13 CAFE’ PINGADO Espr.<br />
14 CAPPUCCINO Espresso<br />
15 MOCACCINO Espresso<br />
16 CAPPCIOCC Espresso<br />
21 CAFE’ DESCAFEINADO<br />
22 CAFE’ LONGO DESCAFEINADO<br />
23 CAFE’ PINGADO DESCAFEIN.<br />
24 CAPPUCCINO DESCAF.<br />
25 MOCCACCINO DESCAF.<br />
26 CAPPCHOCC DESCAF.<br />
31 CEVADA<br />
32 CEVADA LONGO<br />
33 CEVADA PINGADO<br />
34 CAPPUCCINO CEVADA<br />
35 MOCACCINO CEVADA<br />
36 CAPPCHOCC CEVADA<br />
41 LEITE<br />
42 LEITE COM CHOCOLATE<br />
43 CHOCOLATE<br />
44 CHOCOLATE FORTE<br />
45 CHOCOLATE LEITE<br />
46 CHA’<br />
91 AGUA QUENTE<br />
92 COPO
In programmazione i tasti assumono i seguenti significati:<br />
In the programming mode the keys have the following meaning:<br />
En programación, las teclas asumen los siguientes significados:<br />
En programmation les touches ont le sens suivant:<br />
In der Programmierung nehmen <strong>di</strong>e Tasten <strong>di</strong>e folgenden Funktionen an:<br />
Na programação as teclas assumem os seguintes significados:<br />
1: Incrementa<br />
2: Visualizza nome<br />
3: Sposta il cursore<br />
4: Prova polvere<br />
5: Torna al menù precedente (esc)<br />
6: Prova solo acqua<br />
7: Decrementa<br />
8: Prova completa (Menù dosi)<br />
Prova EV o Sol (Menù dosi bevanda)<br />
9: Enter<br />
0: Prova completa (Menù dosi bevanda)<br />
1: Augmente<br />
2: Visualiser nom<br />
3: Déplace curseur<br />
4: Essai poudre<br />
5: Retour au menu précédent (esc)<br />
6: Essai seulement eau<br />
7: Diminue<br />
8: Essai complete (Menu doses)<br />
Essai EV ou Sol (Menu doses boisson)<br />
9: Enter<br />
0: Essai complete (Menu doses<br />
boisson)<br />
1: Incrementa cifra<br />
2: Esci menù<br />
3: Decrementa cifra<br />
5: Muovi cursore<br />
7: Enter/scorri opzioni<br />
9: Mostra il nome <strong>di</strong> scatola, EV o<br />
mixer (Menù dosi)<br />
14: Prova solo polvere (Menù dosi)<br />
15: Prova solo acqua (Menù dosi)<br />
16: Prova completa (Menù dosi)<br />
1: augmenter valeur<br />
2: escape<br />
3: <strong>di</strong>sminuir valor<br />
5: deplacer curseur<br />
7: enter / défiler options<br />
9: dans le menu doses affiche le nom<br />
de boite ou mixeur<br />
14: dans le menu doses essai poudres<br />
seules<br />
15: dans le menu doses essai eau<br />
seule<br />
16: dans le menu doses essai complet<br />
1 Increase<br />
2 Show name<br />
3 Move cursor<br />
4 Powder test<br />
5 Go back to previous menu (esc)<br />
6 Only water test<br />
7 Decrease<br />
8 Complete test (Dose menu)<br />
EV or Inst. Test (Drink dose menu)<br />
9 Enter<br />
0 Complete test (Drink dose menu)<br />
1: Erhöhen<br />
2: Name anzeigen<br />
3: Cursor bewegen<br />
4: Pulverprobe<br />
5:Zurück zum vorherigen Menu (esc)<br />
6: Test nur Wasser<br />
7: Vermindern<br />
8: Test komplett (Menù Dosierung)<br />
Test MV oder Sol (Menu Getränkedosierungen)<br />
9: Enter<br />
0: Test komplett (Menu Getränkedosierungen)<br />
64<br />
1 increase value<br />
2 escape<br />
3 decrease value<br />
5 move cursor<br />
7 enter / scroll options<br />
9 in the doses selections menu<br />
shows name of box or mixer<br />
14 in the doses selections menu<br />
performs only soluble powder test<br />
15 in the doses selections menu<br />
performs only water test<br />
16 in the doses selections menu<br />
performs complete test<br />
1: erhöhen<br />
2: escape<br />
3: vermindern<br />
5: cursor bewegen<br />
7: enter / abrollen der optionen<br />
9: im dosierungsmenü wird der namen<br />
der schachtel oder des mixers<br />
angezeigt<br />
14: im dosierungsmenü wird nur der<br />
pulvertest durchgeführt<br />
15 im dosierungsmenü wird nur der<br />
wassertest durchgeführt<br />
16 im dosierungsmenü wir ein kompletter<br />
test durchgeführt<br />
1: Incrementa<br />
2: Visualiza nombre<br />
3: Desplaza cursor<br />
4: Prueba polvo<br />
5: Vuelve al menú precedente (esc)<br />
6: Prueba agua<br />
7: Disminuye<br />
8: Prueba completa (Menú dosis)<br />
Prueba EV o Sol (Menú dosis bebida)<br />
9: Enter<br />
0: Prueba completa (Menú dosis bebida)<br />
1: Incrementa<br />
2: Visualiza nome<br />
3: Desloca cursor<br />
4: Prova pó<br />
5: Volta ao menu anterior (esc)<br />
6: Prova Somente Água<br />
7: Decrementa<br />
8: Prova completa (Menù doses)<br />
Prova EV ou Sol (Menù doses bebida)<br />
9: Enter<br />
0: Prova completa (Menù doses bebida)<br />
1 aumentar valor<br />
2 escape<br />
3 <strong>di</strong>sminuir valor<br />
5 mover cursor<br />
7 enter / deslizamiento options<br />
9 en el menú dosis prueba el nombre<br />
de caja o mixer<br />
14 en el menú dosis realiza solamente<br />
prueba de polvo<br />
15 en el menú dosis realiza solamente<br />
prueba de agua<br />
16 en el menú dosis realizaprueba<br />
completa<br />
1: aumentar cifra<br />
2: escape<br />
3: <strong>di</strong>minuir cifra<br />
5: mover cursor<br />
7: enter / Percorrer opções<br />
9 no menu doses: mostra o nome da<br />
caixa ou mixer<br />
14 no menu doses:<br />
Executa teste somente pó<br />
15 no menu doses: executa teste<br />
Somente água<br />
16 no menu doses: executa teste<br />
Completo
Tasto1: Scorre allarmi, (se premuto per 5 secon<strong>di</strong><br />
vengono visualizzati a <strong>di</strong>splay gli ultimi 15<br />
allarmi)<br />
Tasto 5: Reset allarmi<br />
Co<strong>di</strong>ce 01:Rotazione gruppo<br />
Co<strong>di</strong>ce 02: Riempimento tubi MDB<br />
Co<strong>di</strong>ce 03: Svuota tubi MDB<br />
Co<strong>di</strong>ce 04:Test Ingressi e svuota tubi MDB<br />
Co<strong>di</strong>ce 05: Reset allarmi ( oppure solo 5 )<br />
Co<strong>di</strong>ce 06: Prova completa<br />
Co<strong>di</strong>ce 07: Prova solo acqua<br />
Co<strong>di</strong>ce 08:Movimento traslatore<br />
Co<strong>di</strong>ce 09:Rotazione colonna bicchieri<br />
Co<strong>di</strong>ce 12: Visualizza le battute totali<br />
Co<strong>di</strong>ce 13:Sgancio Bicchiere<br />
Co<strong>di</strong>ce 14: Prova mixer<br />
Co<strong>di</strong>ce 15: Ricarica Decontatori<br />
Co<strong>di</strong>ce 16: Prova Senza zucchero<br />
Co<strong>di</strong>ce 17:Erogazione Paletta<br />
Co<strong>di</strong>ce 18:Test macinadosatore<br />
Co<strong>di</strong>ce 0A:Visualizz.Temperatura ultime 48 ore<br />
Vega A<br />
Co<strong>di</strong>ce 0B:Visualizz.Temperatura ultime 48 ore<br />
Vega B<br />
Tasto+zucchero: Reset allarmi<br />
Tasto–Zucchero: Scorri allarmi (se premuto per<br />
5 secon<strong>di</strong> vengono visualizzati a <strong>di</strong>splay gli ultimi<br />
15 allarmi )<br />
Touche 1 : Défiler alarmes (presser 5 secondes,<br />
les 15 dernières alarmes s’affichent)<br />
Touche 5: Reset alarmes<br />
Code 01: Rotation Groupe<br />
Code 02: Rempli.Tubes MDB<br />
Code 03: Vid.tubes MDB<br />
Code 04:Essai entrées et vidage tubes pour MDB<br />
Code 05: Reset alarmes (ou 5 seulement)<br />
Code 06: Essai complet<br />
Code 07: Essai eau<br />
Code 08: Deplacement gobelet<br />
Code 09: Rotat.colonne gobelet<br />
Code 12: Visualise frappes totales<br />
Code 13: Déclenchement gobelet<br />
Code 14: Essai Mixer<br />
Code 15: Recharge des décompteurs<br />
Code 16: Essai sans sucre<br />
Code 17: Palettes<br />
Code 18: Essai moulin-doseur<br />
Code 0A: Affich. température 48 dernières heures<br />
Vega A<br />
Code 0B: Affich. température 48 dernières heures<br />
Vega B<br />
Touche+sucre: Reset alarmes<br />
Touche+sucre:Défiler alarmes (presser 5 secondes,<br />
les 15 dernières alarmes s’affichent)<br />
In manutenzione i tasti assumono i seguenti significati:<br />
In the maintenance mode the keys have the following meaning:<br />
En mantenimiento, las teclas asumen los siguientes significados:<br />
En entretien les touches ont le sens suivant:<br />
In der Wartung nehmen <strong>di</strong>e Tasten <strong>di</strong>e folgenden Funktionen an:<br />
Na manutenção as teclas assumem os seguintes significados:<br />
Key 1: Scroll ALARMS (if pressed for 5 seconds<br />
appear to <strong>di</strong>splay the last 15 alarms)<br />
Key 5: Reset alarms<br />
Code 01:Group rotation<br />
Code 02: MDB tube filling<br />
Code 03: MDB tube depletion<br />
Code 04:Input test and empty pipes for MDB<br />
Code 05: Reset alarms (or only 5)<br />
Code 06: Complete test<br />
Code 07: Only water test<br />
Code 08:Nozzle movement<br />
Code 09:Column rotation<br />
Code 12: Total entries <strong>di</strong>splay<br />
Code 13:Cup release<br />
Code 14: Mixer test<br />
Code 15: Refill<br />
Code 16: Test without sugar<br />
Code 17: Spoon<br />
Code 18: Grinder-doser test<br />
Code 0A: Display Temperature last 48 hours Vega A<br />
Code 0B: Display Temperature last 48 hours Vega B<br />
Key+Sugar: Reset alarms<br />
Key–Sugar: Scroll ALARMS (if pressed for 5 seconds<br />
appear to <strong>di</strong>splay the last 15 alarms)<br />
Taste 1: Abrollen der Alarme, (wird <strong>di</strong>ese Taste für<br />
5 Sekunden angedrückt, werden auf dem Display<br />
<strong>di</strong>e letzten 15 Alarme visualisiert).<br />
Taste 5: Reset Störungen<br />
Kode 01: Drehung Einheit<br />
Kode 02: MDB Röhren füllen<br />
Kode 03: MDB Röhren leeren<br />
Kode 04: Test Eingänge und Röhrenentleerung<br />
für MDB<br />
Kode 05: Reset Störungen ( oder nur 5 )<br />
Kode 06: Test Komplett<br />
Kode 07: Test nur Wasser<br />
Kode 08: Bewegung ausgabedüsen<br />
Kode 09: Säule drehen<br />
Kode 12: Anzeige summe der anschläge<br />
Kode 13: Becher aushängen<br />
Kode 14: Test Mixer<br />
Kode 15: Rückstellung der Rückzähler<br />
Kode 16: Test ohne Zucker<br />
Kode 17: Stäbchenauslösung aushängen<br />
Kode 18: Mahldosierer test.<br />
Kode 0A: Temperaturangabe der letzten 48 Stunden<br />
Vega A<br />
Kode 0B: Temperaturangabe der letzten 48 Stunden<br />
Vega B<br />
Taste+ Zucker: Reset Störungen<br />
Taste– Zucker: Abrollen der Alarme, (wird <strong>di</strong>ese<br />
Taste für 5 Sekunden angedrückt, werden auf dem<br />
Display <strong>di</strong>e letzten 15 Alarme visualisiert).<br />
65<br />
Tecla 1: Deslizamiento Alarmas, (si se pulsa<br />
durante 5 segundos parecen mostrar los últimos<br />
15 alarmas)<br />
Tecla 5: Reset alarmes<br />
Có<strong>di</strong>go 01:Rotación Grupo<br />
Co<strong>di</strong>ce 02: Llenado tubos MDB<br />
Có<strong>di</strong>go 03: Vaciado tubos MDB<br />
Có<strong>di</strong>go 04:Test entradas y vacía tubos para MDB<br />
Có<strong>di</strong>go 05: Reset alarmes (o sólo 5)<br />
Có<strong>di</strong>go 06: Prueba completa<br />
Có<strong>di</strong>go 07: Prueba Sólo Agua<br />
Có<strong>di</strong>go 08:Movimiento del brazo<br />
Có<strong>di</strong>go 09:Rotación columna<br />
Có<strong>di</strong>go 12: Visualiza ventas totales<br />
Có<strong>di</strong>go 13:Desenganche vaso<br />
Có<strong>di</strong>go 14: Prueba Mezclador<br />
Có<strong>di</strong>go 15: Recarga<br />
Có<strong>di</strong>go 16: Prueba Sin Azúca<br />
Có<strong>di</strong>go 17:Paletina<br />
Có<strong>di</strong>go 18:Prueba muele-dosador<br />
Có<strong>di</strong>go 0A:Visualiza Temperatura últimas 48<br />
horas Vega A<br />
Có<strong>di</strong>go 0B:Visualiza Temperatura últimas 48<br />
horas Vega B<br />
Tecla+Azúca: Reset alarmes<br />
Tecla–Azúca: Deslizamiento Alarmas (si se pulsa<br />
durante 5 segundos parecen mostrar los últimos<br />
15 alarmas)<br />
Tecla 1: Corre alarmes, (se pressionado por 5<br />
segundos visualizam-se os últimos 15 alarmes<br />
no <strong>di</strong>splay)<br />
Tecla 5: Reset alarmes<br />
Có<strong>di</strong>go 01: Rotação do Grupo<br />
Có<strong>di</strong>go 02: Carga tubos MDB<br />
Có<strong>di</strong>go 03: Descarrega tubos MDB<br />
Có<strong>di</strong>go 04: Teste entradas e esvazia tubos para MDB<br />
Có<strong>di</strong>go 05: Reset alarmes (ou somente 5)<br />
Có<strong>di</strong>go 06: Prova completa<br />
Có<strong>di</strong>go 07: Prova só Água<br />
Có<strong>di</strong>go 08: Movimiento del brazo<br />
Có<strong>di</strong>go 09: Gira coluna copos<br />
Có<strong>di</strong>go 12: Visualiza ventas totales<br />
Có<strong>di</strong>go 13: Desenganche copo<br />
Có<strong>di</strong>go 14: Prova mixer<br />
Có<strong>di</strong>go 15: Recarga Decontadores<br />
Có<strong>di</strong>go 16: Prova Amargo<br />
Có<strong>di</strong>go 17: Paletinas<br />
Có<strong>di</strong>go 18: Prova dosador do moedor<br />
Có<strong>di</strong>go 0A: Visualização Temperatura das últimas<br />
48 horas Vega A<br />
Có<strong>di</strong>go 0B: Visualização Temperatura das últimas<br />
48 horas Vega B<br />
Tecla+ açucar: Reset alarmes<br />
Tecla+ açucar: Corre alarmes, (se pressionado por<br />
5 segundos visualizam-se os últimos 15 alarmes<br />
no <strong>di</strong>splay)
Tastiera selezione <strong>di</strong>retta versione Espresso - Tastiera selezione <strong>di</strong>retta versione Espresso Doppia campana Caffè<br />
Direct selection keyboard –Espresso version - Direct selection keypad, for the “Double Coffee-Hopper” Espresso Coffee version<br />
Teclado selección <strong>di</strong>recta versión Expreso - Teclado selección <strong>di</strong>recta versión Espresso Doble molino de Café<br />
Clavier sélection <strong>di</strong>recte version Expresso - Clavier sélection <strong>di</strong>recte version Expresso Double moulin à Café<br />
Tastatur Direktauswahl Version Espresso - Direktwahl-Tastatur Version Espresso Doppel-Kaffeemühle<br />
Teclado seleção <strong>di</strong>reta versão Expresso - Teclado selecção <strong>di</strong>recta versão Expresso Dupla campana Café<br />
P1 Scorre allarmi<br />
P2 Reset allarmi<br />
P3 Prova completa<br />
P4 Prova solo acqua<br />
P6 Prova mixer in sequenza<br />
P8 Battute totali per 2 sec.<br />
P9 Rotazione colonna bicchieri<br />
P10 Sgancio bicchiere<br />
P11 Prova senza zucchero e palette<br />
P12 Prova sgancio palette<br />
P13 Reset decontatori<br />
P14 Riempimento tubi MDB<br />
P15 Svuotamento tubi MDB<br />
P16 Test microinterruttori<br />
P1 Défiler alarmes<br />
P2 Reset alarmes<br />
P3 Essai complet<br />
P4 Essai eau<br />
P6 Essai Mixer<br />
P8 Rotation Groupe<br />
P9 Rotat.colonne gobelet<br />
P10 Déclenchement gobelet<br />
P11 Essai sans sucre et Palettes<br />
P12 Essai déclenchement Palettes<br />
P13 Reset décompteurs<br />
P14 Rempli.Tubes MDB<br />
P15 Vid.tubes MDB<br />
P16 Test Micro Interrupt.<br />
In manutenzione i tasti assumono i seguenti significati:<br />
In the maintenance mode the keys have the following meaning:<br />
En mantenimiento, las teclas asumen los siguientes significados:<br />
En entretien les touches ont le sens suivant:<br />
In der Wartung nehmen <strong>di</strong>e Tasten <strong>di</strong>e folgenden Funktionen an:<br />
Na manutenção as teclas assumem os seguintes significados:<br />
P1 Scorre allarmi<br />
P2 Reset allarmi<br />
P3 Prova completa<br />
P4 Prova solo acqua<br />
P5 Prova macinino e dosatore<br />
P6 Prova mixer in sequenza<br />
P7 Rotazione gruppo caffè<br />
P8 Battute totali per 2 sec.<br />
P9 Rotazione colonna bicchieri<br />
P10 Sgancio bicchiere<br />
P11 Prova senza zucchero e palette<br />
P12 Prova sgancio palette<br />
P13 Reset decontatori<br />
P14 Riempimento tubi MDB<br />
P15 Svuotamento tubi MDB<br />
P16 Test microinterruttori<br />
P1 Défiler alarmes<br />
P2 Reset alarmes<br />
P3 Essai complet<br />
P4 Essai eau<br />
P5 Essai moulin-doseur<br />
P6 Essai Mixer<br />
P7 Total Sélections<br />
P8 Rotation Groupe<br />
P9 Rotat.colonne gobelet<br />
P10 Déclenchement gobelet<br />
P11 Essai sans sucre et Palettes<br />
P12 Essai déclenchement Palettes<br />
P13 Reset décompteurs<br />
P14 Rempli.Tubes MDB<br />
P15 Vid.tubes MDB<br />
P16 Test Micro Interrupt.<br />
Tastiera selezione <strong>di</strong>retta versione Solubile<br />
Direct selection keyboard –Instant version<br />
Teclado selección <strong>di</strong>recta versión Soluble<br />
Tastatur Direktauswahl Version Instant<br />
Teclado seleção <strong>di</strong>reta versão Solúvel<br />
P1 Scroll alarms<br />
P2 Reset alarms<br />
P3 Complete test<br />
P4 Only water test<br />
P6 Mixer test<br />
P8 Total selections<br />
P9 Column rotation test<br />
P10 Cup release test<br />
P11 Test without sugar and spoons<br />
P12 Spoon release<br />
P13 Decount reset<br />
P14 MDB tube filling<br />
P15 MDB tube depletion<br />
P16 Micro switch test<br />
P1 Abrollen der Alarme<br />
P2 Reset Störungen<br />
P3 Test Komplett<br />
P4 Test nur Wasser<br />
P6 Test Mixer<br />
P8 Gesamt Ausgaben<br />
P9 Säule drehen<br />
P10 Becher aushängen<br />
P11 Test ohne Zucker/ ausgelöst<br />
P12 Test Stäbchenauslösung aushängen<br />
P13 Rückstellung der Rückzähler<br />
P14 MDB Röhren füllen<br />
P15 MDB Röhren leeren<br />
P16 Test Mikroschalter<br />
66<br />
P1 Scroll ALARMS<br />
P2 Reset alarms<br />
P3 Complete test<br />
P4 Only water test<br />
P5 Ground coffee test<br />
P6 Mixer test<br />
P7 Group rotation<br />
P8 Total selections<br />
P9 Column rotation<br />
P10 Cup release test<br />
P11 Test without sugar and spoons<br />
P12 Spoon release<br />
P13 Decount reset<br />
P14 MDB tube filling<br />
P15 MDB tube depletion<br />
P16 Micro switch test<br />
P1 Abrollen der Alarme<br />
P2 Reset Störungen<br />
P3 Test Komplett<br />
P4 Test nur Wasser<br />
P5 Mahldosierer test.<br />
P6 Test Mixer<br />
P7 Drehung Einheit<br />
P8 Gesamt Ausgaben<br />
P9 Säule drehen<br />
P10 Becher aushängen<br />
P11 Test ohne Zucker/ ausgelöst<br />
P12 Test Stäbchenauslösung<br />
aushängen<br />
P13 Rückstellung der Rückzähler<br />
P14 MDB Röhren füllen<br />
P15 MDB Röhren leeren<br />
P16 Test Mikroschalter<br />
P1 Deslizamiento Alarmas<br />
P2 Reset Averías<br />
P3 Prueba Completa<br />
P4 Prueba Sólo Agua<br />
P5 Prueba Café Molido<br />
P6 Prueba Mezclador<br />
P7 Rotación Grupo<br />
P8 Ventas Totales<br />
P9 Gira columna vaso<br />
P10 Desenganche vaso<br />
P11 Prueba Sin azúca y paletinas<br />
P12 Desenganche paletinas<br />
P13 Reset decanta<br />
P14 Llenado tubos MDB<br />
P15 Vaciado tubos MDB<br />
P16 Test Microinterruptores<br />
P1 Corre alarmes<br />
P2 Reset alarmes<br />
P3 Prova completa<br />
P4 Prova só Água<br />
P5 Prova dosador / moedor<br />
P6 Prova mixer<br />
P7 Rotação do Grupo<br />
P8 Serviços Totais<br />
P9 Gira coluna copos<br />
P10 Desenganche copo<br />
P11 Prova Amargo<br />
P12 Prova desenganche paletinas<br />
P13 Reset Decontadores<br />
P14 Carga tubos MDB<br />
P15 Descarrega tubos MDB<br />
P16 Teste Micro interruptores<br />
P1 Deslizamiento Alarmas<br />
P2 Reset Averías<br />
P3 Prueba Completa<br />
P4 Prueba Sólo Agua<br />
P6 Prueba Mezclador<br />
P8 Ventas Totales<br />
P9 Gira columna vaso<br />
P10 Desenganche vaso<br />
P11 Prueba Sin azúca y paletinas<br />
P12 Desenganche paletinas<br />
P13 Reset decanta<br />
P14 Llenado tubos MDB<br />
P15 Vaciado tubos MDB<br />
P16 Test Microinterruptores<br />
P1 Corre alarmes<br />
P2 Reset alarmes<br />
P3 Prova completa<br />
P4 Prova só Água<br />
P6 Prova mixer<br />
P8 Serviços Totais<br />
P9 Gira coluna copos<br />
P10 Desenganche copo<br />
P11 Prova Amargo<br />
P12 Prova desenganche paletinas<br />
P13 Reset Decontadores<br />
P14 Carga tubos MDB<br />
P15 Descarrega tubos MDB<br />
P16 Teste Micro interruptores
Modulo MO8.2_02IT<br />
Rev.3 del 15/10/09<br />
Pag 1/1<br />
Modello Matricola<br />
Mittente (<br />
N° tel. Cliente<br />
(per eventuale ricontatto da<br />
nome società)<br />
parte personale Bianchi)<br />
In<strong>di</strong>rizzo e-mail/N.ro Fax<br />
(per conferma attivazione<br />
Data installazione<br />
garanzia)<br />
PROBLEMI DURANTE PRIMA INSTALLAZIONE? SI NO<br />
SE SI,<br />
PROBLEMATICHE<br />
RISCONTRATE<br />
IN CASO DI PROBLEMI ALLA PRIMA INSTALLAZIONE, LISTA RICAMBI NECESSARI:<br />
Particolari mancanti<br />
Cablaggi<br />
Schede elettroniche<br />
Centralina alimentatore<br />
Pulsantiera<br />
Circuito idraulico<br />
Pompa<br />
Elettrovalvole<br />
Motori/Elettromagneti<br />
Microinterruttori<br />
Gruppo caffè<br />
Macinino dosatore<br />
Distributore bicchiere<br />
Distributore palette<br />
SCHEDA RAPPORTO DI PRIMA INSTALLAZIONE - ATTIVAZIONE GARANZIA<br />
Si prega il Gentile Cliente <strong>di</strong> ritornare via fax o e-mail la presente scheda (S.R.I.) alla Bianchi Ven<strong>di</strong>ng Group S.p.A. dopo aver ultimato<br />
le operazioni d’installazione del <strong>di</strong>stributore in caso <strong>di</strong> buon fine dell'installazione. In caso <strong>di</strong> problematiche, utilizzare il presente modulo<br />
per segnalare alla Bianchi la problematica e richiedere pezzi <strong>di</strong> ricambio in garanzia.<br />
Si fa notare che la spe<strong>di</strong>zione <strong>di</strong> questo modulo compilato è la con<strong>di</strong>zione per l'attivazione della Garanzia sulla matricola, che altrimenti<br />
andrà regolarmente a decadere ad un anno dalla data <strong>di</strong> consegna da Bianchi Italia della matricola stessa.<br />
Con<strong>di</strong>zioni <strong>di</strong> garanzia <strong>di</strong>sponibili nel manuale <strong>di</strong> uso della macchina e sul sito www.bianchiven<strong>di</strong>ng.com<br />
DA INVIARE FAX: +39 035 883 304 o e mail: customercare@bianchiven<strong>di</strong>ng.com<br />
Gruppo frigorifero<br />
Filtro<br />
Altro<br />
NOTE SULLA SODDISFAZIONE DEL PRODOTTO:<br />
(Riportare eventuali note sul<br />
prodotto e/o sul servizio offerto<br />
dalla Bianchi Ven<strong>di</strong>g S.p.A., per<br />
avere, nel futuro, un prodotto<br />
che vada sempre maggiormente<br />
incontro alle Sue aspettative)<br />
MODULO OPERATIVO<br />
Co<strong>di</strong>ce Quantità<br />
�
�<br />
Modulo MO8.2_02IT<br />
Rev.3 del 15/10/09<br />
Pag 1/1<br />
Si prega il Gentile Cliente <strong>di</strong> ritornare via fax o e-mail la presente scheda alla Bianchi Ven<strong>di</strong>ng Group S.p.A. per la richiesta dei pezzi <strong>di</strong><br />
ricambio in garanzia, descrivendo il dettaglio delle anomalie riscontrate sulla macchina. La Bianchi Ven<strong>di</strong>ng Group S.p.A. si riserva <strong>di</strong><br />
richiedere in reso il/i pezzo/i anomalo/i smontato/i dalla macchina e <strong>di</strong> rivalersi con il cliente, in caso <strong>di</strong> mancato riscontro dell'anomalia<br />
lamentata.<br />
Con<strong>di</strong>zioni <strong>di</strong> garanzia <strong>di</strong>sponibili nel manuale <strong>di</strong> uso della macchina e sul sito www.bianchiven<strong>di</strong>ng.com<br />
DA INVIARE FAX: +39 035 883 304 o e mail: customercare@bianchiven<strong>di</strong>ng.com<br />
Modello Matricola<br />
Mittente (<br />
N° tel. Cliente<br />
(per eventuale ricontatto da<br />
nome società)<br />
parte personale Bianchi)<br />
In<strong>di</strong>rizzo e-mail/N.ro Fax<br />
(per conferma attivazione<br />
Data installazione<br />
garanzia)<br />
PROBLEMATICHE<br />
RISCONTRATE<br />
LISTA RICAMBI NECESSARI:<br />
Particolari mancanti<br />
Cablaggi<br />
Schede elettroniche<br />
Centralina alimentatore<br />
Pulsantiera<br />
Circuito idraulico<br />
Pompa<br />
Elettrovalvole<br />
Motori/Elettromagneti<br />
Microinterruttori<br />
Gruppo caffè<br />
Macinino dosatore<br />
Distributore bicchiere<br />
Distributore palette<br />
Gruppo frigorifero<br />
Filtro<br />
Altro<br />
NOTE SULLA SODDISFAZIONE DEL PRODOTTO:<br />
(Riportare eventuali note sul<br />
prodotto e/o sul servizio offerto<br />
dalla Bianchi Ven<strong>di</strong>g S.p.A., per<br />
avere, nel futuro, un prodotto<br />
che vada sempre maggiormente<br />
incontro alle Sue aspettative)<br />
MODULO OPERATIVO<br />
SCHEDA RICHIESTA RICAMBI IN GARANZIA<br />
Co<strong>di</strong>ce Quantità
Modulo MO8.2_02EN<br />
Rev.3 del 15/10/09<br />
Pag 1/1<br />
Dear Customer, The hereby form is a necessary feed-back for the Bianchi Ven<strong>di</strong>ng Group S.p.A. Considered this form as formal report<br />
of first installation, the BVG, kindly, asks you to fill this form in, once the process of first installation of the unit has been performed and<br />
to return it back to us. Please send it via FAX or e-mail as specified below. Should anything go wrong during the first installation<br />
process, please, specify the matter occured with relative brief description of the fact in the de<strong>di</strong>cated box then send this form to the<br />
same fax n° or e-mail address as below. Bianchi Ven<strong>di</strong>ng Group S.p.A. will activate the 1 (one) year warranty, starting from the moment<br />
the hereby form is received correctly filled in all voices. Therefore, in ad<strong>di</strong>tion to what said, in case the hereby form is not returned to the<br />
BVG, automatically the company will start the warranty from the date of sale of the unit.<br />
Warraty policy available in the Use & Maintenance manual attached to machines and on the: www.bianchindustry.com<br />
To be sent FAX: +39 035 883 304 or e-mail: customercare@bianchiven<strong>di</strong>ng.com<br />
Model: Serial Number<br />
Sender:<br />
Sender tel. N°<br />
(company title)<br />
(eventual call back by the BVG)<br />
Sender E-mail/ Fax N°<br />
(to confirm the warranty being<br />
Installation Date<br />
activated)<br />
Wiring/cable<br />
Electronics<br />
Power supply<br />
Keypad<br />
Hydraulic circuit<br />
Pump<br />
Electrovalve<br />
Motor/electromagnet<br />
Microswitch<br />
Coffee Group<br />
Grinder / doser<br />
Cup <strong>di</strong>spernser<br />
Stirrer Dispenser<br />
Refrigerator group<br />
Water filter<br />
Other<br />
SATISFACTION NOTE<br />
(write eventual notes about<br />
product and/or service provided<br />
by the BVG. This to improve and<br />
better satisfy Your needs in the<br />
future)<br />
MODULO OPERATIVO<br />
FIRST INSTALLATION FORM - WARRANTY ACTIVATION<br />
MATTER DURING THE FIRST INSTALLATION? YES NO<br />
IF YES, WRITE<br />
HERE A<br />
DESCRIPTION<br />
MATTER DURING FIRST INSTALLATION, SPECIFY PARTS REQUIRED<br />
Missing parts<br />
Code Quantity<br />
�
�<br />
Modulo MO8.2_02EN<br />
Rev.3 del 15/10/09<br />
Pag 1/1<br />
Model: Serial Number<br />
Sender:<br />
Sender tel. N°<br />
(company title)<br />
(eventual call back by the BVG)<br />
Sender E-mail/ Fax N°<br />
(to confirm the warranty being<br />
Installation Date<br />
activated)<br />
MATTER OCURED<br />
PARTS REQUIRED<br />
Missing parts<br />
Wiring/cable<br />
Electronics<br />
Power supply<br />
Keypad<br />
Hydraulic circuit<br />
Pump<br />
Electrovalve<br />
Motor/electromagnet<br />
Microswitch<br />
Coffee Group<br />
Grinder / doser<br />
Cup <strong>di</strong>spernser<br />
Stirrer Dispenser<br />
MODULO OPERATIVO<br />
WARRANTY CLAIM<br />
Dear Customer, The hereby form is a formal warranty claim to be sent via fax or e-mail as specified below. Please, to describe the<br />
matter occured in the de<strong>di</strong>cated box. Beware, the BVG, could ask to return the faulty component back for quality inspection purposes.<br />
On top of that, to verify the right claiming.<br />
Warraty policy available in the Use & Maintenance manual attached to machines and on the: www.bianchindustry.com<br />
To be sent FAX: +39 035 883 304 or e-mail: customercare@bianchiven<strong>di</strong>ng.com<br />
Refrigerator group<br />
Water filter<br />
Other<br />
SATISFACTION NOTE<br />
(write eventual notes about<br />
product and/or service provided<br />
by the BVG. This to improve and<br />
better satisfy Your needs in the<br />
future)<br />
Code Quantity
BIANCHI VENDING GROUP S.p.A.<br />
Corso Africa 9 - 24040 Località Zingonia, Verdellino (BG) - ITALIA<br />
tel. +39.035.4502111- fax +39.035.883.304<br />
Cod. 11121611 - Ed. 05/2010 - Rev.0
